
Время на прочтение
4 мин
Количество просмотров 7.6K
Привет, когда разрабатываем любой проект на React, мы, при выборе что рендерить, больше всего имеем дело с условными операторами или просто с передачей компонентов в определенный компонент, функцию или тому подобное. Но если происходит неожиданная ситуация и в React компоненте или функции случается ошибка, то, зачастую мы видим белый экран смерти. И после этого нам надо открыть инструменты разработчика, чтобы увидеть в консоли ошибку. А это точно не лучший способ обработки ошибок.
Ошибки во время работы или белый экран с ошибками должны быть качественно обработаны. Для этого нам и понадобится React Error Boundary. В React добавили Error Boundary для отлавливания JavaScript ошибок и эффективной обработки их. Как сказано в react документации, Error Boundary — это компоненты React, которые отлавливают ошибки JavaScript в любом месте деревьев их дочерних компонентов, сохраняют их в журнале ошибок и выводят запасной UI вместо рухнувшего дерева компонентов. До дня, когда написана данная статья, react boundaries поддерживаются только как классовые компоненты. Следовательно, когда вы используете React с хуками, то это будет единственный классовый компонент, который вам понадобится.
Но хватит теории, давайте погружаться в код.
Давайте создадим классовый компонент, и используем его как error boundary. Вот код –
class ErrorBoundary extends Component {
    state = {
        error: null,
    };
    static getDerivedStateFromError(error) {
        return { error };
    }
    render() {
        const { error } = this.state;

        if (error) {
            return (
                <div>
                    <p>Seems like an error occured!</p>
                    <p>{error.message}</p>
                </div>
            );
        }
        return this.props.children;
    }
}

export default ErrorBoundary;
В коде выше вы увидите статичную функцию getDerivedStateFromError(error). Данная функция превращает классовый компонент ErrorBoundary в компонент, который действительно обрабатывает ошибки.
Мы отлавливаем ошибки внутри функции getDerivedStateFromError и помещаем их в состояние компонента. Если ошибка произошла, то мы отображаем её текст (пока что), а если нету, то просто возвращаем компонент, который должен отображаться.
Теперь, давайте посмотрим где мы можем использовать этот Error Boundary. Представьте, вы отображаете список пользователей, который получаете из API. Это выглядит примерно так –
const Users = ({ userData, handleMoreDetails }) => {
    return (
        <div>
            <h1>Users List: </h1>

            <ul>
                {userData.map((user) => (
                    <div key={user.id}>
                        <p>Name: {user.name}</p>
                        <p>Company: {user.company}</p>
                        <button onClick={() => handleMoreDetails(user.id)}>
                            More details
                        </button>
                    </div>
                ))}
            </ul>
        </div>
    );
};
Компонент User будет прекрасно работать, пока у нас всё в порядке с получением данных из userData. Но, если по какой-то причине userData будет undefined или null, наше приложение будет сломано! Так что, давайте добавим Error Boundary в данный компонент. После добавления наш код будет выглядеть вот так –
const Users = ({ userData, handleMoreDetails }) => {
    return (
        <div>
            <h1>Users List: </h1>
            <ErrorBoundary>
                <ul>
                    {userData.map((user) => (
                        <div key={user.id}>
                            <p>Name: {user.name}</p>
                            <p>Company: {user.company}</p>
                            <button onClick={() => handleMoreDetails(user.id)}>
                                More details
                            </button>
                        </div>
                    ))}
                </ul>
            </ErrorBoundary>
        </div>
    );
};
Когда ошибка произойдет, наш Error Boundary компонент отловит ошибку, и текст данной ошибки будет отображен на экране. Это спасет приложение от поломки, и пользователь поймет, что пошло не так.
Важный пункт, это выбрать, где мы используем Error Boundary, т.к. ошибка будет отображаться вместо компонента. Следовательно, нам нужно всегда быть уверенными, где будет отображаться текст данной ошибки. В нашем примере, мы хотим показывать верхнюю часть страницы, и все остальные данные. Нам всего лишь нужно заменить компонент, где ошибка произошла, и, в данной ситуации, это просто элемент ul. И мы выбираем использовать только ul элемент внутри Error Boundary, а не весь компонент целиком.
На текущий момент мы уже поняли, что такое Error Boundary и как использовать его. А вот наше место отображения ошибки выглядит не особо хорошо, и может быть улучшено. Способы, как мы отображаем ошибки и как “ломаются” наши компоненты будут отличаться от ситуации к ситуации. Так что нам надо сделать наш Error Boundary компонент более адаптивным к этим ситуациям.
Для этого мы создадим проп ErrorComponent внутри Error Boundary, и будем возвращать элемент, который прокиним внутрь данного пропа, чтобы он отображался во время ошибки. Ниже приведены финальный версии Error Boundary и User компонентов –
// User Component

const Users = ({ userData, handleMoreDetails }) => {
    const ErrorMsg = (error) => {
        return (
            <div>
                {/* Вы можете использовать свои стили и код для обработки ошибок */}
                <p>Something went wrong!</p>
                <p>{error.message}</p>
            </div>
        );
    };

    return (
        <div>
            <h1>Users List: </h1>
            <ErrorBoundary ErrorComponent={ErrorMsg}>
                <ul>
                    {userData.map((user) => (
                        <div key={user.id}>
                            <p>Name: {user.name}</p>
                            <p>Company: {user.company}</p>
                            <button onClick={() => handleMoreDetails(user.id)}>
                                More details
                            </button>
                        </div>
                    ))}
                </ul>
            </ErrorBoundary>
        </div>
    );
};
// ErrorBoundary Component
class ErrorBoundary extends Component {
state = {
error: null,
};
static getDerivedStateFromError(error) {
return { error };
}
render() {
const { error } = this.state;
if (error) {
return <this.props.ErrorComponent error={error} />;
}
return this.props.children;
}
}Вы можете также передавать проп key внутрь компонента Error Boundary, если вам нужно отображать несколько ошибок внутри одного компонента. Это позволит более гибко настроить данные ошибки для каждого элемента.
Error Boundary – это одна из приятных фишек React, которая, в свою очередь, я вижу что сравнительно редко используется. Но использование этого в вашем коде, будьте уверены, спасет вас от неловких моментов при внезапных ошибках. И кто не хочет лучше обрабатывать свои ошибки. 😉
В ситуации, когда вы не хотите писать свой собственный Error Boundary компонент, для этого можно использовать react-error-boundary.
А на этом пост заканчивается. Поделитесь своими мыслями в комментариях. И не забывайте, всегда продолжайте учиться!

Все хотят писать производительные, функциональные и при этом стабильные приложения. Но так как всем людям свойственно ошибаться, кода без ошибок не бывает. Независимо от уровня внимательности и количества написанных тестов всегда что-то может пойти не так. Поэтому с точки зрения пользовательского опыта важно предсказать появление проблемы, локализовать и устранить ее.

Рассмотрим обработку ошибок в React: что делать при их появлении, как их выявить и устранить.
Почему нужно находить ошибки в React
Начиная с 16-й версии React, возникающая во время жизненного цикла ошибка приводит к размонтированию всего приложения, если его не остановить. Ранее компоненты сохранялись на экране, даже если были искажены и не функционировали должным образом. Теперь уничтожить страницу полностью и отобразить пустой экран может досадная необнаруженная ошибка в незначительной части пользовательского интерфейса или даже в неконтролируемой разработчиком внешней библиотеке.
Выявление ошибок в JavaScript
В обычном JavaScript для выявления ошибок есть довольно простые инструменты. Например, оператор try/catch: попытаться (try) что-то выполнить, а если не получится, то поймать (catch) ошибку и сделать что-нибудь, чтобы минимизировать ее последствия.
try {
  // некорректная операция может вызвать ошибку
  doSomething();
} catch (e) {
  // если ошибка произошла, ловим ее и делаем что-нибудь без остановки приложения,
  // например отправляем ее в службу регистрации
}
Для функции async синтаксис будет такой же:
try {
  await fetch('/bla-bla');
} catch (e) {
  // Выборка не удалась! С этим нужно что-то делать!
}
Для традиционных промисов есть метод catch. Предыдущий пример fetch с API на основе промиса можно переписать так:
fetch('/bla-bla').then((result) => {
  // Если промис выполнен успешно, результат будет здесь,
  // с ним можно сделать что-нибудь полезное
}).catch((e) => {
  // О нет, выборка не удалась! Нужно что-то с этим сделать!
})
Это та же концепция, только немного другая реализация, поэтому и далее для всех ошибок используем синтаксис try/catch.
Простой try/catch в React: как правильно его выполнить
С пойманной ошибкой нужно что-то делать кроме того, чтобы записать ее куда-нибудь. Иначе говоря, что можно сделать, чтобы упростить жизнь пользователю? Не стоит оставлять его с пустым экраном или неработающим интерфейсом.
Наиболее очевидным и интуитивно понятным решением будет рендеринг на экране чего-либо до исправления ситуации. К счастью, оператор catch предоставляет для этого ряд возможностей, включая установку состояния. Например:
const SomeComponent = () => {
const [hasError, setHasError] = useState(false);useEffect(() => {
try {
// делаем что-либо, например выборку данных
} catch(e) {
// выборка не прошла, данных для рендеринга нет!
setHasError(true);
}
})
// что-то произошло во время выборки, отобразим красивый экран с ошибкой
if (hasError) return <SomeErrorScreen />
// данные есть - отрендерим их
return <SomeComponentContent {...datasomething} /
Мы пытаемся отправить запрос на выборку данных. В случае неудачи устанавливаем состояние ошибки и, если оно равно true, отображаем экран ошибки с дополнительной информацией для пользователя, например номером службы поддержки.
Этот способ подходит для простых, предсказуемых и ограниченных вариантов использования, таких как обнаружение неудачного запроса fetch.
Но если вы захотите отловить все возможные варианты ошибок в компоненте, то столкнетесь с определенными проблемами и серьезными ограничениями.
Ограничение 1: проблемы с хуком useEffect
Если просто обернуть useEffect с помощью try/catch, это не сработает:
try {
  useEffect(() => {
    throw new Error('Hulk smash!');
  }, [])
} catch(e) {
  // useEffect выбрасывается, но не вызывается
}
Дело в том, что useEffect вызывается асинхронно после рендеринга, поэтому для try/catch все проходит успешно. Подобное происходит и с любым Promise: если не ожидать результата, JavaScript просто продолжит свое дело, вернется к нему, когда промис будет выполнен, и выполнит только то, что находится внутри useEffect (и затем промиса). Выполненный блок try/catch исчезнет к тому времени.
Чтобы отлавливать ошибки внутри useEffect, нужно также поместить try/catch внутрь:
useEffect(() => {
 try {
   throw new Error('Hulk smash!');
 } catch(e) {
   // эта ошибка будет перехвачена
 }
}, [])
Поэкспериментируйте с этим примером.
Это относится к любому хуку, использующему useEffect, и ко всем асинхронным действиям. В результате вместо одного try/catch, обертывающего все, придется разбить его на несколько блоков: по одному на каждый хук.
Ограничение 2: дочерние компоненты
try/catch не сможет поймать ошибку внутри дочерних компонентов. Например:
const Component = () => {
  let child;try {
    child = <Child />
  } catch(e) {
    // бесполезен для отлова ошибок внутри дочернего компонента, не будет запускаться
  }
  return child;
}
Или даже так:
const Component = () => {
  try {
    return <Child />
  } catch(e) {
    // по-прежнему бесполезен для обнаружения ошибок внутри дочернего компонента, не будет запускаться
  }
}
Убедитесь на этом примере.
После Child /> нет реального рендеринга компонента. Мы создаем Element компонента, который является его определением. Это просто объект, который содержит необходимую информацию, такую как тип компонента и реквизиты, которые позже будут использоваться самим React, что фактически и вызовет рендеринг этого компонента. И произойдет это после успешного выполнения блока try/catch. Та же ситуация, что с промисами и хуком useEffect.
Ограничение 3: нельзя установить состояние во время рендеринга
Если попытаться отловить ошибки вне useEffect и различных обратных вызовов (т. е. во время рендеринга компонента), то разобраться с ними должным образом уже не так просто: обновления состояния во время рендеринга не допускаются.
Вот пример простого кода, который вызовет бесконечный цикл повторных рендеров, если произойдет ошибка:
const Component = () => {
  const [hasError, setHasError] = useState(false);try {
    doSomethingComplicated();
  } catch(e) {
    // недопустимый вариант! В случае ошибки вызовет бесконечный цикл
    // см. реальный пример в codesandbox ниже
    setHasError(true);
  }
}
Убедитесь сами в codesandbox.
Конечно, можно просто отобразить экран ошибки вместо установки состояния:
const Component = () => {
  try {
    doSomethingComplicated();
  } catch(e) {
    // допустимый вариант
    return <SomeErrorScreen />
  }
}
Но это немного громоздко и заставит по-разному обрабатывать ошибки в одном и том же компоненте: состояние для useEffect и обратных вызовов, а также прямой возврат для всего остального.
// это рабочий, но громоздкий вариант, не заслуживающий внимания
const SomeComponent = () => {
const [hasError, setHasError] = useState(false);useEffect(() => {
try {
// делаем что-либо, например выборку данных
} catch(e) {
// невозможен простой return в случае ошибок в useEffect и callbacks,
// поэтому приходится использовать состояние
setHasError(true);
}
})try {
// делаем что-либо во время рендеринга
} catch(e) {
// но здесь мы не можем использовать состояние, поэтому в случае ошибки нужно возвращать напрямую
return <SomeErrorScreen />;
}// и все же нужен return в случае ошибки состояния
if (hasError) return <SomeErrorScreen />
return <SomeComponentContent {...datasomething} />
}
В итоге, если в React полагаться исключительно на try/catch, то мы либо пропустим большую часть ошибок, либо превратим каждый компонент в непонятную смесь кода, которая, вероятно, сама по себе вызовет ошибки.
К счастью, есть и другой способ.
Компонент React ErrorBoundary
Обойти отмеченные выше ограничения позволяет React Error Boundaries. Это специальный API, который превращает обычный компонент в оператор try/catch в некотором роде только для декларативного кода React. Типичное использование будет примерно таким:
const Component = () => {
  return (
    <ErrorBoundary>
      <SomeChildComponent />
      <AnotherChildComponent />
    </ErrorBoundary>
  )
}
Теперь, если в этих компонентах или их дочерних элементах что-то пойдет не так во время рендеринга, ошибка будет обнаружена и обработана.
Но React не предоставляет компонент как таковой, а просто дает инструмент для его реализации. Простейшая реализация будет примерно такой:
class ErrorBoundary extends React.Component {
  constructor(props) {
    super(props);
    // инициализировать состояние ошибки
    this.state = { hasError: false };
  }// если произошла ошибка, установите состояние в true
  static getDerivedStateFromError(error) {
    return { hasError: true };
  }  render() {
    // если произошла ошибка, вернуть резервный компонент
    if (this.state.hasError) {
      return <>Oh no! Epic fail!</>
    }    return this.props.children;
  }
}
Мы создаем компонент класса regular и реализуем метод getDerivedStateFromError, который возвращает компонент в надлежащие границы ошибок.
Кроме того, при работе с ошибками важно отправить информацию о них в сервис обработки. Для этого в Error Boundary есть метод componentDidCatch:
class ErrorBoundary extends React.Component {
  // все остальное остается прежнимcomponentDidCatch(error, errorInfo) {
    // отправить информацию об ошибке
    log(error, errorInfo);
  }
}
После настройки границ ошибок с ними можно работать, как и с любым другим компонентом. Например, можно сделать его более пригодным для повторного использования и передать резервный вариант в качестве реквизита:
render() {
  // если произошла ошибка, вернуть резервный компонент
  if (this.state.hasError) {
    return this.props.fallback;
  }return this.props.children;
}
Используем таким образом:
const Component = () => {
  return (
    <ErrorBoundary fallback={<>Oh no! Do something!</>}>
      <SomeChildComponent />
      <AnotherChildComponent />
    </ErrorBoundary>
  )
}
Можно выполнять и другие задачи, например сброс состояния при нажатии кнопки, дифференциацию ошибок по типам и отправку ошибки в контекст.
Полный пример в codesandbox.
Однако есть одно предостережение: улавливаются не все ошибки.
Компонент ErrorBoundary: ограничения
ErrorBoundary улавливает только те ошибки, которые возникают во время жизненного цикла React. Все происходящее за его пределами, включая разрешенные промисы, асинхронный код с setTimeout, различные обратные вызовы и обработчики событий, просто исчезнет, если не будут обработано явно.
const Component = () => {
useEffect(() => {
// будет пойман компонентом ErrorBoundary
throw new Error('Destroy everything!');
}, [])const onClick = () => {
// эта ошибка просто исчезнет в void
throw new Error('Hulk smash!');
}
useEffect(() => {
// если это не сработает, ошибка тоже исчезнет
fetch('/bla')
}, [])
return <button onClick={onClick}>click me</button>
}
const ComponentWithBoundary = () => {
return (
<ErrorBoundary>
<Component />
</ErrorBoundary>
)
}
Общей рекомендацией для ошибок такого рода является использование обычных try/catch. По крайней мере здесь мы можем более или менее безопасно использовать состояние: обратные вызовы обработчиков событий — это как раз те места, где обычно устанавливают состояние. Итак, технически можно просто объединить два подхода, например:
const Component = () => {
const [hasError, setHasError] = useState(false);// большинство ошибок в этом и в дочерних компонентах будут перехвачены ErrorBoundary
const onClick = () => {
try {
// эта ошибка будет поймана catch
throw new Error('Hulk smash!');
} catch(e) {
setHasError(true);
}
}
if (hasError) return 'something went wrong';
return <button onClick={onClick}>click me</button>
}
const ComponentWithBoundary = () => {
return (
<ErrorBoundary fallback={"Oh no! Something went wrong"}>
<Component />
</ErrorBoundary>
)
}
Мы вернулись к исходной ситуации: каждый компонент должен поддерживать свое состояние «ошибка» и, что более важно, принимать решение о том, что с ним делать.
Конечно, вместо того чтобы обрабатывать эти ошибки на уровне компонентов, можно просто передавать их до родителя, у которого есть ErrorBoundary, через пропсы или Context. Таким образом, по крайней мере можно иметь «резервный» компонент только в одном месте:
const Component = ({ onError }) => {
const onClick = () => {
try {
throw new Error('Hulk smash!');
} catch(e) {
// просто вызовите пропс вместо сохранения здесь состояния
onError();
}
}return <button onClick={onClick}>click me</button>
}
const ComponentWithBoundary = () => {
const [hasError, setHasError] = useState();
const fallback = "Oh no! Something went wrong";
if (hasError) return fallback;
return (
<ErrorBoundary fallback={fallback}>
<Component onError={() => setHasError(true)} />
</ErrorBoundary>
)
}
Но здесь много дополнительного кода! Так пришлось бы делать для каждого дочернего компонента в дереве рендеринга. Не говоря уже о том, что сейчас мы обрабатываем два состояния ошибки: в родительском компоненте и в самом ErrorBoundary. А у ErrorBoundary уже есть все механизмы для распространения ошибок вверх по дереву — здесь мы делаем двойную работу.
Разве нельзя просто перехватывать эти ошибки из асинхронного кода и обработчиков событий с помощью ErrorBoundary?
Поиск асинхронных ошибок с помощью ErrorBoundary
Хитрость заключается в том, чтобы сначала поймать ошибки с помощью try/catch, затем внутри оператора catch запустить обычную повторную визуализацию React, а затем повторно отбросить эти ошибки обратно в жизненный цикл повторной визуализации. Таким образом, ErrorBoundary может перехватывать их, как и любую другую ошибку. И поскольку обновление состояния — это способ запуска повторного рендеринга, а функция установки состояния может фактически принимать функцию обновления в качестве аргумента, решение — чистая магия.
const Component = () => {
  // создать случайное состояние, которое будем использовать для выдачи ошибок
  const [state, setState] = useState();const onClick = () => {
    try {
      // возникла какая-то проблема
    } catch (e) {
      // обновление состояния триггера с функцией обновления в качестве аргумента
      setState(() => {
        // повторно выдать эту ошибку в функции обновления
        // будет запущено во время обновления состояния
        throw e;
      })
    }
  }
}
Полный пример в этом codesandbox.
Последним шагом будет абстрагирование этого сокращения, поэтому нам не нужно создавать случайные состояния в каждом компоненте. Здесь можно проявить творческий подход и создать хук, который создаст генератор асинхронных ошибок:
const useThrowAsyncError = () => {
  const [state, setState] = useState();return (error) => {
    setState(() => throw error)
  }
}
Используем так:
const Component = () => {
  const throwAsyncError = useThrowAsyncError();useEffect(() => {
    fetch('/bla').then().catch((e) => {
      // выдать асинхронную ошибку здесь
      throwAsyncError(e)
    })
  })
}
Или можно создать оболочку для обратных вызовов следующим образом:
const useCallbackWithErrorHandling = (callback) => {
  const [state, setState] = useState();return (...args) => {
    try {
      callback(...args);
    } catch(e) {
      setState(() => throw e);
    }
  }
}
Используем так:
const Component = () => {
  const onClick = () => {
    // выполнить что-либо опасное здесь
  }const onClickWithErrorHandler = useCallbackWithErrorHandling(onClick);  return <button onClick={onClickWithErrorHandler}>click me!</button>
}
Или что-нибудь еще, что душе угодно и требуется приложению. Ошибки теперь не спрячутся.
Полный пример в этом codesandbox.
Можно ли использовать react-error-boundary?
Для тех, кто не любит изобретать велосипед или просто предпочитает библиотеки для уже решенных задач, есть хороший вариант, который реализует гибкий компонент ErrorBoundary и имеет несколько полезных утилит, подобных описанным выше. Это — react-error-boundary.
Использовать его или нет — вопрос личных предпочтений, стиля программирования и уникальных особенностей компонентов.
Теперь, если в приложении возникнет проблема, вы сможете легко с ней справиться.
И запомните:
- Блоки
try/catchне будут перехватывать ошибки внутри хуков, таких какuseEffect, и внутри любых дочерних компонентов. ErrorBoundaryих перехватывать может, но не работает с ошибками в асинхронном коде и в обработчиках событий.- Тем не менее вы можете заставить
ErrorBoundaryловить их. Просто сначала их нужно поймать с помощьюtry/catch, а затем забросить обратно в жизненный цикл React.
Читайте также:
- Управление состоянием в React: обзор
- 9 советов по работе с консолью JavaScript, которые помогут оптимизировать отладку
- Preact вместо ручной оптимизации React-приложения
Читайте нас в Telegram, VK и Дзен
Перевод статьи Nadia Makarevich: How to handle errors in React: full guide
Let’s face it. Nobody wants to see a broken, empty page while surfing the web. It leaves you stranded and confused. You don’t know what happened or what caused it, leaving you with a bad impression of the website.
It is often better to communicate the error and let the user continue to use the app. The user will get less of a bad impression and can continue to use its features.
In today’s post, we’ll go through different ways to handle errors in React applications.
The Classic ‘Try and Catch’ Method in React
If you’ve used JavaScript, you’ve probably had to write a ‘try and catch’ statement. To make sure we’re on board with what it is, here’s one:
It is a great tool to catch misbehaving code and ensure our app doesn’t blow up into smithereens. To be more realistic and close to the React world as possible, let’s see an example of how you’d use this in your app:
When doing network calls in React, you’d usually use the try...catch statement. But why? Unfortunately, try...catch only works on imperative code. It does not work on declarative code like the JSX we are writing in our components. So that is why you don’t see a massive try...catch wrapping our whole app. It just won’t work.
So, what do we do? Glad you asked. In React 16, a new concept got introduced — React Error Boundaries. Let’s dig into what they are.
React Error Boundaries
Before we get into error boundaries, let us first see why they are necessary. Imagine you had a component like this:
If you try to render this component somewhere, you’ll get an error like this one:
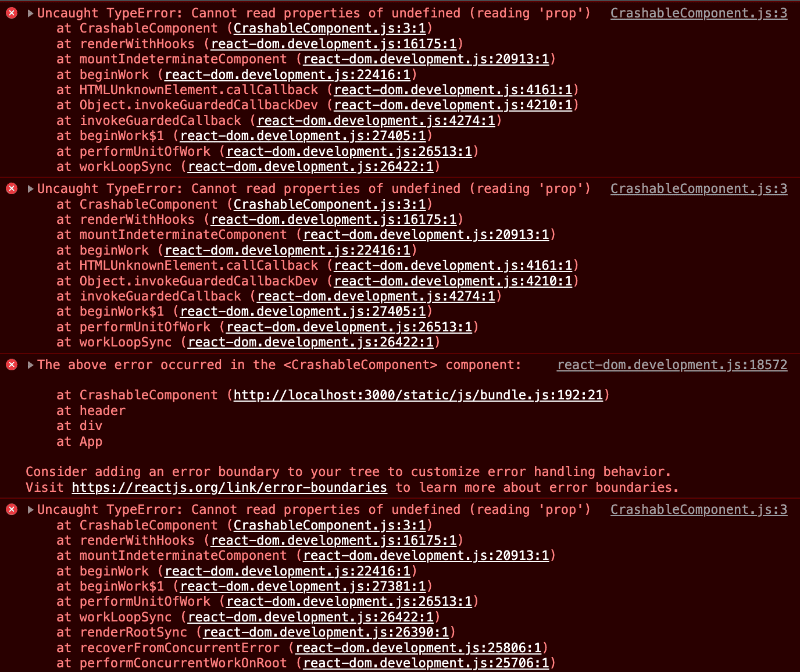
Not only that, the whole page will be blank, and the user won’t be able to do or see anything. But what happened? We tried to access a property iDontExist.prop, which doesn’t exist (we don’t pass it to the component). This is a banal example, but it shows that we cannot catch these errors with the try...catch statement.
This whole experiment brings us to error boundaries. Error boundaries are React components that catch JavaScript errors anywhere in their child component tree. Then, they log those caught errors and display a fallback UI instead of the component tree that crashed. Error boundaries catch errors during rendering, in lifecycle methods, and in constructors of the whole tree below them.
An error boundary is a class component that defines either (or both) of the lifecycle methods static getDerivedStateFromError() or componentDidCatch().
static getDerivedStateFromError() renders a fallback UI after an error has been thrown.
componentDidCatch() can log error information to your service provider (like AppSignal) or to a browser console.
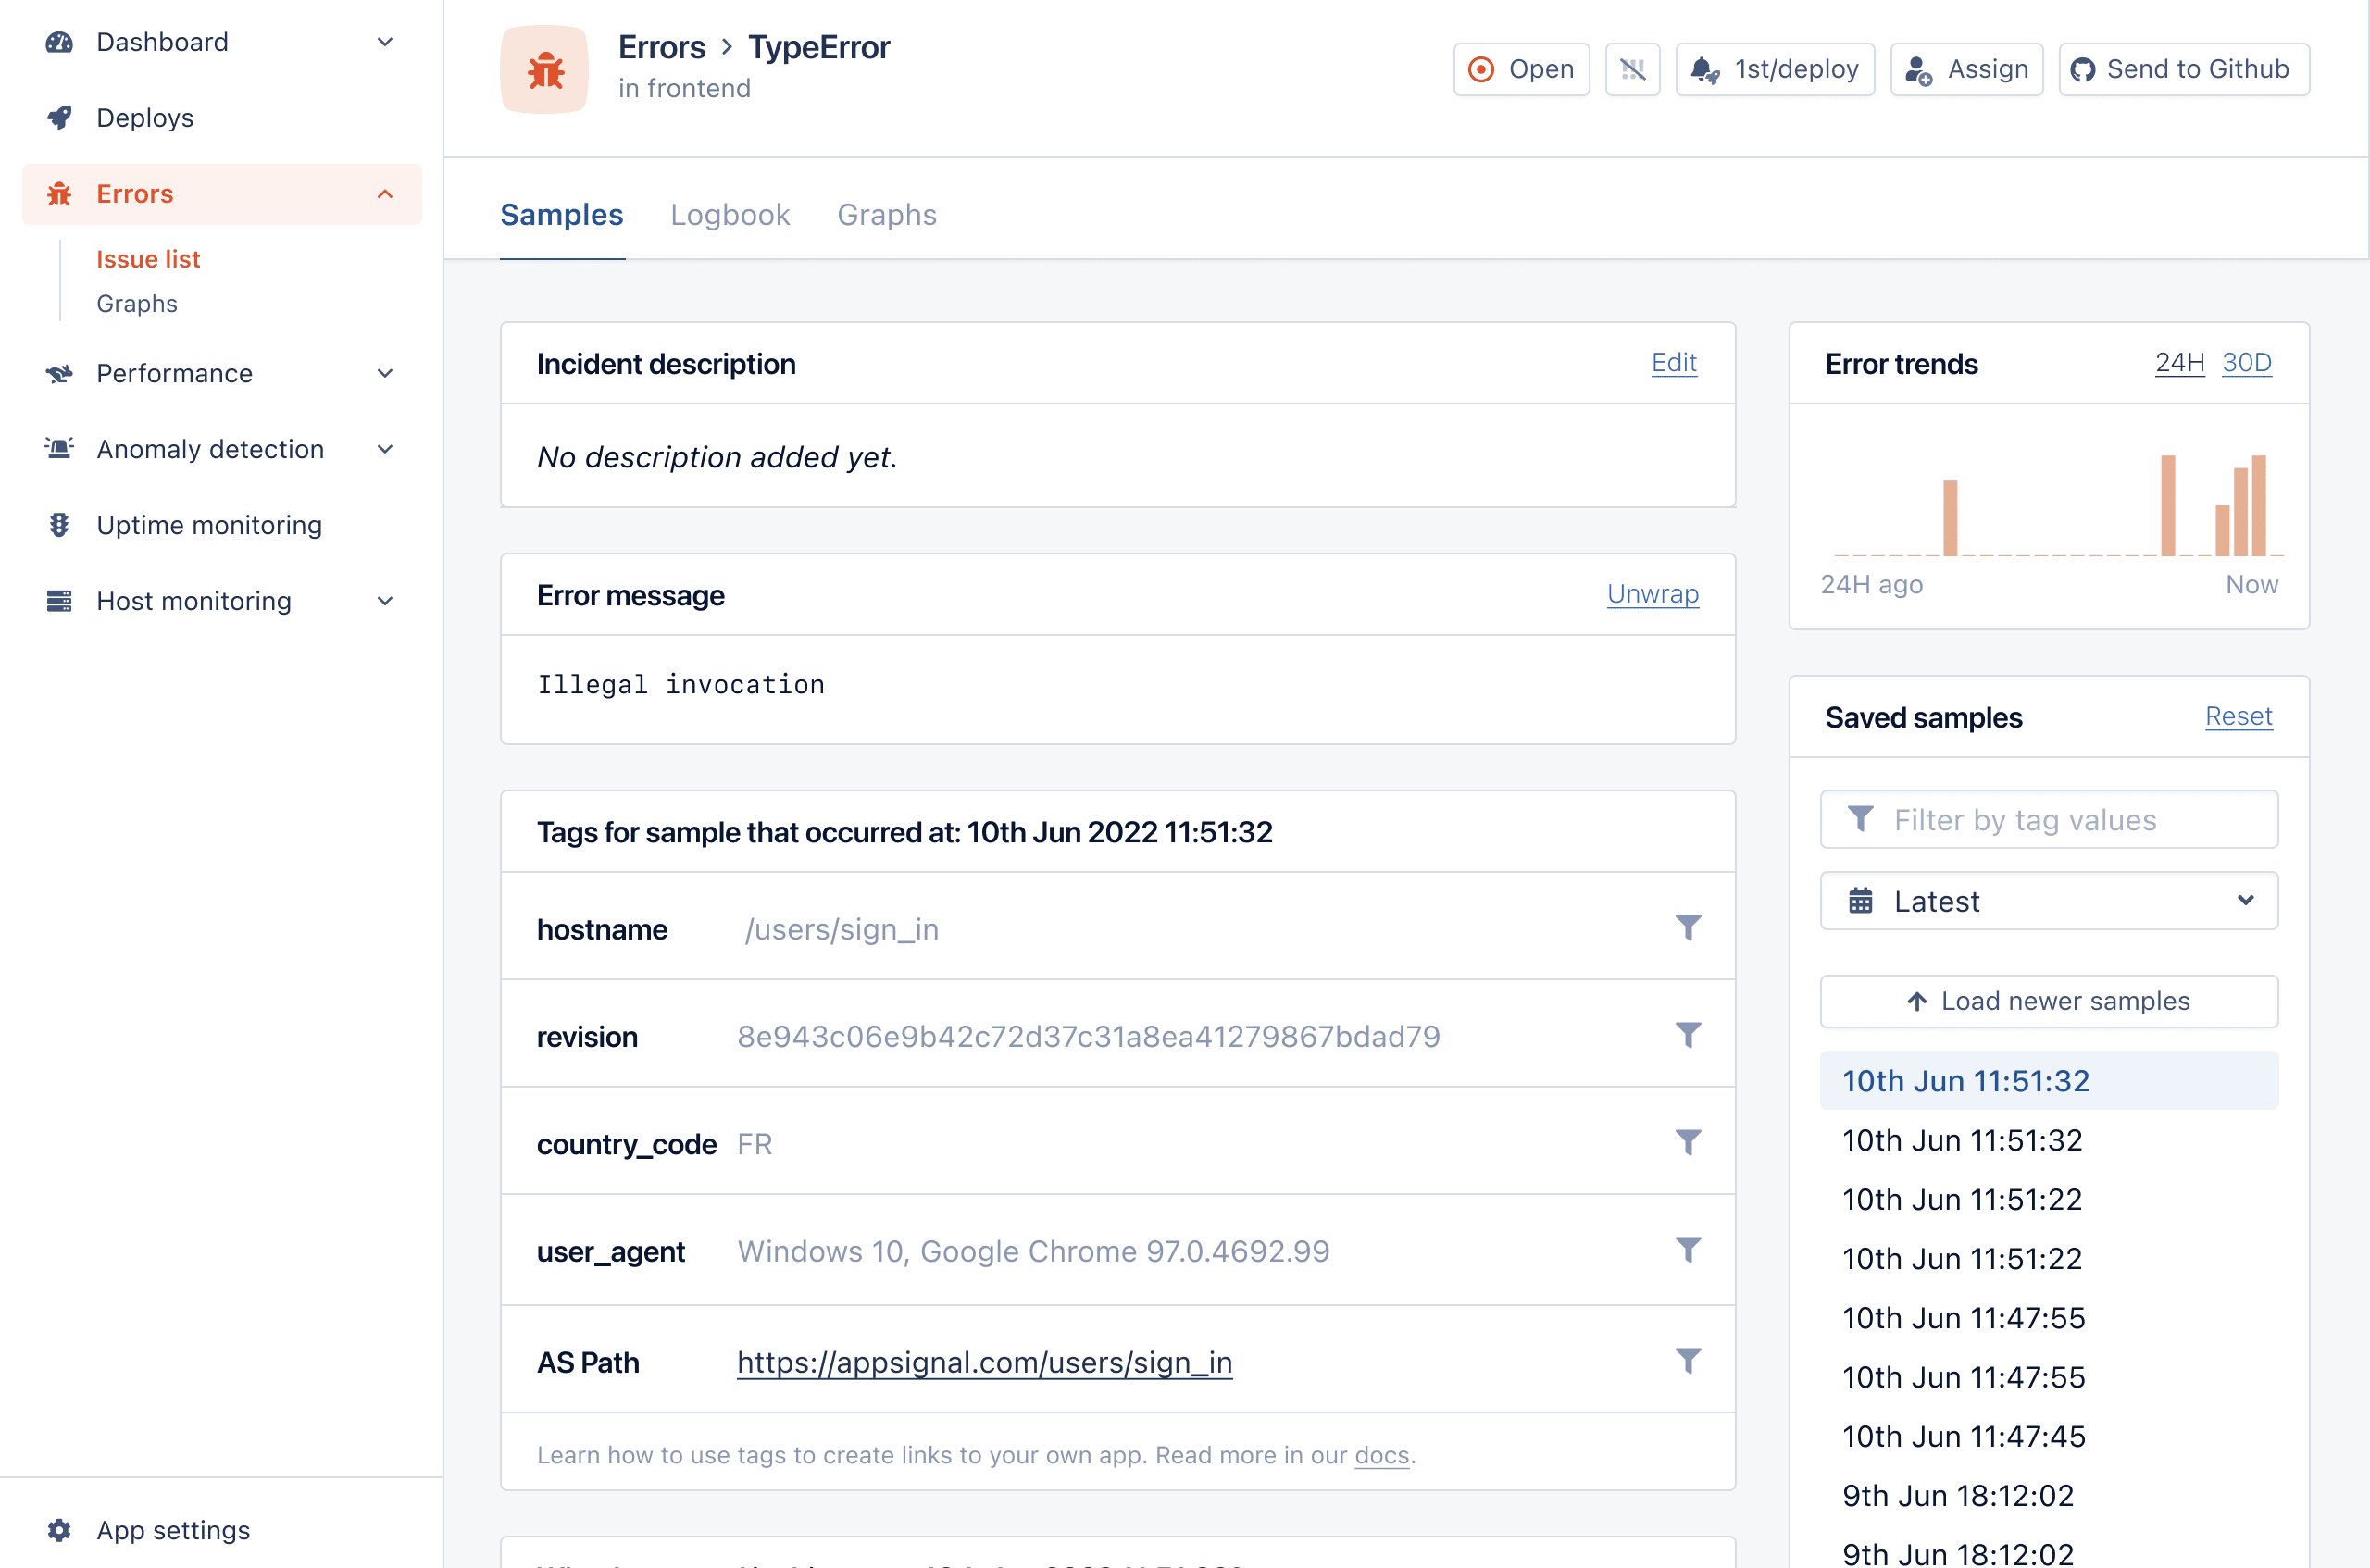
Here’s an example of how information about a React error looks in AppSignal’s ‘issue list’:
Let’s see a typical error boundary component:
We can use ErrorBoundary like so:
Now, when we open our app, we will get a working app with the following:

That is precisely what we want. We want our app to remain functional when an error occurs. But we also want to inform the user (and our error tracking service) about the error.
Beware that using an error boundary is not a silver bullet. Error boundaries do not catch errors for:
- Event handlers
- Asynchronous code (e.g.
setTimeoutorrequestAnimationFramecallbacks) - Server-side rendering
- Errors that are thrown in the error boundary itself (rather than its children)
You still need to use the try...catch statement for these fellas. So, let’s go ahead and show how you can do that.
Error Catching in Event Handlers
As mentioned before, error boundaries can’t help us when an error is thrown inside an event handler. Let’s see how we can handle those. Below is a small button component that throws an error when you click it:
Notice that we have a try and catch block inside handleClick that ensures our error is caught. If you render the component and try to click it, this happens:

We have to do the same in other cases, like in setTimeout calls.
Error Catching in setTimeout Calls
Imagine we have a similar button component, but this one calls setTimeout when clicked. Here’s how it looks:
After 1,000 milliseconds, the setTimeout callback will throw an error. Luckily, we wrap that callback logic in try...catch, and setError in the component. That way, no stack trace is shown in the browser console. Also, we communicate the error to the user. Here’s how it looks in the app:

That is all well and good, as we got our app’s pages up and running despite errors popping all over the place in the background. But is there an easier way to handle errors without writing custom error boundaries? You bet there is, and of course, it comes in the form of a JavaScript package. Let me introduce you to the react-error-boundary.
JavaScript’s react-error-boundary Package
You can pop that library inside your package.json faster than ever with:
Now, you’re ready to use it. Remember the ErrorBoundary component we made? You can forget about it because this package exports its own. Here’s how to use it:
In the example above, we render the same CrashableComponent, but this time, we use the ErrorBoundary component from the react-error-boundary library. It does the same thing as our custom one, except that it receives the FallbackComponent prop plus the onError function handler. The result is the same as we had with our custom ErrorBoundary component, except you don’t have to worry about maintaining it since you’re using an external package.
One great thing about this package is that you can easily wrap your function components into a withErrorBoundary making it a higher-order component (HOC). Here’s how that looks:
Nice, you’re good to go now to capture all those errors bugging you.
But maybe you don’t want another dependency in your project. Can you achieve it yourself? Of course you can. Let’s see how it can be done.
Using Your Own React Boundaries
You can achieve a similar, if not the same, effect you get from react-error-boundary. We already showed a custom ErrorBoundary component, but let’s improve it.
Now you get the ErrorBoundary and the HOC errorBoundary that you can use across your app. Extend and play around with it as much as you want. You can make them receive custom fallback components to customize how you recover from each error. You can also make them receive an onError prop and later call it inside componentDidCatch. The possibilities are endless.
But one thing is for sure — you didn’t need that dependency after all. I bet writing your own error boundary will bring a sense of achievement, and you’ll get to understand it better. Also, who knows what ideas you might get when you’re trying to customize it.
Summing Up: Get Started with React Error Handling
Thanks for reading this blog post about handling errors in React. I hope you had as much fun reading and trying things out as I did writing it. You can find all the code, with examples, in the GitHub repo I created.
A quick rundown of the things we went through:
- React Error boundaries are great for catching errors in declarative code (e.g., inside their child component tree).
- For other cases, you need to use a
try...catchstatement (e.g., async calls likesetTimeout, event handlers, server-side rendering, and errors thrown in the error boundary itself). - A library like
react-error-boundarycan help you write less code. - You can also run your own error boundary and customize it as much as you want.
That is all, folks. Thanks for tuning in, and catch you in the next one!
P.S. If you liked this post, subscribe to our JavaScript Sorcery list for a monthly deep dive into more magical JavaScript tips and tricks.
P.P.S. If you need an APM for your Node.js app, go and check out the AppSignal APM for Node.js.
Давайте признаем, что тот, кто ищет что-то в интернете, не хочет наткнуться на нерабочую пустую страницу. Это, как минимум, путает, сбивает с толку. Сидишь и не понимаешь, что произошло и почему, это оставляет плохое впечатление о сайте. Часто лучше сообщить об ошибке и дать пользователю продолжить пользоваться приложением или сайтом. В таком случае он получит меньше негативных эмоций и не закроет это приложение.
В этой статье мы пройдёмся по различным способам справиться с ошибками в приложениях на React.

Классический метод «Try and Catch» в React
Если вы использовали JavaScript, вам, вероятно, приходилось писать инструкцию «try and catch». Чтобы убедиться в этом, посмотрите:
try {
  somethingBadMightHappen();
} catch (error) {
  console.error("Something bad happened");
  console.error(error);
Это отличный инструмент для выявления неправильного кода и обеспечения того, чтобы наше приложение не сломалось. Чтобы быть более реалистичным и максимально приближенным к миру React, давайте посмотрим пример того, как вы будете использовать это в своем приложении:
const fetchData = async () => {
  try {
    return await fetch("https://some-url-that-might-fail.com");
  } catch (error) {
    console.error(error); // You might send an exception to your error tracker like AppSignal
    return error;
  }
При выполнении сетевых вызовов в React обычно используют инструкцию try...catch. Но почему? К сожалению, try...catch работает только с императивным кодом, но не работает с декларативным, таким как JSX, который пишут в компонентах. Вот почему вы не видите массивной упаковки try...catch всего нашего приложения. Это просто не сработает.
Итак, что делать? В React 16 появилась новая концепция — границы ошибок React. Давайте разберемся, что это такое.
Границы ошибок React
Прежде чем мы перейдем к границам ошибок, давайте сначала посмотрим, почему они необходимы. Представьте, что у вас есть такой компонент:
const CrashableComponent = (props) => {
  return <span>{props.iDontExist.prop}</span>;
};

export default CrashableComponent
Если вы попытаетесь отобразить этот компонент где-нибудь, вы получите ошибку, подобную этой:

Мало того, вся страница будет пустой, и пользователь не сможет ничего делать или видеть. Но что произошло? Мы попытались получить доступ к свойству iDontExist.prop, которого не существует (мы не передаем его компоненту). Это банальный пример, но он показывает, что мы не можем поймать эти ошибки try...catch с помощью инструкции.
Весь этот эксперимент подводит нас к границам ошибок. Границы ошибок — это компоненты React, которые улавливают ошибки JavaScript в любом месте своего дочернего дерева компонентов. Затем они регистрируют эти обнаруженные ошибки и отображают резервный пользовательский интерфейс вместо дерева компонентов, которое разбилось. Границы ошибок улавливают ошибки во время рендеринга, в методах жизненного цикла и в конструкторах всего дерева под ними.
Граница ошибки — это классовый компонент, который определяет один (или оба) из методов жизненного цикла static getDerivedStateFromError() или componentDidCatch(). static getDerivedStateFromError() отображает резервный пользовательский интерфейс после возникновения ошибки. componentDidCatch() можно передавать информацию об ошибках вашему поставщику услуг (например, AppSignal) или в консоль браузера.
Вот пример того, как информация об ошибке React выглядит в «списке проблем» AppSignal:

Давайте посмотрим на типичный компонент границы ошибки:
import { Component } from "react";

class ErrorBoundary extends Component {
  constructor(props) {
    super(props);
    this.state = { hasError: false };
  }

  static getDerivedStateFromError(error) {
    // Update state so the next render will show the fallback UI.
    return {
      hasError: true,
      error,
    };
  }

  componentDidCatch(error, errorInfo) {
    // You can also log the error to an error reporting service like AppSignal
    // logErrorToMyService(error, errorInfo);
  }

  render() {
    const { hasError, error } = this.state;

    if (hasError) {
      // You can render any custom fallback UI
      return (
        <div>
          <p>Something went wrong ????</p>

          {error.message && <span>Here's the error: {error.message}</span>}
        </div>
      );
    }

    return this.props.children;
  }
}

export default ErrorBoundary
Мы можем использовать ErrorBoundary примерно так:
<ErrorBoundary>
  <CrashableComponent />
</ErrorBoundary
Теперь, когда мы открываем наше приложение, мы получим рабочее приложение с текстом:

Это именно то, чего мы хотим. Мы хотим, чтобы наше приложение оставалось функциональным при возникновении ошибки. Но также хотим информировать пользователя (и нашу службу отслеживания ошибок) об ошибке.
Помните, что использование границ ошибок не панацея. Границы ошибок не распознают ошибки для:
-
Обработчики событий.
-
Асинхронный код (например,
setTimeout, илиrequestAnimationFrameCallbacks). -
Server-side rendering.
-
Ошибки, которые возникают в самой границе ошибки (а не в ее дочерних элементах).
В этих случаях всё равно нужно использовать try...catch. И так, давайте продолжим и покажем, как вы можете это сделать.
Перехват ошибок в обработчиках событий
Как упоминалось ранее, границы ошибок не могут нам помочь, когда ошибка выдается внутри обработчика событий. Давайте посмотрим, как можно с ними справиться. Ниже приведен небольшой компонент кнопки, который выдает ошибку при нажатии на него:
import { useState } from "react";

const CrashableButton = () => {
  const [error, setError] = useState(null);

  const handleClick = () => {
    try {
      throw Error("Oh no :(");
    } catch (error) {
      setError(error);
    }
  };

  if (error) {
    return <span>Caught an error.</span>;
  }

  return <button onClick={handleClick}>Click Me To Throw Error</button>;
};

export default CrashableButton
Обратите внимание, что у нас есть блок try and catch внутри handleClick, который гарантирует, что наша ошибка будет обнаружена. Если вы отобразите компонент и попытаетесь щелкнуть по нему, это произойдет:

Нужно делать то же самое в других случаях, например, в вызовах setTimeout
Перехват ошибок в вызовах setTimeout
Представьте, что у нас есть аналогичный компонент button, но он вызывает setTimeout при нажатии. Вот как это выглядит:
import { useState } from "react";

const SetTimeoutButton = () => {
  const [error, setError] = useState(null);

  const handleClick = () => {
    setTimeout(() => {
      try {
        throw Error("Oh no, an error :(");
      } catch (error) {
        setError(error);
      }
    }, 1000);
  };

  if (error) {
    return <span>Caught a delayed error.</span>;
  }

  return (
    <button onClick={handleClick}>Click Me To Throw a Delayed Error</button>
  );
};

export default SetTimeoutButton
Через 1000 миллисекунд callback setTimeout выдаст ошибку. К счастью, мы включаем эту логику обратного вызова в try...catch и в компонент setError. Таким образом, трассировка стека не отображается в консоли браузера. Кроме того, мы сообщаем об ошибке пользователю. Вот как это выглядит в приложении:

Таким образом, мы запустили страницы приложения, несмотря на то, что ошибки появляются повсюду в фоновом режиме. Но есть ли более простой способ обработки ошибок без написания пользовательских границ ошибок? Вы можете поспорить, что есть, и, конечно же, он поставляется в виде пакета JavaScript. Позвольте мне познакомить вас с react-error-boundary.
react-error-boundary пакет JavaScript
Вы можете вставить эту библиотеку в свой package.json быстрее, чем когда-либо, с:
npm install --save react-error-boundaryТеперь вы готовы использовать его. Помните компонент ErrorBoundary, который мы создали? Вы можете забыть об этом, потому что этот пакет экспортирует свои собственные. Вот как это использовать:
import { ErrorBoundary } from "react-error-boundary";
import CrashableComponent from "./CrashableComponent";

const FancyDependencyErrorHandling = () => {
  return (
    <ErrorBoundary
      FallbackComponent={ErrorFallback}
      onError={(error) => {
        // You can also log the error to an error reporting service like AppSignal
        // logErrorToMyService(error, errorInfo);
        console.error(error);
      }}
    >
      <CrashableComponent />
    </ErrorBoundary>
  );
};

const ErrorFallback = ({ error }) => (
  <div>
    <p>Something went wrong ????</p>

    {error.message && <span>Here's the error: {error.message}</span>}
  </div>
);

export default FancyDependencyErrorHandling
В этом примере визуализируем то же CrashableComponent, но на этот раз мы используем компонент ErrorBoundary из библиотеки react-error-boundary. Он делает то же самое, что и наш пользовательский, за исключением того, что он получает FallbackComponent и обработчик функции onError. Результат тот же, что и с нашим пользовательским компонентом ErrorBoundary, за исключением того, что вам не нужно беспокоиться о его обслуживании, поскольку вы используете внешний пакет.
Одна из замечательных особенностей этого пакета заключается в том, что вы можете легко обернуть свои функциональные компоненты в компонент withErrorBoundary более высокого порядка (HOC). Вот как это выглядит:
import { withErrorBoundary } from "react-error-boundary";

const CrashableComponent = (props) => {
  return <span>{props.iDontExist.prop}</span>;
};

export default withErrorBoundary(CrashableComponent, {
  FallbackComponent: () => <span>Oh no :(</span>,
});
Хорошо, теперь вы можете записывать все те ошибки, которые вас беспокоят.
Но, возможно, вы не хотите, чтобы в вашем проекте была другая зависимость. Давайте посмотрим, как это можно сделать самостоятельно.
Используя свои собственные границы React
Похожего, если не точно такого же эффекта можно достичь с помощью react-error-boundary. Мы уже разбирали кастомный ErrorBoundary компонент, но предлагаю его улучшить.
import { Component } from "react";

export default class ErrorBoundary extends Component {
  constructor(props) {
    super(props);
    this.state = { hasError: false };
  }

  static getDerivedStateFromError(error) {
    // Update state so the next render will show the fallback UI.
    return {
      hasError: true,
      error,
    };
  }

  componentDidCatch(error, errorInfo) {
    // You can also log the error to an error reporting service like AppSignal
    // logErrorToMyService(error, errorInfo);
  }

  render() {
    const { hasError, error } = this.state;

    if (hasError) {
      // You can render any custom fallback UI
      return <ErrorFallback error={error} />;
    }

    return this.props.children;
  }
}

const ErrorFallback = ({ error }) => (
  <div>
    <p>Something went wrong ????</p>

    {error.message && <span>Here's the error: {error.message}</span>}
  </div>
);

const errorBoundary = (WrappedComponent) => {
  return class extends ErrorBoundary {
    render() {
      const { hasError, error } = this.state;

      if (hasError) {
        // You can render any custom fallback UI
        return <ErrorFallback error={error} />;
      }

      return <WrappedComponent {...this.props} />;
    }
  };
};

export { errorBoundary };
У вас получились ErrorBoundary и HOC errorBoundary, которые вы можете использовать во всем приложении. Их можно масштабировать и видоизменять. Вы можете сделать так, чтобы они получали индивидуальные fallback компоненты для кастомизации способов восстановления после каждой ошибки. Ещё можно настроить получение onError, и потом вызывать его внутриcomponentDidCatch. Возможности не ограничены.
Одно могу сказать точно — эти взаимосвязи не нужны в конце концов. Уверен, написание собственного error boundary даст ощущение успеха, сможете лучше их понимать. Ну и кто знает, может, придут какие-то интересные идеи в голову, пока вы экспериментируете с кастомизацией.
Резюмируем:
-
Границы ошибок React отлично подходят для обнаружения ошибок в декларативном коде (например, внутри дерева дочерних компонентов).
-
Для других случаев необходимо использовать инструкцию
try...catch(например, асинхронные вызовы, такие какsetTimeoutобработчики событий, рендеринг на стороне сервера и ошибки, возникающие в самой границе ошибки). -
Подобная библиотека
react-error-boundaryпомогает писать меньше кода. -
Вы также можете запустить свою собственную границу ошибок и настроить ее так, как хотите.
Ideally you shouldn’t ever have something that would cause a js error. We don’t live in a perfect world though so heres a few things I would do to help mitigate them.
Think about how the code you’re writing could break
if you are calling a method on a variable, think, «is this always going to be this datatype?»
handleClick = (e) => {
  e && e.preventDefault()
  // code here
}

handleSomething = (data) => {
  if (Array.isArray(data)) {
    data.reduce(...) // we know this will be here
  }
}
When making variables, use default values.
Meaning const { loading = false, data = [] } = this.props. This will help in data type consistencies.
Handle asynchronous data more elegantly
Make sure to handle the pending / waiting state of your component. You could (for instance) use a Loading component that renders the content when loaded.
render() {
  const { data = [] } = this.props
  return (
    <Loading loading={data.length > 0}>
      <MyComponent data={data} />
    </Loading>
  )
}
Where the loading component would be something like.
const Loading = ({ children, loading = false, message = 'Loading...' }) => {
  if (loading) {
    return <span>{message}</span>
  }
  return children
}
You should catch exceptions
If you’re writing something that you think could break or if you just want to be overly cautious you can use try catch blocks to catch exceptions in functional components.
const MyComponent = ({ data = [] }) => {
  try {
    return <ul>{data.map( item => <li key={item}>{item}</li> )</ul>
  } catch (error) {
    const message = error.message || 'I broke!'
    return <span className="broken-component">{message}</span>
  }
}
In class components you can use
componentDidCatch(error, errorInfo) {
  // Handle error here.
}
The docs have a ton of great info if you’d like to learn more
Now, this is just a rudimentary example to describe what I am talking about. But it will help reduce your JS exceptions, which (when uncaught) will break your single page application. So you need to handle them.
If a URL is invalid redirect to a 404 page. If a component needs data then wait for the data to render it. If you are trying to access a property on an object that is nested (especially if its from the server), aka this.props.myData.obj.something.somethingelse. Chances are that that object path wont always be there. You need to ensure that each of those aren’t undefined or null.
Extra credit
I’ve used lodash’s get helper, which has helped me reduce exceptions!
_.get(this.props, 'myData.obj.something.somethingelse') // returns `undefined` if the path is invalid
I guess the moral of the story is you should be proactive in your code to capture things that could break. 

От автора: эта статья познакомит вас с концепцией error boundaries в React. Мы рассмотрим, какие задачи они пытаются решить, как их реализовать и какие у них есть недостатки. Наконец, мы рассмотрим небольшой слой абстракции, который делает error boundaries еще лучше!
Даже в самых безупречных приложениях время от времени возникают ошибки выполнения. Сеть может выйти из строя, какая-то внутренняя служба может выйти из строя, или пользователи могут предоставить вам некоторую вводную информацию, которая просто не вычисляется. Или — ну знаете — баги. Но как лучше всего обрабатывать ошибки, чтобы ваше приложение оставалось безотказным, продолжало реагировать и обеспечивать максимально удобное взаимодействие с пользователем?
Что такое error boundaries?
Error boundaries — это способ React обрабатывать ошибки в приложении. Они позволяют вам реагировать и восстанавливаться после ошибок времени выполнения, а также предоставляют резервный пользовательский интерфейс, если это применимо.
Идея, лежащая в основе error boundaries, заключается в том, что вы можете заключить любую часть вашего приложения в специальный компонент — так называемую границу ошибки (error boundary)- и если в этой части приложения возникнет неперехваченная ошибка, она будет содержаться в этом компоненте. Затем вы можете показать ошибку, сообщить об этом в службу отчетов об ошибках и попытаться ее исправить, если это возможно.
Error boundaries были введены в React 16 и были одной из первых функций, появившихся в результате усилий команды React по переписыванию Fiber. Это единственный компонент, который вам все еще нужно написать как компонент класса (так что пока никаких хуков!), Но он определенно должен быть частью любого современного приложения React.

Профессия Frontend-разработчик PRO
Готовим Frontend-разработчиков с нуля
На курсе вы научитесь создавать интерфейсы веб-сервисов с помощью языков программирования и
дополнительных технологий. Сможете разрабатывать планировщики задач, мессенджеры, интернет-магазины…
Узнать подробнее
До 10 проектов в портфолио для старта карьеры
Подходит для новичков без опыта в программировании
Практика на вебинарах с разработчиками из крупных компаний
Обратите внимание, что даже несмотря на то, что вы можете создать несколько error boundaries в своем приложении, как правило, выбирают только одну на корневом уровне. При желании вы можете использовать супер-грануляцию, но мой опыт подсказывает, что часто бывает достаточно корневого уровня.
Моя первая error boundary
Error boundary — это обычный компонент класса, который реализует один (или оба) из следующих методов:
static getDerivedStateFromError(error)
Этот метод возвращает новое состояние на основе обнаруженной ошибки. Обычно вы меняете флаг состояния, который сообщает error boundary, следует ли предоставлять резервный пользовательский интерфейс.
componentDidCatch(error, errorInfo)
Этот метод вызывается всякий раз, когда возникает ошибка. Вы можете зарегистрировать ошибку (и любую дополнительную информацию) в службе отчетов об ошибках, попытаться исправить ошибку и сделать все, что вам нужно.
Чтобы показать, как это реализовано, давайте сделаем несколько шагов. Во-первых, давайте создадим компонент обычного класса.
|
class ErrorBoundary extends React.Component { render() { return this.props.children; } } |
Этот компонент почти ничего не делает — он просто отображает своих дочерних элементов. Зарегистрируем ошибку в сервисе ошибок!
|
class ErrorBoundary extends React.Component { componentDidCatch(error, errorInfo) { errorService.log({ error, errorInfo }); } render() { return this.props.children; } } |
Теперь, когда у пользователей возникает ошибка, мы получаем уведомление через службу отчетов об ошибках. Мы получим саму ошибку, а также полный стек компонентов, в которых произошла ошибка. Это значительно упростит работу по исправлению ошибок в дальнейшем!
Однако мы все еще нарушаем работу приложения! Это плохо. Давайте предоставим резервный пользовательский интерфейс. Для этого нам нужно отслеживать, находимся ли мы в ошибочном состоянии — и именно здесь на помощь приходит статический метод getDerivedStateFromError!
|
class ErrorBoundary extends React.Component { state = { hasError: false }; static getDerivedStateFromError(error) { return { hasError: true }; } componentDidCatch(error, errorInfo) { errorService.log({ error, errorInfo }); } render() { if (this.state.hasError) { return <h1>Oops, we done goofed up</h1>; } return this.props.children; } } |
И теперь у нас есть базовая, но функциональная Error boundary!
Начнем использовать Error boundary
Теперь приступим к ее использованию. Просто оберните компонент корневого приложения в новый компонент ErrorBoundary!
|
ReactDOM.render( <ErrorBoundary> <App /> </ErrorBoundary>, document.getElementById(‘root’) ) |
Обратите внимание, что вы можете использовать error boundaries так, чтобы они также отображали базовый макет (верхний колонтитул, нижний колонтитул и т. Д.).
Добавим функцию reset!
Иногда подобные ошибки случаются, когда пользовательский интерфейс переходит в нестабильное состояние. Всякий раз, когда возникает ошибка, все поддерево error boundary размонтируется, что, в свою очередь, сбрасывает любое внутреннее состояние.
Предоставление пользователю кнопки «Хочу повторить попытку», которая будет пытаться перемонтировать поддерево с новым состоянием, иногда может быть хорошей идеей! Давайте сделаем это.
|
1 2 3 4 5 6 7 8 9 10 11 12 13 14 15 16 17 18 19 20 21 22 |
class ErrorBoundary extends React.Component { state = { hasError: false }; static getDerivedStateFromError(error) { return { hasError: true }; } componentDidCatch(error, errorInfo) { errorService.log({ error, errorInfo }); } render() { if (this.state.hasError) { return ( <div> <h1>Oops, we done goofed up</h1> <button type=«button» onClick={() => this.setState({ hasError: false })}> Try again? </button> </div> ); } return this.props.children; } } |
Конечно, это может быть не очень хорошей идеей для приложения. При реализации подобных функций учитывайте свои потребности и потребности пользователей.
Инструмент воспроизведения сеанса с открытым исходным кодом
Отладка веб-приложения в производственной среде может быть сложной задачей и потребовать много времени. OpenReplay — это альтернатива с открытым исходным кодом для FullStory, LogRocket и Hotjar. Он позволяет отслеживать и воспроизводить все, что делают ваши пользователи, и показывает, как ваше приложение ведет себя при каждой проблеме. Это похоже на то, как если бы инспектор вашего браузера был открыт, когда вы смотрите через плечо пользователя. OpenReplay — единственная доступная альтернатива с открытым исходным кодом.
Ограничения
Error boundaries отлично подходят для того, что они делают — вылавливают ошибки времени выполнения, которых вы не ожидали во время рендеринга. Однако есть несколько типов ошибок, которые не обнаруживаются, и с которыми нужно справляться другим способом. К ним относятся:
ошибки в обработчиках событий (например, при нажатии кнопки)
ошибки в асинхронных обратных вызовах (например, setTimeout)
ошибки, которые происходят в самом компоненте error boundary
ошибки, возникающие при рендеринге на стороне сервера
Эти ограничения могут показаться серьезными, но в большинстве случаев их можно обойти, используя try-catch и hasError.
|
function SignUpButton(props) { const [hasError, setError] = React.useState(false); const handleClick = async () => { try { await api.signUp(); } catch(error) { errorService.log({ error }) setError(true); } } if (hasError) { return <p>Sign up failed!</p>; } return <button onClick={handleClick}>Sign up</button>; } |
Это работает достаточно хорошо, даже если вам нужно продублировать несколько строк кода.
Создание лучшей Error boundary
Error boundaries хороши по умолчанию, но было бы неплохо повторно использовать их логику обработки ошибок в обработчиках событий и асинхронных местах. Это достаточно просто реализовать через контекстный API! Давайте реализуем функцию для запуска ошибок вручную.
|
1 2 3 4 5 6 7 8 9 10 11 12 13 14 15 16 17 18 19 20 |
class ErrorBoundary extends React.Component { state = { hasError: false }; static getDerivedStateFromError(error) { return { hasError: true }; } componentDidCatch(error, errorInfo) { errorService.log({ error, errorInfo }); } triggerError = ({ error, errorInfo }) => { errorService.log({ error, errorInfo }); this.setState({ hasError: true }); } resetError = () => this.setState({ hasError: false }); render() { if (this.state.hasError) { return <h1>Oops, we done goofed up</h1>; } return this.props.children; } } |
Затем давайте создадим контекст и передадим в него нашу новую функцию:
|
const ErrorBoundaryContext = React.createContext(() => {}); |
Затем мы можем создать пользовательский хук для извлечения функции запуска ошибки из любого дочернего компонента:
|
const useErrorHandling = () => { return React.useContext(ErrorBoundaryContext) } |
Затем давайте обернем нашу error boundary в контексте:
|
1 2 3 4 5 6 7 8 9 10 11 12 13 14 15 16 17 18 19 20 21 22 23 24 |
class ErrorBoundary extends React.Component { state = { hasError: false }; static getDerivedStateFromError(error) { return { hasError: true }; } componentDidCatch(error, errorInfo) { errorService.log({ error, errorInfo }); } triggerError = ({ error, errorInfo }) => { errorService.log({ error, errorInfo }); this.setState({ hasError: true }); } resetError = () => this.setState({ hasError: false }); render() { return ( <ErrorBoundaryContext.Provider value={this.triggerError}> {this.state.hasError ? <h1>Oops, we done goofed up</h1> : this.props.children } </ErrorBoundaryContext.Provider> ); } } |
Теперь мы можем запускать ошибки и из наших обработчиков событий!
|
function SignUpButton(props) { const { triggerError } = useErrorHandling(); const handleClick = async () => { try { await api.signUp(); } catch(error) { triggerError(error); } } return <button onClick={handleClick}>Sign up</button>; } |
Теперь нам не нужно думать об отчетах об ошибках или создании резервного пользовательского интерфейса для каждого реализованного нами обработчика кликов — все это находится в компоненте error boundary.
Использование react-error-boundary
Написание собственной логики error boundary, как мы делали выше, — это нормально, и вам подойдет большинство вариантов использования. Однако это решенная проблема. Член команды React Core Брайан Вон (а позже очень талантливый преподаватель React Кент С. Доддс) потратил немного времени на создание [react-error-boundary] (https://www.npmjs.com/package/react-error-boundary) пакета npm, который дает вам почти то же самое, что и выше.
API немного отличается, поэтому вы можете передавать пользовательские резервные компоненты и логику reset вместо написания своей собственной, но он используется очень похожим образом. Вот пример:
|
ReactDOM.render( <ErrorBoundary FallbackComponent={MyFallbackComponent} onError={(error, errorInfo) => errorService.log({ error, errorInfo })} > <App /> </ErrorBoundary>, document.getElementById(‘root’) ) |
Вы также можете посмотреть, как это реализовано — он использует другой подход к запуску ошибок из хуков, но в остальном все работает примерно так же.
Заключение
Обработка ошибок и неожиданных событий имеет решающее значение для любого качественного приложения. Чрезвычайно важно обеспечить удобство работы пользователей, даже если все идет не так, как планировалось.
Error boundaries — отличный способ заставить ваше приложение упасть изящно и даже содержать ошибки, которые привели к падению, в то время как остальная часть приложения продолжит работать! Напишите свой собственный или воспользуйтесь библиотекой react-error-boundary, которая сделает все за вас. Независимо от того, что вы выберете, пользователи будут вам благодарны!
Автор: Kristofer Selbekk
Источник: blog.openreplay.com
Редакция: Команда webformyself.
Профессия Frontend-разработчик PRO
Готовим Frontend-разработчиков с нуля
На курсе вы научитесь создавать интерфейсы веб-сервисов с помощью языков программирования и
дополнительных технологий. Сможете разрабатывать планировщики задач, мессенджеры, интернет-магазины…
Узнать подробнее
До 10 проектов в портфолио для старта карьеры
Подходит для новичков без опыта в программировании
Практика на вебинарах с разработчиками из крупных компаний
Читайте нас в Telegram, VK, Яндекс.Дзен
Looking into how to catch and handle errors in React.
Usages, patterns and caveats of try/catch and ErrorBoundary, what’s possible, what’s not, and how to catch all errors, including async and errors from event handlers, with ErrorBoundary.
Table of Contents
- Why we should catch errors in React
- Remembering how to catch errors in javascript
- Simple try/catch in React: how to and caveats
- React ErrorBoundary component
- ErrorBoundary component: limitations
- Catching async errors with ErrorBoundary
- Can I just use react-error-boundary instead?
We all want our apps to be stable, to work perfectly, and cater to every edge case imaginable, isn’t it? But the sad reality is we are all humans (at least that is my assumption), we all make mistakes, and there is no such thing as a bug-free code. No matter how careful we are or how many automated tests we write, there always will be a situation when something goes terribly wrong. The important thing, when it comes to user experience, is to predict that terrible thing, localize it as much as possible, and deal with it in a graceful way until it can be actually fixed.
So today, let’s take a look at error handling in React: what we can do if an error happens, what are the caveats of different approaches to error catching, and how to mitigate them.
Why we should catch errors in React
But first thing first: why it’s vitally important to have some error-catching solution in React?
The answer is simple: starting from version 16, an error thrown during React lifecycle will cause the entire app to unmount itself if not stopped. Before that, components would be preserved on the screen, even if malformed and misbehaved. Now, an unfortunate uncaught error in some insignificant part of the UI, or even some external library that you have no control over, can destroy the entire page and render an empty screen for everyone.
Never before had frontend developers such destructive power 😅
Remembering how to catch errors in javascript
When it comes to catching those nasty surprises in regular javascript, the tools are pretty straightforward.
We have our good old try/catch statement, which is more or less self-explanatory: try to do stuff, and if they fail — catch the mistake and do something to mitigate it:
try {
doSomething();
} catch (e) {
}
This also will work with
asyncfunction with the same syntax:try {
await fetch('/bla-bla');
} catch (e) {
}
Or, if we’re going with the old-school promises, we have a
catchmethod specifically for them. So if we re-write the previousfetchexample with promised-based API, it will look like this:fetch('/bla-bla').then((result) => {
}).catch((e) => {
})
It’s the same concept, just a bit different implementation, so for the rest of the article I’m just going to use
try/catchsyntax for all errors.Simple try/catch in React: how to and caveats
When an error is caught, we need to do something with it, right? So, what exactly can we do, other than logging it somewhere? Or, to be more precise: what can we do for our users? Just leaving them with an empty screen or broken interface is not exactly user-friendly.
The most obvious and intuitive answer would be to render something while we wait for the fix. Luckily, we can do whatever we want in that
catchstatement, including setting the state. So we can do something like this:const SomeComponent = () => {
const [hasError, setHasError] = useState(false);
useEffect(() => {
try {
} catch(e) {
setHasError(true);
}
})
if (hasError) return <SomeErrorScreen />
return <SomeComponentContent {...datasomething} />
}
We’re trying to send a fetch request, if it fails — setting the error state, and if the error state is
true, then we render an error screen with some additional info for users, like a support contact number.This approach is pretty straightforward and works great for simple, predictable, and narrow use cases like catching a failed
fetchrequest.But if you want to catch all errors that can happen in a component, you’ll face some challenges and serious limitations.
Limitation 1: you will have trouble with useEffect hook.
If we wrap
useEffectwithtry/catch, it just won’t work:try {
useEffect(() => {
throw new Error('Hulk smash!');
}, [])
} catch(e) {
}
It’s happening because
useEffectis called asynchronously after render, so fromtry/catchperspective everything went successfully. It’s the same story as with any Promise: if we don’t wait for the result, then javascript will just continue with its business, return to it when the promise is done, and only execute what is insideuseEffect(or then of a Promise).try/catchblock will be executed and long gone by then.In order for errors inside
useEffectto be caught, try/catch should be placed inside as well:useEffect(() => {
try {
throw new Error('Hulk smash!');
} catch(e) {
}
}, [])
Play around with this example to see it:
This applies to any hook that uses
useEffector to anything asynchronous really. As a result, instead of just onetry/catchthat wraps everything, you’d have to split it into multiple blocks: one for each hook.Limitation 2: children components. try/catch won’t be able to catch anything that is happening inside children components. You can’t just do this:
const Component = () => {
let child;
try {
child = <Child />
} catch(e) {
}
return child;
}
or even this:
const Component = () => {
try {
return <Child />
} catch(e) {
}
}
Play around with this example to see it:
This is happening because when we write
<Child />we’re not actually rendering this component. What we’re doing is creating a componentElement, which is nothing more than a component’s definition. It’s just an object that contains necessary information like component type and props, that will be used later by React itself, which will actually trigger the render of this component. And it will happen aftertry/catchblock is executed successfully, exactly the same story as with promises and useEffect hook.If you’re curious to learn in more detail how elements and components work, here is the article for you: The mystery of React Element, children, parents and re-renders
Limitation 3: setting state during render is a no-no
If you’re trying to catch errors outside of
useEffectand various callbacks (i.e. during component’s render), then dealing with them properly is not that trivial anymore: state updates during render are not allowed.Simple code like this, for example, will just cause an infinite loop of re-renders, if an error happens:
const Component = () => {
const [hasError, setHasError] = useState(false);
try {
doSomethingComplicated();
} catch(e) {
setHasError(true);
}
}
Check it out in codesandbox
We could, of course, just return the error screen here instead of setting state:
const Component = () => {
try {
doSomethingComplicated();
} catch(e) {
return <SomeErrorScreen />
}
}
But that, as you can imagine, is a bit cumbersome, and will force us to handle errors in the same component differently: state for
useEffectand callbacks, and direct return for everything else.const SomeComponent = () => {
const [hasError, setHasError] = useState(false);
useEffect(() => {
try {
} catch(e) {
setHasError(true);
}
})
try {
} catch(e) {
return <SomeErrorScreen />;
}
if (hasError) return <SomeErrorScreen />
return <SomeComponentContent {...datasomething} />
}
To summarise this section: if we rely solely on
try/catchin React, we will either miss most of the errors, or will turn every component into an incomprehensible mess of code that will probably cause errors by itself.Luckily, there is another way.
React ErrorBoundary component
To mitigate the limitations from above, React gives us what is known as “Error Boundaries”: a special API that turns a regular component into a
try/catchstatement in a way, only for React declarative code. Typical usage that you can see in every example over there, including React docs, will be something like this:const Component = () => {
return (
<ErrorBoundary>
<SomeChildComponent />
<AnotherChildComponent />
</ErrorBoundary>
)
}
Now, if something goes wrong in any of those components or their children during render, the error will be caught and dealt with.
But React doesn’t give us the component per se, it just gives us a tool to implement it. The simplest implementation would be something like this:
class ErrorBoundary extends React.Component {
constructor(props) {
super(props);
this.state = { hasError: false };
}
static getDerivedStateFromError(error) {
return { hasError: true };
}
render() {
if (this.state.hasError) {
return <>Oh no! Epic fail!</>
}
return this.props.children;
}
}
We create a regular class component (going old-school here, no hooks for error boundaries available) and implement
getDerivedStateFromErrormethod — that turns the component into a proper error boundary.Another important thing to do when dealing with errors is to send the error info somewhere where it can wake up everyone who’s on-call. For this, error boundaries give us
componentDidCatchmethod:class ErrorBoundary extends React.Component {
componentDidCatch(error, errorInfo) {
log(error, errorInfo);
}
}
After the error boundary is set up, we can do whatever we want with it, same as any other component. We can, for example, make it more re-usable and pass the fallback as a prop:
render() {
if (this.state.hasError) {
return this.props.fallback;
}
return this.props.children;
}
And use it like this:
const Component = () => {
return (
<ErrorBoundary fallback={<>Oh no! Do something!</>}>
<SomeChildComponent />
<AnotherChildComponent />
</ErrorBoundary>
)
}
Or anything else that we might need, like resetting state on a button click, differentiating between types of errors, or pushing that error to a context somewhere.
See full example here:
There is one caveat in this error-free world though: it doesn’t catch everything.
ErrorBoundary component: limitations
Error boundary catches only errors that happen during React lifecycle. Things that happen outside of it, like resolved promises, async code with setTimeout, various callbacks and event handlers, will just disappear if not dealt with explicitly.
const Component = () => {
useEffect(() => {
throw new Error('Destroy everything!');
}, [])
const onClick = () => {
throw new Error('Hulk smash!');
}
useEffect(() => {
fetch('/bla')
}, [])
return <button onClick={onClick}>click me</button>
}
const ComponentWithBoundary = () => {
return (
<ErrorBoundary>
<Component />
</ErrorBoundary>
)
}
The common recommendation here is to use regular try/catch for that kind of errors. And at least here we can use state safely (more or less): callbacks of event handlers are exactly the places where we usually set state anyway. So technically, we can just combine two approaches and do something like this:
const Component = () => {
const [hasError, setHasError] = useState(false);
const onClick = () => {
try {
throw new Error('Hulk smash!');
} catch(e) {
setHasError(true);
}
}
if (hasError) return 'something went wrong';
return <button onClick={onClick}>click me</button>
}
const ComponentWithBoundary = () => {
return (
<ErrorBoundary fallback={"Oh no! Something went wrong"}>
<Component />
</ErrorBoundary>
)
}
But. We’re back to square one: every component needs to maintain its “error” state and more importantly — make a decision on what to do with it.
We can, of course, instead of dealing with those errors on a component level just propagate them up to the parent that has
ErrorBoundaryvia props orContext. That way at least we can have a “fallback” component in just one place:const Component = ({ onError }) => {
const onClick = () => {
try {
throw new Error('Hulk smash!');
} catch(e) {
onError();
}
}
return <button onClick={onClick}>click me</button>
}
const ComponentWithBoundary = () => {
const [hasError, setHasError] = useState();
const fallback = "Oh no! Something went wrong";
if (hasError) return fallback;
return (
<ErrorBoundary fallback={fallback}>
<Component onError={() => setHasError(true)} />
</ErrorBoundary>
)
}
But it’s so much additional code! We’d have to do it for every child component in the render tree. Not to mention that we’re basically maintaining two error states now: in the parent component, and in
ErrorBoundaryitself. AndErrorBoundaryalready has all the mechanisms in place to propagate the errors up the tree, we’re doing double work here.Can’t we just catch those errors from async code and event handlers with
ErrorBoundaryinstead?Catching async errors with ErrorBoundary
Interestingly enough — we can catch them all with ErrorBoundary! Everyone’s favorite Dan Abramov shares with us a cool hack to achieve exactly that: Throwing Error from hook not caught in error boundary · Issue #14981 · facebook/react.
The trick here is to catch those errors first with
try/catch, then insidecatchstatement trigger normal React re-render, and then re-throw those errors back into the re-render lifecycle. That wayErrorBoundarycan catch them as any other error. And since state update is the way to trigger re-render, and state set function can actually accept a updater function as an argument, the solution is pure magic:const Component = () => {
const [state, setState] = useState();
const onClick = () => {
try {
} catch (e) {
setState(() => {
throw e;
})
}
}
}
Full example here:
The final step here would be to abstract that hack away, so we don’t have to create random states in every component. We can go creative here, and make a hook that gives us an async errors thrower:
const useThrowAsyncError = () => {
const [state, setState] = useState();
return (error) => {
setState(() => throw error)
}
}
And use it like this:
const Component = () => {
const throwAsyncError = useThrowAsyncError();
useEffect(() => {
fetch('/bla').then().catch((e) => {
throwAsyncError(e)
})
})
}
Or, we can create a wrapper for callbacks like this:
const useCallbackWithErrorHandling = (callback) => {
const [state, setState] = useState();
return (...args) => {
try {
callback(...args);
} catch(e) {
setState(() => throw e);
}
}
}
And use it like this:
const Component = () => {
const onClick = () => {
}
const onClickWithErrorHandler = useCallbackWithErrorHandling(onClick);
return <button onClick={onClickWithErrorHandler}>click me!</button>
}
Or anything else that your heart desires and the app requires. No limits! And no errors will get away anymore.
Full example here:
Can I just use react-error-boundary instead?
For those of you, who hate re-inventing the wheel or just prefer libraries for already solved problems, there is a nice one that implements a flexible ErrorBoundary component and has a few useful utils similar to those described above: GitHub — bvaughn/react-error-boundary
Whether to use it or not is just a matter of personal preferences, coding style, and unique situations within your components.
That is all for today, hope from now on if something bad happens in your app, you’ll be able to deal with the situation with ease and elegance.
And remember:
try/catchblocks won’t catch errors inside hooks likeuseEffectand inside any children componentsErrorBoundarycan catch them, but it won’t catch errors in async code and event handlers- Nevertheless, you can make
ErrorBoundarycatch those, you just need to catch them withtry/catchfirst and then re-throw them back into the React lifecycle
Live long and error-free! ✌🏼

Nadia Makarevich
Frontend Architect, coder
Worked on architecture of Jira Frontend monorepo (300 devs, 2mil lines of code), Atlassian Design systems. Currently Founding Engineer in Pyn
Follow on Twitter, LinkedIn, Youtube
Get the latest content by email
More of some useful read
Editor’s note: This article was updated on 13 April 2022 to reflect the most recent information for react-error-boundary, including use of the withErrorBoundary function as a higher order component.
Errors are bound to happen in our applications, whether they’re server-related errors, edge cases, or others. As such, many methods have been developed to prevent these errors from interfering with user and developer experience. In React, one such method is the use of error boundaries.
In this article, we’ll examine React error handling using react-error-boundary. We’ll cover the following:
- Error boundaries in React
- react-error-boundary
ErrorBoundarycomponent- Resetting error boundaries
useErrorHandlerHookwithErrorBoundaryfunction as HOC
Error boundaries in React
Error boundaries were introduced in React 16 as a way to catch and handle JavaScript errors that occur in the UI parts of our component. So error boundaries only catch errors that occur in a lifecycle method, render method, and inside Hooks like useEffect. According to the React documentation, error boundaries do not handle errors in:
- Event handlers
- Asynchronous code (e.g.,
setTimeoutorrequestAnimationFramecallbacks) - Server-side rendering
- Errors thrown in the error boundary itself (rather than its children)
So basically, error boundaries only handle errors in the parts of our code that involve React.
To create an error boundary, we simply have to create a class component and define a state variable for determining whether the error boundary has caught an error. Our class component should also have at least three methods:
- A static method called
getDerivedStateFromError, which is used to update the error boundary’s state - A
componentDidCatchlifecycle method for performing operations when our error boundaries catch an error, such as logging to an error logging service - A
rendermethod for rendering our error boundary’s child or the fallback UI in case of an error
Here’s an example (taken from the React docs) of what our simple error boundary should look like:
class ErrorBoundary extends React.Component {
  constructor(props) {
    super(props);
    this.state = { hasError: false };
  }

  static getDerivedStateFromError(error) {
    // Update state so the next render will show the fallback UI.
    return { hasError: true };
  }

  componentDidCatch(error, errorInfo) {
    // You can also log the error to an error reporting service
    logErrorToMyService(error, errorInfo);
  }

  render() {
    if (this.state.hasError) {
      // You can render any custom fallback UI
      return <h1>Something went wrong.</h1>;
    }

    return this.props.children;
  }
}
react-error-boundary
react-error-boundary is a wrapper around React’s error boundary that allows developers to implement error boundaries in code without building them from scratch. With react-error-boundary, we can simply wrap components where we expect errors with the provided ErrorBoundary component and pass in some extra props to customize our error boundary’s behavior.
In this article, I will work through using react-error-boundary to deal with errors in a React application. Let’s take a look at what the library offers.
ErrorBoundary component
The ErrorBoundary component is the main component available in react-error-boundary. It allows us to implement the typical React error boundary with less code.
Here’s a very basic use case of ErrorBoundary:
function App(){
  ...
  return (
    <ErrorBoundary
          FallbackComponent={OurFallbackComponent}
        >
          <ComponentThatMightThrowAnError/>
    </ErrorBoundary>
  );
}

const OurFallbackComponent = ({ error, componentStack, resetErrorBoundary }) => {
  return (
    <div>
      <h1>An error occurred: {error.message}</h1>
      <button onClick={resetErrorBoundary}>Try again</button>
    </div>
  );
};
In the above component, we simply wrap our component with the ErrorBoundary component and pass in our fallback component to the FallbackComponent prop so that if there’s an error (that can be caught and handled by react-error-boundary), our fallback component will be rendered; otherwise, our component will be rendered.
We also have the fallbackRender prop, which is a render prop-based API for specifying our fallback component in an inline manner. Here’s the above code block using the fallbackRender prop:
function App(){
  ...
  return (
    <ErrorBoundary
      fallbackRender =  {({error, resetErrorBoundary, componentStack}) => (
          <div>
          <h1>An error occurred: {error.message}</h1>
          <button onClick={resetErrorBoundary}>Try again</button>
        </div>
      )}
    >
      <ComponentThatMightThrowAnError/>
    </ErrorBoundary>
  );
}
The ErrorBoundary also has an onError prop, which acts as a listener that is triggered when our error boundary catches and handles an error in its child components. It is from this place that we might choose to log such errors to whatever error logging service we might be using.
function App(){
  ...

  return (
    <ErrorBoundary
      onError = {(error, componentStack) => {
        logToErrorLoggingService(error, componentStack);
      }}
      ...
    >
      <ComponentThatMightThrowAnError/>
    </ErrorBoundary>
  );
}
Resetting error boundaries
react-error-boundary also provides a way for our code to recover from errors caught by our error boundaries. This is done using the reset keys and the resetErrorBoundary function passed to the fallback component.
The best way to explain how this works is to use an example code block taken directly from the React documentation:
function ErrorFallback({error, componentStack, resetErrorBoundary}) {
  return (
    <div role="alert">
      <p>Something went wrong:</p>
      <pre>{error.message}</pre>
      <pre>{componentStack}</pre>
      <button onClick={resetErrorBoundary}>Try again</button>
    </div>
  )
}

function Bomb() {
  throw new Error('💥 KABOOM 💥')
}

function App() {
  const [explode, setExplode] = React.useState(false)
  return (
    <div>
      <button onClick={() => setExplode(e => !e)}>toggle explode</button>
      <ErrorBoundary
        FallbackComponent={ErrorFallback}
        onReset={() => setExplode(false)}
        resetKeys={[explode]}
      >
        {explode ? <Bomb /> : null}
      </ErrorBoundary>
    </div>
  )
}
As we can see from the code above, a state Hook was created and used to determine whether the App component renders a Bomb component that throws an error or an error-safe component. Reset keys were also passed to the error boundary component. These reset keys determine whether the error boundary’s internal state will be reset. If one of the reset keys change during renders, the error boundary’s internal state will be reset.
On the other hand, calling the resetComponent function triggers the onResethandler of our ErrorBoundary component, where we set our explode state value to false. This causes our App component to render an error-safe component.
We also have the onResetKeysChange handler, which is triggered when the value of the reset keys change, causing a reset of the error boundary’s internal state.
useErrorHandler Hook
Another great feature of the react-error-boundary library is that it allows developers to use error boundaries to catch errors that wouldn’t otherwise be caught by traditional React error boundaries. This means we can now use error boundaries to catch errors during API requests, event handlers, and other parts of code where errors could occur.
There are two ways to use the useErrorHandler Hook:
const handleError = useErrorHandler(): then we can call thehandleError(error)and pass in the error object, just like in the example belowuseErrorHandler(error): this is useful when we’re handling the error state ourselves or when we’re getting it from another Hook
This is how we would catch errors in an API request using the first method:
 const App = () => {
  return (
    <ErrorBoundary
      FallbackComponent={CharacterFallback}
    >
      <ComponentWhereErrorMightOccur/>
    </ErrorBoundary>
  );
};


const ComponentWhereErrorMightOccur = () => {
  const handleError = useErrorHandler();
  const callAPI = () => {
    const result = fetch(apiURL)
    .then(
      (response) => response.json(),
      (error) => handleError(error))
    .then((data) => {
      return data["results"];
    });
    return result;
  };
  useEffect(() => {
    (async function () {
      await callAPI();
    })();
  }, []);
  return (
    ...
  );
};
As you can see, all we need to do is pass the error object returned from fetching data from our API to our handleError function, which was returned by the useErrorHandle Hook. This way, our error boundaries are more useful.
withErrorBoundary function as HOC
React-error-boundary allows us to utilize the withErrorBoundary function as a higher order component (HOC) to manage problems within components. This way we can focus on developing components while leaving error handling to the function. Furthermore, this method decreases the amount of code required to implement the component and its tests.
Here’s an example from the react-error-boundary docs for how to use this:
import {withErrorBoundary} from 'react-error-boundary'

const ComponentWithErrorBoundary = withErrorBoundary(ComponentThatMayError, {
  FallbackComponent: ErrorBoundaryFallbackComponent,
  onError(error, info) {
    // Do something with the error
    // E.g. log to an error logging client here
  },
})

const ui = <ComponentWithErrorBoundary />
Conclusion
react-error-boundary enables React developers to reduce the amount of code that must be written and expand their error boundary capabilities to catch other forms of errors that wouldn’t otherwise be identified by regular error boundaries. Learn more about react-error-boundary on GitHub.
Get setup with LogRocket’s modern React error tracking in minutes:
- Visit https://logrocket.com/signup/ to get an app ID.
- Install LogRocket via NPM or script tag.
LogRocket.init()must be called client-side, not server-side. - NPM
- Script Tag
- (Optional) Install plugins for deeper integrations with your stack:
- Redux middleware
- ngrx middleware
- Vuex plugin
$ npm i --save logrocketimport LogRocket from 'logrocket';
LogRocket.init('app/id');
Add to your HTML:<script src="https://cdn.lr-ingest.com/LogRocket.min.js"></script>
<script>window.LogRocket && window.LogRocket.init('app/id');</script>
Get started now