
Перейти к содержанию
Есть две вещи, которые могут вызвать ошибку DHCP. Одна из них это конфигурация на вашем компьютере или устройстве, которая позволяет DHCP-серверу назначать ему IP-адрес. Другая – это настройка самого DHCP-сервера.
Ошибка DHCP означает, что сервер вашей сети, предоставляющий IP-адрес для устройств, не может назначить вашему устройству IP-адрес.
Содержание
- Как происходит ошибка DHCP
- Устранение неполадок, исправить ошибку DHCP
- Исправить настройки DHCP вручную
- Исправить ошибку DHCP с настройками маршрутизатора
Как происходит ошибка DHCP
Поскольку настройка DHCP может разорвать ваше интернет-соединение, ошибка может появляться во многих формах. В конечном счете, основным симптомом является то, что вы не сможете получить доступ к Интернету.
Ошибка DHCP возникает, когда DHCP-сервер или маршрутизатор в сети не может автоматически настроить IP-адрес компьютера или устройства для подключения к сети. Обычно это приводит к ошибке сетевого подключения при попытке доступа в Интернет через веб-браузер.

Что делает ошибку DHCP настолько трудной для устранения, потому что ошибка не всегда включает упоминание о DHCP. Однако вы можете подтвердить, является ли ошибка DHCP причиной вашей проблемы с интернет-соединением , несколькими способами.
Устранение неполадок, исправить ошибку DHCP
Самый простой способ исправить проблемы с интернет-соединением – позволить Windows автоматически исправить ваши интернет-настройки. Если ваши настройки DHCP неверны, Windows попытается их исправить автоматически.
- Для этого просто щелкните правой кнопкой мыши значок сетевого подключения на панели задач Windows и выберите Устранение неполадок.

- Средство устранения неполадок в сети определит все параметры, которые могут вызывать проблемы с подключением к Интернету. Он предоставит вам возможность применить предложенные исправления. Если ваши настройки DHCP вызывают ошибку, они также будут исправлены. Выберите Применить это исправление, чтобы применить предложенные изменения.

- Если автоматические исправления сработали, вы должны увидеть, как работает ваше сетевое соединение. Откройте веб-браузер и попробуйте подключиться к Интернету. Если это все еще не работает, вам нужно будет вручную исправить настройки DHCP.


Исправить настройки DHCP вручную
Если автоматическое устранение неполадок не исправило ваши настройки DHCP, вы можете сделать это вручную.
- Выберите меню «Пуск» и выберите значок « Настройки» . Откроется окно настроек Windows. Выберите Сеть и Интернет в окне настроек Windows.

- Откроется Статус сети окно. Прокрутите вниз и выберите Изменить параметры адаптера.

- Это отобразит все сетевые адаптеры, которые настроены на вашем компьютере. Щелкните правой кнопкой мыши активный адаптер и выберите « Свойства».

- В окне «Свойства Wi-Fi» выберите « Протокол Интернета версии 4» и выберите « Свойства».
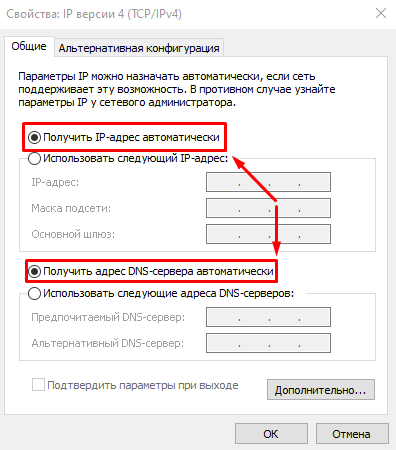
- Если параметр Получить IP-адрес автоматически не выбран, выберите его.
- Выберите OK и Закрыть, чтобы сохранить новые настройки. Перезагрузите компьютер.


Этот параметр позволяет DHCP-серверу или маршрутизатору в сети назначать компьютеру следующий доступный IP-адрес в сети.
Если вы заметили, что параметр Получить IP-адрес автоматически уже выбран, ошибка DHCP может вообще не быть вызвана сетевыми настройками вашего компьютера. Это может быть вызвано настройками вашего маршрутизатора.
Исправить ошибку DHCP с настройками маршрутизатора
В типичной корпоративной сети это DNS-сервер, который управляет IP-адресами устройств в сети. Все настройки DHCP управляются вашим ИТ-отделом, поэтому, если у вас возникают проблемы с сетевым подключением, вам следует обратиться в свою службу технической поддержки.
Однако в домашней сети настройки DHCP в вашем маршрутизаторе управляют IP-адресами устройств в сети. Если вы видите ошибки DHCP, вы должны проверить настройки маршрутизатора.
Просмотров 32к.
Обновлено 16.07.2019
Если не удалось получить IP-адрес от DHCP сервера и «Диагностика неполадок» не помогла, перезагрузите роутер, проверьте или сбросьте настройки подключения. Как это сделать и зачем нужен DHCP-сервер, объясняем далее.
- Что такое DHCP
- Почему возникает ошибка типа «Не удалось получить IP-адрес»
- Как быть, если не удалось получить IP-адрес от DHCP сервера: решение проблемы
- Перезагрузка роутера
- Включение DHCP на роутере
- Фильтрация по MAC-адресу
- Проверка «DHCP-клиента»
- Сброс настроек
- Подводим итоги
DHCP – это протокол, который назначает индивидуальный IP-адрес каждому устройству, подключенному к сети. IP выступает в качестве идентификатора для приема и передачи данных от маршрутизатора на определенный ПК, смартфон или игровую консоль. DHCP используется в любом сетевом оборудовании:
- Если стационарный компьютер, ноутбук или другая техника подключена к интернету напрямую, то получение IP-адреса происходит от DHCP-сервера провайдера.
- В локальной или Wi-Fi сети за раздачу IP отвечает DHCP маршрутизатора, роутера или точки подключения.
К примеру, к домашней Wi-Fi-сети подключено 3 устройства, тогда каждое получит собственный IP:
- ПК – 192.168.0.100;
- смартфон – 192.168.0.101;
- принтер – 192.168.0.102.
Зная адрес каждого девайса, можно создать общую сеть для передачи данных, просмотра видео или отправки документа на печать. При этом роутер для доступа в интернет получает индивидуальный IP от DHCP-сервера провайдера.
DHCP также называют динамическим IP-адресом. То есть сервер назначает свободный идентификатор для вышедшего в сеть девайса.
Почему возникает ошибка типа «Не удалось получить IP-адрес»
Ошибка типа «Не удалось получить IP-адрес» появляется из-за отсутствия DHCP-сервера, его неправильной настройки или отсутствия свободных для подключения адресов. Если провайдер предоставляет только фиксированный IP, он же статичный, то получить его с включенными DHCP не получится.
К другим причинам относится:
- неправильно указанный DNS;
- подключение через неактивный VPN или прокси;
- проблемы на стороне провайдера или владельца сайта.
Данные о настройке статического IP провайдер указывает в договоре.
Как быть, если не удалось получить IP-адрес от DHCP сервера: решение проблемы
Рассмотрим ключевые неисправности и способы их решения.
Перезагрузка роутера
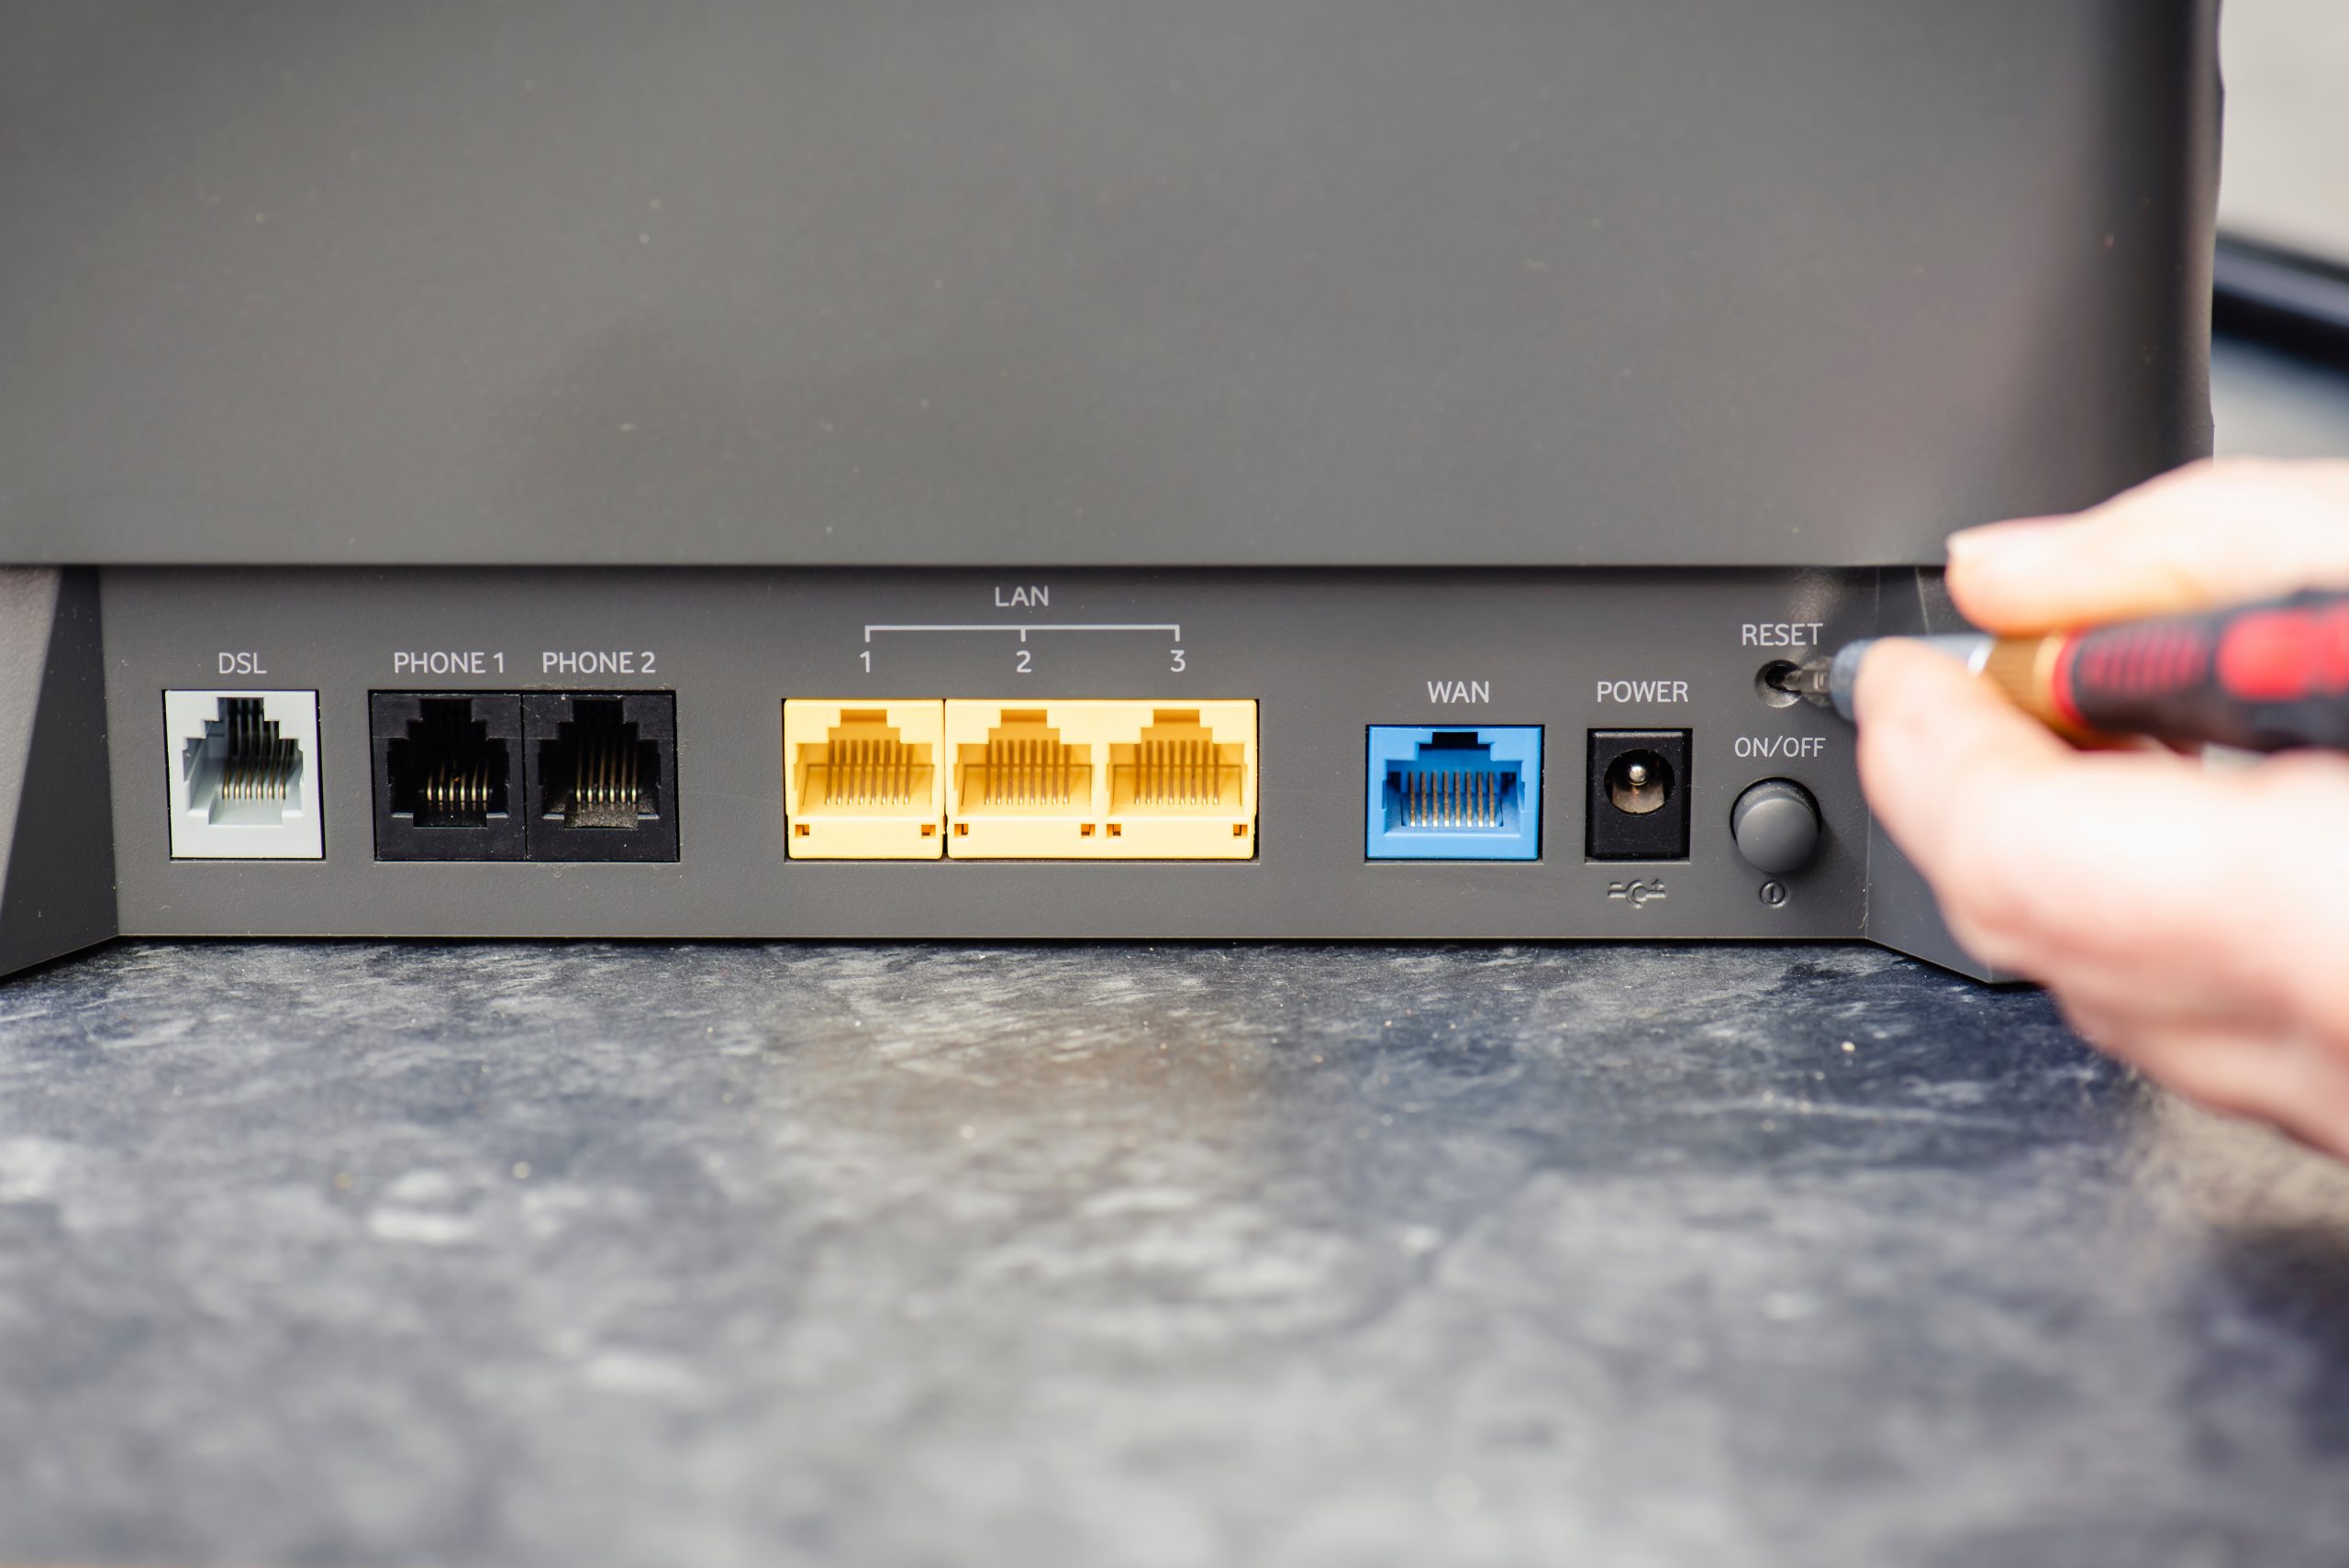
Прежде чем сбрасывать настройки, перезагрузите роутер, отключив его от сети на 30-60 секунд. Не используйте кнопку RESET на корпусе, в зависимости от модели она приводит к возвращению устройства к заводским параметрам.
Вместе с роутером перезагрузите другие устройства.
Включение DHCP на роутере
Неправильная настройка или сброс параметров приводят к отключению протокола. Чтобы активировать его снова:
- Зайдите в настройки роутера с помощью IP-адреса и пароля, указанного снизу корпуса. Если таковые не указаны, данные для авторизации можно найти в интернете по названию модели.
- Откройте раздел «DHCP-сервер». Он может находиться как в основном меню, так и во вкладках «Сети», «Сегменты», «Интерфейсы LAN» или «Wi-Fi».
- Напротив названия протокола поставьте галочку на «Включить». Перед выходом из настроек не забудьте «Применить» новые параметры.

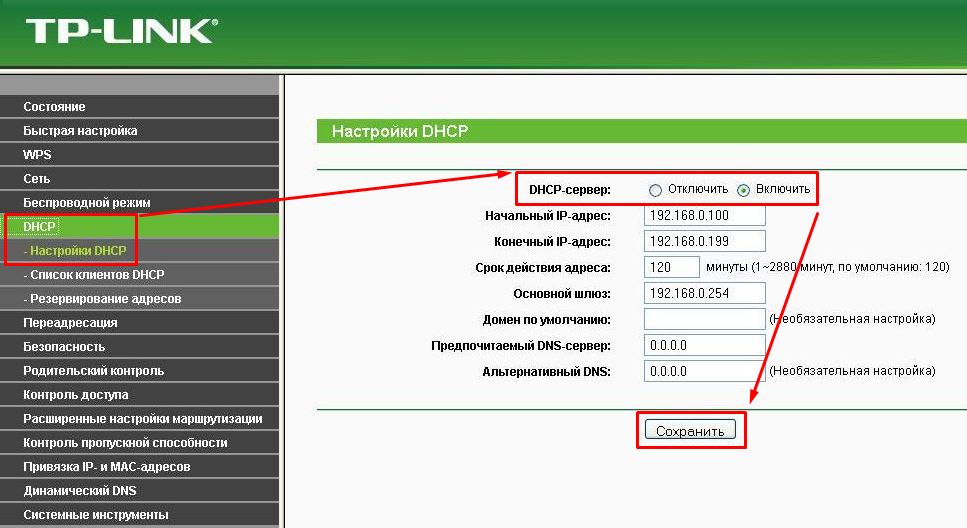
В этом же разделе можно назначить диапазон выдаваемых адресов и время их действия.
Фильтрация по MAC-адресу
MAC-адрес – этой физический идентификатор, который получает любая техника с доступом в сеть. Поскольку каждый МАК уникален, то на некоторых прошивках роутеров можно создать белый список устройств, которые могут к нему подключаться. Если девайса нет в перечне, получить IP не удастся. Чтобы это исправить:
- Зайдите в настройки роутера, как описано выше.
- В разделе «Сети» откройте «Фильтрацию по MAC-адресу» и отключите ее.
Не забудьте «Сохранить» или «Принять» новые настройки.
Проверка «DHCP-клиента»
Убедившись, что с параметрами роутера все отлично, переходим к ПК на Windows:
- Откройте меню «Пуск», в списке разверните «Служебные – Windows» и выберите «Панель управления».
- Перейдите в «Администрирование». Если на «Панели управления» нет нужного элемента, измените тип просмотра и вместо «Категории» выберите «Крупные значки» либо «Мелкие значки».
- В «Администрировании» дважды клацните левой кнопкой мыши по ярлыку «Службы».
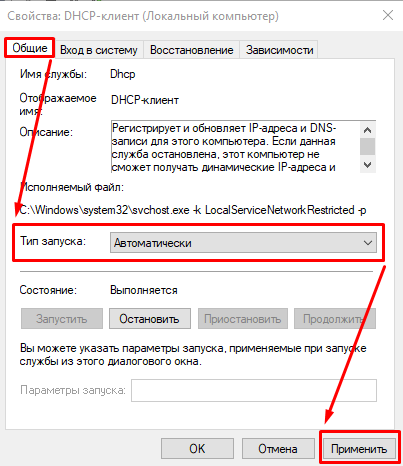
- Откройте «DHCP-клиент».
- Перейдите во вкладку «Общие», в «Типе запуска» установите «Автоматически» и нажмите «Применить».

Следующий шаг:
- Вернитесь в главное окно «Панели управления» и откройте «Центр управления сетями и общим доступом».
- В «Просмотре активных сетей» клацните по подключению для выхода в сеть – оно находится напротив названия сети в строчке «Подключения».
- В развернувшемся окне выберите «Свойства».
- Отметьте «IP версии 4 (TCP/IPv4)» и снова нажмите «Свойства». В «Общих» должны быть активны «Получить IP/DNS-адрес автоматически».

На смартфонах по умолчанию включено подключение к динамическим IP.
Сброс настроек
Из-за ошибок, накопившихся в ходе работы, роутер начинает функционировать неправильно. Выходом из сложившейся ситуации станет сброс настроек к заводскому состоянию. После может понадобиться повторная настройка подключения к интернету с помощью логина, пароля и типа подключения, указанного в договоре с провайдером.
Первый способ сброса заключается в удержании кнопки RESET на корпусе устройства на протяжении 3-10 секунд. После этого световые индикаторы должны моргнуть, а устройство перезагрузиться.
Второй вариант:
- Зайдите в настройки Wi-Fi.
- Перейдите в «Систему» и выберите «Сброс настроек».
Перезагрузка в таком случае произойдет автоматически.
Подводим итоги
Без активного DHCP-сервера устройство не сможет получить IP-адрес и выйти в сеть. Если вышеописанные советы не помогли, обратитесь к провайдеру. Не исключено проведение технических работ или повреждение магистральной линии.
DHCP Error: What It Is and How to Fix It
Troubleshoot DHCP errors on Windows
Updated on December 28, 2021
A DHCP error means the server on your network that provides an Internet Protocol address for devices isn’t able to assign your computer an IP address. Because the DHCP setting can break the internet connection, the error can appear in many forms, but the end result is that you can’t access the internet.
Instructions in this article apply to all Windows 10 PCs.
Causes of DHCP Errors
Two things can cause a DHCP error. One is the configuration on the computer or device that allows a DHCP server to assign it an IP. The other is the configuration of the DHCP server.
DHCP errors occur when the DHCP server or router on a network cannot automatically adjust the device’s IP address to join the network. This results in a network connection error when you access the internet with a web browser.
What makes DHCP errors so difficult to troubleshoot is that the error message doesn’t always include any mention of DHCP.
How to Fix DHCP Errors
Try these steps until the DHCP error is resolved:
-
Run the Windows Network Troubleshooter. The easiest way to fix internet connection issues is by letting Windows automatically fix the internet settings. Right-click the network connection icon in the Windows taskbar and select Troubleshoot problems. The network troubleshooter identifies any settings that may cause an internet connection problem. If the DHCP settings caused the error, select Apply this fix to apply any suggested changes.
-
Check the DHCP adapter settings. The DHCP server or router on the network should automatically assign the computer an IP address by default. Still, this option can be disabled, so look in the network adapter settings to make sure it’s enabled.
-
Check the DHCP router settings. On a home network, DHCP settings in the router manage the IP addresses of devices on the network. Verify that the DHCP beginning and ending addresses match the gateway address.
-
Contact IT support. On a typical corporate network, a DNS server manages the IP address of devices on the network. All DHCP settings are managed by an IT department. When you have network connection issues, contact your IT help desk.
FAQ
-
How can I fix the DHCP error on my Kindle Fire HDX?
The easiest way to fix this is to change the IP type from dynamic to static. Go to Settings > WiFi > press and hold the network you are connected to and select Modify Network. Select Show advanced > Set IP Settings to Static.
-
How do I fix a DHCP failure on my Chromebook?
The most common reason for a DHCP failure is an outdated OS on your Chromebook. To check for updates, go to Time > Settings > About Chrome OS > Check for Updates.
Thanks for letting us know!
Get the Latest Tech News Delivered Every Day
Subscribe
Dynamic Host Configuration Protocol, or DHCP, eases the task of administering IP addresses for network endpoints by centralizing address allocation configuration.
Troubleshooting DHCP can be challenging and requires a basic knowledge of the protocol and how networks function. Below are some common DHCP problems and how to fix them.
DHCP server configurations
There are two basic types of DHCP server configurations:
- centralized server-based DHCP servers in enterprise networks; and
- DHCP servers running on local network devices.
1. Centralized server-based DHCP server in an enterprise network
When an endpoint needs an IP address, it broadcasts its DHCP packets. Network devices then relay those requests across the network to the enterprise DHCP server.
Network devices must have correct configurations to properly handle the requests and responses. If something is misconfigured, endpoint devices will not obtain a valid address.
2. DHCP server running on a local network device
The second type of DHCP configuration is what small remote branches or in-home networks frequently use. The DHCP server runs on a local network device, such as a wireless router, that connects the site to the internet.
The advantage of this configuration is the DHCP server is local to the site and can continue to function even if connectivity to the enterprise network fails. This enables users at these locations to access cloud-based SaaS applications. However, the proliferation of internet-enabled devices — such as desktops, laptops, and digital assistants, as well as mobile, home automation and IoT devices — could easily cause a local server to run out of addresses in its default configuration, which might have only 50 or 100 addresses available.
How do you diagnose and fix DHCP errors?
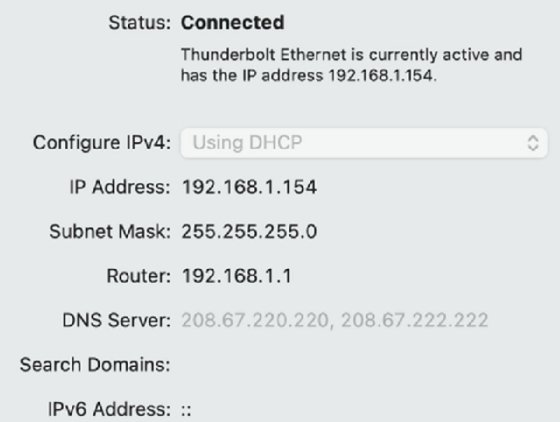
The first step in diagnosing DHCP is to examine your device’s IP address and network settings. You’ll need to verify it is using DHCP and not a manually configured address.
If it is configured to use DHCP and has an IP address, note the address, subnet mask, default router and DNS servers. The image below shows this information for a MacBook Pro.
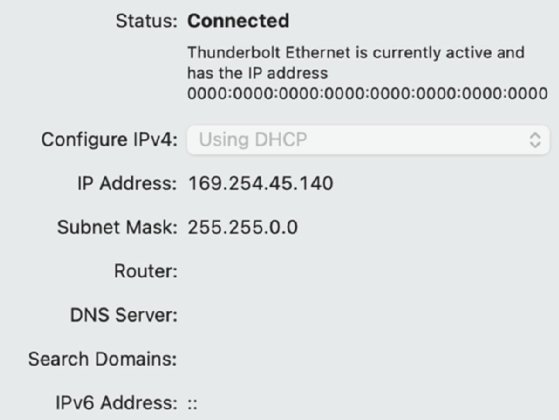
If a device is unable to get an IP address via DHCP, it will use an automatic private IP address from the address range 169.254.x.y, as shown in the image below.
The following reasons could cause DHCP errors and compel a device to use a self-assigned IP address:
- the DHCP server failed;
- all available addresses have been allocated;
- the network to the server failed;
- a configuration change affected DHCP packet relay;
- a configuration mistake happened during new installation; or
- media access control (MAC) address filtering is enabled, and the new device isn’t included in the server’s configuration.
The most common reasons for this error include DHCP server failure, no available addresses and network failure.
Error 1. No address assigned
The first DHCP error is no assigned IP address. The most common reasons for this error include DHCP server failure, no available addresses and network failure. To start diagnosis, verify the following items:
- the DHCP server is functional;
- the DHCP server hasn’t run out of addresses; and
- there isn’t a network failure.
If any devices in the affected subnet can get or renew their addresses, then the server and the network are functioning properly. Check that the DHCP server’s address pool still has addresses available.
You should also check for a network problem in the part of the network where the failing device is connected. It could be an incorrect switch port configuration, or perhaps the switch for your device has disconnected from the rest of the subnet. If your device is portable, move it to a good network connection, and try to get a DHCP address. A failure at this point indicates something is incorrect in the device configuration itself, not in the network or with the DHCP server.
For a new installation where no devices are working correctly, you should investigate network configuration mistakes that prevent the DHCP relay operation from working correctly. Also, check for MAC address filtering, which isn’t used often, but should be verified.
The most challenging step will likely be checking network connectivity, simply because a variety of causes could cause a failure. You can start the diagnostic process by assigning a manual address to one device. Use that address to verify basic network connectivity to the DHCP server with ping and traceroute. If that works, then you’ll need to check that the network device configurations are set to relay DHCP packets and that no blocking firewall rules exist. Look for simple things like typographical mistakes in addresses.
Be advised that some malware can create a denial-of-service attack by making DHCP requests until all addresses have been consumed. Each request uses a different MAC address, so you can examine the switch forwarding table to find the port on which many MAC addresses have been detected. This enables you to identify the infected device.
Error 2. Address is assigned but no connectivity
The next DHCP error is when an address is assigned but the device can’t communicate with other devices. In this case, the following reasons could cause a DHCP error:
- IP address conflict, where another device is using the same address;
- a rogue DHCP server hands out same addresses; or
- a rogue DHCP server hands out addresses outside the address range.
For conflicting IP addresses, you’ll need to track down both devices by finding the MAC address of both devices. You’ll then need to find the switch port to which each device is connected. A good network management system can help you with this process. One of the devices may have a manually assigned address from the DHCP address range. A best practice is to reserve separate address ranges for devices with fixed addresses.
In another case, a rogue DHCP server may hand out addresses from the same address range or a different address range. You may need to conduct network sleuthing with packet capture tools to identify the location of rogue servers.
The key symptom of a rogue DHCP server is the endpoints always get their addresses via DHCP. The addresses can be from the same range, or the rogue server may be using a different range than what’s assigned to the subnet. In either case, you’ll need to track down the rogue server and remove it from the network or disable DHCP on it.
Some network equipment vendors have a feature to detect rogue DHCP servers, frequently called DHCP snooping. You may be able to use it to identify and suppress the action of undesirable DHCP servers.
Error 3. Address is valid but is missing DHCP options
The next DHCP error is where an address is valid but the DHCP options are not properly configured. DHCP options pass additional information to the endpoint to do things like identify a default gateway (option 3), make DNS requests (option 6) or identify a Trivial FTP server from which to download a device configuration (option 66).
The exact troubleshooting steps vary by the endpoint device type and its function. For example, VoIP phones need multiple DHCP options set. You’ll need to refer to vendor documentation for configuration guidance.
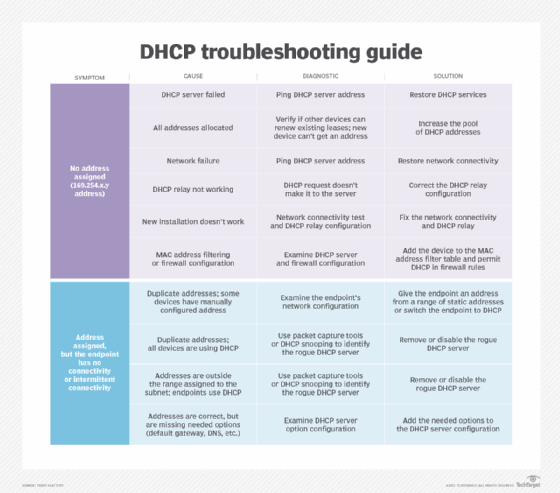
DHCP troubleshooting guide
Here is a quick DHCP troubleshooting guide that covers the common errors and their causes.
Conclusion
DHCP troubleshooting is challenging because it involves several components: the endpoint device, its network connection, the network devices — like routers, switches, access points and firewalls — and the DHCP server itself.
As with all network troubleshooting, a methodical approach works best. Gather facts, and perform tests that verify whether a component is working or not. In rare cases, you may need to use packet captures to verify that DHCP exchanges are happening or to identify rogue DHCP servers.
There is no doubt about it that these days we are all at least somewhat reliant on the internet to improve the quality of our daily lives. We need it to manage our incomings and outgoings, order goods and supplies, work from home, and entertain us once the day is done.
So, when something goes wrong, and this vital service is taken from us, it can feel a bit like we are missing a limb. In fact, even if an area is a few minutes without a solid connection, the Internet Service Provider’s (ISP’s) phones begin to ring furiously.
So, when there are issues with your DHCP, it is understandable that frustration can begin to rise. However, this is an easy enough problem to remedy at home if you know how it is done.
Yes, the problem may sound like it is incredibly complex and needing a professional to remedy it, but there are a few things you can do from home to fix it.
What is a DHCP?
The acronym DHCP stands for Dynamic Host Configuration Protocol.
Admittedly, this sounds like an incredibly complex device that might seem tough enough to understand.
However, once you know what it does, it is then easier to diagnose problems with it and get it working again.
Effectively, all it does is manage your network and automate the process of configuring devices on IP networks.
Because it is widely supported and relatively easy to use (and diagnose problems with), it is the default protocol used by nearly all routers worldwide.
Without a DHCP, any device that needs an IP address to connect to the internet needs to be given a static address by a network administrator.
These days, most of the user prefer not to use a wired connection to the internet. Though internet speeds can suffer a little, we can still enjoy a high standard of service using a wireless setup that we can use in every room of the house.
This makes choosing the right modem or router for the job an important factor for wireless internet users. After all, quality is paramount as internet signals are received and distributed through them.
In recent times, more and more people are beginning to report a problem with ASUS modems in particular. They report that while attempting to connect to the internet, they are instead getting an error message that reads: “your ISP’s DHCP does not function properly.”
But, don’t worry too much if you are getting this same message with a different router brand. The issue is caused by the same thing and thus is fixed in the same way.
Below, we are going to show you all possible options to diagnose and fix the problem. Suppose you are not all that ‘techy’ by nature, don’t lose heart. Each and every one of these fixes is doable by even the most novice enthusiasts among us.
It is also worth noting that none of these fixes will require you to take anything apart or make any risky moves that could potentially damage your gear. So, without any further ado, let’s get into it!
1) DHCP Query Frequency
The first and foremost cause of issues with the DHCP is that it is very easy to make a mistake or two while you are setting up the system.
Regardless of who set it up, the main error that leads to issues is really easy to remedy.
All you need to do to remedy it is to change the DHCP query frequency from aggressive to normal.
When the router is in aggressive mode, it will still work just fine. But, if you then change the router to normal mode, the router will then resend the DHCP request in 5 minutes or less.
With a bit of luck, this will recalibrate the DHCP, and it should start working the way it should again.

2) SH3
Normally, SH3’s are used in order to boost the strength of the internet signal in your home.
However, what a lot of people don’t take into account is that default IPs have different SH3 values.
This default value is 192.168.100.1. It is absolutely vital to make sure that this value remains the same when tinkering with your system.
It is worth mentioning that your WAN gateway address will have a value that vaguely resembles this one. Try not to mix them up.
So, make sure that you have the right numbers and manually input them if they are incorrect. This then should resolve the issue for you.
3) Master Reset the Modem
If neither of the above has worked out for you, the next logical step is to go for a master reset of the modem itself.
Like most electronic and communication devices, hard resets are great for resolving any and all outstanding issues.
In fact, they have such a high rate of success that IT professionals often joke that they would be out of a job if people just did this before calling.
Below, we are going to run you through how to perform a master reset safely:
- First, unplug the router from the wall and use a pin (if needed) to press in and hold the reset button for a minimum of 15 seconds
- As soon as the power indicator light starts flashing, the reset will be done, and you can let go of the button
- Reconnect to the network and go to the router setup page
- Put your name and password in as “admin” and then hit the go or continue button
- Next, make a new password and click the “Next” button
- Then, you will have to set the network names for both frequencies, 2.4GHz, and 5GHz
- As soon as you connect to the internet, you should notice that the “DHCP does not function properly” issue should have been resolved.
If this fix hasn’t worked for you, don’t worry about it too much. We still have a couple of suggestions to go.
4) Provisional Signals
Unfortunately, this next fix is not one that you can do entirely independently – but it does help to know the way to ask for assistance so that they can check the right thing.
So, you will need to get in touch with your service provider and ask them to send a “provisioning signal.”
These signals are pretty magical things as they perform a type of reset on your device that resets your dynamic IP address and the DHCP. This should ensure that the error doesn’t happen again if it works.

5) Check the Resolution Settings
If at some stage you decided to update your resolution settings and changed the value from 380.68-4 to 380.69 (or anywhere from 380 to 382), it can cause this DHCP error.
We recommend checking your settings to see if this is the case. Once you have confirmed this, the next step is to perform a factory reset.
By doing this, you will effectively restore all of the original settings, thus bringing it back to a time when it worked perfectly.