

![]() pc-porta » Сб окт 12, 2019 12:07 pm
pc-porta » Сб окт 12, 2019 12:07 pm


 Samsung CLX-4195fw ошибка a1-4111 или a1-4112
РЕШЕНИЕ:
1) снимаете крышку правую боковую если стоять лицом к принтеру.
2) с лева вверху есть электро-магнит он притягивает железную площадку. На электро-магните и на железной площадке есть приклеенная резинка.
3) а дальше – классика. Удаляем резинки и на якорь электро-магнита 2 слоя термо-усадочной трубки. И делаем потуже пружинку или ставим новую/бушную потуже. 

то-же самое у ми сдеся :
https://yadi.sk/i/aRaB63_Zs1hM8w
I solved that error message with the help of Jack and his YouTube instruction: https://youtu.be/Eivc3FAYNMM
worked for my Samsung CLP-680
Dear Jack, BIG thank you from Germany! You saved world resources! It perfectly worked for my Samsung CLP-680 printer. I just used the same cushion and had to move it back to the right position only. BIG thank you!
4. Alignment and Troubleshooting
► Error Code
A1-4111
A1-4112
► Error message
Error #A1-4112 Call for service
► Symptom
The transfer roller can’t move the engage/disengage position.
► Troubleshooting method
1) Turn the machine off then on. If the error persists, turn the machine off again.
2) Remove the right cover.
3) Check if the connection between main board and Feed drive unit are correct.
4) If the connection is OK, replace the step motor of the Feed drive unit.
5) If the problem persists, replace the main board.
► Error Code
A1-4310
► Error message
Error #A1-4310 Call for service
► Symptom
The motor for ITB unit does not operate normally.
► Troubleshooting method
1) Turn the machine off then on. If the error persists, turn the machine off again.
2) Remove the right cover.
3) Check if the connection between main board and the main drive unit are correct.
4) If the connection is OK, replace the main drive unit.
5) If the problem persists, replace the main board.
4-29
Copyright© 1995-2013 SAMSUNG. All rights reserved.
 07:53
07:53
Samsung CLP 415N ошибка A1-4111 / Samsung CLP-415N error A1-4111
 01:41
01:41
Samsung CLP-415N A4 Colour Laser Printer
 09:12
09:12
Samsung CLP-415NW,CLX- 4195FW vs Brother 3075cw,9325cw *Overview*
 07:15
07:15
SAMSUNG Color Laser Printer Toner Refill — CLP-415NW C1810W
 11:20
11:20
Reset Samsung CLP 680 415 — fix firmware cip resoftare no more chips necessary
 07:38
07:38
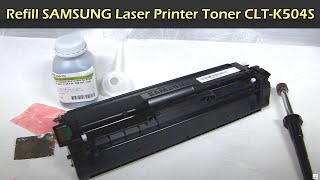
Samsung Laser Printer Toner Refill CLT-K504S for CLP-415NW C1810W
 01:52
01:52
Papierstau beim Samsung CLP 680 DW / CLX 6260 beheben
 04:14
04:14
How to flash firmware on printer SAMSUNG CLP-415NW
211
3.
Полезные сведения о меню настройки
Сеть
Некоторые меню могут не отображаться на дисплее в зависимости
от параметров или моделей. Это значит, что данные функции
недоступны для этого устройства (см. «Обзор меню» на стр. 30).
Чтобы изменить параметры меню:
•
Нажмите кнопку
(
Меню) > Сеть на панели управления.
Эту функцию можно настроить в приложении SyncThru™ Web
Service.
Откройте браузер на компьютере, подключенном к сети, и
введите IP-адрес устройства. Когда откроется окно SyncThru™
Web Service,
щелкните Настройки > Параметры сети (см.
«
Настройка сообщения SyncThru™ Web Service» на стр. 245).
Параметр
Описание
TCP/IP (IPv4)
Позволяет выбрать нужный протокол и установить
параметры сетевой среды (см. «Установка IP-
адреса» на стр. 148).
В этом меню пользователь может задать
множество параметров. Если вы
недостаточно знакомы с процессом
настройки, оставьте все значения, как есть,
или обратитесь к системному
администратору.
TCP/IP (IPv6)
Позволяет настроить протокол IPv6 для сетевого
подключения (см. «Конфигурация IPv6» на стр.
160).
Скор. Ethernet
Настройка скорости передачи данных по сети.
После изменения этого параметра
выключите и включите питание.
802.1x
Выбор аутентификации пользователя для
передачи данных по сети. Для получения
дополнительной информации обращайтесь к
администратору сети.

Сеть
212
3.
Полезные сведения о меню настройки
Беспроводной
Этот параметр позволяет настроить для
использования беспроводную сеть (см.
«
Настройка беспроводной сети» на стр. 163).
Сброс настроек
Восстановление сетевых настроек по умолчанию.
Включите и выключите питание.
Конфигур. сети
В данном списке отображаются сведения о
сетевом подключении и конфигурации устройства
(
см. «Печать отчета о конфигурации сети» на стр.
148).
Включение сети
Включение или выключение сетевого интерфейса
Ethernet.
После изменения этого параметра
выключите и включите питание.
Включение HTTP
Включение или отключение сервиса SyncThru™
Web Service.
После изменения этого параметра
выключите и включите питание.
Параметр
Описание
WINS
Вы можете настроить сервер WINS.
WINS(Windows Internet Name Service)
используется в ОС Windows.
После изменения этого параметра
выключите и включите питание.
SNMP V1/V2
Вы можете настроить SNMP (Simple Network
Management Protocol).
Администратор может
использовать SNMP для наблюдения за сетью и
управления ею.
SNTP
Вы можете настроить SNTP (Simple Network Time
Protocol) settings. SNTP
синхронизирует
системное время компьютера через Интернет
(NTP),
чтобы при обмене данными не было
разницы во времени.
UPnP(SSDP)
Вы можете настроить протокол UPnP (SSDP).
После изменения этого параметра
выключите и включите питание.
MDNS
Вы можете настроить параметры mDNS (Multicast
Domain Name System).
Параметр
Описание

Сеть
213
3.
Полезные сведения о меню настройки
SetIP
Вы можете настроить параметры SetIP.
SLP
Вы можете настроить параметры SLP (Service
Location Protocol).
Этот протокол позволяет хост-
приложениям находить службы в локальной сети
без предварительных настроек.
После изменения этого параметра
выключите и включите питание.
Параметр
Описание

214
3.
Полезные сведения о меню настройки
Управление USB
Некоторые меню могут не отображаться на дисплее в зависимости
от параметров или моделей. Это значит, что данные функции
недоступны для этого устройства (см. «Обзор меню» на стр. 30).
Если вы хотите воспользоваться этой функцией, вам необходимо
подключить устройство памяти USB в разъем USB принтера.
Чтобы изменить параметры меню:
•
Нажмите кнопку
(
Меню) > Управление USB на панели
управления (см. «Использование флэш-накопителя USB» на стр.
56).
Элемент
Описание
USB-
печать
Хранящиеся на флэш-накопителе USB файлы
можно выводить непосредственно на печать.
Управ. файлами
Файлы изображений, хранящиеся на накопителе
USB,
можно удалять по одному либо удалить все
сразу путем форматирования устройства.
Провер. место
Можно узнать объем свободной памяти, доступной
для сохранения документов.

215
3.
Полезные сведения о меню настройки
Управ. задан.
Некоторые меню могут не отображаться на дисплее в зависимости
от параметров или моделей. Это значит, что данные функции
недоступны для этого устройства (см. «Обзор меню» на стр. 30).
Чтобы изменить параметры меню:
•
Нажмите кнопку
(
Меню) > Управ. задан. на панели управления.
Элемент
Описание
Текущее задан.
В этом меню отображаются задания печати,
ожидающие своей очереди.
Защищ. задание
В этом меню отображаются задания печати,
сохраненные на диске.
Сохран.задан.
В этом меню отображаются задания печати,
сохраненные на диске.
Политика
Если память уже содержит файл с таким же
именем, как и имя нового файла, этот файл можно
будет переименовать или перезаписать.

4.
Специальные
функции
В это главе описываются специальные функции печати.
•
Поправка на высоту
217
•
Ввод различных символов
218
•
Функции принтера
220
•
Использование дополнительных устройств.238
•
Сведения, приведенные в этой главе, в основном относятся к операционной
системе Windows 7.
•
В некоторых моделях для перехода к меню нижнего уровня может потребоваться
нажать кнопку
OK
.

217
4.
Специальные функции
Поправка на высоту
На качество печати влияет атмосферное давление, которое
определяется высотой расположения устройства над уровнем моря.
Следующие инструкции помогут добиться наилучшего качества
печати.
Перед тем, как задать значение высоты, необходимо определить
высоту расположения устройства над уровнем моря.
1
Высоко 3
2
Высоко 2
3
Высоко 1
4
Обычная
Высоту можно настроить в меню Параметры устройств программы
Samsung Easy Printer Manager program.
•
Для пользователей ОС Windows и Mac: настройка в меню
Samsung Easy Printer Manager >
(
переход в расширенный
режим) > Параметры устройств, см. «Параметры устройств» на
стр. 251.
•
Если ваше устройство подключено к локальной сети, можно
настроить высоту над уровнем моря с помощью службы
SyncThru™ Web Service (
см.
«
Настройка сообщения SyncThru™
Web Service»
на стр. 245).
•
Высоту можно также настроить с помощью дисплея в меню
Настр. сист. (см.
«
Основные параметры устройства» на стр.
33).
0
4,000 m
(13,123 ft)
3,000 m
(9,842 ft)
2,000 m
(6,561 ft)
1,000 m
(3,280 ft)
4
3
2
1

Ввод различных символов, Ввод буквенно-цифровых символов, Буквы и цифры клавиатуры
Страница 218
- Изображение
- Текст
218
4.
Специальные функции
Ввод различных символов
Только модели CLP-68xND Series/CLP-68xDW Series.
При выполнении различных задач может потребоваться ввод имен и
номеров.
1
Ввод буквенно-цифровых символов
Нажимайте ее, пока нужный символ не появится на дисплее.
Например, чтобы ввести букву O, нажимайте кнопку «6» с буквами
MNO.
Каждый раз при нажатии кнопки «6» на дисплее по очереди
появляются символы «M», «N», «O» (в верхнем и нижнем регистре) и,
наконец, «6». Для поиска нужной буквы см. «Буквы и цифры
клавиатуры» на стр. 218.
•
Для ввода пробела дважды нажмите клавишу 1.
•
Чтобы удалить последнюю цифру или символ, нажмите на
стрелку.
2
Буквы и цифры клавиатуры
•
В зависимости от модели и комплектации набор специальных
символов устройства может отличаться от иллюстраций в
данном руководстве пользователя.
•
В зависимости от выполняемого задания некоторые значения
могут быть недоступны.
Клав
иша
Назначенные цифры, буквы и символы
1
@ / . ’ 1
2
A B C a b c 2
3
D E F d e f 3
4
G H I g h i 4
5
J K L j k l 5
6
M N O m n o 6
7
P Q R S p q r s 7
8
T U V t u v 8
9
W X Y Z w x y z 9
0
& + — , 0

Ввод различных символов
219
4.
Специальные функции
*
* % _ ~ ! # $ ( ) [ ]
(
Эти символы доступны для ввода при сетевой авторизации)
#
# = | ? » : { } < > ;
(
Эти символы доступны для ввода при сетевой авторизации)
Клав
иша
Назначенные цифры, буквы и символы

Функции принтера, Изменение стандартных параметров печати, Выбор устройства по умолчанию
Страница 220
- Изображение
- Текст
220
4.
Специальные функции
Функции принтера
•
Основные функции печати описаны в
Краткое руководство (см.
«
Основные операции печати» на стр. 49).
•
Функции и комплектация устройств могут различаться в
зависимости от модели (см. «Функции различных моделей» на
стр. 8).
3
Изменение стандартных параметров печати
1
В ОС Windows войдите в меню Пуск.
2
Выберите Панель управления > Устройства и принтеры.
3
Щелкните значок устройства правой кнопкой мыши.
4
Выберите Настройка печати.
Если элемент Настройка печати помечен значком ▶, то для этого
принтера можно выбрать другие драйверы.
5
Задайте нужные параметры на каждой вкладке.
6
Щелкните ОК.
Изменить настройки для всех заданий печати можно в окне
Настройка печати.
4
Выбор устройства по умолчанию
1
В ОС Windows войдите в меню Пуск.
2
Выберите Панель управления > Устройства и принтеры.
3
Выберите устройство.
4
Щелкните правой кнопкой мыши по устройству и выберите
пункт Назначить принтером, используемым по умолчанию.
Если элемент Настройка печати помечен значком ▶, то для этого
принтера можно выбрать другие драйверы.

Комментарии
4. Alignment and Troubleshooting
► Error Code
A1-4111
A1-4112
► Error message
Error #A1-4112 Call for service
► Symptom
The transfer roller can’t move the engage/disengage position.
► Troubleshooting method
1) Turn the machine off then on. If the error persists, turn the machine off again.
2) Remove the right cover.
3) Check if the connection between main board and Feed drive unit are correct.
4) If the connection is OK, replace the step motor of the Feed drive unit.
5) If the problem persists, replace the main board.
► Error Code
A1-4310
► Error message
Error #A1-4310 Call for service
► Symptom
The motor for ITB unit does not operate normally.
► Troubleshooting method
1) Turn the machine off then on. If the error persists, turn the machine off again.
2) Remove the right cover.
3) Check if the connection between main board and the main drive unit are correct.
4) If the connection is OK, replace the main drive unit.
5) If the problem persists, replace the main board.
4-29
Copyright© 1995-2013 SAMSUNG. All rights reserved.
You are here: Home / error code / Samsung CLP415NW model and fix error codes list
– Compatible Printer model: Samsung CLP415NW
– Samsung CLP415NW Error Codes with quick guides:
- Code: A1-1210
- Display: Error #A1-1210 Call for service
- Description: The fuser motor does not operate. / The fuser motor is operating but is recognized as stop status.
- Troubleshooting Guides: 1) Turn the machine off then on. If the error persists, turn the machine off again. 2) Remove the rear and right cover. 3) Check if there are any obstacles or paper around the fuser unit. 4) Check if the connection between main board and fuser motor are correct. 5) If the connection is OK, replace the fuser motor. 6) If the problem persists, replace the main board.
- Code: A1-2112, A1-3612
- Display: Error #Call for service
- Description: The OPC/Deve motor does not operate. / The OPC/Deve motor is operating but is recognized as stop status.
- Troubleshooting Guides: 1) Turn the machine off then on. If the error persists, turn the machine off again. 2) Remove the right cover. 3) Check if the connection between main board and OPC/Deve motor are correct. 4) If the connection is OK, replace the OPC/Deve motor. 5) If the problem persists, replace the main board.
- Code: A1-4111, A1-4112
- Display: Error # Call for service
- Description: The transfer roller can’t move the engage/disengage position.
- Troubleshooting Guides: 1) Turn the machine off then on. If the error persists, turn the machine off again. 2) Remove the right cover. 3) Check if the connection between main board and Feed drive unit are correct. 4) If the connection is OK, replace the step motor of the Feed drive unit. 5) If the problem persists, replace the main board.
- Code: A1-4310
- Display: Error #A1-4310 Call for service
- Description: The motor for ITB unit does not operate normally.
- Troubleshooting Guides: 1) Turn the machine off then on. If the error persists, turn the machine off again. 2) Remove the right cover. 3) Check if the connection between main board and the main drive unit are correct. 4) If the connection is OK, replace the main drive unit. 5) If the problem persists, replace the main board.
- Code: A2-1210, A2-2110
- Display: Error # Call for service
- Description: The SMPS fan or Fuser fan does no operate normally.
- Troubleshooting Guides: 1) Turn the machine off then on. If the error persists, turn the machine off again. 2) Remove the right cover. 3) Check if the connection between main board and the related fan is correct. 4) If the connection is OK, replace the defective fan.
- Code: A3-3211, A3-3212
- Display: Error # Call for service
- Description: The inner temperature sensor is defective.
- Troubleshooting Guides: 1) Turn the machine off then on. If the error persists, turn the machine off again. 2) Enter the tech mode. Check the temperature sensor output. 3) If the sensor is defective, replace it. 4) If the temperature sensor is OK, replace the main board.
- Code: A3-3311, A3-3312
- Display: Error # Call for service
- Description: The outer temperature sensor is defective.
- Troubleshooting Guides: 1) Turn the machine off then on. If the error persists, turn the machine off again. 2) Enter the tech mode. Check the temperature sensor output. 3) If the sensor is defective, replace it. 4) If the temperature sensor is OK, replace the main board.
- Code: A3-3320
- Display: Not proper room temp. Move set
- Description: The value of the outer temperature sensor is out of normal area.
- Troubleshooting Guides: 1) Check if the machine is installed in the proper area. 2) If the temperature sensor is defective, replace it.
- Code: C2-2110, C2-3110
- Display: Prepare Toner
- Description: The remaining toner cartridge is less than 10%
- Troubleshooting Guides: 1) Print the supply information report. Check the life remaining of the toner cartridge. 2) If its life is at the end, turn the machine off and replace the toner cartridge with new one.
- Code: C2-2120, C2-2150, C2-3120
- Display: Replace Toner
- Description: The toner cartridge is at the end of its life.
- Troubleshooting Guides: 1) If its life is at the end, turn the machine off and replace the toner cartridge with new one.
- Code: C2-2320, C2-2410, C2-3320
- Display: Error # Install [color[ toner Install [color] toner cartridge
- Description: The toner cartridge is not installed or the CRUM has some problem.
- Troubleshooting Guides: 1) Check if the toner cartridge is installed properly. Turn the machine off then on. 2) If the error message is not disappear, remove the toner cartridge. Thoroughly roll the cartridge five or six times to distribute the toner evenly inside the cartridge. And reinstall the toner cartridge. 3) If the problem persists, check that the CRUM contact area is contaminated. Clean it. 4) If the problem persists, replace the toner cartridge with new one.
- Code: C2-2512, C2-3512
- Display: Not Compatible [color] toner cart.
- Description: Toner cartridge is not compatible.
- Troubleshooting Guides: 1) Print the supply information report. Check information of the toner cartridge. 2) If the toner cartridge is not a Samsung genuine toner cartridge, replace with new one.

Solve Samsung CLP415NW Error codes
- Code: C2-3150, C2-4120, C2-4150
- Display: Replace Toner
- Description: The toner cartridge is at the end of its life.
- Troubleshooting Guides: 1) If its life is at the end, turn the machine off and replace the toner cartridge with new one.
- Code: C2-3410, C2-4320, C2-4410
- Display: Error # Install [color[ toner Install [color] toner cartridge
- Description: The toner cartridge is not installed or the CRUM has some problem.
- Troubleshooting Guides: 1) Check if the toner cartridge is installed properly. Turn the machine off then on. 2) If the error message is not disappear, remove the toner cartridge. Thoroughly roll the cartridge five or six times to distribute the toner evenly inside the cartridge. And reinstall the toner cartridge. 3) If the problem persists, check that the CRUM contact area is contaminated. Clean it. 4) If the problem persists, replace the toner cartridge with new one.
- Code: C2-4110, C2-5110
- Display: Prepare Toner
- Description: The remaining toner cartridge is less than 10%
- Troubleshooting Guides: 1) Print the supply information report. Check the life remaining of the toner cartridge. 2) If its life is at the end, turn the machine off and replace the toner cartridge with new one.
- Code: C2-4512, C2-5512
- Display: Not Compatible [color] toner cart.
- Description: Toner cartridge is not compatible.
- Troubleshooting Guides: 1) Print the supply information report. Check information of the toner cartridge. 2) If the toner cartridge is not a Samsung genuine toner cartridge, replace with new one.
- Code: C2-5120, C2-5150
- Display: Replace Toner
- Description: The toner cartridge is at the end of its life.
- Troubleshooting Guides: 1) If its life is at the end, turn the machine off and replace the toner cartridge with new one.
- Code: C2-5320, C2-5410
- Display: Error # Install [color[ toner Install [color] toner cartridge
- Description: The toner cartridge is not installed or the CRUM has some problem.
- Troubleshooting Guides: 1) Check if the toner cartridge is installed properly. Turn the machine off then on. 2) If the error message is not disappear, remove the toner cartridge. Thoroughly roll the cartridge five or six times to distribute the toner evenly inside the cartridge. And reinstall the toner cartridge. 3) If the problem persists, check that the CRUM contact area is contaminated. Clean it. 4) If the problem persists, replace the toner cartridge with new one.
- Code: C5-1110, C5-1120
- Display: Prepare new Transfer belt Replace new Transfer belt
- Description: The ITB Unit is at the end of its life.
- Troubleshooting Guides: 1) Print the supply information report. Check the life remaining of the ITB unit. 2) If its life is at the end, turn the machine off and replace the ITB unit with new one.
- Code: C5-1310
- Display: Install TR belt unit.
- Description: The ITB Unit is not installed properly.
- Troubleshooting Guides: 1) Turn the machine off. Remove and reinstall the ITB unit. 2) Turn the machine on. If the problem persists, replace the ITB unit.
- Code: C5-1410
- Display: Not compatible transfer belt.
- Description: The ITB unit is not compatible.
- Troubleshooting Guides: 1) If the toner cartridge is not a Samsung genuine ITB Unit, replace with new one.
- Code: C5-1710
- Display: Transfer Belt Error
- Description: The ITB home position sensor has the problem.
- Troubleshooting Guides: 1) Turn the machine off. Replace the ITB Unit.
- Code: C6-1110, C6-1120
- Display: Replace Fuser Soon Replace newReplace new Tray1 roller Replace new Tray1 roller Fuser unit
- Description: The fuser unit is at the end of its life.
- Troubleshooting Guides: 1) If its life is at the end, turn the machine off and replace the fuser unit with new one.
- Code: C7-1110
- Display: Waste toner Full Replace new one
- Description: The waste toner container is at the end of its life.
- Troubleshooting Guides: 1) If its life is at the end, turn the machine off and replace the waste toner container with new one.
- Code: C7-1311
- Display: Not Installed Waste tank
- Description: The waste toner container is not installed
- Troubleshooting Guides: 1) Check if the waste toner container is installed properly. 2) Remove and reinstall the waste toner container.
- Code: C9-1112, C9-1116
- Display: Replace new Tray1 roller Replace new Tray1 roller
- Description: The pick up roller or reverse roller is at the end of its life.
- Troubleshooting Guides: 1) Turn the machine off. 2) Replace the pick up roller Assy and reverse roller Assy.
- Code: M1-1110
- Display: Paper Jam in Tray 1
- Description: The jammed paper has occurred in the tray1.
- Troubleshooting Guides: 1) Remove the jammed paper. 2) If the jammed paper occurs continually, check the followings. a) Check if the pick up/forward/reverse roller are worn out or contaminated. Clean the contaminated part or replace it. b) Check if the actuator is assembled correctly. 3) Check the pick up clutch and regi clutch operation. If they are defective, replace them.
- Code: M1-5112
- Display: Paper Empty in Tray1
- Description: Paper is empty in Tray1
- Troubleshooting Guides: 1) Take off the cassette. If there is no paper on the tray, load the paper. 2) If the problem persists, check the following. a) Check if the paper empty sensor is contaminated or defective. Replace it.
- Code: M2-1110, M2-1116
- Display: Paper Jam inside machine Paper jam or empty
- Description: The jammed paper has occurred inside machine.
- Troubleshooting Guides: 1) Remove the jammed paper. 2) If the problem persists, check the following. a) Check if there is any obstacles or paper on the paper path. Remove it. b) Check if the FRAME-RETARD unit is assembled properly. c) Check if the pick up clutch, regi clutch, feed drive unit are working normally. If there is a defective part, replace it.
- Code: M3-1110
- Display: Paper Jam in exit area
- Description: The jammed paper has occurred in the exit area.
- Troubleshooting Guides: 1) Remove the jammed paper. 2) If the problem persists, check the following. a) Check if there is any obstacles or paper on the paper path. Remove it. b) Check if the fuser unit is assembled properly. If the fuser unit is defective, replace it. c) Check if the FRAME-EXIT unit has any defective parts. Replace the FRAME-EXIT.
- Code: M3-2130
- Display: Output bin full Remove paper
- Description: The machine detected that the output tray has got full or the bin-full sensor is defective.
- Troubleshooting Guides: 1) Remove the paper on the output tray. 2) Check if the Bin-full Sensor connector is connected properly. Reconnect it. 3) If the sensor is defective, replace it.
- Code: S2-4120
- Display: Door open Close it
- Description: Door is open or the cover open switch is defective.
- Troubleshooting Guides: 1) Check if the front cover is closed perfectly. 2) If the error persists, check that the cover-open sensor is working normally. If it is defective, replace the HVPS board.
- Code: S5-3110
- Display: Error #S5-3110 Call for service
- Description: The communication error between main board and OPE board has occurred.
- Troubleshooting Guides: 1) Turn the machine off then on. 2) If the problem persists, check the followings. a) Check the connection between main board and OPE board. Reconnect the harness. b) If the connection is OK, replace the main board or OPE board.
- Code: S6-3123, S6-3128
- Display: Network Problem: IP Conflict 802.1x Network Error
- Description: IP address conflicts with that of other system.
- Troubleshooting Guides: 1) Change the machine’s IP address. 2) Check the setting-up for 802.1x confirmation server.
- Code: U1-2132, U1-2315, U1-2320
- Display: Error # Turn off then on
- Description: The temperature control of fuser unit is abnormal.
- Troubleshooting Guides: 1) Check if the input voltage is normal. 2) Turn the machine off. Remove and reinstall the fuser unit. Be careful when connecting the AC-connector and Thermistor connector. 3) Turn the machine on. Is the error message is disappeared? 4) Check the followings. If the fuser unit has any problem, replace it. a) Check if the fuser connector is connected properly. b) Check if the halogen lamp voltage is normal. c) Check if the thermistor is contaminated or twisted. 5) If the problem persists, replace the main board or SMPS board.
- Code: U1-2330, U1-2334
- Display: Error # Turn off then on
- Description: The temperature control of fuser unit is abnormal.
- Troubleshooting Guides: 1) Check if the input voltage is normal. 2) Turn the machine off. Remove and reinstall the fuser unit. Be careful when connecting the AC-connector and Thermistor connector. 3) Turn the machine on. Is the error message is disappeared? 4) Check the followings. If the fuser unit has any problem, replace it. a) Check if the fuser connector is connected properly. b) Check if the halogen lamp voltage is normal. c) Check if the thermistor is contaminated or twisted. 5) If the problem persists, replace the main board or SMPS board.
- Code: U1-2340, U1-234H
- Display: Error # Turn off then on
- Description: The temperature control of fuser unit is abnormal.
- Troubleshooting Guides: 1) Check if the input voltage is normal. 2) Turn the machine off. Remove and reinstall the fuser unit. Be careful when connecting the AC-connector and Thermistor connector. 3) Turn the machine on. Is the error message is disappeared? 4) Check the followings. If the fuser unit has any problem, replace it. a) Check if the fuser connector is connected properly. b) Check if the halogen lamp voltage is normal. c) Check if the thermistor is contaminated or twisted. 5) If the problem persists, replace the main board or SMPS board.
- Code: U2-6122, U2-6142
- Display: Error # Turn off then on
- Description: LSU Motor does not work normally. / LSU Hsync signal is abnormal.
- Troubleshooting Guides: 1) Check if the LSU harness on the main board is connected properly. 2) If it is OK, check that the LSU harness on LSU board is connected properly. 3) Check if the LSU harness is defective. 4) If the problem persists, replace the LSU. 5) If the problem persists after replacing LSU, replace the main board.
– Get more information about Epson XP 15000 troubleshooting, click here
– Get more error code list with quick guide to fix printer product, click here
– About get help with reseting Epson inkpad or others, click here
Samsung printer reset software introduction:
Notes before resetting Samsung printer:
– Identify accurate version, serial and crum of Samsung printer.
– How to get Samsung printer model info: Click Here
– Before you continue with the reprogramming of the firmware, please make sure that the device is installed on your computer.
– It is very important that under no circumstances should you remove the chip from the cartridge while reprogramming the firmware. After you have succesfully reprogrammed the printer, remove the chip from the cartridge and store it somewhere safely (the chip – a key). In all cartridges which you are going to use in the printer, the chip has to be either removed or sealed. If you have accidently inserted a new cartridge without removing the chip, the device will be blocked. In order to unblock it, you can use the stored chip as a key which help you to unblock the printer.
– And make sure that any other devices (except mouse and keyboard), which are connected to your computer via USB or LPT ports are disconnected. It’s preferable that the computer is connected to the “UPS” (uninterruptible power source) device, because if during the reprogramming process the electricity source has any interruptions, then the reprogramming will be carried out with an error, which makes the device unable to work.
– This firmware will be installed directly to your printer. Before opening firmare link make sure that printer is turned on and connected to your computer and printer drivers are installed correctly.
Be aware that with the reprogramming of the firmware the manufacturer’s warranty goes lost!!
How To Run Firmware Fix Samsung printer
1. Connect the printer to the computer and turn it on.
2. Wait until the printer is ready for work.
3. Drag and drop *.hd to usbprns2.exe file.

4. The reprogramming process starts automatically.
5. Wait until the printer reprograms (10-20 minute) and restarts.
6. After that the reprogramming process is finished, restart the printer.
Contact us to get support with Samsung CLP415NW Error case
Telegram: https://t.me/hyperaktiv
Facebook: https://www.facebook.com/dngnm/
Or click here to get more ways.