
Ok, so… I´m having the same original discussed problem, that mmathys had, he probably solved it with the new updates, good for him, I recently formatted my PC, after reinstalling all browsers and essentials, I went for the scp, as usual, installed the drivers and all, with my controller connected, and it just doesn’t open it, the software recognizes the DS3, but it doesn’t open the device, I tried everything possible in my hands, reseting the controller, reinstalling the drivers a hundred times, I even tried to use the original scp, it even worked, but after one day it happens the same thing, it recognizes the device, but it doesn’t open.
I really hope someone could help me, this is very important for me, very much important.
Thanks for now
Ошибка «Не удалось открыть устройство» появляется, когда пользователи пытаются использовать SCPtoolkit для подключения своих контроллеров DualShock 3 или DualShock 4 к ПК. Большинство затронутых пользователей сообщают, что контроллер отображается как подключенный, но не распознается в игре.
Обновление: SCPtoolkit является продолжением программы сервера SCP, поскольку первоначальный разработчик прекратил поддержку программного обеспечения. К сожалению, на данный момент SCPToolkit также заброшен и не получал новых обновлений с момента выхода Windows 11. Из-за этого у вас могут возникнуть проблемы при использовании его с последней сборкой Windows.
Наиболее распространенная причина, по которой вы видите ошибку «Не удалось открыть устройство», — это сценарий, в котором возникает несоответствие, влияющее на контроллер DualShock 3 или DualShock 4. Другие возможные причины включают неправильно настроенную службу SCPP DSx или неправильно установленный адаптер Bluetooth.
В некоторых случаях также может появиться эта ошибка, если подключенный контроллер DS2 или DS3 отображается на неправильной вкладке в диспетчере устройств и его необходимо преобразовать в HID-совместимое устройство.
1. Сбросьте контроллер DualShock 3 / DualShock 4.
Одной из наиболее распространенных причин появления ошибки «Не удалось открыть устройство» при подключении контроллеров DualShock 3 и DualShock 4 является несовместимость прошивки.
Примечание. Это следует учитывать, если вы используете контроллер DualShock как на консоли Playstation, так и на ПК.
К счастью, вы можете легко решить эту проблему, перезагрузив контроллер. Эта процедура сотрет все временные данные с контроллера и вернет контроллер к заводским настройкам по умолчанию. Сброс также приведет к тому, что устройство «забудет» все сохраненные подключения, поэтому вам нужно будет повторить подключение, если вы также используете консоль.
Кнопка сброса расположена на задней панели контроллера (как на DualShock 3, так и на DualShock 4), но вам понадобится острый предмет, чтобы нажать ее достаточно долго, чтобы начать процедуру сброса.
Вот краткое руководство, которое проведет вас через процесс сброса контроллера DualShock:
Примечание. Приведенные ниже инструкции будут работать как на DualShock 3, так и на DualShock 4.
- Если у вас есть консоль PlayStation, сначала убедитесь, что она выключена, чтобы не мешать процедуре.
Примечание. Для достижения наилучших результатов отключите консоль от электрической розетки. - Возьмите контроллер DualShock, переверните его и найдите кнопку сброса сзади рядом с кнопкой L2.
Примечание. На контроллере DualShock 3 кнопка сброса расположена даже ближе к кнопке L2.
- Используйте небольшой острый предмет, чтобы нажать кнопку сброса и удерживать ее нажатой в течение 5 секунд или более.
Примечание. Если у вас нет достаточно маленькой отвертки, вы можете использовать зубочистку или иглу. - Подключите контроллер DualShock 3 или DualShock 4 к ПК и повторите попытку подключения с помощью утилиты ScpToolkit и посмотрите, устранена ли проблема.
2. Вручную запустите службу SCP DSx и измените тип поведения (если применимо).
Другой сценарий, в котором вы можете ожидать увидеть ошибку «Не удалось открыть устройство» при попытке использовать программное обеспечение SCPToolkit, — это если основная служба (служба SCP DSX) неправильно настроена или заблокирована инструментом оптимизации системы.
Примечание. Инструменты оптимизации ресурсов, такие как Razer Cortex, CleanMyPC или System Mechanic, обычно слишком агрессивны со сторонними службами и могут в конечном итоге остановить основную службу SCPToolkit и вызвать эту проблему.
Если вы используете инструмент такого типа, первое, что вы должны сделать, это получить доступ к экрану «Службы» и убедиться, что служба SCP DSX запущена и что для ее типа запуска установлено значение «Автоматически».
Если вы обнаружите, что эта служба остановлена и неправильно настроена, устраните проблему и убедитесь, что программе оптимизации ресурсов не разрешено повторять такое поведение.
Вот краткое руководство, которое проведет вас через этот процесс:
- Нажмите клавишу Windows + R, чтобы открыть диалоговое окно «Выполнить».
- Затем введите «services.msc» и нажмите Ctrl + Shift + Enter, чтобы открыть экран «Службы».
- В разделе «Контроль учетных записей» (UAC) нажмите «Да», чтобы предоставить доступ администратора.
- На экране «Службы» перейдите на вкладку «Службы (локальные)» и прокрутите список служб вниз, пока не найдете службу SCP DSx.
- Затем щелкните правой кнопкой мыши службу SCP DSx, затем выберите «Свойства» в только что появившемся контекстном меню.
- В специальном меню службы SCP DSx перейдите на вкладку «Общие», затем установите для параметра «Тип запуска» значение «Автоматически».
- Переместитесь ниже и нажмите кнопку «Пуск», если служба отключена, прежде чем нажать «Применить», чтобы сохранить изменения.
- Теперь, когда служба SCP DSx настроена правильно, войдите в программу оптимизации ресурсов, которая вызвала проблему, и внесите службу SCP DSx в белый список, чтобы эта проблема не возникала в будущем.
Примечание. Если вы больше не используете программу, блокирующую службу SCP DSx, нет причин ее оставлять. В этом случае ближе к экрану «Службы» выполните следующие действия, чтобы удалить его.
- Нажмите клавишу Windows + R, чтобы открыть диалоговое окно «Выполнить». В поле «Выполнить» введите «appwiz.cpl», затем нажмите Ctrl + Shift + Enter, чтобы открыть меню «Программы и компоненты» с правами администратора.
- В разделе «Контроль учетных записей» (UAC) нажмите «Да», чтобы предоставить доступ администратора.
- В меню «Программы и компоненты» прокрутите список установленных программ и найдите программу оптимизации ресурсов, которая вызывает проблему.
- Щелкните его правой кнопкой мыши и выберите «Удалить» в контекстном меню.
- После завершения удаления перезагрузите компьютер, затем попытайтесь подключить контроллер DualShock с помощью программы набора инструментов SCP и посмотрите, устранена ли проблема.
3. Превратите контроллер в HID-совместимое устройство.
Если вы столкнулись с этой проблемой в Windows 10 или Windows 11, наиболее распространенная причина, по которой программа набора инструментов SCP не обнаруживает ваш контроллер и не запускает «Не удалось открыть устройство», заключается в том, что диспетчер устройств не пометил его как HID. -совместимое устройство.
Скорее всего, контроллер не отображается в разделе «Устройства интерфейса пользователя» должным образом и отображается в разделе «Звук» или другой подкатегории. К счастью, вы можете решить эту проблему, используя Диспетчер устройств, чтобы обновить текущее программное обеспечение драйвера с помощью локального драйвера для USB-устройства ввода.
Примечание. Многие пользователи успешно использовали это исправление в Windows 10 и Windows 11 и подтвердили, что после того, как контроллер был реклассифицирован как устройство, совместимое с HUD, ошибка «Не удалось открыть устройство» полностью исчезла.
Вот краткое руководство о том, как это сделать:
- Нажмите клавишу Windows + R, чтобы открыть диалоговое окно «Выполнить».
- Затем введите «devmgmt.msc» и нажмите Ctrl + Shift + Enter, чтобы открыть диалоговое окно «Выполнить».
- В разделе «Контроль учетных записей» нажмите «Да», чтобы предоставить доступ администратора.
- Как только вы окажетесь в Диспетчере устройств, прокрутите список установленных программ и найдите контроллер Playstation 3 или PlayStation 4.
- Щелкните его правой кнопкой мыши и выберите «Обновить драйвер» из списка.
- Затем нажмите гиперссылку «Просмотреть мой компьютер для поиска драйверов» в следующем меню.
- На следующем экране нажмите «Позвольте мне выбрать из списка доступных драйверов на моем компьютере».
- На следующем экране нажмите «Устройство ввода USB», затем нажмите «ОК», чтобы загрузить правильный драйвер.
- Выполните оставшиеся шаги, чтобы вместо этого установить этот драйвер и заставить Диспетчер устройств переклассифицировать контроллер как устройство с интерфейсом пользователя.
- Повторите попытку подключения и посмотрите, устранена ли ошибка «Не удалось открыть устройство».
4. Запустите утилиту SCPCleanWipe и переустановите адаптер Bluetooth.
Если эта проблема появляется и исчезает, но в основном это происходит, когда вы пытаетесь использовать контроллер в режиме Bluetooth. Вы должны повторить попытку подключения ПОСЛЕ запуска утилиты SCPCleanWipe и переустановки основного драйвера SCP, проверяя только совместимый контроллер DualShock (либо DualShock 3, либо DualShock 4).
Примечание. Если вы хотите играть через соединение Bluetooth, вам также необходимо убедиться, что вы выбрали правильный ключ Bluetooth после запуска утилиты SCPDriverInstall. Если вы не используете соединение Bluetooth, снимите флажок с параметра «Драйвер Bluetooth».
Вот краткое руководство по запуску утилиты SCPCleanWipe перед переустановкой программы:
- Нажмите клавишу Windows + E, чтобы открыть проводник, затем перейдите в каталог установки набора инструментов SCP.
- Во-первых, убедитесь, что SCP Toolit не запущен активно, затем откройте любой браузер и загрузите последняя сборка ScpTookit с официального GitHub листинг.
- В специальном списке щелкните ScpTookit_Setup.exe, чтобы начать загрузку последней версии.
Примечание. Это необходимо, даже если у вас уже установлен этот инструмент — скорее всего, вы установили его без инструмента CleanWipe.
- После завершения загрузки дважды щелкните исполняемый файл и запустите его с правами администратора.
- На первом экране выберите правильное местоположение и установите флажок «Я согласен с условиями лицензии», прежде чем нажать «Далее».
Примечание. Если у вас уже есть существующая установка, вполне нормально установить ее в том же месте.
- На следующем экране убедитесь, что отмечены все функции по умолчанию, особенно утилита SCP Toolkit CLean Wipe.
- После правильной настройки установщика нажмите «Установить».
- Нажмите «Да» в UAC (Контроль учетных записей пользователей) еще раз, чтобы подтвердить настройки.
- После завершения установки нажмите клавишу Windows + E, чтобы открыть проводник.
- Затем используйте панель навигации вверху, чтобы перейти к следующему местоположению: C:Program FilesNefarius Software SolutionsScpToolkit.
- Оказавшись внутри, щелкните правой кнопкой мыши ScpCleanWipe.exe, затем выберите «Запуск от имени администратора» в контекстном меню.
Примечание. При запуске этого инструмента все сообщения перестанут появляться при подключении контроллера.
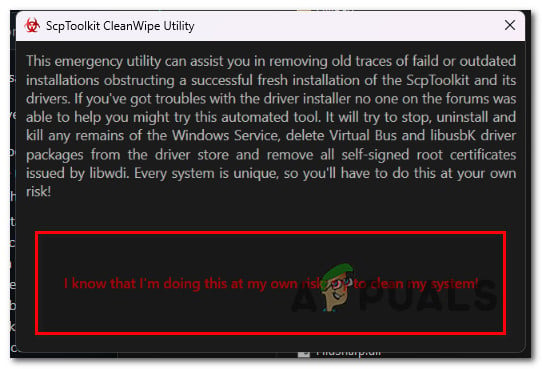
- В запросе подтверждения нажмите Я знаю, что делаю это на свой страх и риск; попробуй почистить систему.
- Необязательно: если вы используете контроллер DualShock с соединением Bluetooth, переустановите адаптер Bluetooth на этом этапе. Если вы играете только через провод или у вас нет возможности Bluetooth на этом ПК, перейдите к следующему шагу ниже.
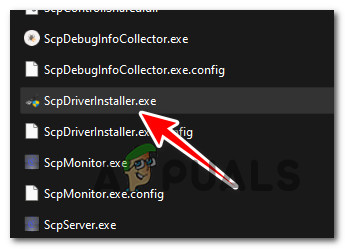
- Затем вернитесь в папку установки ScpToolkit и дважды щелкните утилиту SCPDriverInstaller.
Примечание. В разделе «Контроль учетных записей» (UAC) нажмите «Да», чтобы предоставить доступ администратора.
- На первом экране проверьте только ту версию Dualshock, которую вы будете использовать.
Примечание: например, если вы используете DualShock 4, убедитесь, что все записи DUalSHock сняты. - Необязательно: выберите активный ключ Bluetooth. Важно выбирать ТОЛЬКО те адаптеры Bluetooth, которые вы используете (если вы их используете). Если нет, снимите флажок с опции драйвера Bluetooth.
- Нажмите «Установить» и дождитесь завершения операции.
- Используйте свой контроллер в игре и посмотрите, устранена ли проблема.
Hello everyone,
Last week was the last time I managed to normally use my official PS3 Dualshock 3 controller on my PC. I believe after which the PC updated some stuff.
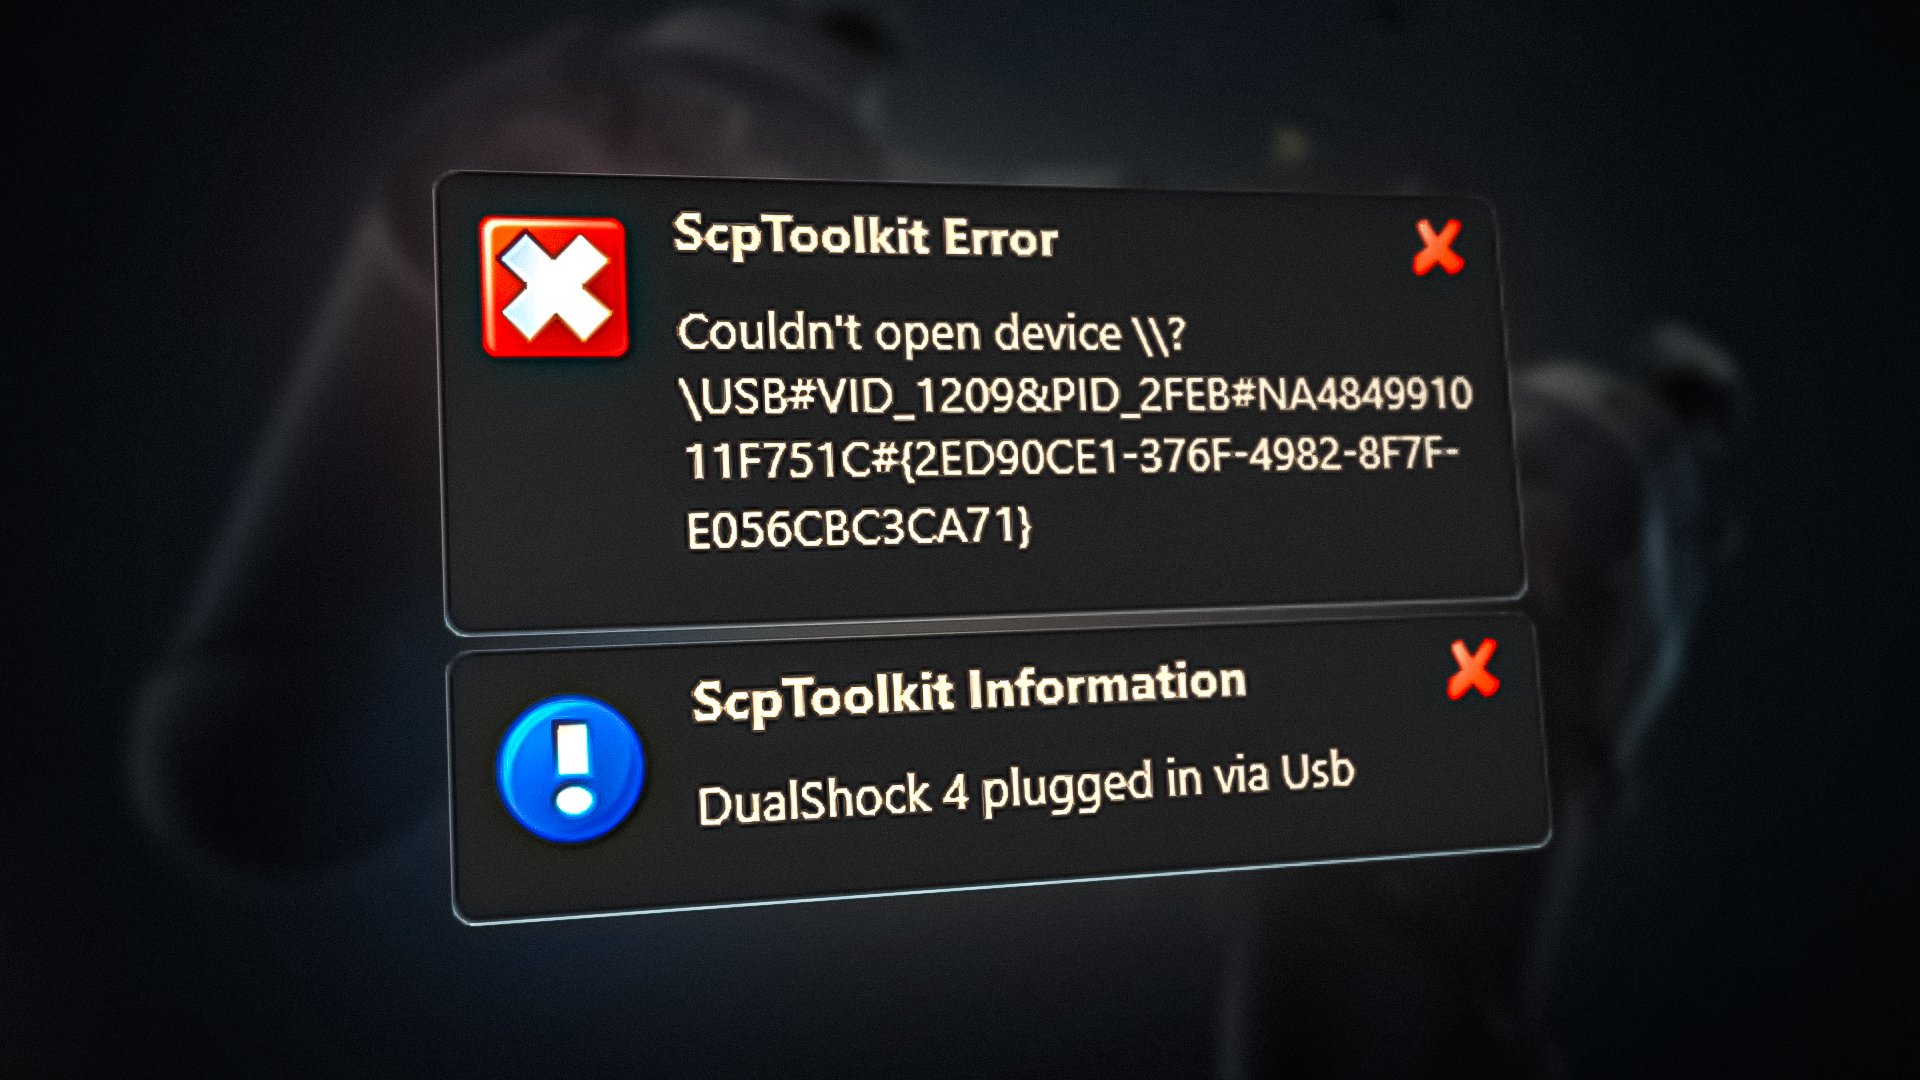
Now when I boot up my PC, the controller tries to connect to it (I have it via USB, since I don’t have bluetooth), and the lights keep on blinking until they just turn off eventually. I tried to reinstall my drivers, since when it does that, reinstalling is usually how I fix it, but when I try to go to the driver installer on the program, I get this.

It says to consult the logs, but I understand nothing that’s written there. I tried using Better DS3 which I had as a backup, but since my controller doesn’t seem to work with my PC anymore, it doesn’t show up.
I was using the controller normally, I don’t know where it went wrong. The SCP Monitor gives me this.

I am stumped as to what I should do. I can’t play my games because keyboard is so uncomfortable. I included the logs, just in case it helps anyone decipher what’s going on.
Logs.zip
Any help?
The error ‘Couldn’t Open Device’ appears when users attempt to use the SCPtoolkit to connect their DualShock 3 or DualShock 4 controllers on PC. Most affected users are reporting that the controller shows up as connected but it doesn’t get recognized in the game.
Update: SCPtoolkit is a continuation of the SCP server program since the original developer stopped supporting the software. Unfortunately, as of now, SCPToolkit is also abandoned and didn’t receive any new update since Windows 11 came out. Because of this, you might run into issues while using it with the latest Windows build.
The most common reason why you will see the ‘Couldn’t Open Device’ error is a scenario in which there’s an inconsistency affecting the DualShock 3 or DualShock 4 controller. Other potential causes included a misconfigured SCPP DSx Service or an incorrectly installed Bluetooth adapter.
In some cases, it’s also likely to see this error if the connected DS2 or DS3 controller shows up in the wrong tab under Device Manager and needs to be converted into an HID-compliant device.
1. Reset the DualShock 3 / DualShock 4 Controller
One of the most common reasons why you will see the ‘Couldn’t Open Device’ error when connecting both DualShock 3 and DualShock 4 controllers is a firmware inconsistency.
Note: This is to be respected if you are using your DualShock controller on both a Playstation console and on PC.
Fortunately, you can fix this issue easily by resetting your controller. This procedure will wipe out all temporary data from the controller and return the controller to the factory defaults. Resetting will also make the device ‘forget’ any saved connections, so you will need to redo the connection if you’re also using a console.
The reset button is located on the back of the controller (on both the DualShock 3 and DualShock 4), but you will need a sharp object to press it long enough to initiate the reset procedure.
Here’s a quick guide that will walk you through the process of resetting your DualShock controller:
Note: The instructions below will work on both DualShock 3 and DualShock 4.
- If you have a PlayStation console, start by ensuring that it’s turned off so it doesn’t interfere with the procedure.
Note: For the best results, unplug your console from the power outlet. - Pick up your DualShock controller, flip it over, and locate the reset button at the back near the L2 button.

Locating the Reset button Note: With the DualShock 3 controller, the reset button is even closer to the L2 button.
- Use a small and pointy object to push the reset button and keep it pressed for 5 seconds or more.
Note: If you don’t have a screwdriver small enough to fit, you can use a toothpick or needle. - Connect your DualShock 3 or DualShock 4 controller to your PC and repeat the connection attempt using the ScpToolkit utility and see if the problem is now fixed.

2. Manually start the SCP DSx Service & Change the behavior type (if applicable)
Another scenario where you might expect to see the ‘Couldn’t Open Device’ error when attempting to use the SCPToolkit software is if the main service (SCP DSX Service) is incorrectly configured or it’s inhibited by a system optimization tool.
Note: Resource optimization tools like Razer Cortex, CleanMyPC or System Mechanic are typically too aggressive with 3rd party service and might end up stopping the main SCPToolkit service and cause this issue.
If you use a tool of this kind, the first thing you should do is access the Services screen and ensure that the SCP DSX Service is started and that its startup type is set to Automatic.
If you discover that this service is stopped and incorrectly configured, rectify the issue and ensure that the resource optimization program is not allowed to produce this behavior once again.
Here’s a quick guide that will guide you through this process:
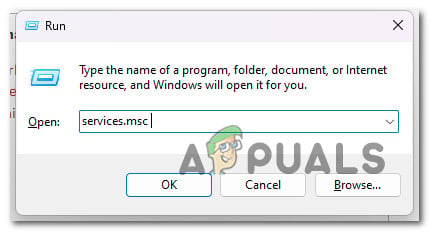
- Press Windows key + R to open up a Run dialog box.
- Next, type ‘services.msc’ and press Ctrl + Shift + Enter to open up the Services screen.

Open up the Services screen - At the User Account Control (UAC), click Yes to grant admin access.
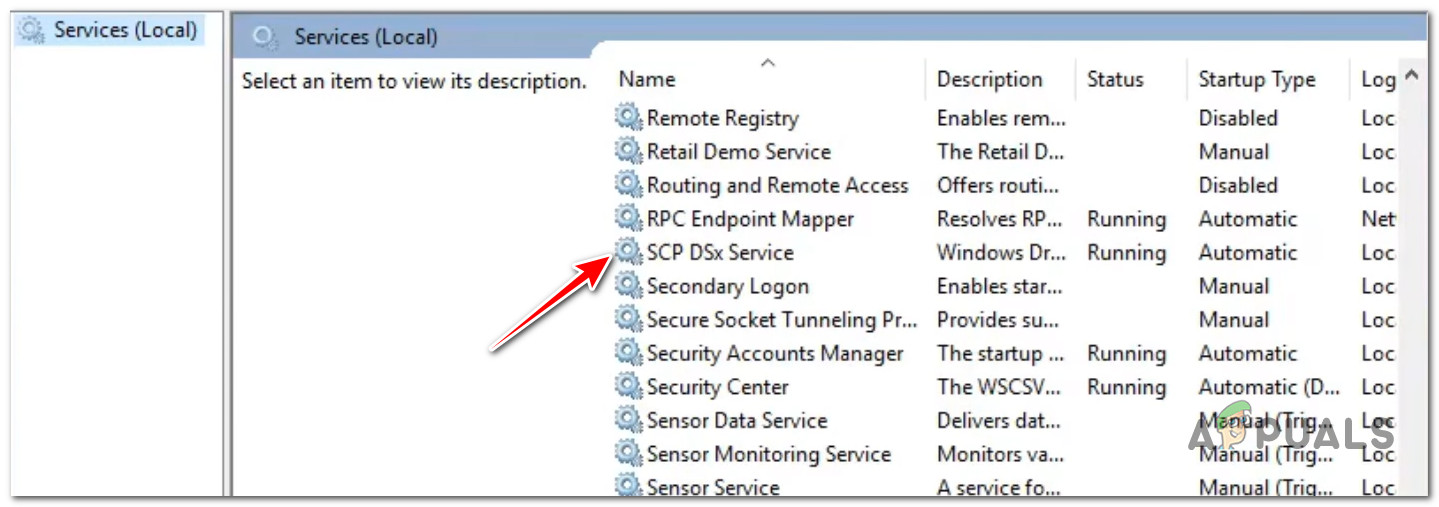
- Inside the Services screen, go over the Services (Local) tab and scroll down through the list of services until you locate the SCP DSx Service.

Locating the SCP DsX service - Next, right-click on SCP DSx Service, then click on Properties from the context menu that just appeared.
- From the dedicated menu of SCP DSx Service, access the General tab, then set the Startup type to Automatic.
- Move down below and click the Start button if the service is disabled before clicking on Apply to save the changes.
- Now that the SCP DSx Service is correctly configured, access the resource optimization program that caused the issue in the first place and whitelist the SCP DSx Service so that the issue doesn’t occur in the future.
Preventing the resource optimization program from interfering with SCP DSx Service Note: If you no longer use the program that is blocking the SCP DSx Service, there’s no reason to keep it. In this case, closer to the Services screen continue with the steps below to uninstall it.
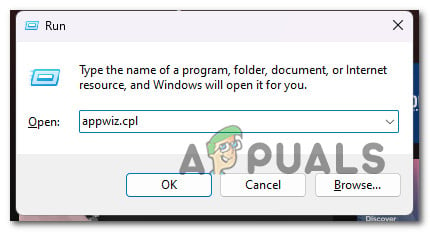
- Press the Windows key + R to open up a Run dialog box. Inside the Run box, type ‘appwiz.cpl’, then press Ctrl + Shift + Enter to open up the Program and Features menu with admin access.
Open up the Programs and Features menu - At the User Account Control (UAC), click Yes to grant admin access.
- Inside the Programs and Features menu, scroll down through the list of installed programs and locate the resource optimization program that’s causing the issue.
- Right-click on it, then choose Uninstall from the context menu.

Uninstall the resource optimization program - Once the uninstallation is complete, reboot your PC, then attempt to connect your DualShock controller using the SCP toolkit program and see if the problem is fixed.

3. Revert the controller to a HID-compliant device
If you’re experiencing this issue on Windows 10 or Windows 11, the most common reason why the SCP toolkit program is not detecting your controller and triggering the ‘Couldn’t Open Device’ is that Device Manager didn’t label it as an HID-compliant device.
Most likely, the controller doesn’t show under Human Interface Devices as it should and is displayed under Sound or another sub-category. Fortunately, you can fix this issue by using Device Manager to update the current driver software with the local driver for USB Input Device.
Note: A lot of users have used this fix successfully on Windows 10 and Windows 11 and have confirmed that once the controller was reclassified as a HUD-compliant device, the ‘Couldn’t Open Device’ error went away completely.
Here’s a quick guide on how to do this:
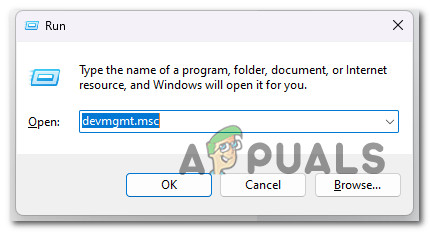
- Press Windows key + R to open up a Run dialog box.
- Next, type ‘devmgmt.msc’ and press Ctrl + Shift + Enter to open up a Run dialog box.
Open Device Manager - At the User Account Control, click Yes to grant admin access.
- Once you’re inside Device Manager, scroll down through the list of installed programs and locate the Playstation 3 or PlayStation 4 controller.
- Right-click on it and choose Update Driver from the list.

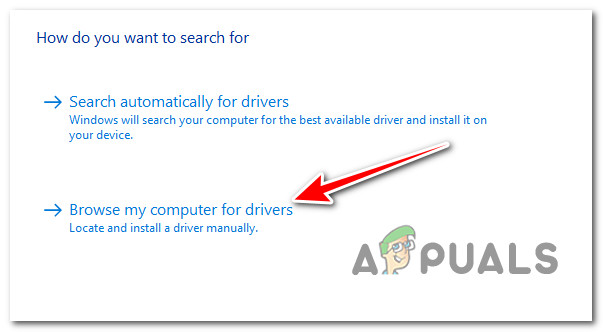
Updating the driver - Next, click on Browse my computer for drivers hyperlink from the next menu.

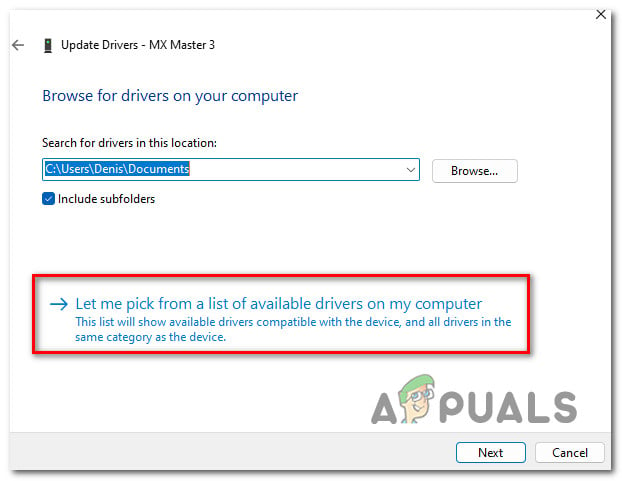
Searching for the driver manually - From the next screen, click on Let me pick from a list of available drivers on my computer.

Choosing the drivers automatically - From the next screen, click on USB Input Device, then click on Ok to load the correct driver.
- Follow the remaining steps to install this driver instead and force Device Manager to reclassify the controller as a Human Interface device.
- Retry the connection and see if the ‘Couldn’t Open Device’ error is fixed.

4. Run the SCPCleanWipe Utility & Reinstall Bluetooth Adapter
If you get this issue on and off, but it’s mostly occurring when you try to use the controller in Bluetooth mode. You should retry the connection AFTER running the SCPCleanWipe utility and reinstalling the main SCP driver while checking only the compatible DualShock controller (either DualShock 3 or DualShock 4).
Note: If you care about playing on a Bluetooth connection, you will also need to ensure that you select the correct Bluetooth dongle after you run the SCPDriverInstall utility. If you don’t use the Bluetooth connection, uncheck the Bluetooth Driver option.
Here’s a quick guide on running the SCPCleanWipe utility before reinstalling the program:
- Press the Windows key + E to open up the FIle Explorer, then navigate to the installation directory of the SCP toolkit.
- First, ensure that the SCP Tookit is not actively running, then open any browser and download the latest build of ScpTookit from the official GitHub listing.
- From the dedicated listing, click on ScpTookit_Setup.exe to initiate the download of the latest version.

Download the latest version of the Scp Toolkit Note: This is required even if you already have this tool installed – it’s likely that you installed it without the CleanWipe tool.
- Once the download is complete, double-click on the executable and run it with admin access,
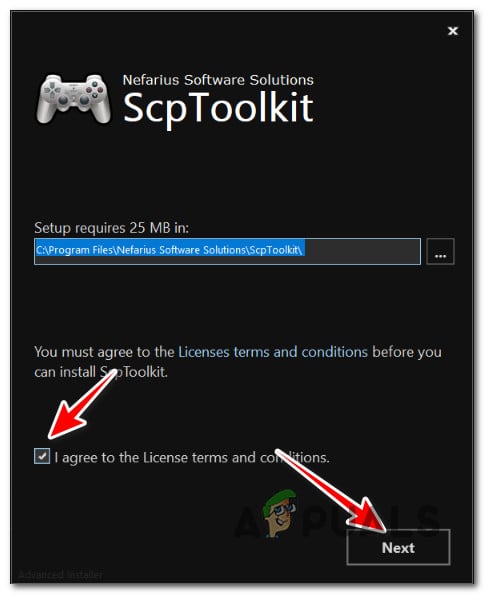
- At the first screen, choose the correct location and check the box associated with I agree to the licence terms and conditions before clicking Next.

Getting past the initial setup screen Note: If you already have an existing installation, it’s perfectly fine to install this in the same location.
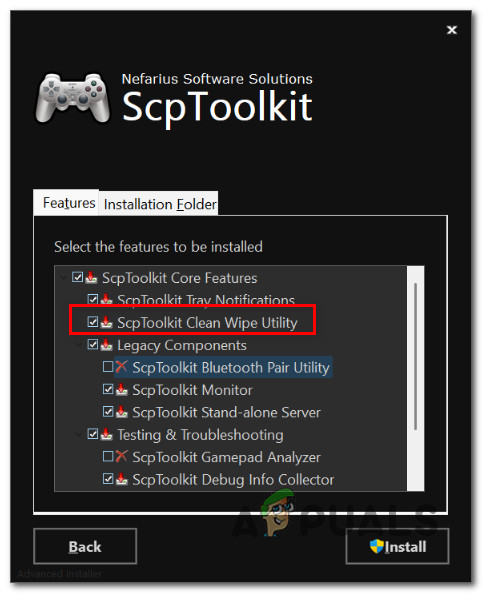
- At the next screen, ensure that every default feature is checked, especially the SCP Toolkit CLean Wipe utility.

Configuring the SCP Tookit installation - Once the installer is correctly configured, click on Install.
- Click Yes at the UAC (User Account Control) once again to confirm the settings.
- After the installation is complete, press the Windows key + E to open up File Explorer.
- Next, use the navigation bar at the top to navigate to the following location:
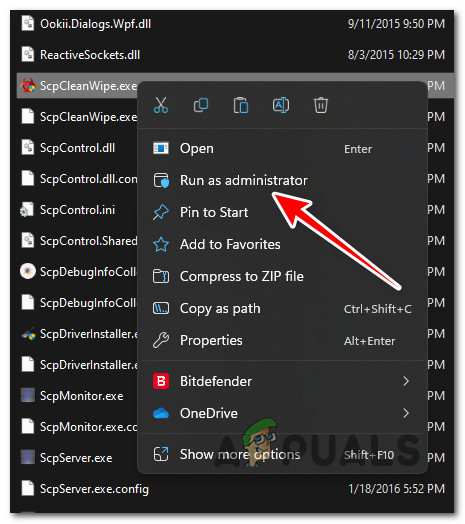
C:Program FilesNefarius Software SolutionsScpToolkit
- Once inside, right-click on ScpCleanWipe.exe, then click on Run as administrator from the context menu.

Running as administrator Note: Running this tool will make all messages stop popping up when you plug your controller.
- At the confirmation prompt, click on I know that I’m doing this at m own risk; try to clean my system.

Confirm the cleanup process - Optional: If you use your DualShock controller on a BlueTooth connection, reinstall the Bluetooth adapter at this step. If you only play wired or you don’t have Bluetooth capabilities on this PC, move to the next step below.
- Next, return to the installation folder of ScpToolkit and double-click on the SCPDriverInstaller utility.

Running the SCP installer Note: At the User Account Control (UAC), click Yes to grant admin access.
- On the first screen, only check the Dualshock version that you will be using.
Note: e.g. if you are using DualShock 4, ensure that all DUalSHock entries are unchecked. - Optional: Choose the active Bluetooth dongle. It’s important to ONLY select the Bluetooth adapters that you are using (if you are using one). If not, uncheck the Bluetooth Driver Option.
- Click Install and wait until the operation is complete.
- Use your controller in the game and see if the problem is now fixed.

Muhammad Zubyan
Muhammad Zubyan is a certified Google IT Support Professional with over 7 years of extensive experience. He has worked on more than 1500 computers, gaining valuable insights that enable him to detect and troubleshoot any complicated root cause of Windows-related issues and errors. In addition to managing Appuals as a Senior Editor, he is currently developing his own Game Optimization program that caters to both gamers and casual users alike.
Gorefist
16.09.2020
Через стим все работает, остальные проги не нужны. Раньше тоже их использовался, отказался просто в пользу стима.
Для не стим игр, просто запускаешь стим в фоне, все будет работать.
Ответить
Развернуть ветку
Pierre Dalique
16.09.2020
Вот да. одно время пользовался дс4вин, и в системе оно хорошо работает, но были какие то проблемы, из-за чего пришлось отказаться. Поддержка стима отличная. Полностью устраивает
Ответить
Развернуть ветку
Аккаунт отморожен
16.09.2020
А я и не понял как стим заставить увидеть пад, он висел в сопряженных в устройствах, в бигпикчер чот там включал и все. Пришлось после тестов купить ревасд, там до сих пор как часы, дрова их четкие.
Ответить
Развернуть ветку
Аккаунт удален
16.09.2020
Комментарий недоступен
Ответить
Развернуть ветку
SonD.VaNintedno
16.09.2020
запускай все игры, даже пиратки, даже из сторонних лаучнеров через стим, просто добавь exe шник в библиотеку, или лаучнер например origin, через стим запусти ориджин и потом уже игру.
запускай всё через big picture и на всякий случай с английской раскладкой.
проверенно, даже от нинтедно геймпад так работает.
Ответить
Развернуть ветку
lamurchik
16.09.2020
запускай всё через big picture и на всякий случай с английской раскладкой.
Глупость какая.
Ответить
Развернуть ветку
SonD.VaNintedno
16.09.2020
у меня эмулятор демон соулса нормально начинал работать с геймпадом от нинтедно procon только в таких условиях.
Ответить
Развернуть ветку
Аккаунт удален
16.09.2020
Комментарий недоступен
Ответить
Развернуть ветку
Аккаунт удален
16.09.2020
Комментарий недоступен
Ответить
Развернуть ветку
Аккаунт отморожен
16.09.2020
А вот у меня от этих дров соски дрожали при тесте и в контрол (первое, что стояло на компе) джесси сама по себе ходила и камера шароебилась. При том, что на старых дровах и старой дс4виндовс этой ситуации не было. Странно, не так ли?
Ответить
Развернуть ветку
knight.killer
16.09.2020
Геймпад точно оригинальный? У меня подобное только с китайцами было.
Ответить
Развернуть ветку
GabeN Stimovitch
16.09.2020
Автор
Да оригинал.Вроде получилось соединить.Только через старую версию проги)
Ответить
Развернуть ветку