
Cправка — Gmail
Войти
Справка Google
- Справочный центр
- Сообщество
- Gmail
- Политика конфиденциальности
- Условия предоставления услуг
- Отправить отзыв
Тема отзыва
Информация в текущем разделе Справочного центра
Общие впечатления о Справочном центре Google
- Справочный центр
- Сообщество
- Раньше не работали с интегрированным сервисом Gmail?
Gmail
A «Permission denied» error means that the server rejected your connection. There could be several reasons why, and the most common examples are explained below.
Should the sudo command or elevated privileges be used with Git?
You should not be using the sudo command or elevated privileges, such as administrator permissions, with Git. If you have a very good reason you must use sudo, then ensure you are using it with every command (it’s probably just better to use su to get a shell as root at that point). If you generate SSH keys without sudo and then try to use a command like sudo git push, you won’t be using the same keys that you generated.
Check that you are connecting to the correct server
Typing is hard, we all know it. Pay attention to what you type; you won’t be able to connect to «githib.com» or «guthub.com». In some cases, a corporate network may cause issues resolving the DNS record as well.
To make sure you are connecting to the right domain, you can enter the following command:
$ ssh -vT git@github.com
> OpenSSH_8.1p1, LibreSSL 2.7.3
> debug1: Reading configuration data /Users/YOU/.ssh/config
> debug1: Reading configuration data /etc/ssh/ssh_config
> debug1: /etc/ssh/ssh_config line 47: Applying options for *
> debug1: Connecting to github.com port 22.
The connection should be made on port 22, unless you’re overriding settings to use SSH over HTTPS.
Always use the «git» user
All connections, including those for remote URLs, must be made as the «git» user. If you try to connect with your GitHub username, it will fail:
$ ssh -T GITHUB-USERNAME@github.com
> Permission denied (publickey).
If your connection failed and you’re using a remote URL with your GitHub username, you can change the remote URL to use the «git» user.
You should verify your connection by typing:
$ ssh -T git@github.com
> Hi USERNAME! You've successfully authenticated...
Make sure you have a key that is being used
- Open TerminalTerminalGit Bash.
- Verify that you have a private key generated and loaded into SSH.
# start the ssh-agent in the background
$ eval "$(ssh-agent -s)"
> Agent pid 59566
$ ssh-add -l -E sha256
> 2048 SHA256:274ffWxgaxq/tSINAykStUL7XWyRNcRTlcST1Ei7gBQ /Users/USERNAME/.ssh/id_rsa (RSA)
If you have GitHub Desktop installed, you can use it to clone repositories and not deal with SSH keys.
-
If you are using Git Bash, turn on ssh-agent:
# start the ssh-agent in the background
$ eval "$(ssh-agent -s)"
> Agent pid 59566
If you are using another terminal prompt, such as Git for Windows, turn on ssh-agent:
# start the ssh-agent in the background $ eval $(ssh-agent -s) > Agent pid 59566 -
Verify that you have a private key generated and loaded into SSH.
$ ssh-add -l -E sha256
> 2048 SHA256:274ffWxgaxq/tSINAykStUL7XWyRNcRTlcST1Ei7gBQ /Users/USERNAME/.ssh/id_rsa (RSA)
- Open TerminalTerminalGit Bash.
- Verify that you have a private key generated and loaded into SSH.
$ ssh-add -l -E sha256
> 2048 SHA256:274ffWxgaxq/tSINAykStUL7XWyRNcRTlcST1Ei7gBQ /Users/USERNAME/.ssh/id_rsa (RSA)
The ssh-add command should print out a long string of numbers and letters. If it does not print anything, you will need to generate a new SSH key and associate it with GitHub.
Tip: On most systems the default private keys (~/.ssh/id_rsa and ~/.ssh/identity) are automatically added to the SSH authentication agent. You shouldn’t need to run ssh-add path/to/key unless you override the file name when you generate a key.
Getting more details
You can also check that the key is being used by trying to connect to git@github.com:
$ ssh -vT git@github.com
> ...
> debug1: identity file /Users/YOU/.ssh/id_rsa type -1
> debug1: identity file /Users/YOU/.ssh/id_rsa-cert type -1
> debug1: identity file /Users/YOU/.ssh/id_dsa type -1
> debug1: identity file /Users/YOU/.ssh/id_dsa-cert type -1
> ...
> debug1: Authentications that can continue: publickey
> debug1: Next authentication method: publickey
> debug1: Trying private key: /Users/YOU/.ssh/id_rsa
> debug1: Trying private key: /Users/YOU/.ssh/id_dsa
> debug1: No more authentication methods to try.
> Permission denied (publickey).
In that example, we did not have any keys for SSH to use. The «-1» at the end of the «identity file» lines means SSH couldn’t find a file to use. Later on, the «Trying private key» lines also indicate that no file was found. If a file existed, those lines would be «1» and «Offering public key», respectively:
$ ssh -vT git@github.com
> ...
> debug1: identity file /Users/YOU/.ssh/id_rsa type 1
> ...
> debug1: Authentications that can continue: publickey
> debug1: Next authentication method: publickey
> debug1: Offering RSA public key: /Users/YOU/.ssh/id_rsa
Verify the public key is attached to your account
You must provide your public key to GitHub to establish a secure connection.
-
Open Terminal.
-
Start SSH agent in the background.
$ eval "$(ssh-agent -s)" > Agent pid 59566 -
Find and take a note of your public key fingerprint.
$ ssh-add -l -E sha256 > 2048 SHA256:274ffWxgaxq/tSINAykStUL7XWyRNcRTlcST1Ei7gBQ /Users/USERNAME/.ssh/id_rsa (RSA) -
In the upper-right corner of any page, click your profile photo, then click Settings.

-
In the «Access» section of the sidebar, click SSH and GPG keys.
-
Compare the list of SSH keys with the output from the
ssh-addcommand.

-
Open the command line.
-
Start SSH agent in the background.
$ ssh-agent -s > Agent pid 59566 -
Find and take a note of your public key fingerprint.
$ ssh-add -l -E sha256 > 2048 SHA256:274ffWxgaxq/tSINAykStUL7XWyRNcRTlcST1Ei7gBQ /Users/USERNAME/.ssh/id_rsa (RSA) -
In the upper-right corner of any page, click your profile photo, then click Settings.
-
In the «Access» section of the sidebar, click SSH and GPG keys.
-
Compare the list of SSH keys with the output from the
ssh-addcommand.
-
Open Terminal.
-
Start SSH agent in the background.
$ eval "$(ssh-agent -s)" > Agent pid 59566 -
Find and take a note of your public key fingerprint. If you’re using OpenSSH 6.7 or older:
$ ssh-add -l
 > 2048 a0:dd:42:3c:5a:9d:e4:2a:21:52:4e:78:07:6e:c8:4d /Users/USERNAME/.ssh/id_rsa (RSA)
If you’re using OpenSSH 6.8 or newer:
$ ssh-add -l -E md5 > 2048 MD5:a0:dd:42:3c:5a:9d:e4:2a:21:52:4e:78:07:6e:c8:4d /Users/USERNAME/.ssh/id_rsa (RSA) -
In the upper-right corner of any page, click your profile photo, then click Settings.
-
In the «Access» section of the sidebar, click SSH and GPG keys.
-
Compare the list of SSH keys with the output from the
ssh-addcommand.
If you don’t see your public key in GitHub, you’ll need to add your SSH key to GitHub to associate it with your computer.
Warning: If you see an SSH key you’re not familiar with on GitHub, delete it immediately and contact GitHub Support, for further help. An unidentified public key may indicate a possible security concern. For more information, see «Reviewing your SSH keys.»
by Afam Onyimadu
Afam is a geek and the go-to among his peers for computer solutions. He has a wealth of experience with Windows operating systems, dating back to his introduction… read more
Updated on June 15, 2022
- The permission denied error message is often caused with you try transferring or copying files without the proper access privileges.
- Tiny typo errors in location addresses are enough to cause this error on a server request.
- If global read/write settings are changed, they should be revoked as soon as the file transfer is over.
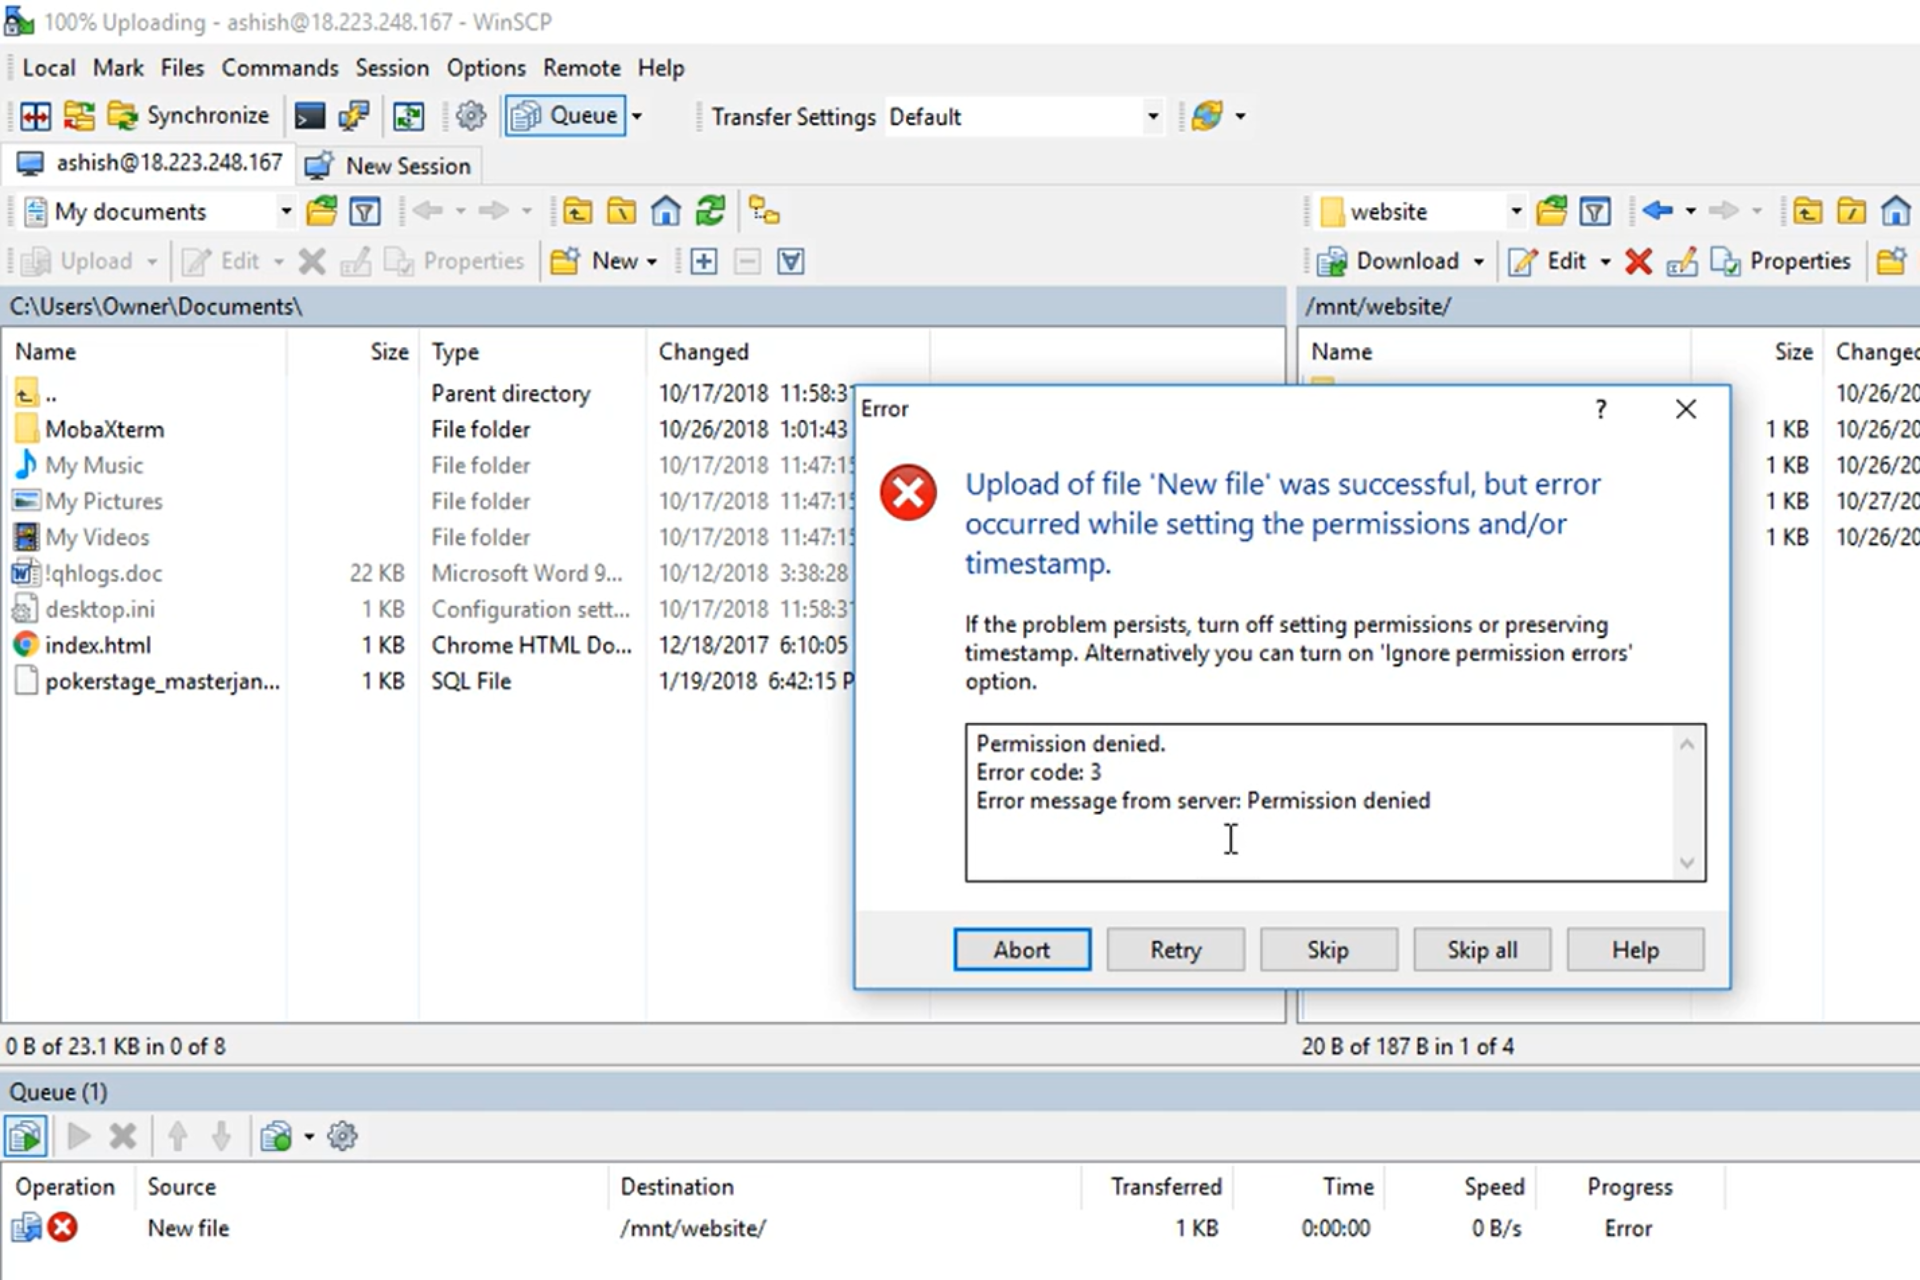
In this article, we discuss the error permission denied. error code: 3 error message from server: permission denied
Error codes on computers or computing processes can be frustrating. In many instances, it implies that your operations are halted, and you will no longer be able to execute specific tasks. Unfortunately, the permission denied error code 3 is not an exception.
In this article, we dive into this error and recommend what to do when it comes up. Note that Windows users may face a similar problem of no access to the server.
Without much ado, let’s jump into it.
What does it mean when it says permission denied?
Firstly, let’s point out that you should be mindful of a few variations to this error. You may get either of the following:
- Permission denied. error code 3
- SFTP error 3 permission denied
- WinSCP network error: permission denied
- Error message from server: permission denied
Whichever is the case, it most likely means that you do not have adequate rights to access or transfer a directory or file.
In the case of the SFTP variant, you can usually access the SFTP server via SSH, but you will not be able to make changes to a specific directory or file.
Generally, you will get this error while transferring or copying files from a local system to a remote host.
How do I fix the denied permissions error?
1. Confirm the password and username
Since this error is often caused because you do not have the proper access rights to a file, it could mean you are using the wrong credentials. Therefore, you should check your username and password and ensure they are the credentials with the proper rights to access the file.
2. Change file permission to read/write
- Type in this code to give read permission:
sudo chmod -R 755 /remote-dir/
- Type in this code to give write permission:
sudo chmod -R 777 /remote-dir/
- Try the file copy or transfer again and see if you have the permission denied error message.


Changing the file permission to RXW for everyone could pose a security risk. Hence, if this is your adopted method, you should undo it once the transfer is completed.
- Microsoft Edge for Chromebook: How to Download & Install
- The Video Cannot be Played Error Code: 102630 [Fix]
3. Confirm the remote file path
This is a rookie mistake, but not one to be ignored. You may have just typed in the wrong resource path. In this case, your access will be denied.
All you need to do is confirm the correct path and re-input it. If you still do not have access, skip to the next solution.
With any of these three fixes, you should have been able to resolve the permission denied. error code: 3 error message from server: permission denied on your server.
You mainly have to pay attention to user rights, and you will be able to avoid this issue in the future.
![]()
|
Диман Лопухов Пользователь Сообщений: 1 |
FETCH — Сервер сообщает об ошибке: -ERR access denied. www.popmail.com . |
|
Vladimir Yashnikov Новичок Сообщений: 4 |
Программа сообщает, что запрещён доступ. |
|
snake Новичок Сообщений: 8 |
ага. да вот только у меня в офисе точно НЕ платный локальный почтовый сервер. з.ы. the bat! 3.99.25 |
|
Иван Болховитинов  Гуру Сообщений: 3530 Машина должна работать, а человек думать |
>access denied возможно пароль неверный, возможно в настройках самого сервера ещё что-то для ящика не то указано… |
|
snake Новичок Сообщений: 8 |
#5
20.02.2008 15:57:42 в помощь: |
So the possible reason for this would be related to typo in environment variables names or else not installed dotenv package .
So if there is any other error apart from typo and dotenv npm package ,then you must try these solutions which are given below:
First solution
for Windows only
Open cmd as run as administrator and then write two commands
net stop winnatnet start winnat
hope this may solve the problem …
Second solution
for windows only
make sure to see that in your environment variable that there is no semicolon(;) at the end of the variable and there is no colon (:) after the variable name.
for example I was working on my project in which my env variables were not working so the structure for my .env file was like PORT:5000; CONNECTION_URL:MongoDbString.<password>/<dbname>; so it was giving me this error
Error: listen EACCES: permission denied 5000;
at Server.setupListenHandle [as _listen2] (node:net:1313:21)
at listenInCluster (node:net:1378:12)
at Server.listen (node:net:1476:5)
at Function.listen (E:MERN REACTmern_memoriesservernode_modulesexpresslibapplication.js:618:24)
at file:///E:/MERN%20REACT/mern_memories/server/index.js:29:9
at processTicksAndRejections (node:internal/process/task_queues:96:5)
Emitted ‘error’ event on Server instance at:
at emitErrorNT (node:net:1357:8)
at processTicksAndRejections (node:internal/process/task_queues:83:21) {
code: ‘EACCES’,
errno: -4092,
syscall: ‘listen’,
address: ‘5000;’,
port: -1
}
[nodemon] app crashed — waiting for file changes before starting…
So i did some changes in my env file this time i removed the colon(:) and replaced it with equal(=) and removed semi colon at the end so my .env file was looking like this
PORT = 5000
CONNECTION_URL = MongoDbString.<password>/<dbname>
After changing these thing my server was running on the port 5000 without any warning and issues
Hope this may works…
#code #developers #mernstack #nodejs #react #windows #hostservicenetwork #http #permission-denied #EACCES:-4092