
This means that a TCP RST was received and the connection is now closed. This occurs when a packet is sent from your end of the connection but the other end does not recognize the connection; it will send back a packet with the RST bit set in order to forcibly close the connection.
This can happen if the other side crashes and then comes back up or if it calls close() on the socket while there is data from you in transit, and is an indication to you that some of the data that you previously sent may not have been received.
It is up to you whether that is an error; if the information you were sending was only for the benefit of the remote client then it may not matter that any final data may have been lost. However you should close the socket and free up any other resources associated with the connection.
The “Connection reset by peer” error occurs during a network connection when the other end or server closes the connection without reading the transferred data. The peer will return the data packet you sent while sending the RST (reset) bit and forcefully terminate the connection.
This issue usually happens if you are being blocked by the Firewall on any point in the route. But it can also happen due to other reasons. In this article, we mention different causes for the error along with how you can resolve it in each scenario.
Causes for Connection Reset By Peer
Here are some of the potential reasons for the “Connection reset by peer” error:
- Access blocked by firewall or hosts file.
- Your IP banned on the host server.
- Server settings changed without restarting the daemons.
- Low timeout period for connection.
- Server busy with maximum connections.
- Bugs in the program used to set up the connection.
First, make sure your system is not too busy. If you have high usage of CPU, memory or network, you’ll experience issues while setting up a new connection.
Also, try restarting the session and retry the attempt to make the connection. Then move on to the possible solution we have provided below.
Most of the steps we have mentioned are for a Debian based Linux server. If you have any other system, you can apply similar steps by searching on the internet for the exact process. Some commands also vary between the different Linux systems. So look out for those as well.
Check Logs
First, you need to check the logs or error messages to narrow down the reason for the error.
If you have access to the server, you can check the server-side logs as well.
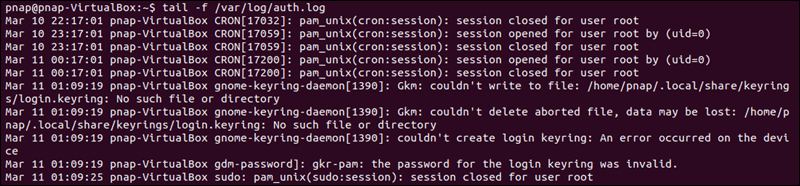
For example, if you are experiencing this issue while setting up an ssh connection, you need to check the /var/log/auth.log file. To do so,
- Open the Terminal.
- Enter
tail -f /var/log/auth.log.
It shows the logging information sent by the SSH daemon during the authentication attempts of your remote system.
Check Internet Connectivity and Routing
The next thing you should do is check for internet connectivity issues. You can check if the public or private server has gone down using IP lookup or similar websites.
You can also use use traceroute or tracert to trace the route between the two endpoints and check which access point is resetting your connection. The syntax is:
- On Linux:
traceroute [domain/IP] - On Windows:
tracert [domain/IP]

If the public server or access points are down, you need to wait until they are up again. For issues with the private server, you can contact the system admin or restart it if you have access.
Check for IP Ban
One major reason for this issue while connecting to public servers is your IP being blacklisted by major security service providers. Most public servers ban IP addresses while conforming to these server’s database.
To check whether your IP address is blacklisted,
- Open the MX Toolbox Supertool webpage.
- Set the yellow drop down box to Blacklist Check.
- Enter your IP address on the text box and click Blacklist Check. If you don’t know you IP address, search for “What is my IP” on Google.


If your IP is blacklisted on multiple security networks, or important ones like BARRACUDA, BLOCKLIST.DE, Nordspam BL, etc., most servers or security filters will also ban you.
The only thing you can do is talk your ISP and have them contact the server admin to remove the ban.
You can also try changing your IP address using VPN to bypass this issue.
Check Firewall and Network Security Filters
The “Connection reset by peer” error occurs mostly due to Firewalls blocking access to the server.
If you have access to the private server you are trying to connect to, you can check if the firewall is actually blocking access to your IP. To do so on Linux,
- Open the Terminal
- Enter
sudo iptables -L --line-number
- Check for authentication attempts of your IP address and check if the target accepts or rejects the connection.

You can also check other security filters available on the server. The steps may vary between the respective programs, so check the official website or documentation for the methods.
Then, you need to whitelist your IP address on intrusion prevention apps like Fail2ban, DenyHosts, and so on, to make exceptions to the Firewall rules. The necessary steps to do so on Fail2ban is as follows:
- Open the Terminal and enter
sudo nano /etc/fail2ban/jail.conf - Remove the # symbol in front of
ignoreip =and add the IP addresses you want on the line. - For instance, the line can be
ignoreip = 10.10.10.8 - Save and exit.
Warning: Practices such as disabling Firewall or making exception for all IPs on the firewall is not recommended. Firewalls and security filters exist to protect your system. So rather than compromising the security, it’s better to search for a workaround.
Restart Services and Daemons
If you encounter this issue on a private network, it is possible that the server admin has changed the rules for the connection without restarting the daemon services. This causes the service daemons to get stuck as it is still want to conform to the previous settings.
- Contact the server administrator and ask them to restart the service and the daemons in such scenario.
- If you have access to the server, you can do it yourself. First, verify that the services and the daemons are running using systemctl command.
- Restart the relevant daemons. The command you need for this process in a debian-based system is
sudo systemctl restart “daemon name”
For instance, if you are setting up a FTP connection using samba share, you need to use the command sudo systemctl restart smbd. Since SSH service is available on almost all distros of linux, you don’t have to install any service package for it. So, for SSH connection, the command is sudo systemctl restart ssh.
And if you are using any other hosting services to set up the connection, you need to restart their daemons as well.
Edit Hosts File
Hosts files allow you to permit or deny access to particular IP addresses or hostnames. If you have access to the server, you should also check these files and make sure your IP address can establish a connection to the server.
To do so for a Debian System,
- Open the Terminal and enter
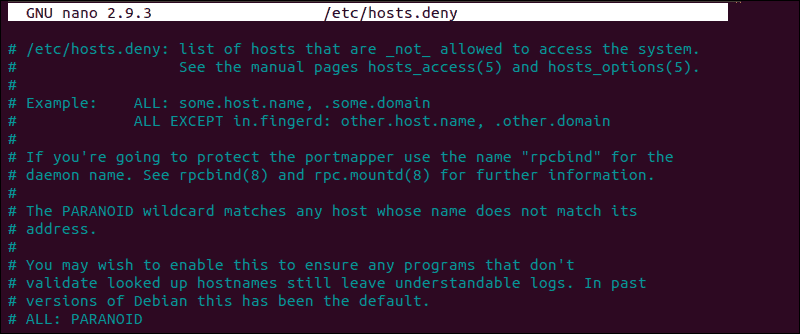
sudo nano /etc/hosts.deny
- Search for your local IP or host name on the file.
- If it’s there, comment it out by typing # before the line. You can also remove the line altogether.

You can also add your IP address on the hosts.allow file to force the connection. The process is similar to the above.
- Open the Terminal and enter
sudo nano /etc/hosts.allow. - Enter your IP address using the syntax is
daemon_list : client_list [: command] - Save and exit.
The daemon for FTP is usually vsftpd and for ssh, scp, and sftp is sshd. So, to allow ssh connection with local address, 10.10.10.8, you need to add sshd : 10.10.10.8 , LOCAL
It is also possible to edit the hosts file on Windows based server. You can refer to out article on editing hosts file on Windows for more to learn the necessary process.
Increase Timeout or Send Keepalive Packets
Many networking tools drop idle TCP and FTP connections after a certain period of inactivity.
There are two ways to prevent this issue:
- Increase the timeout period.
- Send periodic heartbeat data.
The first option is not a good solution. Keeping the timeout long can affect the server’s connections to other networks as they have to wait longer before attempting to set up a connection. You also need to increase the timeout on both ends, which is not always possible.
So, the better solution is to send regular heartbeat or keepalive packets. This prevents the connection from being idle and keeps the session alive for longer period.
Some connections allow sending keepalive packets but you have to enable this process for others. Here’s how you can enable the process of sending such packets:
On Linux
- Open the Terminal and enter
sudo nano /etc/sysctl.conf - Add the following lines while changing the values (in seconds) per your preference:
net.ipv4.tcp_keepalive_time = 300net.ipv4.tcp_keepalive_probes = 9net.ipv4.tcp_keepalive_intvl = 10
- Save and exit.
- Enter the command
sysctl --load=/etc/sysctl.conf

The above lines specify that the system waits for 300 seconds before sending the first keepalive packet. Then, it keeps sending the packet every 10 seconds. If it doesn’t receive ACK (acknowledgement) signal for 9 successive times, the connection is dropped.
Increasing the Keepalive period for SSH connections might compromise security as it remains open for a longer time. This connection is supposed to be very secure, so it’s not recommended to make any changes to the keepalive settings for ssh.
On Windows
- Open Run and enter
regedit. - Navigate to
ComputerHKEY_LOCAL_MACHINESystemCurrentControlSetServicesTcpipParameters
- Right-click on Parameters
- Add the following DWORD entries along with the respective values (in milliseconds) as you see fit:
- KeepAliveTime – 300000 (in Decimal)
- KeepAliveInterval – 1000
- To add an entry, right-click on Parameter, select New > DWORD (32-bit) Value and enter the name.
- Then, double-click on the entry to change its Value data.

Note: You must also enable TCP keepalive packets in your TCP/FTP client.
Check sshd_config File
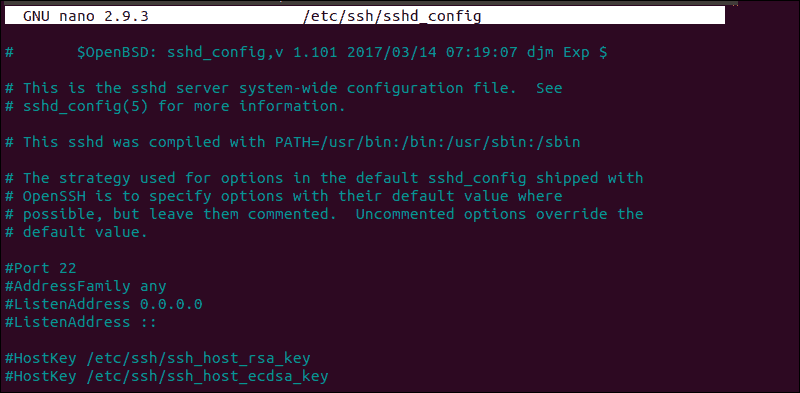
The sshd_config file configures all settings an SSH (Secure Shell) connection uses. So, if possible, you need to check this file on the server and make sure everything is alright.
- Open the file using the command
sudo nano /etc/ssh/sshd_config.
- Look at the options we have provided below and change accordingly. You may also change other options depending on your connection. We recommend checking out the sshd_config documentation for more information.
- After changing these values, save and exit.
- Restart sshd using the command
sudo systemctl restart ssh

Some of the options are:
MaxStartups
The MaxStartups value determines the maximum number of possible unauthenticated connections to the SSH daemon before the connections start dropping.
It has the format MaxStartups 10:30:100, where,
- 10: Number of unauthenticated connections the dropping starts
- 30: Probability of dropping after reaching the maximum unauthenticated number
- 100: Maximum number of connections possible before dropping all of them
If your remote client needs to make more number of connections concurrently, you need to change these values.
Subsystem sftp
On a secure FTP connection using openssh package, the default value of Subsystem sftp is set to /usr/lib/openssh/sftp-server. However, sometimes, the openssh binary is available at /usr/lib/ssh/sftp-server instead. So you can alter this value and check if it works. If it doesn’t, revert it to the previous path.
ClientAlive
ClientAlive is a more secure keepalive setting. You can change the ClientAliveInterval and ClientAliveCountMax values in sshd_config to enable this setting.
ClientAliveInterval determines the interval of inactivity after which sshd sends an encrypted message to the client. And ClientAliveCountMax determines the max number of times sshd sends this message before dropping the connection if it doesn’t get any response.
Check Support for SSL
If the host server has enabled SSL (Secure Sockets Layer) but you haven’t enabled this service on your end, you can’t establish a connection.
So, you need to check the support for SSL on your TCP or any other network client and enable it. If it doesn’t support SSL, you need to use another client.
You also need to check your certificates and make sure you don’t have any malformed keys or certificates.
Change Open Connection Limit
Establishing a network connection also creates a socket, which is the logical window the client uses to communicate with the server. However, a server has a limit on how many sockets it can open at the same time.
If the server has already reached this limit, any new connection causes the server to drop the idle old connections. You can refresh or restart the session to renew the session. However, you can also increase the limit on the server side to facilitate more open connections.
If you want to change the limit for only the current session, you can use the command ulimit -n 65535, while replacing the number depending on your requirement.
To change it permanently,
- Open the Terminal and enter
sudo nano /etc/security/limits.conf - Add the following lines while changing the value of the limit if you want:
* soft nofile 65535* hard nofile 65535
- Save and exit. Then, restart the daemons and the session.

For Debian and Ubuntu systems, you need to enable PAM user limits as well. To do so,
- Enter sudo nano
/etc/pam.d/common-session - Add
required pam_limits.so - Add this command on
/etc/pam.d/common-session-noninteractiveas well. - If you are using a SSH connection, add the line to
/etc/pam.d/sshd
Debug Your Scripts and Configurations
Many users have encountered this issue while creating their own connection applications. In such scenario, any bugs in the scripts or configuration that unnecessarily close the connection or don’t conform the connection with the protocol will cause this error.
So, we recommend carefully looking through the program. Some protocols have quit or close commands that makes the host server close the connection.
You also need to close all forked child processes before exiting to prevent zombie processes. The zombie processes stay in the process table even after terminating the child. If there are too many zombie processes, the process table gets full. This way, the system fails to create new processes, disrupting the connection.
If you have trouble debugging your program, we recommend getting help from technical forums such as stackoverflow while providing the source code.
Connection Reset by peer means the remote side is terminating the session. This error is generated when the OS receives notification of TCP Reset (RST) from the remote peer.
Understanding Connection Reset by peer
Connection reset by peer means the TCP stream was abnormally closed from the other end. A TCP RST was received and the connection is now closed. This occurs when a packet is sent from our end of the connection but the other end does not recognize the connection; it will send back a packet with the RST bit set in order to forcibly close the connection.
“Connection reset by peer” is the TCP/IP equivalent of slamming the phone back on the hook. It’s more polite than merely not replying, leaving one hanging. But it’s not the FIN-ACK expected of the truly polite TCP/IP.
Understanding RST TCP Flag
RST is used to abort connections. It is very useful to troubleshoot a network connection problem.
RST (Reset the connection). Indicates that the connection is being aborted. For active connections, a node sends a TCP segment with the RST flag in response to a TCP segment received on the connection that is incorrect, causing the connection to fail.
The sending of an RST segment for an active connection forcibly terminates the connection, causing data stored in send and receive buffers or in transit to be lost. For TCP connections being established, a node sends an RST segment in response to a connection establishment request to deny the connection attempt. The sender will get Connection Reset by peer error.
Understanding TCP Flags SYN ACK RST FIN URG PSH
Check network connectivity
The “ping” command is a tool used to test the availability of a network resource. The “ping” command sends a series of packets to a network resource and then measures the amount of time it takes for the packets to return.
If you want to ping a remote server, you can use the following command: ping <remote server>
In this example, “<remote server>” is the IP address or hostname of the remote server that you want to ping.
Ping the remote host we were connected to. If it doesn’t respond, it might be offline or there might be a network problem along the way. If it does respond, this problem might have been a transient one (so we can reconnect now)
If you are experiencing packet loss when pinging a remote server, there are a few things that you can do to troubleshoot the issue.
The first thing that you can do is check the network interface on the remote server. To do this, use the “ifconfig” command. The output of the “ifconfig” command will show you the status of all network interfaces on the system. If there is a problem with one of the interfaces, it will be shown in the output.
You can also use the “ip route” command to check routing information. The output of the “ip route” command will show you a list of all routes on the system. If there is a problem with one of the routes, it will be shown in the output.
If you are still experiencing packet loss, you can try to use a different network interface. To do this, use the “ping” command with the “-i” option. For example, the following command will use the eth0 interface:
ping -i eth0 google.com
Check remote service port is open
A port is a logical entity which acts as a endpoint of communication associated with an application or process on an Linux operating system. We can use some Linux commands to check remote port status.
Commands like nc, curl can be used to check if remote ports are open or not. For example, the following command will check if port 80 is open on google.com:
nc -zv google.com 80
The output of the above command should look something like this: Connection to google.com port 80 [tcp/80] succeeded!
This means that the port is open and we can establish a connection to it.
6 ways to Check a remote port is open in Linux
Check application log on remote server
For example, if the error is related with SSH. we can debug this on the remote server from sshd logs. The log entries will be in one of the files in the /var/log directory. SSHD will be logging something every time it drops our session.
Oct 22 12:09:10 server internal-sftp[4929]: session closed for local user fred from [192.0.2.33]
Check related Linux kernel parameters
Kernel parameter is also related to Connection Reset by peer error. The keepalive concept is very simple: when we set up a TCP connection, we associate a set of timers. Some of these timers deal with the keepalive procedure. When the keepalive timer reaches zero, we send our peer a keepalive probe packet with no data in it and the ACK flag turned on.
we can do this because of the TCP/IP specifications, as a sort of duplicate ACK, and the remote endpoint will have no arguments, as TCP is a stream-oriented protocol. On the other hand, we will receive a reply from the remote host (which doesn’t need to support keepalive at all, just TCP/IP), with no data and the ACK set.
If we receive a reply to we keepalive probe, we can assert that the connection is still up and running without worrying about the user-level implementation. In fact, TCP permits us to handle a stream, not packets, and so a zero-length data packet is not dangerous for the user program.
we usually use tcp keepalive for two tasks:
- Checking for dead peers
- Preventing disconnection due to network inactivity
Check Application heartbeat configuration
Connection Reset by peer error is also related to the application. Certain networking tools (HAproxy, AWS ELB) and equipment (hardware load balancers) may terminate “idle” TCP connections when there is no activity on them for a certain period of time. Most of the time it is not desirable.
We will use rabbitmq as an example. When heartbeats are enabled on a connection, it results in periodic light network traffic. Therefore heartbeats have a side effect of guarding client connections that can go idle for periods of time against premature closure by proxies and load balancers.
With a heartbeat timeout of 30 seconds the connection will produce periodic network traffic roughly every 15 seconds. Activity in the 5 to 15 second range is enough to satisfy the defaults of most popular proxies and load balancers. Also see the section on low timeouts and false positives above.
Check OS metric on peer side
Connection Reset by peer can be triggered by a busy system. we can setup a monitoring for our Linux system to the metrics like CPU, memory, network etc. If the system is too busy, the network will be impacted by this.
For example, we can use the “top” command to check the CPU usage. The output of the “top” command will show us the list of processes sorted by CPU usage. If there is a process which is using a lot of CPU, we can investigate this further to see if it is causing the network issues.
We can also use the “netstat” command to check network statistics. The output of the “netstat” command will show us a list of active network connections. If there are too many connections established, this could be causing the network issues.
We can use these commands to troubleshoot network issues on a Linux system. By using these commands, we can narrow down the root cause of the issue and fix it.
Monitoring Linux System with Telegraf Influxdb Grafana
Troubleshoot Network Slow Problems In Linux
Introduction
A remote machine has prevented an SSH connection you were attempting to establish or maintain. The “ssh_exchange_identification: read: Connection reset by peer” message is not specific enough to immediately explain what triggered the error.
To be able to resolve the issue successfully, we first need to identify its cause. This article provides an in-depth analysis of the likely causes and provides the most effective solutions.
By reading this tutorial, you will learn how to fix the “ssh_exchange_identification: read: Connection reset by peer” Error.

Prerequisites
- Necessary permissions to access remote server
- A user account with root or sudo privileges
The “ssh_exchange_identification: read: Connection reset by peer” error indicates that the remote machine abruptly closed the Transition Control Protocol (TCP) stream. In most instances, a quick reboot of a remote server might solve a temporary outage or connectivity issue.
Note: Network-based firewalls or load-balancers can sometimes distort IPs or security permissions. This type of problem can be resolved by contacting your service provider.
Learning how to troubleshoot this issue, and determining the underlying cause, helps you prevent future occurrences on your system. The most common causes of the “ssh_exchange_identification: read: Connection reset by peer” error are:
- The connection is being blocked due to the Host-Based Access Control Lists.
- Intrusion prevention software is blocking your IP by updating firewall rules (Fail2ban, DenyHosts, etc.).
- Changes to the SSH daemon configuration file.
Check the hosts.deny and hosts.allow File
The hosts.deny and hosts.allow files are TCP wrappers. As a security feature, these files are used to limit which IP address or hostname can establish a connection to the remote machine.
Note: Inspect the hosts.deny and hosts.allow files on the remote server, not on the local client.
How to Edit hosts.deny File
Access your remote server and open the hosts.deny file using your preferred text editor. If you are using nano on a Debian based system, enter the following command:
sudo nano /etc/hosts.denyEmpty lines and lines starting with the ‘#’ symbol are comments. Check if you can locate your local IP or host-name in the file. If it is present, it should be removed or commented out, or else it prevents you from establishing a remote connection.
After making the necessary changes, save the file and exit. Attempt to reconnect via SSH.
How to Edit hosts.allow File
As an additional precaution, edit the hosts.allow file. Access rules within the hosts.allow are applied first. They take precedence over rules specified in hosts.deny file. Enter the following command to access the hosts.allow file:
sudo nano /etc/hosts.allowAdding host-names and IPs to the file defines exceptions to the settings in the hosts.deny file.

For example, a strict security policy within the etc/hosts.deny file, would deny access to all hosts:
sshd : ALL
ALL : ALL
Subsequently, you can add a single IP address, an IP range, or a hostname to the etc/hosts.allow file. By adding the following line, only the following IP would be allowed to establish an SSH connection with your remote server:
sshd : 10.10.0.5, LOCALKeep in mind that such a limiting security setting can affect administering capabilities on your remote servers.
Check if fail2ban Banned Your IP Address
If you’ve tried to connect on multiple occasions, your IP might be blocked by an intrusion prevention software. Fail2ban is a service designed to protect you from brute force attacks, and it can misinterpret your authentication attempts as an attack.
Fail2ban monitors and dynamically alters firewall rules to ban IP addresses that exhibit suspicious behavior. It monitors logs, like the hosts.deny and hosts.allow files we edited previously.
In our example, we used the following command to check if the iptables tool is rejecting your attempted connections:
sudo iptables -L --line-numberThe output in your terminal window is going to list all authentication attempts. If you find that a firewall is indeed preventing your SSH connection, you can white-list your IP with fail2ban. Otherwise, the service is going to block all future attempts continuously. To access the fail2ban configuration file, enter the following command:
sudo nano /etc/fail2ban/jail.confEdit the file by uncommenting the line that contains "ignoreip =" add the IP or IP range you want to white-list.
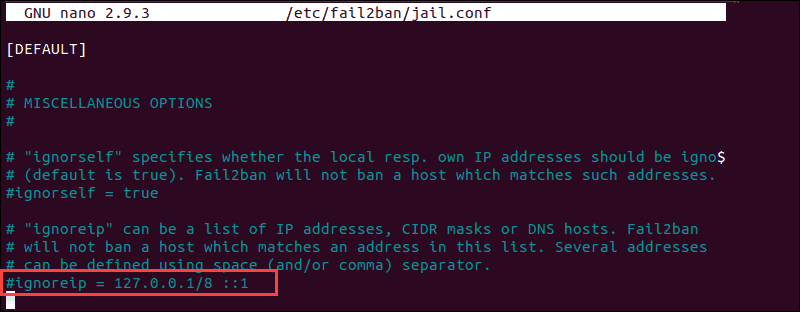
Fail2ban is now going to make an exception and not report suspicious behavior for the IP in question.
Check the sshd_config File
If you are continuing to experience the ‘ssh_exchange_identification: read: Connection reset by peer’ error, examine the authentication log entry. By default, the SSH daemon sends logging information to the system logs. Access the /var/log/auth.log file after your failed attempt to login. To review the latest log entries type:
tail -f /var/log/auth.logThe output presents the results of your authentication attempts, information about your user account, authentication key, or password.
The log provides you with information that can help you find possible issues in the sshd configuration file, sshd_config. Any changes made to the file can affect the terms under which an ssh connection is established and lead the remote server to treat the client as incompatible. To access the sshd_config file type:
sudo nano /etc/ssh/sshd_configThe sshd configuration file enables you to change basic settings, such as the default TCP port or SSH key pairs for authentication, as well as more advanced functions such as port-forwarding.
For example, the MaxStartups variable defines how many connections a system accepts in a predefined period. If you have a system that makes a large number of connections in a short timeframe, it might be necessary to increase the default values for this variable. Otherwise, the remote system might refuse additional attempted ssh connections.

Anytime you edit the sshd_config file, restart the sshd service for the changes to take effect:
service sshd restartOnly edit the variables that you are familiar with. A server can become unreachable as a result of a faulty configuration file.
Conclusion
You have thoroughly checked the most common reasons behind the “ssh_exchange_identification: read: Connection reset by peer” error. By looking at each possibility, in turn, you have successfully solved the issue and now know how to deal with similar problems going forward.
The number of potential causes is vast and difficult to troubleshoot in every respect. Ultimately, if the error persists, it might be necessary to contact your host.
The connection reset by peer is a TCP/IP error that occurs when the other end (peer) has unexpectedly closed the connection. It happens when you send a packet from your end, but the other end crashes and forcibly closes the connection with the RST packet instead of the TCP FIN, which is used to close a connection under normal circumstances. In Go, you can detect the connection reset by peer by checking if the error returned by the peer is equal to syscall.ECONNRESET.
Reproduce the connection reset by peer error
We can reproduce the error by creating a server and client that do the following:
- the server reads a single byte and then closes the connection
- the client sends more than one byte
If the server closes the connection with the remaining bytes in the socket’s receive buffer, then an RST packet is sent to the client. When the client tries to read from such a closed connection, it will get the connection reset by peer error.
See the following example, which simulates this behavior.
package main

import (
    "errors"
    "log"
    "net"
    "os"
    "syscall"
    "time"
)

func server() {
    listener, err := net.Listen("tcp", ":8080")
    if err != nil {
        log.Fatal(err)
    }

    defer listener.Close()

    conn, err := listener.Accept()
    if err != nil {
        log.Fatal("server", err)
        os.Exit(1)
    }
    data := make([]byte, 1)
    if _, err := conn.Read(data); err != nil {
        log.Fatal("server", err)
    }

    conn.Close()
}

func client() {
    conn, err := net.Dial("tcp", "localhost:8080")
    if err != nil {
        log.Fatal("client", err)
    }

    if _, err := conn.Write([]byte("ab")); err != nil {
        log.Printf("client: %v", err)
    }

    time.Sleep(1 * time.Second) // wait for close on the server side

    data := make([]byte, 1)
    if _, err := conn.Read(data); err != nil {
        log.Printf("client: %v", err)
        if errors.Is(err, syscall.ECONNRESET) {
            log.Print("This is connection reset by peer error")
        }
    }
}

func main() {
    go server()

    time.Sleep(3 * time.Second) // wait for server to run

    client()
}
Output:
2021/10/20 19:01:58 client: read tcp [::1]:59897->[::1]:8080: read: connection reset by peer
2021/10/20 19:01:58 This is connection reset by peer error
Handle the connection reset by peer error
Typically, you can see the connection reset by peer error in response to a request being sent from the client to the server. It means that something bad has happened to the server: it has rebooted, the program has crashed, or other problems have occurred that cause the connection to be forcibly closed. Since TCP connections can be broken, there is no need to handle the connection reset by peer in any special way on the client side. You can log the error, ignore it or retry the connection when it occurs. In the example above, we detect the error using the errors.Is() function by checking if the returned error is an instance of syscall.ECONNRESET.
Difference between connection reset by peer and broken pipe
Both connection reset by peer and broken pipe errors occur when a peer (the other end) unexpectedly closes the underlying connection. However, there is a subtle difference between them. Usually, you get the connection reset by peer when you read from the connection after the server sends the RST packet, and when you write to the connection after the RST instead, you get the broken pipe error.
Check how to handle the
broken pipeerror in Go post, where will find another example of generating anRSTpacket and thebroken pipeerror.
Replace the client() function in the example above with the following code to reproduce the broken pipe error.
func client() {
    conn, err := net.Dial("tcp", "localhost:8080")
    if err != nil {
        log.Fatal("client", err)
    }

    if _, err := conn.Write([]byte("ab")); err != nil {
        log.Printf("client: %v", err)
    }

    time.Sleep(1 * time.Second) // wait for close on the server side

    if _, err := conn.Write([]byte("b")); err != nil {
        log.Printf("client: %v", err)
    }
}
With the new client, you will see the output:
2021/10/20 19:55:40 client: write tcp [::1]:60399->[::1]:8080: write: broken pipe
Note that these simple examples do not cover all cases where connection reset by peer and broken pipe may occur. There are much more situations where you can see these errors, and what error you see in what situation requires a deep understanding of the TCP design.