
Я делал ИИ, и у меня возникла проблема, что ии по какой-то причине не распознаёт мой микрофон. Подскажите пожалуйста, в чём проблема?
Мой микрофон в полном порядке и он работает.
Код:
import sys
import time
import webbrowser

import pyttsx3
import speech_recognition as sr
import pyautogui as pg


tts = pyttsx3.init()
def talk(words):
    tts.say(words)
    print(words)
    tts.runAndWait()

talk("Спроси")

def command():
    r = sr.Recognizer()

    with sr.Microphone() as source:
        print("Говорите...")
        r.pause_threshold = 1
        r.adjust_for_ambient_noise(source, duration=1)
        audio = r.listen(source)

    try:
        zadanie = r.recognize_google(audio, language="ru-RU").lower()
        print("Вы сказали:", zadanie)
    except sr.UnknownValueError:
        talk("Я вас не поняла")
        zadanie = command()

    return zadanie

def makeSomething(zadanie):
    if 'открой яндекс' in zadanie:
        talk("Уже открываю")
        url = 'https://ya.ru/'
        webbrowser.open(url)
    elif 'стоп' in zadanie:
        talk("Да конечно")
        sys.exit()
    elif 'привет' in zadanie:
        talk('привет')
    elif 'напиши код' in zadanie:
        talk('Окей, без проблем')
        pg.leftClick(99, 157, duration=0.5)
        pg.click(136, 161, duration=1)


while True:
    makeSomething(command())
Ошибка:

задан 5 фев в 14:35
![]()
5
К ИИ ведь тоже подход нужен, не правильно с ним обращаешься, вот он и не хочет с тобой дружить 
import webbrowser

import pyttsx3
from speech_recognition import Microphone, Recognizer, UnknownValueError, RequestError


class VoiceAssistant:
    def __init__(self):
        self.__recognizer = Recognizer()
        self.__tts = pyttsx3.init()

    def waiting_command(self):
        try:
            with Microphone() as source:
                print("Говорите...")
                self.speak("Ожидаю команды...")
                self.__recognizer.pause_threshold = 1
                self.__recognizer.adjust_for_ambient_noise(source, duration=1)
                audio = self.__recognizer.listen(source)
        except OSError:
            self.speak("Проверьте микрофон...")
            return
        try:
            command = self.__recognizer.recognize_google(audio, language="ru-RU").lower()
            print("Вы сказали:", command)
            return command
        except UnknownValueError as e:
            self.speak(f"Упс... ошибочка - {e}")
            return "Не поняла, повторите!"
        except RequestError as e:
            self.speak(f"Упс... ошибочка - {e}")

    def perform_command(self, command: str):
        match command:
            case 'открой браузер':
                webbrowser.open("https://yandex.ru")
            case 'всё спасибо ты свободна':
                self.speak("до свидания")
                exit(0)

    def speak(self, text: str):
        self.__tts.say(text)
        self.__tts.runAndWait()


def main():
    voice_assistant = VoiceAssistant()
    while True:
        command = voice_assistant.waiting_command()
        voice_assistant.perform_command(command)


if __name__ == '__main__':
    main()
ответ дан 5 фев в 17:34
![]()
АлександрАлександр
2,9852 золотых знака14 серебряных знаков21 бронзовый знак
16

- Remove From My Forums
помогите, пожалуйста, настроить внешний микрофон
-
Вопрос
-
проблема в следующем, ни через «запись», ни через Windows Speech Recognition не могу настроить микрофон. вроде бы по логике микрофон и прочее настраивается в Windows Speech Recognition, но у меня этой проги нет, точнее если её открыть, то там только вот эта ссылка http://www.microsoft.com/enable/products/windowsvista/speech.aspx
можно как то по другому микрофон настроить? подскажите, пожалуйста.
Все ответы
-
Какая версия Windows: Русская или Англиская? Если Русская, то Windows Speech Recognition в ней не доступен. Данная вункция просто вырезана из русской версии. А микрофон надо настраивать через свойства зуковой карты, по-моему так. Поробнее скажу завтра.
-
stanisluv написано: Если Русская, то Windows Speech Recognition в ней не доступен. Данная вункция просто вырезана из русской версии.
Это не совсем верное утверждение. При установке английского языкового пакета на русскую Vista Ultimate функция распознавания речи волшебным образом появляется.
А вот бардак с микрофоном в Vista присутствует, начиная с того, что даже его громкость отсутствует в микшере и заканчивая позорным звуком, коего не наблюдалось в ХР. Но я для этого как-нибудь отдельную тему создам.
Оксана
У вас в области уведомлений рядом с часами есть значок динамика? Щелкните по нему правой кнопкой мыши и выберите из меню пункт «Записывающие устройства» (Recording Devices) /по памяти пишу. Там будут настройки микрофона, если он распознается системой.Опишите конфигурацию компьютера и расскажите, используются ли стандартные драйверы, предложенные системой, или вы загружали драйверы аудиокарты с сайта производителя оборудования.
-
Или так: Пуск/Панель управления/Устройства и звук/Звук/запись. Если там невозможно настроить, то тогда нужно смореть, что с драйверами.
-
stanisluv написано: Или так: Пуск/Панель управления/Устройства и звук/Звук/запись. Если там невозможно настроить, то тогда нужно смореть, что с драйверами.
Согласен. У меня микрофон с наушинками и колонки — все функционирует в комплексе. Работает в Skype без проблем. А произведены настройки с помощью панели Realtek Hight Definition Audio (конфигурация входов, уровни) и Вистовские настройки (Звуки-Воспроизведение-Свойства-Уровни- выбираете какое подключение микрофона (с передней или задней панели)).
-
ГЫ.Все так пишут ответы, но главная героиня не отвечает)))
Вобще проблема может быть из-за того что на компьютере установлены две панели для микрофона (задняя и передняя), так вот скажу: ПРИ ПРИСУТСТВИИ ПЕРЕДНЕЙ ПАНЕЛИ ЗАДНЯЯ ОТКЛЮЧАЕТСЯ хоту ты убейсь…Оксано, может ты не туда тыкаеш?))))? -
А где взять английский языковой пакет? Подойдет он на Vista Home Premium? Будет ли Vista после установки пакета англоязычная? Как установить этот чудный пакет?
-
Языковой пакет можно поставить только на Vista Ultimate… языковое самообразование пользователя видимо не поощряется

Привет! Видимо в результате разборки и чистки ноутбука, сборка была выполнена неправильно, что привело к отсутствию работы встроенного микрофона. Попробуйте выполнить следующие действия, чтобы исправить проблему:
1. Перезагрузите ноутбук.
2. Зайдите в BIOS (нажав клавишу F2 при запуске ноутбука), проверьте, включен ли встроенный микрофон в разделе «Integrated Peripherals». Если он выключен, включите его и сохраните изменения.
3. Проверьте драйвер встроенного микрофона в диспетчере устройств. Если драйвера нет или он не правильно установлен, установите или обновите его.
4. Проверьте настройки звука. Откройте «Панель управления», выберите «Звук», затем «Запись». Проверьте, включен ли встроенный микрофон и установите его по умолчанию.
Если все эти действия не помогут, проверьте состояние самого микрофона и его кабеля подключения. Если необходимо, замените микрофон или кабель. Если проблема не решается, обратитесь к специалисту для дополнительной проверки. Удачи!
Speech recognition is a relatively new but important feature in Windows computers. This option allows you to voice type and give commands to use applications in Windows. However, in some cases, the Speech Recognition Setup may not work. If speech recognition doesn’t work on your Windows 11/10 computer, then please read this article for the resolutions.
Voice recognition not working
![Windows Speech Recognition doesn’t work [Fixed]](https://www.thewindowsclub.com/wp-content/uploads/2022/08/Speech-Recognition-Setup-Doesnt-Work.jpg "Windows Speech Recognition doesn’t work [Fixed]")
Speech Recognition helps you do various things on your computer. From opening a program to dictate text in any text editor – you can do everything using this functionality. However, if it doesn’t work on your computer, the following suggestions may be handy for you.
The main causes of Speech Recognition not working are hardware related issues, software/system permissions, missing or corrupt system files, issues with drivers, etc. If you encounter this problem on your computer, then please try the following solutions sequentially to fix the same:
- Re-enable Speech Recognition
- Check for hardware related issues
- Check if the correct microphone is connected
- Check for microphone permissions
- Increase the input volume of your microphone
- Check speech language
- Turn on Online Speech Recognition using Registry
- Change Group Policy settings
- Disable hotkey changer software
- Reinstall microphone (if external)
- Run the Recording audio troubleshooter
- Perform SFC scan
- Troubleshoot in Clean Boot State
- Miscellaneous solutions
1] Re-enable Speech Recognition
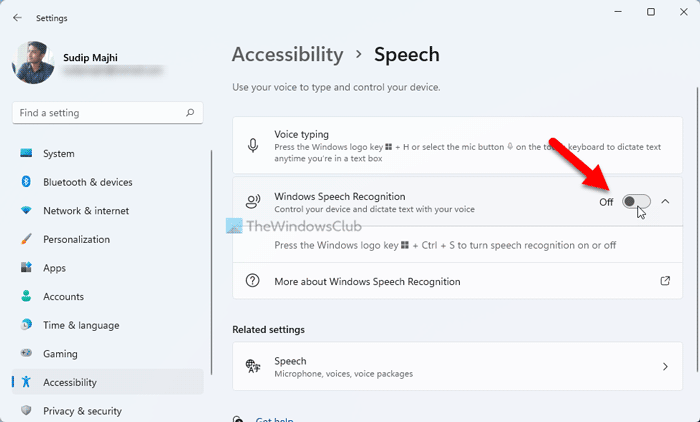
Even if you have turned on the Speech Recognition in Windows Settings, a bug or glitch could disable it automatically. It happens when you use a Beta or Dev Channel build. That is why it is recommended to verify the setting or re-enable it in Windows Settings.
To re-enable Speech Recognition in Windows 11, follow these steps:
- Press Win+I to open Windows Settings.
- Switch to the Accessibility tab.
- Click on the Speech menu.
- Toggle the Windows Speech Recognition button to turn it on.
Then, check if you can use Speech Recognition on your computer or not.
2] Check for hardware related issues
If there are issues with the microphone hardware or the USB connections then no matter what you try on your computer, the speech recognition will not work properly. In this case, we advise you to check your microphone with another computer to isolate the cause with the hardware. If the microphone works fine with another computer, then you can try further solutions.
3] Check if the correct microphone is connected
Ideally, the preferred microphone for any function on the computer is the default microphone of the laptop and if it is not attached then you would have to attach an external one. In the latter case, a Windows computer may or may not detect an external microphone. To confirm this, try the following.
- Right-click on the Start button and select Settings from the menu.
- In the Settings window, go to the System tab on the list on the left-hand side. In the right pane scroll down to Sound and click on it.
- Now scroll down to the Input section and check which microphone is connected and currently in use. It can be judged by checking the radio button.
If your mic is not connected, then click on add device and connect your Input microphone. Make sure that it is the one on which the radio button is checked after connecting.
4] Check for microphone permissions
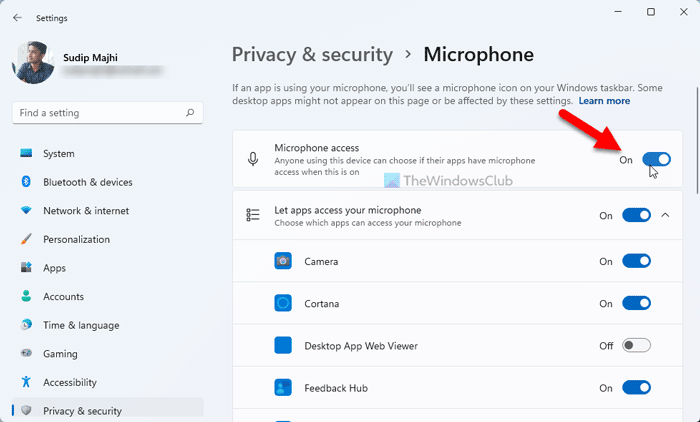
- Right-click on the Start button and select Settings from the menu.
- In the Settings window, go to the Privacy and Security tab on the list on the left-hand side.
- In the right pane, scroll down to App permissions, and click on Microphone.
- Turn the switches on for Microphone access and Let your apps access the microphone.
Also make sure that the switch is turned ON for the application for which you need the speech recognition.
5] Increase the input volume of your microphone
Usually, the volume of the output devices like speaker and headset is visible in the system tray itself. However, you will have to change the microphone volume through the Settings panel. In case the microphone volume is low, the issue in discussion can appear since the computer might not be able to recognize your speech. In this case, you can increase the microphone volume as follows.
- Right-click on the Start button and select Settings from the menu.
- Go to the System tab on the list on the left-hand side and then go to the Sound option on the list on the right-hand side.
- Scroll down to the Input section and you can use the slider to increase the volume.
6] Check speech language
Another reason for your software not recognizing the speech to the microphone could be that you might have selected the wrong language for speech recognition. This can be checked and fixed as follows.
- Right-click on the Start button and select Settings from the menu.
- Go to the Time and Language tab on the list on the left-hand side.
- In the right pane, scroll down and click on Speech.
- Check the speech language and change it if is incorrect.
Although Speech Recognition works with many languages, if you understand English, it is recommended to set English as the primary language. At times, a bug or glitch may block you from using speech recognition when you use any language other than English. That is why it is recommended to follow this guide to change Windows language back to English.
7] Turn on Online Speech Recognition using Registry

If you get this problem with Online Speech Recognition, you must verify the Registry settings. It is possible to enable or disable online Speech Recognition using Windows Registry. If you deactivated this feature in the past, you might encounter the aforementioned problem. That is why follow these steps to turn on Online Speech Recognition using Registry:
- Press Win+R to open the Run prompt.
- Type regedit > click the OK button.
- Click on the Yes button.
- Navigate to this path: HKEY_CURRENT_USERSoftwareMicrosoftSpeech_OneCoreSettingsOnlineSpeechPrivacy
- Right-click on OnlineSpeechPrivacy > New > DWORD (32-bit) Value.
- Set the name as HasAccepted.
- Double-click on it to set the Value data as 1.
- Click the OK button.
- Close all windows and restart your PC.
After that, you can use online Speech Recognition without any error.
8] Change Group Policy settings
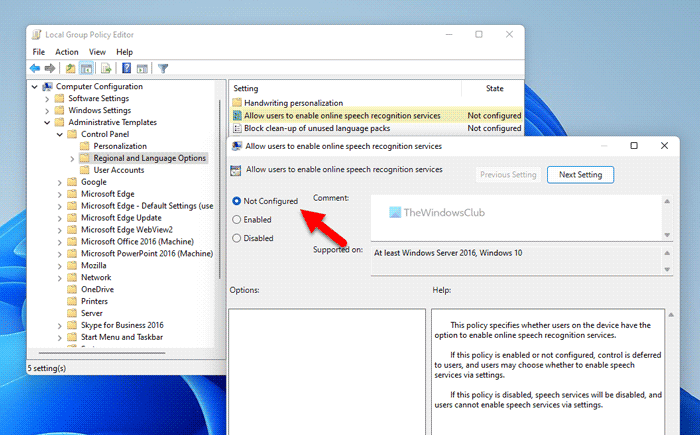
There is a Group Policy setting that helps you prevent or block users from enabling Speech Recognition on Windows 11/10 PC. If you enabled this setting earlier, you could not turn on the same option from Windows Settings. That is why follow the following steps to allow the user to enable online speech recognition:
- Search for gpedit.msc in the Taskbar search box.
- Click on the individual search result.
- Go to Computer Configuration > Administrative Templates > Control Panel > Regional and Language Options.
- Double-click on the Allow users to enable online speech recognition services setting.
- Choose the Enabled or Not Configured option.
- Click the OK button.
After that, you can turn on or off online speech recognition without any problem.
9] Disable hotkey changer software
Windows 11/10 allows users to activate Speech Recognition using a hotkey, Win+Ctrl+S. However, if you have used the same keyboard shortcut to open something else or execute a different command, you won’t be able to use Speech Recognition. That is why it is suggested to check the hotkey changer software or keyboard shortcut changer software minutely.
10] Reinstall microphone (if external)
If you use an external microphone, it is recommended to reinstall it. You can do the following:
- Unplug the microphone from your computer first. Restart your computer and re-plug it in.
- If you haven’t installed the driver, it is suggested to do that. However, if you have already installed the corresponding driver, you can remove it first and reinstall the same.
- Verify if your microphone is in working condition. You can use the same microphone with another computer.
11] Run the Recording audio troubleshooter
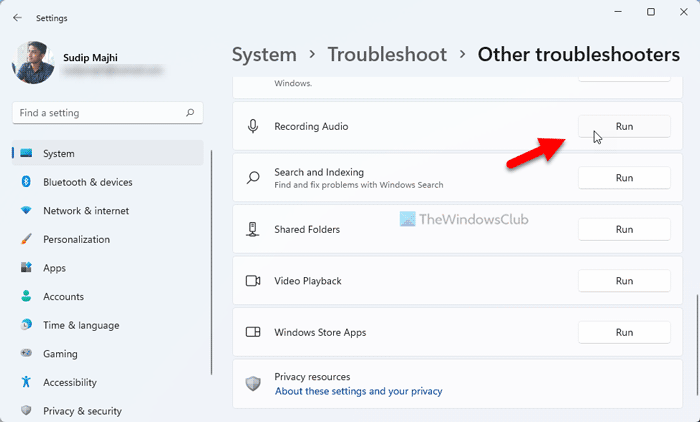
The Recording Audio troubleshooter is an excellent tool to check for problems related to microphone and speech recognition. You can run it as follows.
- Right-click on the Start button and select Settings from the menu.
- In the Settings window, go to the System tab on the list on the left-hand side.
- In the right pane, scroll down and click on Troubleshoot. On the next page, select Other troubleshooters.
- From the list of troubleshooters, select Run corresponding to the Recording Audio troubleshooter.
12] Run SFC scan
If everything else fails, it could be quite possible that the system files are missing or corrupt. In this case, you can consider performing an SFC scan on your computer. The SFC scan will replace the missing and corrupt files and fix the problem of speech recognition not working.
13] Troubleshoot in Clean Boot State
It is quite possible that an external software might be interfering with speech recognition on the intended software. This case can be isolated by troubleshooting the computer in the clean boot state. While in the clean boot state, no other third-party software will launch at the startup itself. In this case, you can identify the problematic software and halt it while using the speech recognition function.
14] Miscellaneous solutions
You can also try solutions like moving to a quieter place, using an external microphone instead of your laptop’s microphone, updating drivers, etc.
Read: How to disable Speech Recognition feature in Windows
How do I turn on my microphone?
First of all, the hardware of the microphone should be plugged and turned on. Some external microphones may have a switch to turn them on but most of them are simply plug and play. If your external microphone requires a separate power supply, make sure that the same is connected. Usually, windows will recognize the hardware and it will be turned on automatically. If that does not happen, you can use the Realtek audio player or Windows Settings to turn it ON manually.
Read: Best Speech Recognition software for Windows 11/10
What is a microphone used for?
A microphone is simply an audio input device for sending an audio input to the computer. The audio input can be used for recording, voice typing, instructing the system, etc. Usually, these days laptops come with inbuilt microphones.
Windows Speech Recognition is not available for the current display language
If you get Windows Speech Recognition is not available for the current display error in Windows 11/10, you need to set English as the default language. If you have used any regional language or anything else as the primary display language, you may encounter the aforementioned error on your computer.
That is why follow these steps to set English as the default Windows display language in Windows 11:
- Press Win+I to open Windows Settings.
- Click on the Time & language tab.
- Select the Language & region menu.
- Expand the Windows display language drop-down menu.
- Select English from the list.
However, you must install the English language first. For that, you can click the Add a language button, select English (United States) and click the Next button to get started with the installation process.
Following that, you can choose it from the drop-down menu.
How do I set up voice recognition on Windows 11?
To set up Voice Recognition or Speech Recognition on Windows 11, you need to open the Windows Settings panel first. Then, go to the Accessibility tab and click on the Speech menu. Following that, toggle the Windows Speech Recognition button to turn it on. Then, you can press Win+Ctrl+S to open the respective panel.
Why is my Windows Speech Recognition not working?
There are many reasons why Speech Recognition might not be working on your computer. For example, if it is turned off in the Windows Settings panel, you cannot use it by pressing the Win+Ctrl+S shortcut. On the other hand, it could be a microphone issue as well. If you use a third-party app, an internal conflict can also cause the same issue.
Does Windows 11 have a talk-to-text feature?
Yes, like Windows 10, Windows 11 also has a talk to text features included. For that, you do not need to install third-party programs or services. You can press Win+H to open the corresponding panel and start talking. Everything will be typed automatically in any text editing or word processing application.
Содержание
- Как отключить функцию распознавания речи в Windows 10
- Отключить распознавание речи в Windows 10
- Отключить функцию распознавания речи в Интернете
- Speech Recognition could not start because the language configuration is not supported.
- Replies (5)
- Speech Recognition not Working Windows 10
- Replies (11)
- Два способа отключить Распознавание голоса в Windows 10.
- Чтобы отключить распознавание голоса в Windows 10, выполните следующие действия.
- Отключить распознавание речи в сети с помощью настройки реестра.
- Speech recognition error — windows 10
- Replies (5)
Как отключить функцию распознавания речи в Windows 10
В этом посте мы расскажем, как отключить Распознавание речи в Windows 10 v1809 . Распознавание речи – это технология, которая используется для управления компьютерами с помощью голосовых команд. С распознаванием речи вы можете произносить команды, на которые компьютер будет реагировать, и вы также можете диктовать текст на компьютер, что устраняет необходимость набирать слова в любом текстовом редакторе или текстовом редакторе. Функция распознавания речи, позволяет общаться с вашим компьютером. Вы можете улучшить свои компьютеры, чтобы лучше понимать свой собственный голос, чтобы улучшить точность дикции. Однако, чтобы повысить его точность, вы должны «обучить особенности». Если вы не нашли его производительность удовлетворительной, следуйте приведенным ниже инструкциям, чтобы отключить его.
Отключить распознавание речи в Windows 10

Чтобы отключить распознавание речи в Windows 10, откройте «Настройки»> «Удобство доступа»> «Речь» и включите или выключите Включить распознавание речи , чтобы включить или отключить эту функцию.
Отключить функцию распознавания речи в Интернете
Онлайновое распознавание речи позволяет вам общаться с Cortana и приложениями, которые используют облачное распознавание речи.
1] через настройки
Чтобы отключить распознавание речи в Интернете в Windows 10:
- Нажмите « Пуск » и выберите « Настройки ».
- Перейдите в раздел «Конфиденциальность».
- Переключитесь на « Речь » и на правой панели сдвиньте переключатель, чтобы отключить функцию « Онлайн распознавание речи ».
Речевые сервисы существуют как на вашем устройстве, так и в облаке. Это связано с тем, что Microsoft собирает необходимую информацию с этих служб, чтобы улучшить взаимодействие с пользователем. Поэтому, чтобы остановить это, отключите параметр Знакомство с вами , а также в разделе « Подписание и ввод персонализации ».
2] с помощью редактора реестра
Откройте диалоговое окно Выполнить , нажав комбинацию Windows + R. В пустом поле диалогового окна введите « regedit » и нажмите « Enter ».
Далее перейдите по следующему адресу:
HKEY_CURRENT_USER Software Microsoft Speech_OneCore Settings OnlineSpeechPrivacy
Проверьте значение по умолчанию HasAccepted в правой панели окна.
- HasAccepted = 1 означает, что онлайн-распознавание речи включено.
Чтобы навсегда отключить эту функцию, дважды нажмите клавишу и измените значение слова D с 1 на 0 .
Пожалуйста, имейте в виду, что даже если вы используете 64-битную Windows, как в моем случае, вы все равно должны создать 32-битное значение DWORD.
Перезагрузите компьютер еще раз, чтобы изменения вступили в силу.
В дальнейшем вам не следует включать функцию распознавания речи в Windows 10.
Speech Recognition could not start because the language configuration is not supported.
So I’ve been trying to get Cortana to work on my Windows 10 PC. However, even after setting all languages and regions to English (US), the speech recognition software refuses to launch.
A lot of solutions said that you have to go to Control Panel -> Speech Recognition -> Advanced Settings, but the Advanced Settings link is missing. I only have Control Panel Home and Text to Speech listed.
I’ve tried running ctfmon and adding it to the registry, but that does not work.
Any ideas on how to get this mysterious Advanced Settings link visible?
![]()
Thank you for posting your query in Microsoft Community.
I understand your concern and will guide you in the right direction.
Windows Speech Recognition has been included in Windows 10 with advanced feature of Dictation into applications that weren’t supported previously with Windows 7.
Windows Speech Recognition recognizes your speech accurately and empowers users to interact with their computers by voice. It was designed for people who want to significantly limit their use of the mouse and keyboard while maintaining or increasing their overall productivity. You can dictate documents and emails in mainstream applications, use voice commands to start and switch between applications, control the operating system, and even fill out forms on the Web.
I suggest you to perform the following steps to check the result:
1. Go to Control Panel ->Speech Recognition.
2. Click Advance Speech options on the left panel.
3. Change the Language to another option.
4. Uncheck the «Review documents and mail to improve accuracy.
Refer below article to Use Speech Recognition:
Refer to the below link on Use voice recognition in Windows 10:
Hope this information helps. Please let me know if you need further assistance.
Speech Recognition not Working Windows 10
Speech Recognition not working on Windows 10. Started trying to use it with Windows update 1903. Omen 17T using Realtek internal microphone. Cortana works, but speech recognition does not. Updated microphone driver, ran it in Administrator mode, tried turning off Cortana. Next plugged in a Dragon Diction Microphone changing appropriate settings and speech recognition would still not work. Note the speech recognition setup about Peter worked in both cases, but after that speech recognition does not do anything when it says it is listening to commands. I troubleshooted with Omen tech support and no luck. Also rolled back Windows to 1809 earlier build, trying everything above again and it still did not work. I would like to be able to use speech recognition with the Realtek internal microphone. Please provide instructions to fix for 1809 build. This feature would be great to help ameliorate repetitive motion injury to wrist and thumb.
* Please try a lower page number.
* Please enter only numbers.
* Please try a lower page number.
* Please enter only numbers.
Hey Tucker. I’m Greg, an installation specialist, 10 year Windows MVP, and Volunteer Guardian Moderator here to help you.
Did this work correctly before on the PC? Can you System Restore to a point before the problem began following this guide: http://home.bt.com/tech-gadgets/computing/how-t.
You can System Restore from Repair Mode if it will not work in Windows, following one of these paths: https://www.tenforums.com/tutorials/2294-advanc.
It would be best to try Troubleshooting it first with Version 1903 since you need the Version Update anyway and have me here to help you. But you can try with 1809 first;
When ready I would manually upgrade to the latest version 1903 by opening the Media Creation Tool from this link: http://windows.microsoft.com/en-us/windows-10/m. , choose Download Tool Now, then open the tool and choose Upgrade This PC Now. This saves your files, apps and most settings in place, is the most stable method to change versions, brings your Updates current, resolves most problems.
If any problems report back the verbatim error and number, then continue with these steps for overcoming Version Upgrade problems: http://answers.microsoft.com/en-us/windows/wiki.
If the Version has problems I will work with you to try to resolve them. If the problems are unfixable for now, you have ten days to roll it back in Recovery settings.
Most problems are resolved by doing this gold standard Clean Install which should get you past all difficulties as it has millions of others who have followed the steps in this link and never come back to report another problem: http://answers.microsoft.com/en-us/windows/wiki. . So read it over and see if its something you want to learn to do.
I hope this helps. Feel free to ask back any questions and keep me posted. If you’ll wait to rate whether my post helped you, I will keep working with you until it’s resolved.
I hope this helps. Feel free to ask back any questions and keep me posted. If you will wait to rate my post, I will keep working with you until it’s resolved.
Standard Disclaimer: There are links to non-Microsoft websites. The pages appear to be providing accurate, safe information. Watch out for ads on the sites that may advertise products frequently classified as a PUP (Potentially Unwanted Products). Thoroughly research any product advertised on the sites before you decide to download and install it.
Windows MVP 2010-20
Over 100,000 helped in forums in 10 years
I do not quit for those who are polite and cooperative.
I will walk you through any steps and will not let you fail.
Два способа отключить Распознавание голоса в Windows 10.
Публикация: 21 Октябрь 2018 Обновлено: 7 Август 2019
Windows предоставляет функцию распознавания речи на основе устройств (доступную как с помощью приложения Windows Recech Recognition Desktop), так и с помощью облачной службой распознавания речи на тех рынках и регионах, где доступна Cortana. Microsoft может использовать голосовые данные, взаимодействия с компьютером, чтобы улучшить услуги распознавания речи.
Чтобы использовать распознавание речи, необходимо включить параметр «Знакомство с вами» (параметр конфиденциальности в разделе «Персонализация рукописного ввода и ввода с клавиатуры»), поскольку голосовые службы существуют как в облаке, так и на вашем устройстве. Информация, которую Microsoft собирает с их помощью, позволяет их улучшить. Речевые службы, которые не передаются в облако и присутствуют только на вашем устройстве, такие как «Диктор» и «Распознавание речи Windows», по-прежнему будут работать, если этот параметр отключен, но Microsoft уже не будет собирать данные.
Если для параметра «Диагностика и использование данных» («Параметры» → «Конфиденциальность» → «Диагностика и отзывы») установлено значение «Полные», входящие данные для рукописного ввода и ввода текста отправляются в Microsoft, и компания использует эти данные в совокупности, чтобы улучшить платформу для всех пользователей.
Чтобы отключить распознавание голоса в Windows 10, выполните следующие действия.
- Откройте приложение «Параметры».
- Перейдите в раздел «Конфиденциальность» → «Голосовые функции».
- Справа отключите опцию «Распознавания голоса в сети» передвинув ползунок переключателя в положение «Откл.».
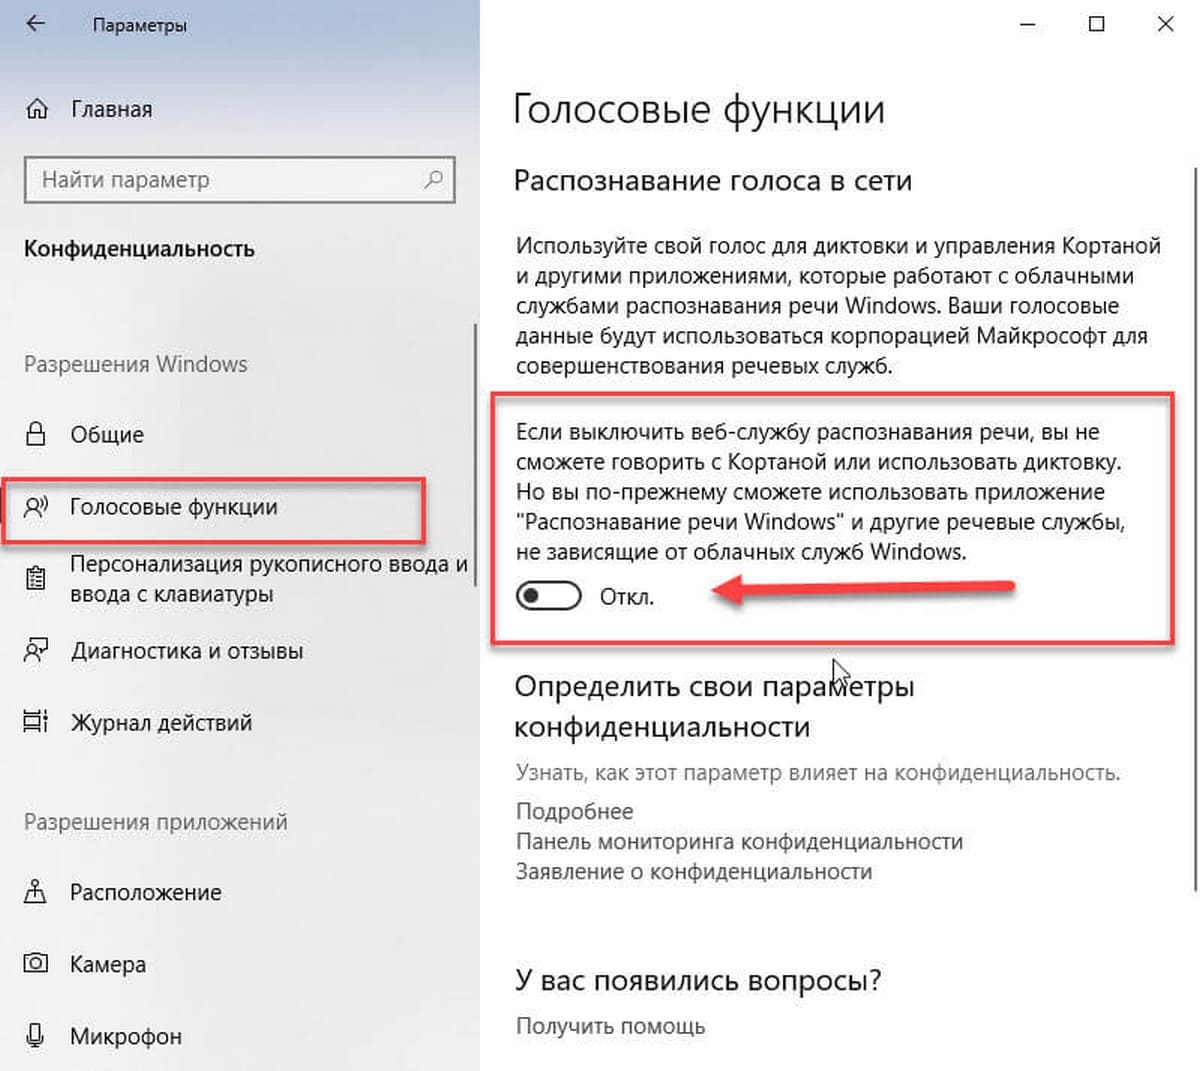
Теперь функция отключена.
Кроме того, вы можете применить настройки реестра.
Отключить распознавание речи в сети с помощью настройки реестра.
- Загрузите следующий ZIP-архив: загрузите ZIP-архив.
- Извлеките его содержимое в любую папку. Вы можете разместить файлы непосредственно на рабочем столе.
- Дважды кликните файл Off-Online Recognition.reg, чтобы начать процесс слияния.
Чтобы отменить изменение при необходимости, используйте файл On-Online Speech Recognition.reg.
Все!
Файлы реестра, выше, изменяют ветвь реестра
Они изменяют параметр DWORD (32 бита) с именем HasAccepted.
- HasAccepted = 1 — Включить распознавание речи в сети.
- HasAccepted = 0 — Функция распознавания речи отключена.
Кроме того, начиная с Windows 10 build 17063, ОС имеет ряд новых параметров в разделе «Конфиденциальность». К ним относятся возможность управления разрешениями на использование для ваших библиотек / папок, микрофона , календаря , информации учетной записи пользователя , файловой системы , местоположения , контактов , истории вызовов , электронной почты , обмена сообщениями и т. Д.
Наконец, вы можете отключить распознавание речи в сети на странице конфиденциальности программы установки Windows во время установки ОС с нуля.
Speech recognition error — windows 10
I keep getting this error. I have followed as many of the ‘fixes’ that I can find and to no avail:
Speech recognition could not start because the language configuration is not supported
The recognizer language must match the language of the user interface. Please change the recognizer language in the speech recognition control panel under advanced options
Can someone please help me..it’s driving me nuts
HI TG. I’m Greg, an installation specialist and 9 year Windows MVP here to help you.
I hope this helps. Feel free to ask back any questions and keep me posted. If you’ll wait to rate whether my post helped you, I will keep working with you until it’s resolved.
Standard Disclaimer: There are links to non-Microsoft websites. The pages appear to be providing accurate, safe information. Watch out for ads on the sites that may advertise products frequently classified as a PUP (Potentially Unwanted Products). Thoroughly research any product advertised on the sites before you decide to download and install it.
Windows MVP 2010-20
Over 100,000 helped in forums in 10 years
I do not quit for those who are polite and cooperative.
I will walk you through any steps and will not let you fail.
Was this reply helpful?
Sorry this didn’t help.
Great! Thanks for your feedback.
How satisfied are you with this reply?
Thanks for your feedback, it helps us improve the site.
How satisfied are you with this reply?
Thanks for your feedback.
I’m unsure how to do this.
I know how to select ‘run’ and then enter ctfmon.exe, but nothing happens.
CTFMON had been removed from startup. So I added the registry key.
Was this reply helpful?
Sorry this didn’t help.
Great! Thanks for your feedback.
How satisfied are you with this reply?
Thanks for your feedback, it helps us improve the site.
How satisfied are you with this reply?
Thanks for your feedback.
My language is English Australian, I’ve downloaded Australian as it says it’s compatible, however, I’ve also put everything back to English US just in case.
Nothing seems to work
Was this reply helpful?
Sorry this didn’t help.
Great! Thanks for your feedback.
How satisfied are you with this reply?
Thanks for your feedback, it helps us improve the site.
How satisfied are you with this reply?
Thanks for your feedback.
1) Go over this checklist to make sure the install is set up correctly, optimized for best performance, and any needed repairs get done: http://answers.microsoft.com/en-us/windows/wiki.
Start with Step 4 to turn off Startup freeloaders which can conflict and cause issues, then Step 7 to check for infection the most thorough way, then step 10 to check for damaged System Files, and also Step 16 to test a new Local Admin account. Then continue with the other steps to go over your install most thoroughly.
2) Update your drivers from motherboard maker’s Support Downloads web page, using the full model number, Serial Number or Dell Service Tag on sticker. Compare the latest drivers available for download with the ones presently installed in Device Manager reached by right clicking the Start Menu. Make sure you have the latest BIOS or UEFI firmware, Chipset, Display (Video), Sound, USB3, Bluetooth, Network and all other drivers, or else download and install the latest now.
Updating drivers from the Device Manager or Windows Update is rarely enough. The most basic thing we need to learn to maintain a PC is keep the latest manufacturer’s drivers installed from their Support Downloads web page.
3) If nothing else helps you can run a Repair Install by installing the Media Creation Tool and choosing from it to Upgrade Now. This reinstalls Windows in about an hour while saving your files, apps and most settings, solves many problems while also bringing it up to the latest version 1809 which you need anyway and by the most stable method. http://windows.microsoft.com/en-us/windows-10/m.
But remember that in Windows 10 everything depends upon the quality of the install, and Factory or Upgrade installs are inferior installs which most enthusiasts won’t even run because they’d expect endless issues. Consider now or later doing the Clean Install in this link which compiles the best possible install that will stay that way as long as you stick with the tools and methods given: http://answers.microsoft.com/en-us/windows/wiki.
There is also an automated Fresh Start that reinstalls WIndows while shedding corrupting factory bloatware, saves your files, but doesn’t clear the drive to get it cleanest: https://www.howtogeek.com/265054/how-to-easily-.
I hope this helps. Feel free to ask back any questions and let us know how it goes. If you’ll wait to rate whether my post helped you, I will keep working with you until it’s resolved.
Standard Disclaimer: There are links to non-Microsoft websites. The pages appear to be providing accurate, safe information. Watch out for ads on the sites that may advertise products frequently classified as a PUP (Potentially Unwanted Products). Thoroughly research any product advertised on the sites before you decide to download and install it.
Windows MVP 2010-20
Over 100,000 helped in forums in 10 years
I do not quit for those who are polite and cooperative.
I will walk you through any steps and will not let you fail.