
Содержание
- ИТ База знаний
- Полезно
- Навигация
- Серверные решения
- Телефония
- Корпоративные сети
- Как исправить ошибку SSH Connection Refused
- Бесплатный вводный урок на онлайн курс по Linux
- Почему при использовании SSH возникает отказ в подключении?
- Клиент SSH не установлен
- Демон SSH не установлен на сервере
- Учетные данные неверны
- Служба SSH не работает
- Брандмауэр препятствует подключению SSH
- Порт SSH закрыт
- Отладка и ведение журнала SSH
- Бесплатный вводный урок на онлайн курс по Linux
- Полезно?
- Почему?
- Глава 10: Common error messages
- 10.1 «The server’s host key is not cached in the registry»
- 10.2 «WARNING — POTENTIAL SECURITY BREACH!»
- 10.3 «SSH protocol version 2 required by our configuration but remote only provides (old, insecure) SSH-1»
- 10.4 «The first cipher supported by the server is . below the configured warning threshold»
- 10.5 «Remote side sent disconnect message type 2 (protocol error): «Too many authentication failures for root»»
- 10.6 «Out of memory»
- 10.7 «Internal error», «Internal fault», «Assertion failed»
- 10.8 «Unable to use key file», «Couldn’t load private key», «Couldn’t load this key»
- 10.9 «Server refused our key», «Server refused our public key», «Key refused»
- 10.10 «Access denied», «Authentication refused»
- 10.11 «No supported authentication methods available»
- 10.12 «Incorrect MAC received on packet» or «Incorrect CRC received on packet»
- 10.13 «Incoming packet was garbled on decryption»
- 10.14 «PuTTY X11 proxy: various errors»
- 10.15 «Network error: Software caused connection abort»
- 10.16 «Network error: Connection reset by peer»
- 10.17 «Network error: Connection refused»
- 10.18 «Network error: Connection timed out»
- 10.19 «Network error: Cannot assign requested address»
ИТ База знаний
Курс по Asterisk
Полезно
— Узнать IP — адрес компьютера в интернете
— Онлайн генератор устойчивых паролей
— Онлайн калькулятор подсетей
— Калькулятор инсталляции IP — АТС Asterisk
— Руководство администратора FreePBX на русском языке
— Руководство администратора Cisco UCM/CME на русском языке
— Руководство администратора по Linux/Unix
Навигация
Серверные решения
Телефония
FreePBX и Asterisk
Настройка программных телефонов
Корпоративные сети
Протоколы и стандарты
Как исправить ошибку SSH Connection Refused
В соединении отказано
У вас проблемы с доступом к удаленному серверу через SSH? Если SSH отвечает сообщением «Connection Refused» (Соединение отклонено), возможно, вам придется изменить запрос или проверить настройки.

Бесплатный вводный урок на онлайн курс по Linux
Мы собрали концентрат самых востребованных знаний, которые позволят начать карьеру администраторов Linux, расширить текущие знания и сделать уверенный шаг в DevOps
Почему при использовании SSH возникает отказ в подключении?
Существует множество причин, по которым вы можете получить ошибку «Connection Refused» при попытке подключения к серверу по SSH. Чтобы решить эту проблему, вам сначала нужно определить, почему система отказалась от вашего подключения через SSH.
Ниже вы найдете некоторые из наиболее распространенных причин, которые могут вызвать отказ в соединении SSH.
Клиент SSH не установлен
Прежде чем устранять другие проблемы, первым делом необходимо проверить, правильно ли установлен SSH. На машине, с которой вы получаете доступ к серверу, должен быть настроен клиент SSH. Без правильной настройки клиента вы не сможете подключиться к серверу.
Чтобы проверить, есть ли в вашей системе клиент SSH, введите в окне терминала следующее:
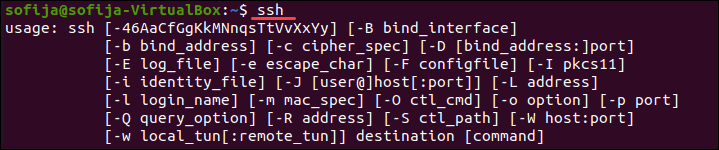
Если терминал предоставляет список параметров команды ssh, клиент SSH установлен в системе. Однако, если он ответит, что команда не найдена (command not found), вам необходимо установить клиент OpenSSH.
Решение: установить клиент SSH
Чтобы установить клиент SSH на свой компьютер, откройте терминал и выполните одну из команд, перечисленных ниже.
Для систем Ubuntu / Debian:
Для систем CentOS / RHEL:
Демон SSH не установлен на сервере
Так же, как вам нужна клиентская версия SSH для доступа к удаленному серверу, вам нужна версия сервера для прослушивания и приема соединений. Таким образом, сервер может отклонить входящее соединение, если SSH-сервер отсутствует или настройка неверна.
Чтобы проверить, доступен ли SSH на удаленном сервере, выполните команду:
Если на выходе отображается «Connection refused», переходите к установке SSH на сервере.

Решение: установите SSH на удаленный сервер
Чтобы решить проблему отсутствия сервера SSH, установите сервер OpenSSH.
Учетные данные неверны
Опечатки или неправильные учетные данные — частые причины отказа в SSH-соединении. Убедитесь, что вы не ошиблись при вводе имени пользователя или пароля.
Затем проверьте, правильно ли вы используете IP-адрес сервера.
Наконец, убедитесь, что у вас открыт правильный порт SSH. Вы можете проверить, запустив:
На выходе отображается номер порта, как на картинке ниже.

Служба SSH не работает
Служба SSH должна быть включена и работать в фоновом режиме. Если служба не работает, демон SSH не может принимать соединения.
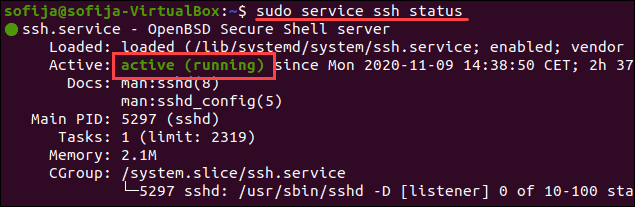
Чтобы проверить статус службы, введите эту команду:
Вывод должен ответить, что служба активна. Если терминал отвечает, что служба не работает, включите его, чтобы решить проблему.
Решение: включить службу SSH
Если система показывает, что демон SSH не активен, вы можете запустить службу, выполнив:
Чтобы служба запускалась при загрузке, выполните команду:
Брандмауэр препятствует подключению SSH
SSH может отклонить соединение из-за ограничений брандмауэра. Брандмауэр защищает сервер от потенциально опасных подключений. Однако, если в системе настроен SSH, необходимо настроить брандмауэр, чтобы разрешить SSH-соединения.
Убедитесь, что брандмауэр не блокирует SSH-соединения, так как это может вызвать ошибку «Connection refused».
Решение: разрешить SSH-подключения через брандмауэр
Чтобы решить проблему, о которой мы упоминали выше, вы можете использовать ufw (Uncomplicated Firewall — несложный брандмауэр), инструмент интерфейса командной строки для управления конфигурацией брандмауэра.
Введите следующую команду в окне терминала, чтобы разрешить SSH-соединения:

Порт SSH закрыт
Когда вы пытаетесь подключиться к удаленному серверу, SSH отправляет запрос на определенный порт. Чтобы принять этот запрос, на сервере должен быть открыт порт SSH.
Если порт закрыт, сервер отказывает в соединении.
По умолчанию SSH использует порт 22. Если вы не вносили никаких изменений в конфигурацию порта, вы можете проверить, прослушивает ли сервер входящие запросы.
Чтобы вывести список всех прослушивающих портов, запустите:
Найдите порт 22 в выходных данных и проверьте, установлено ли для него STATE значение LISTEN .
Кроме того, вы можете проверить, открыт ли конкретный порт, в данном случае порт 22:

Решение: откройте порт SSH
Чтобы разрешить порту 22 слушать запросы, используйте команду iptables :
Вы также можете открывать порты через графический интерфейс, изменив настройки брандмауэра.
Отладка и ведение журнала SSH
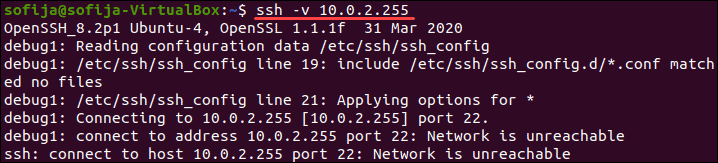
Чтобы проанализировать проблемы SSH в Linux, вы можете включить подробный режим или режим отладки. Когда вы включаете этот режим, SSH выдает отладочные сообщения, которые помогают устранять проблемы с подключением, конфигурацией и аутентификацией.
Существует три уровня детализации:
Поэтому вместо доступа к удаленному серверу с использованием синтаксиса ssh [server_ip] добавьте параметр -v и выполните:
В качестве альтернативы вы можете использовать:
Бесплатный вводный урок на онлайн курс по Linux
Мы собрали концентрат самых востребованных знаний, которые позволят начать карьеру администраторов Linux, расширить текущие знания и сделать уверенный шаг в DevOps
Полезно?
Почему?
😪 Мы тщательно прорабатываем каждый фидбек и отвечаем по итогам анализа. Напишите, пожалуйста, как мы сможем улучшить эту статью.
😍 Полезные IT – статьи от экспертов раз в неделю у вас в почте. Укажите свою дату рождения и мы не забудем поздравить вас.
Источник
Глава 10: Common error messages
This chapter lists a number of common error messages which PuTTY and its associated tools can produce, and explains what they mean in more detail.
We do not attempt to list all error messages here: there are many which should never occur, and some which should be self-explanatory. If you get an error message which is not listed in this chapter and which you don’t understand, report it to us as a bug (see appendix B) and we will add documentation for it.
10.1 «The server’s host key is not cached in the registry»
This error message occurs when PuTTY connects to a new SSH server. Every server identifies itself by means of a host key; once PuTTY knows the host key for a server, it will be able to detect if a malicious attacker redirects your connection to another machine.
If you see this message, it means that PuTTY has not seen this host key before, and has no way of knowing whether it is correct or not. You should attempt to verify the host key by other means, such as asking the machine’s administrator.
If you see this message and you know that your installation of PuTTY has connected to the same server before, it may have been recently upgraded to SSH protocol version 2. SSH protocols 1 and 2 use separate host keys, so when you first use SSH-2 with a server you have only used SSH-1 with before, you will see this message again. You should verify the correctness of the key as before.
See section 2.2 for more information on host keys.
10.2 «WARNING — POTENTIAL SECURITY BREACH!»
This message, followed by «The server’s host key does not match the one PuTTY has cached in the registry», means that PuTTY has connected to the SSH server before, knows what its host key should be, but has found a different one.
This may mean that a malicious attacker has replaced your server with a different one, or has redirected your network connection to their own machine. On the other hand, it may simply mean that the administrator of your server has accidentally changed the key while upgrading the SSH software; this shouldn’t happen but it is unfortunately possible.
You should contact your server’s administrator and see whether they expect the host key to have changed. If so, verify the new host key in the same way as you would if it was new.
See section 2.2 for more information on host keys.
10.3 «SSH protocol version 2 required by our configuration but remote only provides (old, insecure) SSH-1»
By default, PuTTY only supports connecting to SSH servers that implement SSH protocol version 2. If you see this message, the server you’re trying to connect to only supports the older SSH-1 protocol.
If the server genuinely only supports SSH-1, then you need to either change the «SSH protocol version» setting (see section 4.19.4), or use the -1 command-line option; in any case, you should not treat the resulting connection as secure.
You might start seeing this message with new versions of PuTTY (from 0.68 onwards) where you didn’t before, because it used to be possible to configure PuTTY to automatically fall back from SSH-2 to SSH-1. This is no longer supported, to prevent the possibility of a downgrade attack.
10.4 «The first cipher supported by the server is . below the configured warning threshold»
This occurs when the SSH server does not offer any ciphers which you have configured PuTTY to consider strong enough. By default, PuTTY puts up this warning only for Blowfish, single-DES, and Arcfour encryption.
See section 4.22 for more information on this message.
(There are similar messages for other cryptographic primitives, such as host key algorithms.)
10.5 «Remote side sent disconnect message type 2 (protocol error): «Too many authentication failures for root»»
This message is produced by an OpenSSH (or Sun SSH) server if it receives more failed authentication attempts than it is willing to tolerate.
This can easily happen if you are using Pageant and have a large number of keys loaded into it, since these servers count each offer of a public key as an authentication attempt. This can be worked around by specifying the key that’s required for the authentication in the PuTTY configuration (see section 4.23.8); PuTTY will ignore any other keys Pageant may have, but will ask Pageant to do the authentication, so that you don’t have to type your passphrase.
On the server, this can be worked around by disabling public-key authentication or (for Sun SSH only) by increasing MaxAuthTries in sshd_config .
10.6 «Out of memory»
This occurs when PuTTY tries to allocate more memory than the system can give it. This may happen for genuine reasons: if the computer really has run out of memory, or if you have configured an extremely large number of lines of scrollback in your terminal. PuTTY is not able to recover from running out of memory; it will terminate immediately after giving this error.
However, this error can also occur when memory is not running out at all, because PuTTY receives data in the wrong format. In SSH-2 and also in SFTP, the server sends the length of each message before the message itself; so PuTTY will receive the length, try to allocate space for the message, and then receive the rest of the message. If the length PuTTY receives is garbage, it will try to allocate a ridiculous amount of memory, and will terminate with an «Out of memory» error.
This can happen in SSH-2, if PuTTY and the server have not enabled encryption in the same way (see question A.7.3 in the FAQ).
This can also happen in PSCP or PSFTP, if your login scripts on the server generate output: the client program will be expecting an SFTP message starting with a length, and if it receives some text from your login scripts instead it will try to interpret them as a message length. See question A.7.4 for details of this.
10.7 «Internal error», «Internal fault», «Assertion failed»
Any error beginning with the word «Internal» should never occur. If it does, there is a bug in PuTTY by definition; please see appendix B and report it to us.
Similarly, any error message starting with «Assertion failed» is a bug in PuTTY. Please report it to us, and include the exact text from the error message box.
10.8 «Unable to use key file», «Couldn’t load private key», «Couldn’t load this key»
Various forms of this error are printed in the PuTTY window, or written to the PuTTY Event Log (see section 3.1.3.1) when trying public-key authentication, or given by Pageant when trying to load a private key.
If you see one of these messages, it often indicates that you’ve tried to load a key of an inappropriate type into PuTTY, Plink, PSCP, PSFTP, or Pageant.
You may have tried to load an SSH-2 key in a «foreign» format (OpenSSH or ssh.com ) directly into one of the PuTTY tools, in which case you need to import it into PuTTY’s native format ( *.PPK ) using PuTTYgen – see section 8.2.12.
Alternatively, you may have specified a key that’s inappropriate for the connection you’re making. The SSH-2 and the old SSH-1 protocols require different private key formats, and a SSH-1 key can’t be used for a SSH-2 connection (or vice versa).
10.9 «Server refused our key», «Server refused our public key», «Key refused»
Various forms of this error are printed in the PuTTY window, or written to the PuTTY Event Log (see section 3.1.3.1) when trying public-key authentication.
If you see one of these messages, it means that PuTTY has sent a public key to the server and offered to authenticate with it, and the server has refused to accept authentication. This usually means that the server is not configured to accept this key to authenticate this user.
This is almost certainly not a problem with PuTTY. If you see this type of message, the first thing you should do is check your server configuration carefully. Common errors include having the wrong permissions or ownership set on the public key or the user’s home directory on the server. Also, read the PuTTY Event Log; the server may have sent diagnostic messages explaining exactly what problem it had with your setup.
Section 8.3 has some hints on server-side public key setup.
10.10 «Access denied», «Authentication refused»
Various forms of this error are printed in the PuTTY window, or written to the PuTTY Event Log (see section 3.1.3.1) during authentication.
If you see one of these messages, it means that the server has refused all the forms of authentication PuTTY has tried and it has no further ideas.
It may be worth checking the Event Log for diagnostic messages from the server giving more detail.
This error can be caused by buggy SSH-1 servers that fail to cope with the various strategies we use for camouflaging passwords in transit. Upgrade your server, or use the workarounds described in section 4.28.11 and possibly section 4.28.12.
10.11 «No supported authentication methods available»
This error indicates that PuTTY has run out of ways to authenticate you to an SSH server. This may be because PuTTY has TIS or keyboard-interactive authentication disabled, in which case see section 4.23.4 and section 4.23.5.
10.12 «Incorrect MAC received on packet» or «Incorrect CRC received on packet»
This error occurs when PuTTY decrypts an SSH packet and its checksum is not correct. This probably means something has gone wrong in the encryption or decryption process. It’s difficult to tell from this error message whether the problem is in the client, in the server, or in between.
In particular, if the network is corrupting data at the TCP level, it may only be obvious with cryptographic protocols such as SSH, which explicitly check the integrity of the transferred data and complain loudly if the checks fail. Corruption of protocols without integrity protection (such as HTTP) will manifest in more subtle failures (such as misdisplayed text or images in a web browser) which may not be noticed.
Occasionally this has been caused by server bugs. An example is the bug described at section 4.28.8, although you’re very unlikely to encounter that one these days.
In this context MAC stands for Message Authentication Code. It’s a cryptographic term, and it has nothing at all to do with Ethernet MAC (Media Access Control) addresses, or with the Apple computer.
10.13 «Incoming packet was garbled on decryption»
This error occurs when PuTTY decrypts an SSH packet and the decrypted data makes no sense. This probably means something has gone wrong in the encryption or decryption process. It’s difficult to tell from this error message whether the problem is in the client, in the server, or in between.
If you get this error, one thing you could try would be to fiddle with the setting of «Miscomputes SSH-2 encryption keys» (see section 4.28.10) or «Ignores SSH-2 maximum packet size» (see section 4.28.5) on the Bugs panel.
10.14 «PuTTY X11 proxy: various errors»
This family of errors are reported when PuTTY is doing X forwarding. They are sent back to the X application running on the SSH server, which will usually report the error to the user.
When PuTTY enables X forwarding (see section 3.4) it creates a virtual X display running on the SSH server. This display requires authentication to connect to it (this is how PuTTY prevents other users on your server machine from connecting through the PuTTY proxy to your real X display). PuTTY also sends the server the details it needs to enable clients to connect, and the server should put this mechanism in place automatically, so your X applications should just work.
A common reason why people see one of these messages is because they used SSH to log in as one user (let’s say «fred»), and then used the Unix su command to become another user (typically «root»). The original user, «fred», has access to the X authentication data provided by the SSH server, and can run X applications which are forwarded over the SSH connection. However, the second user («root») does not automatically have the authentication data passed on to it, so attempting to run an X application as that user often fails with this error.
If this happens, it is not a problem with PuTTY. You need to arrange for your X authentication data to be passed from the user you logged in as to the user you used su to become. How you do this depends on your particular system; in fact many modern versions of su do it automatically.
10.15 «Network error: Software caused connection abort»
This is a generic error produced by the Windows network code when it kills an established connection for some reason. For example, it might happen if you pull the network cable out of the back of an Ethernet-connected computer, or if Windows has any other similar reason to believe the entire network has become unreachable.
Windows also generates this error if it has given up on the machine at the other end of the connection ever responding to it. If the network between your client and server goes down and your client then tries to send some data, Windows will make several attempts to send the data and will then give up and kill the connection. In particular, this can occur even if you didn’t type anything, if you are using SSH-2 and PuTTY attempts a key re-exchange. (See section 4.20.2 for more about key re-exchange.)
(It can also occur if you are using keepalives in your connection. Other people have reported that keepalives fix this error for them. See section 4.14.1 for a discussion of the pros and cons of keepalives.)
We are not aware of any reason why this error might occur that would represent a bug in PuTTY. The problem is between you, your Windows system, your network and the remote system.
10.16 «Network error: Connection reset by peer»
This error occurs when the machines at each end of a network connection lose track of the state of the connection between them. For example, you might see it if your SSH server crashes, and manages to reboot fully before you next attempt to send data to it.
However, the most common reason to see this message is if you are connecting through a firewall or a NAT router which has timed the connection out. See question A.7.8 in the FAQ for more details. You may be able to improve the situation by using keepalives; see section 4.14.1 for details on this.
Note that Windows can produce this error in some circumstances without seeing a connection reset from the server, for instance if the connection to the network is lost.
10.17 «Network error: Connection refused»
This error means that the network connection PuTTY tried to make to your server was rejected by the server. Usually this happens because the server does not provide the service which PuTTY is trying to access.
Check that you are connecting with the correct protocol (SSH, Telnet or Rlogin), and check that the port number is correct. If that fails, consult the administrator of your server.
10.18 «Network error: Connection timed out»
This error means that the network connection PuTTY tried to make to your server received no response at all from the server. Usually this happens because the server machine is completely isolated from the network, or because it is turned off.
Check that you have correctly entered the host name or IP address of your server machine. If that fails, consult the administrator of your server.
Unix also generates this error when it tries to send data down a connection and contact with the server has been completely lost during a connection. (There is a delay of minutes before Unix gives up on receiving a reply from the server.) This can occur if you type things into PuTTY while the network is down, but it can also occur if PuTTY decides of its own accord to send data: due to a repeat key exchange in SSH-2 (see section 4.20.2) or due to keepalives (section 4.14.1).
10.19 «Network error: Cannot assign requested address»
This means that the operating system rejected the parameters of the network connection PuTTY tried to make, usually without actually trying to connect to anything, because they were simply invalid.
A common way to provoke this error is to accidentally try to connect to port 0, which is not a valid port number.
Источник
Содержание
- Полное исправление: ошибка 1005 доступ запрещен на Windows 10, 8.1, 7
- Ошибка 1005 доступ запрещен, как это исправить?
- Решение 1. Проверьте свой антивирус
- Решение 2. Попробуйте использовать VPN
- Решение 3 — Попробуйте использовать другой браузер
- Решение 4 — Отключить прокси
- Решение 5. Убедитесь, что дата и время указаны правильно
- Решение 6 — Выполните Чистую загрузку
- Решение 7 — Выполнить восстановление системы
- Решение 8 — Обратитесь к администратору сайта или вашему провайдеру
- Глава 10: Common error messages
- 10.1 «The server’s host key is not cached in the registry»
- 10.2 «WARNING — POTENTIAL SECURITY BREACH!»
- 10.3 «SSH protocol version 2 required by our configuration but remote only provides (old, insecure) SSH-1»
- 10.4 «The first cipher supported by the server is . below the configured warning threshold»
- 10.5 «Remote side sent disconnect message type 2 (protocol error): «Too many authentication failures for root»»
- 10.6 «Out of memory»
- 10.7 «Internal error», «Internal fault», «Assertion failed»
- 10.8 «Unable to use key file», «Couldn’t load private key», «Couldn’t load this key»
- 10.9 «Server refused our key», «Server refused our public key», «Key refused»
- 10.10 «Access denied», «Authentication refused»
- 10.11 «No supported authentication methods available»
- 10.12 «Incorrect MAC received on packet» or «Incorrect CRC received on packet»
- 10.13 «Incoming packet was garbled on decryption»
- 10.14 «PuTTY X11 proxy: various errors»
- 10.15 «Network error: Software caused connection abort»
- 10.16 «Network error: Connection reset by peer»
- 10.17 «Network error: Connection refused»
- 10.18 «Network error: Connection timed out»
- 10.19 «Network error: Cannot assign requested address»
Полное исправление: ошибка 1005 доступ запрещен на Windows 10, 8.1, 7
Иногда могут возникать ошибки подключения, и, говоря об этой ошибке, наиболее распространенной является ошибка 1005, доступ запрещен. Эта ошибка может быть проблематичной, но в этой статье мы покажем вам, как ее исправить.
Ошибка 1005 отказано в доступе является относительно распространенным явлением, и, говоря об этой ошибке, вот некоторые похожие проблемы, о которых сообщили пользователи:
- Cloudflare error 1005, error 1006. Это некоторые распространенные проблемы, с которыми вы можете столкнуться, но вы можете исправить их, просто отключив антивирус.
- Crunchyroll error 1005, banned IP — эта проблема может возникнуть, если ваш IP забанен, но в большинстве случаев вы можете исправить это, просто используя хороший VPN.
- Владелец этого веб-сайта заблокировал ваш IP-адрес Cloudflare. Эта проблема может возникать из-за вашего прокси-сервера. Чтобы исправить это, просто отключите его и проверьте, помогает ли это.
- Ошибка 1005 VPN — эта ошибка может возникать из-за вашего VPN-клиента, поэтому вы можете отключить его или попробовать переключиться на другой VPN.
- Проверьте свой антивирус
- Попробуйте использовать VPN
- Попробуйте использовать другой браузер
- Отключить прокси
- Убедитесь, что дата и время указаны правильно
- Выполнить чистую загрузку
- Выполните восстановление системы
- Обратитесь к администратору сайта или вашему провайдеру
Решение 1. Проверьте свой антивирус

В большинстве случаев ошибка 1005 доступ запрещен может появиться из-за вашего антивируса. Иногда ваш антивирус может мешать работе вашей системы, и для решения этой проблемы рекомендуется отключить определенные антивирусные функции и проверить, помогает ли это.
Если проблема все еще существует, возможно, вы можете решить проблему, просто полностью отключив антивирус. В худшем случае вам, возможно, придется полностью удалить антивирус и проверить, решает ли это проблему.
Даже если вы решите удалить антивирус, ваша система будет защищена Защитником Windows, поэтому вам не нужно беспокоиться о вашей безопасности. Если удаление антивируса решает проблему, вы можете рассмотреть возможность перехода на другой антивирус.
На рынке есть много отличных антивирусных инструментов, но если вам нужен надежный антивирус, который не будет мешать вашей системе, вам следует рассмотреть возможность использования Bitdefender . Версия 2019 включает в себя дополнительные функции безопасности и множество улучшений совместимости, что делает его более мощным, чем предыдущие версии.
— Загрузите Bitdefender Antivirus 2019 по специальной цене со скидкой 35%.
Решение 2. Попробуйте использовать VPN

Иногда вы не можете получить доступ к определенным веб-сайтам из-за ошибки 1005 сообщение об отказе в доступе. Ваш IP-адрес или страна могут быть заблокированы для доступа к определенным веб-сайтам, или ваш интернет-провайдер может препятствовать вам посещать эти сайты.
Если у вас возникла эта проблема, вы можете решить ее, просто используя VPN. Существует множество отличных инструментов VPN, но если вы хотите простой и надежный VPN, мы настоятельно рекомендуем вам попробовать CyberGhost VPN . Как только вы включите VPN, проверьте, решена ли проблема.
Почему стоит выбрать CyberGhost? Cyberghost для Windows
- 256-битное шифрование AES
- Более 3000 серверов по всему миру
- Отличный ценовой план
- Отличная поддержка
Получить сейчас CyberGhost VPN
Решение 3 — Попробуйте использовать другой браузер
Иногда сообщение 1005 об отказе в доступе может появиться из-за вашего браузера. Проблема может быть в ваших настройках, поврежденной установке или чем-то еще, и для ее устранения рекомендуется переключиться на другой браузер.
Если проблема не появляется в другом браузере, это означает, что ваш браузер по умолчанию является проблемой. Вы можете использовать новый браузер в качестве обходного пути или начать устранение неполадок браузера по умолчанию и попытаться устранить основную проблему.
Решение 4 — Отключить прокси
Прокси-сервер является полезным методом защиты вашей конфиденциальности, и многие пользователи, как правило, используют его. Однако настройки прокси-сервера иногда могут приводить к появлению сообщения об ошибке «Отказано в доступе 1005», и для его устранения необходимо отключить все настройки прокси-сервера на компьютере. Это довольно просто сделать, и вы можете сделать это, выполнив следующие действия:
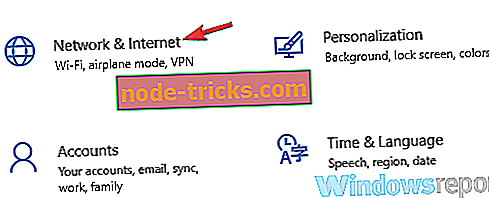
- Откройте приложение «Настройки» . Вы можете сделать это быстро, нажав Windows Key + I.
- Когда откроется приложение «Настройки», перейдите в раздел « Сеть и Интернет ».
Выберите Proxy на левой панели и отключите все параметры на правой панели.
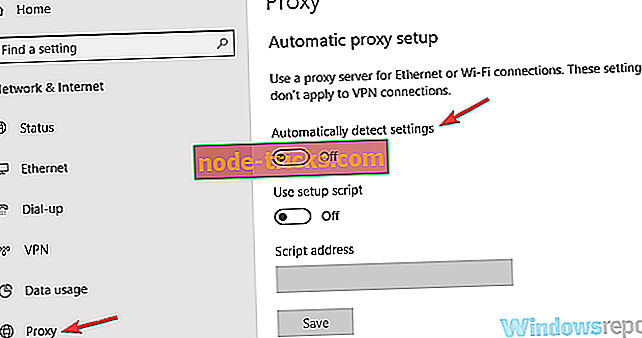
После этого прокси должен быть полностью отключен на вашем компьютере. Теперь проверьте, если проблема все еще там.
Решение 5. Убедитесь, что дата и время указаны правильно
Иногда вы можете получить сообщение об ошибке 1005 об отказе в доступе просто потому, что ваши дата и время неверны. Если вы заметили, что ваша дата или время неверны, вы можете решить эту проблему, выполнив следующие действия:
- Щелкните правой кнопкой мыши значок часов на панели задач. Выберите Настроить дату / время в контекстном меню.

Когда откроется новое окно, найдите параметр « Установить время автоматически» и выключите его. Подождите несколько секунд и включите его снова.

Таким образом вы автоматически настроите дату и время. Кроме того, вы можете нажать кнопку « Изменить», чтобы вручную настроить дату и время. Как только ваша дата и время будут правильными, проблема должна быть решена, и все снова начнет работать.
Решение 6 — Выполните Чистую загрузку
Если вы продолжаете получать сообщение об ошибке 1005 «Отказано в доступе» при попытке посетить определенные веб-сайты, возможно, проблема связана со сторонними приложениями на вашем ПК. Некоторые приложения автоматически запускаются на вашем компьютере и вызывают проблему, как только вы загружаетесь в Windows.
Чтобы найти причину проблемы, рекомендуется выполнить чистую загрузку и отключить все запускаемые приложения и службы. Для этого просто выполните следующие действия:
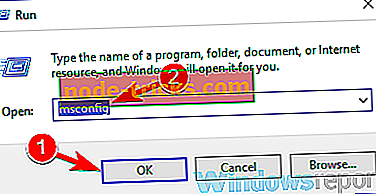
- Нажмите клавиши Windows + R, чтобы открыть диалоговое окно «Выполнить». Введите msconfig и нажмите OK или нажмите Enter .
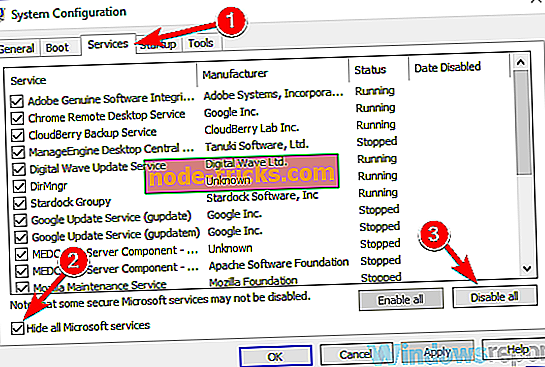
Откроется окно конфигурации системы . Перейдите на вкладку « Службы » и установите флажок « Скрыть все службы Microsoft» . Нажмите кнопку Отключить все, чтобы отключить все службы.
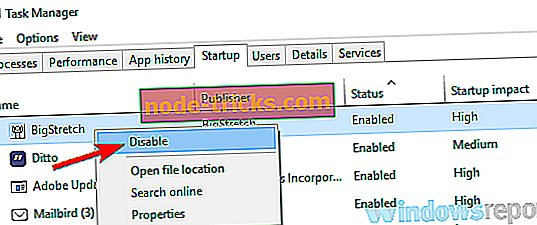
После этого убедитесь, что проблема все еще существует. Если проблема не появляется, скорее всего, проблема в одном из отключенных приложений или служб. Чтобы точно определить проблему, рекомендуется поочередно включать отключенные службы и приложения, пока не найдете причину проблемы.
Как только вы найдете проблемное приложение, лучше удалить его с вашего ПК. Чтобы полностью удалить приложение с вашего компьютера, рекомендуется использовать программное обеспечение для удаления, такое как IOBit Uninstaller .
- Скачать сейчас IObit Uninstaller PRO 7 бесплатно
Иногда, когда вы пытаетесь удалить приложение, некоторые файлы и записи в реестре могут остаться позади, и это может вызвать проблему, поэтому рекомендуется использовать программу удаления, чтобы полностью удалить выбранное приложение вместе со всеми его файлами.
Решение 7 — Выполнить восстановление системы
Если проблема все еще существует, и вы продолжаете получать сообщение 1005 об отказе в доступе, возможно, вы можете решить проблему, выполнив Восстановление системы. В случае, если вы не знакомы с ним, восстановление системы — это встроенная функция, которая может легко восстановить вашу систему до более раннего состояния и исправить многие проблемы на этом пути.
Чтобы выполнить восстановление системы, вам просто нужно сделать следующее:
- Нажмите клавиши Windows + S и введите восстановление системы . Теперь выберите « Создать точку восстановления» из списка результатов.
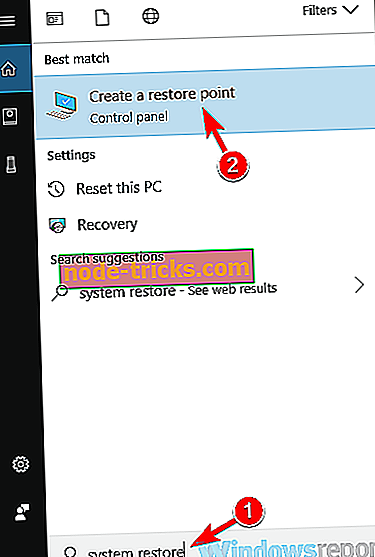
Должно появиться окно « Свойства системы» . Нажмите кнопку Восстановление системы .
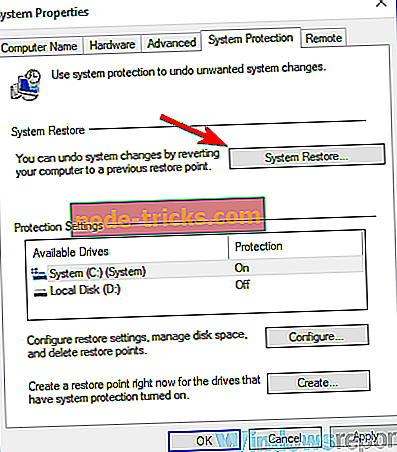

После того, как ваша система восстановлена, проверьте, не устранена ли проблема.
Решение 8 — Обратитесь к администратору сайта или вашему провайдеру
Если сообщение об отказе в доступе 1005 все еще присутствует, возможно, вы можете исправить его, связавшись с администратором сайта. Возможно, что ваш IP был забанен по ошибке или автоматически сервером, и обращение к администратору может исправить это.
Кроме того, вы также можете связаться с вашим Интернет-провайдером и проверить, связана ли проблема с ними.
Ошибка 1005 Отказ в доступе может помешать вам получить доступ к определенным веб-сайтам, и в большинстве случаев вы можете решить проблему, отключив прокси-сервер и используя хороший VPN.
Источник
Глава 10: Common error messages
This chapter lists a number of common error messages which PuTTY and its associated tools can produce, and explains what they mean in more detail.
We do not attempt to list all error messages here: there are many which should never occur, and some which should be self-explanatory. If you get an error message which is not listed in this chapter and which you don’t understand, report it to us as a bug (see appendix B) and we will add documentation for it.
10.1 «The server’s host key is not cached in the registry»
This error message occurs when PuTTY connects to a new SSH server. Every server identifies itself by means of a host key; once PuTTY knows the host key for a server, it will be able to detect if a malicious attacker redirects your connection to another machine.
If you see this message, it means that PuTTY has not seen this host key before, and has no way of knowing whether it is correct or not. You should attempt to verify the host key by other means, such as asking the machine’s administrator.
If you see this message and you know that your installation of PuTTY has connected to the same server before, it may have been recently upgraded to SSH protocol version 2. SSH protocols 1 and 2 use separate host keys, so when you first use SSH-2 with a server you have only used SSH-1 with before, you will see this message again. You should verify the correctness of the key as before.
See section 2.2 for more information on host keys.
10.2 «WARNING — POTENTIAL SECURITY BREACH!»
This message, followed by «The server’s host key does not match the one PuTTY has cached in the registry», means that PuTTY has connected to the SSH server before, knows what its host key should be, but has found a different one.
This may mean that a malicious attacker has replaced your server with a different one, or has redirected your network connection to their own machine. On the other hand, it may simply mean that the administrator of your server has accidentally changed the key while upgrading the SSH software; this shouldn’t happen but it is unfortunately possible.
You should contact your server’s administrator and see whether they expect the host key to have changed. If so, verify the new host key in the same way as you would if it was new.
See section 2.2 for more information on host keys.
10.3 «SSH protocol version 2 required by our configuration but remote only provides (old, insecure) SSH-1»
By default, PuTTY only supports connecting to SSH servers that implement SSH protocol version 2. If you see this message, the server you’re trying to connect to only supports the older SSH-1 protocol.
If the server genuinely only supports SSH-1, then you need to either change the «SSH protocol version» setting (see section 4.19.4), or use the -1 command-line option; in any case, you should not treat the resulting connection as secure.
You might start seeing this message with new versions of PuTTY (from 0.68 onwards) where you didn’t before, because it used to be possible to configure PuTTY to automatically fall back from SSH-2 to SSH-1. This is no longer supported, to prevent the possibility of a downgrade attack.
10.4 «The first cipher supported by the server is . below the configured warning threshold»
This occurs when the SSH server does not offer any ciphers which you have configured PuTTY to consider strong enough. By default, PuTTY puts up this warning only for Blowfish, single-DES, and Arcfour encryption.
See section 4.22 for more information on this message.
(There are similar messages for other cryptographic primitives, such as host key algorithms.)
10.5 «Remote side sent disconnect message type 2 (protocol error): «Too many authentication failures for root»»
This message is produced by an OpenSSH (or Sun SSH) server if it receives more failed authentication attempts than it is willing to tolerate.
This can easily happen if you are using Pageant and have a large number of keys loaded into it, since these servers count each offer of a public key as an authentication attempt. This can be worked around by specifying the key that’s required for the authentication in the PuTTY configuration (see section 4.23.8); PuTTY will ignore any other keys Pageant may have, but will ask Pageant to do the authentication, so that you don’t have to type your passphrase.
On the server, this can be worked around by disabling public-key authentication or (for Sun SSH only) by increasing MaxAuthTries in sshd_config .
10.6 «Out of memory»
This occurs when PuTTY tries to allocate more memory than the system can give it. This may happen for genuine reasons: if the computer really has run out of memory, or if you have configured an extremely large number of lines of scrollback in your terminal. PuTTY is not able to recover from running out of memory; it will terminate immediately after giving this error.
However, this error can also occur when memory is not running out at all, because PuTTY receives data in the wrong format. In SSH-2 and also in SFTP, the server sends the length of each message before the message itself; so PuTTY will receive the length, try to allocate space for the message, and then receive the rest of the message. If the length PuTTY receives is garbage, it will try to allocate a ridiculous amount of memory, and will terminate with an «Out of memory» error.
This can happen in SSH-2, if PuTTY and the server have not enabled encryption in the same way (see question A.7.3 in the FAQ).
This can also happen in PSCP or PSFTP, if your login scripts on the server generate output: the client program will be expecting an SFTP message starting with a length, and if it receives some text from your login scripts instead it will try to interpret them as a message length. See question A.7.4 for details of this.
10.7 «Internal error», «Internal fault», «Assertion failed»
Any error beginning with the word «Internal» should never occur. If it does, there is a bug in PuTTY by definition; please see appendix B and report it to us.
Similarly, any error message starting with «Assertion failed» is a bug in PuTTY. Please report it to us, and include the exact text from the error message box.
10.8 «Unable to use key file», «Couldn’t load private key», «Couldn’t load this key»
Various forms of this error are printed in the PuTTY window, or written to the PuTTY Event Log (see section 3.1.3.1) when trying public-key authentication, or given by Pageant when trying to load a private key.
If you see one of these messages, it often indicates that you’ve tried to load a key of an inappropriate type into PuTTY, Plink, PSCP, PSFTP, or Pageant.
You may have tried to load an SSH-2 key in a «foreign» format (OpenSSH or ssh.com ) directly into one of the PuTTY tools, in which case you need to import it into PuTTY’s native format ( *.PPK ) using PuTTYgen – see section 8.2.12.
Alternatively, you may have specified a key that’s inappropriate for the connection you’re making. The SSH-2 and the old SSH-1 protocols require different private key formats, and a SSH-1 key can’t be used for a SSH-2 connection (or vice versa).
10.9 «Server refused our key», «Server refused our public key», «Key refused»
Various forms of this error are printed in the PuTTY window, or written to the PuTTY Event Log (see section 3.1.3.1) when trying public-key authentication.
If you see one of these messages, it means that PuTTY has sent a public key to the server and offered to authenticate with it, and the server has refused to accept authentication. This usually means that the server is not configured to accept this key to authenticate this user.
This is almost certainly not a problem with PuTTY. If you see this type of message, the first thing you should do is check your server configuration carefully. Common errors include having the wrong permissions or ownership set on the public key or the user’s home directory on the server. Also, read the PuTTY Event Log; the server may have sent diagnostic messages explaining exactly what problem it had with your setup.
Section 8.3 has some hints on server-side public key setup.
10.10 «Access denied», «Authentication refused»
Various forms of this error are printed in the PuTTY window, or written to the PuTTY Event Log (see section 3.1.3.1) during authentication.
If you see one of these messages, it means that the server has refused all the forms of authentication PuTTY has tried and it has no further ideas.
It may be worth checking the Event Log for diagnostic messages from the server giving more detail.
This error can be caused by buggy SSH-1 servers that fail to cope with the various strategies we use for camouflaging passwords in transit. Upgrade your server, or use the workarounds described in section 4.28.11 and possibly section 4.28.12.
10.11 «No supported authentication methods available»
This error indicates that PuTTY has run out of ways to authenticate you to an SSH server. This may be because PuTTY has TIS or keyboard-interactive authentication disabled, in which case see section 4.23.4 and section 4.23.5.
10.12 «Incorrect MAC received on packet» or «Incorrect CRC received on packet»
This error occurs when PuTTY decrypts an SSH packet and its checksum is not correct. This probably means something has gone wrong in the encryption or decryption process. It’s difficult to tell from this error message whether the problem is in the client, in the server, or in between.
In particular, if the network is corrupting data at the TCP level, it may only be obvious with cryptographic protocols such as SSH, which explicitly check the integrity of the transferred data and complain loudly if the checks fail. Corruption of protocols without integrity protection (such as HTTP) will manifest in more subtle failures (such as misdisplayed text or images in a web browser) which may not be noticed.
Occasionally this has been caused by server bugs. An example is the bug described at section 4.28.8, although you’re very unlikely to encounter that one these days.
In this context MAC stands for Message Authentication Code. It’s a cryptographic term, and it has nothing at all to do with Ethernet MAC (Media Access Control) addresses, or with the Apple computer.
10.13 «Incoming packet was garbled on decryption»
This error occurs when PuTTY decrypts an SSH packet and the decrypted data makes no sense. This probably means something has gone wrong in the encryption or decryption process. It’s difficult to tell from this error message whether the problem is in the client, in the server, or in between.
If you get this error, one thing you could try would be to fiddle with the setting of «Miscomputes SSH-2 encryption keys» (see section 4.28.10) or «Ignores SSH-2 maximum packet size» (see section 4.28.5) on the Bugs panel.
10.14 «PuTTY X11 proxy: various errors»
This family of errors are reported when PuTTY is doing X forwarding. They are sent back to the X application running on the SSH server, which will usually report the error to the user.
When PuTTY enables X forwarding (see section 3.4) it creates a virtual X display running on the SSH server. This display requires authentication to connect to it (this is how PuTTY prevents other users on your server machine from connecting through the PuTTY proxy to your real X display). PuTTY also sends the server the details it needs to enable clients to connect, and the server should put this mechanism in place automatically, so your X applications should just work.
A common reason why people see one of these messages is because they used SSH to log in as one user (let’s say «fred»), and then used the Unix su command to become another user (typically «root»). The original user, «fred», has access to the X authentication data provided by the SSH server, and can run X applications which are forwarded over the SSH connection. However, the second user («root») does not automatically have the authentication data passed on to it, so attempting to run an X application as that user often fails with this error.
If this happens, it is not a problem with PuTTY. You need to arrange for your X authentication data to be passed from the user you logged in as to the user you used su to become. How you do this depends on your particular system; in fact many modern versions of su do it automatically.
10.15 «Network error: Software caused connection abort»
This is a generic error produced by the Windows network code when it kills an established connection for some reason. For example, it might happen if you pull the network cable out of the back of an Ethernet-connected computer, or if Windows has any other similar reason to believe the entire network has become unreachable.
Windows also generates this error if it has given up on the machine at the other end of the connection ever responding to it. If the network between your client and server goes down and your client then tries to send some data, Windows will make several attempts to send the data and will then give up and kill the connection. In particular, this can occur even if you didn’t type anything, if you are using SSH-2 and PuTTY attempts a key re-exchange. (See section 4.20.2 for more about key re-exchange.)
(It can also occur if you are using keepalives in your connection. Other people have reported that keepalives fix this error for them. See section 4.14.1 for a discussion of the pros and cons of keepalives.)
We are not aware of any reason why this error might occur that would represent a bug in PuTTY. The problem is between you, your Windows system, your network and the remote system.
10.16 «Network error: Connection reset by peer»
This error occurs when the machines at each end of a network connection lose track of the state of the connection between them. For example, you might see it if your SSH server crashes, and manages to reboot fully before you next attempt to send data to it.
However, the most common reason to see this message is if you are connecting through a firewall or a NAT router which has timed the connection out. See question A.7.8 in the FAQ for more details. You may be able to improve the situation by using keepalives; see section 4.14.1 for details on this.
Note that Windows can produce this error in some circumstances without seeing a connection reset from the server, for instance if the connection to the network is lost.
10.17 «Network error: Connection refused»
This error means that the network connection PuTTY tried to make to your server was rejected by the server. Usually this happens because the server does not provide the service which PuTTY is trying to access.
Check that you are connecting with the correct protocol (SSH, Telnet or Rlogin), and check that the port number is correct. If that fails, consult the administrator of your server.
10.18 «Network error: Connection timed out»
This error means that the network connection PuTTY tried to make to your server received no response at all from the server. Usually this happens because the server machine is completely isolated from the network, or because it is turned off.
Check that you have correctly entered the host name or IP address of your server machine. If that fails, consult the administrator of your server.
Unix also generates this error when it tries to send data down a connection and contact with the server has been completely lost during a connection. (There is a delay of minutes before Unix gives up on receiving a reply from the server.) This can occur if you type things into PuTTY while the network is down, but it can also occur if PuTTY decides of its own accord to send data: due to a repeat key exchange in SSH-2 (see section 4.20.2) or due to keepalives (section 4.14.1).
10.19 «Network error: Cannot assign requested address»
This means that the operating system rejected the parameters of the network connection PuTTY tried to make, usually without actually trying to connect to anything, because they were simply invalid.
A common way to provoke this error is to accidentally try to connect to port 0, which is not a valid port number.
Источник
Trying to connect to a Debian 9.13 server, SSHy just shows WebSocket connection failed: Error in connection establishment: code 1005 in the terminal window. It doesn’t make a difference whether a correct or invalid username/password is given.
The browser console shows:

so it appears that something went wrong during DH exchange.
Running the server in debug mode (/usr/sbin/sshd -ddd -p 99 and connect to port 99), the server shows:
sh-4.4# /usr/sbin/sshd -ddd -p 99
debug2: load_server_config: filename /etc/ssh/sshd_config
debug2: load_server_config: done config len = 275
debug2: parse_server_config: config /etc/ssh/sshd_config len 275
debug3: /etc/ssh/sshd_config:61 setting ChallengeResponseAuthentication no
debug3: /etc/ssh/sshd_config:84 setting UsePAM yes
debug3: /etc/ssh/sshd_config:88 setting GatewayPorts yes
debug3: /etc/ssh/sshd_config:89 setting X11Forwarding yes
debug3: /etc/ssh/sshd_config:93 setting PrintMotd no
debug3: /etc/ssh/sshd_config:113 setting AcceptEnv LANG LC_*
debug3: /etc/ssh/sshd_config:116 setting Subsystem sftp	/usr/lib/openssh/sftp-server
debug1: sshd version OpenSSH_7.4, OpenSSL 1.0.2u  20 Dec 2019
debug1: private host key #0: ssh-rsa SHA256:AAzT984aD0JhEOUC4cYjuC22IWEhmzQT4burzFHFOv0
debug1: private host key #1: ecdsa-sha2-nistp256 SHA256:AuqxsTzwaC2OWRHyysPLhIqo24AX5Z3GI753EW3ZwHg
debug1: private host key #2: ssh-ed25519 SHA256:U70HBHIOQCKd07RtkNF1Zp3MDjKZaeotXJ8HFPafhtU
debug1: rexec_argv[0]='/usr/sbin/sshd'
debug1: rexec_argv[1]='-ddd'
debug1: rexec_argv[2]='-p'
debug1: rexec_argv[3]='99'
debug3: oom_adjust_setup
debug1: Set /proc/self/oom_score_adj from 0 to -1000
debug2: fd 3 setting O_NONBLOCK
debug1: Bind to port 99 on 0.0.0.0.
Server listening on 0.0.0.0 port 99.
debug2: fd 4 setting O_NONBLOCK
debug3: sock_set_v6only: set socket 4 IPV6_V6ONLY
debug1: Bind to port 99 on ::.
Server listening on :: port 99.
-----
debug3: fd 5 is not O_NONBLOCK
debug1: Server will not fork when running in debugging mode.
debug3: send_rexec_state: entering fd = 8 config len 275
debug3: ssh_msg_send: type 0
debug3: send_rexec_state: done
debug1: rexec start in 5 out 5 newsock 5 pipe -1 sock 8
debug1: inetd sockets after dupping: 3, 3
Connection from x.x.x.x port 54782 on y.y.y.y port 99
debug1: Client protocol version 2.0; client software version SSHyClient
debug1: no match: SSHyClient
debug1: Local version string SSH-2.0-OpenSSH_7.4p1 Debian-10+deb9u7
debug1: Enabling compatibility mode for protocol 2.0
debug2: fd 3 setting O_NONBLOCK
debug3: ssh_sandbox_init: preparing seccomp filter sandbox
debug2: Network child is on pid 13729
debug3: preauth child monitor started
debug3: privsep user:group 102:65534 [preauth]
debug1: permanently_set_uid: 102/65534 [preauth]
debug3: ssh_sandbox_child: setting PR_SET_NO_NEW_PRIVS [preauth]
debug3: ssh_sandbox_child: attaching seccomp filter program [preauth]
debug1: list_hostkey_types: ssh-rsa,rsa-sha2-512,rsa-sha2-256,ecdsa-sha2-nistp256,ssh-ed25519 [preauth]
debug3: send packet: type 20 [preauth]
debug1: SSH2_MSG_KEXINIT sent [preauth]
debug3: receive packet: type 20 [preauth]
debug1: SSH2_MSG_KEXINIT received [preauth]
debug2: local server KEXINIT proposal [preauth]
debug2: KEX algorithms: curve25519-sha256,curve25519-sha256@libssh.org,ecdh-sha2-nistp256,ecdh-sha2-nistp384,ecdh-sha2-nistp521,diffie-hellman-group-exchange-sha256,diffie-hellman-group16-sha512,diffie-hellman-group18-sha512,diffie-hellman-group14-sha256,diffie-hellman-group14-sha1 [preauth]
debug2: host key algorithms: ssh-rsa,rsa-sha2-512,rsa-sha2-256,ecdsa-sha2-nistp256,ssh-ed25519 [preauth]
debug2: ciphers ctos: chacha20-poly1305@openssh.com,aes128-ctr,aes192-ctr,aes256-ctr,aes128-gcm@openssh.com,aes256-gcm@openssh.com [preauth]
debug2: ciphers stoc: chacha20-poly1305@openssh.com,aes128-ctr,aes192-ctr,aes256-ctr,aes128-gcm@openssh.com,aes256-gcm@openssh.com [preauth]
debug2: MACs ctos: umac-64-etm@openssh.com,umac-128-etm@openssh.com,hmac-sha2-256-etm@openssh.com,hmac-sha2-512-etm@openssh.com,hmac-sha1-etm@openssh.com,umac-64@openssh.com,umac-128@openssh.com,hmac-sha2-256,hmac-sha2-512,hmac-sha1 [preauth]
debug2: MACs stoc: umac-64-etm@openssh.com,umac-128-etm@openssh.com,hmac-sha2-256-etm@openssh.com,hmac-sha2-512-etm@openssh.com,hmac-sha1-etm@openssh.com,umac-64@openssh.com,umac-128@openssh.com,hmac-sha2-256,hmac-sha2-512,hmac-sha1 [preauth]
debug2: compression ctos: none,zlib@openssh.com [preauth]
debug2: compression stoc: none,zlib@openssh.com [preauth]
debug2: languages ctos:  [preauth]
debug2: languages stoc:  [preauth]
debug2: first_kex_follows 0  [preauth]
debug2: reserved 0  [preauth]
debug2: peer client KEXINIT proposal [preauth]
debug2: KEX algorithms: diffie-hellman-group-exchange-sha256,diffie-hellman-group-exchange-sha1,diffie-hellman-group14-sha256,diffie-hellman-group14-sha1,diffie-hellman-group1-sha256,diffie-hellman-group1-sha1 [preauth]
debug2: host key algorithms: ssh-rsa [preauth]
debug2: ciphers ctos: aes128-ctr [preauth]
debug2: ciphers stoc: aes128-ctr [preauth]
debug2: MACs ctos: hmac-sha2-256,hmac-sha1 [preauth]
debug2: MACs stoc: hmac-sha2-256,hmac-sha1 [preauth]
debug2: compression ctos: none [preauth]
debug2: compression stoc: none [preauth]
debug2: languages ctos:  [preauth]
debug2: languages stoc:  [preauth]
debug2: first_kex_follows 0  [preauth]
debug2: reserved 0  [preauth]
debug1: kex: algorithm: diffie-hellman-group-exchange-sha256 [preauth]
debug1: kex: host key algorithm: ssh-rsa [preauth]
debug1: kex: client->server cipher: aes128-ctr MAC: hmac-sha2-256 compression: none [preauth]
debug1: kex: server->client cipher: aes128-ctr MAC: hmac-sha2-256 compression: none [preauth]
debug1: expecting SSH2_MSG_KEX_DH_GEX_REQUEST [preauth]
debug3: receive packet: type 34 [preauth]
debug1: SSH2_MSG_KEX_DH_GEX_REQUEST received [preauth]
debug3: mm_request_send entering: type 0 [preauth]
debug3: mm_request_receive entering
debug3: monitor_read: checking request 0
debug3: mm_answer_moduli: got parameters: 2048 2048 8192
debug3: mm_request_send entering: type 1
debug2: monitor_read: 0 used once, disabling now
debug3: mm_choose_dh: waiting for MONITOR_ANS_MODULI [preauth]
debug3: mm_request_receive_expect entering: type 1 [preauth]
debug3: mm_request_receive entering [preauth]
debug3: mm_choose_dh: remaining 0 [preauth]
debug1: SSH2_MSG_KEX_DH_GEX_GROUP sent [preauth]
debug3: send packet: type 31 [preauth]
debug2: bits set: 1028/2048 [preauth]
debug1: expecting SSH2_MSG_KEX_DH_GEX_INIT [preauth]
debug3: receive packet: type 32 [preauth]
debug2: bits set: 997/2048 [preauth]
debug3: mm_key_sign entering [preauth]
debug3: mm_request_send entering: type 6 [preauth]
debug3: mm_key_sign: waiting for MONITOR_ANS_SIGN [preauth]
debug3: mm_request_receive_expect entering: type 7 [preauth]
debug3: mm_request_receive entering [preauth]
debug3: mm_request_receive entering
debug3: monitor_read: checking request 6
debug3: mm_answer_sign
debug3: mm_answer_sign: hostkey proof signature 0x5616450b5d00(271)
debug3: mm_request_send entering: type 7
debug2: monitor_read: 6 used once, disabling now
debug3: send packet: type 33 [preauth]
debug3: send packet: type 21 [preauth]
debug2: set_newkeys: mode 1 [preauth]
debug1: rekey after 4294967296 blocks [preauth]
debug1: SSH2_MSG_NEWKEYS sent [preauth]
debug1: expecting SSH2_MSG_NEWKEYS [preauth]
debug3: receive packet: type 1 [preauth]
ssh_dispatch_run_fatal: Connection from x.x.x.x port 54782: incomplete message [preauth]
debug1: do_cleanup [preauth]
debug3: PAM: sshpam_thread_cleanup entering [preauth]
debug1: monitor_read_log: child log fd closed
debug3: mm_request_receive entering
debug1: do_cleanup
debug3: PAM: sshpam_thread_cleanup entering
debug1: Killing privsep child 13729
debug1: audit_event: unhandled event 12
sh-4.4#
It would be good to improve the error handling in this situation (#39) to give a more meaningful error, as well as actually fixing the issue.
Глава 10: Common error messages
This chapter lists a number of common error messages which PuTTY and its associated tools can produce, and explains what they mean in more detail.
We do not attempt to list all error messages here: there are many which should never occur, and some which should be self-explanatory. If you get an error message which is not listed in this chapter and which you don’t understand, report it to us as a bug (see appendix B) and we will add documentation for it.
10.1 «The server’s host key is not cached in the registry»
This error message occurs when PuTTY connects to a new SSH server. Every server identifies itself by means of a host key; once PuTTY knows the host key for a server, it will be able to detect if a malicious attacker redirects your connection to another machine.
If you see this message, it means that PuTTY has not seen this host key before, and has no way of knowing whether it is correct or not. You should attempt to verify the host key by other means, such as asking the machine’s administrator.
If you see this message and you know that your installation of PuTTY has connected to the same server before, it may have been recently upgraded to SSH protocol version 2. SSH protocols 1 and 2 use separate host keys, so when you first use SSH-2 with a server you have only used SSH-1 with before, you will see this message again. You should verify the correctness of the key as before.
See section 2.2 for more information on host keys.
10.2 «WARNING — POTENTIAL SECURITY BREACH!»
This message, followed by «The server’s host key does not match the one PuTTY has cached in the registry», means that PuTTY has connected to the SSH server before, knows what its host key should be, but has found a different one.
This may mean that a malicious attacker has replaced your server with a different one, or has redirected your network connection to their own machine. On the other hand, it may simply mean that the administrator of your server has accidentally changed the key while upgrading the SSH software; this shouldn’t happen but it is unfortunately possible.
You should contact your server’s administrator and see whether they expect the host key to have changed. If so, verify the new host key in the same way as you would if it was new.
See section 2.2 for more information on host keys.
10.3 «SSH protocol version 2 required by our configuration but remote only provides (old, insecure) SSH-1»
By default, PuTTY only supports connecting to SSH servers that implement SSH protocol version 2. If you see this message, the server you’re trying to connect to only supports the older SSH-1 protocol.
If the server genuinely only supports SSH-1, then you need to either change the «SSH protocol version» setting (see section 4.19.4), or use the -1 command-line option; in any case, you should not treat the resulting connection as secure.
You might start seeing this message with new versions of PuTTY (from 0.68 onwards) where you didn’t before, because it used to be possible to configure PuTTY to automatically fall back from SSH-2 to SSH-1. This is no longer supported, to prevent the possibility of a downgrade attack.
10.4 «The first cipher supported by the server is . below the configured warning threshold»
This occurs when the SSH server does not offer any ciphers which you have configured PuTTY to consider strong enough. By default, PuTTY puts up this warning only for Blowfish, single-DES, and Arcfour encryption.
See section 4.22 for more information on this message.
(There are similar messages for other cryptographic primitives, such as host key algorithms.)
10.5 «Remote side sent disconnect message type 2 (protocol error): «Too many authentication failures for root»»
This message is produced by an OpenSSH (or Sun SSH) server if it receives more failed authentication attempts than it is willing to tolerate.
This can easily happen if you are using Pageant and have a large number of keys loaded into it, since these servers count each offer of a public key as an authentication attempt. This can be worked around by specifying the key that’s required for the authentication in the PuTTY configuration (see section 4.23.8); PuTTY will ignore any other keys Pageant may have, but will ask Pageant to do the authentication, so that you don’t have to type your passphrase.
On the server, this can be worked around by disabling public-key authentication or (for Sun SSH only) by increasing MaxAuthTries in sshd_config .
10.6 «Out of memory»
This occurs when PuTTY tries to allocate more memory than the system can give it. This may happen for genuine reasons: if the computer really has run out of memory, or if you have configured an extremely large number of lines of scrollback in your terminal. PuTTY is not able to recover from running out of memory; it will terminate immediately after giving this error.
However, this error can also occur when memory is not running out at all, because PuTTY receives data in the wrong format. In SSH-2 and also in SFTP, the server sends the length of each message before the message itself; so PuTTY will receive the length, try to allocate space for the message, and then receive the rest of the message. If the length PuTTY receives is garbage, it will try to allocate a ridiculous amount of memory, and will terminate with an «Out of memory» error.
This can happen in SSH-2, if PuTTY and the server have not enabled encryption in the same way (see question A.7.3 in the FAQ).
This can also happen in PSCP or PSFTP, if your login scripts on the server generate output: the client program will be expecting an SFTP message starting with a length, and if it receives some text from your login scripts instead it will try to interpret them as a message length. See question A.7.4 for details of this.
10.7 «Internal error», «Internal fault», «Assertion failed»
Any error beginning with the word «Internal» should never occur. If it does, there is a bug in PuTTY by definition; please see appendix B and report it to us.
Similarly, any error message starting with «Assertion failed» is a bug in PuTTY. Please report it to us, and include the exact text from the error message box.
10.8 «Unable to use key file», «Couldn’t load private key», «Couldn’t load this key»
Various forms of this error are printed in the PuTTY window, or written to the PuTTY Event Log (see section 3.1.3.1) when trying public-key authentication, or given by Pageant when trying to load a private key.
If you see one of these messages, it often indicates that you’ve tried to load a key of an inappropriate type into PuTTY, Plink, PSCP, PSFTP, or Pageant.
You may have tried to load an SSH-2 key in a «foreign» format (OpenSSH or ssh.com ) directly into one of the PuTTY tools, in which case you need to import it into PuTTY’s native format ( *.PPK ) using PuTTYgen – see section 8.2.12.
Alternatively, you may have specified a key that’s inappropriate for the connection you’re making. The SSH-2 and the old SSH-1 protocols require different private key formats, and a SSH-1 key can’t be used for a SSH-2 connection (or vice versa).
10.9 «Server refused our key», «Server refused our public key», «Key refused»
Various forms of this error are printed in the PuTTY window, or written to the PuTTY Event Log (see section 3.1.3.1) when trying public-key authentication.
If you see one of these messages, it means that PuTTY has sent a public key to the server and offered to authenticate with it, and the server has refused to accept authentication. This usually means that the server is not configured to accept this key to authenticate this user.
This is almost certainly not a problem with PuTTY. If you see this type of message, the first thing you should do is check your server configuration carefully. Common errors include having the wrong permissions or ownership set on the public key or the user’s home directory on the server. Also, read the PuTTY Event Log; the server may have sent diagnostic messages explaining exactly what problem it had with your setup.
Section 8.3 has some hints on server-side public key setup.
10.10 «Access denied», «Authentication refused»
Various forms of this error are printed in the PuTTY window, or written to the PuTTY Event Log (see section 3.1.3.1) during authentication.
If you see one of these messages, it means that the server has refused all the forms of authentication PuTTY has tried and it has no further ideas.
It may be worth checking the Event Log for diagnostic messages from the server giving more detail.
This error can be caused by buggy SSH-1 servers that fail to cope with the various strategies we use for camouflaging passwords in transit. Upgrade your server, or use the workarounds described in section 4.28.11 and possibly section 4.28.12.
10.11 «No supported authentication methods available»
This error indicates that PuTTY has run out of ways to authenticate you to an SSH server. This may be because PuTTY has TIS or keyboard-interactive authentication disabled, in which case see section 4.23.4 and section 4.23.5.
10.12 «Incorrect MAC received on packet» or «Incorrect CRC received on packet»
This error occurs when PuTTY decrypts an SSH packet and its checksum is not correct. This probably means something has gone wrong in the encryption or decryption process. It’s difficult to tell from this error message whether the problem is in the client, in the server, or in between.
In particular, if the network is corrupting data at the TCP level, it may only be obvious with cryptographic protocols such as SSH, which explicitly check the integrity of the transferred data and complain loudly if the checks fail. Corruption of protocols without integrity protection (such as HTTP) will manifest in more subtle failures (such as misdisplayed text or images in a web browser) which may not be noticed.
Occasionally this has been caused by server bugs. An example is the bug described at section 4.28.8, although you’re very unlikely to encounter that one these days.
In this context MAC stands for Message Authentication Code. It’s a cryptographic term, and it has nothing at all to do with Ethernet MAC (Media Access Control) addresses, or with the Apple computer.
10.13 «Incoming packet was garbled on decryption»
This error occurs when PuTTY decrypts an SSH packet and the decrypted data makes no sense. This probably means something has gone wrong in the encryption or decryption process. It’s difficult to tell from this error message whether the problem is in the client, in the server, or in between.
If you get this error, one thing you could try would be to fiddle with the setting of «Miscomputes SSH-2 encryption keys» (see section 4.28.10) or «Ignores SSH-2 maximum packet size» (see section 4.28.5) on the Bugs panel.
10.14 «PuTTY X11 proxy: various errors»
This family of errors are reported when PuTTY is doing X forwarding. They are sent back to the X application running on the SSH server, which will usually report the error to the user.
When PuTTY enables X forwarding (see section 3.4) it creates a virtual X display running on the SSH server. This display requires authentication to connect to it (this is how PuTTY prevents other users on your server machine from connecting through the PuTTY proxy to your real X display). PuTTY also sends the server the details it needs to enable clients to connect, and the server should put this mechanism in place automatically, so your X applications should just work.
A common reason why people see one of these messages is because they used SSH to log in as one user (let’s say «fred»), and then used the Unix su command to become another user (typically «root»). The original user, «fred», has access to the X authentication data provided by the SSH server, and can run X applications which are forwarded over the SSH connection. However, the second user («root») does not automatically have the authentication data passed on to it, so attempting to run an X application as that user often fails with this error.
If this happens, it is not a problem with PuTTY. You need to arrange for your X authentication data to be passed from the user you logged in as to the user you used su to become. How you do this depends on your particular system; in fact many modern versions of su do it automatically.
10.15 «Network error: Software caused connection abort»
This is a generic error produced by the Windows network code when it kills an established connection for some reason. For example, it might happen if you pull the network cable out of the back of an Ethernet-connected computer, or if Windows has any other similar reason to believe the entire network has become unreachable.
Windows also generates this error if it has given up on the machine at the other end of the connection ever responding to it. If the network between your client and server goes down and your client then tries to send some data, Windows will make several attempts to send the data and will then give up and kill the connection. In particular, this can occur even if you didn’t type anything, if you are using SSH-2 and PuTTY attempts a key re-exchange. (See section 4.20.2 for more about key re-exchange.)
(It can also occur if you are using keepalives in your connection. Other people have reported that keepalives fix this error for them. See section 4.14.1 for a discussion of the pros and cons of keepalives.)
We are not aware of any reason why this error might occur that would represent a bug in PuTTY. The problem is between you, your Windows system, your network and the remote system.
10.16 «Network error: Connection reset by peer»
This error occurs when the machines at each end of a network connection lose track of the state of the connection between them. For example, you might see it if your SSH server crashes, and manages to reboot fully before you next attempt to send data to it.
However, the most common reason to see this message is if you are connecting through a firewall or a NAT router which has timed the connection out. See question A.7.8 in the FAQ for more details. You may be able to improve the situation by using keepalives; see section 4.14.1 for details on this.
Note that Windows can produce this error in some circumstances without seeing a connection reset from the server, for instance if the connection to the network is lost.
10.17 «Network error: Connection refused»
This error means that the network connection PuTTY tried to make to your server was rejected by the server. Usually this happens because the server does not provide the service which PuTTY is trying to access.
Check that you are connecting with the correct protocol (SSH, Telnet or Rlogin), and check that the port number is correct. If that fails, consult the administrator of your server.
10.18 «Network error: Connection timed out»
This error means that the network connection PuTTY tried to make to your server received no response at all from the server. Usually this happens because the server machine is completely isolated from the network, or because it is turned off.
Check that you have correctly entered the host name or IP address of your server machine. If that fails, consult the administrator of your server.
Unix also generates this error when it tries to send data down a connection and contact with the server has been completely lost during a connection. (There is a delay of minutes before Unix gives up on receiving a reply from the server.) This can occur if you type things into PuTTY while the network is down, but it can also occur if PuTTY decides of its own accord to send data: due to a repeat key exchange in SSH-2 (see section 4.20.2) or due to keepalives (section 4.14.1).
10.19 «Network error: Cannot assign requested address»
This means that the operating system rejected the parameters of the network connection PuTTY tried to make, usually without actually trying to connect to anything, because they were simply invalid.
A common way to provoke this error is to accidentally try to connect to port 0, which is not a valid port number.
Источник
-
#1
Hi,
I’m transferring a site from an old server to a new server and am having trouble importing the database to the new server via SSH. When I import, I get the following error:
Code:
ERROR 1005 (HY000) at line 3755: Can't create table `let7_mag5`.`catalog_product_relation` (errno: 140 "Wrong create options")Checking Google, someone else had the same problem as me (https://stackoverflow.com/questions…cant-create-table-errno-140-wrong-create-opti) and they solved it by adding the following to their my.ini file:
Code:
innodb_file_format = Barracuda # For dynamic and compressed InnoDB tablesI tried adding this to both /etc/my.cnf & /usr/local/directadmin/conf/my.cnf but it didn’t work. I still keep getting this error when I try and import the database to the new server.
Another suggestion on the other persons page was to remove ROW_FORMAT = DYNAMIC from the phpmyadmin import script but I can’t use phpmyadmin as the database is too big for phpmyadmin and needs to be done by SSH.
Any other know a solution?
Thanks a lot
-
#2
/usr/local/directadmin/conf/my.cnf
Certainly don’t put it there as this is only for password so better remove it there again.
I presume you are using Mariadb on your new server. When using MariaDB 10.2 then strict mode is in effect by default (which was not the case on 10.1 and older and Mysql) which also can cause this error.
I had a look for you on Google and found a bug report about your error here:
As a solution this came up in that bug report (which was not a bug)
In InnoDB 5.7 (both in MySQL 5.7 and MariaDB 10.2) innodb_strict_mode=1 by default, so both of them fail to create a table with the wrong ROW_FORMAT.
If you want the old behavior, set innodb_strict_mode=0.
You might also use this in /etc/my.cnf under [mysqld]
which also disables strict mode. Don’t forget to restart mysql/mariadb afterwards.
Hope it helps you fixing this.
By the way, I also use SSH to backup and restore databases, works the best and the quickest.
However, your customers maybe can’t use SSH. If somebody ever has the same issue but is a customer, advise them to use Bigdump, which can do big database imports without issues.
-
#3
Thanks a lot for your reply. I was able to import all of my databases except one which is giving me another problem (timeout setting?).
I presume you are using Mariadb on your new server.
Yes, I used the auto-install script on a new Centos 8 server.
Server type: MariaDB
Documentation Server version: 10.4.14-MariaDB — MariaDB
Server Protocol version: 10
You were right that the problem was the strict mode. However, I couldn’t disable the strict mode with the «sql_mode=» addition in the /etc/my.cnf file. However, I did get it disabled by adding «innodb_strict_mode = OFF» to the file. This solved the problem
But, I have one database (the largest one) which I don’t believe has been imported successfully as it time’s out. i.e After I enter the password, the import process never finishes. I notice in general on this new server that the SSH times out at around 10 minutes, so I presume the problem is the SSH times out before the process has finished?
Doing some googling suggested I should change the ClientAliveInterval & ClientAliveCountMax in /etc/ssh/sshd_config. These settings weren’t in this file and the file suggested to create a .conf file in /etc/ssh/ssh_config.d/ with those settings which I did. But this didn’t work.
Any ideas? Thanks a lot.
-
#4
so I presume the problem is the SSH times out before the process has finished?
That is a good possibility.
There are indeed 2 options which you can use to have the process finished.
1.) What you already did but it should be present by default in the /etc/sshd/sshd_config file. So odd it wasn’t in there. I always have them in there by default, they are just marked. So I unmark them and use this:
ClientAliveInterval 120
ClientAliveCountMax 30
Maybe you used = character like ClientAliveInterval=120, maybe that is the cause it’s not working?
And I presume you restarted SSH.
2.) If you can’t get this to work, there is always the «screen» command.
It’s even better to use that anyway when working via SSH, because if your connection get’s closed for whatever reason, even your home ISP has an issue or something, then you won’t be able to see what’s going on or how far you got on return.
When using the screen command, if you loose connection and you’re able to connect later on, you will always be able to reconnect to the screen you were working on and see what’s happening.
So even if you are thrown out on an SSH timeout, then screen windows will keep working, so you just have to be patient that the restore is done.
Here’s a good howto:

How To Use Linux Screen
Screen or GNU Screen, is a terminal multiplexer. In other words, it means that you can a start a screen session and then open any number of windows (virtual terminals) inside that session.

linuxize.com
Also check with less or nano or vi (maybe less is best to use) the last lines of the mysql backup file. When finished, you can check if the content is present in the database after restore so you’re sure that all is back.
As for forums and sites, advise is to use file and attachment on file/hd and not in database, because that this can cause growth in database until a point it gets giving issues.
-
#5
That is a good possibility.
There are indeed 2 options which you can use to have the process finished.
1.) What you already did but it should be present by default in the /etc/sshd/sshd_config file. So odd it wasn’t in there. I always have them in there by default, they are just marked. So I unmark them and use this:
ClientAliveInterval 120
ClientAliveCountMax 30Maybe you used = character like ClientAliveInterval=120, maybe that is the cause it’s not working?
And I presume you restarted SSH.dd
Thanks a lot for your help Richard. I had mistakenly opened ssh_config instead of sshd_config. Un-commenting the lines and adding the 120 & 30 values fixed the issue.
-
#6
You’re welcome. Glad to see it’s fixed now.
Secure Shell (SSH) is a key WordPress development tool. It grants advanced users access to key platforms and software that make coding and other tasks easier, faster, and more organized.
So if you attempt to use SSH only to see a “Connection refused” error, you may start to feel concerned. However, this is a common issue, and it’s entirely possible to fix it on your own with just a bit of troubleshooting. You’ll be back to running commands in no time flat.
In this post, we’ll discuss what SSH is and when to use it. Then we’ll explain some common reasons your connection may be refused, including in PuTTY. Finally, we’ll provide some troubleshooting tips.
Let’s dive in!
Prefer to watch the video version?
What Is SSH and When Should I Use It?
Secure Shell (SSH), also sometimes called Secure Socket Shell, is a protocol for securely accessing your site’s server over an unsecured network. In other words, it’s a way to safely log in to your server remotely using your preferred command-line interface:
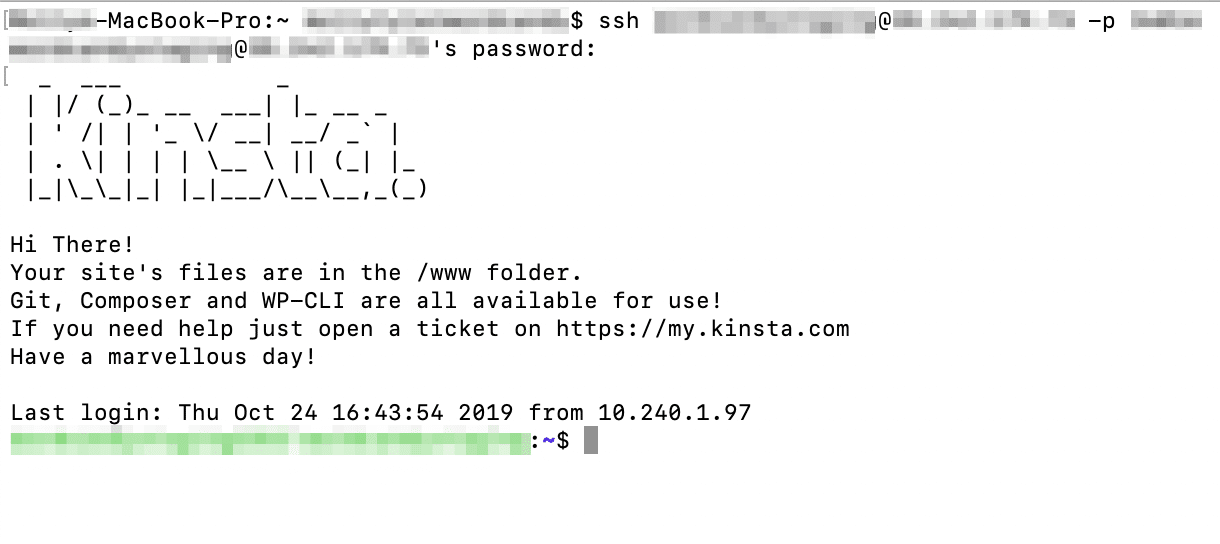
Unlike File Transfer Protocol (FTP), which only enables you to upload, delete, and edit files on your server, SSH can accomplish a wide range of tasks. For instance, if an error locks you out of your WordPress site, you can use SSH to access it remotely.
This protocol also enables you to use several key developer tools, including:
- WP-CLI. The WordPress command line. You can use it for a variety of tasks, including new installations, bulk plugin updates, and media file imports.
- Composer. A PHP package manager. It enables you to implement several frameworks for use in your site’s code by pulling the necessary libraries and dependencies.
- Git. A version control system used to track changes in code. This is especially useful for teams of developers working together on a single project.
- npm. A JavaScript package manager. It includes a command-line and JavaScript software registry. Note: Kinsta customers will need an Enterprise plan in order to access this feature.
It’s important to note that using SSH is an advanced skill. Generally speaking, lay users of WordPress should contact their developers or hosting providers for help, rather than trying to resolve issues with SSH themselves.
Why Is My SSH Connection Refused? (5 Reasons for Connectivity Errors)
Unfortunately, there are many scenarios that could occur while you’re trying to connect to your server via SSH, which might result in an error reading “Connection refused”.
Below are some of the most common issues that might be causing problems for you.
1. Your SSH Service Is Down
In order to connect to your server with SSH, it must be running an SSH daemon – a program that runs in the background to listen for and accept connections.
If this service is down, you will not be able to successfully connect to your server and may receive a Connection refused error:

Your server’s SSH daemon may be down for a wide variety of reasons, including unexpected traffic spikes, resource outages, or even a Distributed Denial of Service (DDoS) attack. In addition to the troubleshooting steps we’ll mention below, you may want to contact your hosting provider to determine the root cause of the issue.
If you suspect that your SSH service might be down, you can run this command to find out:
sudo service ssh statusIf the command line returns a status of down, then you’ve likely found the reason behind your connectivity error.
2. You Have the Wrong Credentials
Although it may seem too simple to be true, it’s possible that you’re just entering the wrong credentials when trying to connect to your server. There are four pieces of information needed to run SSH:
- Host name. The IP address of the server you’re trying to connect to or your domain name.
- Username. Your (S)FTP username.
- Password. Your (S)FTP password.
- Port. The default port is 22. However, some hosting providers (including Kinsta) change their SSH port number for security reasons. If this is the case, you should be able to find it by logging in to your MyKinsta dashboard.
You can also check to see which port is being used for SSH by running this command:
grep Port /etc/ssh/sshd_configThe command line should return the correct port.
Check to make sure you’re entering the right credentials and taking into account the possibility of typos or entering the wrong IP address or port.
3. The Port You’re Trying to Use Is Closed
A “port” is simply the endpoint to which you’re directed when connecting to your server. In addition to making sure you have the correct one, you’ll also want to check to see if the port you’re trying to use is open.
Any open port is a security vulnerability, as hackers can try to exploit it and gain access to the server. For this reason, unused ports are often closed to prevent attacks.
In the event that port 22, or the custom SSH port for your server, has been closed, you will likely see a Connection refused error. You can see all the ports listening on your server by running this command:
sudo lsof -i -n -P | grep LISTENThis command should return a list of ports with the LISTEN state. Ideally, you want to see port 22 or your server’s custom SSH port listed here. If it’s not, you’ll need to reopen the port in order to connect to your server.
4. SSH Isn’t Installed on Your Server
As we briefly mentioned earlier, servers use SSH daemons to listen for and accept connections. Therefore, if the server you’re trying to connect to doesn’t have one installed, you won’t be able to access it using SSH.
Generally speaking, almost all hosting providers will have SSH daemons installed on their servers by default. This particular issue is more common on localhost or dedicated servers.
5. Firewall Settings Are Preventing an SSH Connection
Since open ports present a security risk, firewalls installed to protect servers from hackers sometimes block connections to them. Unfortunately, this means that even harmless users who are trying to SSH into their servers may receive a Connection refused error as a result of firewall settings.
If your setup appears to be in order and you still can’t connect, take a look at your firewall’s rules. You can display them in your command-line interface with the following commands:
sudo iptables-save # display IPv4 rulessudo ip6tables-save # display IPv6 rulesYour results will vary, but you’ll want to look for these elements to determine if your firewall is blocking SSH connections:
- dport 22: This refers to the destination port, which for SSH is usually port 22 (reminder: Kinsta doesn’t use this port number).
- REJECT: This would indicate that connections are being refused from the specified destination.
- DROP: Like REJECT, this means that connections to the relevant port are being blocked.
If you search the results of the commands above for dport 22, you should be able to determine if your firewall is preventing an SSH connection. If so, you’ll have to change the rules to accept requests.
Why Does PuTTY Say Connection Refused?
PuTTY is an SSH client. If you’re familiar with FTP, this platform is the FileZilla equivalent to SSH on Windows machines. In other words, PuTTY enables users to input their credentials and launch an SSH connection:
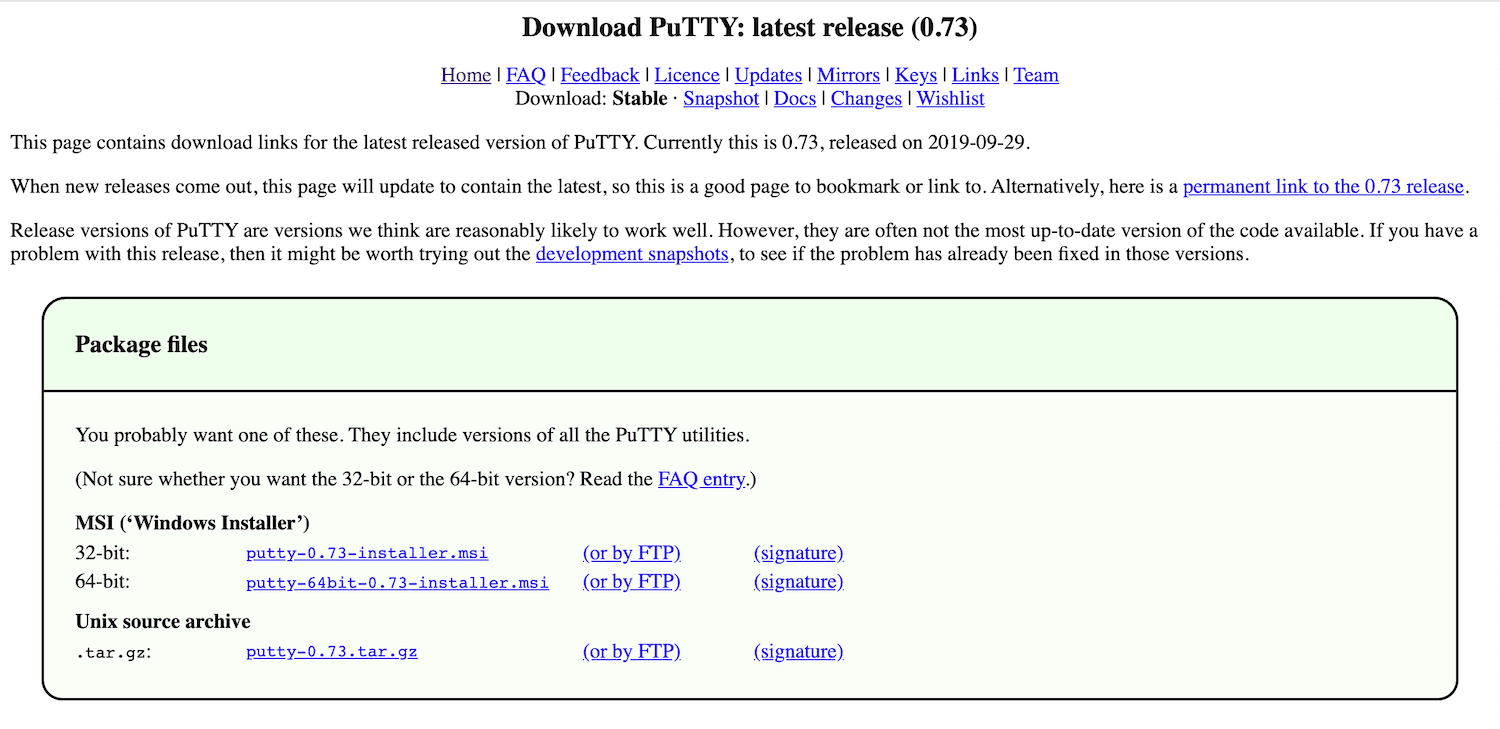
If you’re a PuTTY user and see the Connection refused error, the cause is likely one of those listed above.
This is an SSH connectivity error like any other, and the troubleshooting tips below should work whether you’re using PuTTY, Terminal, or any other program for connecting to your server with SSH.
We’ve taken our knowledge of effective website management at scale, and turned it into an ebook and video course. Click to download The Guide to Managing 60+ WordPress Sites!
How Do I Troubleshoot SSH Connectivity Errors?
When you’re experiencing an SSH connectivity error, there are a few steps you can take to troubleshoot it depending on the cause. Here are some tips for troubleshooting the reasons for a Connection refused error that we covered above:
- If your SSH service is down. Contact your hosting provider to see why your SSH service isn’t running. For localhost or dedicated servers, you can use the command
sudo service ssh restartto try to get it running again. - If you entered the wrong credentials. Once you’ve double-checked the SSH port using the
grep Port /etc/ssh/sshd_configcommand, try connecting again with the correct details. - If your SSH port is closed. This is usually a side effect of one of the two reasons listed below. Either install an SSH daemon on the server you want to connect to or change your firewall rules to accept connections to your SSH port.
- If SSH isn’t installed on your server. Install an SSH tool such as OpenSSH on the server you want to connect to using the
sudo apt install openssh-servercommand. - If your firewall is blocking your SSH connection. Disable the firewall rules blocking your SSH connection by changing the destination port’s settings to ACCEPT.
If you’re attempting to connect to your hosting provider’s server, it may be wiser to contact support than to try troubleshooting the problem yourself. Users on localhost or dedicated servers may be able to find further support on more advanced forums if none of the above solutions works.
Are you getting the ‘Connection refused’ error over SSH? Learn why that’s happening and how to troubleshoot SSH connectivity errors thanks to this guide 🙅 ✋Click to Tweet
Summary
Being able to connect to your server with SSH is convenient in a wide range of situations. It can enable you to access your site when you’re locked out of your WordPress dashboard, run commands via WP-CLI, track changes in your site’s code with Git, and more.
Although there are several causes that could be behind your SSH connectivity error, these are a few of the most common:
- Your SSH service is down.
- You have the wrong credentials.
- The port you’re trying to use is closed.
- SSH isn’t installed on your server.
- Firewall settings are preventing an SSH connection.
Get all your applications, databases and WordPress sites online and under one roof. Our feature-packed, high-performance cloud platform includes:
- Easy setup and management in the MyKinsta dashboard
- 24/7 expert support
- The best Google Cloud Platform hardware and network, powered by Kubernetes for maximum scalability
- An enterprise-level Cloudflare integration for speed and security
- Global audience reach with up to 35 data centers and 275 PoPs worldwide
Test it yourself with $20 off your first month of Application Hosting or Database Hosting. Explore our plans or talk to sales to find your best fit.
предыдущая глава | содержание | следующая глава
- 10.1 «The server’s host key is not cached in the registry»
- 10.2 «WARNING — POTENTIAL SECURITY BREACH!»
- 10.3 «SSH protocol version 2 required by our configuration but remote only provides (old, insecure) SSH-1»
- 10.4 «The first cipher supported by the server is … below the configured warning threshold»
- 10.5 «Remote side sent disconnect message type 2 (protocol error): «Too many authentication failures for root»»
- 10.6 «Out of memory»
- 10.7 «Internal error», «Internal fault», «Assertion failed»
- 10.8 «Unable to use key file», «Couldn’t load private key», «Couldn’t load this key»
- 10.9 «Server refused our key», «Server refused our public key», «Key refused»
- 10.10 «Access denied», «Authentication refused»
- 10.11 «No supported authentication methods available»
- 10.12 «Incorrect MAC received on packet» or «Incorrect CRC received on packet»
- 10.13 «Incoming packet was garbled on decryption»
- 10.14 «PuTTY X11 proxy: various errors»
- 10.15 «Network error: Software caused connection abort»
- 10.16 «Network error: Connection reset by peer»
- 10.17 «Network error: Connection refused»
- 10.18 «Network error: Connection timed out»
- 10.19 «Network error: Cannot assign requested address»
This chapter lists a number of common error messages which PuTTY and its associated tools can produce, and explains what they mean in more detail.
We do not attempt to list all error messages here: there are many which should never occur, and some which should be self-explanatory. If you get an error message which is not listed in this chapter and which you don’t understand, report it to us as a bug (see appendix B) and we will add documentation for it.
10.1 «The server’s host key is not cached in the registry»
This error message occurs when PuTTY connects to a new SSH server. Every server identifies itself by means of a host key; once PuTTY knows the host key for a server, it will be able to detect if a malicious attacker redirects your connection to another machine.
If you see this message, it means that PuTTY has not seen this host key before, and has no way of knowing whether it is correct or not. You should attempt to verify the host key by other means, such as asking the machine’s administrator.
If you see this message and you know that your installation of PuTTY has connected to the same server before, it may have been recently upgraded to SSH protocol version 2. SSH protocols 1 and 2 use separate host keys, so when you first use SSH-2 with a server you have only used SSH-1 with before, you will see this message again. You should verify the correctness of the key as before.
See section 2.2 for more information on host keys.
10.2 «WARNING — POTENTIAL SECURITY BREACH!»
This message, followed by «The server’s host key does not match the one PuTTY has cached in the registry», means that PuTTY has connected to the SSH server before, knows what its host key should be, but has found a different one.
This may mean that a malicious attacker has replaced your server with a different one, or has redirected your network connection to their own machine. On the other hand, it may simply mean that the administrator of your server has accidentally changed the key while upgrading the SSH software; this shouldn’t happen but it is unfortunately possible.
You should contact your server’s administrator and see whether they expect the host key to have changed. If so, verify the new host key in the same way as you would if it was new.
See section 2.2 for more information on host keys.
10.3 «SSH protocol version 2 required by our configuration but remote only provides (old, insecure) SSH-1»
By default, PuTTY only supports connecting to SSH servers that implement SSH protocol version 2. If you see this message, the server you’re trying to connect to only supports the older SSH-1 protocol.
If the server genuinely only supports SSH-1, then you need to either change the «SSH protocol version» setting (see section 4.19.4), or use the -1 command-line option; in any case, you should not treat the resulting connection as secure.
You might start seeing this message with new versions of PuTTY (from 0.68 onwards) where you didn’t before, because it used to be possible to configure PuTTY to automatically fall back from SSH-2 to SSH-1. This is no longer supported, to prevent the possibility of a downgrade attack.
10.4 «The first cipher supported by the server is … below the configured warning threshold»
This occurs when the SSH server does not offer any ciphers which you have configured PuTTY to consider strong enough. By default, PuTTY puts up this warning only for Blowfish, single-DES, and Arcfour encryption.
See section 4.22 for more information on this message.
(There are similar messages for other cryptographic primitives, such as host key algorithms.)
10.5 «Remote side sent disconnect message type 2 (protocol error): «Too many authentication failures for root»»
This message is produced by an OpenSSH (or Sun SSH) server if it receives more failed authentication attempts than it is willing to tolerate.
This can easily happen if you are using Pageant and have a large number of keys loaded into it, since these servers count each offer of a public key as an authentication attempt. This can be worked around by specifying the key that’s required for the authentication in the PuTTY configuration (see section 4.23.8); PuTTY will ignore any other keys Pageant may have, but will ask Pageant to do the authentication, so that you don’t have to type your passphrase.
On the server, this can be worked around by disabling public-key authentication or (for Sun SSH only) by increasing MaxAuthTries in sshd_config.
10.6 «Out of memory»
This occurs when PuTTY tries to allocate more memory than the system can give it. This may happen for genuine reasons: if the computer really has run out of memory, or if you have configured an extremely large number of lines of scrollback in your terminal. PuTTY is not able to recover from running out of memory; it will terminate immediately after giving this error.
However, this error can also occur when memory is not running out at all, because PuTTY receives data in the wrong format. In SSH-2 and also in SFTP, the server sends the length of each message before the message itself; so PuTTY will receive the length, try to allocate space for the message, and then receive the rest of the message. If the length PuTTY receives is garbage, it will try to allocate a ridiculous amount of memory, and will terminate with an «Out of memory» error.
This can happen in SSH-2, if PuTTY and the server have not enabled encryption in the same way (see question A.7.3 in the FAQ).
This can also happen in PSCP or PSFTP, if your login scripts on the server generate output: the client program will be expecting an SFTP message starting with a length, and if it receives some text from your login scripts instead it will try to interpret them as a message length. See question A.7.4 for details of this.
10.7 «Internal error», «Internal fault», «Assertion failed»
Any error beginning with the word «Internal» should never occur. If it does, there is a bug in PuTTY by definition; please see appendix B and report it to us.
Similarly, any error message starting with «Assertion failed» is a bug in PuTTY. Please report it to us, and include the exact text from the error message box.
10.8 «Unable to use key file», «Couldn’t load private key», «Couldn’t load this key»
Various forms of this error are printed in the PuTTY window, or written to the PuTTY Event Log (see section 3.1.3.1) when trying public-key authentication, or given by Pageant when trying to load a private key.
If you see one of these messages, it often indicates that you’ve tried to load a key of an inappropriate type into PuTTY, Plink, PSCP, PSFTP, or Pageant.
You may have tried to load an SSH-2 key in a «foreign» format (OpenSSH or ssh.com) directly into one of the PuTTY tools, in which case you need to import it into PuTTY’s native format (*.PPK) using PuTTYgen – see section 8.2.12.
Alternatively, you may have specified a key that’s inappropriate for the connection you’re making. The SSH-2 and the old SSH-1 protocols require different private key formats, and a SSH-1 key can’t be used for a SSH-2 connection (or vice versa).
10.9 «Server refused our key», «Server refused our public key», «Key refused»
Various forms of this error are printed in the PuTTY window, or written to the PuTTY Event Log (see section 3.1.3.1) when trying public-key authentication.
If you see one of these messages, it means that PuTTY has sent a public key to the server and offered to authenticate with it, and the server has refused to accept authentication. This usually means that the server is not configured to accept this key to authenticate this user.
This is almost certainly not a problem with PuTTY. If you see this type of message, the first thing you should do is check your server configuration carefully. Common errors include having the wrong permissions or ownership set on the public key or the user’s home directory on the server. Also, read the PuTTY Event Log; the server may have sent diagnostic messages explaining exactly what problem it had with your setup.
Section 8.3 has some hints on server-side public key setup.
10.10 «Access denied», «Authentication refused»
Various forms of this error are printed in the PuTTY window, or written to the PuTTY Event Log (see section 3.1.3.1) during authentication.
If you see one of these messages, it means that the server has refused all the forms of authentication PuTTY has tried and it has no further ideas.
It may be worth checking the Event Log for diagnostic messages from the server giving more detail.
This error can be caused by buggy SSH-1 servers that fail to cope with the various strategies we use for camouflaging passwords in transit. Upgrade your server, or use the workarounds described in section 4.28.11 and possibly section 4.28.12.
10.11 «No supported authentication methods available»
This error indicates that PuTTY has run out of ways to authenticate you to an SSH server. This may be because PuTTY has TIS or keyboard-interactive authentication disabled, in which case see section 4.23.4 and section 4.23.5.
10.12 «Incorrect MAC received on packet» or «Incorrect CRC received on packet»
This error occurs when PuTTY decrypts an SSH packet and its checksum is not correct. This probably means something has gone wrong in the encryption or decryption process. It’s difficult to tell from this error message whether the problem is in the client, in the server, or in between.
In particular, if the network is corrupting data at the TCP level, it may only be obvious with cryptographic protocols such as SSH, which explicitly check the integrity of the transferred data and complain loudly if the checks fail. Corruption of protocols without integrity protection (such as HTTP) will manifest in more subtle failures (such as misdisplayed text or images in a web browser) which may not be noticed.
Occasionally this has been caused by server bugs. An example is the bug described at section 4.28.8, although you’re very unlikely to encounter that one these days.
In this context MAC stands for Message Authentication Code. It’s a cryptographic term, and it has nothing at all to do with Ethernet MAC (Media Access Control) addresses, or with the Apple computer.
10.13 «Incoming packet was garbled on decryption»
This error occurs when PuTTY decrypts an SSH packet and the decrypted data makes no sense. This probably means something has gone wrong in the encryption or decryption process. It’s difficult to tell from this error message whether the problem is in the client, in the server, or in between.
If you get this error, one thing you could try would be to fiddle with the setting of «Miscomputes SSH-2 encryption keys» (see section 4.28.10) or «Ignores SSH-2 maximum packet size» (see section 4.28.5) on the Bugs panel.
10.14 «PuTTY X11 proxy: various errors»
This family of errors are reported when PuTTY is doing X forwarding. They are sent back to the X application running on the SSH server, which will usually report the error to the user.
When PuTTY enables X forwarding (see section 3.4) it creates a virtual X display running on the SSH server. This display requires authentication to connect to it (this is how PuTTY prevents other users on your server machine from connecting through the PuTTY proxy to your real X display). PuTTY also sends the server the details it needs to enable clients to connect, and the server should put this mechanism in place automatically, so your X applications should just work.
A common reason why people see one of these messages is because they used SSH to log in as one user (let’s say «fred»), and then used the Unix su command to become another user (typically «root»). The original user, «fred», has access to the X authentication data provided by the SSH server, and can run X applications which are forwarded over the SSH connection. However, the second user («root») does not automatically have the authentication data passed on to it, so attempting to run an X application as that user often fails with this error.
If this happens, it is not a problem with PuTTY. You need to arrange for your X authentication data to be passed from the user you logged in as to the user you used su to become. How you do this depends on your particular system; in fact many modern versions of su do it automatically.
10.15 «Network error: Software caused connection abort»
This is a generic error produced by the Windows network code when it kills an established connection for some reason. For example, it might happen if you pull the network cable out of the back of an Ethernet-connected computer, or if Windows has any other similar reason to believe the entire network has become unreachable.
Windows also generates this error if it has given up on the machine at the other end of the connection ever responding to it. If the network between your client and server goes down and your client then tries to send some data, Windows will make several attempts to send the data and will then give up and kill the connection. In particular, this can occur even if you didn’t type anything, if you are using SSH-2 and PuTTY attempts a key re-exchange. (See section 4.20.2 for more about key re-exchange.)
(It can also occur if you are using keepalives in your connection. Other people have reported that keepalives fix this error for them. See section 4.14.1 for a discussion of the pros and cons of keepalives.)
We are not aware of any reason why this error might occur that would represent a bug in PuTTY. The problem is between you, your Windows system, your network and the remote system.
10.16 «Network error: Connection reset by peer»
This error occurs when the machines at each end of a network connection lose track of the state of the connection between them. For example, you might see it if your SSH server crashes, and manages to reboot fully before you next attempt to send data to it.
However, the most common reason to see this message is if you are connecting through a firewall or a NAT router which has timed the connection out. See question A.7.8 in the FAQ for more details. You may be able to improve the situation by using keepalives; see section 4.14.1 for details on this.
Note that Windows can produce this error in some circumstances without seeing a connection reset from the server, for instance if the connection to the network is lost.
10.17 «Network error: Connection refused»
This error means that the network connection PuTTY tried to make to your server was rejected by the server. Usually this happens because the server does not provide the service which PuTTY is trying to access.
Check that you are connecting with the correct protocol (SSH, Telnet or Rlogin), and check that the port number is correct. If that fails, consult the administrator of your server.
10.18 «Network error: Connection timed out»
This error means that the network connection PuTTY tried to make to your server received no response at all from the server. Usually this happens because the server machine is completely isolated from the network, or because it is turned off.
Check that you have correctly entered the host name or IP address of your server machine. If that fails, consult the administrator of your server.
Unix also generates this error when it tries to send data down a connection and contact with the server has been completely lost during a connection. (There is a delay of minutes before Unix gives up on receiving a reply from the server.) This can occur if you type things into PuTTY while the network is down, but it can also occur if PuTTY decides of its own accord to send data: due to a repeat key exchange in SSH-2 (see section 4.20.2) or due to keepalives (section 4.14.1).
10.19 «Network error: Cannot assign requested address»
This means that the operating system rejected the parameters of the network connection PuTTY tried to make, usually without actually trying to connect to anything, because they were simply invalid.
A common way to provoke this error is to accidentally try to connect to port 0, which is not a valid port number.
Иногда могут возникать ошибки подключения, и, говоря об этой ошибке, наиболее распространенной является ошибка 1005, доступ запрещен. Эта ошибка может быть проблематичной, но в этой статье мы покажем вам, как ее исправить.
Ошибка 1005 отказано в доступе является относительно распространенным явлением, и, говоря об этой ошибке, вот некоторые похожие проблемы, о которых сообщили пользователи:
- Cloudflare error 1005, error 1006. Это некоторые распространенные проблемы, с которыми вы можете столкнуться, но вы можете исправить их, просто отключив антивирус.
- Crunchyroll error 1005, banned IP — эта проблема может возникнуть, если ваш IP забанен, но в большинстве случаев вы можете исправить это, просто используя хороший VPN.
- Владелец этого веб-сайта заблокировал ваш IP-адрес Cloudflare. Эта проблема может возникать из-за вашего прокси-сервера. Чтобы исправить это, просто отключите его и проверьте, помогает ли это.
- Ошибка 1005 VPN — эта ошибка может возникать из-за вашего VPN-клиента, поэтому вы можете отключить его или попробовать переключиться на другой VPN.
- Проверьте свой антивирус
- Попробуйте использовать VPN
- Попробуйте использовать другой браузер
- Отключить прокси
- Убедитесь, что дата и время указаны правильно
- Выполнить чистую загрузку
- Выполните восстановление системы
- Обратитесь к администратору сайта или вашему провайдеру
Решение 1. Проверьте свой антивирус
В большинстве случаев ошибка 1005 доступ запрещен может появиться из-за вашего антивируса. Иногда ваш антивирус может мешать работе вашей системы, и для решения этой проблемы рекомендуется отключить определенные антивирусные функции и проверить, помогает ли это.
Если проблема все еще существует, возможно, вы можете решить проблему, просто полностью отключив антивирус. В худшем случае вам, возможно, придется полностью удалить антивирус и проверить, решает ли это проблему.
Даже если вы решите удалить антивирус, ваша система будет защищена Защитником Windows, поэтому вам не нужно беспокоиться о вашей безопасности. Если удаление антивируса решает проблему, вы можете рассмотреть возможность перехода на другой антивирус.
На рынке есть много отличных антивирусных инструментов, но если вам нужен надежный антивирус, который не будет мешать вашей системе, вам следует рассмотреть возможность использования Bitdefender . Версия 2019 включает в себя дополнительные функции безопасности и множество улучшений совместимости, что делает его более мощным, чем предыдущие версии.
— Загрузите Bitdefender Antivirus 2019 по специальной цене со скидкой 35%.
Решение 2. Попробуйте использовать VPN
Иногда вы не можете получить доступ к определенным веб-сайтам из-за ошибки 1005 сообщение об отказе в доступе. Ваш IP-адрес или страна могут быть заблокированы для доступа к определенным веб-сайтам, или ваш интернет-провайдер может препятствовать вам посещать эти сайты.
Если у вас возникла эта проблема, вы можете решить ее, просто используя VPN. Существует множество отличных инструментов VPN, но если вы хотите простой и надежный VPN, мы настоятельно рекомендуем вам попробовать CyberGhost VPN . Как только вы включите VPN, проверьте, решена ли проблема.
Почему стоит выбрать CyberGhost? Cyberghost для Windows
- 256-битное шифрование AES
- Более 3000 серверов по всему миру
- Отличный ценовой план
- Отличная поддержка
Получить сейчас CyberGhost VPN
Решение 3 — Попробуйте использовать другой браузер
Иногда сообщение 1005 об отказе в доступе может появиться из-за вашего браузера. Проблема может быть в ваших настройках, поврежденной установке или чем-то еще, и для ее устранения рекомендуется переключиться на другой браузер.
Если проблема не появляется в другом браузере, это означает, что ваш браузер по умолчанию является проблемой. Вы можете использовать новый браузер в качестве обходного пути или начать устранение неполадок браузера по умолчанию и попытаться устранить основную проблему.
Решение 4 — Отключить прокси
Прокси-сервер является полезным методом защиты вашей конфиденциальности, и многие пользователи, как правило, используют его. Однако настройки прокси-сервера иногда могут приводить к появлению сообщения об ошибке «Отказано в доступе 1005», и для его устранения необходимо отключить все настройки прокси-сервера на компьютере. Это довольно просто сделать, и вы можете сделать это, выполнив следующие действия:
- Откройте приложение «Настройки» . Вы можете сделать это быстро, нажав Windows Key + I.
- Когда откроется приложение «Настройки», перейдите в раздел « Сеть и Интернет ».

- Выберите Proxy на левой панели и отключите все параметры на правой панели.
После этого прокси должен быть полностью отключен на вашем компьютере. Теперь проверьте, если проблема все еще там.
Решение 5. Убедитесь, что дата и время указаны правильно
Иногда вы можете получить сообщение об ошибке 1005 об отказе в доступе просто потому, что ваши дата и время неверны. Если вы заметили, что ваша дата или время неверны, вы можете решить эту проблему, выполнив следующие действия:
- Щелкните правой кнопкой мыши значок часов на панели задач. Выберите Настроить дату / время в контекстном меню.
- Когда откроется новое окно, найдите параметр « Установить время автоматически» и выключите его. Подождите несколько секунд и включите его снова.
Таким образом вы автоматически настроите дату и время. Кроме того, вы можете нажать кнопку « Изменить», чтобы вручную настроить дату и время. Как только ваша дата и время будут правильными, проблема должна быть решена, и все снова начнет работать.
Решение 6 — Выполните Чистую загрузку
Если вы продолжаете получать сообщение об ошибке 1005 «Отказано в доступе» при попытке посетить определенные веб-сайты, возможно, проблема связана со сторонними приложениями на вашем ПК. Некоторые приложения автоматически запускаются на вашем компьютере и вызывают проблему, как только вы загружаетесь в Windows.
Чтобы найти причину проблемы, рекомендуется выполнить чистую загрузку и отключить все запускаемые приложения и службы. Для этого просто выполните следующие действия:
- Нажмите клавиши Windows + R, чтобы открыть диалоговое окно «Выполнить». Введите msconfig и нажмите OK или нажмите Enter .
- Откроется окно конфигурации системы . Перейдите на вкладку « Службы » и установите флажок « Скрыть все службы Microsoft» . Нажмите кнопку Отключить все, чтобы отключить все службы.
- Перейдите на вкладку « Автозагрузка » и нажмите « Открыть диспетчер задач» .
- Диспетчер задач появится, и вы увидите список запускаемых приложений. Щелкните правой кнопкой мыши первую запись в списке и выберите « Отключить» в меню. Повторите этот шаг для всех запускаемых приложений.
- После отключения всех запускаемых приложений вернитесь в окно « Конфигурация системы» . Нажмите Apply и OK и перезагрузите компьютер.
После этого убедитесь, что проблема все еще существует. Если проблема не появляется, скорее всего, проблема в одном из отключенных приложений или служб. Чтобы точно определить проблему, рекомендуется поочередно включать отключенные службы и приложения, пока не найдете причину проблемы.
Как только вы найдете проблемное приложение, лучше удалить его с вашего ПК. Чтобы полностью удалить приложение с вашего компьютера, рекомендуется использовать программное обеспечение для удаления, такое как IOBit Uninstaller .
- Скачать сейчас IObit Uninstaller PRO 7 бесплатно
Иногда, когда вы пытаетесь удалить приложение, некоторые файлы и записи в реестре могут остаться позади, и это может вызвать проблему, поэтому рекомендуется использовать программу удаления, чтобы полностью удалить выбранное приложение вместе со всеми его файлами.
Решение 7 — Выполнить восстановление системы
Если проблема все еще существует, и вы продолжаете получать сообщение 1005 об отказе в доступе, возможно, вы можете решить проблему, выполнив Восстановление системы. В случае, если вы не знакомы с ним, восстановление системы — это встроенная функция, которая может легко восстановить вашу систему до более раннего состояния и исправить многие проблемы на этом пути.
Чтобы выполнить восстановление системы, вам просто нужно сделать следующее:
- Нажмите клавиши Windows + S и введите восстановление системы . Теперь выберите « Создать точку восстановления» из списка результатов.
- Должно появиться окно « Свойства системы» . Нажмите кнопку Восстановление системы .
- Когда откроется окно восстановления системы, нажмите Далее, чтобы продолжить.
- Установите флажок Показать больше точек восстановления, если доступно. Выберите нужную точку восстановления и нажмите « Далее» .
- Следуйте инструкциям на экране для завершения процесса восстановления.
После того, как ваша система восстановлена, проверьте, не устранена ли проблема.
Решение 8 — Обратитесь к администратору сайта или вашему провайдеру
Если сообщение об отказе в доступе 1005 все еще присутствует, возможно, вы можете исправить его, связавшись с администратором сайта. Возможно, что ваш IP был забанен по ошибке или автоматически сервером, и обращение к администратору может исправить это.
Кроме того, вы также можете связаться с вашим Интернет-провайдером и проверить, связана ли проблема с ними.
Ошибка 1005 Отказ в доступе может помешать вам получить доступ к определенным веб-сайтам, и в большинстве случаев вы можете решить проблему, отключив прокси-сервер и используя хороший VPN.
Trying to connect to a Debian 9.13 server, SSHy just shows WebSocket connection failed: Error in connection establishment: code 1005 in the terminal window. It doesn’t make a difference whether a correct or invalid username/password is given.
The browser console shows:
so it appears that something went wrong during DH exchange.
Running the server in debug mode (/usr/sbin/sshd -ddd -p 99 and connect to port 99), the server shows:
sh-4.4# /usr/sbin/sshd -ddd -p 99
debug2: load_server_config: filename /etc/ssh/sshd_config
debug2: load_server_config: done config len = 275
debug2: parse_server_config: config /etc/ssh/sshd_config len 275
debug3: /etc/ssh/sshd_config:61 setting ChallengeResponseAuthentication no
debug3: /etc/ssh/sshd_config:84 setting UsePAM yes
debug3: /etc/ssh/sshd_config:88 setting GatewayPorts yes
debug3: /etc/ssh/sshd_config:89 setting X11Forwarding yes
debug3: /etc/ssh/sshd_config:93 setting PrintMotd no
debug3: /etc/ssh/sshd_config:113 setting AcceptEnv LANG LC_*
debug3: /etc/ssh/sshd_config:116 setting Subsystem sftp	/usr/lib/openssh/sftp-server
debug1: sshd version OpenSSH_7.4, OpenSSL 1.0.2u  20 Dec 2019
debug1: private host key #0: ssh-rsa SHA256:AAzT984aD0JhEOUC4cYjuC22IWEhmzQT4burzFHFOv0
debug1: private host key #1: ecdsa-sha2-nistp256 SHA256:AuqxsTzwaC2OWRHyysPLhIqo24AX5Z3GI753EW3ZwHg
debug1: private host key #2: ssh-ed25519 SHA256:U70HBHIOQCKd07RtkNF1Zp3MDjKZaeotXJ8HFPafhtU
debug1: rexec_argv[0]='/usr/sbin/sshd'
debug1: rexec_argv[1]='-ddd'
debug1: rexec_argv[2]='-p'
debug1: rexec_argv[3]='99'
debug3: oom_adjust_setup
debug1: Set /proc/self/oom_score_adj from 0 to -1000
debug2: fd 3 setting O_NONBLOCK
debug1: Bind to port 99 on 0.0.0.0.
Server listening on 0.0.0.0 port 99.
debug2: fd 4 setting O_NONBLOCK
debug3: sock_set_v6only: set socket 4 IPV6_V6ONLY
debug1: Bind to port 99 on ::.
Server listening on :: port 99.
-----
debug3: fd 5 is not O_NONBLOCK
debug1: Server will not fork when running in debugging mode.
debug3: send_rexec_state: entering fd = 8 config len 275
debug3: ssh_msg_send: type 0
debug3: send_rexec_state: done
debug1: rexec start in 5 out 5 newsock 5 pipe -1 sock 8
debug1: inetd sockets after dupping: 3, 3
Connection from x.x.x.x port 54782 on y.y.y.y port 99
debug1: Client protocol version 2.0; client software version SSHyClient
debug1: no match: SSHyClient
debug1: Local version string SSH-2.0-OpenSSH_7.4p1 Debian-10+deb9u7
debug1: Enabling compatibility mode for protocol 2.0
debug2: fd 3 setting O_NONBLOCK
debug3: ssh_sandbox_init: preparing seccomp filter sandbox
debug2: Network child is on pid 13729
debug3: preauth child monitor started
debug3: privsep user:group 102:65534 [preauth]
debug1: permanently_set_uid: 102/65534 [preauth]
debug3: ssh_sandbox_child: setting PR_SET_NO_NEW_PRIVS [preauth]
debug3: ssh_sandbox_child: attaching seccomp filter program [preauth]
debug1: list_hostkey_types: ssh-rsa,rsa-sha2-512,rsa-sha2-256,ecdsa-sha2-nistp256,ssh-ed25519 [preauth]
debug3: send packet: type 20 [preauth]
debug1: SSH2_MSG_KEXINIT sent [preauth]
debug3: receive packet: type 20 [preauth]
debug1: SSH2_MSG_KEXINIT received [preauth]
debug2: local server KEXINIT proposal [preauth]
debug2: KEX algorithms: curve25519-sha256,curve25519-sha256@libssh.org,ecdh-sha2-nistp256,ecdh-sha2-nistp384,ecdh-sha2-nistp521,diffie-hellman-group-exchange-sha256,diffie-hellman-group16-sha512,diffie-hellman-group18-sha512,diffie-hellman-group14-sha256,diffie-hellman-group14-sha1 [preauth]
debug2: host key algorithms: ssh-rsa,rsa-sha2-512,rsa-sha2-256,ecdsa-sha2-nistp256,ssh-ed25519 [preauth]
debug2: ciphers ctos: chacha20-poly1305@openssh.com,aes128-ctr,aes192-ctr,aes256-ctr,aes128-gcm@openssh.com,aes256-gcm@openssh.com [preauth]
debug2: ciphers stoc: chacha20-poly1305@openssh.com,aes128-ctr,aes192-ctr,aes256-ctr,aes128-gcm@openssh.com,aes256-gcm@openssh.com [preauth]
debug2: MACs ctos: umac-64-etm@openssh.com,umac-128-etm@openssh.com,hmac-sha2-256-etm@openssh.com,hmac-sha2-512-etm@openssh.com,hmac-sha1-etm@openssh.com,umac-64@openssh.com,umac-128@openssh.com,hmac-sha2-256,hmac-sha2-512,hmac-sha1 [preauth]
debug2: MACs stoc: umac-64-etm@openssh.com,umac-128-etm@openssh.com,hmac-sha2-256-etm@openssh.com,hmac-sha2-512-etm@openssh.com,hmac-sha1-etm@openssh.com,umac-64@openssh.com,umac-128@openssh.com,hmac-sha2-256,hmac-sha2-512,hmac-sha1 [preauth]
debug2: compression ctos: none,zlib@openssh.com [preauth]
debug2: compression stoc: none,zlib@openssh.com [preauth]
debug2: languages ctos:  [preauth]
debug2: languages stoc:  [preauth]
debug2: first_kex_follows 0  [preauth]
debug2: reserved 0  [preauth]
debug2: peer client KEXINIT proposal [preauth]
debug2: KEX algorithms: diffie-hellman-group-exchange-sha256,diffie-hellman-group-exchange-sha1,diffie-hellman-group14-sha256,diffie-hellman-group14-sha1,diffie-hellman-group1-sha256,diffie-hellman-group1-sha1 [preauth]
debug2: host key algorithms: ssh-rsa [preauth]
debug2: ciphers ctos: aes128-ctr [preauth]
debug2: ciphers stoc: aes128-ctr [preauth]
debug2: MACs ctos: hmac-sha2-256,hmac-sha1 [preauth]
debug2: MACs stoc: hmac-sha2-256,hmac-sha1 [preauth]
debug2: compression ctos: none [preauth]
debug2: compression stoc: none [preauth]
debug2: languages ctos:  [preauth]
debug2: languages stoc:  [preauth]
debug2: first_kex_follows 0  [preauth]
debug2: reserved 0  [preauth]
debug1: kex: algorithm: diffie-hellman-group-exchange-sha256 [preauth]
debug1: kex: host key algorithm: ssh-rsa [preauth]
debug1: kex: client->server cipher: aes128-ctr MAC: hmac-sha2-256 compression: none [preauth]
debug1: kex: server->client cipher: aes128-ctr MAC: hmac-sha2-256 compression: none [preauth]
debug1: expecting SSH2_MSG_KEX_DH_GEX_REQUEST [preauth]
debug3: receive packet: type 34 [preauth]
debug1: SSH2_MSG_KEX_DH_GEX_REQUEST received [preauth]
debug3: mm_request_send entering: type 0 [preauth]
debug3: mm_request_receive entering
debug3: monitor_read: checking request 0
debug3: mm_answer_moduli: got parameters: 2048 2048 8192
debug3: mm_request_send entering: type 1
debug2: monitor_read: 0 used once, disabling now
debug3: mm_choose_dh: waiting for MONITOR_ANS_MODULI [preauth]
debug3: mm_request_receive_expect entering: type 1 [preauth]
debug3: mm_request_receive entering [preauth]
debug3: mm_choose_dh: remaining 0 [preauth]
debug1: SSH2_MSG_KEX_DH_GEX_GROUP sent [preauth]
debug3: send packet: type 31 [preauth]
debug2: bits set: 1028/2048 [preauth]
debug1: expecting SSH2_MSG_KEX_DH_GEX_INIT [preauth]
debug3: receive packet: type 32 [preauth]
debug2: bits set: 997/2048 [preauth]
debug3: mm_key_sign entering [preauth]
debug3: mm_request_send entering: type 6 [preauth]
debug3: mm_key_sign: waiting for MONITOR_ANS_SIGN [preauth]
debug3: mm_request_receive_expect entering: type 7 [preauth]
debug3: mm_request_receive entering [preauth]
debug3: mm_request_receive entering
debug3: monitor_read: checking request 6
debug3: mm_answer_sign
debug3: mm_answer_sign: hostkey proof signature 0x5616450b5d00(271)
debug3: mm_request_send entering: type 7
debug2: monitor_read: 6 used once, disabling now
debug3: send packet: type 33 [preauth]
debug3: send packet: type 21 [preauth]
debug2: set_newkeys: mode 1 [preauth]
debug1: rekey after 4294967296 blocks [preauth]
debug1: SSH2_MSG_NEWKEYS sent [preauth]
debug1: expecting SSH2_MSG_NEWKEYS [preauth]
debug3: receive packet: type 1 [preauth]
ssh_dispatch_run_fatal: Connection from x.x.x.x port 54782: incomplete message [preauth]
debug1: do_cleanup [preauth]
debug3: PAM: sshpam_thread_cleanup entering [preauth]
debug1: monitor_read_log: child log fd closed
debug3: mm_request_receive entering
debug1: do_cleanup
debug3: PAM: sshpam_thread_cleanup entering
debug1: Killing privsep child 13729
debug1: audit_event: unhandled event 12
sh-4.4#
It would be good to improve the error handling in this situation (#39) to give a more meaningful error, as well as actually fixing the issue.
I was exploring ssh and was trying to log into my pc from my phone, i’m on mac by the way.
i activated the ssh server on my mac, and i logged into it with my phone in the same LAN, by entering my mac local ip address.
Now i was figuring out a way to connect from remote, since in that case i can’t put my mac local address.
I set up a port forwarding rule in my router, to forward everything that arrives to my public ip on port 22 to my mac, then i tried to ssh into my pc using the public ip…
It doesn’t work the connection is refused, it yield error 1005 or something like that.
What am i missing exactly?
I couldn’t find another answer to this question.
EDIT:My router is a Home&Life model by wind 3..it is italian so i don’t think anybody in here is familiar with it.
Just so you guys know, i tried to do the same with a simple node server,
i can access it with my public ip, if i make a port forwarding rule.
asked Sep 9, 2020 at 9:00
![]()
AdonaiAdonai
31 silver badge3 bronze badges
2
If you are testing from inside the network it is likely that your router does not support NAT loopback. If you test off mobile data/4G and same result I’d check if there is a firewall rule blocking on the router (Most have separate NAT/port forwarding and firewall configuration sections).
Also to double check your public IP visit a site like https://www.whatsmyip.org
answered Sep 9, 2020 at 12:53
![]()
1
My ISP (in Brazil) deny all traffic on port 22 for the residential plan, only the commercial plan (more expensive and with fixed ip) allow traffic on the port 22 and others.
Not sure if it is your case, but since the node server works, try changing from port 22 to another one like 5555, or 5656. Is good to not use default ssh port as well.
answered Sep 9, 2020 at 16:59
![]()
1
Check your ISP, which ports are open from outside, try to check with check open port
and also now some ISP not give you a real public IP4
answered Sep 9, 2020 at 14:19
![]()
Depending on your hardware (using the router provided by your ISP ?), you may also have to check the firewall settings. Some factory presets («Secure», «High filtering», …) deny all entering connections, no matter the NAT settings.
answered Sep 9, 2020 at 14:48
![]()
HttqmHttqm
1,1067 silver badges16 bronze badges
You must log in to answer this question.
Not the answer you’re looking for? Browse other questions tagged
.
Not the answer you’re looking for? Browse other questions tagged
.
I created a new user on ubuntu 10
username: codeuser
There is an existing user called «admin». Now, my problem is that I cannot directly connect to the server using the codeuser credentials. But, I can SSH in through «admin» and then su (change the user to codeuser) and it works. How do I get the shell access to the codeuser user ?
This is the output of my files:
cat /etc/passwd

root:x:0:0:root:/root:/bin/bash
www-data:x:33:33:www-data:/var/www:/bin/bash
admin:x:1000:1000:,,,:/home/admin:/bin/bash
ftp:x:107:65534::/home/ftp:/bin/false
codeuser:x:1004:33::/home/codeuser:/bin/bash


cat /etc/group

root:x:0:
www-data:x:33:
codeuser:x:1005:


iptables -L
Chain INPUT (policy ACCEPT)
target     prot opt source               destination
ACCEPT     tcp  --  anywhere             anywhere            tcp dpt:mysql

Chain FORWARD (policy ACCEPT)
target     prot opt source               destination

Chain OUTPUT (policy ACCEPT)
target     prot opt source               destination
asked Apr 1, 2011 at 17:04
![]()
3
Check /etc/ssh/sshd_config for allowed users list. If it is OK, the problem is more complex. Try to connect as «ssh codeuser@your-server -v»
answered Apr 1, 2011 at 17:18
![]()
HUBHUB
6,5803 gold badges23 silver badges22 bronze badges
2
On Ubuntu 18.04 I had simply neglected to add my client’s public key to the authorized keys file (this post got me thinking about the authorized_keys file: https://superuser.com/a/1337741/413936).
chmod 700 ~/.ssh
cd ~/.ssh
touch authorized_keys
chmod 600 authorized_keys
Then add your client’s public key to authorized_keys file.
For whatever reason though, I didn’t need to add PasswordAuthentication yes to /etc/ssh/sshd_config on Ubuntu 18.04.3 LTS as other people have mentioned. To be clear, mine is commented out like this # PubkeyAuthentication yes and I restarted both ssh and sshd services and was still able to ssh in.
answered Jan 15, 2020 at 18:33
![]()
jbobbinsjbobbins
1551 silver badge4 bronze badges
1
Stumble to this thread after create a new user and cannot SSH to the new user.
I managed to fix it after looked for the group and user of .ssh folder and authorized_keys file. They were set to root:root, because I copied them from other user’s folder with sudo.
So I fix it with:
sudo chown new_user:new_user /home/new_user/.ssh/
sudo chown new_user:new_user /home/new_user/.ssh/authorized_keys
Hope this helps
answered May 12, 2021 at 13:18
![]()
Wild TeddyWild Teddy
1511 silver badge2 bronze badges
1
Check /var/log/auth.log for any errors. Did you assign codeuser a password using the passwd command?
answered Apr 1, 2011 at 17:06
![]()
Pratik AminPratik Amin
3,2933 gold badges22 silver badges19 bronze badges
A quite old post but still valid.
Worth checking logs as Marco Ramos mentioned above.
In my case with Debian 9 a group must granted with permissions /var/log/auth.log
Nov 23 23:10:46 AreNAS sshd[6765]: User are from 192.168.0.36 not allowed because none of user's groups are listed in AllowGroups
answered Nov 23, 2019 at 23:28
![]()
Make sure the public key is correct in this place:
/home/newUsername/.ssh/authorized_keys
answered Jul 31, 2021 at 14:10
![]()
Try to check /var/log/auth.log for possible error messages.
Also, ask the user to try to login with ssh -v, for more verbose output.
Hope this helps!
answered Apr 1, 2011 at 17:13
![]()
Marco RamosMarco Ramos
3,12022 silver badges25 bronze badges
On new Debian installations (may be even other distributions) you have to enable password login. It started to happen recently. AllowUsers won’t help you, PermitRootLogin yes won’t help you.
Default configuration in /etc/ssh/sshd_config is:
# To disable tunneled clear text passwords, change to no here!
#PasswordAuthentication yes
but it won’t let you ssh to it with plain text password. You have to uncomment it, restart sshd, insert your ssh key and comment it back or leave it enabled.
answered Jan 23, 2019 at 8:26
![]()
Trying to connect to a Debian 9.13 server, SSHy just shows WebSocket connection failed: Error in connection establishment: code 1005 in the terminal window. It doesn’t make a difference whether a correct or invalid username/password is given.
The browser console shows:
so it appears that something went wrong during DH exchange.
Running the server in debug mode (/usr/sbin/sshd -ddd -p 99 and connect to port 99), the server shows:
sh-4.4# /usr/sbin/sshd -ddd -p 99
debug2: load_server_config: filename /etc/ssh/sshd_config
debug2: load_server_config: done config len = 275
debug2: parse_server_config: config /etc/ssh/sshd_config len 275
debug3: /etc/ssh/sshd_config:61 setting ChallengeResponseAuthentication no
debug3: /etc/ssh/sshd_config:84 setting UsePAM yes
debug3: /etc/ssh/sshd_config:88 setting GatewayPorts yes
debug3: /etc/ssh/sshd_config:89 setting X11Forwarding yes
debug3: /etc/ssh/sshd_config:93 setting PrintMotd no
debug3: /etc/ssh/sshd_config:113 setting AcceptEnv LANG LC_*
debug3: /etc/ssh/sshd_config:116 setting Subsystem sftp	/usr/lib/openssh/sftp-server
debug1: sshd version OpenSSH_7.4, OpenSSL 1.0.2u  20 Dec 2019
debug1: private host key #0: ssh-rsa SHA256:AAzT984aD0JhEOUC4cYjuC22IWEhmzQT4burzFHFOv0
debug1: private host key #1: ecdsa-sha2-nistp256 SHA256:AuqxsTzwaC2OWRHyysPLhIqo24AX5Z3GI753EW3ZwHg
debug1: private host key #2: ssh-ed25519 SHA256:U70HBHIOQCKd07RtkNF1Zp3MDjKZaeotXJ8HFPafhtU
debug1: rexec_argv[0]='/usr/sbin/sshd'
debug1: rexec_argv[1]='-ddd'
debug1: rexec_argv[2]='-p'
debug1: rexec_argv[3]='99'
debug3: oom_adjust_setup
debug1: Set /proc/self/oom_score_adj from 0 to -1000
debug2: fd 3 setting O_NONBLOCK
debug1: Bind to port 99 on 0.0.0.0.
Server listening on 0.0.0.0 port 99.
debug2: fd 4 setting O_NONBLOCK
debug3: sock_set_v6only: set socket 4 IPV6_V6ONLY
debug1: Bind to port 99 on ::.
Server listening on :: port 99.
-----
debug3: fd 5 is not O_NONBLOCK
debug1: Server will not fork when running in debugging mode.
debug3: send_rexec_state: entering fd = 8 config len 275
debug3: ssh_msg_send: type 0
debug3: send_rexec_state: done
debug1: rexec start in 5 out 5 newsock 5 pipe -1 sock 8
debug1: inetd sockets after dupping: 3, 3
Connection from x.x.x.x port 54782 on y.y.y.y port 99
debug1: Client protocol version 2.0; client software version SSHyClient
debug1: no match: SSHyClient
debug1: Local version string SSH-2.0-OpenSSH_7.4p1 Debian-10+deb9u7
debug1: Enabling compatibility mode for protocol 2.0
debug2: fd 3 setting O_NONBLOCK
debug3: ssh_sandbox_init: preparing seccomp filter sandbox
debug2: Network child is on pid 13729
debug3: preauth child monitor started
debug3: privsep user:group 102:65534 [preauth]
debug1: permanently_set_uid: 102/65534 [preauth]
debug3: ssh_sandbox_child: setting PR_SET_NO_NEW_PRIVS [preauth]
debug3: ssh_sandbox_child: attaching seccomp filter program [preauth]
debug1: list_hostkey_types: ssh-rsa,rsa-sha2-512,rsa-sha2-256,ecdsa-sha2-nistp256,ssh-ed25519 [preauth]
debug3: send packet: type 20 [preauth]
debug1: SSH2_MSG_KEXINIT sent [preauth]
debug3: receive packet: type 20 [preauth]
debug1: SSH2_MSG_KEXINIT received [preauth]
debug2: local server KEXINIT proposal [preauth]
debug2: KEX algorithms: curve25519-sha256,curve25519-sha256@libssh.org,ecdh-sha2-nistp256,ecdh-sha2-nistp384,ecdh-sha2-nistp521,diffie-hellman-group-exchange-sha256,diffie-hellman-group16-sha512,diffie-hellman-group18-sha512,diffie-hellman-group14-sha256,diffie-hellman-group14-sha1 [preauth]
debug2: host key algorithms: ssh-rsa,rsa-sha2-512,rsa-sha2-256,ecdsa-sha2-nistp256,ssh-ed25519 [preauth]
debug2: ciphers ctos: chacha20-poly1305@openssh.com,aes128-ctr,aes192-ctr,aes256-ctr,aes128-gcm@openssh.com,aes256-gcm@openssh.com [preauth]
debug2: ciphers stoc: chacha20-poly1305@openssh.com,aes128-ctr,aes192-ctr,aes256-ctr,aes128-gcm@openssh.com,aes256-gcm@openssh.com [preauth]
debug2: MACs ctos: umac-64-etm@openssh.com,umac-128-etm@openssh.com,hmac-sha2-256-etm@openssh.com,hmac-sha2-512-etm@openssh.com,hmac-sha1-etm@openssh.com,umac-64@openssh.com,umac-128@openssh.com,hmac-sha2-256,hmac-sha2-512,hmac-sha1 [preauth]
debug2: MACs stoc: umac-64-etm@openssh.com,umac-128-etm@openssh.com,hmac-sha2-256-etm@openssh.com,hmac-sha2-512-etm@openssh.com,hmac-sha1-etm@openssh.com,umac-64@openssh.com,umac-128@openssh.com,hmac-sha2-256,hmac-sha2-512,hmac-sha1 [preauth]
debug2: compression ctos: none,zlib@openssh.com [preauth]
debug2: compression stoc: none,zlib@openssh.com [preauth]
debug2: languages ctos:  [preauth]
debug2: languages stoc:  [preauth]
debug2: first_kex_follows 0  [preauth]
debug2: reserved 0  [preauth]
debug2: peer client KEXINIT proposal [preauth]
debug2: KEX algorithms: diffie-hellman-group-exchange-sha256,diffie-hellman-group-exchange-sha1,diffie-hellman-group14-sha256,diffie-hellman-group14-sha1,diffie-hellman-group1-sha256,diffie-hellman-group1-sha1 [preauth]
debug2: host key algorithms: ssh-rsa [preauth]
debug2: ciphers ctos: aes128-ctr [preauth]
debug2: ciphers stoc: aes128-ctr [preauth]
debug2: MACs ctos: hmac-sha2-256,hmac-sha1 [preauth]
debug2: MACs stoc: hmac-sha2-256,hmac-sha1 [preauth]
debug2: compression ctos: none [preauth]
debug2: compression stoc: none [preauth]
debug2: languages ctos:  [preauth]
debug2: languages stoc:  [preauth]
debug2: first_kex_follows 0  [preauth]
debug2: reserved 0  [preauth]
debug1: kex: algorithm: diffie-hellman-group-exchange-sha256 [preauth]
debug1: kex: host key algorithm: ssh-rsa [preauth]
debug1: kex: client->server cipher: aes128-ctr MAC: hmac-sha2-256 compression: none [preauth]
debug1: kex: server->client cipher: aes128-ctr MAC: hmac-sha2-256 compression: none [preauth]
debug1: expecting SSH2_MSG_KEX_DH_GEX_REQUEST [preauth]
debug3: receive packet: type 34 [preauth]
debug1: SSH2_MSG_KEX_DH_GEX_REQUEST received [preauth]
debug3: mm_request_send entering: type 0 [preauth]
debug3: mm_request_receive entering
debug3: monitor_read: checking request 0
debug3: mm_answer_moduli: got parameters: 2048 2048 8192
debug3: mm_request_send entering: type 1
debug2: monitor_read: 0 used once, disabling now
debug3: mm_choose_dh: waiting for MONITOR_ANS_MODULI [preauth]
debug3: mm_request_receive_expect entering: type 1 [preauth]
debug3: mm_request_receive entering [preauth]
debug3: mm_choose_dh: remaining 0 [preauth]
debug1: SSH2_MSG_KEX_DH_GEX_GROUP sent [preauth]
debug3: send packet: type 31 [preauth]
debug2: bits set: 1028/2048 [preauth]
debug1: expecting SSH2_MSG_KEX_DH_GEX_INIT [preauth]
debug3: receive packet: type 32 [preauth]
debug2: bits set: 997/2048 [preauth]
debug3: mm_key_sign entering [preauth]
debug3: mm_request_send entering: type 6 [preauth]
debug3: mm_key_sign: waiting for MONITOR_ANS_SIGN [preauth]
debug3: mm_request_receive_expect entering: type 7 [preauth]
debug3: mm_request_receive entering [preauth]
debug3: mm_request_receive entering
debug3: monitor_read: checking request 6
debug3: mm_answer_sign
debug3: mm_answer_sign: hostkey proof signature 0x5616450b5d00(271)
debug3: mm_request_send entering: type 7
debug2: monitor_read: 6 used once, disabling now
debug3: send packet: type 33 [preauth]
debug3: send packet: type 21 [preauth]
debug2: set_newkeys: mode 1 [preauth]
debug1: rekey after 4294967296 blocks [preauth]
debug1: SSH2_MSG_NEWKEYS sent [preauth]
debug1: expecting SSH2_MSG_NEWKEYS [preauth]
debug3: receive packet: type 1 [preauth]
ssh_dispatch_run_fatal: Connection from x.x.x.x port 54782: incomplete message [preauth]
debug1: do_cleanup [preauth]
debug3: PAM: sshpam_thread_cleanup entering [preauth]
debug1: monitor_read_log: child log fd closed
debug3: mm_request_receive entering
debug1: do_cleanup
debug3: PAM: sshpam_thread_cleanup entering
debug1: Killing privsep child 13729
debug1: audit_event: unhandled event 12
sh-4.4#
It would be good to improve the error handling in this situation (#39) to give a more meaningful error, as well as actually fixing the issue.
Иногда могут возникать ошибки подключения, и, говоря об этой ошибке, наиболее распространенной является ошибка 1005, доступ запрещен. Эта ошибка может быть проблематичной, но в этой статье мы покажем вам, как ее исправить.
Ошибка 1005 отказано в доступе является относительно распространенным явлением, и, говоря об этой ошибке, вот некоторые похожие проблемы, о которых сообщили пользователи:
- Cloudflare error 1005, error 1006. Это некоторые распространенные проблемы, с которыми вы можете столкнуться, но вы можете исправить их, просто отключив антивирус.
- Crunchyroll error 1005, banned IP — эта проблема может возникнуть, если ваш IP забанен, но в большинстве случаев вы можете исправить это, просто используя хороший VPN.
- Владелец этого веб-сайта заблокировал ваш IP-адрес Cloudflare. Эта проблема может возникать из-за вашего прокси-сервера. Чтобы исправить это, просто отключите его и проверьте, помогает ли это.
- Ошибка 1005 VPN — эта ошибка может возникать из-за вашего VPN-клиента, поэтому вы можете отключить его или попробовать переключиться на другой VPN.
- Проверьте свой антивирус
- Попробуйте использовать VPN
- Попробуйте использовать другой браузер
- Отключить прокси
- Убедитесь, что дата и время указаны правильно
- Выполнить чистую загрузку
- Выполните восстановление системы
- Обратитесь к администратору сайта или вашему провайдеру
Решение 1. Проверьте свой антивирус
В большинстве случаев ошибка 1005 доступ запрещен может появиться из-за вашего антивируса. Иногда ваш антивирус может мешать работе вашей системы, и для решения этой проблемы рекомендуется отключить определенные антивирусные функции и проверить, помогает ли это.
Если проблема все еще существует, возможно, вы можете решить проблему, просто полностью отключив антивирус. В худшем случае вам, возможно, придется полностью удалить антивирус и проверить, решает ли это проблему.
Даже если вы решите удалить антивирус, ваша система будет защищена Защитником Windows, поэтому вам не нужно беспокоиться о вашей безопасности. Если удаление антивируса решает проблему, вы можете рассмотреть возможность перехода на другой антивирус.
На рынке есть много отличных антивирусных инструментов, но если вам нужен надежный антивирус, который не будет мешать вашей системе, вам следует рассмотреть возможность использования Bitdefender . Версия 2019 включает в себя дополнительные функции безопасности и множество улучшений совместимости, что делает его более мощным, чем предыдущие версии.
— Загрузите Bitdefender Antivirus 2019 по специальной цене со скидкой 35%.
Решение 2. Попробуйте использовать VPN
Иногда вы не можете получить доступ к определенным веб-сайтам из-за ошибки 1005 сообщение об отказе в доступе. Ваш IP-адрес или страна могут быть заблокированы для доступа к определенным веб-сайтам, или ваш интернет-провайдер может препятствовать вам посещать эти сайты.
Если у вас возникла эта проблема, вы можете решить ее, просто используя VPN. Существует множество отличных инструментов VPN, но если вы хотите простой и надежный VPN, мы настоятельно рекомендуем вам попробовать CyberGhost VPN . Как только вы включите VPN, проверьте, решена ли проблема.
Почему стоит выбрать CyberGhost? Cyberghost для Windows
- 256-битное шифрование AES
- Более 3000 серверов по всему миру
- Отличный ценовой план
- Отличная поддержка
Получить сейчас CyberGhost VPN
Решение 3 — Попробуйте использовать другой браузер
Иногда сообщение 1005 об отказе в доступе может появиться из-за вашего браузера. Проблема может быть в ваших настройках, поврежденной установке или чем-то еще, и для ее устранения рекомендуется переключиться на другой браузер.
Если проблема не появляется в другом браузере, это означает, что ваш браузер по умолчанию является проблемой. Вы можете использовать новый браузер в качестве обходного пути или начать устранение неполадок браузера по умолчанию и попытаться устранить основную проблему.
Решение 4 — Отключить прокси
Прокси-сервер является полезным методом защиты вашей конфиденциальности, и многие пользователи, как правило, используют его. Однако настройки прокси-сервера иногда могут приводить к появлению сообщения об ошибке «Отказано в доступе 1005», и для его устранения необходимо отключить все настройки прокси-сервера на компьютере. Это довольно просто сделать, и вы можете сделать это, выполнив следующие действия:
- Откройте приложение «Настройки» . Вы можете сделать это быстро, нажав Windows Key + I.
- Когда откроется приложение «Настройки», перейдите в раздел « Сеть и Интернет ».
- Выберите Proxy на левой панели и отключите все параметры на правой панели.
После этого прокси должен быть полностью отключен на вашем компьютере. Теперь проверьте, если проблема все еще там.
Решение 5. Убедитесь, что дата и время указаны правильно
Иногда вы можете получить сообщение об ошибке 1005 об отказе в доступе просто потому, что ваши дата и время неверны. Если вы заметили, что ваша дата или время неверны, вы можете решить эту проблему, выполнив следующие действия:
- Щелкните правой кнопкой мыши значок часов на панели задач. Выберите Настроить дату / время в контекстном меню.
- Когда откроется новое окно, найдите параметр « Установить время автоматически» и выключите его. Подождите несколько секунд и включите его снова.
Таким образом вы автоматически настроите дату и время. Кроме того, вы можете нажать кнопку « Изменить», чтобы вручную настроить дату и время. Как только ваша дата и время будут правильными, проблема должна быть решена, и все снова начнет работать.
Решение 6 — Выполните Чистую загрузку
Если вы продолжаете получать сообщение об ошибке 1005 «Отказано в доступе» при попытке посетить определенные веб-сайты, возможно, проблема связана со сторонними приложениями на вашем ПК. Некоторые приложения автоматически запускаются на вашем компьютере и вызывают проблему, как только вы загружаетесь в Windows.
Чтобы найти причину проблемы, рекомендуется выполнить чистую загрузку и отключить все запускаемые приложения и службы. Для этого просто выполните следующие действия:
- Нажмите клавиши Windows + R, чтобы открыть диалоговое окно «Выполнить». Введите msconfig и нажмите OK или нажмите Enter .
- Откроется окно конфигурации системы . Перейдите на вкладку « Службы » и установите флажок « Скрыть все службы Microsoft» . Нажмите кнопку Отключить все, чтобы отключить все службы.
- Перейдите на вкладку « Автозагрузка » и нажмите « Открыть диспетчер задач» .
- Диспетчер задач появится, и вы увидите список запускаемых приложений. Щелкните правой кнопкой мыши первую запись в списке и выберите « Отключить» в меню. Повторите этот шаг для всех запускаемых приложений.
- После отключения всех запускаемых приложений вернитесь в окно « Конфигурация системы» . Нажмите Apply и OK и перезагрузите компьютер.
После этого убедитесь, что проблема все еще существует. Если проблема не появляется, скорее всего, проблема в одном из отключенных приложений или служб. Чтобы точно определить проблему, рекомендуется поочередно включать отключенные службы и приложения, пока не найдете причину проблемы.
Как только вы найдете проблемное приложение, лучше удалить его с вашего ПК. Чтобы полностью удалить приложение с вашего компьютера, рекомендуется использовать программное обеспечение для удаления, такое как IOBit Uninstaller .
- Скачать сейчас IObit Uninstaller PRO 7 бесплатно
Иногда, когда вы пытаетесь удалить приложение, некоторые файлы и записи в реестре могут остаться позади, и это может вызвать проблему, поэтому рекомендуется использовать программу удаления, чтобы полностью удалить выбранное приложение вместе со всеми его файлами.
Решение 7 — Выполнить восстановление системы
Если проблема все еще существует, и вы продолжаете получать сообщение 1005 об отказе в доступе, возможно, вы можете решить проблему, выполнив Восстановление системы. В случае, если вы не знакомы с ним, восстановление системы — это встроенная функция, которая может легко восстановить вашу систему до более раннего состояния и исправить многие проблемы на этом пути.
Чтобы выполнить восстановление системы, вам просто нужно сделать следующее:
- Нажмите клавиши Windows + S и введите восстановление системы . Теперь выберите « Создать точку восстановления» из списка результатов.
- Должно появиться окно « Свойства системы» . Нажмите кнопку Восстановление системы .
- Когда откроется окно восстановления системы, нажмите Далее, чтобы продолжить.
- Установите флажок Показать больше точек восстановления, если доступно. Выберите нужную точку восстановления и нажмите « Далее» .
- Следуйте инструкциям на экране для завершения процесса восстановления.
После того, как ваша система восстановлена, проверьте, не устранена ли проблема.
Решение 8 — Обратитесь к администратору сайта или вашему провайдеру
Если сообщение об отказе в доступе 1005 все еще присутствует, возможно, вы можете исправить его, связавшись с администратором сайта. Возможно, что ваш IP был забанен по ошибке или автоматически сервером, и обращение к администратору может исправить это.
Кроме того, вы также можете связаться с вашим Интернет-провайдером и проверить, связана ли проблема с ними.
Ошибка 1005 Отказ в доступе может помешать вам получить доступ к определенным веб-сайтам, и в большинстве случаев вы можете решить проблему, отключив прокси-сервер и используя хороший VPN.
Secure Shell (SSH) is a key WordPress development tool. It grants advanced users access to key platforms and software that make coding and other tasks easier, faster, and more organized.
So if you attempt to use SSH only to see a “Connection refused” error, you may start to feel concerned. However, this is a common issue, and it’s entirely possible to fix it on your own with just a bit of troubleshooting. You’ll be back to running commands in no time flat.
In this post, we’ll discuss what SSH is and when to use it. Then we’ll explain some common reasons your connection may be refused, including in PuTTY. Finally, we’ll provide some troubleshooting tips.
Let’s dive in!
Prefer to watch the video version?
What Is SSH and When Should I Use It?
Secure Shell (SSH), also sometimes called Secure Socket Shell, is a protocol for securely accessing your site’s server over an unsecured network. In other words, it’s a way to safely log in to your server remotely using your preferred command-line interface:
Unlike File Transfer Protocol (FTP), which only enables you to upload, delete, and edit files on your server, SSH can accomplish a wide range of tasks. For instance, if an error locks you out of your WordPress site, you can use SSH to access it remotely.
This protocol also enables you to use several key developer tools, including:
- WP-CLI. The WordPress command line. You can use it for a variety of tasks, including new installations, bulk plugin updates, and media file imports.
- Composer. A PHP package manager. It enables you to implement several frameworks for use in your site’s code by pulling the necessary libraries and dependencies.
- Git. A version control system used to track changes in code. This is especially useful for teams of developers working together on a single project.
- npm. A JavaScript package manager. It includes a command-line and JavaScript software registry. Note: Kinsta customers will need an Enterprise plan in order to access this feature.
It’s important to note that using SSH is an advanced skill. Generally speaking, lay users of WordPress should contact their developers or hosting providers for help, rather than trying to resolve issues with SSH themselves.
Why Is My SSH Connection Refused? (5 Reasons for Connectivity Errors)
Unfortunately, there are many scenarios that could occur while you’re trying to connect to your server via SSH, which might result in an error reading “Connection refused”.
Below are some of the most common issues that might be causing problems for you.
1. Your SSH Service Is Down
In order to connect to your server with SSH, it must be running an SSH daemon – a program that runs in the background to listen for and accept connections.
If this service is down, you will not be able to successfully connect to your server and may receive a Connection refused error:
Your server’s SSH daemon may be down for a wide variety of reasons, including unexpected traffic spikes, resource outages, or even a Distributed Denial of Service (DDoS) attack. In addition to the troubleshooting steps we’ll mention below, you may want to contact your hosting provider to determine the root cause of the issue.
If you suspect that your SSH service might be down, you can run this command to find out:
sudo service ssh statusIf the command line returns a status of down, then you’ve likely found the reason behind your connectivity error.
2. You Have the Wrong Credentials
Although it may seem too simple to be true, it’s possible that you’re just entering the wrong credentials when trying to connect to your server. There are four pieces of information needed to run SSH:
- Host name. The IP address of the server you’re trying to connect to or your domain name.
- Username. Your (S)FTP username.
- Password. Your (S)FTP password.
- Port. The default port is 22. However, some hosting providers (including Kinsta) change their SSH port number for security reasons. If this is the case, you should be able to find it by logging in to your MyKinsta dashboard.
You can also check to see which port is being used for SSH by running this command:
grep Port /etc/ssh/sshd_configThe command line should return the correct port.
Check to make sure you’re entering the right credentials and taking into account the possibility of typos or entering the wrong IP address or port.
3. The Port You’re Trying to Use Is Closed
A “port” is simply the endpoint to which you’re directed when connecting to your server. In addition to making sure you have the correct one, you’ll also want to check to see if the port you’re trying to use is open.
Any open port is a security vulnerability, as hackers can try to exploit it and gain access to the server. For this reason, unused ports are often closed to prevent attacks.
In the event that port 22, or the custom SSH port for your server, has been closed, you will likely see a Connection refused error. You can see all the ports listening on your server by running this command:
sudo lsof -i -n -P | grep LISTENThis command should return a list of ports with the LISTEN state. Ideally, you want to see port 22 or your server’s custom SSH port listed here. If it’s not, you’ll need to reopen the port in order to connect to your server.
4. SSH Isn’t Installed on Your Server
As we briefly mentioned earlier, servers use SSH daemons to listen for and accept connections. Therefore, if the server you’re trying to connect to doesn’t have one installed, you won’t be able to access it using SSH.
Generally speaking, almost all hosting providers will have SSH daemons installed on their servers by default. This particular issue is more common on localhost or dedicated servers.
5. Firewall Settings Are Preventing an SSH Connection
Since open ports present a security risk, firewalls installed to protect servers from hackers sometimes block connections to them. Unfortunately, this means that even harmless users who are trying to SSH into their servers may receive a Connection refused error as a result of firewall settings.
If your setup appears to be in order and you still can’t connect, take a look at your firewall’s rules. You can display them in your command-line interface with the following commands:
sudo iptables-save # display IPv4 rulessudo ip6tables-save # display IPv6 rulesYour results will vary, but you’ll want to look for these elements to determine if your firewall is blocking SSH connections:
- dport 22: This refers to the destination port, which for SSH is usually port 22 (reminder: Kinsta doesn’t use this port number).
- REJECT: This would indicate that connections are being refused from the specified destination.
- DROP: Like REJECT, this means that connections to the relevant port are being blocked.
If you search the results of the commands above for dport 22, you should be able to determine if your firewall is preventing an SSH connection. If so, you’ll have to change the rules to accept requests.
Why Does PuTTY Say Connection Refused?
PuTTY is an SSH client. If you’re familiar with FTP, this platform is the FileZilla equivalent to SSH on Windows machines. In other words, PuTTY enables users to input their credentials and launch an SSH connection:
If you’re a PuTTY user and see the Connection refused error, the cause is likely one of those listed above.
This is an SSH connectivity error like any other, and the troubleshooting tips below should work whether you’re using PuTTY, Terminal, or any other program for connecting to your server with SSH.
We’ve taken our knowledge of effective website management at scale, and turned it into an ebook and video course. Click to download The Guide to Managing 60+ WordPress Sites!
How Do I Troubleshoot SSH Connectivity Errors?
When you’re experiencing an SSH connectivity error, there are a few steps you can take to troubleshoot it depending on the cause. Here are some tips for troubleshooting the reasons for a Connection refused error that we covered above:
- If your SSH service is down. Contact your hosting provider to see why your SSH service isn’t running. For localhost or dedicated servers, you can use the command
sudo service ssh restartto try to get it running again. - If you entered the wrong credentials. Once you’ve double-checked the SSH port using the
grep Port /etc/ssh/sshd_configcommand, try connecting again with the correct details. - If your SSH port is closed. This is usually a side effect of one of the two reasons listed below. Either install an SSH daemon on the server you want to connect to or change your firewall rules to accept connections to your SSH port.
- If SSH isn’t installed on your server. Install an SSH tool such as OpenSSH on the server you want to connect to using the
sudo apt install openssh-servercommand. - If your firewall is blocking your SSH connection. Disable the firewall rules blocking your SSH connection by changing the destination port’s settings to ACCEPT.
If you’re attempting to connect to your hosting provider’s server, it may be wiser to contact support than to try troubleshooting the problem yourself. Users on localhost or dedicated servers may be able to find further support on more advanced forums if none of the above solutions works.
Are you getting the ‘Connection refused’ error over SSH? Learn why that’s happening and how to troubleshoot SSH connectivity errors thanks to this guide 🙅 ✋Click to Tweet
Summary
Being able to connect to your server with SSH is convenient in a wide range of situations. It can enable you to access your site when you’re locked out of your WordPress dashboard, run commands via WP-CLI, track changes in your site’s code with Git, and more.
Although there are several causes that could be behind your SSH connectivity error, these are a few of the most common:
- Your SSH service is down.
- You have the wrong credentials.
- The port you’re trying to use is closed.
- SSH isn’t installed on your server.
- Firewall settings are preventing an SSH connection.
Get all your applications, databases and WordPress sites online and under one roof. Our feature-packed, high-performance cloud platform includes:
- Easy setup and management in the MyKinsta dashboard
- 24/7 expert support
- The best Google Cloud Platform hardware and network, powered by Kubernetes for maximum scalability
- An enterprise-level Cloudflare integration for speed and security
- Global audience reach with up to 35 data centers and 275 PoPs worldwide
Get started with a free trial of our Application Hosting or Database Hosting. Explore our plans or talk to sales to find your best fit.