
Некоторые пользователи Windows сообщают, что в конечном итоге они видят «Фатальную ошибку» каждый раз, когда пытаются запустить Starbound на своем компьютере. Эта ошибка появляется на начальном экране запуска и подтверждается, что она возникает в Windows 7, Windows 8.1 и Windows 10.
Неустранимая ошибка StarBound на компьютере с Windows
После изучения этой конкретной проблемы выяснилось, что существует несколько различных причин, которые могут вызывать этот код ошибки. Вот список потенциальных виновников, которые могут быть ответственны за появление этой «фатальной ошибки» с Starbound на компьютере с Windows:
- Vsync включен — одним из наиболее распространенных виновников, которые, как известно, вызывают эту проблему с Starbound, является VSYNC. В частности, когда эта графическая функция включена на ПК младшего класса, игра может отказываться запускаться. Поскольку вы не можете перейти в главное меню, чтобы отключить эту функцию, вы можете решить эту проблему, только изменив основной файл конфигурации Starbound (starbound.config), чтобы заставить Vsync оставаться отключенным.
- Устаревший драйвер графического процессора. С этой проблемой также можно столкнуться из-за сильно устаревшего драйвера графического процессора, который не позволяет вашему компьютеру визуализировать игру. Несколько затронутых пользователей сообщили, что проблема была окончательно решена после того, как они успешно обновили свои графические драйверы до последней доступной версии.
- Повреждение игрового файла — как сообщают многие пользователи Steam, вы также можете ожидать увидеть эту проблему из-за какого-либо повреждения, которое влияет на локальную установку Starbound. Если этот сценарий применим, вы можете решить проблему, принудительно проверив целостность файла через Steam. В более серьезных обстоятельствах вам может потребоваться переустановить игру и очистить модифицированный контент перед переустановкой, чтобы решить проблему.
- Версия игры несовместима с Windows 10. Имейте в виду, что есть определенные модифицированные версии Starbound, которые по умолчанию не работают в Windows 10. Если этот сценарий применим, вы сможете решить проблему, принудительно запустив основной исполняемый файл игры в режиме совместимости с Windows 7.
Теперь, когда вы знаете всех потенциальных виновников, вот список проверенных методов, которые некоторые затронутые пользователи успешно развернули, чтобы разобраться в этой проблеме:
Метод 1: установка VSync на False в Starbound
Как оказалось, во многих задокументированных случаях эта проблема возникает всякий раз, когда VSync включен в конфигурации ПК, где компоненты GPU / CPU недостаточно мощны для поддержки этой графической функции. Однако, в отличие от других игр, Starbound предпочитает предотвращать запуск игры в подобных ситуациях вместо того, чтобы позволить ей запускаться с проблемами производительности.
Если вы оказались в этом сценарии, следуйте приведенным ниже инструкциям, чтобы открыть файл конфигурации Starbound и изменить файл starbound.config так, чтобы VSync был установлен на False, чтобы предотвратить его активацию при запуске игры.
Вот краткое пошаговое руководство, которое проведет вас через весь процесс:
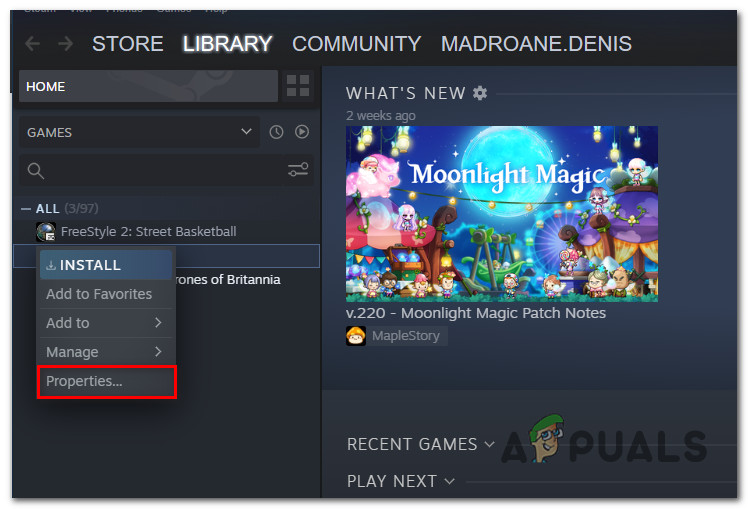
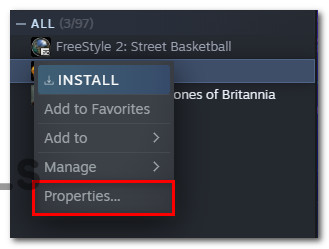
- Откройте Steam, перейдите на вкладку «Библиотека», затем щелкните правой кнопкой мыши запись, связанную со Starbound, и выберите «Свойства» в только что появившемся контекстном меню.
Доступ к экрану свойств Starbound
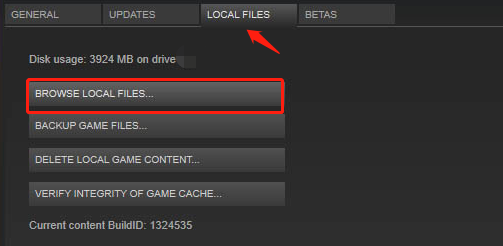
- Как только вы окажетесь на экране свойств Starbound, нажмите «Локальные файлы» в вертикальном меню слева, затем нажмите «Обзор локальных файлов».
Доступ к локальным файлам StarBound
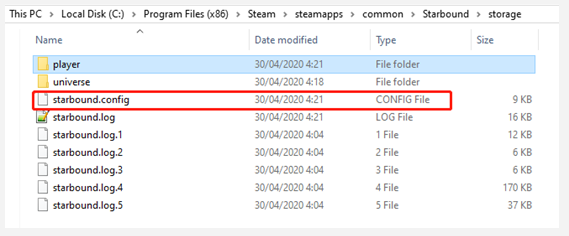
- После того, как вы окажетесь внутри локальной установки Starbound, дважды щелкните папку хранилища и щелкните правой кнопкой мыши файл с именем starbound.config. Затем в только что подготовленном контекстном меню нажмите «Открыть с помощью блокнота».
Открытие starbound.config с помощью Блокнота
- Как только вы увидите внутреннюю структуру starbound.config, найдите строку кода «vsync»: true ». Когда вы его увидите, измените значение на false («vsync»: false) перед сохранением изменений.
- Запустите Starbound еще раз и посмотрите, решена ли проблема.
Если проблема все еще не решена, поскольку вы все еще сталкиваетесь с той же «фатальной ошибкой» при запуске Starbound, перейдите к следующему потенциальному исправлению ниже.
Метод 2: обновите драйвер графического процессора до последней версии
По словам некоторых затронутых пользователей, вы также можете ожидать увидеть эту проблему в тех случаях, когда вы пытаетесь использовать сильно устаревший драйвер графического процессора для рендеринга игры.
Несколько затронутых пользователей подтвердили, что им удалось решить проблему, обновив драйверы графического процессора и физический модуль, чтобы гарантировать, что каждый компонент, обрабатывающий внутриигровой рендеринг, использует последнюю доступную итерацию.
Если этот сценарий применим и вы точно знаете, что не обновляли драйверы графического процессора в течение некоторого времени, следуйте приведенным ниже инструкциям для получения пошаговых инструкций по обновлению текущих драйверов графического процессора, чтобы убедиться, что фатальная ошибка Starbound не повторяется. сам:
- Откройте диалоговое окно «Выполнить», нажав клавиши Windows + R. Внутри текстового поля введите devmgmt.msc и нажмите Enter, чтобы открыть Диспетчер устройств.
Запуск диспетчера устройств
- Зайдя в диспетчер устройств, прокрутите список установленных устройств вниз, затем разверните раскрывающееся меню, относящееся к адаптерам дисплея.
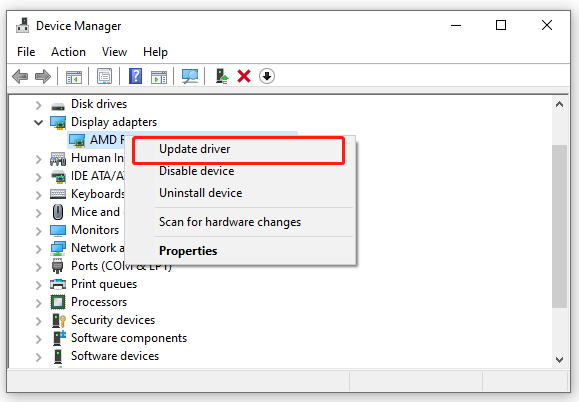
- После раскрытия меню щелкните правой кнопкой мыши драйвер графического процессора, который вы хотите обновить, затем щелкните «Обновить драйвер» в только что появившемся контекстном меню.
Обновление графического драйвера
Примечание. Если вы столкнулись с этой проблемой на ноутбуке, вероятно, у вас есть как выделенный, так и встроенный графический процессор. В этом случае вам нужно только обновить специальный эквивалент.
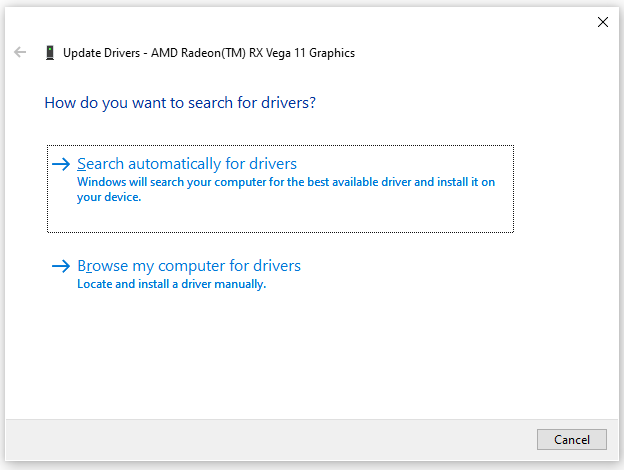
- На следующем экране нажмите «Автоматический поиск обновленного программного обеспечения драйвера». Затем дождитесь завершения первоначального сканирования, затем следуйте инструкциям на экране, чтобы завершить установку новой версии драйвера в случае обнаружения нового драйвера.
Поиск новейшего драйвера
- После установки новейшего драйвера перезагрузите компьютер и снова запустите Starbound после завершения следующего запуска, чтобы проверить, устранена ли проблема.
Если диспетчер устройств не нашел новую версию драйвера в вашем случае, вы также можете использовать проприетарное программное обеспечение, предоставленное производителем вашего графического процессора, чтобы убедиться, что вы используете последнюю версию драйвера, совместимую с вашей моделью графического процессора:
GeForce Experience — Nvidia
Адреналин — AMD
Драйвер Intel — Intel
Если вы уже использовали последнюю версию драйвера графического процессора или обновление версии драйвера не устранило проблему в вашем случае, перейдите к следующему потенциальному исправлению ниже.
Метод 3: проверка целостности игры в Steam
Если ни один из вышеперечисленных методов не помог в вашем случае, вам следует подумать о несогласованности, вызванной коррупцией, которая влияет на установку Starbound в Steam.
Как сообщается, нескольким затронутым пользователям, которые оказались в аналогичном сценарии, удалось решить проблему с помощью функции проверки целостности в Steam, чтобы обнаружить и исправить поврежденные файлы игры.
Если вы запускаете игру через Steam и еще не пробовали это сделать, следуйте приведенным ниже инструкциям, чтобы автоматически сканировать каждый файл игры Starbound и заменять каждый поврежденный элемент на исправный эквивалент:
- Начните с обычного открытия Steam (с правами администратора), затем войдите в меню «Библиотека» на вкладке вверху.
- Когда вы увидите список игр, щелкните правой кнопкой мыши Starbound, затем выберите Свойства в только что появившемся контекстном меню.
Доступ к экрану свойств
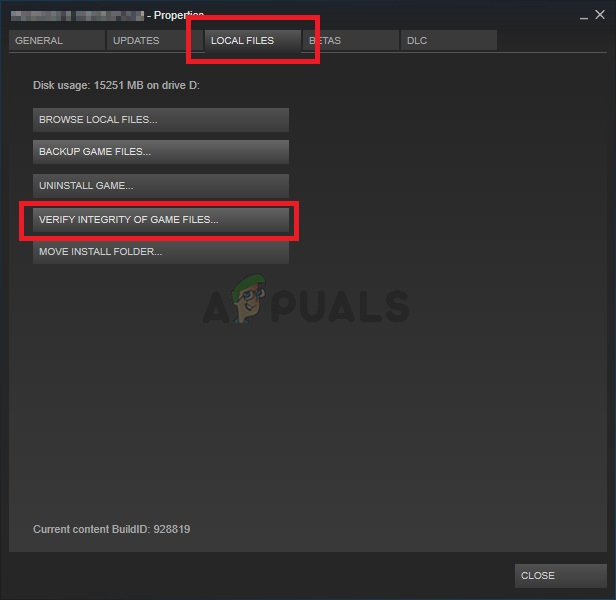
- Как только вы окажетесь на экране свойств Starbound, используйте вертикальное меню слева, чтобы выбрать «Локальные файлы», затем перейдите в меню с правой стороны и нажмите «Проверить целостность файлов игры».
Проверка целостности файлов игры
- Подтвердите операцию, затем дождитесь ее завершения, прежде чем снова запустить игру и посмотреть, устранена ли проблема.
Если проблема все еще не устранена, перейдите к следующему потенциальному исправлению ниже.
Метод 4: запуск игры в режиме совместимости (с доступом администратора)
По словам некоторых пользователей, которые также сталкивались с этой проблемой в Windows 10, вы также можете ожидать увидеть эту проблему, если имеете дело с какой-либо проблемой совместимости.
Имейте в виду, что Starbound изначально был разработан для работы в Windows 7, и если вы пытаетесь отрендерить модифицированную сборку, которая не модифицирована для поддержки в Windows 10, вы можете ожидать, что каждый раз при попытке вы увидите сообщение о фатальной ошибке. для запуска игры.
К счастью, другие пользователи, которые оказались в подобном сценарии, сообщили, что они, наконец, смогли запустить игру в обычном режиме после того, как они принудительно запустили свой исполняемый файл игры в режиме совместимости с Windows 7 (и убедитесь, что ему предоставлены права администратора).
Если вы еще не пробовали это исправление, следуйте пошаговым инструкциям ниже, как это сделать:
- Щелкните правой кнопкой мыши основной исполняемый файл Starbound (или ярлык, который вы используете для запуска игры) и выберите «Свойства» в только что появившемся контекстном меню.
Доступ к экрану свойств Starbound
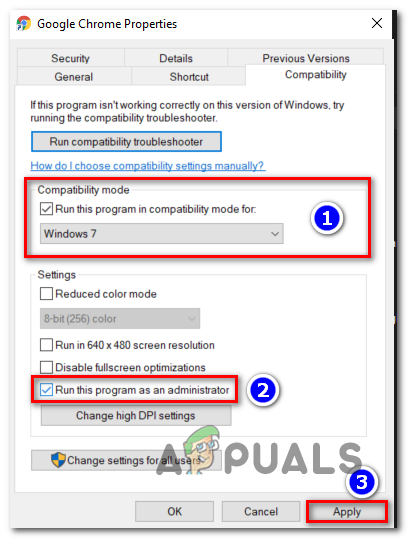
- Как только вы окажетесь на экране «Свойства», щелкните вкладку «Совместимость» в меню вверху.
- Затем установите флажок Запустить эту программу в режиме совместимости для, затем выберите Windows 7 из списка доступных параметров.
Запуск Starbound в режиме совместимости
- Затем установите флажок, связанный с Запускать эту программу от имени администратора, прежде чем, наконец, нажать Применить, чтобы сохранить изменения.
- Теперь, когда вы наконец убедились, что игра настроена для работы в режиме совместимости с Windows 7, запустите ее еще раз и посмотрите, устранена ли проблема.
Если при запуске все еще появляется сообщение о «фатальной ошибке», перейдите к последнему потенциальному исправлению ниже.
Метод 5: переустановка игры
Если ни одно из вышеперечисленных исправлений не помогло в вашем случае, последнее возможное исправление, которое вы можете развернуть, состоит в том, чтобы по существу удалить игру и убедиться, что все оставшиеся файлы (моды, пользовательские файлы, данные о пользовательских настройках и т. Д.) Также удалены и не будет частью будущей установки.
Некоторые пользователи, которые также сталкивались с этой проблемой, подтвердили, что им, наконец, удалось решить эту проблему, переустановив игру и удалив все оставшиеся данные перед ее повторной установкой по официальным каналам.
Чтобы вам было проще, мы составили серию пошаговых инструкций:
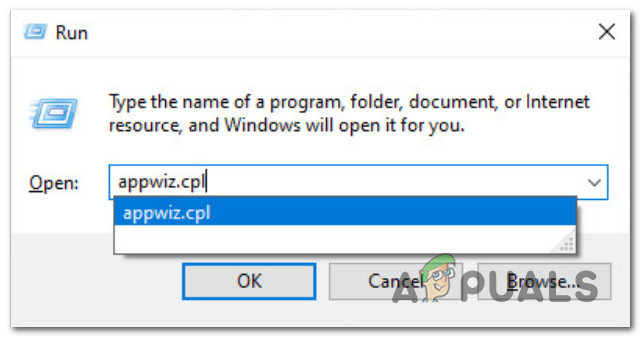
- Нажмите клавишу Windows + R, чтобы открыть диалоговое окно «Выполнить». Затем введите appwiz.cpl и нажмите Enter, чтобы открыть меню «Программы и компоненты».
Открытие меню «Программы и функции» через окно «Выполнить»
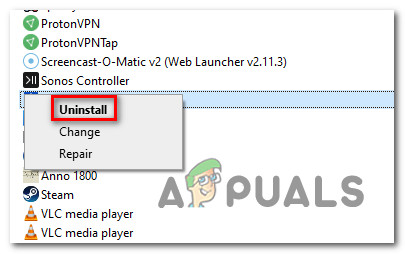
- Когда вы, наконец, войдете в меню «Программы и компоненты», прокрутите список установленных приложений и найдите Starbound. Когда вы его увидите, щелкните его запись правой кнопкой мыши и выберите «Удалить» в только что появившемся контекстном меню.
Удаление Starbound из списка приложений
- На экране удаления следуйте инструкциям на экране, чтобы завершить удаление, прежде чем окончательно перезагрузить компьютер.
- После успешного удаления игры посетите место, в которое вы ее изначально установили, и удалите все оставшиеся файлы и папки, чтобы убедиться в отсутствии данных, которые будут взаимодействовать с будущей установкой.
Примечание: если вы установили игру через Steam, вам необходимо перейти в следующую папку: C: Program Files (x86) Steam SteamApps common Starbound - Как только Starbound будет удален и предыдущее место установки очищено, следуйте официальным каналам, чтобы снова загрузить игру (через Steam или другую программу запуска) и посмотреть, исправлено ли наконец сообщение о «фатальной ошибке».
A lot of players encounter the Starbound fatal error when launching the game or joining multiplayer. Don’t worry. This post of MiniTool explores several effective ways to fix the Starbound fatal error access violation detected.
Starbound is an action-adventure video game developed by Chucklefish. It is available on many platforms, including Microsoft Windows, Linux, PlayStation 4, and Xbox One. Since its release, this game has attracted a large number of players around the world.
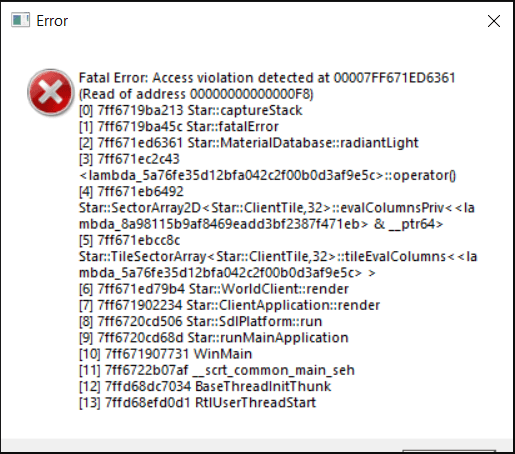
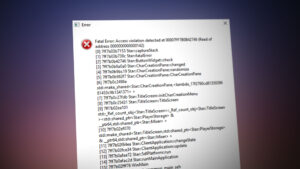
Sometimes, however, many Windows users complain that Starbound crashes on startup and throws the “fatal error access via lotion detected” message. In addition, the Starbound fatal error is often accompanied by error codes like 00007FF7AB290173 and 0000000000000188. Here’s a true example from the Reddit forum:
Is there a fix for the fatal error [Error] Fatal Error: Access violation detected at 00007FF7AB290173 (Read of address 0000000000000188) it only happens when I try to join multiplayer with an already-existing character.
https://www.reddit.com/r/starbound/comments/ojcrfy/fatal_error_fix/
What causes the “Starbound fatal error access violation detected” error? After analyzing extensive user reports from different forums and communities, we found the error is often related to the following factors:
- Lack of administrative privileges
- Inappropriate compatibility settings
- Outdated or corrupted graphics card driver
- Corrupted or missing game files
- Enabled VSync
How to fix the “fatal exception caught Starbound” error? Here we summarize 6 proven ways to fix the error. Let’s start trying.
# 1. Run the Game in Compatibility Mode with Admin Rights
Many users from the Steam community reported that the Starbound fatal error access violation can be solved by running the game as an administrator in combability mode. Follow the steps below to have a try.’
Step 1. Press the Win + E keys to open the File Explorer and locate the game installation folder. If you have installed the game via Steam, the folder is usually located in the following path:
C:Programs Files (x86)SteamSteamSteamappscommonStarbound
Step 2. Right-click the starbound.exe file and select Properties.
Step 3. Navigate to the Compatibility mode and tick the checkbox next to Run this program as an administrator.
Step 4. Tick the checkbox next to Run this program in compatibility mode for and select Windows 8 or older version from the drop-down menu.
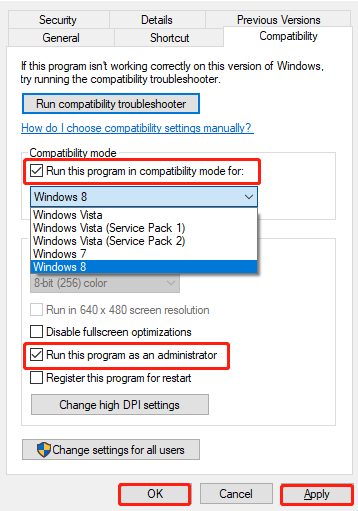
Step 5. Click on Apply and OK to save the changes.
Step 6. Revert to the game installation folder and repeat the same procedure for the starbound_opengl.exe and launcher/launcher.exe files. Once done, restart the game and check if the “Starbound fatal error access violation Windows 10” issue gets fixed.
# 2. Clear the Forced Compatibility Settings of Steam
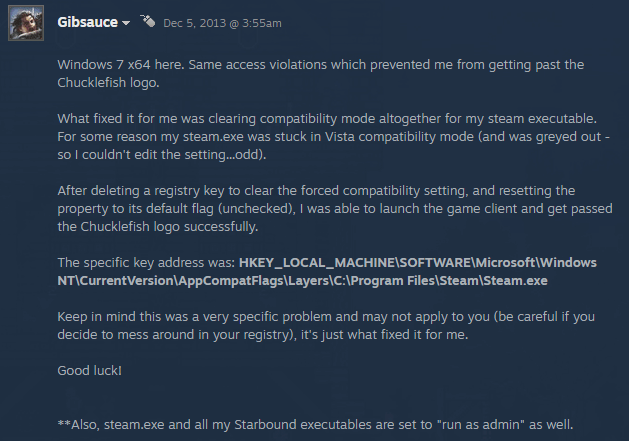
Some users from the Steam community reported that the fatal error access violation Starbound also occurs if the Steam client is stuck in Vista compatibility mode. In this case, you can try clearing the forced compatibility settings in Registry Editor and resetting the properties to its default settings.
Note:
The Registry Editor is a powerful Windows built-in tool, and improper operation could lead to your system being unstable or even inoperable. So, we highly recommend you back up the Registry in case anything goes wrong.
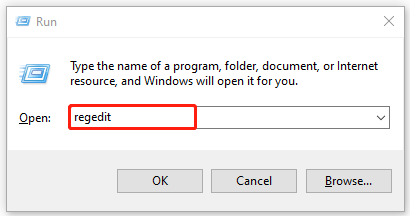
Step 1. Press the Win + R keys to open the Run dialog box, and then type regedit in it and hit Enter. Then click on Yes when a User Account Control window pops up.
Step 2. In the Registry Editor window, locate the following entry key from the left navigation bar.
HKEY_LOCAL_MACHINESOFTWAREMicrosoftWindows NTCurrentVersionAppCompatFlagsLayersC:Program FilesSteamSteam.exe
Step 3. Delete the forced compatibility registry key from the right panel.
Step 4. Open the Properties window of Steam.exe and Starbound.exe files as we explained above, untick the checkbox for Run this program in compatibility mode for, and click on OK to save the change.
Step 5. After you reset the properties to the default settings, you can relaunch the game and see if the “Starbound fatal exception caught starexception” error disappears.
# 3. Disable VSync in Starbound
VSync is a kind of graphics technology that can synchronize the frame rate of the game and the refresh rate of the game monitor. If the VSync is enabled on a low-end computer where the GPU is not powerful enough to sustain the feature, you may encounter the fatal exception caught Starbound error.
In this case, you can follow the steps below to disable VSync in Starbound.
Step 1. Launch your Steam client and sign in to your account and navigate to the Library tab.
Step 2. Right-click Starbound from the left pane and select Properties.
Step 3. Inside the Properties window, navigate to the Local Files section and click on Browse Local Files.
Step 4. Now, you should locate the local installation of Starbound, open the Storage folder, right-click the starbound.config file and select Open with Notepad.
Step 5. In the Notepad window, find a code line named vsync: true and change its value to false. Then press Ctrl + S keys to save the change.
Now, you can relaunch the game and check if the “Starbound fatal error access violation Windows 10” error is fixed.
# 4. Update Your Graphics Card Driver
Sometimes an outdated or corrupted graphics card driver can trigger the fatal error access violation Starbound as well. In this case, you can try updating the GPU driver to the latest version.
Step 1. Press the Win + R keys to open the Run dialog box, and then type devmgmt.msc in the box and hit Enter to open this program.
Step 2. Expand the Display adapters category, and then right-click the graphics card driver and select Update Driver.
Step 3. Then you can select Search automatically for drivers option and follow the on-screen prompts to complete the update. Alternatively, you can download the latest graphics card driver from the manufacturer’s website and install it on your computer.
# 5. Verify the Integrity of the Game Files
If the game installation files become corrupted or missing, you may encounter various issues like Starbound fatal error access violation detected. To rule out this situation, you can use Steam to verify the integrity of the game files.
Step 1. Run the Steam client as an administrator, and then navigate to the Library tab.
Step 2. Right-click Starbound from the left pane and select Properties.
Step 3. Inside the Properties window, navigate to the Local Files section and click on the Verify Integrity of Game Files option. Then wait for the repair to complete and relaunch the game and see if it works properly.
# 6. Reinstall the Game
If none of the above methods fix the “fatal exception caught Starbound” error, you may consider reinstalling this game. It is very simple to operate. To do so, follow the steps below:
Step 1. Open the Run box again, type appwiz.cpl in it, and hit Enter.
Tips:
Alternatively, you can open Steam, navigate to the Library tab, right-click Starbound and select Uninstall from the drop-down menu. Then click on Delete to confirm the operation. Once uninstalled, you can redownload from Steam.
Step 2. Right-click Starbound from the list of installed programs and select Uninstall. After the uninstallation completes, download the game from its official website and install it on your computer.
Further reading: If you enter some issues like file system corruption or low disk space when reinstalling the game, don’t worry. MiniTool Partition Wizard can help you fix them easily by checking file system errors, extending/resizing partitions, analyzing disk space, upgrading to a larger hard disk, etc.
Some Windows users are reporting that they end up seeing a ‘Fatal Error‘ every time they attempt to launch Starbound on their computer. This error appears at the initial startup screen and it’s confirmed to occur on Windows 7, Windows 8.1, and Windows 10.
After investigating this particular issue, it turns out that there are several different causes that might be causing this error code. Here’s a list of potential culprits that might be responsible for the apparition of this ‘fatal error’ with Starbound on a Windows computer:
- Vsync is Enabled – One of the most common culprits that are known to trigger this issue with Starbound is VSYNC. More specifically, when this graphical feature is enabled on a low-end PC configuration, the game might refuse to launch. Since you cannot get to the main menu in order to disable this feature, you can only resolve this problem by modifying the main config file of Starbound (starbound.config) in order to force Vsync to stay Disabled.
- Outdated GPU driver – It’s also possible to encounter this issue due to a severely outdated GPU driver that makes it impossible for your PC to render the game. Several affected users have reported that the issue was finally resolved after they have successfully updated their graphical drivers to the latest version available.
- Game file corruption – As a lot of Steam users are reporting, you can also expect to see this issue due to some kind of corruption that is affecting the local installation of Starbound. If this scenario is applicable, you can fix the issue by forcing a file integrity check via Steam. In more serious circumstances, you might need to reinstall the game and clear modded content before reinstalling in order to fix the issue.
- Game version is incompatible with Windows 10 – Keep in mind that there are certain modded versions of Starbound that will not function on Windows 10 by default. If this scenario is applicable, you should be able to fix the issue by forcing the main game executable to run in compatibility mode with Windows 7.
Now that you know every potential culprit, here’s a list of verified methods that some affected users have successfully deployed to get to the bottom of this issue:
Method 1: Putting VSync to False in Starbound
As it turns out, in a lot of documented cases, this issue occurs whenever VSync is enabled on a PC configuration where the GPU / CPU components are not powerful enough to sustain this graphical feature. However, unlike other games, Starbound prefers to prevent the game from starting in situations like this instead of letting it run with performance issues.
If you find yourself in this scenario, follow the instructions below to discover the config file of Starbound and modify the starbound.config so that VSync is set to False in order to prevent it from becoming active when you launch the game.
Here’s a quick step-by-step guide that will guide you through the entire process:
- Open up Steam, access the Library tab, then right-click on the entry associated with Starbound and choose Properties from the context menu that just appeared.

Accessing the Properties screen of Starbound - Once you’re inside the Properties screen of Starbound, click on Local Files from the vertical menu on the left, then click on Browse Local Files.

Accessing the local files of StarBound - After you find yourself inside local installation of Starbound, double-click on the storage folder, and right-click on the file named starbound.config. Next, from the context menu that just prepared, click on Open with Notepad.

Opening starbound.config with Notepad - Once you get to see the internals of the starbound.config, look for the code line ‘vsync” : true’. When you see it, change the value to false (“vsync” : false) before saving the changes.
- Launch Starbound once again and see if the problem is now fixed.


If the issue is still not resolved as you’re still encountering the same ‘fatal error’ when launching Starbound, move down to the next potential fix below.
Method 2: Update GPU driver to the Latest version
According to some affected users, you can also expect to see this issue in instances where you’re trying to use a severely outdated GPU driver to render the game.
Several affected users have confirmed that they managed to fix the issue by updating the GPU drivers plus the physics module to ensure that every component that is handling in-game rendering is using the latest available iteration.
If this scenario is applicable and you know for sure you haven’t updated your GPU drivers in a while, follow the instructions below for step-by-step instructions on updating the current GPU drivers to ensure that the Starbound Fatal error doesn’t repeat itself:
- Open up a Run dialog box by pressing Windows key + R. Inside the text box, type ‘devmgmt.msc’ and press Enter to open up Device Manager.

Running Device Manager - Once you’re inside Device Manager, scroll down through the list of installed devices, then expand the drop-down menu that’s specific to Display Adapters.
- After the menu is expanded, right-click on the GPU driver that you want to update, then click on Update driver from the context menu that just appeared.

Updating the Graphics Driver Note: If you’re encountering this issue on a laptop, then you likely have both a dedicated and an integrated GPU solution. In this case, you only need to update the dedicated equivalent.
- At the next screen, click on Search Automatically for updated driver software. Next, wait for the initial scan to complete, then follow the on-screen instructions to complete the installation of the newer driver version in case a new driver is discovered.

Searching for the newest driver - After the newest driver is installed, reboot your computer and launch Starbound again once the next startup is complete to see if the issue is now fixed.


In case Device Manager didn’t find a new driver version in your case, you can also use the proprietary software provided by your GPU manufacturer to make sure that you’re using the latest driver version compatible with your GPU model:
GeForce Experience – Nvidia
Adrenalin – AMD
Intel Driver – Intel
If you were already using the latest GPU driver version or updating the driver version didn’t fix the issue in your case, move down to the next potential fix below.
Method 3: Verifying the Integrity of the Game in Steam
If none of the methods above have worked in your case, you should start considering a corruption-fueled inconsistency that is affecting the Steam installation of Starbound.
Several affected users that found themselves in a similar scenario have reportedly managed to fix the issue by using the integrity check feature on Steam in order to detect and fix corrupted game files.
If you’re launching the game through Steam and you haven’t tried this yet, follow the instructions below to automatically scan every Starbound game file and replace every corrupted item with a healthy equivalent:
- Start by opening up Steam conventionally (with admin access), then access the Library menu from the tab at the top.
- Once you see the list of games, right-click on Starbound, then click on Properties from the context menu that just appeared.

Accessing the Properties screen - Once you’re inside the Properties screen of Starbound, use the vertical menu on the left to click on Local Files, then move over to the right-hand side menu and click on Verify Integrity of Game Files.

Verifying the integrity of game files - Confirm the operation, then wait for it to complete before launching the game once again and seeing if the issue is now fixed.
In case this problem is still not fixed, move down to the next potential fix below.
Method 4: Running the Game in Compatibility Mode (with Admin Access)
According to some users that were also encountering this issue on Windows 10, you can also expect to see this issue if you’re dealing with some kind of compatibility issue.
Keep in mind that Starbound was originally designed to run on Windows 7, and if you’re trying to render a modded built that’s not modified to be supported on Windows 10, you can expect to see the ‘fatal error’ prompt every time you attempt to launch the game.
Fortunately, other users that found themselves in a similar scenario have reported that they were finally able to launch the game normally after they forced their game executable to launch in compatibility mode with Windows 7 (and ensure that admin rights are given to it).
If you haven’t tried this fix yet, follow the instructions below for step by step instructions on how to do so:
- Right-click on the main executable of Starbound (or the shortcut that you use to launch the game) and click on Properties from the context menu that just appeared.

Accessing the Properties screen of Starbound - Once you’re inside the Properties screen, click on the Compatibility tab from the menu at the top.
- Next, check the box associated with Run this program in compatibility mode for, then select Windows 7 from the list of available options.

Running Starbound in compatibility mode - Next, check the box associated with Run this program as an administrator before finally clicking on Apply to save the changes.
- Now that you’ve finally made sure that the game is configured to run in compatibility mode with Windows 7, launch it once again and see if the problem is now fixed.

If the same ‘fatal error’ prompt is still occurring at startup, move down to the final potential fix below.
Method 5: Reinstalling the Game
If none of the fixes above have been effective in your case, the last potential fix that you can deploy is to essentially uninstall the game and ensure like any leftover files (mods, custom files, user preference data, etc.) are also deleted and will not be a part of a future installation.
Some users that were also dealing with this issue have confirmed that they finally managed to fix this issue by reinstalling the game and deleting any remnant data before reinstalling it using the official channels.
To make things easier for you, we’ve put together a step-by-step series of instructions:
- Press Windows key + R to open up a Run dialog box. Next, type ‘appwiz.cpl‘ and press Enter to open up the Programs and Features menu.

Opening the Programs and features menu via Run box - Once you’re finally inside the Programs and Features menu, scroll down through the list of installed applications and locate Starbound. When you see it, right-click on its entry and click Uninstall from the context menu that just appeared.

Uninstalling Starbound from the list of applications - Inside the uninstallation screen, follow the on-screen instructions to complete the uninstallation before finally restarting your computer.
- After the game has been successfully uninstalled, visit the location where you originally installed it and delete every leftover file and folder to ensure that there is no remnant data that will interact with the future installation.
Note: If you installed the game through Steam, you need to navigate to the following location:C:Program Files (x86)SteamSteamAppscommonStarbound
- Once Starbound is uninstalled and the previous installation location is cleared, follow the official channels to download the game again (via Steam or a different launcher) and see if the ‘fatal error’ prompt is finally fixed.

Kevin Arrows
Kevin Arrows is a highly experienced and knowledgeable technology specialist with over a decade of industry experience. He holds a Microsoft Certified Technology Specialist (MCTS) certification and has a deep passion for staying up-to-date on the latest tech developments. Kevin has written extensively on a wide range of tech-related topics, showcasing his expertise and knowledge in areas such as software development, cybersecurity, and cloud computing. His contributions to the tech field have been widely recognized and respected by his peers, and he is highly regarded for his ability to explain complex technical concepts in a clear and concise manner.
-
Hello everybody. Recently I have been unable to lanch Starbound, the game crashes at startup with a window telling me the game stopped to work. I looked in the log, but the log doesn’t tell anything. I tried then to launch the 32bit version, the game crashes at the same way, but I get a window telling there has been a fatal error access violation.
I tried to remove all the mods, reinstall the game, and even reinstall steam, and nothing work. I looked for solutions in the web, and it seems this error happens often.I have tried everything possible, and it still doesn’t work. I start to be out of solutions. Here is the log I get for both versions.
[15:03:41.395] [Info] Root: Preparing Root...
[15:03:41.395] [Info] Root: Done preparing Root.
[15:03:41.395] [Info] Client Version 1.3.3 (windows i386) Source ID: c21069b204d626bfe673a047a2100d2fcd0766d4 Protocol: 743
[15:03:41.396] [Info] Root: Scanning for asset sources in directory '..assets'
[15:03:43.480] [Info] Root: Scanning for asset sources in directory '..mods'
[15:03:43.480] [Warn] Root: Unrecognized file in asset directory 'mods_go_here', skipping
[15:03:43.481] [Info] Root: Detected asset source named 'base' at '..assetspacked.pak'
[15:03:43.481] [Info] Root: Detected unnamed asset source at '..assetsuser'
[15:03:43.481] [Info] Loading assets from: '..assetspacked.pak'
[15:03:45.847] [Info] Loading assets from: '..assetsuser'
[15:03:46.753] [Info] Assets digest is 563ff626b877e7d080472517395bc6c4eda613eaf6ac1576e95136a4ca9b3d64
[15:03:46.753] [Info] Root: Loaded Assets in 5.3575 seconds
[15:03:46.759] [Info] Application: Initializing SDL Video
[15:03:46.776] [Info] Application: Initializing SDL Joystick
[15:03:46.848] [Info] Application: Initializing SDL Sound
[15:03:47.073] [Info] Failed to initialize Steam platform services
[15:03:47.073] [Info] Application: No platform services available
[15:03:47.073] [Info] Application: Creating SDL Window
[15:03:47.662] [Info] Application: Enabling VSync with late swap tearing
[15:03:47.689] [Info] Application: Opened default audio device with 44.1khz / 16 bit stereo audio, 2048 sample size buffer
[15:03:47.695] [Info] OpenGL version: '4.5.13507 Compatibility Profile Context 23.20.15033.1003' vendor: 'ATI Technologies Inc.' renderer: 'AMD Radeon (TM) R9 380 Series' shader: '4.50'
[15:03:47.699] [Info] Application: initialization...
[15:03:47.700] [Info] Root: Loaded Configuration in 0.00154931 seconds
[15:03:47.705] [Info] Application: renderer initialization...
[15:03:47.707] [Info] detected supported OpenGL texture size 16384, using atlasNumCells 128
[15:03:47.707] [Info] detected supported OpenGL texture size 16384, using atlasNumCells 64
[15:03:47.709] [Info] Root: Loaded ImageMetadataDatabase in 1.792e-06 seconds
[15:03:47.778] [Info] Application: main update loop...
[15:03:47.804] [Info] Root: Loaded NameGenerator in 0.0158382 seconds
[15:03:48.022] [Info] Root: Loaded PlantDatabase in 0.217939 seconds
[15:03:48.614] [Error] Fatal Error: Access violation detected at 161FF0D9 (Read of address 00000008)
[0] c9986a Star::captureStack
[1] c99aa2 Star::fatalError
[2] c953d2 Star::SignalHandlerImpl::sehTrampoline
[3] 16358c1b
[4] 161b1db7
[5] 161b1e38
[6] 161ac3f0
[7] 161acdcc
[8] 161ad07c
[9] 161b8130
[10] 157b75b4
[11] 1587c7a7
[12] 158cdf87
[13] 1619e821
[14] 1563ff8b
[15] 1563fffc
[16] 1564035d
[17] 68c40edf wglCopyContext
[18] 68c4d5b7 wglSwapBuffers
[19] 76929ff6 SwapBuffers
[20] 6c80f59b SDL_LogCritical
[21] 6c8038f4 SDL_LogCritical
[22] 129b8a6 Star::runMainApplication
[23] c03a5c WinMain
[24] 13c4e99 __scrt_common_main_seh
[25] 77938654 BaseThreadInitThunk
[26] 77ea4a77 RtlGetAppContainerNamedObjectPath
[27] 77ea4a47 RtlGetAppContainerNamedObjectPath
[15:03:48.648] [Info] Root: Loaded ObjectDatabase in 0.860179 seconds
[15:03:48.680] [Info] Root: Loaded ProjectileDatabase in 0.658207 seconds
[15:03:48.817] [Info] Root: Loaded NpcDatabase in 0.136593 seconds
[15:03:48.822] [Info] Root: Loaded StagehandDatabase in 0.00446183 seconds
[15:03:48.830] [Info] Root: Loaded VehicleDatabase in 0.00853402 seconds
[15:03:48.835] [Info] Root: Loaded PlayerFactory in 0.00442675 seconds
[15:03:48.998] [Info] Root: Loaded MonsterDatabase in 0.349361 seconds
[15:03:49.000] [Info] Root: Loaded VersioningDatabase in 0.00169626 seconds
[15:03:49.000] [Info] Root: Loaded EntityFactory in 0.164917 seconds
[15:03:49.104] [Info] Root: Loaded ParticleDatabase in 0.104144 seconds
[15:03:49.550] [Info] Root: Loaded MaterialDatabase in 0.549692 seconds
[15:03:49.562] [Info] Root: Loaded TerrainDatabase in 0.0124186 seconds
[15:03:49.636] [Info] Root: Loaded BiomeDatabase in 0.0743115 seconds
[15:03:49.638] [Info] Root: Loaded LiquidsDatabase in 0.0018624 seconds
[15:03:49.664] [Info] Root: Loaded StatusEffectDatabase in 0.0255488 seconds
[15:03:50.070] [Info] Root: Loaded DamageDatabase in 0.405716 seconds
[15:03:50.085] [Info] Root: Loaded EffectSourceDatabase in 0.0146191 seconds
[15:03:50.090] [Info] Root: Loaded FunctionDatabase in 0.00585805 seconds
[15:03:50.151] [Info] Root: Loaded TreasureDatabase in 0.0607409 seconds
[15:03:50.554] [Info] Root: Loaded DungeonDefinitions in 0.402385 seconds
[15:03:50.554] [Info] Root: Loaded TilesetDatabase in 5.76e-05 seconds
[15:03:50.560] [Info] Root: Loaded StatisticsDatabase in 0.0063296 seconds
[15:03:50.561] [Info] Root: Loaded EmoteProcessor in 0.000295936 seconds
[15:03:50.577] [Info] Root: Loaded SpeciesDatabase in 0.0160502 seconds
[15:03:50.620] [Info] Root: Loaded QuestTemplateDatabase in 0.0434171 seconds
[15:03:50.623] [Info] Root: Loaded AiDatabase in 0.00231322 seconds
[15:03:50.624] [Info] Root: Loaded TechDatabase in 0.00185626 seconds
[15:03:50.643] [Info] Root: Loaded CodexDatabase in 0.0184545 seconds
[15:03:51.159] [Info] Root: Loaded BehaviorDatabase in 0.516247 seconds
[15:03:51.163] [Info] Root: Loaded DanceDatabase in 0.00392167 seconds
[15:03:51.176] [Info] Root: Loaded SpawnTypeDatabase in 0.0130616 seconds
[15:03:51.182] [Info] Root: Loaded RadioMessageDatabase in 0.00521882 seconds
[15:03:51.763] [Info] Root: Writing runtime configuration to '..storagestarbound.config'
[06:11:30.955] [Info] Root: Preparing Root...
[06:11:30.955] [Info] Root: Done preparing Root.
[06:11:30.955] [Info] Client Version 1.3.3 (windows x86_64) Source ID: c21069b204d626bfe673a047a2100d2fcd0766d4 Protocol: 743
[06:11:30.955] [Info] Root: Scanning for asset sources in directory '..assets'
[06:11:32.193] [Info] Root: Scanning for asset sources in directory '..mods'
[06:11:32.194] [Warn] Root: Unrecognized file in asset directory 'mods_go_here', skipping
[06:11:32.194] [Info] Root: Detected asset source named 'base' at '..assetspacked.pak'
[06:11:32.194] [Info] Root: Detected unnamed asset source at '..assetsuser'
[06:11:32.194] [Info] Loading assets from: '..assetspacked.pak'
[06:11:33.629] [Info] Loading assets from: '..assetsuser'
[06:11:34.308] [Info] Assets digest is 563ff626b877e7d080472517395bc6c4eda613eaf6ac1576e95136a4ca9b3d64
[06:11:34.308] [Info] Root: Loaded Assets in 3.35306 seconds
[06:11:34.312] [Info] Application: Initializing SDL Video
[06:11:34.326] [Info] Application: Initializing SDL Joystick
[06:11:34.374] [Info] Application: Initializing SDL Sound
[06:11:34.569] [Info] Failed to initialize Steam platform services
[06:11:34.569] [Info] Application: No platform services available
[06:11:34.569] [Info] Application: Creating SDL Window
[06:11:35.004] [Info] Application: Enabling VSync with late swap tearing
[06:11:35.028] [Info] Application: Opened default audio device with 44.1khz / 16 bit stereo audio, 2048 sample size buffer
[06:11:35.034] [Info] OpenGL version: '4.5.13507 Compatibility Profile Context 23.20.15033.1003' vendor: 'ATI Technologies Inc.' renderer: 'AMD Radeon (TM) R9 380 Series' shader: '4.50'
[06:11:35.035] [Info] Application: initialization...
[06:11:35.037] [Info] Root: Loaded Configuration in 0.00127002 seconds
[06:11:35.041] [Info] Application: renderer initialization...
[06:11:35.042] [Info] detected supported OpenGL texture size 16384, using atlasNumCells 128
[06:11:35.043] [Info] detected supported OpenGL texture size 16384, using atlasNumCells 64
[06:11:35.045] [Info] Root: Loaded ImageMetadataDatabase in 2.56e-06 seconds
[06:11:35.098] [Info] Application: main update loop...
[06:11:35.120] [Info] Root: Loaded NameGenerator in 0.0151368 seconds

-
I’ve been receiving this constantly this week where in previous weeks it almost never occurred. I develop mods and I’ve been working with my mods everyday this week and last.
-
Is there anyboy for helping me ? I’m still unable to play to Starbound.
-
I haven’t received word on this either.
-
Could both of you attempt to remake the issue and give us a new version of the logs you get? Both logs seem to cut off before showing the full error, which we need. The screenshot does reveal an error, but in my experience that alone is not enough to fix the issue
-
I haven’t encountered it as often in the recent week, but I will be sure to gather my log when it does occur again.
Edit: I actually had it in one of my backup logs, it’s the entire log file. Not a single stack trace line number either
[10:17:51.399] [Info] Root: Preparing Root...
[10:17:51.399] [Info] Root: Done preparing Root.
[10:17:51.399] [Info] Client Version 1.3.3 (windows x86_64) Source ID: c21069b204d626bfe673a047a2100d2fcd0766d4 Protocol: 743
[10:17:51.399] [Info] Root: Scanning for asset sources in directory '..assets'
[10:17:51.611] [Info] Root: Scanning for asset sources in directory '..mods'
[10:17:52.074] [Warn] Root: Unrecognized file in asset directory 'mods_go_here', skipping
[10:17:52.075] [Info] Root: Detected asset source named 'base' at '..assetspacked.pak'
[10:17:52.075] [Info] Root: Detected asset source named 'Better Dash (no more double tap)' at '..modsBetter Dash (no more double tap) v1.2.pak'
[10:17:52.075] [Info] Root: Detected asset source named 'CNAnimatedHandheldTorches' at '..modsCNAnimatedHandheldTorches'
[10:17:52.075] [Info] Root: Detected asset source named 'CNStarFoundry' at '..modsCNStarFoundry'
[10:17:52.075] [Info] Root: Detected asset source named 'FrackinUniverse' at '..modsFrackinUniverse'
[10:17:52.075] [Info] Root: Detected asset source named 'OptionalErchius' at '..modsOptionalErchius'
[10:17:52.075] [Info] Root: Detected asset source named 'CNSurvivalist' at '..modsCNSurvivalist'
[10:17:52.075] [Info] Root: Detected asset source named 'MoreFarming' at '..modsMoreFarming'
[10:17:52.075] [Info] Root: Detected asset source named 'MoreFarmingCollections' at '..modsMoreFarmingCollections'
[10:17:52.075] [Info] Root: Detected asset source named 'MoreFarmingFU' at '..modsMoreFarmingFU'
[10:17:52.075] [Info] Root: Detected asset source named 'MoreFarmingPC' at '..modsMoreFarmingPC'
[10:17:52.075] [Info] Root: Detected asset source named 'food_spoil_bars' at '..modsfood_spoil_bars.pak'
[10:17:52.075] [Info] Root: Detected asset source named 'MMM' at '..modsmmm_1-3.pak'
[10:17:52.075] [Info] Root: Detected asset source named 'Skippable Cinematics' at '..modsskippable_cinematics_1-1.pak'
[10:17:52.075] [Info] Root: Detected asset source named 'GardenBot2' at '..modsGardenbot2'
[10:17:52.075] [Info] Root: Detected unnamed asset source at '..assetsuser'
[10:17:52.075] [Info] Loading assets from: '..assetspacked.pak'
[10:17:52.359] [Info] Loading assets from: '..modsBetter Dash (no more double tap) v1.2.pak'
[10:17:52.359] [Info] Loading assets from: '..modsCNAnimatedHandheldTorches'
[10:17:52.387] [Info] Loading assets from: '..modsCNStarFoundry'
[10:17:52.410] [Info] Loading assets from: '..modsFrackinUniverse'
[10:17:53.561] [Info] Loading assets from: '..modsOptionalErchius'
[10:17:53.562] [Info] Loading assets from: '..modsCNSurvivalist'
[10:17:53.621] [Info] Loading assets from: '..modsMoreFarming'
[10:17:53.846] [Info] Loading assets from: '..modsMoreFarmingCollections'
[10:17:53.854] [Info] Loading assets from: '..modsMoreFarmingFU'
[10:17:53.862] [Info] Loading assets from: '..modsMoreFarmingPC'
[10:17:53.867] [Info] Loading assets from: '..modsfood_spoil_bars.pak'
[10:17:53.867] [Info] Loading assets from: '..modsmmm_1-3.pak'
[10:17:53.867] [Info] Loading assets from: '..modsskippable_cinematics_1-1.pak'
[10:17:53.872] [Info] Loading assets from: '..modsGardenbot2'
[10:17:53.878] [Info] Loading assets from: '..assetsuser'
[10:18:17.453] [Info] Assets digest is f82f79eaadd7358dc82f58e8e7a824ea93d5e79bf93accf4b22ae17a4a129985
[10:18:17.453] [Info] Root: Loaded Assets in 26.0537 seconds
[10:18:17.456] [Info] Application: Initializing SDL Video
[10:18:17.459] [Info] Application: Initializing SDL Joystick
[10:18:17.682] [Info] Application: Initializing SDL Sound
[10:18:17.733] [Info] Initialized Steam services
[10:18:17.734] [Info] Application: Creating SDL Window
[10:18:17.875] [Info] Application: Enabling VSync with late swap tearing
[10:18:17.894] [Info] Application: Opened default audio device with 44.1khz / 16 bit stereo audio, 2048 sample size buffer
[10:18:17.899] [Info] OpenGL version: '4.6.0 NVIDIA 391.35' vendor: 'NVIDIA Corporation' renderer: 'GeForce GTX 1080/PCIe/SSE2' shader: '4.60 NVIDIA'
[10:18:17.900] [Info] Application: initialization...
[10:18:17.901] [Info] Root: Loaded Configuration in 0.000620328 seconds
[10:18:17.902] [Info] Application: renderer initialization...
[10:18:17.902] [Info] detected supported OpenGL texture size 32768, using atlasNumCells 128
[10:18:17.903] [Info] detected supported OpenGL texture size 32768, using atlasNumCells 64
[10:18:17.904] [Info] Root: Loaded ImageMetadataDatabase in 7.66478e-07 seconds
[10:18:17.914] [Info] Application: main update loop...
[10:18:17.915] [Info] Loading mods from user generated content with id '745573454' from directory 'E:Program Files (x86)Steamsteamappsworkshopcontent211820745573454'
[10:18:17.915] [Info] Reloading to include all user generated content
[10:18:17.915] [Info] Root: Reloading from disk
[10:18:17.915] [Info] Root: Writing runtime configuration to '..storagestarbound.config'
[10:18:17.978] [Info] Root: Loaded Configuration in 0.000596568 seconds
[10:18:17.978] [Info] Root: Scanning for asset sources in directory '..assets'
[10:18:18.185] [Info] Root: Scanning for asset sources in directory '..mods'
[10:18:18.629] [Warn] Root: Unrecognized file in asset directory 'mods_go_here', skipping
[10:18:18.629] [Info] Root: Scanning for asset sources in directory 'E:Program Files (x86)Steamsteamappsworkshopcontent211820745573454'
[10:18:18.630] [Info] Root: Detected asset source named 'base' at '..assetspacked.pak'
[10:18:18.630] [Info] Root: Detected asset source named 'Better Dash (no more double tap)' at '..modsBetter Dash (no more double tap) v1.2.pak'
[10:18:18.630] [Info] Root: Detected asset source named 'CNAnimatedHandheldTorches' at '..modsCNAnimatedHandheldTorches'
[10:18:18.630] [Info] Root: Detected asset source named 'CNStarFoundry' at '..modsCNStarFoundry'
[10:18:18.630] [Info] Root: Detected asset source named 'FrackinUniverse' at '..modsFrackinUniverse'
[10:18:18.630] [Info] Root: Detected asset source named 'OptionalErchius' at '..modsOptionalErchius'
[10:18:18.630] [Info] Root: Detected asset source named 'CNSurvivalist' at '..modsCNSurvivalist'
[10:18:18.630] [Info] Root: Detected asset source named 'MoreFarming' at '..modsMoreFarming'
[10:18:18.630] [Info] Root: Detected asset source named 'MoreFarmingCollections' at '..modsMoreFarmingCollections'
[10:18:18.630] [Info] Root: Detected asset source named 'MoreFarmingFU' at '..modsMoreFarmingFU'
[10:18:18.630] [Info] Root: Detected asset source named 'MoreFarmingPC' at '..modsMoreFarmingPC'
[10:18:18.630] [Info] Root: Detected asset source named 'food_spoil_bars' at '..modsfood_spoil_bars.pak'
[10:18:18.630] [Info] Root: Detected asset source named 'MMM' at '..modsmmm_1-3.pak'
[10:18:18.630] [Info] Root: Detected asset source named 'Skippable Cinematics' at '..modsskippable_cinematics_1-1.pak'
[10:18:18.630] [Info] Root: Detected asset source named 'steambound' at 'E:Program Files (x86)Steamsteamappsworkshopcontent211820745573454contents.pak'
[10:18:18.630] [Info] Root: Detected asset source named 'GardenBot2' at '..modsGardenbot2'
[10:18:18.630] [Info] Root: Detected unnamed asset source at '..assetsuser'
[10:18:18.630] [Info] Loading assets from: '..assetspacked.pak'
[10:18:18.906] [Info] Loading assets from: '..modsBetter Dash (no more double tap) v1.2.pak'
[10:18:18.906] [Info] Loading assets from: '..modsCNAnimatedHandheldTorches'
[10:18:18.933] [Info] Loading assets from: '..modsCNStarFoundry'
[10:18:18.956] [Info] Loading assets from: '..modsFrackinUniverse'
[10:18:20.071] [Info] Loading assets from: '..modsOptionalErchius'
[10:18:20.072] [Info] Loading assets from: '..modsCNSurvivalist'
[10:18:20.129] [Info] Loading assets from: '..modsMoreFarming'
[10:18:20.348] [Info] Loading assets from: '..modsMoreFarmingCollections'
[10:18:20.355] [Info] Loading assets from: '..modsMoreFarmingFU'
[10:18:20.364] [Info] Loading assets from: '..modsMoreFarmingPC'
[10:18:20.369] [Info] Loading assets from: '..modsfood_spoil_bars.pak'
[10:18:20.369] [Info] Loading assets from: '..modsmmm_1-3.pak'
[10:18:20.369] [Info] Loading assets from: '..modsskippable_cinematics_1-1.pak'
[10:18:20.369] [Info] Loading assets from: 'E:Program Files (x86)Steamsteamappsworkshopcontent211820745573454contents.pak'
[10:18:20.375] [Info] Loading assets from: '..modsGardenbot2'
[10:18:20.380] [Info] Loading assets from: '..assetsuser'
[10:18:22.510] [Info] Assets digest is b96a0cafb1d1ad0ef5e9da090c9abf14d9923a15f839638bd45145d35aa42ca4
[10:18:22.510] [Info] Root: Loaded Assets in 4.53194 seconds
[10:18:22.517] [Info] Root: Loaded NameGenerator in 0.00651805 seconds
[10:18:22.523] [Info] Root: Loaded ImageMetadataDatabase in 1.02189e-06 seconds
[10:18:22.592] [Info] Root: Loaded PlantDatabase in 0.074667 seconds
[10:18:22.997] [Info] Root: Loaded ObjectDatabase in 0.486585 seconds
[10:18:23.288] [Info] Root: Loaded MonsterDatabase in 0.290808 seconds
[10:18:23.319] [Info] Root: Loaded ProjectileDatabase in 0.727318 seconds
[10:18:23.323] [Info] Root: Loaded StagehandDatabase in 0.00422656 seconds
[10:18:23.333] [Info] Root: Loaded VehicleDatabase in 0.00943982 seconds
[10:18:23.339] [Info] Root: Loaded NpcDatabase in 0.0506776 seconds
[10:18:23.368] [Info] Root: Loaded PlayerFactory in 0.0350823 seconds
[10:18:23.369] [Info] Root: Loaded VersioningDatabase in 0.00107714 seconds
[10:18:23.369] [Info] Root: Loaded EntityFactory in 0.0303269 seconds
[10:18:23.421] [Info] Root: Loaded ParticleDatabase in 0.0517162 seconds
[10:18:23.762] [Info] Root: Loaded MaterialDatabase in 0.39327 seconds
[10:18:23.768] [Info] Root: Loaded TerrainDatabase in 0.00623777 seconds
[10:18:24.007] [Info] Root: Loaded BiomeDatabase in 0.23846 seconds
[10:18:24.010] [Info] Root: Loaded LiquidsDatabase in 0.00303343 seconds
[10:18:24.050] [Info] Root: Loaded StatusEffectDatabase in 0.0400452 seconds
[10:18:24.346] [Info] Root: Loaded DamageDatabase in 0.295795 seconds
[10:18:24.351] [Info] Root: Loaded EffectSourceDatabase in 0.00475926 seconds
[10:18:24.370] [Info] Root: Loaded FunctionDatabase in 0.0185327 seconds
[10:18:24.432] [Info] Root: Loaded TreasureDatabase in 0.0620129 seconds
[10:18:24.907] [Info] Root: Loaded DungeonDefinitions in 0.476075 seconds
[10:18:24.908] [Info] Root: Loaded TilesetDatabase in 5.77406e-05 seconds
[10:18:24.908] [Info] Root: Loaded StatisticsDatabase in 0.000876329 seconds
[10:18:24.908] [Info] Root: Loaded EmoteProcessor in 4.59882e-05 seconds
[10:18:24.925] [Info] Root: Loaded SpeciesDatabase in 0.0159224 seconds
[10:18:24.949] [Info] Root: Loaded QuestTemplateDatabase in 0.0237227 seconds
[10:18:24.951] [Info] Root: Loaded AiDatabase in 0.0027437 seconds
[10:18:24.955] [Info] Root: Loaded TechDatabase in 0.00320793 seconds
[10:18:24.964] [Info] Root: Loaded CodexDatabase in 0.00906962 seconds
[10:18:25.159] [Info] Root: Loaded BehaviorDatabase in 0.195717 seconds
[10:18:25.161] [Info] Root: Loaded DanceDatabase in 0.00170054 seconds
[10:18:25.168] [Info] Root: Loaded SpawnTypeDatabase in 0.00676229 seconds
[10:18:25.200] [Info] Root: Loaded RadioMessageDatabase in 0.0321283 seconds
[10:18:30.268] [Info] Root: Loaded ItemDatabase in 6.90034 seconds
[10:18:31.479] [Info] Root: Loaded CollectionDatabase in 6.27925 seconds
[10:18:33.206] [Error] Fatal Error: Access violation detected at 00007FF62C7F2746 (Read of address 0000000000000142)
[0] 7ff62c067153 Star::captureStack
[1] 7ff62c06739c Star::fatalError
[2] 7ff62c7f2746 Star::ButtonWidget::check
[3] 7ff62c84a0a0 Star::CharCreationPane::changed
[4] 7ff62c84bc19 Star::CharCreationPane::randomize
[5] 7ff62c8482f7 Star::CharCreationPane::CharCreationPane
[6] 7ff62c8d498e std::make_shared<Star::CharCreationPane,<lambda_17f2760cd8135039681453c9b1341371> >
[7] 7ff62c8d7fdb Star::TitleScreen::initCharCreationMenu
[8] 7ff62c8d5431 Star::TitleScreen::TitleScreen
[9] 7ff62bf9a101 std::_Ref_count_obj<Star::TitleScreen>::_Ref_count_obj<Star::TitleScreen><std::shared_ptr<Star::PlayerStorage> & __ptr64,std::shared_ptr<Star::Mixer> >
[10] 7ff62bf9f070 std::make_shared<Star::TitleScreen,std::shared_ptr<Star::PlayerStorage> & __ptr64,std::shared_ptr<Star::Mixer> >
[11] 7ff62bfa64ea Star::ClientApplication::changeState
[12] 7ff62bface34 Star::ClientApplication::update
[13] 7ff62c7aaa72 Star::SdlPlatform::run
[14] 7ff62c7aac2d Star::runMainApplication
[15] 7ff62bfaff76 WinMain
[16] 7ff62c998daf __scrt_common_main_seh
[17] 7ffc75a91fe4 BaseThreadInitThunk
[18] 7ffc774eefc1 RtlUserThreadStart
-
The error seems to be referencing the character creation window, tho exactly what is wrong is past my understanding. Try removing mods and re-adding them 1 at a time. Make sure you unsubscribe from Steambound when you do this, as any mod is a candidate. If subscribing back to it does not cause the error, then it should not be a problem
-
[10:18:18.630] [Info] Root: Detected asset source named 'steambound' at 'E:Program Files (x86)Steamsteamappsworkshopcontent211820745573454contents.pak'
-
Ah, I see. It isn’t a guaranteed issue however, so modifying my mod list is unlikely to make it guaranteed. Need to be able to 100% reproduce the issue before we take these steps. At the moment, it isn’t 100%. Not for me anyways.
-
My problem is totally different and far more complex, it’s not caused by a mod since I removed all of them, I reinstalled the game, and even reinstalled steam, and nothing work. When I debugged it with Visual Studio, and looked in the event journal, I discovered the crash was caused when the game called a Windows library «ucrtbase.dll». I tried to repair Windows with sfc /scannow, register the library again, desactivate the data execution prevention, and replace the library with the one of another computer, and nothing work. I learned it was a library linked to Visual C++, I removed and reinstalled all of them, and again it failed. After searching on the web, it seems to be a common problem which happens in Starbound, with no real solution. I’m totally desperated and out of solutions, and my modder friends are too. I have paid this game, and I would want to play it again, so if a dev could help me, it would be awesome. Here is the Windows crash report I get in the event journal.
Version=1
EventType=APPCRASH
EventTime=131679585052722890
ReportType=2
Consent=1
UploadTime=131679585058492994
ReportStatus=268435456
ReportIdentifier=fdc3726d-a147-4363-b70f-dbcfd51b9b77
IntegratorReportIdentifier=c369dfd2-2404-4552-9541-a3f7cbe76a70
Wow64Host=34404
NsAppName=starbound.exe
AppSessionGuid=000013d4-0001-00c8-1fb8-1488e2d1d301
TargetAppId=W:00064da69c2a65512697ff5b119b7a7d775700000904!0000cfcf60ca83a06265b7ae40e1d2924dd9685014da!starbound.exe
TargetAppVer=2017//10//18:11:52:20!0!starbound.exe
BootId=4294967295
TargetAsId=1050
UserImpactVector=13104
Response.BucketId=e87f9f1f01f097586d3bf73e7316d9a9
Response.BucketTable=4
Response.LegacyBucketId=2106549098316749225
Response.type=4
Sig[0].Name=Nom de l’application
Sig[0].Value=starbound.exe
Sig[1].Name=Version de l’application
Sig[1].Value=0.9.0.0
Sig[2].Name=Horodatage de l’application
Sig[2].Value=59e74074
Sig[3].Name=Nom du module par défaut
Sig[3].Value=ucrtbase.dll
Sig[4].Name=Version du module par défaut
Sig[4].Value=10.0.16299.248
Sig[5].Name=Horodateur du module par défaut
Sig[5].Value=e71e5dfe
Sig[6].Name=Code de l’exception
Sig[6].Value=c0000005
Sig[7].Name=Décalage de l’exception
Sig[7].Value=000000000000b769
DynamicSig[1].Name=Version du système
DynamicSig[1].Value=10.0.16299.2.0.0.256.48
DynamicSig[2].Name=Identificateur de paramètres régionaux
DynamicSig[2].Value=1036
DynamicSig[22].Name=Information supplémentaire n° 1
DynamicSig[22].Value=3500
DynamicSig[23].Name=Information supplémentaire n° 2
DynamicSig[23].Value=3500f9ce772f88a07ac83f416cf47244
DynamicSig[24].Name=Information supplémentaire n° 3
DynamicSig[24].Value=0a7f
DynamicSig[25].Name=Information supplémentaire n° 4
DynamicSig[25].Value=0a7ff3300a05efc3686a589be72d1358
UI[2]=C:Program Files (x86)SteamsteamappscommonStarboundwin64starbound.exe
UI[3]=Starbound a cessé de fonctionner
UI[4]=Windows peut rechercher une solution au problème en ligne.
UI[5]=Rechercher une solution en ligne et fermer le programme
UI[6]=Rechercher ultérieurement une solution en ligne et fermer le programme
UI[7]=Fermer le programme
LoadedModule[0]=C:Program Files (x86)SteamsteamappscommonStarboundwin64starbound.exe
LoadedModule[1]=C:WINDOWSSYSTEM32ntdll.dll
LoadedModule[2]=C:WINDOWSSystem32KERNEL32.DLL
LoadedModule[3]=C:WINDOWSSystem32KERNELBASE.dll
LoadedModule[4]=C:WINDOWSSystem32USER32.dll
LoadedModule[5]=C:WINDOWSSystem32win32u.dll
LoadedModule[6]=C:WINDOWSSystem32GDI32.dll
LoadedModule[7]=C:WINDOWSSystem32gdi32full.dll
LoadedModule[8]=C:WINDOWSSystem32msvcp_win.dll
LoadedModule[9]=C:WINDOWSSystem32ucrtbase.dll
LoadedModule[10]=C:WINDOWSSystem32ADVAPI32.dll
LoadedModule[11]=C:WINDOWSSystem32msvcrt.dll
LoadedModule[12]=C:WINDOWSSystem32sechost.dll
LoadedModule[13]=C:WINDOWSSystem32RPCRT4.dll
LoadedModule[14]=C:WINDOWSSystem32WS2_32.dll
LoadedModule[15]=C:WINDOWSSYSTEM32dbghelp.dll
LoadedModule[16]=C:WINDOWSSYSTEM32OPENGL32.dll
LoadedModule[17]=C:Program Files (x86)SteamsteamappscommonStarboundwin64zlib1.dll
LoadedModule[18]=C:WINDOWSSYSTEM32MSVCP140.dll
LoadedModule[19]=C:WINDOWSSYSTEM32VCRUNTIME140.dll
LoadedModule[20]=C:WINDOWSSYSTEM32GLU32.dll
LoadedModule[21]=C:WINDOWSSYSTEM32CRYPTBASE.DLL
LoadedModule[22]=C:WINDOWSSystem32bcryptPrimitives.dll
LoadedModule[23]=C:Program Files (x86)SteamsteamappscommonStarboundwin64steam_api64.dll
LoadedModule[24]=C:WINDOWSSystem32SHELL32.dll
LoadedModule[25]=C:WINDOWSSystem32cfgmgr32.dll
LoadedModule[26]=C:WINDOWSSystem32shcore.dll
LoadedModule[27]=C:WINDOWSSystem32combase.dll
LoadedModule[28]=C:WINDOWSSystem32windows.storage.dll
LoadedModule[29]=C:WINDOWSSystem32shlwapi.dll
LoadedModule[30]=C:WINDOWSSystem32kernel.appcore.dll
LoadedModule[31]=C:WINDOWSSystem32powrprof.dll
LoadedModule[32]=C:WINDOWSSystem32profapi.dll
LoadedModule[33]=C:Program Files (x86)SteamsteamappscommonStarboundwin64SDL2.dll
LoadedModule[34]=C:WINDOWSSystem32IMM32.dll
LoadedModule[35]=C:WINDOWSSystem32ole32.dll
LoadedModule[36]=C:WINDOWSSystem32OLEAUT32.dll
LoadedModule[37]=C:WINDOWSSYSTEM32VERSION.dll
LoadedModule[38]=C:WINDOWSSYSTEM32WINMM.dll
LoadedModule[39]=C:WINDOWSSYSTEM32WINMMBASE.dll
LoadedModule[40]=C:Program Files (x86)SteamsteamappscommonStarboundwin64glew32.dll
LoadedModule[41]=C:Program Files (x86)Steamgameoverlayrenderer64.dll
LoadedModule[42]=C:WINDOWSSystem32PSAPI.DLL
LoadedModule[43]=C:WINDOWSsystem32uxtheme.dll
LoadedModule[44]=C:WINDOWSsystem32dwmapi.dll
LoadedModule[45]=C:WINDOWSSystem32clbcatq.dll
LoadedModule[46]=C:WindowsSystem32dinput8.dll
LoadedModule[47]=C:WINDOWSSYSTEM32inputhost.dll
LoadedModule[48]=C:WINDOWSSYSTEM32CoreMessaging.dll
LoadedModule[49]=C:WINDOWSSYSTEM32CoreUIComponents.dll
LoadedModule[50]=C:WINDOWSSYSTEM32ntmarta.dll
LoadedModule[51]=C:WINDOWSSYSTEM32wintypes.dll
LoadedModule[52]=C:WINDOWSSYSTEM32HID.DLL
LoadedModule[53]=C:WINDOWSSystem32SETUPAPI.DLL
LoadedModule[54]=C:WINDOWSSYSTEM32DEVOBJ.dll
LoadedModule[55]=C:WINDOWSSystem32WINTRUST.dll
LoadedModule[56]=C:WINDOWSSystem32MSASN1.dll
LoadedModule[57]=C:WINDOWSSystem32CRYPT32.dll
LoadedModule[58]=C:WINDOWSSYSTEM32XInput1_4.dll
LoadedModule[59]=C:WINDOWSSYSTEM32DSOUND.DLL
LoadedModule[60]=C:WINDOWSSYSTEM32MMDevAPI.DLL
LoadedModule[61]=C:WINDOWSSYSTEM32PROPSYS.dll
LoadedModule[62]=C:WINDOWSSYSTEM32wdmaud.drv
LoadedModule[63]=C:WINDOWSSYSTEM32AVRT.dll
LoadedModule[64]=C:WINDOWSSYSTEM32ksuser.dll
LoadedModule[65]=C:WINDOWSSYSTEM32AUDIOSES.DLL
LoadedModule[66]=C:WINDOWSSYSTEM32msacm32.drv
LoadedModule[67]=C:WINDOWSSYSTEM32MSACM32.dll
LoadedModule[68]=C:WINDOWSSYSTEM32midimap.dll
LoadedModule[69]=C:Program Files (x86)Steamsteamclient64.dll
LoadedModule[70]=C:WINDOWSSystem32imagehlp.dll
LoadedModule[71]=C:WINDOWSSYSTEM32IPHLPAPI.DLL
LoadedModule[72]=C:WINDOWSSYSTEM32MSWSOCK.dll
LoadedModule[73]=C:WINDOWSSYSTEM32Secur32.dll
LoadedModule[74]=C:Program Files (x86)Steamtier0_s64.dll
LoadedModule[75]=C:Program Files (x86)Steamvstdlib_s64.dll
LoadedModule[76]=C:WINDOWSSYSTEM32SSPICLI.DLL
LoadedModule[77]=C:WINDOWSSystem32MSCTF.dll
LoadedModule[78]=C:WINDOWSSystem32DriverStoreFileRepositoryc0325741.inf_amd64_21ca712404c688c3atig6pxx.dll
LoadedModule[79]=C:WINDOWSSystem32DriverStoreFileRepositoryc0325741.inf_amd64_21ca712404c688c3atio6axx.dll
LoadedModule[80]=C:WINDOWSSYSTEM32dxva2.dll
LoadedModule[81]=C:WINDOWSSystem32DriverStoreFileRepositoryc0325741.inf_amd64_21ca712404c688c3atig6txx.dll
LoadedModule[82]=C:WINDOWSSYSTEM32atiadlxx.dll
LoadedModule[83]=C:WINDOWSSYSTEM32USERENV.dll
LoadedModule[84]=C:WINDOWSSYSTEM32WTSAPI32.dll
LoadedModule[85]=C:WindowsSystem32Windows.UI.dll
LoadedModule[86]=C:WindowsSystem32TextInputFramework.dll
State[0].Key=Transport.DoneStage1
State[0].Value=1
OsInfo[0].Key=vermaj
OsInfo[0].Value=10
OsInfo[1].Key=vermin
OsInfo[1].Value=0
OsInfo[2].Key=verbld
OsInfo[2].Value=16299
OsInfo[3].Key=ubr
OsInfo[3].Value=371
OsInfo[4].Key=versp
OsInfo[4].Value=0
OsInfo[5].Key=arch
OsInfo[5].Value=9
OsInfo[6].Key=lcid
OsInfo[6].Value=1036
OsInfo[7].Key=geoid
OsInfo[7].Value=84
OsInfo[8].Key=sku
OsInfo[8].Value=48
OsInfo[9].Key=domain
OsInfo[9].Value=0
OsInfo[10].Key=prodsuite
OsInfo[10].Value=256
OsInfo[11].Key=ntprodtype
OsInfo[11].Value=1
OsInfo[12].Key=platid
OsInfo[12].Value=10
OsInfo[13].Key=sr
OsInfo[13].Value=0
OsInfo[14].Key=tmsi
OsInfo[14].Value=152875
OsInfo[15].Key=osinsty
OsInfo[15].Value=3
OsInfo[16].Key=iever
OsInfo[16].Value=11.371.16299.0-11.0.60
OsInfo[17].Key=portos
OsInfo[17].Value=0
OsInfo[18].Key=ram
OsInfo[18].Value=32628
OsInfo[19].Key=svolsz
OsInfo[19].Value=464
OsInfo[20].Key=wimbt
OsInfo[20].Value=0
OsInfo[21].Key=blddt
OsInfo[21].Value=170928
OsInfo[22].Key=bldtm
OsInfo[22].Value=1534
OsInfo[23].Key=bldbrch
OsInfo[23].Value=rs3_release
OsInfo[24].Key=bldchk
OsInfo[24].Value=0
OsInfo[25].Key=wpvermaj
OsInfo[25].Value=0
OsInfo[26].Key=wpvermin
OsInfo[26].Value=0
OsInfo[27].Key=wpbuildmaj
OsInfo[27].Value=0
OsInfo[28].Key=wpbuildmin
OsInfo[28].Value=0
OsInfo[29].Key=osver
OsInfo[29].Value=10.0.16299.371.amd64fre.rs3_release.170928-1534
OsInfo[30].Key=buildflightid
OsInfo[30].Value=06acce52-bca7-4b7c-aa03-691d79ca112e
OsInfo[31].Key=edition
OsInfo[31].Value=Professional
OsInfo[32].Key=ring
OsInfo[32].Value=Retail
OsInfo[33].Key=containerid
OsInfo[34].Key=containertype
OsInfo[35].Key=edu
OsInfo[35].Value=0
FriendlyEventName=Fonctionnement arrêté
ConsentKey=APPCRASH
AppName=Starbound
AppPath=C:Program Files (x86)SteamsteamappscommonStarboundwin64starbound.exe
NsPartner=windows
NsGroup=windows8
ApplicationIdentity=2F3A53304C3DCCF3B495CCCFEE136726
MetadataHash=183629364
-
you may want to check this out, then. The site rates the file a 27%, 22%, or 0% security rating, depending on where it is
-
It just tells what I already know and doesn’t help me at all. I don’t think anybody here will be able to help me. I sent a mail to the Chucklefish support.
Last edited: Apr 12, 2018
-
notice that the site mentioned that file may or may not be malware hiding as a .dll. If you have Malwarebytes, do a scan immediately, if not, download the free version (only real time protection is disabled) and do a scan immediately
-
No it’s not, it’s in System32, it’s a system library, and I have already an antimalware and antivirus which scan my computer all the days.
-
I found the problem, I put vsync to false and it works for me.
-
All because of vsync. What a great thing *sarcastically*. Sometimes vsync only crash my games, not just Starbound. Why they even enable vsync in a game if it will only make it crash?
-
How do you put VSync to false????
-
Hey. The way you can do this is to navigate to the ‘starbound.config’ file in the game assets. It should be located in `Disk/<where you installed steam, most likely Program Files x86>/Steam/steamapps/common/Starbound/storage/starbound.config. Once you are inside the file, search (or ctrl+f) for «vsync». You should find a line looking like this:
«vsync» : true,
Just change the ‘true’ to ‘false’, and save the file and exit. Done!


Share This Page
Некоторые пользователи Windows сообщают, что в конечном итоге они видят «Фатальную ошибку» каждый раз, когда пытаются запустить Starbound на своем компьютере. Эта ошибка появляется на начальном экране запуска и подтверждается, что она возникает в Windows 7, Windows 8.1 и Windows 10.
Неустранимая ошибка StarBound на компьютере с Windows
После изучения этой конкретной проблемы выяснилось, что существует несколько различных причин, которые могут вызывать этот код ошибки. Вот список потенциальных виновников, которые могут быть ответственны за появление этой «фатальной ошибки» с Starbound на компьютере с Windows:
- Vsync включен — одним из наиболее распространенных виновников, которые, как известно, вызывают эту проблему с Starbound, является VSYNC. В частности, когда эта графическая функция включена на ПК младшего класса, игра может отказываться запускаться. Поскольку вы не можете перейти в главное меню, чтобы отключить эту функцию, вы можете решить эту проблему, только изменив основной файл конфигурации Starbound (starbound.config), чтобы заставить Vsync оставаться отключенным.
- Устаревший драйвер графического процессора. С этой проблемой также можно столкнуться из-за сильно устаревшего драйвера графического процессора, который не позволяет вашему компьютеру визуализировать игру. Несколько затронутых пользователей сообщили, что проблема была окончательно решена после того, как они успешно обновили свои графические драйверы до последней доступной версии.
- Повреждение игрового файла — как сообщают многие пользователи Steam, вы также можете ожидать увидеть эту проблему из-за какого-либо повреждения, которое влияет на локальную установку Starbound. Если этот сценарий применим, вы можете решить проблему, принудительно проверив целостность файла через Steam. В более серьезных обстоятельствах вам может потребоваться переустановить игру и очистить модифицированный контент перед переустановкой, чтобы решить проблему.
- Версия игры несовместима с Windows 10. Имейте в виду, что есть определенные модифицированные версии Starbound, которые по умолчанию не работают в Windows 10. Если этот сценарий применим, вы сможете решить проблему, принудительно запустив основной исполняемый файл игры в режиме совместимости с Windows 7.
Теперь, когда вы знаете всех потенциальных виновников, вот список проверенных методов, которые некоторые затронутые пользователи успешно развернули, чтобы разобраться в этой проблеме:
Метод 1: установка VSync на False в Starbound
Как оказалось, во многих задокументированных случаях эта проблема возникает всякий раз, когда VSync включен в конфигурации ПК, где компоненты GPU / CPU недостаточно мощны для поддержки этой графической функции. Однако, в отличие от других игр, Starbound предпочитает предотвращать запуск игры в подобных ситуациях вместо того, чтобы позволить ей запускаться с проблемами производительности.
Если вы оказались в этом сценарии, следуйте приведенным ниже инструкциям, чтобы открыть файл конфигурации Starbound и изменить файл starbound.config так, чтобы VSync был установлен на False, чтобы предотвратить его активацию при запуске игры.
Вот краткое пошаговое руководство, которое проведет вас через весь процесс:
- Откройте Steam, перейдите на вкладку «Библиотека», затем щелкните правой кнопкой мыши запись, связанную со Starbound, и выберите «Свойства» в только что появившемся контекстном меню.Доступ к экрану свойств Starbound
- Как только вы окажетесь на экране свойств Starbound, нажмите «Локальные файлы» в вертикальном меню слева, затем нажмите «Обзор локальных файлов».
Доступ к локальным файлам StarBound - После того, как вы окажетесь внутри локальной установки Starbound, дважды щелкните папку хранилища и щелкните правой кнопкой мыши файл с именем starbound.config. Затем в только что подготовленном контекстном меню нажмите «Открыть с помощью блокнота».Открытие starbound.config с помощью Блокнота
- Как только вы увидите внутреннюю структуру starbound.config, найдите строку кода «vsync»: true ». Когда вы его увидите, измените значение на false («vsync»: false) перед сохранением изменений.
- Запустите Starbound еще раз и посмотрите, решена ли проблема.
Если проблема все еще не решена, поскольку вы все еще сталкиваетесь с той же «фатальной ошибкой» при запуске Starbound, перейдите к следующему потенциальному исправлению ниже.
Метод 2: обновите драйвер графического процессора до последней версии
По словам некоторых затронутых пользователей, вы также можете ожидать увидеть эту проблему в тех случаях, когда вы пытаетесь использовать сильно устаревший драйвер графического процессора для рендеринга игры.
Несколько затронутых пользователей подтвердили, что им удалось решить проблему, обновив драйверы графического процессора и физический модуль, чтобы гарантировать, что каждый компонент, обрабатывающий внутриигровой рендеринг, использует последнюю доступную итерацию.
Если этот сценарий применим и вы точно знаете, что не обновляли драйверы графического процессора в течение некоторого времени, следуйте приведенным ниже инструкциям для получения пошаговых инструкций по обновлению текущих драйверов графического процессора, чтобы убедиться, что фатальная ошибка Starbound не повторяется. сам:
- Откройте диалоговое окно «Выполнить», нажав клавиши Windows + R. Внутри текстового поля введите devmgmt.msc и нажмите Enter, чтобы открыть Диспетчер устройств.Запуск диспетчера устройств
- Зайдя в диспетчер устройств, прокрутите список установленных устройств вниз, затем разверните раскрывающееся меню, относящееся к адаптерам дисплея.
- После раскрытия меню щелкните правой кнопкой мыши драйвер графического процессора, который вы хотите обновить, затем щелкните «Обновить драйвер» в только что появившемся контекстном меню.Обновление графического драйвера
Примечание. Если вы столкнулись с этой проблемой на ноутбуке, вероятно, у вас есть как выделенный, так и встроенный графический процессор. В этом случае вам нужно только обновить специальный эквивалент.
- На следующем экране нажмите «Автоматический поиск обновленного программного обеспечения драйвера». Затем дождитесь завершения первоначального сканирования, затем следуйте инструкциям на экране, чтобы завершить установку новой версии драйвера в случае обнаружения нового драйвера.Поиск новейшего драйвера
- После установки новейшего драйвера перезагрузите компьютер и снова запустите Starbound после завершения следующего запуска, чтобы проверить, устранена ли проблема.
Если диспетчер устройств не нашел новую версию драйвера в вашем случае, вы также можете использовать проприетарное программное обеспечение, предоставленное производителем вашего графического процессора, чтобы убедиться, что вы используете последнюю версию драйвера, совместимую с вашей моделью графического процессора:
GeForce Experience — Nvidia
Адреналин — AMD
Драйвер Intel — Intel
Если вы уже использовали последнюю версию драйвера графического процессора или обновление версии драйвера не устранило проблему в вашем случае, перейдите к следующему потенциальному исправлению ниже.
Метод 3: проверка целостности игры в Steam
Если ни один из вышеперечисленных методов не помог в вашем случае, вам следует подумать о несогласованности, вызванной коррупцией, которая влияет на установку Starbound в Steam.
Как сообщается, нескольким затронутым пользователям, которые оказались в аналогичном сценарии, удалось решить проблему с помощью функции проверки целостности в Steam, чтобы обнаружить и исправить поврежденные файлы игры.
Если вы запускаете игру через Steam и еще не пробовали это сделать, следуйте приведенным ниже инструкциям, чтобы автоматически сканировать каждый файл игры Starbound и заменять каждый поврежденный элемент на исправный эквивалент:
- Начните с обычного открытия Steam (с правами администратора), затем войдите в меню «Библиотека» на вкладке вверху.
- Когда вы увидите список игр, щелкните правой кнопкой мыши Starbound, затем выберите Свойства в только что появившемся контекстном меню.Доступ к экрану свойств
- Как только вы окажетесь на экране свойств Starbound, используйте вертикальное меню слева, чтобы выбрать «Локальные файлы», затем перейдите в меню с правой стороны и нажмите «Проверить целостность файлов игры».
Проверка целостности файлов игры - Подтвердите операцию, затем дождитесь ее завершения, прежде чем снова запустить игру и посмотреть, устранена ли проблема.
Если проблема все еще не устранена, перейдите к следующему потенциальному исправлению ниже.
Метод 4: запуск игры в режиме совместимости (с доступом администратора)
По словам некоторых пользователей, которые также сталкивались с этой проблемой в Windows 10, вы также можете ожидать увидеть эту проблему, если имеете дело с какой-либо проблемой совместимости.
Имейте в виду, что Starbound изначально был разработан для работы в Windows 7, и если вы пытаетесь отрендерить модифицированную сборку, которая не модифицирована для поддержки в Windows 10, вы можете ожидать, что каждый раз при попытке вы увидите сообщение о фатальной ошибке. для запуска игры.
К счастью, другие пользователи, которые оказались в подобном сценарии, сообщили, что они, наконец, смогли запустить игру в обычном режиме после того, как они принудительно запустили свой исполняемый файл игры в режиме совместимости с Windows 7 (и убедитесь, что ему предоставлены права администратора).
Если вы еще не пробовали это исправление, следуйте пошаговым инструкциям ниже, как это сделать:
- Щелкните правой кнопкой мыши основной исполняемый файл Starbound (или ярлык, который вы используете для запуска игры) и выберите «Свойства» в только что появившемся контекстном меню.Доступ к экрану свойств Starbound
- Как только вы окажетесь на экране «Свойства», щелкните вкладку «Совместимость» в меню вверху.
- Затем установите флажок Запустить эту программу в режиме совместимости для, затем выберите Windows 7 из списка доступных параметров.Запуск Starbound в режиме совместимости
- Затем установите флажок, связанный с Запускать эту программу от имени администратора, прежде чем, наконец, нажать Применить, чтобы сохранить изменения.
- Теперь, когда вы наконец убедились, что игра настроена для работы в режиме совместимости с Windows 7, запустите ее еще раз и посмотрите, устранена ли проблема.
Если при запуске все еще появляется сообщение о «фатальной ошибке», перейдите к последнему потенциальному исправлению ниже.
Метод 5: переустановка игры
Если ни одно из вышеперечисленных исправлений не помогло в вашем случае, последнее возможное исправление, которое вы можете развернуть, состоит в том, чтобы по существу удалить игру и убедиться, что все оставшиеся файлы (моды, пользовательские файлы, данные о пользовательских настройках и т. Д.) Также удалены и не будет частью будущей установки.
Некоторые пользователи, которые также сталкивались с этой проблемой, подтвердили, что им, наконец, удалось решить эту проблему, переустановив игру и удалив все оставшиеся данные перед ее повторной установкой по официальным каналам.
Чтобы вам было проще, мы составили серию пошаговых инструкций:
- Нажмите клавишу Windows + R, чтобы открыть диалоговое окно «Выполнить». Затем введите appwiz.cpl и нажмите Enter, чтобы открыть меню «Программы и компоненты».Открытие меню «Программы и функции» через окно «Выполнить»
- Когда вы, наконец, войдете в меню «Программы и компоненты», прокрутите список установленных приложений и найдите Starbound. Когда вы его увидите, щелкните его запись правой кнопкой мыши и выберите «Удалить» в только что появившемся контекстном меню.Удаление Starbound из списка приложений
- На экране удаления следуйте инструкциям на экране, чтобы завершить удаление, прежде чем окончательно перезагрузить компьютер.
- После успешного удаления игры посетите место, в которое вы ее изначально установили, и удалите все оставшиеся файлы и папки, чтобы убедиться в отсутствии данных, которые будут взаимодействовать с будущей установкой.
Примечание: если вы установили игру через Steam, вам необходимо перейти в следующую папку: C: Program Files (x86) Steam SteamApps common Starbound - Как только Starbound будет удален и предыдущее место установки очищено, следуйте официальным каналам, чтобы снова загрузить игру (через Steam или другую программу запуска) и посмотреть, исправлено ли наконец сообщение о «фатальной ошибке».
Starbound не запускается fatal exception caught (ApplicationException)
Только загрузил эту игру, пиратскую версию не лицензию, сразу же появляется ошибка. Заранее предупреждаю что я не пират, просто хочу купить платную версию игры если она мне понравится.

16934 просмотра
больше 5 лет назад
 Starbound
2 ответа
 2
2
 1
1

Доброго времени суток вам уважаемый пользователь нашего портала. К сожалению ошибка данного типа не имеет конкретного решения, особенно если она появляется на пиратской версии игры. Зачастую здесь виноваты конфигурации клиента, а так же моды встроенные в клиент.
Для начала могу посоветовать вам удалить файл starbound.config который должен находится в каталоге с игрой. К сожалению точного расположения его я не могу назвать, ибо на всех репаках он находится в разных местах. Найдите его, и попробуйте если не удалить, так переименовать в starbound.bak — после этого напишите пройдет ли ошибка или нет.
Удачи, и буду ждать вашего ответа. В крайнем случае вам нужно будет скачать другой репак, думаю это решит проблему. Ещё было бы хорошо если бы вы предоставили характеристики вашего компьютера. 
Ответ дан
больше 5 лет назад
1

К сожалению данная ошибка не исправлена. У друга была точно такая же проблема, и могу сказать что на поиски решения ушло чуть больше полу дня, и ничего он так и не исправил. Проблема была устранена автоматически после установки обновлений, но в вашем случае это исключено, так как вы не покупали лицензию в Стиме. Могу посоветовать скачать другой репак , отключить антивирус , или же использовать патч.
Можно ещё попробовать запустить игру в режиме совместимости а так же от имени администратора. Если что, это можно сделать нажав на ПКМ на игровое приложение, далее Свойства, оттуда идем в Совместимость, и выставляем настройки.
Больше к сожалению кроме как банальных и простых способов которые я описал выше ничего посоветовать не могу, можете сами погуглить — решения, тем более для пиратки, увы нет. Если бы было, на нашем сайте вам уже давно бы точно дали ответ. Желаю удачи, если все таки справитесь каким-то чудесным образом с этой проблемы, буду благодарен если поделитесь инструкцией.
Ответ дан
больше 5 лет назад
0
Содержание
- Как исправить «фатальную ошибку» в Starbound в Windows?
- Метод 1: установка VSync на False в Starbound
- Метод 2: обновите драйвер графического процессора до последней версии
- Метод 3: проверка целостности игры в Steam
- Метод 4: запуск игры в режиме совместимости (с доступом администратора)
- Метод 5: переустановка игры
- Starbound ошибка fatal exception caught
Как исправить «фатальную ошибку» в Starbound в Windows?
Некоторые пользователи Windows сообщают, что в конечном итоге они видят «Фатальную ошибку» каждый раз, когда пытаются запустить Starbound на своем компьютере. Эта ошибка появляется на начальном экране запуска и подтверждается, что она возникает в Windows 7, Windows 8.1 и Windows 10.
 Неустранимая ошибка StarBound на компьютере с Windows
Программы для Windows, мобильные приложения, игры — ВСЁ БЕСПЛАТНО, в нашем закрытом телеграмм канале — Подписывайтесь:)
После изучения этой конкретной проблемы выяснилось, что существует несколько различных причин, которые могут вызывать этот код ошибки. Вот список потенциальных виновников, которые могут быть ответственны за появление этой «фатальной ошибки» с Starbound на компьютере с Windows:
- Vsync включен — одним из наиболее распространенных виновников, которые, как известно, вызывают эту проблему с Starbound, является VSYNC. В частности, когда эта графическая функция включена на ПК младшего класса, игра может отказываться запускаться. Поскольку вы не можете перейти в главное меню, чтобы отключить эту функцию, вы можете решить эту проблему, только изменив основной файл конфигурации Starbound (starbound.config), чтобы заставить Vsync оставаться отключенным.
- Устаревший драйвер графического процессора. С этой проблемой также можно столкнуться из-за сильно устаревшего драйвера графического процессора, который не позволяет вашему компьютеру визуализировать игру. Несколько затронутых пользователей сообщили, что проблема была окончательно решена после того, как они успешно обновили свои графические драйверы до последней доступной версии.
- Повреждение игрового файла — как сообщают многие пользователи Steam, вы также можете ожидать увидеть эту проблему из-за какого-либо повреждения, которое влияет на локальную установку Starbound. Если этот сценарий применим, вы можете решить проблему, принудительно проверив целостность файла через Steam. В более серьезных обстоятельствах вам может потребоваться переустановить игру и очистить модифицированный контент перед переустановкой, чтобы решить проблему.
- Версия игры несовместима с Windows 10. Имейте в виду, что есть определенные модифицированные версии Starbound, которые по умолчанию не работают в Windows 10. Если этот сценарий применим, вы сможете решить проблему, принудительно запустив основной исполняемый файл игры в режиме совместимости с Windows 7.
Теперь, когда вы знаете всех потенциальных виновников, вот список проверенных методов, которые некоторые затронутые пользователи успешно развернули, чтобы разобраться в этой проблеме:
Метод 1: установка VSync на False в Starbound
Как оказалось, во многих задокументированных случаях эта проблема возникает всякий раз, когда VSync включен в конфигурации ПК, где компоненты GPU / CPU недостаточно мощны для поддержки этой графической функции. Однако, в отличие от других игр, Starbound предпочитает предотвращать запуск игры в подобных ситуациях вместо того, чтобы позволить ей запускаться с проблемами производительности.
Если вы оказались в этом сценарии, следуйте приведенным ниже инструкциям, чтобы открыть файл конфигурации Starbound и изменить файл starbound.config так, чтобы VSync был установлен на False, чтобы предотвратить его активацию при запуске игры.
Вот краткое пошаговое руководство, которое проведет вас через весь процесс:
- Откройте Steam, перейдите на вкладку «Библиотека», затем щелкните правой кнопкой мыши запись, связанную со Starbound, и выберите «Свойства» в только что появившемся контекстном меню.Доступ к экрану свойств Starbound
- Как только вы окажетесь на экране свойств Starbound, нажмите «Локальные файлы» в вертикальном меню слева, затем нажмите «Обзор локальных файлов».Доступ к локальным файлам StarBound
- После того, как вы окажетесь внутри локальной установки Starbound, дважды щелкните папку хранилища и щелкните правой кнопкой мыши файл с именем starbound.config. Затем в только что подготовленном контекстном меню нажмите «Открыть с помощью блокнота».Открытие starbound.config с помощью Блокнота
- Как только вы увидите внутреннюю структуру starbound.config, найдите строку кода «vsync»: true ». Когда вы его увидите, измените значение на false («vsync»: false) перед сохранением изменений.
- Запустите Starbound еще раз и посмотрите, решена ли проблема.
Если проблема все еще не решена, поскольку вы все еще сталкиваетесь с той же «фатальной ошибкой» при запуске Starbound, перейдите к следующему потенциальному исправлению ниже.
Метод 2: обновите драйвер графического процессора до последней версии
По словам некоторых затронутых пользователей, вы также можете ожидать увидеть эту проблему в тех случаях, когда вы пытаетесь использовать сильно устаревший драйвер графического процессора для рендеринга игры.
Несколько затронутых пользователей подтвердили, что им удалось решить проблему, обновив драйверы графического процессора и физический модуль, чтобы гарантировать, что каждый компонент, обрабатывающий внутриигровой рендеринг, использует последнюю доступную итерацию.
Если этот сценарий применим и вы точно знаете, что не обновляли драйверы графического процессора в течение некоторого времени, следуйте приведенным ниже инструкциям для получения пошаговых инструкций по обновлению текущих драйверов графического процессора, чтобы убедиться, что фатальная ошибка Starbound не повторяется. сам:
- Откройте диалоговое окно «Выполнить», нажав клавиши Windows + R. Внутри текстового поля введите devmgmt.msc и нажмите Enter, чтобы открыть Диспетчер устройств.Запуск диспетчера устройств
- Зайдя в диспетчер устройств, прокрутите список установленных устройств вниз, затем разверните раскрывающееся меню, относящееся к адаптерам дисплея.
- После раскрытия меню щелкните правой кнопкой мыши драйвер графического процессора, который вы хотите обновить, затем щелкните «Обновить драйвер» в только что появившемся контекстном меню.Обновление графического драйвера
Примечание. Если вы столкнулись с этой проблемой на ноутбуке, вероятно, у вас есть как выделенный, так и встроенный графический процессор. В этом случае вам нужно только обновить специальный эквивалент.
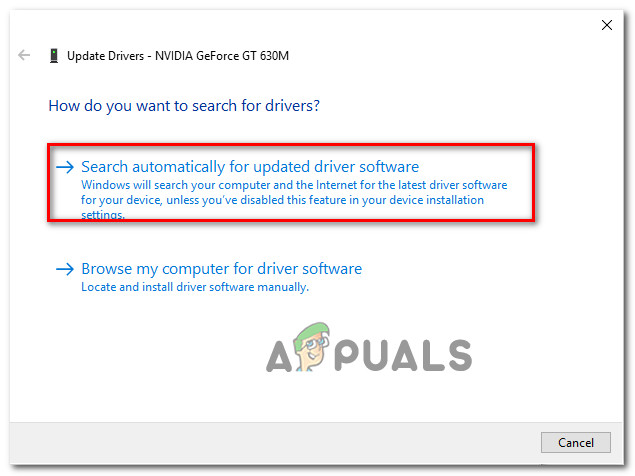 Поиск новейшего драйвера
Если диспетчер устройств не нашел новую версию драйвера в вашем случае, вы также можете использовать проприетарное программное обеспечение, предоставленное производителем вашего графического процессора, чтобы убедиться, что вы используете последнюю версию драйвера, совместимую с вашей моделью графического процессора:
Если вы уже использовали последнюю версию драйвера графического процессора или обновление версии драйвера не устранило проблему в вашем случае, перейдите к следующему потенциальному исправлению ниже.
Метод 3: проверка целостности игры в Steam
Если ни один из вышеперечисленных методов не помог в вашем случае, вам следует подумать о несогласованности, вызванной коррупцией, которая влияет на установку Starbound в Steam.
Как сообщается, нескольким затронутым пользователям, которые оказались в аналогичном сценарии, удалось решить проблему с помощью функции проверки целостности в Steam, чтобы обнаружить и исправить поврежденные файлы игры.
Если вы запускаете игру через Steam и еще не пробовали это сделать, следуйте приведенным ниже инструкциям, чтобы автоматически сканировать каждый файл игры Starbound и заменять каждый поврежденный элемент на исправный эквивалент:
- Начните с обычного открытия Steam (с правами администратора), затем войдите в меню «Библиотека» на вкладке вверху.
- Когда вы увидите список игр, щелкните правой кнопкой мыши Starbound, затем выберите Свойства в только что появившемся контекстном меню.Доступ к экрану свойств
- Как только вы окажетесь на экране свойств Starbound, используйте вертикальное меню слева, чтобы выбрать «Локальные файлы», затем перейдите в меню с правой стороны и нажмите «Проверить целостность файлов игры».Проверка целостности файлов игры
- Подтвердите операцию, затем дождитесь ее завершения, прежде чем снова запустить игру и посмотреть, устранена ли проблема.
Если проблема все еще не устранена, перейдите к следующему потенциальному исправлению ниже.
Метод 4: запуск игры в режиме совместимости (с доступом администратора)
По словам некоторых пользователей, которые также сталкивались с этой проблемой в Windows 10, вы также можете ожидать увидеть эту проблему, если имеете дело с какой-либо проблемой совместимости.
Имейте в виду, что Starbound изначально был разработан для работы в Windows 7, и если вы пытаетесь отрендерить модифицированную сборку, которая не модифицирована для поддержки в Windows 10, вы можете ожидать, что каждый раз при попытке вы увидите сообщение о фатальной ошибке. для запуска игры.
К счастью, другие пользователи, которые оказались в подобном сценарии, сообщили, что они, наконец, смогли запустить игру в обычном режиме после того, как они принудительно запустили свой исполняемый файл игры в режиме совместимости с Windows 7 (и убедитесь, что ему предоставлены права администратора).
Если вы еще не пробовали это исправление, следуйте пошаговым инструкциям ниже, как это сделать:
- Щелкните правой кнопкой мыши основной исполняемый файл Starbound (или ярлык, который вы используете для запуска игры) и выберите «Свойства» в только что появившемся контекстном меню.Доступ к экрану свойств Starbound
- Как только вы окажетесь на экране «Свойства», щелкните вкладку «Совместимость» в меню вверху.
- Затем установите флажок Запустить эту программу в режиме совместимости для, затем выберите Windows 7 из списка доступных параметров.Запуск Starbound в режиме совместимости
- Затем установите флажок, связанный с Запускать эту программу от имени администратора, прежде чем, наконец, нажать Применить, чтобы сохранить изменения.
- Теперь, когда вы наконец убедились, что игра настроена для работы в режиме совместимости с Windows 7, запустите ее еще раз и посмотрите, устранена ли проблема.
Если при запуске все еще появляется сообщение о «фатальной ошибке», перейдите к последнему потенциальному исправлению ниже.
Метод 5: переустановка игры
Если ни одно из вышеперечисленных исправлений не помогло в вашем случае, последнее возможное исправление, которое вы можете развернуть, состоит в том, чтобы по существу удалить игру и убедиться, что все оставшиеся файлы (моды, пользовательские файлы, данные о пользовательских настройках и т. Д.) Также удалены и не будет частью будущей установки.
Некоторые пользователи, которые также сталкивались с этой проблемой, подтвердили, что им, наконец, удалось решить эту проблему, переустановив игру и удалив все оставшиеся данные перед ее повторной установкой по официальным каналам.
Чтобы вам было проще, мы составили серию пошаговых инструкций:
- Нажмите клавишу Windows + R, чтобы открыть диалоговое окно «Выполнить». Затем введите appwiz.cpl и нажмите Enter, чтобы открыть меню «Программы и компоненты».Открытие меню «Программы и функции» через окно «Выполнить»
- Когда вы, наконец, войдете в меню «Программы и компоненты», прокрутите список установленных приложений и найдите Starbound. Когда вы его увидите, щелкните его запись правой кнопкой мыши и выберите «Удалить» в только что появившемся контекстном меню.Удаление Starbound из списка приложений
- На экране удаления следуйте инструкциям на экране, чтобы завершить удаление, прежде чем окончательно перезагрузить компьютер.
- После успешного удаления игры посетите место, в которое вы ее изначально установили, и удалите все оставшиеся файлы и папки, чтобы убедиться в отсутствии данных, которые будут взаимодействовать с будущей установкой.
Примечание: если вы установили игру через Steam, вам необходимо перейти в следующую папку: C: Program Files (x86) Steam SteamApps common Starbound - Как только Starbound будет удален и предыдущее место установки очищено, следуйте официальным каналам, чтобы снова загрузить игру (через Steam или другую программу запуска) и посмотреть, исправлено ли наконец сообщение о «фатальной ошибке».
Источник
Starbound ошибка fatal exception caught
I keep getting the message: Fatal Exception caught (StarException) An error occured during loading: (JsonException) No such key in Json::get(«completionConditions»)
each time I try to start StarBound, and I have no idea what the cause is, any help would be greatly appreciated.


If you have mods, remove them

Try removing one mod at a time and starting up the game to test which one is causing the issue. I did this and simply deleted the one problematic mod.

it would be whatever mod used quests — have the same problem (among others) with some mods I used..
however (shameless plug) Gardenbot2 works just fine 😉
also starcheat isnt updated to handle the 3rd tab of inventory yet.. give wizzo a few days


I had the same issue. So far, the easy fix I found was deleting my old character and starting fresh. I think the previous player files are having issues being compatible with the new patch. Once I created a new character, the game worked like a charm (I had only one, so when I created the new one, he was the only character I had. Just FYI)
Edit: I tried to play again today, but found myself back in the same boat as before. I couldn’t get it to work, so I joined a multiplayer server I owned. That seemed to make it work. Maybe it’s something to do with the single-player mode?
Источник
-
Unable to launch, even after re-install.
Turned off overlays.
Happens on both 64 & 32 bit.
Tried running as admin.[14:56:24.665] [Info] Root: Preparing Root... [14:56:24.666] [Info] Root: Done preparing Root. [14:56:24.666] [Info] Client Version 1.4.4 (windows x86_64) Source ID: 8cbe6faf22282659828a194e06a08999f213769e Protocol: 747 [14:56:24.666] [Info] Root: Scanning for asset sources in directory '..assets' [14:56:25.127] [Info] Root: Scanning for asset sources in directory '..mods' [14:56:25.127] [Warn] Root: Unrecognized file in asset directory 'mods_go_here', skipping [14:56:25.127] [Info] Root: Detected asset source named 'base' at '..assetspacked.pak' [14:56:25.128] [Info] Root: Detected unnamed asset source at '..assetsuser' [14:56:25.128] [Info] Loading assets from: '..assetspacked.pak' [14:56:25.705] [Info] Loading assets from: '..assetsuser' [14:56:26.720] [Info] Assets digest is 531f0b8469832a566d23a0b9870ed717c63291164883670d0ee17086a100d3cd [14:56:26.720] [Info] Root: Loaded Assets in 2.05399 seconds [14:56:26.722] [Info] Application: Initializing SDL Video [14:56:26.736] [Info] Application: Initializing SDL Joystick [14:56:26.739] [Info] Root: Shutting down Root [14:56:26.873] [Error] Fatal Exception caught: (ApplicationException) Couldn't initialize SDL Joystick: CoCreateInstance() DirectX error 0xx [0] 7ff6d35ca213 Star::captureStack [1] 7ff6d35c8f9e Star::StarException::StarException [2] 7ff6d3cda9f5 Star::SdlPlatform::SdlPlatform [3] 7ff6d3cdd682 Star::runMainApplication [4] 7ff6d3517731 WinMain [5] 7ff6d3ec07af __scrt_common_main_seh [6] 7ffdd7017bd4 BaseThreadInitThunk [7] 7ffdd71eced1 RtlUserThreadStart Caught at: [0] 7ff6d35ca213 Star::captureStack [1] 7ff6d35ca7d4 Star::fatalException [2] 7ff6d3f83a3c `Star::runMainApplication'::`1'::catch$76 [3] 7ffdc0901030 [4] 7ffdc0903328 is_exception_typeof [5] 7ffdd7220666 RtlCaptureContext [6] 7ff6d3cdd682 Star::runMainApplication [7] 7ff6d3517731 WinMain [8] 7ff6d3ec07af __scrt_common_main_seh [9] 7ffdd7017bd4 BaseThreadInitThunk [10] 7ffdd71eced1 RtlUserThreadStart
Last edited by a moderator: Apr 7, 2020
-
Try uninstalling then reinstalling Direct X and see if that helps you, it seems to be related to direct X.
-
It’s able to launch after restarting the PC, but not if the PC has been of for over ~ 30 mins.
Just tried a Direct X reinstall, will update if it fixes for good
-
So is it working like it should?
-
I take that back, it is now producing the same error again and unable to launch
-
@Iris Blanche You have any other suggestions?
-
This is very odd, I can’t reliably reproduce the error.
Once it starts happening the only fix is a restart.
This solves it every time but if my PC has been on for a while the error may re-occur -
Might be some additional software interfering or it is hardware related…
Does this issue happen after you started some other software? Maybe something is blocking some access afterwards because a remnant is still running. Would explain why it works after a restart. -
Oddly enough the same thing has been happening to a friend on a different pc. Granted I’ve got loads of background stuff running on mine but his is a fresh windows install
I’ll try some process killing and see if I can find the culprit
Last edited by a moderator: Apr 19, 2020
-
adgga
Intergalactic TouristEver found the culprit? I’m having the same error now and the only other «solution» I could find online was on reddit. (Was just to reinstall Starbound.)

Share This Page
- by
Matthew Paxton - Last Updated: September 14, 2022
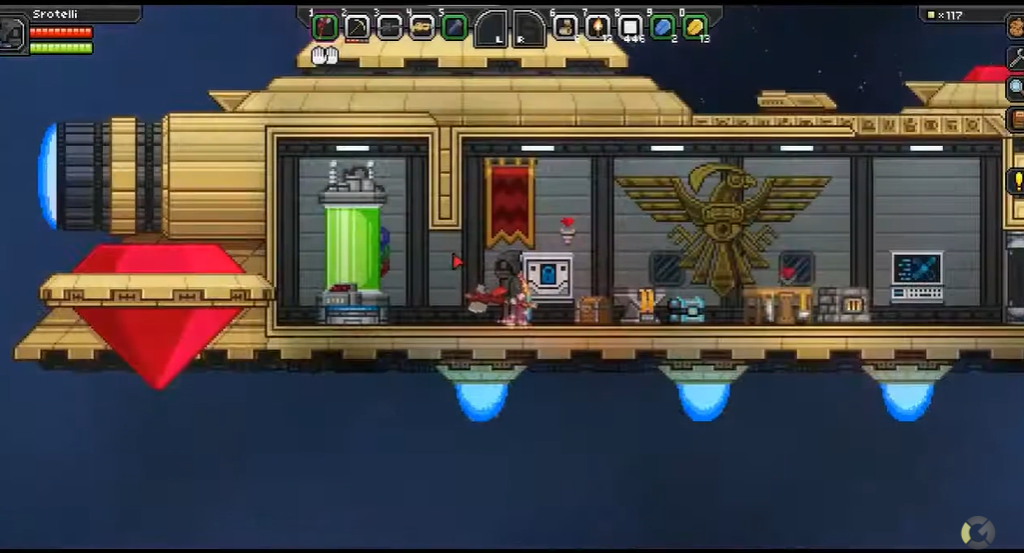
The Starbound Fatal Exception Caught: (UniverseServerException) is a persisting error many players have encountered in the game. However, most have failed to troubleshoot or find the cause of this issue.
As with any launch error, our technical team has endeavored to find workarounds to this issue. Read on to learn them in detail in this guide!
Fix #1: Do Not Host and Play in Single Player Mode at the Same Time
One of the major reasons players run into this error is because they host and play in single-player mode simultaneously.
This doesn’t seem right and should not be. It overloads the game, thus making you run into the error. Therefore, ensure you run these two options independently.

Fix #2: Run the Game as Admin
Another way to avoid this error or Starbound crashes upon joining the server is to run the game as an administrator. This affords you the privilege of having all the read and rights, which will tremendously help against issues relating to crashes.
If you have already run into this error, close the game and open it again. To run the game as an admin, right-click on the game file and select run as administrator.
It would also be advantageous for you to run your game in admin mode in order to obtain some free in-game items that other players usually receive only if they play on Starbound servers with free items.
Fix #3: Reinstall the Game
If the above methods do not resolve the issue, you might need to uninstall and reinstall the game. There is a possibility that your game files are corrupt, causing you to encounter this error. You can do this from the control panel [1].
Fix #4: Disable Third Party Programs
You can also solve all error-related problems by disabling all third-party programs that may interfere with the game like antiviruses. You can do this from the control panel menu option. Choose programs and features, then right-click on the programs you would love to deactivate.

Conclusion
The Fatal Exception Caught: (UniverseServerException) error on Starbound can be caused by several reasons. This includes corrupt game files, hosting and playing the game in single-player mode, etc. However, for whatever reason you may run into this problem, all the fixes we have shared in this guide are working and dependable you can count on them.
Matthew Paxton
Mathew has nursed a love of video games since childhood. Now, as an adult, he enjoys playing challenging games as much as he enjoys relating with other gamers. Matthew created Hypernia to give gamers like himself accurate and reliable information about games, servers, communication protocols, and much more.
 report this ad
report this ad
Leave a Reply
A lot of players encounter the Starbound fatal error when launching the game or joining multiplayer. Don’t worry. This post of MiniTool explores several effective ways to fix the Starbound fatal error access violation detected.
Starbound is an action-adventure video game developed by Chucklefish. It is available on many platforms, including Microsoft Windows, Linux, PlayStation 4, and Xbox One. Since its release, this game has attracted a large number of players around the world.
Sometimes, however, many Windows users complain that Starbound crashes on startup and throws the “fatal error access via lotion detected” message. In addition, the Starbound fatal error is often accompanied by error codes like 00007FF7AB290173 and 0000000000000188. Here’s a true example from the Reddit forum:
Is there a fix for the fatal error [Error] Fatal Error: Access violation detected at 00007FF7AB290173 (Read of address 0000000000000188) it only happens when I try to join multiplayer with an already-existing character.
https://www.reddit.com/r/starbound/comments/ojcrfy/fatal_error_fix/
What causes the “Starbound fatal error access violation detected” error? After analyzing extensive user reports from different forums and communities, we found the error is often related to the following factors:
- Lack of administrative privileges
- Inappropriate compatibility settings
- Outdated or corrupted graphics card driver
- Corrupted or missing game files
- Enabled VSync
How to fix the “fatal exception caught Starbound” error? Here we summarize 6 proven ways to fix the error. Let’s start trying.
# 1. Run the Game in Compatibility Mode with Admin Rights
Many users from the Steam community reported that the Starbound fatal error access violation can be solved by running the game as an administrator in combability mode. Follow the steps below to have a try.’
Step 1. Press the Win + E keys to open the File Explorer and locate the game installation folder. If you have installed the game via Steam, the folder is usually located in the following path:
C:Programs Files (x86)SteamSteamSteamappscommonStarbound
Step 2. Right-click the starbound.exe file and select Properties.
Step 3. Navigate to the Compatibility mode and tick the checkbox next to Run this program as an administrator.
Step 4. Tick the checkbox next to Run this program in compatibility mode for and select Windows 8 or older version from the drop-down menu.
Step 5. Click on Apply and OK to save the changes.
Step 6. Revert to the game installation folder and repeat the same procedure for the starbound_opengl.exe and launcher/launcher.exe files. Once done, restart the game and check if the “Starbound fatal error access violation Windows 10” issue gets fixed.
# 2. Clear the Forced Compatibility Settings of Steam
Some users from the Steam community reported that the fatal error access violation Starbound also occurs if the Steam client is stuck in Vista compatibility mode. In this case, you can try clearing the forced compatibility settings in Registry Editor and resetting the properties to its default settings.
Note:
The Registry Editor is a powerful Windows built-in tool, and improper operation could lead to your system being unstable or even inoperable. So, we highly recommend you back up the Registry in case anything goes wrong.
Step 1. Press the Win + R keys to open the Run dialog box, and then type regedit in it and hit Enter. Then click on Yes when a User Account Control window pops up.
Step 2. In the Registry Editor window, locate the following entry key from the left navigation bar.
HKEY_LOCAL_MACHINESOFTWAREMicrosoftWindows NTCurrentVersionAppCompatFlagsLayersC:Program FilesSteamSteam.exe
Step 3. Delete the forced compatibility registry key from the right panel.
Step 4. Open the Properties window of Steam.exe and Starbound.exe files as we explained above, untick the checkbox for Run this program in compatibility mode for, and click on OK to save the change.
Step 5. After you reset the properties to the default settings, you can relaunch the game and see if the “Starbound fatal exception caught starexception” error disappears.
# 3. Disable VSync in Starbound
VSync is a kind of graphics technology that can synchronize the frame rate of the game and the refresh rate of the game monitor. If the VSync is enabled on a low-end computer where the GPU is not powerful enough to sustain the feature, you may encounter the fatal exception caught Starbound error.
In this case, you can follow the steps below to disable VSync in Starbound.
Step 1. Launch your Steam client and sign in to your account and navigate to the Library tab.
Step 2. Right-click Starbound from the left pane and select Properties.
Step 3. Inside the Properties window, navigate to the Local Files section and click on Browse Local Files.
Step 4. Now, you should locate the local installation of Starbound, open the Storage folder, right-click the starbound.config file and select Open with Notepad.
Step 5. In the Notepad window, find a code line named vsync: true and change its value to false. Then press Ctrl + S keys to save the change.
Now, you can relaunch the game and check if the “Starbound fatal error access violation Windows 10” error is fixed.
# 4. Update Your Graphics Card Driver
Sometimes an outdated or corrupted graphics card driver can trigger the fatal error access violation Starbound as well. In this case, you can try updating the GPU driver to the latest version.
Step 1. Press the Win + R keys to open the Run dialog box, and then type devmgmt.msc in the box and hit Enter to open this program.
Step 2. Expand the Display adapters category, and then right-click the graphics card driver and select Update Driver.
Step 3. Then you can select Search automatically for drivers option and follow the on-screen prompts to complete the update. Alternatively, you can download the latest graphics card driver from the manufacturer’s website and install it on your computer.
# 5. Verify the Integrity of the Game Files
If the game installation files become corrupted or missing, you may encounter various issues like Starbound fatal error access violation detected. To rule out this situation, you can use Steam to verify the integrity of the game files.
Step 1. Run the Steam client as an administrator, and then navigate to the Library tab.
Step 2. Right-click Starbound from the left pane and select Properties.
Step 3. Inside the Properties window, navigate to the Local Files section and click on the Verify Integrity of Game Files option. Then wait for the repair to complete and relaunch the game and see if it works properly.
# 6. Reinstall the Game
If none of the above methods fix the “fatal exception caught Starbound” error, you may consider reinstalling this game. It is very simple to operate. To do so, follow the steps below:
Step 1. Open the Run box again, type appwiz.cpl in it, and hit Enter.
Tips:
Alternatively, you can open Steam, navigate to the Library tab, right-click Starbound and select Uninstall from the drop-down menu. Then click on Delete to confirm the operation. Once uninstalled, you can redownload from Steam.
Step 2. Right-click Starbound from the list of installed programs and select Uninstall. After the uninstallation completes, download the game from its official website and install it on your computer.
Further reading: If you enter some issues like file system corruption or low disk space when reinstalling the game, don’t worry. MiniTool Partition Wizard can help you fix them easily by checking file system errors, extending/resizing partitions, analyzing disk space, upgrading to a larger hard disk, etc.
here is the log and a pic of the error that comes up when i try to run the game, i cant run the game at all and i have no mods. this is my last hope before i lose my saves and reinstall it

[20:42:20.183] [Info] Root: Preparing Root…
[20:42:20.184] [Info] Root: Done preparing Root.
[20:42:20.184] [Info] Client Version 1.3.4 (windows x86_64) Source ID: f468c99f113f3d44bb548367da9c9a1c6f4b031d Protocol: 745
[20:42:20.184] [Info] Root: Scanning for asset sources in directory ‘..assets’
[20:42:20.186] [Info] Root: Shutting down Root
[20:42:20.600] [Error] Fatal Exception caught: (ApplicationException) Application threw exception during startup
[0] 7ff614bd78c3 Star::captureStack
[1] 7ff614bd664e Star::StarException::StarException
[2] 7ff614bd6738 Star::StarException::StarException
[3] 7ff615319c50 Star::ApplicationException::ApplicationException
[4] 7ff6155de94a `Star::SdlPlatform::SdlPlatform’::`1′::catch$315
[5] 7ff9e809c840 _C_specific_handler
[6] 7ff9e8092e83 _TypeMatch
[7] 7ff9f449e2b3 RtlCaptureContext
[8] 7ff615319f82 Star::SdlPlatform::SdlPlatform
[9] 7ff61531cdd2 Star::runMainApplication
[10] 7ff614b204a1 WinMain
[11] 7ff61551849f __scrt_common_main_seh
[12] 7ff9f4323034 BaseThreadInitThunk
[13] 7ff9f4471461 RtlUserThreadStart
Caused by: (AssetSourceException) No index header found!
[0] 7ff614bd78c3 Star::captureStack
[1] 7ff614bd664e Star::StarException::StarException
[2] 7ff614c07991 Star::PackedAssetSource::PackedAssetSource
[3] 7ff614be5a50 std::make_shared<Star::PackedAssetSource,Star::String & __ptr64>
[4] 7ff614f9319c Star::Root::scanForAssetSources
[5] 7ff614f8a7e5 <lambda_629bd0625747976ff7eb77559f7c4f59>::operator()
[6] 7ff614f7c22f std::_Invoker_functor::_Call<<lambda_629bd0625747976ff7eb77559f7c4f59> & __ptr64>
[7] 7ff614f80146 std::invoke<<lambda_629bd0625747976ff7eb77559f7c4f59> & __ptr64>
[8] 7ff614f7d9e9 std::_Invoke_ret<std::shared_ptr<Star::Assets>,<lambda_629bd0625747976ff7eb77559f7c4f59> & __ptr64>
[9] 7ff614f8cbf6 std::_Func_impl<<lambda_629bd0625747976ff7eb77559f7c4f59>,std::allocator<int>,std::shared_ptr<Star::Assets> >::_Do_call
[10] 7ff614f8b5b7 std::_Func_class<std::shared_ptr<Star::BiomeDatabase> >::operator()
[11] 7ff614f812f3 Star::Root::loadMemberFunction<Star::Assets>
[12] 7ff614f8e715 Star::Root::assets
[13] 7ff614b1bab7 Star::ClientApplication::startup
[14] 7ff615319f82 Star::SdlPlatform::SdlPlatform
[15] 7ff61531cdd2 Star::runMainApplication
[16] 7ff614b204a1 WinMain
[17] 7ff61551849f __scrt_common_main_seh
[18] 7ff9f4323034 BaseThreadInitThunk
[19] 7ff9f4471461 RtlUserThreadStart
Caught at:
[0] 7ff614bd78c3 Star::captureStack
[1] 7ff614bd7e84 Star::fatalException
[2] 7ff6155deccc `Star::runMainApplication’::`1′::catch$76
[3] 7ff9e809c840 _C_specific_handler
[4] 7ff9e8092e83 _TypeMatch
[5] 7ff9f449e2b3 RtlCaptureContext
[6] 7ff61531cdd2 Star::runMainApplication
[7] 7ff614b204a1 WinMain
[8] 7ff61551849f __scrt_common_main_seh
[9] 7ff9f4323034 BaseThreadInitThunk
[10] 7ff9f4471461 RtlUserThreadStart
Some Windows users are reporting that they end up seeing a ‘Fatal Error‘ every time they attempt to launch Starbound on their computer. This error appears at the initial startup screen and it’s confirmed to occur on Windows 7, Windows 8.1, and Windows 10.
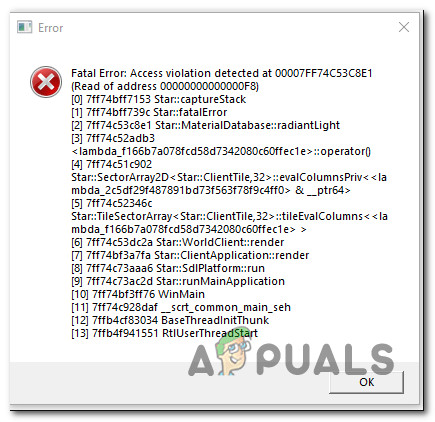
After investigating this particular issue, it turns out that there are several different causes that might be causing this error code. Here’s a list of potential culprits that might be responsible for the apparition of this ‘fatal error’ with Starbound on a Windows computer:
- Vsync is Enabled – One of the most common culprits that are known to trigger this issue with Starbound is VSYNC. More specifically, when this graphical feature is enabled on a low-end PC configuration, the game might refuse to launch. Since you cannot get to the main menu in order to disable this feature, you can only resolve this problem by modifying the main config file of Starbound (starbound.config) in order to force Vsync to stay Disabled.
- Outdated GPU driver – It’s also possible to encounter this issue due to a severely outdated GPU driver that makes it impossible for your PC to render the game. Several affected users have reported that the issue was finally resolved after they have successfully updated their graphical drivers to the latest version available.
- Game file corruption – As a lot of Steam users are reporting, you can also expect to see this issue due to some kind of corruption that is affecting the local installation of Starbound. If this scenario is applicable, you can fix the issue by forcing a file integrity check via Steam. In more serious circumstances, you might need to reinstall the game and clear modded content before reinstalling in order to fix the issue.
- Game version is incompatible with Windows 10 – Keep in mind that there are certain modded versions of Starbound that will not function on Windows 10 by default. If this scenario is applicable, you should be able to fix the issue by forcing the main game executable to run in compatibility mode with Windows 7.
Now that you know every potential culprit, here’s a list of verified methods that some affected users have successfully deployed to get to the bottom of this issue:
Method 1: Putting VSync to False in Starbound
As it turns out, in a lot of documented cases, this issue occurs whenever VSync is enabled on a PC configuration where the GPU / CPU components are not powerful enough to sustain this graphical feature. However, unlike other games, Starbound prefers to prevent the game from starting in situations like this instead of letting it run with performance issues.
If you find yourself in this scenario, follow the instructions below to discover the config file of Starbound and modify the starbound.config so that VSync is set to False in order to prevent it from becoming active when you launch the game.
Here’s a quick step-by-step guide that will guide you through the entire process:
- Open up Steam, access the Library tab, then right-click on the entry associated with Starbound and choose Properties from the context menu that just appeared.
Accessing the Properties screen of Starbound - Once you’re inside the Properties screen of Starbound, click on Local Files from the vertical menu on the left, then click on Browse Local Files.
Accessing the local files of StarBound - After you find yourself inside local installation of Starbound, double-click on the storage folder, and right-click on the file named starbound.config. Next, from the context menu that just prepared, click on Open with Notepad.
Opening starbound.config with Notepad - Once you get to see the internals of the starbound.config, look for the code line ‘vsync” : true’. When you see it, change the value to false (“vsync” : false) before saving the changes.
- Launch Starbound once again and see if the problem is now fixed.

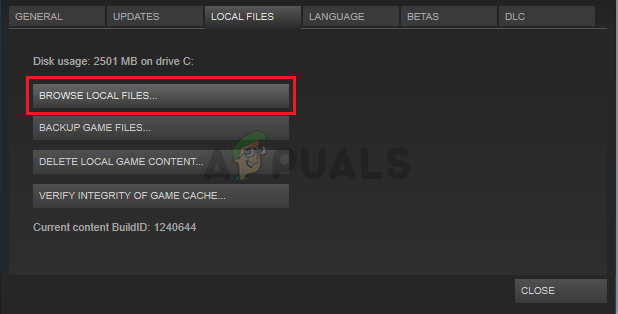
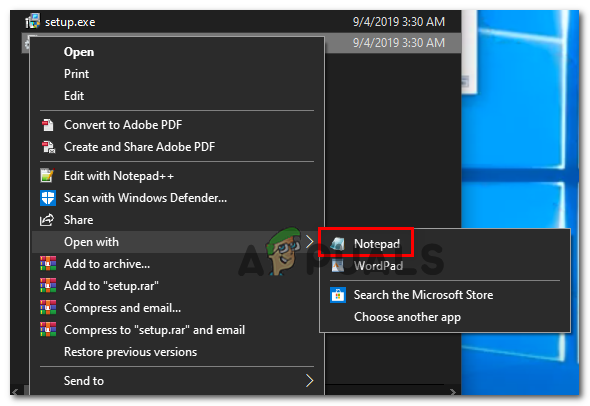
If the issue is still not resolved as you’re still encountering the same ‘fatal error’ when launching Starbound, move down to the next potential fix below.
Method 2: Update GPU driver to the Latest version
According to some affected users, you can also expect to see this issue in instances where you’re trying to use a severely outdated GPU driver to render the game.
Several affected users have confirmed that they managed to fix the issue by updating the GPU drivers plus the physics module to ensure that every component that is handling in-game rendering is using the latest available iteration.
If this scenario is applicable and you know for sure you haven’t updated your GPU drivers in a while, follow the instructions below for step-by-step instructions on updating the current GPU drivers to ensure that the Starbound Fatal error doesn’t repeat itself:
- Open up a Run dialog box by pressing Windows key + R. Inside the text box, type ‘devmgmt.msc’ and press Enter to open up Device Manager.
Running Device Manager - Once you’re inside Device Manager, scroll down through the list of installed devices, then expand the drop-down menu that’s specific to Display Adapters.
- After the menu is expanded, right-click on the GPU driver that you want to update, then click on Update driver from the context menu that just appeared.
Updating the Graphics Driver Note: If you’re encountering this issue on a laptop, then you likely have both a dedicated and an integrated GPU solution. In this case, you only need to update the dedicated equivalent.
- At the next screen, click on Search Automatically for updated driver software. Next, wait for the initial scan to complete, then follow the on-screen instructions to complete the installation of the newer driver version in case a new driver is discovered.
Searching for the newest driver - After the newest driver is installed, reboot your computer and launch Starbound again once the next startup is complete to see if the issue is now fixed.
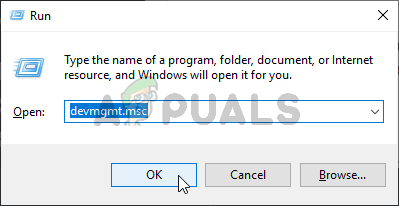
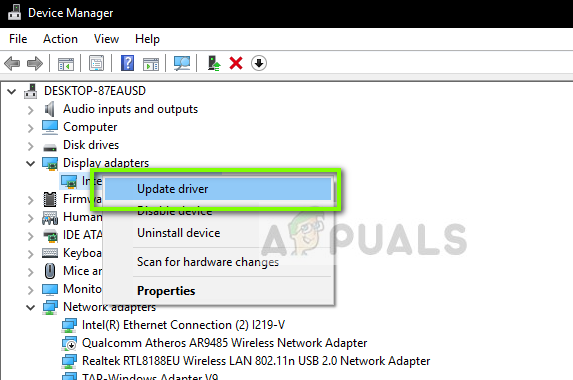

In case Device Manager didn’t find a new driver version in your case, you can also use the proprietary software provided by your GPU manufacturer to make sure that you’re using the latest driver version compatible with your GPU model:
GeForce Experience – Nvidia
Adrenalin – AMD
Intel Driver – Intel
If you were already using the latest GPU driver version or updating the driver version didn’t fix the issue in your case, move down to the next potential fix below.
Method 3: Verifying the Integrity of the Game in Steam
If none of the methods above have worked in your case, you should start considering a corruption-fueled inconsistency that is affecting the Steam installation of Starbound.
Several affected users that found themselves in a similar scenario have reportedly managed to fix the issue by using the integrity check feature on Steam in order to detect and fix corrupted game files.
If you’re launching the game through Steam and you haven’t tried this yet, follow the instructions below to automatically scan every Starbound game file and replace every corrupted item with a healthy equivalent:
- Start by opening up Steam conventionally (with admin access), then access the Library menu from the tab at the top.
- Once you see the list of games, right-click on Starbound, then click on Properties from the context menu that just appeared.
Accessing the Properties screen - Once you’re inside the Properties screen of Starbound, use the vertical menu on the left to click on Local Files, then move over to the right-hand side menu and click on Verify Integrity of Game Files.
Verifying the integrity of game files - Confirm the operation, then wait for it to complete before launching the game once again and seeing if the issue is now fixed.


In case this problem is still not fixed, move down to the next potential fix below.
Method 4: Running the Game in Compatibility Mode (with Admin Access)
According to some users that were also encountering this issue on Windows 10, you can also expect to see this issue if you’re dealing with some kind of compatibility issue.
Keep in mind that Starbound was originally designed to run on Windows 7, and if you’re trying to render a modded built that’s not modified to be supported on Windows 10, you can expect to see the ‘fatal error’ prompt every time you attempt to launch the game.
Fortunately, other users that found themselves in a similar scenario have reported that they were finally able to launch the game normally after they forced their game executable to launch in compatibility mode with Windows 7 (and ensure that admin rights are given to it).
If you haven’t tried this fix yet, follow the instructions below for step by step instructions on how to do so:
- Right-click on the main executable of Starbound (or the shortcut that you use to launch the game) and click on Properties from the context menu that just appeared.
Accessing the Properties screen of Starbound - Once you’re inside the Properties screen, click on the Compatibility tab from the menu at the top.
- Next, check the box associated with Run this program in compatibility mode for, then select Windows 7 from the list of available options.
Running Starbound in compatibility mode - Next, check the box associated with Run this program as an administrator before finally clicking on Apply to save the changes.
- Now that you’ve finally made sure that the game is configured to run in compatibility mode with Windows 7, launch it once again and see if the problem is now fixed.
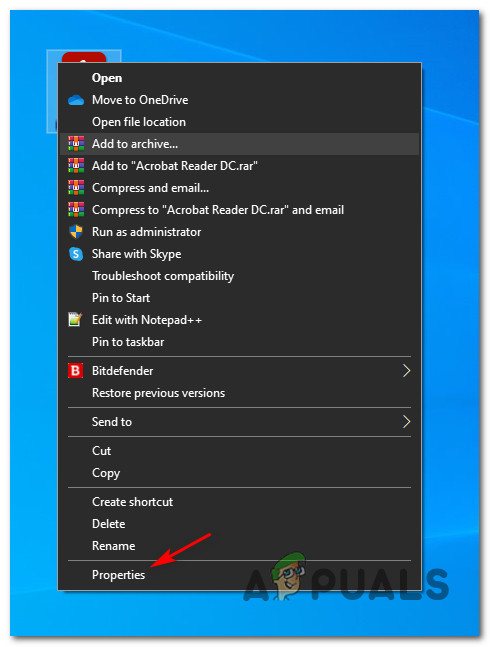

If the same ‘fatal error’ prompt is still occurring at startup, move down to the final potential fix below.
Method 5: Reinstalling the Game
If none of the fixes above have been effective in your case, the last potential fix that you can deploy is to essentially uninstall the game and ensure like any leftover files (mods, custom files, user preference data, etc.) are also deleted and will not be a part of a future installation.
Some users that were also dealing with this issue have confirmed that they finally managed to fix this issue by reinstalling the game and deleting any remnant data before reinstalling it using the official channels.
To make things easier for you, we’ve put together a step-by-step series of instructions:
- Press Windows key + R to open up a Run dialog box. Next, type ‘appwiz.cpl‘ and press Enter to open up the Programs and Features menu.
Opening the Programs and features menu via Run box - Once you’re finally inside the Programs and Features menu, scroll down through the list of installed applications and locate Starbound. When you see it, right-click on its entry and click Uninstall from the context menu that just appeared.
Uninstalling Starbound from the list of applications - Inside the uninstallation screen, follow the on-screen instructions to complete the uninstallation before finally restarting your computer.
- After the game has been successfully uninstalled, visit the location where you originally installed it and delete every leftover file and folder to ensure that there is no remnant data that will interact with the future installation.
Note: If you installed the game through Steam, you need to navigate to the following location:C:Program Files (x86)SteamSteamAppscommonStarbound
- Once Starbound is uninstalled and the previous installation location is cleared, follow the official channels to download the game again (via Steam or a different launcher) and see if the ‘fatal error’ prompt is finally fixed.


Kevin Arrows
Kevin is a dynamic and self-motivated information technology professional, with a Thorough knowledge of all facets pertaining to network infrastructure design, implementation and administration. Superior record of delivering simultaneous large-scale mission critical projects on time and under budget.