
| title | author | description | ms.date | ms.assetid | msc.legacyurl | msc.type |
|---|---|---|---|---|---|---|
|
How to Use HTTP Detailed Errors in IIS 7.0 |
rick-anderson |
Every Web-Site Administrator or Web Developer has seen ‘404 — File not found’, ‘401 — Unauthorized’ or ‘500 — Server Error’ messages in his browser. This ar… |
12/12/2007 |
33897393-97b8-4ee1-836f-25b1348dc3a3 |
/learn/troubleshoot/diagnosing-http-errors/how-to-use-http-detailed-errors-in-iis |
authoredcontent |
by IIS Team
Introduction
Every Web-Site Administrator or Web Developer has seen «404 — File not found», «401 — Unauthorized» or «500 — Server Error» messages in his browser. This article helps you understand how and why IIS generates these errors and how they can be configured.
Many might think that generating error messages does not seem to justify a full article. But there is more to errors than meets the eye. Error messages are a sensitive topic, because every error reveals more about your web-site than you might want revealed. The more information someone can gather about your site, the likelier it is that you will be hacked. A search for «google hacking» or «cross-site scripting» reveals a wealth of information on this topic.
However, error messages are also a valuable tool to troubleshoot problems. Developers and Web-Site Administrators require as much detail as possible when an error occurs. Ideally the error message gives recommendations on how to fix the problem. Here is how IIS addresses these fundamentally opposed goals.
Errors, What Errors?
This article talks about HTTP errors as specified in the HTTP RFC (RFC 2616 — section 6.1.1). An HTTP error is always expressed by sending a response with a status code greater than 400 back to the requesting client.
Client Errors
Status codes between 400 and 500 specify an error that the client made, e.g. bad syntax or a request to a resource that doesn’t exist. You can try this by requesting a bogus URL from the web-site of your choice, for example: http://<IIS7Server>/this_resource_does_not_exist. You get a «404 — File not found» error.
Server Errors
Status codes starting with 500 are errors caused by the server. The most common causes for 500 errors on IIS systems are:
- An ASP or ASPX page that contains a syntax error
- The web server configuration or the application configuration cannot be read or is invalid
- The site is stopped
It is important to note that browsers like IE often replace errors returned from a web server with their own errors. This makes troubleshooting harder. In IE you can turn this feature off. Go to the «Tools» menu, select «Internet Options», click the «Advanced» tab and find the «Show friendly HTTP error messages» check box and uncheck it. To see the raw response, use HTTP tools like WFETCH in the IIS 6.0 Resource Kit (see «Related Links»).
HTTP Errors in IIS
There are two things that can happen when the httpError module (custerr.dll) encounters an error:
- A custom error is generated
- A detailed error is generated
Custom errors are error pages that the regular users of your web-site see. They contain a brief error description of why the error happened, but nothing else. Here is the custom error generated when you request a resource that does not exist, for example: http://<IIS7Server>/this_resource_does_not_exist

Detailed errors are intended for local administrators and developers. They are supposed to provide information that helps to immediately fix the problem. Here is an example of the same request, but now returning a Detailed Error:

This is dangerous, because Detailed Errors contain information about the inner workings of your web-site. Only trusted personnel should see a Detailed Error. The only way to ensures this is to only generate a detailed error if the request comes from the local machine. As soon as the request is not local, a custom error is generated. Look at the following flow diagram:

Data Flow
First: Error check
The httpError module receives a notification if a response is about to be sent (RQ_SEND_RESPONSE notification). The httpError module checks the status code of this response and immediately returns if the status code is not greater than 400.
Second: Custom Error or Detailed Error
The next check is determined by the request origin (is the request a local or remote request) and the setting of the errorMode property. The errorMode property is set to DetailedLocalOnly, which means that Custom Errors are generated for every remote request. If errorMode is set to «Custom», then all error responses will become Custom Error. If errorMode is set to «Detailed» all error responses will become Detailed Errors. The following table clarifies this behavior:
| errorMode | Request origin | Action |
|---|---|---|
| DetailedLocalOnly (default) | Local | Detailed Error |
| DetailedLocalOnly (default) | Remote | Custom Error |
| Custom | Local | Custom Error |
| Custom | Remote | Custom Error |
| Detailed | Local | Detailed Error |
| Detailed | Remote | Detailed Error |
If the httpError module determines that a Custom Error must be generated, it looks into its configuration to see if it can find a matching error. If a match is found, it sends the static file, redirects the request or executes the URL specified. If no match can be found, IIS send a basic one-line message containing the status code. The next section explains the Custom Error configuration in detail.
If custerr.dll determines that a Detailed Error must be generated, another check is needed. IIS does not touch the response if a module overrode the entity of the response with its own error description. It might contain valuable information. ASP.NET is a good example. The entity of an ASP.NET error response might contain the exception stack and its own error description. A Detailed Error is only generated if the entity body of the response is empty.
<httpErrors> Configuration
Here is the IIS custom error section obtained on a clean install:
[!code-xmlMain]
You see that if the status code of a response is 401, IIS will return a file named 401.htm.
Sub-Status Codes
Many HTTP errors have a sub-status. The IIS default Custom Errors configuration does not differentiate based sub-status codes. It sends the same Custom Error page if you enter the wrong credentials (401.1), or if you get access denied based on invalid rights to access a file (401.3). You can see the different sub-status codes in the log files or via Detailed Errors. Here is a list of the different 404 sub-status codes that IIS produces:
| Status | Description |
|---|---|
| 404.1 | Site could not be found |
| 404.2 | Denied by Policy. The request ISAPI or CGI program is not allowed in the Restriction List. |
| 404.3 | The static file handler did not have the file in its MimeMap and therefore rejected the request. |
| 404.4 | No handler was found to serve the request. |
| 404.5 | The Request Filtering Module rejected an URL sequence in the request. |
| 404.6 | The Request Filtering Module denied the HTTP verb of the request. |
| 404.7 | The Request Filtering module rejected the file extension of the request. |
| 404.8 | The Request Filtering module rejected a particular URL segment (characters between two slashes). |
| 404.9 | IIS rejected to serve a hidden file. |
| 404.11 | The Request Filtering module rejected a request that was double escaped. |
| 404.12 | The Request Filtering module rejected a request that contained high bit characters. |
| 404.14 | The Request Filtering module rejected a request with a URL that was too long. |
| 404.15 | The Request Filtering module rejected a request with a too long query string. |
| 413.1 | The Request Filtering module rejected a request that was too long (request + entity body). |
| 431 | The Request Filtering module rejected a header that was too long. |
You can configure the httpErrors section to show a Custom Error for particular sub-status codes. If you add the following line to the httpErrors configuration section, IIS returns 404_3.htm if a file with a file extension is requested that is not included in the IIS MimeMap (<staticContent> configuration section).
[!code-xmlMain]
Here is how to make the example work:
- Add the entry above to your httpErrors configuration section.
- Create a file named 404_3.htm in your
c:inetpubcusterren-usdirectory. - Create a file named test.yyy in you
c:inetpubwwwrootdirectory. - Now request
http://localhost/test.yyy.
The file extension .yyy is not part of the IIS MimeMap and the static file handler will not serve it.
New in IIS: Language-specific Custom Errors
Each more recent browser includes the language of the client as a request header. Here is an example of how this header might look:
[!code-consoleMain]
The syntax and registry of accepted languages is specified in RFC1766.
When generating an error, IIS takes this header into account when it looks for the custom error file it returns. It generates the path for the custom error using the following logic:
prefixLanguageFilePath configuration setting (for example c:inetpubcusterr)+
Accept-Language header sent by the client (for example en-us) +
Path configuration setting (for example 404.htm)
Example:
If the browser sends a request for an non-existing resource and the «Accept-Language» header has the value of «en-us,» the file that gets returned will be c:inetpubcusterren-us404.htm.
For example, if you are from Germany, you want your error messages in German. To do this, you must install the Windows Vista Language Pack for German. This creates the c:inetpubcusterrde-DE directory with custom error files in it. Now if the browser sends the «Accept-Language» header with the value of «de-DE, the file that gets returned will be c:inetpubcusterrde-DE404.htm.
IIS will always fall back to the system language if the directory «de-DE» does not exist.
[!NOTE]
Internet Explorer allows you to configure the Accept-Language header. Go to «Tools» — «Internet Option», select the «General» tab and click the «Languages» button.
Custom Error Options
In the above examples, IIS sends the contents of the file as the custom error response. IIS has two other ways to respond to an error: by executing an URL or by redirecting the request.
ExecuteUrl
If you want to do more in your custom error, e.g. sending an e-mail or logging the error to a database, you can execute an url. This allows you to execute dynamic content like an ASP.NET page. The example below replaces the 404 custom error. Now IIS executes /404.aspx whenever a 404 error occurs.
[!code-xmlMain]
Security Considerations
A word of caution: For architectural reasons, IIS can only execute the URL if it is located in the same Application Pool. Use the redirect feature to execute a Custom Error in a different Application Pool.
IIS can also return a 302 Redirect to the browser when a particular error occurs. Redirect is good if you have a server farm. For instance, you can redirect all your errors to a central location that you closely monitor.
There is risk however: responseMode=»File» (which is the default) allows you to specify every file on the disk. This will not work if you are very security conscious.
A workable scenario might include only allowing the delegation of the errorMode setting. This enables a developer to receive Detailed Errors for his application even if he is using a remote client. All that is necessary is to set errorMode=»Detailed». Here is how to configure this scenario:
Allow the delegation of the httpErrors section:
[!code-xmlMain]
Second, go to the <httpErrors> section in applicationHost.config and change it so that only errorMode is delegated:
[!code-xmlMain]
Summary
Custom and Detailed Errors are powerful IIS features. They help you to troubleshoot problems without compromising the security of your IIS Server. Many configuration options help you to custom tailor your users’ experience. Most importantly: experimenting with it is fun.
See also
- Troubleshooting Common IIS Errors
By default, the IIS server is set to show detailed errors for local requests only, whereas it displays a custom error page for remote requests. This is done for security reasons, since detailed errors could reveal potentially detailed technical information about the web server and website.
Contents
- Why are detailed errors important?
- Enabling detailed errors using the IIS manager
- Enabling detailed errors using the web.config file
- Author
- Recent Posts

Surender Kumar has more than twelve years of experience in server and network administration. His fields of interest are Windows Servers, Active Directory, PowerShell, web servers, networking, Linux, virtualization, and penetration testing. He loves writing for his blog.
The detailed errors also reveal HTTP substatus codes, which are helpful in debugging complex issues. The bad guys out there could use this information to conduct attacks on a web server or website. That is why the IIS server only shows a custom error page for remote requests by default.
Why are detailed errors important?
As discussed above, detailed errors are important when you want to debug a problem in a website hosted on a server running IIS. The custom error page shows an error message that is usually ambiguous. Let’s have a look at the two screenshots below:

403 Forbidden Access is denied error using custom error page
The above screenshot shows a typical 403 – Forbidden: Access is denied error using the custom error page displayed by IIS. It is not very helpful for website administrators. Now, let’s have a look at the following screenshot:

403.14 Forbidden error with detailed error mode enabled
This screenshot shows the same error with detailed error mode enabled. Now, it shows plenty of useful information that an administrator can use to identify the cause and fix the problem.
Enabling detailed errors using the IIS manager
To enable detailed errors:
- Open the IIS manager by pressing WinKey+R, typing inetmgr, and pressing Enter.
- Expand the Sites node and select the website for which you want to enable detailed errors.
- Under the IIS section in the Features View, double-click Error Pages (see the following screenshot).
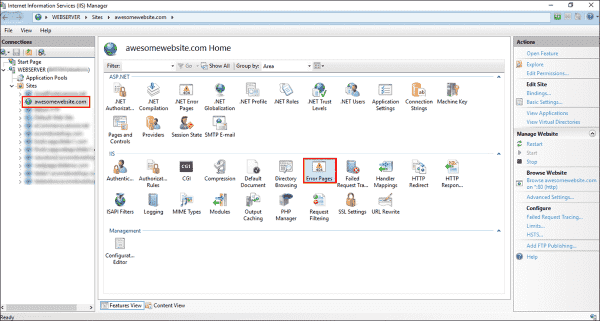
Locating the error pages section in the IIS manager
- In the Actions pane on the right, click Edit Feature Settings.
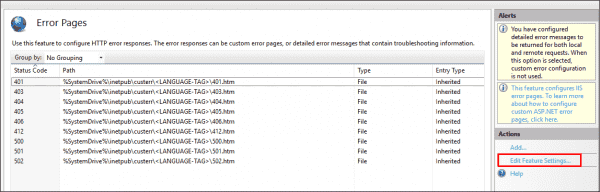
Enabling detailed errors in IIS manager
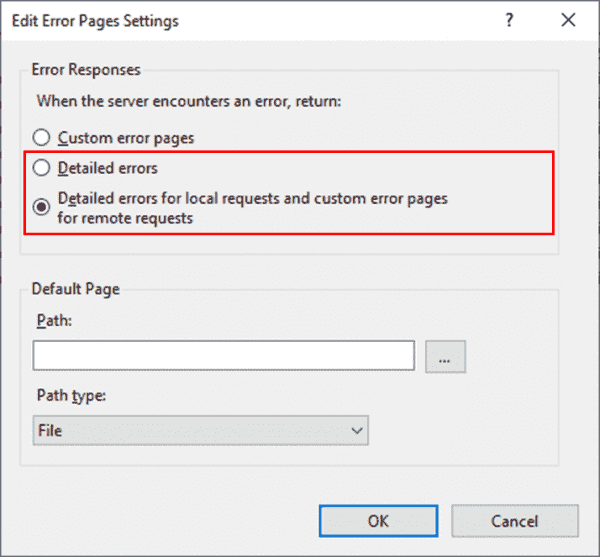
- In Error Responses, you will see three options:
- Custom error pages
- Detailed errors
- Detailed errors for local requests and custom error pages for remote requests (default)
- Now select either the second or third option and click OK.
Viewing the detailed error modes in IIS
Since you can directly access the web server using remote desktop, selecting the third option is best. Now, you can open the web browser on the server itself and try to load the problematic webpage to see a detailed error page containing more technical information. By doing this, you’re not enabling the bad guys out there to view the detailed information, since the detailed error is only displayed for local requests.
Enabling detailed errors using the web.config file
There are situations in which you cannot use the IIS manager to enable detailed errors. For example, if your website is hosted on a shared hosting site, you won’t have access to the IIS manager. In such scenarios, you could enable detailed errors using the web.config file, which is usually located in the root directory of the website. Just add the following line inside the <system.webServer> tag:
<httpErrors errorMode="Detailed" />
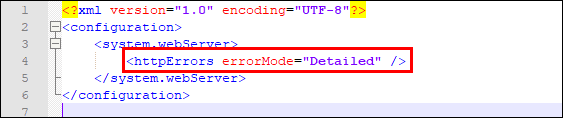
Enabling detailed errors using web.config file
Remember that by adding this line to the web.config file, you are forcing IIS to throw the detailed errors for local or remote requests.
Subscribe to 4sysops newsletter!
Once you identify the root cause of the problem, it is always recommended to disable detailed errors to prevent your website from revealing sensitive information.

The 404 error page is a generic, browser-issued webpage that tells a visitor when a page they are looking for can’t be found. A custom 404 error page, on the other hand, is a specially designed page that delivers the same message but in a more helpful, user-friendly way.
It can tell the visitor what’s going on and what to do next. It can even help save a sale.
This post walks through the steps of how to add an IIS custom error 404 page if you’re a small business administering your own Microsoft IIS server either directly or through a hosting provider. In this post:
- How to identify your web server
- How to prepare custom 404 error pages in IIS 8.5
- How to prepare custom 404 error pages in IIS 10
- How to test your custom 404 error page
- Troubleshooting error pages in IIS 8.5 and 10.0
How to Identify Your Web Server

There are several popular (and many more besides) software programs used to store and host webpages, called servers. If you’re not sure which server you use, contact your web host and they’ll tell you.
If they say Apache — and it very well might be since it’s one of the most widely used servers on the web — leave this post and read How to Configure a Custom 404 Error Page — Apache Server Edition.
Not using Apache? There’s a high chance you’re using another very popular server, Microsoft IIS. Another way to tell that you’re using Microsoft IIS is if your website is programmed in .NET or another Microsoft stack, such as ASP.
So you’re using Microsoft IIS? Let’s begin.
Putting in place a custom 404 error page in Microsoft IIS takes four steps:
- Design a custom 404 error page.
- Put it in the root directory of IIS.
- Edit your Microsoft IIS server properties to deliver your custom error page.
- Test the page.
This post skips to Step 3. We assume you’ve already created a branded, custom 404 error page. We also assume you’ve put this page in the appropriate directory so that IIS has it available to serve. If that’s correct, then you’re in the right guide.
If you’d like a primer on how to do the first step, visit How to Design a 404 Error Page That Saves a Sale.
A Possible Microsoft IIS Complication
Before diving into the process, it’s important to note a potential complication regarding your IIS web server. If your website resides on a dedicated server (one that isn’t shared), you’re good to go with the steps below.
If your website lives on a shared server run by a third-party hosting provider, only the administrator is allowed to make changes to your server files. In other words, you will have to contact the hosting provider before you can gain access to the server and implement the changes outlined below. Unfortunately, this might take a while – but hopefully it’s a brief setback.
Another way to get administrative rights back in your power if you’re on a shared IIS server is to install an ISAPI_Rewrite plug-in into IIS. ISAPI stands for Internet Server Application Program Interface, and you can easily purchase this software from several places. Helicon Tech (www.isapirewrite.com) creates a good version of the software.
Ready to go? Here’s how to tell your server to replace a generic 404 error with your new and improved page.
How to Program Microsoft IIS to Deliver Your Custom Error Page
With administrative rights to make changes to your server files, you can now get in and make the changes. Exactly how to make those changes depends on the version of the software that you’re using.
Here’s a brief guide for IIS 8.5 followed by another set of instructions for IIS 10.0.
How to Prepare Custom 404 Error Pages in IIS 8.5
Step 1: Open the “Internet Information Services (IIS) Manager” tab. This is located on the Task Bar below “Server Manager,” and then underneath “Tools.”
Step 2: Identify website or application. Go to the “Connections” pane and click the plus sign (+) next to your server name to expand it. Then expand “Sites.” Next, find the site or application you want to set a custom error page for.
Step 3: Open “Error Pages.” You can do this by double-clicking “Error Pages,” located in the home pane.

Step 5: Enter the HTTP “Status Code.” When you see the dialog box “Add Custom Error Page,” enter “404” underneath “Status Code.”
Step 6: Select “Execute a URL on this site,” located in the same dialog box. This allows you to serve dynamic content, such as an asp file for the custom error page you’ve created.
Step 7: Enter the URL. Within the text box, “File path,” type the URL of the custom error page, and then click “OK.” Note: Make sure when selecting this option that the path is a relative path.

Once you hit “OK,” your custom 404 error page should be live and doing its job.
How to Prepare Custom 404 Error Pages in IIS 10
Step 1: Open the “Internet Information Services (IIS) Manager” tab. This is located on the Task Bar below “Server Manager,” and then underneath “Tools.”
Step 2: Identify website or application. Go to the “Connections” pane and click the plus sign (+) next to your server name to expand it. Then expand “Sites.” Next, go to the site or application you want to set a custom error page for.
Step 3: Open Error Pages. Double-click the “Error Pages” icon located in the home pane; click “Edit.”
Step 4: Enter the HTTP Status Code. When you see the dialog box “Edit Custom Error Page,” enter “404” underneath “Status Code.”
Step 6: Select “Execute a URL on this Site.” In the same dialog box, select “Execute a URL on this site” so that you can serve your custom page.
Step 7: Enter the URL. Within the text box “URL (relative to the site root),” type the URL of the custom error page and then click “OK.”
Step 8: Select “Edit Feature Settings.” Once you hit “OK,” right-click on the 404 error and select “Edit Feature Settings.”
Step 9: Choose “Custom Error Page,” and then click “OK.” After you click this last OK, your new page should be live and ready.
Test Your New and Improved Custom 404 Error Page
Whether you’re using IIS version 8.5 or 10.0, it’s time to check if your new page is working properly. The easiest way to test your new page is to visit a bogus page on your website. Go to your web browser and type in a fake page on the site, such as www.mywebsite.com/bogus-cheeseburgers.
If the new custom page comes up, congratulations! You’ve properly set up a custom 404 error page for the Microsoft IIS server.
If you’re still getting the generic 404 error page, it’s time to check a common problem and try again.
Troubleshooting in IIS 8.5 and 10.0
- Did you use an absolute path instead of a relative path? It has to be a relative path. This is a common issue that plagues both IIS 8.5 and 10.0. To fix this issue, simply go back to Step 6 and add a relative path. And test again. Hopefully this time you’ll find your custom page live and ready.
- Are you not seeing the admin menus described here? It may be that you don’t have administrative access. If for some reason you cannot get admin access, there is an alternative: you can configure your custom 404 page manually by editing the Web.config file or putting it in code. Here’s where Microsoft offers steps on how to do both.
Note: If your website is programmed in something other than C#, VB.NET, JavaScript or VBScript, you can still use the steps outlined above, but you’ll have to learn how to do it depending on your programming language/framework.
Simple Change, Big Results
No one enjoys getting a bite of something they don’t want. From a visitor’s point of view, coming across a 404 error page on your website is disappointing and confusing.
And depending on what they get instead of what they wanted, a visitor can lose their appetite. In fact, it’s not uncommon for a consumer who encounters a 404 error page to immediately click the back button and exit the site completely.
A sad ending to a potential conversion.
The good news is that a custom error 404 can save the day.
While it might not be the main course that your visitors are craving, a custom error page can serve as the amuse-bouche that opens their appetites and leads them to the final entrée.
Help your hungry visitors get over the disappointment of reaching a generic error by creating and setting up a custom 404 page.
Adding a custom 404 error page is just one of the best practices in SEO. There’s so much more to learn, and you can do just that through our official Bruce Clay SEO Training course.
Melanie Saxe was a senior content writer for Bruce Clay Inc. She holds a B.A. degree in journalism and has many years of experience crafting content for the web. When she’s not writing at work, she’s usually playing Legos with her son, tinkering with her poems, or singing jazzy songs.
See Melanie’s author page for links to connect on social media.
19 Feb 2017
If you are a .NET web developer you must have played around with exception handling in a website. I certainly have and most of the times it has not been a easy exercise. There just seem to be to many levels of exception handling. And too many ways to notify the user that something went wrong. New (ok, some not so new anymore) technologies like MVC.NET, IIS integrated mode and .NET CORE adding their own options. What I won’t be talking about is how to catch and handle exceptions in code here, I will focus on ways to display exception information to the user with customized error pages.
What is a good error page
A good error page should display all the necessary information about what went wrong and if possible what the user can do to fix the problem. With necessary information I mean just enough information to describe to the average user what the problem is, so don’t flood the user with technical details like SQL query xxx on database yyyy failed due to a primary key violation. No average user of any website does need that kind of information (except if your average user is the developer of the site, but in that case you have another problem). A better message would be something like Your account could not be created, please try again. If the problem persists contact us at xxx-yyy. Besides the fact that your users don’t need the technical details, it can also pose a big security problem when you expose those details to the public. So just don’t.
It is also good practice to supply the user with options to either fix the problem or help them find a workaround. An example of this is an Internal Server Error (code 500) caused by an timeout, in this case you could tell the user to try again in x minutes. Another example is a Page Not Found (code 404) error, here it is good practice to give the user alternative links to pages that he might be looking for (this can sometimes be done by taking a closer look at the URL requested). If it its not possible to determine what the user was looking for you could just supply a link to your search page or to the first valid parent page of the requested URL. If you really want to help your users as best as possible, supply options on your error pages to contact you, either by mail, phone, chat or what other options work best for you. Last but not least you could add an unique Id to your error pages and display it to the user. This Id should allow you to get all available technical details from your logs. If a user supplies this Id to you when he contacts you about an error on your site you can easily retrieve all details you need to identify (and hopefully fix) the exact problem.
How to display an error page
Now that we have determined what our error pages should contain we need to tell our application how and when to use them. In a .NET web application (I’m leaving out .NET Core for the time being) you roughly have the following options:
- Using CustomErrors section via web.config
- Using HttpErrors section via web.config
- Routing to a custom error page from code
1. Using CustomErrors section via web.config
The CustomErrors section in the web.config has been around for some time. It is part of the system.web section.
It handles unhandled exceptions which are thrown in the .NET code of your application and routes the requests which caused the exception to custom pages based on the status code of the error. You can set different pages for each error status code (>= 400). Usually the CustomErrors section looks something like this:
<customErrors mode="RemoteOnly" redirectMode="ResponseRewrite" defaultRedirect="~/error.aspx">
      <error statusCode="500" redirect="~/500.aspx" />
      <error statusCode="400" redirect="~/400.aspx" />
      <error statusCode="404" redirect="~/404.aspx" />
</customErrors>
mode attribute
The mode attribute can have one of three values:
- Off
- On
- RemoteOnly
Off disables displaying the custom error pages, in this case the default ASP.NET detailed error pages are always shown.
On always displays your custom error pages. RemoteOnly only shows your custom pages if the request comes from a remote server and not from the server itself, this in the recommended setting, although for testing your custom pages in your development environment you will want to use the On setting.
redirectMode attribute
This attribute has only 2 values:
- Redirect
- ResponseRewrite
Redirect does as it says and redirects your request to the URL you set in the redirect attribute of your custom error page. I would not recommend using this setting. The redirect might confuse the user (changing the URL), and is not a good idea from a SEO perspective. The better option is the ResponseRewrite, this renders the result of your given custom error page without changing the URL. This option has a catch however. The final response returns a statuscode 200. Your error page should always return the appropriate statuscode to the client. To fix this the easiest solution is to use a .ASPX page as your error page (yes, also when using a MVC application) and set the response status code manually in the code(behind) of this .ASPX.
<% Response.StatusCode = 500; %>
defaultRedirect attribute
Sets a default page for all errors for which you have not explicitly set a custom page, if you would get an error with status code 401 and you have not set a specific error page for this, the default page is used. It is advisable to always set this value.
2. Using HttpErrors section via web.config
Since the introduction of IIS Integrated Mode in IIS 7, we have another option to display custom error pages. Through the httpErrors section (under system.webServer) you can configure the IIS integrated mode error handling. The main difference with ASP.NET CustomErrors is the fact that httpErrors can handle all errors that occur in the entire request pipeline, not just in the ASP.NET code. This means that when something goes wrong while requesting a static resource (like an image) your custom error page will also be shown for this request. The config section for httpErrors normally looks like this:
<httpErrors errorMode="Custom" existingResponse="Auto" defaultResponseMode="ExecuteURL" defaultPath="/error.aspx">
      <clear />
      <error statusCode="500" path="/500.aspx" />
      <error statusCode="404" path="/404.aspx" />
</httpErrors>
Within the httpErrors section you can add different paths to error pages for specific status codes, just like with CustomErrors. You should first clear all error pages before you add your own. On the root httpErrors element the most important attributes are the following:
errorMode attribute
This attributes works like the mode attribute of CustomErrors, it has 3 values Custom, Detailed and DetailedLocalOnly. You will usually use either Custom or DetailedLocalOnly, the first always displaying your own custom error pages, the second one only when the request is coming from a remote source.
existingResponse attribute
This attribute determines what should be done with the original response. If the response has an error status code (code >= 400) the httpErrors section could handle it. With this attribute you set whether httpErrors actually should handle it. There are 3 options here, Auto, Passthrough and Replace. Passthrough lets the response pass through untouched, not displaying any error page. Replace always displays a (custom or detailed) errorpage in case of een error statuscode. The Auto option is a little fussy, it chooses between Passthrough and Replace based on whether a flag called SetStatus is true or false. This flag seems to correspond with the TrySkipIisCustomErrors property of the HttpResponse object in ASP.NET. More on this later.
defaultResponseMode attribute
With this attribute you set how the request pipeline routes to a custom error page. Again 3 options, File, ExecuteUrl and Redirect. File simply displays the content of the file you supply. ExecuteUrl actually executes the code under the given local URL, with this option you can use .ASPX files or other executable code. Redirect does as it claims and redirects the client to the givens URL, best not to use this option.
defaultPath attribute
Sets the default path for errors with a status code which has not been explicitly assigned a path. Works just like the defaultRedirect attribute of CustomErrors.
error element
The error element has only 2 required attributes, statusCode and path. Both attributes need little explaining. Keep in mind though that path should be set to either a filepath or a URL path depending on the setting of the defaultResponseMode attribute of the httpErrors element. You can also set the response mode at the error element level instead of at the httpErrors element level. Use the responseMode attribute for this.
How httpErrors handles errors
One of the big catches with httpErrors seems to be that while CustomErrors handles actual (.NET) exceptions, httpErrors handles status codes. This last functionality has given me some problems when I was working on a site which switched from IIS classic to integrated mode. Switching to integrated mode enabled the httpErrors functionality. This had some unexpected side effects with some of the handlers we were using in the site. Many handlers where designed to return a 500 statuscode and some JSON data in the response body whenever something went wrong. The httpErrors functionality picked up on those 500 status codes and started to display Html error pages in stead of the JSON result. It took me some time to figure this out and some more time to find a good fix.
The default settings of httpErrors set the existingResponse attribute to Auto which means for all responses returning an error status code the original response will be substituted with either a custom error page or a detailed IIS error page. Only if you explicitly set the TrySkipIisCustomErrors property of the response in ASP.NET to true the original response will remain untouched. I our case we had to set this property to true in all handlers which set the statuscode for the response to 500. The alternative would have been to disable the httpErrors entirely by setting the existingResponse property to Passthrough, this was not desirable for our site however.
Bypassing CustomErrors
HttpErrors could be a good replacement for CustomErrors, it handles all possible errors, not just those raised in .NET code. However, if you just set the mode property of CustomErrors to Off your site will (whenever an exception is thrown) display detailed ASP.NET error pages, not your httpError pages. CustomErrors seems to bypass httpErrors by setting TrySkipIisCustomErrors to true. The easiest fix for this is setting the existingResponse attribute of httpErrors to Replace. This would mean however that all response which do not throw an exception but do return an error status code will display a httpErrors error page instead of the original response. As mentioned earlier this might not always be desirable. An alternative solution is tweaking your global.asax to just return a 500 status code whenever an exception is thrown and not pass the exception itself.
void Application_Error(object sender, EventArgs e)
{
    Exception error = Server.GetLastError();

    // TODO : Log Exception

    Server.ClearError();

    var httpException = error as HttpException;
    Response.StatusCode = httpException != null ? httpException.GetHttpCode() : (int)HttpStatusCode.InternalServerError;
}
3. Routing to a custom error page from code
Apart from the 2 options to route to custom error pages through web.config settings, there are a few options to do the same from code. I won’t explain these option in depth here, but just do a quick summary.
Using MVC Error attributes
You can add the HandleError attribute to actions you want to have custom error pages in the event of an exception.
[HandleError()]
public ActionResult Index()
{
}
All exceptions within the action are routed to the default Error.cshtml view. You can add a different view by setting the View parameter of the HandleError method, like this HandeError(View="500.cshtml"). HandleError only works if CustomErrors is not set to Off in your web.config.
Overriding the OnException method on a MVC controller
For individual controllers or for a base controller (if you have one) you can override the OnException method.
protected override void OnException(ExceptionContext filterContext)
{
    filterContext.ExceptionHandled = true;

    filterContext.Result = new ViewResult
    {
        ViewName = "~/Views/Error/500.cshtml"
    };
}
Using the Application_Error event
This is an event you can add in your Global.asax, it handles all exceptions which have not been handled at an earlier stage.
protected void Application_Error(object sender, EventArgs e)
{
    var raisedException = Server.GetLastError();

    // TODO : Log Exception

    Server.ClearError();

    Server.Transfer("~/500.aspx");
}
Using a HttpModule
If you add a HttpModule to your request pipeline you can build your error handling into this module. Many 3rd party error handling extensions like Elmah use this technique.
public class ErrorModule : IHttpModule
{
    public void Init(HttpApplication context)
    {
        context.Error += OnError;
    }

    private void OnError(object sender, EventArgs e)
    {
        // Handle error here, log, redirect or alter response
    }

    public void Dispose()
    {
        // TODO : Dispose
    }
}
Conclusion
From the techniques discussed httpErrors seems to have the best papers. It works for all requests, even for static files. CustomErrors has little to no use cases which httpErrors can’t handle. MVC error pages are very easy to use but can only handle errors from within controllers, not in other parts of the code and not for static files. Error handling in Global.asax or in a HttpModule are good options, because they catch all exceptions anywhere in your code. But they still won’t handle errors with static files (although you could configure all files, including static files, to pass through a custom HttpModule and thus handle errors for static files that way). But if you want to easily handle all errors for all request and maintain your custom errorpages in a single place, httpErrors is in most cases your best option. You do have to tweak to get it working properly (bypassing customErrors, fixing possible issues with handlers which should not display a custom html error page, etc.). Keep in mind though that in many cases custom error pages can be avoided altogether. Many site sites still return a full blown custom error page in situations like invalid user input in a form. Such cases should be handled by showing the user which field is invalid within the form not by routing to a custom error page. If you do have to route to a custom error page, try to provide the user with just enough information to help him on his way (‘try again later’, ‘maybe the following links are helpfull…’, ‘if the problem persists contact us at …’). Getting the right texts can be a challenge. In the end better custom error pages make your customer happy and can reduces calls to your service desk. Errors are bad but if they do happen, make them as clear and helpful as possible…