
Microsoft Teams is not like your average program when it comes to installing and uninstall it. The problem with Microsoft Teams is that it’s installed for every user, in the user’s AppData (or program data sometimes). Besides that, we also have Microsoft Teams machine-wide installer, which will automatically install Teams when a user logs in.
Cleaning things up with Microsoft Teams can be quite challenging. I tried for example to remove and re-install Teams for a user recently. The user got an error, Microsoft Teams Installation Has Failed with every update of Microsoft Teams
After removing everything and re-installing Teams he ended up with a blank Teams app. So no chat history and no more Teams channels (even though online everything was still visible).
In this article, I will give you some tips and scripts to remove and cleanup Teams so you can re-install it again.
Make Teams a bit more fun with these funny backgrounds for Microsoft Teams
Fix Microsoft Teams Installation Has Failed
One of the most common errors with Microsoft Teams is the error Installation Has Failed which can appear when Teams tries to update. This error can keep coming back with every update and is pretty annoying.
Simply re-installing Teams isn’t the solution. It will work for now, but the error will probably re-appear with the next update.
The only way to really fix the problem is to remove the local cache and restart Microsoft Teams:
- Close Microsoft Teams
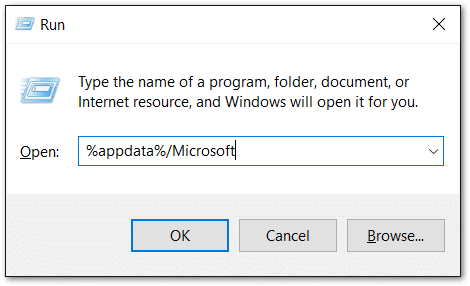
- Press Windows key + R
- Type %appdata% and press enter
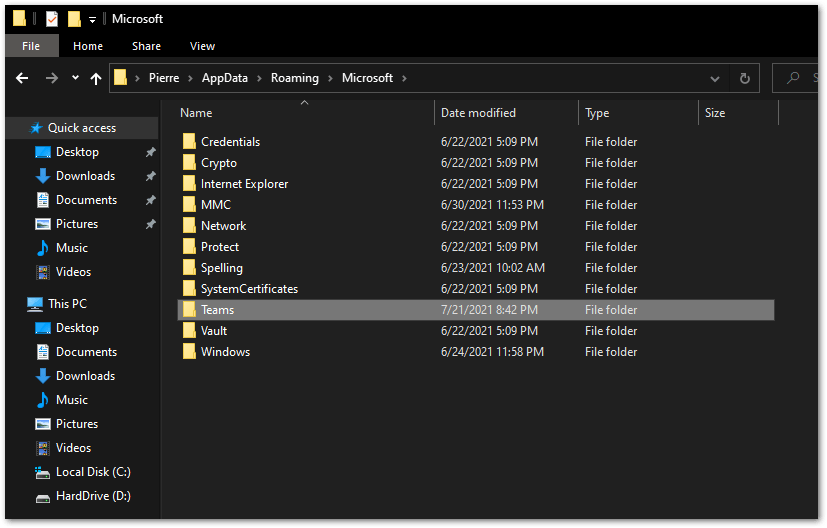
- Open the folder Microsoft
- Delete the folder Teams
5. Restart Teams
You can also use the the PowerShell script below to remove the Microsoft Teams Cache.
Uninstalling Microsoft Teams
We start with the easy part, simply uninstalling Microsoft Teams. Some people commented that their Microsoft Teams keeps reinstalling itself after they have uninstalled it. This is most of the time caused by the Machine-Wide installer.
So to completely uninstall Microsoft Teams you will have to remove both Microsoft Teams and the Teams Machine-Wide Installer.
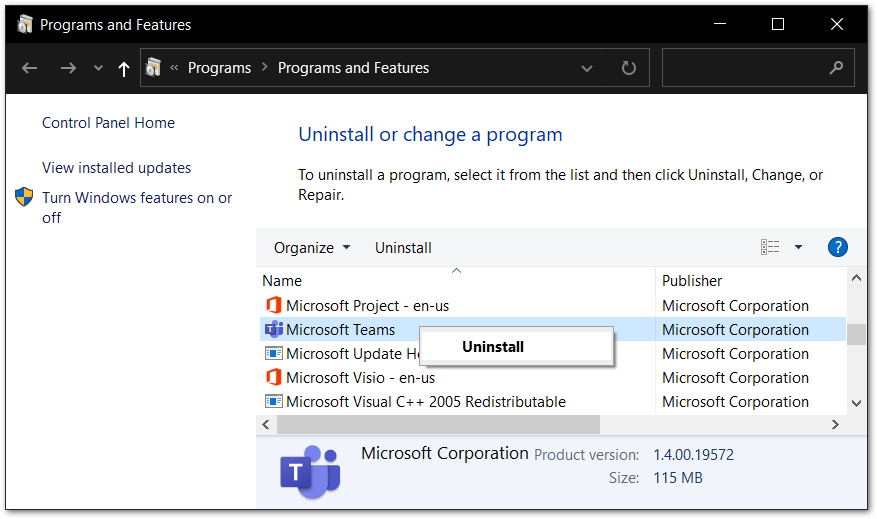
- Open Settings > Apps > Apps & Features
- Search for Teams
- Remove all the apps (yes, I got two Machine-Wide installers… don’t ask why)
Uninstall Microsoft Teams with PowerShell
I like to automate things as much as possible, so of course, we also have a PowerShell script to uninstall Microsoft Teams.
The script will remove the Machine-Wide installer and Microsoft Teams self. Make sure you run the PowerShell script in an elevated mode. You can do this by opening PowerShell as Admin
function unInstallTeams($path) {

	$clientInstaller = "$($path)Update.exe"

	 try {
        $process = Start-Process -FilePath "$clientInstaller" -ArgumentList "--uninstall /s" -PassThru -Wait -ErrorAction STOP

        if ($process.ExitCode -ne 0)
		{
			Write-Error "UnInstallation failed with exit code  $($process.ExitCode)."
        }
    }
    catch {
        Write-Error $_.Exception.Message
    }

}

# Remove Teams Machine-Wide Installer
Write-Host "Removing Teams Machine-wide Installer" -ForegroundColor Yellow

$MachineWide = Get-WmiObject -Class Win32_Product | Where-Object{$_.Name -eq "Teams Machine-Wide Installer"}
$MachineWide.Uninstall()

# Remove Teams for Current Users
$localAppData = "$($env:LOCALAPPDATA)MicrosoftTeams"
$programData = "$($env:ProgramData)$($env:USERNAME)MicrosoftTeams"


If (Test-Path "$($localAppData)CurrentTeams.exe")
{
	unInstallTeams($localAppData)

}
elseif (Test-Path "$($programData)CurrentTeams.exe") {
	unInstallTeams($programData)
}
else {
	Write-Warning  "Teams installation not found"
}
The script will check for the two possible installation locations of Teams and remove it when found.
If you want to run this script for multiple users (on the same computer), then you can use the following part in place of the Remove Teams for Current User section:
# Get all Users
$Users = Get-ChildItem -Path "$($ENV:SystemDrive)Users"

# Process all the Users
$Users | ForEach-Object {
        Write-Host "Process user: $($_.Name)" -ForegroundColor Yellow

        #Locate installation folder
        $localAppData = "$($ENV:SystemDrive)Users$($_.Name)AppDataLocalMicrosoftTeams"
        $programData = "$($env:ProgramData)$($_.Name)MicrosoftTeams"

        If (Test-Path "$($localAppData)CurrentTeams.exe")
        {
	        unInstallTeams($localAppData)

        }
        elseif (Test-Path "$($programData)CurrentTeams.exe") {
	        unInstallTeams($programData)
        }
        else {
	        Write-Warning  "Teams installation not found for user $($_.Name)"
        }
}
Uninstall Teams Machine-wide Installer
Just to be clear, you can safely uninstall the Teams Machine-wide installer. All it does is install Teams for every user that signs in.
You can uninstall the Teams Machine-wide installer in the settings screen or with a PowerShell script.
- Open Settings > Apps > Apps & Features
- Search for Teams
- Uninstall Teams Machine-Wide Installer
You can also remove the Teams Machine-Wide installer with PowerShell. This can be really useful if you need to remove it from multiple computers. Make sure you run the PowerShell script in an elevated mode.
You can open PowerShell as Administrator from start menu.
# Remove Teams Machine-Wide Installer
Write-Host "Removing Teams Machine-wide Installer" -ForegroundColor Yellow

$MachineWide = Get-WmiObject -Class Win32_Product | Where-Object{$_.Name -eq "Teams Machine-Wide Installer"}
$MachineWide.Uninstall()
Microsoft Teams Clear Cache
So I had an occasion where I had to remove Microsoft Teams for users, but after re-installing Teams came back with no history. The only solution to fix this was to clear the cache of Microsoft Teams.
The problem is that there is not one location for the Microsoft Teams’ cache. I expected it to be in the roaming AppData, but it turned out to be not the only location. We also need to clear the Chrome and Edge Cache to completely remove it.
Mark Vale had already created a really nice PowerShell script to clear the Microsoft Teams Cache, so we are going to use that:
# Author: Mark Vale

$clearCache = Read-Host "Do you want to delete the Teams Cache (Y/N)?"
$clearCache = $clearCache.ToUpper()

if ($clearCache -eq "Y"){
    Write-Host "Stopping Teams Process" -ForegroundColor Yellow

    try{
        Get-Process -ProcessName Teams | Stop-Process -Force
        Start-Sleep -Seconds 3
        Write-Host "Teams Process Sucessfully Stopped" -ForegroundColor Green
    }catch{
        echo $_
    }

    Write-Host "Clearing Teams Disk Cache" -ForegroundColor Yellow

    try{
        Get-ChildItem -Path $env:APPDATA"Microsoftteamsapplication cachecache" | Remove-Item -Confirm:$false
        Get-ChildItem -Path $env:APPDATA"Microsoftteamsblob_storage" | Remove-Item -Confirm:$false
        Get-ChildItem -Path $env:APPDATA"Microsoftteamsdatabases" | Remove-Item -Confirm:$false
        Get-ChildItem -Path $env:APPDATA"Microsoftteamscache" | Remove-Item -Confirm:$false
        Get-ChildItem -Path $env:APPDATA"Microsoftteamsgpucache" | Remove-Item -Confirm:$false
        Get-ChildItem -Path $env:APPDATA"MicrosoftteamsIndexeddb" | Remove-Item -Confirm:$false
        Get-ChildItem -Path $env:APPDATA"MicrosoftteamsLocal Storage" | Remove-Item -Confirm:$false
        Get-ChildItem -Path $env:APPDATA"Microsoftteamstmp" | Remove-Item -Confirm:$false
        Write-Host "Teams Disk Cache Cleaned" -ForegroundColor Green
    }catch{
        echo $_
    }

    Write-Host "Stopping Chrome Process" -ForegroundColor Yellow

    try{
        Get-Process -ProcessName Chrome| Stop-Process -Force
        Start-Sleep -Seconds 3
        Write-Host "Chrome Process Sucessfully Stopped" -ForegroundColor Green
    }catch{
        echo $_
    }

    Write-Host "Clearing Chrome Cache" -ForegroundColor Yellow

    try{
        Get-ChildItem -Path $env:LOCALAPPDATA"GoogleChromeUser DataDefaultCache" | Remove-Item -Confirm:$false
        Get-ChildItem -Path $env:LOCALAPPDATA"GoogleChromeUser DataDefaultCookies" -File | Remove-Item -Confirm:$false
        Get-ChildItem -Path $env:LOCALAPPDATA"GoogleChromeUser DataDefaultWeb Data" -File | Remove-Item -Confirm:$false
        Write-Host "Chrome Cleaned" -ForegroundColor Green
    }catch{
        echo $_
    }

    Write-Host "Stopping IE Process" -ForegroundColor Yellow

    try{
        Get-Process -ProcessName MicrosoftEdge | Stop-Process -Force
        Get-Process -ProcessName IExplore | Stop-Process -Force
        Write-Host "Internet Explorer and Edge Processes Sucessfully Stopped" -ForegroundColor Green
    }catch{
        echo $_
    }

    Write-Host "Clearing IE Cache" -ForegroundColor Yellow

    try{
        RunDll32.exe InetCpl.cpl, ClearMyTracksByProcess 8
        RunDll32.exe InetCpl.cpl, ClearMyTracksByProcess 2
        Write-Host "IE and Edge Cleaned" -ForegroundColor Green
    }catch{
        echo $_
    }

    Write-Host "Cleanup Complete... Launching Teams" -ForegroundColor Green
    Start-Process -FilePath $env:LOCALAPPDATAMicrosoftTeamscurrentTeams.exe
    Stop-Process -Id $PID
}
This script will only clear the cache of Microsoft Teams and restart Teams when done.
You can also combine the cleanup and delete script to do everything in one run:
# Clearing Teams Cache by Mark Vale
# Uninstall Teams by Rudy Mens

$clearCache = Read-Host "Do you want to delete the Teams Cache (Y/N)?"
$clearCache = $clearCache.ToUpper()

$uninstall= Read-Host "Do you want to uninstall Teams completely (Y/N)?"
$uninstall= $uninstall.ToUpper()


if ($clearCache -eq "Y"){
    Write-Host "Stopping Teams Process" -ForegroundColor Yellow

    try{
        Get-Process -ProcessName Teams | Stop-Process -Force
        Start-Sleep -Seconds 3
        Write-Host "Teams Process Sucessfully Stopped" -ForegroundColor Green
    }catch{
        echo $_
    }

    Write-Host "Clearing Teams Disk Cache" -ForegroundColor Yellow

    try{
        Get-ChildItem -Path $env:APPDATA"Microsoftteamsapplication cachecache" | Remove-Item -Confirm:$false
        Get-ChildItem -Path $env:APPDATA"Microsoftteamsblob_storage" | Remove-Item -Confirm:$false
        Get-ChildItem -Path $env:APPDATA"Microsoftteamsdatabases" | Remove-Item -Confirm:$false
        Get-ChildItem -Path $env:APPDATA"Microsoftteamscache" | Remove-Item -Confirm:$false
        Get-ChildItem -Path $env:APPDATA"Microsoftteamsgpucache" | Remove-Item -Confirm:$false
        Get-ChildItem -Path $env:APPDATA"MicrosoftteamsIndexeddb" | Remove-Item -Confirm:$false
        Get-ChildItem -Path $env:APPDATA"MicrosoftteamsLocal Storage" | Remove-Item -Confirm:$false
        Get-ChildItem -Path $env:APPDATA"Microsoftteamstmp" | Remove-Item -Confirm:$false
        Write-Host "Teams Disk Cache Cleaned" -ForegroundColor Green
    }catch{
        echo $_
    }

    Write-Host "Stopping Chrome Process" -ForegroundColor Yellow

    try{
        Get-Process -ProcessName Chrome| Stop-Process -Force
        Start-Sleep -Seconds 3
        Write-Host "Chrome Process Sucessfully Stopped" -ForegroundColor Green
    }catch{
        echo $_
    }

    Write-Host "Clearing Chrome Cache" -ForegroundColor Yellow

    try{
        Get-ChildItem -Path $env:LOCALAPPDATA"GoogleChromeUser DataDefaultCache" | Remove-Item -Confirm:$false
        Get-ChildItem -Path $env:LOCALAPPDATA"GoogleChromeUser DataDefaultCookies" -File | Remove-Item -Confirm:$false
        Get-ChildItem -Path $env:LOCALAPPDATA"GoogleChromeUser DataDefaultWeb Data" -File | Remove-Item -Confirm:$false
        Write-Host "Chrome Cleaned" -ForegroundColor Green
    }catch{
        echo $_
    }

    Write-Host "Stopping IE Process" -ForegroundColor Yellow

    try{
        Get-Process -ProcessName MicrosoftEdge | Stop-Process -Force
        Get-Process -ProcessName IExplore | Stop-Process -Force
        Write-Host "Internet Explorer and Edge Processes Sucessfully Stopped" -ForegroundColor Green
    }catch{
        echo $_
    }

    Write-Host "Clearing IE Cache" -ForegroundColor Yellow

    try{
        RunDll32.exe InetCpl.cpl, ClearMyTracksByProcess 8
        RunDll32.exe InetCpl.cpl, ClearMyTracksByProcess 2
        Write-Host "IE and Edge Cleaned" -ForegroundColor Green
    }catch{
        echo $_
    }

    Write-Host "Cleanup Complete..." -ForegroundColor Green
}

if ($uninstall -eq "Y"){
    Write-Host "Removing Teams Machine-wide Installer" -ForegroundColor Yellow
    $MachineWide = Get-WmiObject -Class Win32_Product | Where-Object{$_.Name -eq "Teams Machine-Wide Installer"}
    $MachineWide.Uninstall()


    function unInstallTeams($path) {

	$clientInstaller = "$($path)Update.exe"

	 try {
        $process = Start-Process -FilePath "$clientInstaller" -ArgumentList "--uninstall /s" -PassThru -Wait -ErrorAction STOP

        if ($process.ExitCode -ne 0)
		{
			Write-Error "UnInstallation failed with exit code  $($process.ExitCode)."
        }
    }
    catch {
        Write-Error $_.Exception.Message
    }

    }


    #Locate installation folder
    $localAppData = "$($env:LOCALAPPDATA)MicrosoftTeams"
    $programData = "$($env:ProgramData)$($env:USERNAME)MicrosoftTeams"


    If (Test-Path "$($localAppData)CurrentTeams.exe")
    {
	    unInstallTeams($localAppData)

    }
    elseif (Test-Path "$($programData)CurrentTeams.exe") {
	    unInstallTeams($programData)
    }
    else {
	    Write-Warning  "Teams installation not found"
    }

}
Wrapping Up
I hope these scripts helped you remove and clean up Microsoft Teams. If you want to re-install Microsoft Teams, then make sure you check out this article.
If you have any questions just drop a comment below.
Again thanks to Mark Vale for the clean-up script!
Обновлено 2023 января: перестаньте получать сообщения об ошибках и замедлите работу вашей системы с помощью нашего инструмента оптимизации. Получить сейчас в эту ссылку
- Скачайте и установите инструмент для ремонта здесь.
- Пусть он просканирует ваш компьютер.
- Затем инструмент почини свой компьютер.

Microsoft Teams была запущена в 2017 году как унифицированная платформа для общения и совместной работы, которая помогает предприятиям и организациям достигать своих целей. Корпорация Майкрософт использовала имеющийся у компании опыт работы с программным обеспечением Office и создала унифицированный опыт работы с Teams, Office 365 и Skype для бизнеса.
Однако, как и с любым программным обеспечением, не всегда все идет по плану. Если у вас есть проблемы с Microsoft Teams, вот как исправить проблемы с установкой Microsoft Teams.

Параметр «Загрузить приложение Teams в фоновом режиме для пользователей Skype для бизнеса» включен в Центре администрирования Microsoft Teams: Пока этот параметр включен, любой компьютер в сети, из которого были удалены Teams, будет автоматически загружать и переустанавливать программное обеспечение без уведомления пользователя при входе в клиент Skype для бизнеса.
Microsoft Teams удалена, но не установщик всей машины Teams: Клиент Microsoft Teams — не единственный компонент, который необходимо удалить, чтобы избавиться от программы. Вы также должны найти и удалить установщик для всей машины Teams на своем компьютере, чтобы команды оставались удаленными. Пока на вашем компьютере установлен общесистемный установщик Teams, он будет переустанавливать Teams прямо у вас под носом.
Как решить проблемы с установкой Microsoft Teams?
Обновление за январь 2023 года:
Теперь вы можете предотвратить проблемы с ПК с помощью этого инструмента, например, защитить вас от потери файлов и вредоносных программ. Кроме того, это отличный способ оптимизировать ваш компьютер для достижения максимальной производительности. Программа с легкостью исправляет типичные ошибки, которые могут возникнуть в системах Windows — нет необходимости часами искать и устранять неполадки, если у вас под рукой есть идеальное решение:
- Шаг 1: Скачать PC Repair & Optimizer Tool (Windows 10, 8, 7, XP, Vista — Microsoft Gold Certified).
- Шаг 2: Нажмите «Начать сканирование”, Чтобы найти проблемы реестра Windows, которые могут вызывать проблемы с ПК.
- Шаг 3: Нажмите «Починить все», Чтобы исправить все проблемы.


Запустить установщик от имени администратора
«Режим администратора» — это мощный инструмент, который обычно позволяет обойти большинство ошибок. Запуск большинства программ «от имени администратора» обеспечивает более высокий уровень доступа к вашему компьютеру. Для установщиков это может быть решающим фактором между установкой вашего приложения и его отклонением.
Обычно это не рекомендуется, но вы можете доверять Microsoft Teams, потому что он был разработан Microsoft. Большинство установщиков не нужно запускать от имени администратора, но если вы это сделаете, вы избежите некоторых осложнений, которые могут быть вызваны вашим антивирусом и брандмауэром.
- Сначала перейдите на веб-сайт Microsoft и загрузите Microsoft Teams.
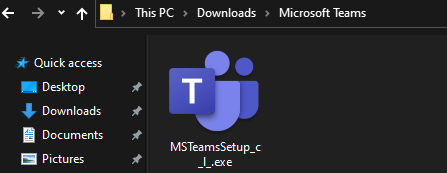
- Теперь откройте папку «Загрузки» или папку, в которой хранится установщик.
- В зависимости от вашего браузера вы также можете просто просмотреть загруженный файл и нажать «Просмотр» в папке.
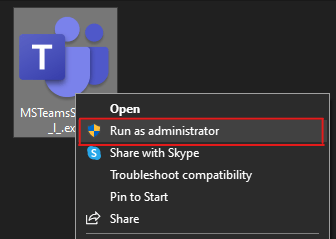
- Наконец, когда установочный файл появится на экране, щелкните его правой кнопкой мыши и выберите Запуск от имени администратора.
- Вам будет предложено подтвердить или даже ввести учетные данные системного администратора. Заполните их и продолжайте.
Теперь установщик Microsoft Teams должен обходить любые проблемы с авторизацией или защитой от вирусов. Мы надеемся, что это решило вашу проблему с установкой Microsoft Teams.
Полное удаление Microsoft Teams
Если вы попытаетесь переустановить Microsoft Teams, ошибка установки может быть вызвана существующим приложением Microsoft Teams на вашем компьютере. Удаление программ может быть сложным процессом, если вы новичок в Windows 10 или не знакомы с процессом удаления.
Точно так же эта проблема может затронуть и пользователей Mac. В этом случае удаление программы простым удалением может привести к образованию оставшихся файлов. Это может помешать установке в будущем, поскольку операционная система считает, что Microsoft Teams уже установлена.
- Сначала откройте меню «Пуск» и введите «Установка и удаление программ».
- Выберите первый результат поискового запроса.
- Теперь у вас должно появиться окно со списком всех программ, установленных в данный момент на вашем компьютере.
- В разделе «Приложения и компоненты» используйте строку поиска и введите «Microsoft Teams».
- Наконец, щелкните программу и выберите «Удалить».
- Следуйте инструкциям, чтобы завершить процесс.
Вы также можете удалить Microsoft Teams для пользователей Mac следующим образом:
- Перед продолжением убедитесь, что Microsoft Teams закрыта и не работает в фоновом режиме.
- Вы можете проверить это с помощью Activity Monitor и поиска Microsoft Teams.
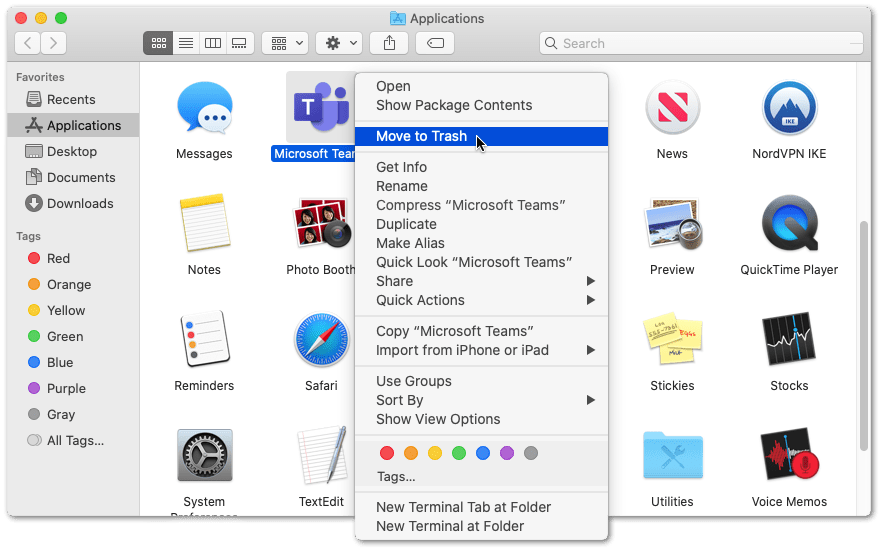
- Теперь откройте Finder и перейдите в папку Applications.
- Там найдите Microsoft Teams и перетащите приложение в корзину. Это приведет к удалению программы.
Использование редактора реестра
Редактор реестра — это мощный набор всех параметров верхнего уровня, которые вы можете настроить в своей операционной системе Windows. Ваши системные настройки собираются и отображаются в редакторе, где мы можем легко получить доступ к этим файлам и изменить их.
В этом методе мы изменим файл, который может удалить или предотвратить установку Microsoft Teams. Это в основном для пользователей, которые могут установить Microsoft Teams, но обнаруживают, что он удаляется или удаляется через несколько часов.
- Сначала откройте меню «Пуск», нажав клавишу Windows.
- Теперь введите «Редактор реестра» или «Regedit» и щелкните первый результат поиска.
- Просмотрите папки слева, пока не дойдете до папки «Команды». Вот папки, которые нужно открыть:
HKEY_CURRENT_USER Программное обеспечение Microsoft Office Команды. - В папке Teams вы должны найти файл PreventInstallationFromMsi. Дважды щелкните этот файл и измените значение информации на 1.
- Если вы не можете найти файл, щелкните правой кнопкой мыши место в папке и выберите «Создать», затем «Строковое значение».
- Назовите новый файл «PreventInstallationFromMsi» и установите значение 1.
Попробуйте установить Microsoft Teams обычным способом или запустив программу установки от имени администратора. Это должно решить проблему и предотвратить удаление само по себе.
Совет экспертов: Этот инструмент восстановления сканирует репозитории и заменяет поврежденные или отсутствующие файлы, если ни один из этих методов не сработал. Это хорошо работает в большинстве случаев, когда проблема связана с повреждением системы. Этот инструмент также оптимизирует вашу систему, чтобы максимизировать производительность. Его можно скачать по Щелчок Здесь
Часто задаваемые вопросы
Одна из особенностей этого установщика заключается в том, что он проверяет ваш профиль на наличие следов команд. Если он обнаруживает какие-либо команды, он не будет пытаться переустановить их (если это не обновление), а если пользователь удалил команды, он все равно обнаружит некоторые остатки и не будет их переустанавливать.
- Используйте другую версию Teams.
- Очистить кеш.
- Загрузите файлы из SharePoint.
- Проверьте разрешения для файлов SharePoint.
- Проверьте недопустимые символы.
- В списке приложений выберите Админ.
- В меню выберите «Настройки» -> «Службы и надстройки».
- Найдите Microsoft Teams и включите внешние приложения.
- Установите для параметра Разрешить внешние приложения в Microsoft Teams значение Вкл.
Другое решение, которое мы нашли, — перейти в C: ProgramData User Microsoft Teams и установить разрешение безопасности для этой папки, чтобы пользователь имел полный контроль. Затем перезагрузите компьютер.
Сообщение Просмотров: 248
Find that you can’t install or update your native Microsoft Teams client app and are faced with errors such as “Failed to Extract Installer”?
As you embark on the hybrid journey of working, learning or keeping in touch with your loved ones, Teams is definitely one of the best platforms. Equipped with features that are essential for virtual meetings, file sharing and virtual communication, Teams isn’t stopping yet. New features, existing feature enhancements and bug patches are delivered through client or app updates.
Did you know Teams is scheduled for an update every 2 weeks? 🤔
You may not notice it as Teams automatically installs available updates for its client when you have it running in the background.
However, there have been several occurrences where users just couldn’t update their Teams client on both Windows and macOS. Other than that, some users also faced problems in trying to install Microsoft Teams on their workstation devices.
Types of Errors When Installing or Updating Microsoft Teams
1. Auto-update doesn’t work
Microsoft Teams has long introduced the auto-update feature where the users don’t have to worry about regularly checking for updates manually. Instead, the Microsoft Teams client will automatically scan and install updates as soon as they’re available.
Be that as it may, users have found that the feature doesn’t always work. You can find more details and how to overcome this issue in Step 1.
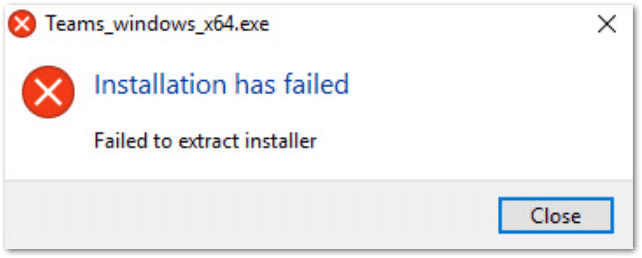
2. Installation has failed, failed to extract installer
Teams users have reported that they receive the “Installation has failed, Failed to extract installer” error when trying to update or install the Teams client.
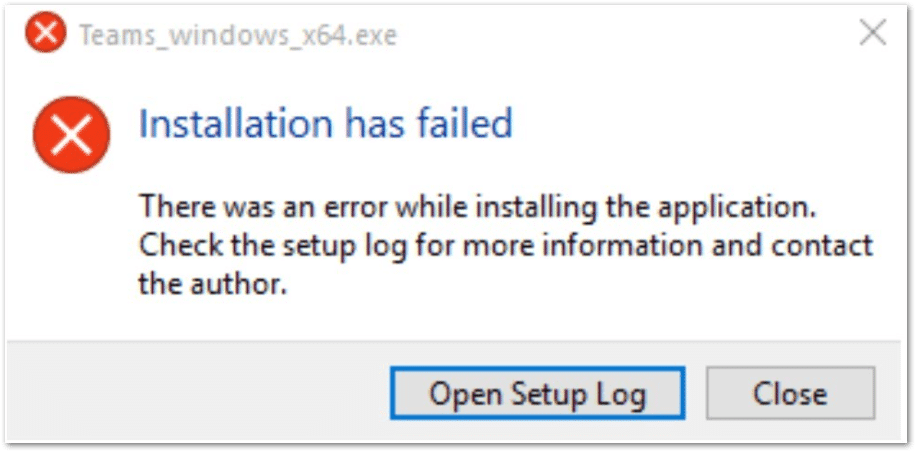
3. There was an error while installing the application
Many users have reported the “installation has failed, there was an error while installing the application” error after the Microsoft Teams app installation has been completed.
Is your Teams client showing the same error? Tell us about your experience in the comments section below!
While the cause of such errors and cases can be vague whether it’s device or software-related, we‘ve done thorough research to compile the best fixes when you can’t download, install or update the Microsoft Teams app.
Let’s get to fixing and make it work! 👩🔧
Table of Contents
8 Fixes for Microsoft Teams Not Downloading, Installing or Updating Successfully
- Try Manually Updating the Teams App
- Clear the Microsoft Teams App Cache and Data
- Reinstall the Microsoft Teams App
- Launch the Microsoft Teams Installer/Client as Administrator
- Turn Off Your Device’s Firewall or Antivirus Temporarily
- Install Microsoft Teams Using a File Archiver
- Try the Web Version of Microsoft Teams
- Contact Microsoft Support
8 Fixes for Issues When Installing or Updating Microsoft Teams
1. Try Manually Updating the Teams App
Firstly, we’d like to focus on issues revolving around the Microsoft Teams client updates. In this case, users have found that their Teams client doesn’t install new updates leaving them with an outdated or old version of the platform.
It’s important to note that the auto-update function only does its job when users leave the Teams client on idle mode. Meaning that you have to leave the Teams client open without using any of its features for a brief moment.
So, if you’ve given some time and your Teams app is still running on an older version, maybe it’s time to take matters into your own hands. 🙌
Luckily, Microsoft Teams has made it easy for you to manually update its desktop client by simply using the in-app feature. Here’s how you can make use of the feature as we also show how you can update your Teams app on mobile:
On Desktop
The Teams app for both Windows and macOS share the same user interface which explains the similar steps you can take to check and install Teams app updates.
- First, launch the Teams app and click the three-dotted menu button in the top right.
- Then, in the drop-down menu, select Check for updates.
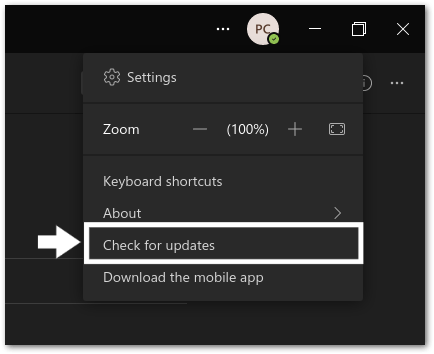
- Teams will then open a window that’ll notify you of the latest updates and you can choose to download them.
On Mobile
For mobile devices, the app itself doesn’t auto-update. Nonetheless, you can configure or enable auto-updates for the Microsoft Teams app through your native app store, whether it’s through the Google Play Store or Apple App Store.
Meanwhile, you can also check and install any pending Microsoft Teams app updates through the following steps:
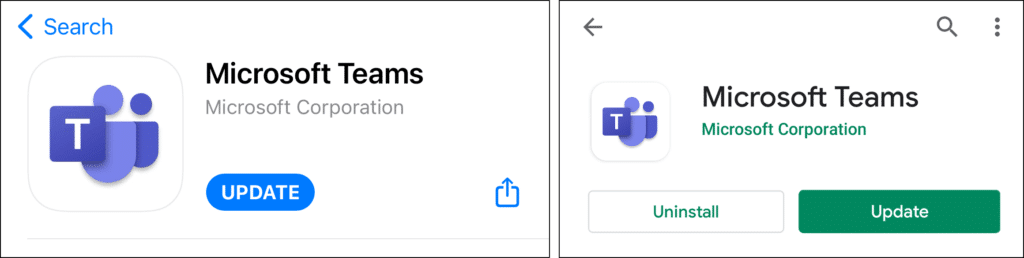
- To begin, navigate to the Play Store (Android) or App Store (iOS).
- Then, search for the Microsoft Teams app.
- Next, look for the installed Microsoft Teams app and go to its app page.
- Finally, if an update is available, select the Update button.
Note: No further action is needed in terms of updating the Microsoft Team app if you’re using its web version as new updates are automatically integrated.
2. Clear the Microsoft Teams App Cache and Data
Every information and interaction on an app is stored as cache data which is used to enhance the app’s performance to best suit your preferences. It also helps to lessen the app’s loading time and information retrieval.
Sounds like cache is a core aspect of an app, so what exactly could go wrong? 🤷♂️
Having said that, another reason that could halt the update process for your Teams client is misconfigured and outdated data. Ultimately, it could hinder app processes including retrieving updates as you might be experiencing on your Teams client. Yes, the same data that would help you to utilize the app better could also be the culprit.
Similarly, if you’re having trouble downloading or installing a new iteration of the Teams client, there could be corrupted data from the previous installation. Hence, the steps below will help you navigate to the app files and from there, you can clear them completely to ensure that your next installation starts from scratch. So, this step is fruitful if you’re eventually going to try to reinstall the app (Step 3).
Nonetheless, if you find that you have issues in installing or updating Microsoft Teams, we recommend clearing the Teams cache and data.
The following steps will show you how to clear the Teams cache on Windows, macOS and extra steps to clear the Teams web browser data if you’re using its web app instead:
On Windows
- Firstly, ensure the Teams app is fully closed and not running. You can double-check by looking in the Task Manager (Ctrl + Shift + Esc). End the Teams process in there if you see it running. (Step 1)
- Next, open up the Run dialogue. (Win + R)
- Copy and paste the following address to access Teams’ cache: %appdata%/Microsoft
- You should see a list of folders here like in the screenshot.
- Then, simply select Teams and delete it.
- Finally, open up Teams and let it set up all the new cache.
On macOS
- To start, make sure Teams is fully closed. We detailed how to do so in Step 1.
- Then, hold down Command+Shift+G and paste the following directory: ~/Library/Application Support/Microsoft

- Here, simply delete the Teams folder.
- After that, open up the Keychain Access app through Launchpad.
- Next, while login is selected in the left sidebar, delete the Microsoft Teams listing.

- Finally, open up Teams and let it set up all the new cache.
On a Web Browser
The following steps were performed on Google Chrome, but are generally similar regardless of whichever browser you’re using:
- First, navigate to the Teams web version and log in.
- On the left side of your address bar, click on the lock or similar.
- Then, click on the Clear cookies and site data… option or similar.

- Finally, in the new window, click on Remove in the bottom right corner.

Note: Clearing cookies and site data will log you out of the website, so save everything before you perform these steps.
Other than that, you may want to try reinstalling the Teams client if manually updating or clearing the client’s cache and data aren’t doing the trick. Follow along as we explain this method in detail next. ⬇
3. Reinstall the Microsoft Teams App
Whether you’re trying to update your Teams client but keeps failing or you’re attempting to get a fresh copy of the app as a way to eliminate bugs and glitches – reinstalling the Teams client is the answer.
By far, the best answer to get the latest version of any client or app is to completely delete its files and get a fresh copy installed 🗑. The same goes for Teams when it gets littered with bugs and overloaded data.
Therefore, if you encounter any issue in installing or updating Microsoft Teams, we suggest uninstalling and reinstalling the Teams client.
In order to reinstall the Teams client on Windows and macOS, here are the steps to do so:
Note: For a more thorough reinstall, after uninstalling the app and before installing a brand new iteration, you can follow the previous step (Step 2) to delete the Microsoft Teams’ app cache and data. Thus, cleaning the client’s data storage, allowing for brand new data to be collected for a smooth operation.
On Windows
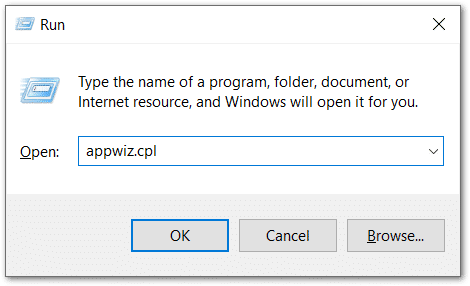
- First, open the Run window by pressing Windows and R keys simultaneously.
- Next, type in appwiz.cpl and press OK in the Run prompt window.
- Now, from the list of apps, select Microsoft Teams and click Uninstall.
- Once the uninstallation is complete, go to the Microsoft Teams download page and reinstall the app.
On macOS
- First, open Finder and look under the Applications tab for Microsoft Teams.
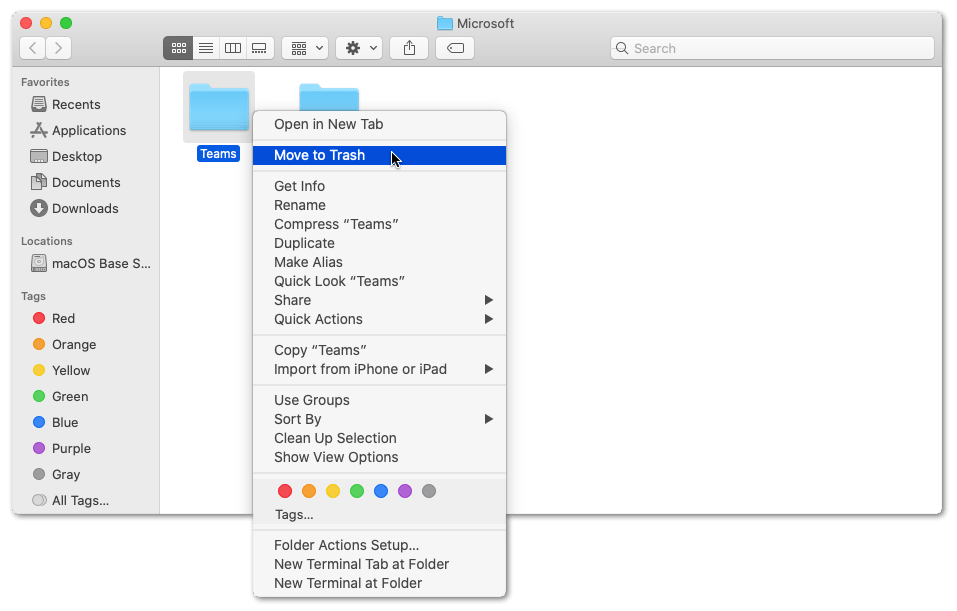
- Then, drag the Microsoft Teams app to the Trash or right-click it and select Move to Trash.
- If requested, enter the credentials you use for your Mac’s administrator account in the next window.
- After that, go to the Trash and right-click on it and select Empty Trash.
- Finally, reinstall the app by going to the Microsoft Teams download page.
4. Launch the Microsoft Teams Installer/Client as Administrator
Another method worth trying is to make use of the “administrator mode” which helps you to bypass some restrictions that could prevent software like Teams from being installed. In some cases, users found that they could successfully install the Teams client by launching the installer as an Administrator.
For this, you can download Microsoft Teams from the Microsoft page.
For Windows
Then, go to the folder that contains the downloaded file and locate the Microsoft Teams installer.
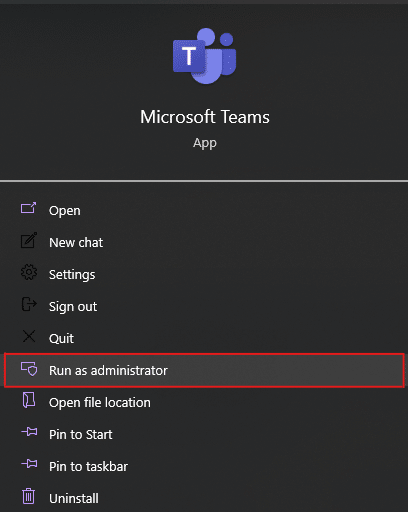
Afterwards, right-click the said installer and select “Run as administrator” as shown below.
Depending on your OS, the system will confirm whether you’d like to proceed and choose “Yes”. It might ask for your administrator credentials which should be the same as what you use to sign in to your device.
Additionally, you may also try running the Teams client as administrator if you have issues updating it to the latest version. Simply use the same steps above with the Teams client launcher.
For macOS and Linux
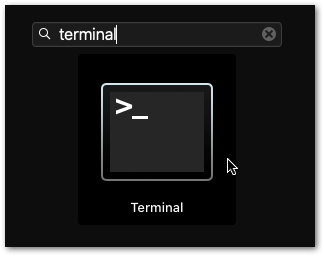
As macOS and many Linux distros have unix-based terminals or command lines, you can open the Microsoft Teams installation file with administrator privileges using your native terminal app with the same command. In the terminal, simply type “sudo” followed by the file/app location and press Enter.
5. Turn Off Your Device’s Firewall or Antivirus Temporarily
As a way to ensure your device’s safety, the firewall and antivirus 🛡 are intended to protect and block your device from malicious software and unauthorized access. Some operating systems provide a built-in firewall to protect your device from online threats.
In rare cases, this could lead to unsuccessful installation as your device’s system may mistakenly believe it may be harmful.
Hence, this brings us to the next troubleshooting method which is to turn off your device’s firewall or antivirus for the Teams client installation or update.
For that reason, you can choose to disable your device’s firewall by following these steps on Windows and macOS:
On Windows
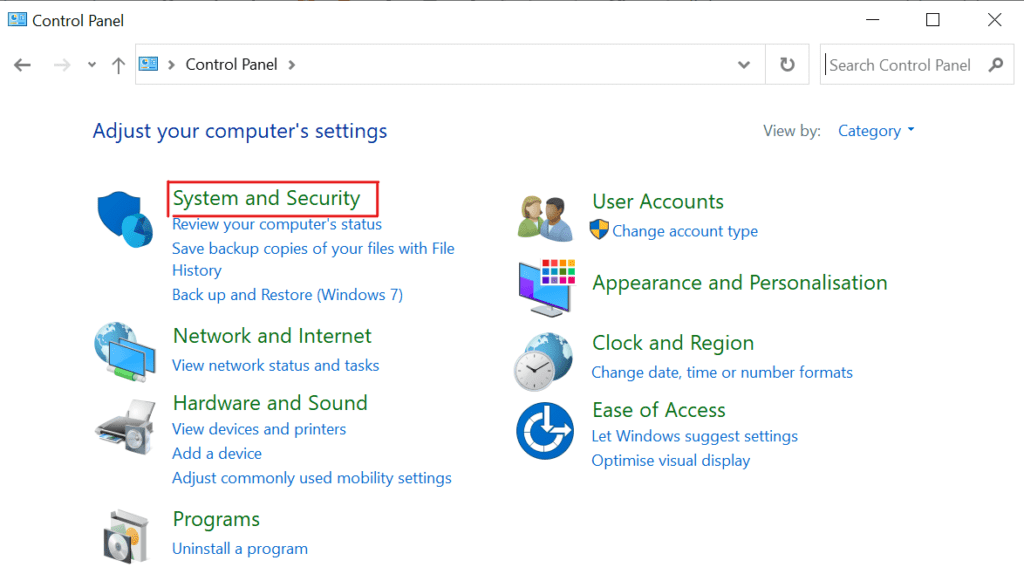
- To start, press your Windows key and type in Control Panel.
![]()
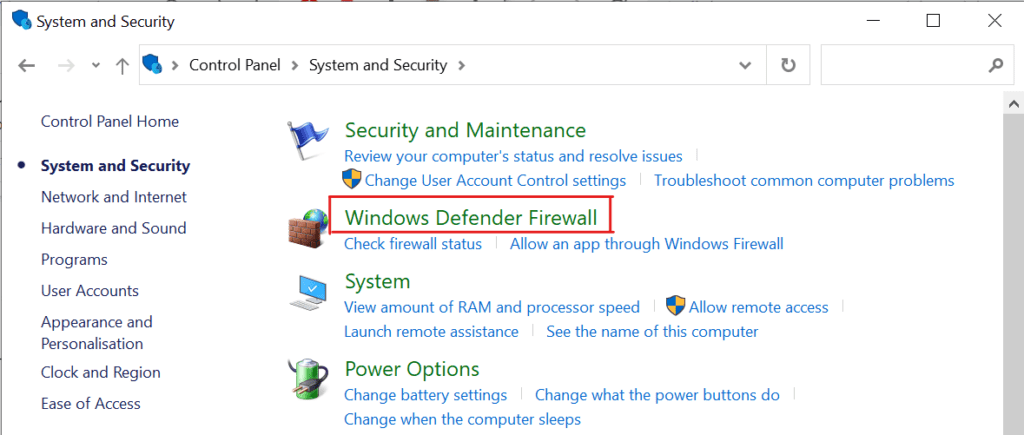
- Next, open the Control Panel app and proceed to select System and Security.
- On the next window, select Windows Defender Firewall.
- Then, you’ll see a list of options and select Turn Windows Firewall on or off.
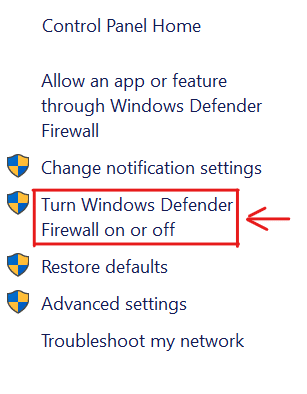
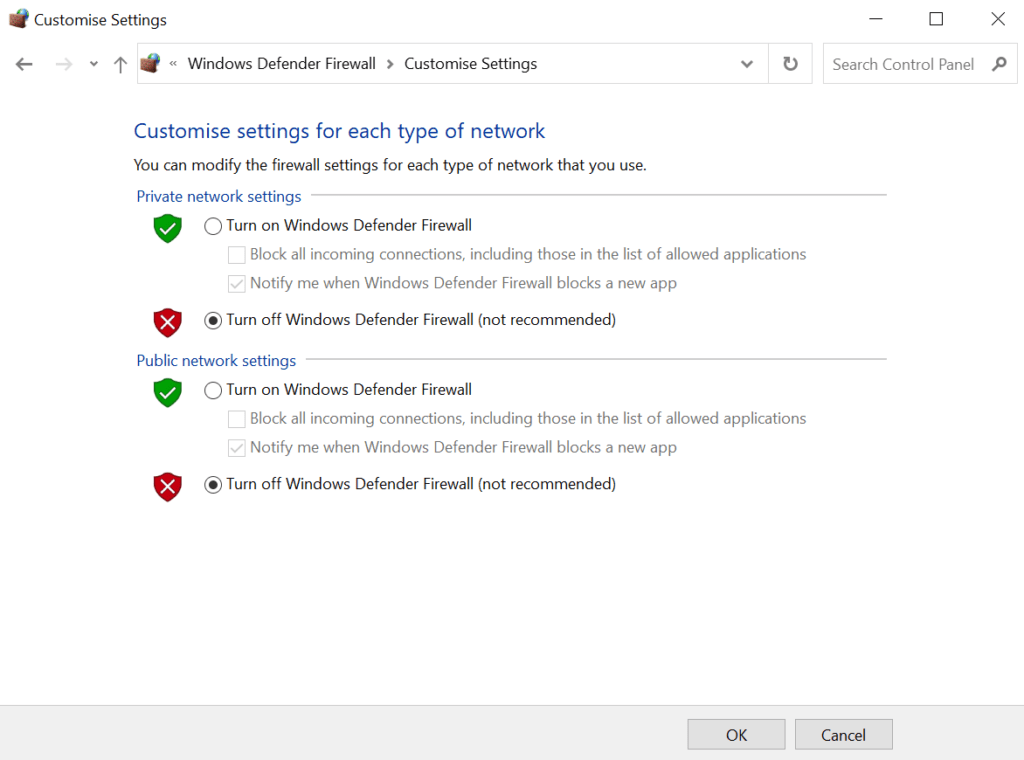
- Afterwards, you’ll see the Customize Settings window, click on the Turn off Windows Defender Firewall buttons. Apply the step to both Private network settings and Public network settings.
- Finally, click OK.
Note: It’s highly advisable that you only turn off your device’s firewall for a brief moment and have it back on after you’ve tried installing or updating Microsoft Teams. Also, you may be asked to re-enable the Windows Firewall when there are changes in your network settings.
On macOS
- Firstly, click the Apple logo in the upper-left corner to open the Apple Menu. From the drop-down menu, select System Preferences.
- Then, select Security & Privacy.
- On the next window, click the Firewall tab.

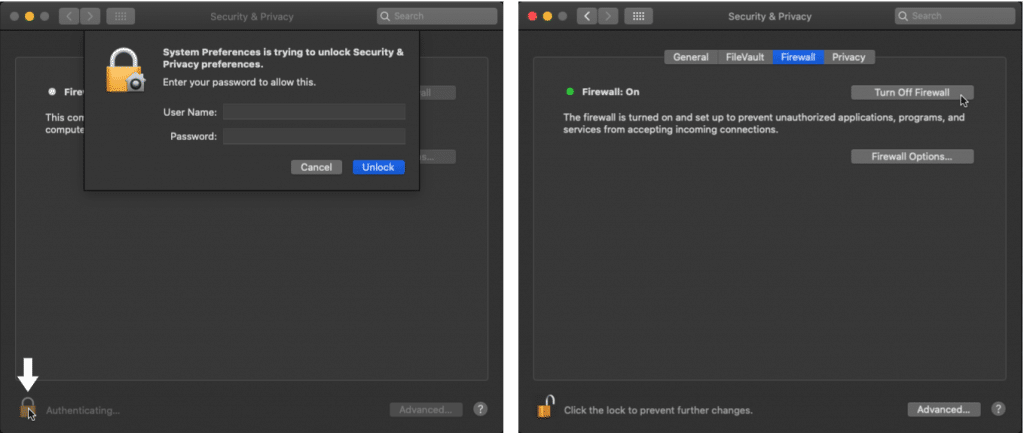
- Next, click the lock icon that you can find at the bottom-left corner of the window.
- Enter your admin username and password as requested to proceed.
- Finally, you can now click the Turn Off Firewall button.
Note: Perhaps you find that without your firewall turned on, Microsoft Teams behaves correctly. In that case, you can allow it through your firewall by following the steps as detailed in our other guide here.
After you’ve turned off your device’s firewall, try installing or updating Microsoft Teams and see if the issue persists. Also, don’t forget to turn the firewall on again after you’re done as it’s important to keep your device protected.
If you’re using third-party antivirus software, we recommend turning it off temporarily along with your device’s firewall as a troubleshooting method.
6. Install Microsoft Teams Using a File Archiver
Moving on, if you insist on using the Teams client, we get it, you don’t want to miss out on the convenience and limitless features. Hence, there’s an alternative to try when you have issues in installing or updating Microsoft Teams.
This may seem confusing at first, but we’re going to guide you through each step!
For this, we’ll be using a third-party file archiver app to do some tweaking to the Teams installer:
- Firstly, you need to completely uninstall any existing instances of Microsoft Teams on your device (Step 3).
- Next, proceed to install a third-party file archiver if you don’t have any. We suggest that you try 7-Zip Portable which you can download here.
- Also, download Microsoft Teams and make sure to choose an easy folder location.
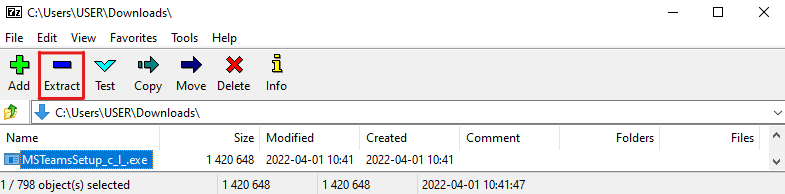
- Launch 7-Zip Portable and browse for the location of the Teams client. Afterwards, right-click on the Teams client and select Extract to which you should take note of the chosen extracted folder location.
- In the extracted Teams client folder, look for the file that ends with .nupkg.
- Similar to step 4, extract the .nupkg file and take note of the extracted folder location.
- Subsequently, you need to locate the appdata folder on your device under the User account folder. You may try these addresses:
C:UsersUSERAppDataLocalMicrosoft
C:UsersAppDataLocalMicrosoft
- In the Microsoft folder, create a new folder titled Teams.
- For the final step, go back to the extracted .nupkg folder, double-click on the lib folder followed by net45.
- Finally, scroll down until you find the Teams client and you can now run the app. Additionally, you can create a shortcut for the client.
Note: This solution is considered a temporary fix as the Teams client won’t appear in your Windows Start list of apps and settings. Therefore, use this method for urgent use and give the previous fixes a try or you can reach out to Microsoft Support (Step 8) for a more definite answer.
7. Try the Web Version of Microsoft Teams
Although the issue in installing or updating Microsoft Teams isn’t a stranger to many of its users, the causes may vary. Undeniably, it might as well be the result of bugs that are currently being resolved on Microsoft Teams’ end. 👩💻
Nevertheless, a great alternative if you keep having issues with the Microsoft Teams client is to try using its web app instead.
Primarily, the web version of Microsoft Teams will run on its best version as updates and bug patches 👾 are directly and automatically implemented. Besides, you may avoid issues that could’ve occurred because your device doesn’t meet Teams’ minimum requirements.
Thus, you can try going on the web version of Microsoft Teams and log in to your account as usual.

We recommend that you try the Teams web app using the Microsoft Edge web browser as other major web browsers such as Google Chrome, Firefox and Safari is believed to run the web app with limited features.
8. Contact Microsoft Support
Perhaps you’ve tried everything and you can’t install or update your Microsoft Teams client successfully. 😩
After long hours of trying to figure out the best fix, you might need professional assistance for a more definitive answer to your Teams issues.
On that account, you can reach out to Microsoft Support or the Teams community who are ready to help you. Here are the 3 best channels you can use to get further help when you have issues installing or updating Microsoft Teams:
- Microsoft Teams Forum – Submit a comprehensive report regarding the issues and get feedback from Microsoft representatives or other Teams users.
- Microsoft Office 365 Support – Send a report directly to the Microsoft Office 365 support department to get a prompt reply.
- Microsoft Teams Twitter – Get the latest announcements regarding the most recent issues, updates or fixes you can try by following the official Microsoft Teams Twitter page.

Conclusion
We understand the crushing feeling when you just can’t update your Teams client, missing out on new features, app enhancements or essential bug patches 😢. Or, you’re trying to download the revolutionary workspace platform but it keeps giving you some error messages! 🚫
We’ve got your back and have done our research on this one. 🕵️♂️
In this article, we’ve compiled the types of Teams update and installation errors you may find familiar as well as the 8 best fixes you can try to combat them. If you’ve tried and confirmed that one of them worked for you, don’t be shy to share with us by leaving a comment. 🤗
Let us know of your experience and comment below:
- Do you find that you can’t update or install your Microsoft Teams client?
- What steps worked for you or other fixes would you like to recommend?
- Are you struggling with any other issues on Microsoft Teams that you need help with?
Share this article with your friends or coworkers so they won’t have the same problem in the future! 😄
This morning Teams wouldn’t start of my laptop was booted today. Sowe decided to re-install. After uninstalling, and downloading the Team_window_x64.exe; the install failed
This is the log file SquirrelSetup
2020-03-26 20:29:12> Program: Starting Squirrel Updater: —install . —rerunningWithoutUAC —exeName=Teams_windows.exe
2020-03-26 20:29:12> Unhandled exception: System.TypeInitializationException: The type initializer for ‘Telemetry.PerfScenario’ threw an exception. —> System.TypeInitializationException: The type initializer for ‘Microsoft.Applications.Telemetry.Diagnostics.LimitingTraceLogger’
threw an exception. —> System.Configuration.ConfigurationErrorsException: Configuration system failed to initialize —> System.IO.FileNotFoundException: Could not load file or assembly ‘System.Xml, Version=4.0.0.0, Culture=neutral, PublicKeyToken=b77a5c561934e089’
or one of its dependencies. The system cannot find the file specified.
at System.Configuration.ExceptionUtil.WrapAsConfigException(String outerMessage, Exception e, String filename, Int32 line)
at System.Configuration.BaseConfigurationRecord.Init(IInternalConfigRoot configRoot, BaseConfigurationRecord parent, String configPath, String locationSubPath)
at System.Configuration.RuntimeConfigurationRecord.Create(InternalConfigRoot configRoot, IInternalConfigRecord parent, String configPath)
at System.Configuration.Internal.InternalConfigRoot.GetConfigRecord(String configPath)
at System.Configuration.ClientConfigurationSystem.EnsureInit(String configKey)
— End of inner exception stack trace —
at System.Configuration.ClientConfigurationSystem.EnsureInit(String configKey)
at System.Configuration.ClientConfigurationSystem.PrepareClientConfigSystem(String sectionName)
at System.Configuration.ClientConfigurationSystem.System.Configuration.Internal.IInternalConfigSystem.GetSection(String sectionName)
at System.Configuration.ConfigurationManager.GetSection(String sectionName)
at System.Runtime.Caching.MemoryCacheStatistics.InitializeConfiguration(NameValueCollection config)
at System.Runtime.Caching.MemoryCacheStatistics..ctor(MemoryCache memoryCache, NameValueCollection config)
at System.Runtime.Caching.MemoryCache.InitDisposableMembers(NameValueCollection config)
at System.Runtime.Caching.MemoryCache.Init(NameValueCollection config)
at System.Runtime.Caching.MemoryCache..ctor()
at System.Runtime.Caching.MemoryCache.get_Default()
at Microsoft.Applications.Telemetry.Diagnostics.LimitingTraceLogger..cctor()
— End of inner exception stack trace —
at Microsoft.Applications.Telemetry.Diagnostics.LimitingTraceLogger.get_CacheExpirationTimeSpan()
at Microsoft.Applications.Telemetry.Settings.TelemetryManagerSettings..ctor(String source, AuthenticationSettings authentication, Uri collectorUrl, Dictionary`2 identifiers, Nullable`1 maxRetries, Nullable`1 baseBackoffForSendingRetries, Nullable`1
maxBackoffForSendingRetries, Nullable`1 parallelSenderTasksNum, Nullable`1 collectorRequestSizeLimitBytes, Nullable`1 dataPackageSizeLimitBytes, Nullable`1 maxRecordsInBatchNum, Nullable`1 defaultBatchingWaitingThreshold, Nullable`1 batchingWaitingThresholdJitter,
Nullable`1 batchesNumWaitingForSendingToKeepBatching, Nullable`1 singleWaitingOnDequeueDurationWhenBatching, Nullable`1 recordsKeptInMemoryLimit, Nullable`1 perfCounterQueuePollingInterval, Nullable`1 statsResetInterval, Nullable`1 performanceCountersEnabled,
Nullable`1 limitingTraceLoggerCachingTime, String performanceCountersCategoryName, Nullable`1 maxRecordNumToDequeueAtOneTimeByBatcher, Nullable`1 waitUntilNoRecordsTimeout, Nullable`1 waitUntilNoRecordsCheckingInterval, Nullable`1 poolBuffers, Nullable`1 compressPackage,
String tenantToken, String additionalPerformanceCounters, Nullable`1 defaultPerformanceCounterCadence, Nullable`1 enableBeacons, Nullable`1 metricCadence, Nullable`1 kpiCadence, Nullable`1 enableTelemetryUploaderMode, Nullable`1 dequeueCount, Nullable`1 disableMultiTenantRequests,
Nullable`1 telemetrySdkModeType)
at Microsoft.Applications.Telemetry.Settings.TelemetryManagerSettingsBuilder.Build()
at Microsoft.Applications.Telemetry.Desktop.DesktopTelemetryManager.AdvancedInitialize(TelemetryManagerSettingsBuilder settingsBuilder)
at Microsoft.Applications.Telemetry.Desktop.LogManager.Initialize(String tenantToken, LogConfiguration configuration)
at Telemetry.AriaWrapper.Initialize()
at Telemetry.AriaWrapper..ctor()
at Telemetry.PerfScenario..cctor()
— End of inner exception stack trace —
at Telemetry.PerfScenario.set_TeamsTelemetryConfig(IConfigProvider value)
at Squirrel.Update.Program.executeCommandLine(String[] args)
at Squirrel.Update.Program.main(String[] args)
>>>>>
After several tries — also running as an admin — still no joy. We noticed an update to windows was available — so we installed it.
Again — no joy.
What to do ?
Having trouble trying to fix Microsoft Teams’ installation issues?
New users of Microsoft Teams will find themselves greeted by a lot of great productivity features. The Microsoft program offers a ton of versatility and accessibility. For one, it supports a lot of media types that otherwise wouldn’t pass off in other chat-based collaboration applications.
Microsoft Teams are often used extensively by schools, startups, and even big companies. However, an uncommon but greatly affecting issue that can put you off from trying out the Microsoft service is running into installation issues.
In this article, we’ll be figuring out why you’re having this problem and guide you through the steps to help you fix it. Here’s how you can fix Microsoft Teams installation issues.
Let’s get started!
- 1. Uninstall Microsoft Teams Completely.
- 2. Remove Microsoft Teams’ Cache Files.
- 3. Run The Installer As Administrator.
- 4. Use The Registry Editor.
1. Uninstall Microsoft Teams Completely.
If you’re trying to reinstall Microsoft Teams, an installation error might be the result of a currently existing Microsoft Teams app on your computer. Getting rid of programs can be a complicated process if you’re either new to Windows 10 or are unfamiliar with the uninstallation process.
Similarly, this problem can also affect Mac users. In cases like this, uninstalling a program by simply deleting them can cause file residues. These will eventually hinder any other installations as your operating system might consider Microsoft Teams as already installed.
In further methods, we’ll be clearing other files, but for now, we’ll uninstall Microsoft Teams properly.
Here’s how you can uninstall Microsoft Teams for Windows:
- First, open up the Start menu and type in ‘Add or remove programs’. Select the first result in your search query.
- Now, you should be directed to a window with a list of all currently installed programs on your computer. Under Apps & Features, utilize the search bar and type in ‘Microsoft Teams’.
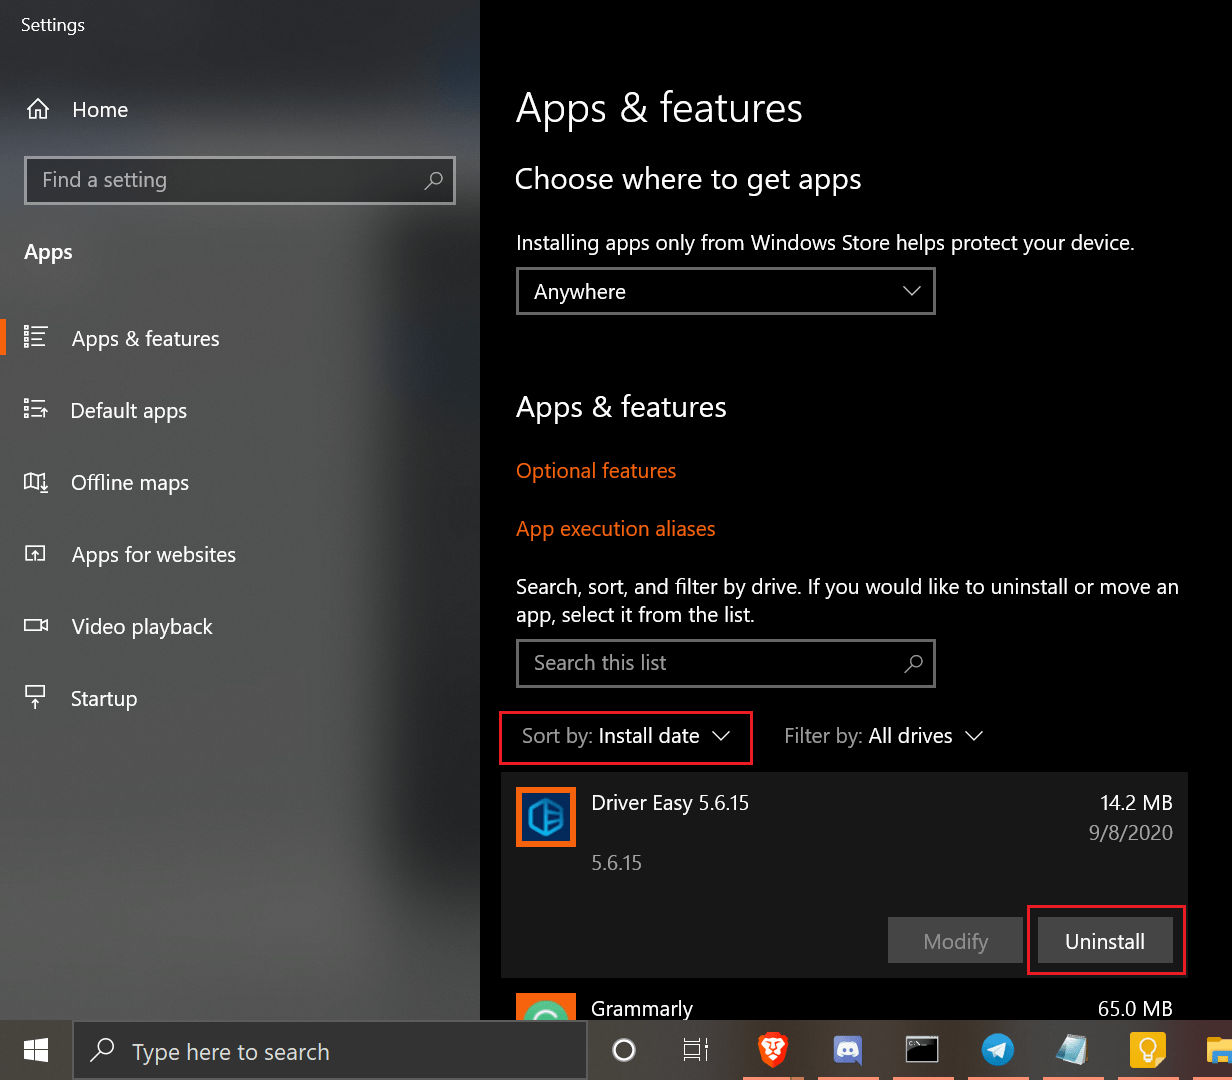
- Finally, click on the program and select Uninstall. Follow the prompts to finish the process.
Alternatively, here’s how you can uninstall Microsoft Teams for Mac users:
- Before you proceed, make sure that Microsoft Teams is closed and not running in the background. You can check by using the Activity Monitor and searching for Microsoft Teams.
- Now, open up Finder and go to the Applications folder.
- When you’re there, try to locate Microsoft Teams and drag the application to the Trash. This will uninstall the program.
Just because you aren’t finding Microsoft Teams in the steps above doesn’t mean that all related files have been deleted. Go ahead and move on to the methods below to delete Microsoft Teams’ cache files.
2. Remove Microsoft Teams’ Cache Files.
Cache files are incredibly useful assets that help improve the user experience for your application. Even for websites, cache files are often saved and collected in the form of cookies.
These data files will take note of any changes or settings you’ve set, and upon reopening that program or website, will load your preferences and replace the default settings. This essentially makes sure that any personal changes you make to the programs you visit and use are kept and saved.
Microsoft Teams keeps a record of your cache files somewhere on your computer. If the program was uninstalled incorrectly, the cache files may have been left behind which could be the cause of the installation error.
Here’s how you can remove Microsoft Teams’ cache files:
- We’ll need to open up the Run dialog box to locate the cache files. Open this by pressing the hotkey Windows key + R or by searching for ‘Run’ in the Start menu.
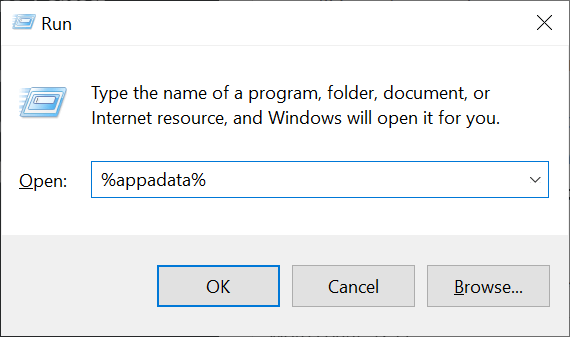
- With the dialog box open, type in ‘%appdata%’ and press Enter.
- A list of numerous folders should be displayed on your screen. Look for and click on Microsoft.
- Once you’re there, locate and delete the Teams folder. You can do this by clicking on the folder and pressing the Delete key to move the file to your Recycle Bin. Similarly, you can also permanently delete files by pressing Shift + Delete.
Try to install the program again to see if that fixed your Microsoft Teams installation issue.
3. Run The Installer As Administrator.
‘Administrator Mode’ is a powerful tool that usually overrides most errors. Running most programs ‘as administrator’ gives it a higher level of access to your computer. For installers, this can be the difference between installing your app or not.
This is generally not recommended, however, you can trust Microsoft Teams since it is developed by Microsoft. Most installers shouldn’t need to be run as an admin, but doing so will bypass a ton of complications that could be caused by your anti-virus and firewall.
Here’s how you can run the installer as an administrator:
- First, go to Microsoft’s website and download Microsoft Teams.
- Now, open the Downloads folder or the folder the installer is saved in. Depending on your browser, you can also just view the downloaded file and click Show in folder.

- Finally, with the installer file on your screen, right-click the installer and select Run as administrator. You will be asked to confirm or even input the admin credentials on your system. Fill this in and continue.
Any issues with permissions or anti-virus protection should now be bypassed by the Microsoft Teams installer. Hopefully, that has solved your Microsoft Teams’ installation issue.
4. Use The Registry Editor.
The Registry Editor is a powerful collection of all level-one settings that you can configure on the Windows operating system. Your systems settings are collected and displayed in the editor, where we can easily access and configure these files.
In this method, we’ll be modifying a file that could be uninstalling or preventing the installation of Microsoft Teams. This is particularly for users that can install Microsoft Teams but find that it gets deleted or uninstalled after a couple of hours.
Here’s how you can configure the Registry Editor:
- Start with opening up the Start menu by pressing on the Windows key.
- Now, type in ‘Registry Editor’ or ‘Regedit’ and click on the first result from your search query.
- On the left side panel, navigate through the folders until you reach the Teams folder. Here are the folders to open:
HKEY_CURRENT_USERSoftwareMicrosoftOfficeTeams
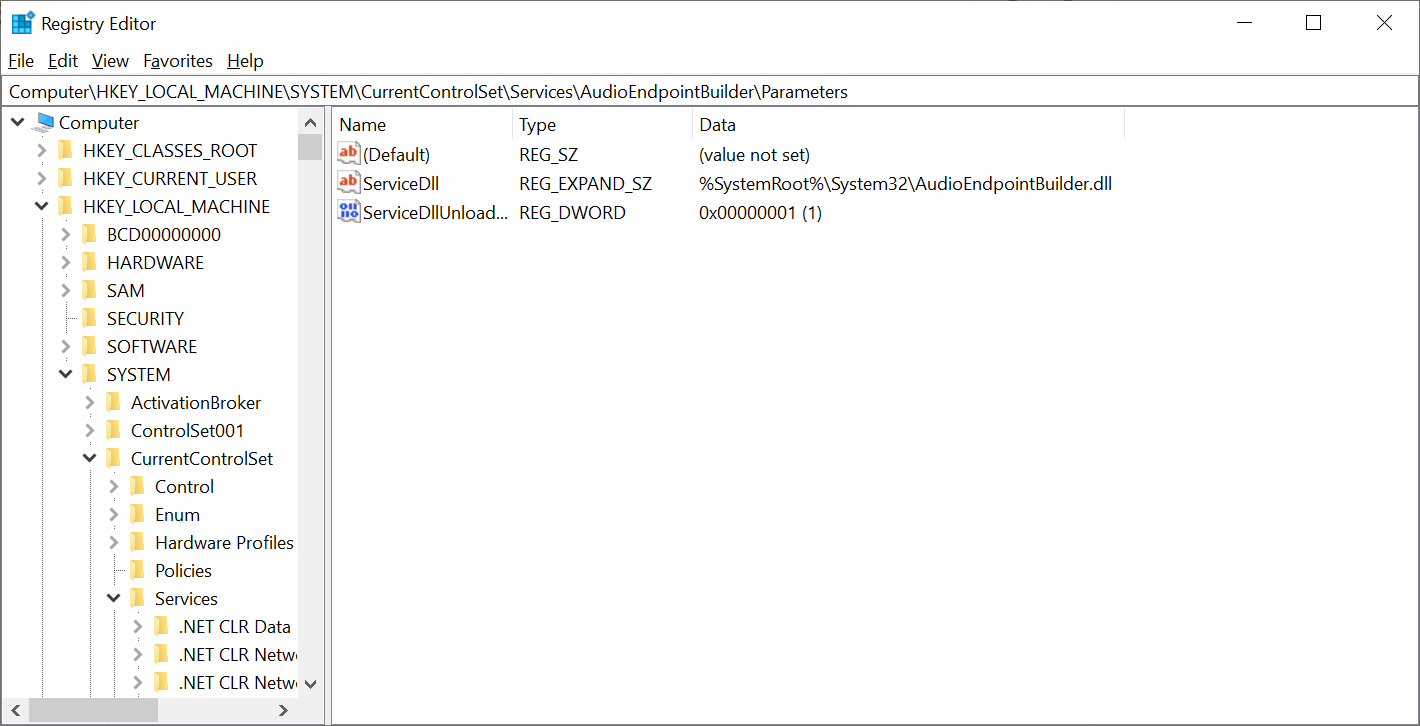
- On the Teams folder, you should notice a file named PreventInstallationFromMsi. Double-click on this file and change the Value data to 1.
- If you cannot find the file, simply right-click on an empty space in the folder and hover over New then select String Value. Name the new file as ‘PreventInstallationFromMsi’ and set the Value data to 1.
Try and install Microsoft Teams normally or by running the installer as an administrator. This should fix your issue and stop it from uninstalling on its own. Feel free to check out our other article so you can disable Microsoft Teams opening on startup.
Now that you’ve reached the end of this article, we hope to have helped you fix Microsoft Teams installation issue. If you have any clarifications, please leave a comment below or discuss your thoughts with our other readers.
If this guide helped you, please share it. 🙂
Join 50,000+ subscribers
Stay updated on the latest discounts, exclusive promos, and news articles from Saint.
This morning Teams wouldn’t start of my laptop was booted today. Sowe decided to re-install. After uninstalling, and downloading the Team_window_x64.exe; the install failed
This is the log file SquirrelSetup
2020-03-26 20:29:12> Program: Starting Squirrel Updater: —install . —rerunningWithoutUAC —exeName=Teams_windows.exe
2020-03-26 20:29:12> Unhandled exception: System.TypeInitializationException: The type initializer for ‘Telemetry.PerfScenario’ threw an exception. —> System.TypeInitializationException: The type initializer for ‘Microsoft.Applications.Telemetry.Diagnostics.LimitingTraceLogger’
threw an exception. —> System.Configuration.ConfigurationErrorsException: Configuration system failed to initialize —> System.IO.FileNotFoundException: Could not load file or assembly ‘System.Xml, Version=4.0.0.0, Culture=neutral, PublicKeyToken=b77a5c561934e089’
or one of its dependencies. The system cannot find the file specified.
at System.Configuration.ExceptionUtil.WrapAsConfigException(String outerMessage, Exception e, String filename, Int32 line)
at System.Configuration.BaseConfigurationRecord.Init(IInternalConfigRoot configRoot, BaseConfigurationRecord parent, String configPath, String locationSubPath)
at System.Configuration.RuntimeConfigurationRecord.Create(InternalConfigRoot configRoot, IInternalConfigRecord parent, String configPath)
at System.Configuration.Internal.InternalConfigRoot.GetConfigRecord(String configPath)
at System.Configuration.ClientConfigurationSystem.EnsureInit(String configKey)
— End of inner exception stack trace —
at System.Configuration.ClientConfigurationSystem.EnsureInit(String configKey)
at System.Configuration.ClientConfigurationSystem.PrepareClientConfigSystem(String sectionName)
at System.Configuration.ClientConfigurationSystem.System.Configuration.Internal.IInternalConfigSystem.GetSection(String sectionName)
at System.Configuration.ConfigurationManager.GetSection(String sectionName)
at System.Runtime.Caching.MemoryCacheStatistics.InitializeConfiguration(NameValueCollection config)
at System.Runtime.Caching.MemoryCacheStatistics..ctor(MemoryCache memoryCache, NameValueCollection config)
at System.Runtime.Caching.MemoryCache.InitDisposableMembers(NameValueCollection config)
at System.Runtime.Caching.MemoryCache.Init(NameValueCollection config)
at System.Runtime.Caching.MemoryCache..ctor()
at System.Runtime.Caching.MemoryCache.get_Default()
at Microsoft.Applications.Telemetry.Diagnostics.LimitingTraceLogger..cctor()
— End of inner exception stack trace —
at Microsoft.Applications.Telemetry.Diagnostics.LimitingTraceLogger.get_CacheExpirationTimeSpan()
at Microsoft.Applications.Telemetry.Settings.TelemetryManagerSettings..ctor(String source, AuthenticationSettings authentication, Uri collectorUrl, Dictionary`2 identifiers, Nullable`1 maxRetries, Nullable`1 baseBackoffForSendingRetries, Nullable`1
maxBackoffForSendingRetries, Nullable`1 parallelSenderTasksNum, Nullable`1 collectorRequestSizeLimitBytes, Nullable`1 dataPackageSizeLimitBytes, Nullable`1 maxRecordsInBatchNum, Nullable`1 defaultBatchingWaitingThreshold, Nullable`1 batchingWaitingThresholdJitter,
Nullable`1 batchesNumWaitingForSendingToKeepBatching, Nullable`1 singleWaitingOnDequeueDurationWhenBatching, Nullable`1 recordsKeptInMemoryLimit, Nullable`1 perfCounterQueuePollingInterval, Nullable`1 statsResetInterval, Nullable`1 performanceCountersEnabled,
Nullable`1 limitingTraceLoggerCachingTime, String performanceCountersCategoryName, Nullable`1 maxRecordNumToDequeueAtOneTimeByBatcher, Nullable`1 waitUntilNoRecordsTimeout, Nullable`1 waitUntilNoRecordsCheckingInterval, Nullable`1 poolBuffers, Nullable`1 compressPackage,
String tenantToken, String additionalPerformanceCounters, Nullable`1 defaultPerformanceCounterCadence, Nullable`1 enableBeacons, Nullable`1 metricCadence, Nullable`1 kpiCadence, Nullable`1 enableTelemetryUploaderMode, Nullable`1 dequeueCount, Nullable`1 disableMultiTenantRequests,
Nullable`1 telemetrySdkModeType)
at Microsoft.Applications.Telemetry.Settings.TelemetryManagerSettingsBuilder.Build()
at Microsoft.Applications.Telemetry.Desktop.DesktopTelemetryManager.AdvancedInitialize(TelemetryManagerSettingsBuilder settingsBuilder)
at Microsoft.Applications.Telemetry.Desktop.LogManager.Initialize(String tenantToken, LogConfiguration configuration)
at Telemetry.AriaWrapper.Initialize()
at Telemetry.AriaWrapper..ctor()
at Telemetry.PerfScenario..cctor()
— End of inner exception stack trace —
at Telemetry.PerfScenario.set_TeamsTelemetryConfig(IConfigProvider value)
at Squirrel.Update.Program.executeCommandLine(String[] args)
at Squirrel.Update.Program.main(String[] args)
>>>>>
After several tries — also running as an admin — still no joy. We noticed an update to windows was available — so we installed it.
Again — no joy.
What to do ?
Обновлено Июнь 2023: перестаньте получать сообщения об ошибках и замедлите работу вашей системы с помощью нашего инструмента оптимизации. Получить сейчас в эту ссылку
- Скачайте и установите инструмент для ремонта здесь.
- Пусть он просканирует ваш компьютер.
- Затем инструмент почини свой компьютер.
Microsoft Teams была запущена в 2017 году как унифицированная платформа для общения и совместной работы, которая помогает предприятиям и организациям достигать своих целей. Корпорация Майкрософт использовала имеющийся у компании опыт работы с программным обеспечением Office и создала унифицированный опыт работы с Teams, Office 365 и Skype для бизнеса.
Однако, как и с любым программным обеспечением, не всегда все идет по плану. Если у вас есть проблемы с Microsoft Teams, вот как исправить проблемы с установкой Microsoft Teams.
Параметр «Загрузить приложение Teams в фоновом режиме для пользователей Skype для бизнеса» включен в Центре администрирования Microsoft Teams: Пока этот параметр включен, любой компьютер в сети, из которого были удалены Teams, будет автоматически загружать и переустанавливать программное обеспечение без уведомления пользователя при входе в клиент Skype для бизнеса.
Microsoft Teams удалена, но не установщик всей машины Teams: Клиент Microsoft Teams — не единственный компонент, который необходимо удалить, чтобы избавиться от программы. Вы также должны найти и удалить установщик для всей машины Teams на своем компьютере, чтобы команды оставались удаленными. Пока на вашем компьютере установлен общесистемный установщик Teams, он будет переустанавливать Teams прямо у вас под носом.
Как решить проблемы с установкой Microsoft Teams?
Обновление за июнь 2023 г .:
Теперь вы можете предотвратить проблемы с ПК с помощью этого инструмента, например, защитить вас от потери файлов и вредоносных программ. Кроме того, это отличный способ оптимизировать ваш компьютер для достижения максимальной производительности. Программа с легкостью исправляет типичные ошибки, которые могут возникнуть в системах Windows — нет необходимости часами искать и устранять неполадки, если у вас под рукой есть идеальное решение:
- Шаг 1: Скачать PC Repair & Optimizer Tool (Windows 10, 8, 7, XP, Vista — Microsoft Gold Certified).
- Шаг 2: Нажмите «Начать сканирование”, Чтобы найти проблемы реестра Windows, которые могут вызывать проблемы с ПК.
- Шаг 3: Нажмите «Починить все», Чтобы исправить все проблемы.
Запустить установщик от имени администратора
«Режим администратора» — это мощный инструмент, который обычно позволяет обойти большинство ошибок. Запуск большинства программ «от имени администратора» обеспечивает более высокий уровень доступа к вашему компьютеру. Для установщиков это может быть решающим фактором между установкой вашего приложения и его отклонением.
Обычно это не рекомендуется, но вы можете доверять Microsoft Teams, потому что он был разработан Microsoft. Большинство установщиков не нужно запускать от имени администратора, но если вы это сделаете, вы избежите некоторых осложнений, которые могут быть вызваны вашим антивирусом и брандмауэром.
- Сначала перейдите на веб-сайт Microsoft и загрузите Microsoft Teams.
- Теперь откройте папку «Загрузки» или папку, в которой хранится установщик.
- В зависимости от вашего браузера вы также можете просто просмотреть загруженный файл и нажать «Просмотр» в папке.
- Наконец, когда установочный файл появится на экране, щелкните его правой кнопкой мыши и выберите Запуск от имени администратора.
- Вам будет предложено подтвердить или даже ввести учетные данные системного администратора. Заполните их и продолжайте.
Теперь установщик Microsoft Teams должен обходить любые проблемы с авторизацией или защитой от вирусов. Мы надеемся, что это решило вашу проблему с установкой Microsoft Teams.
Полное удаление Microsoft Teams
Если вы попытаетесь переустановить Microsoft Teams, ошибка установки может быть вызвана существующим приложением Microsoft Teams на вашем компьютере. Удаление программ может быть сложным процессом, если вы новичок в Windows 10 или не знакомы с процессом удаления.
Точно так же эта проблема может затронуть и пользователей Mac. В этом случае удаление программы простым удалением может привести к образованию оставшихся файлов. Это может помешать установке в будущем, поскольку операционная система считает, что Microsoft Teams уже установлена.
- Сначала откройте меню «Пуск» и введите «Установка и удаление программ».
- Выберите первый результат поискового запроса.
- Теперь у вас должно появиться окно со списком всех программ, установленных в данный момент на вашем компьютере.
- В разделе «Приложения и компоненты» используйте строку поиска и введите «Microsoft Teams».
- Наконец, щелкните программу и выберите «Удалить».
- Следуйте инструкциям, чтобы завершить процесс.
Вы также можете удалить Microsoft Teams для пользователей Mac следующим образом:
- Перед продолжением убедитесь, что Microsoft Teams закрыта и не работает в фоновом режиме.
- Вы можете проверить это с помощью Activity Monitor и поиска Microsoft Teams.
- Теперь откройте Finder и перейдите в папку Applications.
- Там найдите Microsoft Teams и перетащите приложение в корзину. Это приведет к удалению программы.
Использование редактора реестра
Редактор реестра — это мощный набор всех параметров верхнего уровня, которые вы можете настроить в своей операционной системе Windows. Ваши системные настройки собираются и отображаются в редакторе, где мы можем легко получить доступ к этим файлам и изменить их.
В этом методе мы изменим файл, который может удалить или предотвратить установку Microsoft Teams. Это в основном для пользователей, которые могут установить Microsoft Teams, но обнаруживают, что он удаляется или удаляется через несколько часов.
- Сначала откройте меню «Пуск», нажав клавишу Windows.
- Теперь введите «Редактор реестра» или «Regedit» и щелкните первый результат поиска.
- Просмотрите папки слева, пока не дойдете до папки «Команды». Вот папки, которые нужно открыть:
HKEY_CURRENT_USER Программное обеспечение Microsoft Office Команды. - В папке Teams вы должны найти файл PreventInstallationFromMsi. Дважды щелкните этот файл и измените значение информации на 1.
- Если вы не можете найти файл, щелкните правой кнопкой мыши место в папке и выберите «Создать», затем «Строковое значение».
- Назовите новый файл «PreventInstallationFromMsi» и установите значение 1.
Попробуйте установить Microsoft Teams обычным способом или запустив программу установки от имени администратора. Это должно решить проблему и предотвратить удаление само по себе.
Совет экспертов: Этот инструмент восстановления сканирует репозитории и заменяет поврежденные или отсутствующие файлы, если ни один из этих методов не сработал. Это хорошо работает в большинстве случаев, когда проблема связана с повреждением системы. Этот инструмент также оптимизирует вашу систему, чтобы максимизировать производительность. Его можно скачать по Щелчок Здесь
Часто задаваемые вопросы
Одна из особенностей этого установщика заключается в том, что он проверяет ваш профиль на наличие следов команд. Если он обнаруживает какие-либо команды, он не будет пытаться переустановить их (если это не обновление), а если пользователь удалил команды, он все равно обнаружит некоторые остатки и не будет их переустанавливать.
- Используйте другую версию Teams.
- Очистить кеш.
- Загрузите файлы из SharePoint.
- Проверьте разрешения для файлов SharePoint.
- Проверьте недопустимые символы.
- В списке приложений выберите Админ.
- В меню выберите «Настройки» -> «Службы и надстройки».
- Найдите Microsoft Teams и включите внешние приложения.
- Установите для параметра Разрешить внешние приложения в Microsoft Teams значение Вкл.
Другое решение, которое мы нашли, — перейти в C: ProgramData User Microsoft Teams и установить разрешение безопасности для этой папки, чтобы пользователь имел полный контроль. Затем перезагрузите компьютер.
Сообщение Просмотров: 1,301
Find that you can’t install or update your native Microsoft Teams client app and are faced with errors such as “Failed to Extract Installer”?
As you embark on the hybrid journey of working, learning or keeping in touch with your loved ones, Teams is definitely one of the best platforms. Equipped with features that are essential for virtual meetings, file sharing and virtual communication, Teams isn’t stopping yet. New features, existing feature enhancements and bug patches are delivered through client or app updates.
Did you know Teams is scheduled for an update every 2 weeks? 🤔
You may not notice it as Teams automatically installs available updates for its client when you have it running in the background.
However, there have been several occurrences where users just couldn’t update their Teams client on both Windows and macOS. Other than that, some users also faced problems in trying to install Microsoft Teams on their workstation devices.
Types of Errors When Installing or Updating Microsoft Teams
1. Auto-update doesn’t work
Microsoft Teams has long introduced the auto-update feature where the users don’t have to worry about regularly checking for updates manually. Instead, the Microsoft Teams client will automatically scan and install updates as soon as they’re available.
Be that as it may, users have found that the feature doesn’t always work. You can find more details and how to overcome this issue in Step 1.
2. Installation has failed, failed to extract installer
Teams users have reported that they receive the “Installation has failed, Failed to extract installer” error when trying to update or install the Teams client.
3. There was an error while installing the application
Many users have reported the “installation has failed, there was an error while installing the application” error after the Microsoft Teams app installation has been completed.
Is your Teams client showing the same error? Tell us about your experience in the comments section below!
While the cause of such errors and cases can be vague whether it’s device or software-related, we‘ve done thorough research to compile the best fixes when you can’t download, install or update the Microsoft Teams app.
Let’s get to fixing and make it work! 👩🔧
Table of Contents
8 Fixes for Microsoft Teams Not Downloading, Installing or Updating Successfully
- Try Manually Updating the Teams App
- Clear the Microsoft Teams App Cache and Data
- Reinstall the Microsoft Teams App
- Launch the Microsoft Teams Installer/Client as Administrator
- Turn Off Your Device’s Firewall or Antivirus Temporarily
- Install Microsoft Teams Using a File Archiver
- Try the Web Version of Microsoft Teams
- Contact Microsoft Support
8 Fixes for Issues When Installing or Updating Microsoft Teams
1. Try Manually Updating the Teams App
Firstly, we’d like to focus on issues revolving around the Microsoft Teams client updates. In this case, users have found that their Teams client doesn’t install new updates leaving them with an outdated or old version of the platform.
It’s important to note that the auto-update function only does its job when users leave the Teams client on idle mode. Meaning that you have to leave the Teams client open without using any of its features for a brief moment.
So, if you’ve given some time and your Teams app is still running on an older version, maybe it’s time to take matters into your own hands. 🙌
Luckily, Microsoft Teams has made it easy for you to manually update its desktop client by simply using the in-app feature. Here’s how you can make use of the feature as we also show how you can update your Teams app on mobile:
On Desktop
The Teams app for both Windows and macOS share the same user interface which explains the similar steps you can take to check and install Teams app updates.
- First, launch the Teams app and click the three-dotted menu button in the top right.
- Then, in the drop-down menu, select Check for updates.
- Teams will then open a window that’ll notify you of the latest updates and you can choose to download them.
On Mobile
For mobile devices, the app itself doesn’t auto-update. Nonetheless, you can configure or enable auto-updates for the Microsoft Teams app through your native app store, whether it’s through the Google Play Store or Apple App Store.
Meanwhile, you can also check and install any pending Microsoft Teams app updates through the following steps:
- To begin, navigate to the Play Store (Android) or App Store (iOS).
- Then, search for the Microsoft Teams app.
- Next, look for the installed Microsoft Teams app and go to its app page.
- Finally, if an update is available, select the Update button.
Note: No further action is needed in terms of updating the Microsoft Team app if you’re using its web version as new updates are automatically integrated.
2. Clear the Microsoft Teams App Cache and Data
Every information and interaction on an app is stored as cache data which is used to enhance the app’s performance to best suit your preferences. It also helps to lessen the app’s loading time and information retrieval.
Sounds like cache is a core aspect of an app, so what exactly could go wrong? 🤷♂️
Having said that, another reason that could halt the update process for your Teams client is misconfigured and outdated data. Ultimately, it could hinder app processes including retrieving updates as you might be experiencing on your Teams client. Yes, the same data that would help you to utilize the app better could also be the culprit.
Similarly, if you’re having trouble downloading or installing a new iteration of the Teams client, there could be corrupted data from the previous installation. Hence, the steps below will help you navigate to the app files and from there, you can clear them completely to ensure that your next installation starts from scratch. So, this step is fruitful if you’re eventually going to try to reinstall the app (Step 3).
Nonetheless, if you find that you have issues in installing or updating Microsoft Teams, we recommend clearing the Teams cache and data.
The following steps will show you how to clear the Teams cache on Windows, macOS and extra steps to clear the Teams web browser data if you’re using its web app instead:
On Windows
- Firstly, ensure the Teams app is fully closed and not running. You can double-check by looking in the Task Manager (Ctrl + Shift + Esc). End the Teams process in there if you see it running. (Step 1)
- Next, open up the Run dialogue. (Win + R)
- Copy and paste the following address to access Teams’ cache: %appdata%/Microsoft
- You should see a list of folders here like in the screenshot.
- Then, simply select Teams and delete it.
- Finally, open up Teams and let it set up all the new cache.
On macOS
- To start, make sure Teams is fully closed. We detailed how to do so in Step 1.
- Then, hold down Command+Shift+G and paste the following directory: ~/Library/Application Support/Microsoft
- Here, simply delete the Teams folder.
- After that, open up the Keychain Access app through Launchpad.
- Next, while login is selected in the left sidebar, delete the Microsoft Teams listing.
- Finally, open up Teams and let it set up all the new cache.
On a Web Browser
The following steps were performed on Google Chrome, but are generally similar regardless of whichever browser you’re using:
- First, navigate to the Teams web version and log in.
- On the left side of your address bar, click on the lock or similar.
- Then, click on the Clear cookies and site data… option or similar.
- Finally, in the new window, click on Remove in the bottom right corner.
Note: Clearing cookies and site data will log you out of the website, so save everything before you perform these steps.
Other than that, you may want to try reinstalling the Teams client if manually updating or clearing the client’s cache and data aren’t doing the trick. Follow along as we explain this method in detail next. ⬇
3. Reinstall the Microsoft Teams App
Whether you’re trying to update your Teams client but keeps failing or you’re attempting to get a fresh copy of the app as a way to eliminate bugs and glitches – reinstalling the Teams client is the answer.
By far, the best answer to get the latest version of any client or app is to completely delete its files and get a fresh copy installed 🗑. The same goes for Teams when it gets littered with bugs and overloaded data.
Therefore, if you encounter any issue in installing or updating Microsoft Teams, we suggest uninstalling and reinstalling the Teams client.
In order to reinstall the Teams client on Windows and macOS, here are the steps to do so:
Note: For a more thorough reinstall, after uninstalling the app and before installing a brand new iteration, you can follow the previous step (Step 2) to delete the Microsoft Teams’ app cache and data. Thus, cleaning the client’s data storage, allowing for brand new data to be collected for a smooth operation.
On Windows
- First, open the Run window by pressing Windows and R keys simultaneously.
- Next, type in appwiz.cpl and press OK in the Run prompt window.
- Now, from the list of apps, select Microsoft Teams and click Uninstall.
- Once the uninstallation is complete, go to the Microsoft Teams download page and reinstall the app.
On macOS
- First, open Finder and look under the Applications tab for Microsoft Teams.
- Then, drag the Microsoft Teams app to the Trash or right-click it and select Move to Trash.
- If requested, enter the credentials you use for your Mac’s administrator account in the next window.
- After that, go to the Trash and right-click on it and select Empty Trash.
- Finally, reinstall the app by going to the Microsoft Teams download page.
4. Launch the Microsoft Teams Installer/Client as Administrator
Another method worth trying is to make use of the “administrator mode” which helps you to bypass some restrictions that could prevent software like Teams from being installed. In some cases, users found that they could successfully install the Teams client by launching the installer as an Administrator.
For this, you can download Microsoft Teams from the Microsoft page.
For Windows
Then, go to the folder that contains the downloaded file and locate the Microsoft Teams installer.
Afterwards, right-click the said installer and select “Run as administrator” as shown below.
Depending on your OS, the system will confirm whether you’d like to proceed and choose “Yes”. It might ask for your administrator credentials which should be the same as what you use to sign in to your device.
Additionally, you may also try running the Teams client as administrator if you have issues updating it to the latest version. Simply use the same steps above with the Teams client launcher.
For macOS and Linux
As macOS and many Linux distros have unix-based terminals or command lines, you can open the Microsoft Teams installation file with administrator privileges using your native terminal app with the same command. In the terminal, simply type “sudo” followed by the file/app location and press Enter.
5. Turn Off Your Device’s Firewall or Antivirus Temporarily
As a way to ensure your device’s safety, the firewall and antivirus 🛡 are intended to protect and block your device from malicious software and unauthorized access. Some operating systems provide a built-in firewall to protect your device from online threats.
In rare cases, this could lead to unsuccessful installation as your device’s system may mistakenly believe it may be harmful.
Hence, this brings us to the next troubleshooting method which is to turn off your device’s firewall or antivirus for the Teams client installation or update.
For that reason, you can choose to disable your device’s firewall by following these steps on Windows and macOS:
On Windows
- To start, press your Windows key and type in Control Panel.
- Next, open the Control Panel app and proceed to select System and Security.
- On the next window, select Windows Defender Firewall.
- Then, you’ll see a list of options and select Turn Windows Firewall on or off.
- Afterwards, you’ll see the Customize Settings window, click on the Turn off Windows Defender Firewall buttons. Apply the step to both Private network settings and Public network settings.
- Finally, click OK.
Note: It’s highly advisable that you only turn off your device’s firewall for a brief moment and have it back on after you’ve tried installing or updating Microsoft Teams. Also, you may be asked to re-enable the Windows Firewall when there are changes in your network settings.
On macOS
- Firstly, click the Apple logo in the upper-left corner to open the Apple Menu. From the drop-down menu, select System Preferences.
- Then, select Security & Privacy.
- On the next window, click the Firewall tab.
- Next, click the lock icon that you can find at the bottom-left corner of the window.
- Enter your admin username and password as requested to proceed.
- Finally, you can now click the Turn Off Firewall button.
Note: Perhaps you find that without your firewall turned on, Microsoft Teams behaves correctly. In that case, you can allow it through your firewall by following the steps as detailed in our other guide here.
After you’ve turned off your device’s firewall, try installing or updating Microsoft Teams and see if the issue persists. Also, don’t forget to turn the firewall on again after you’re done as it’s important to keep your device protected.
If you’re using third-party antivirus software, we recommend turning it off temporarily along with your device’s firewall as a troubleshooting method.
6. Install Microsoft Teams Using a File Archiver
Moving on, if you insist on using the Teams client, we get it, you don’t want to miss out on the convenience and limitless features. Hence, there’s an alternative to try when you have issues in installing or updating Microsoft Teams.
This may seem confusing at first, but we’re going to guide you through each step!
For this, we’ll be using a third-party file archiver app to do some tweaking to the Teams installer:
- Firstly, you need to completely uninstall any existing instances of Microsoft Teams on your device (Step 3).
- Next, proceed to install a third-party file archiver if you don’t have any. We suggest that you try 7-Zip Portable which you can download here.
- Also, download Microsoft Teams and make sure to choose an easy folder location.
- Launch 7-Zip Portable and browse for the location of the Teams client. Afterwards, right-click on the Teams client and select Extract to which you should take note of the chosen extracted folder location.
- In the extracted Teams client folder, look for the file that ends with .nupkg.
- Similar to step 4, extract the .nupkg file and take note of the extracted folder location.
- Subsequently, you need to locate the appdata folder on your device under the User account folder. You may try these addresses:
C:UsersUSERAppDataLocalMicrosoft
C:UsersAppDataLocalMicrosoft
- In the Microsoft folder, create a new folder titled Teams.
- For the final step, go back to the extracted .nupkg folder, double-click on the lib folder followed by net45.
- Finally, scroll down until you find the Teams client and you can now run the app. Additionally, you can create a shortcut for the client.
Note: This solution is considered a temporary fix as the Teams client won’t appear in your Windows Start list of apps and settings. Therefore, use this method for urgent use and give the previous fixes a try or you can reach out to Microsoft Support (Step 8) for a more definite answer.
7. Try the Web Version of Microsoft Teams
Although the issue in installing or updating Microsoft Teams isn’t a stranger to many of its users, the causes may vary. Undeniably, it might as well be the result of bugs that are currently being resolved on Microsoft Teams’ end. 👩💻
Nevertheless, a great alternative if you keep having issues with the Microsoft Teams client is to try using its web app instead.
Primarily, the web version of Microsoft Teams will run on its best version as updates and bug patches 👾 are directly and automatically implemented. Besides, you may avoid issues that could’ve occurred because your device doesn’t meet Teams’ minimum requirements.
Thus, you can try going on the web version of Microsoft Teams and log in to your account as usual.
We recommend that you try the Teams web app using the Microsoft Edge web browser as other major web browsers such as Google Chrome, Firefox and Safari is believed to run the web app with limited features.
8. Contact Microsoft Support
Perhaps you’ve tried everything and you can’t install or update your Microsoft Teams client successfully. 😩
After long hours of trying to figure out the best fix, you might need professional assistance for a more definitive answer to your Teams issues.
On that account, you can reach out to Microsoft Support or the Teams community who are ready to help you. Here are the 3 best channels you can use to get further help when you have issues installing or updating Microsoft Teams:
- Microsoft Teams Forum – Submit a comprehensive report regarding the issues and get feedback from Microsoft representatives or other Teams users.
- Microsoft Office 365 Support – Send a report directly to the Microsoft Office 365 support department to get a prompt reply.
- Microsoft Teams Twitter – Get the latest announcements regarding the most recent issues, updates or fixes you can try by following the official Microsoft Teams Twitter page.
Conclusion
We understand the crushing feeling when you just can’t update your Teams client, missing out on new features, app enhancements or essential bug patches 😢. Or, you’re trying to download the revolutionary workspace platform but it keeps giving you some error messages! 🚫
We’ve got your back and have done our research on this one. 🕵️♂️
In this article, we’ve compiled the types of Teams update and installation errors you may find familiar as well as the 8 best fixes you can try to combat them. If you’ve tried and confirmed that one of them worked for you, don’t be shy to share with us by leaving a comment. 🤗
Let us know of your experience and comment below:
- Do you find that you can’t update or install your Microsoft Teams client?
- What steps worked for you or other fixes would you like to recommend?
- Are you struggling with any other issues on Microsoft Teams that you need help with?
Share this article with your friends or coworkers so they won’t have the same problem in the future! 😄
Microsoft Teams is not like your average program when it comes to installing and uninstall it. The problem with Microsoft Teams is that it’s installed for every user, in the user’s AppData (or program data sometimes). Besides that, we also have Microsoft Teams machine-wide installer, which will automatically install Teams when a user logs in.
Cleaning things up with Microsoft Teams can be quite challenging. I tried for example to remove and re-install Teams for a user recently. The user got an error, Microsoft Teams Installation Has Failed with every update of Microsoft Teams
After removing everything and re-installing Teams he ended up with a blank Teams app. So no chat history and no more Teams channels (even though online everything was still visible).
In this article, I will give you some tips and scripts to remove and cleanup Teams so you can re-install it again.
Make Teams a bit more fun with these funny backgrounds for Microsoft Teams
Fix Microsoft Teams Installation Has Failed
One of the most common errors with Microsoft Teams is the error Installation Has Failed which can appear when Teams tries to update. This error can keep coming back with every update and is pretty annoying.
Simply re-installing Teams isn’t the solution. It will work for now, but the error will probably re-appear with the next update.
The only way to really fix the problem is to remove the local cache and restart Microsoft Teams:
- Close Microsoft Teams
- Press Windows key + R
- Type %appdata% and press enter
- Open the folder Microsoft
- Delete the folder Teams
5. Restart Teams
You can also use the the PowerShell script below to remove the Microsoft Teams Cache.
Uninstalling Microsoft Teams
We start with the easy part, simply uninstalling Microsoft Teams. Some people commented that their Microsoft Teams keeps reinstalling itself after they have uninstalled it. This is most of the time caused by the Machine-Wide installer.
So to completely uninstall Microsoft Teams you will have to remove both Microsoft Teams and the Teams Machine-Wide Installer.
- Open Settings > Apps > Apps & Features
- Search for Teams
- Remove all the apps (yes, I got two Machine-Wide installers… don’t ask why)
Uninstall Microsoft Teams with PowerShell
I like to automate things as much as possible, so of course, we also have a PowerShell script to uninstall Microsoft Teams.
The script will remove the Machine-Wide installer and Microsoft Teams self. Make sure you run the PowerShell script in an elevated mode. You can do this by opening PowerShell as Admin
function unInstallTeams($path) {

	$clientInstaller = "$($path)Update.exe"

	 try {
        $process = Start-Process -FilePath "$clientInstaller" -ArgumentList "--uninstall /s" -PassThru -Wait -ErrorAction STOP

        if ($process.ExitCode -ne 0)
		{
			Write-Error "UnInstallation failed with exit code  $($process.ExitCode)."
        }
    }
    catch {
        Write-Error $_.Exception.Message
    }

}

# Remove Teams Machine-Wide Installer
Write-Host "Removing Teams Machine-wide Installer" -ForegroundColor Yellow

$MachineWide = Get-WmiObject -Class Win32_Product | Where-Object{$_.Name -eq "Teams Machine-Wide Installer"}
$MachineWide.Uninstall()

# Remove Teams for Current Users
$localAppData = "$($env:LOCALAPPDATA)MicrosoftTeams"
$programData = "$($env:ProgramData)$($env:USERNAME)MicrosoftTeams"


If (Test-Path "$($localAppData)CurrentTeams.exe")
{
	unInstallTeams($localAppData)

}
elseif (Test-Path "$($programData)CurrentTeams.exe") {
	unInstallTeams($programData)
}
else {
	Write-Warning  "Teams installation not found"
}
The script will check for the two possible installation locations of Teams and remove it when found.
If you want to run this script for multiple users (on the same computer), then you can use the following part in place of the Remove Teams for Current User section:
# Get all Users
$Users = Get-ChildItem -Path "$($ENV:SystemDrive)Users"

# Process all the Users
$Users | ForEach-Object {
        Write-Host "Process user: $($_.Name)" -ForegroundColor Yellow

        #Locate installation folder
        $localAppData = "$($ENV:SystemDrive)Users$($_.Name)AppDataLocalMicrosoftTeams"
        $programData = "$($env:ProgramData)$($_.Name)MicrosoftTeams"

        If (Test-Path "$($localAppData)CurrentTeams.exe")
        {
	        unInstallTeams($localAppData)

        }
        elseif (Test-Path "$($programData)CurrentTeams.exe") {
	        unInstallTeams($programData)
        }
        else {
	        Write-Warning  "Teams installation not found for user $($_.Name)"
        }
}
Uninstall Teams Machine-wide Installer
Just to be clear, you can safely uninstall the Teams Machine-wide installer. All it does is install Teams for every user that signs in.
You can uninstall the Teams Machine-wide installer in the settings screen or with a PowerShell script.
- Open Settings > Apps > Apps & Features
- Search for Teams
- Uninstall Teams Machine-Wide Installer
You can also remove the Teams Machine-Wide installer with PowerShell. This can be really useful if you need to remove it from multiple computers. Make sure you run the PowerShell script in an elevated mode.
You can open PowerShell as Administrator from start menu.
# Remove Teams Machine-Wide Installer
Write-Host "Removing Teams Machine-wide Installer" -ForegroundColor Yellow

$MachineWide = Get-WmiObject -Class Win32_Product | Where-Object{$_.Name -eq "Teams Machine-Wide Installer"}
$MachineWide.Uninstall()
Microsoft Teams Clear Cache
So I had an occasion where I had to remove Microsoft Teams for users, but after re-installing Teams came back with no history. The only solution to fix this was to clear the cache of Microsoft Teams.
The problem is that there is not one location for the Microsoft Teams’ cache. I expected it to be in the roaming AppData, but it turned out to be not the only location. We also need to clear the Chrome and Edge Cache to completely remove it.
Mark Vale had already created a really nice PowerShell script to clear the Microsoft Teams Cache, so we are going to use that:
# Author: Mark Vale

$clearCache = Read-Host "Do you want to delete the Teams Cache (Y/N)?"
$clearCache = $clearCache.ToUpper()

if ($clearCache -eq "Y"){
    Write-Host "Stopping Teams Process" -ForegroundColor Yellow

    try{
        Get-Process -ProcessName Teams | Stop-Process -Force
        Start-Sleep -Seconds 3
        Write-Host "Teams Process Sucessfully Stopped" -ForegroundColor Green
    }catch{
        echo $_
    }

    Write-Host "Clearing Teams Disk Cache" -ForegroundColor Yellow

    try{
        Get-ChildItem -Path $env:APPDATA"Microsoftteamsapplication cachecache" | Remove-Item -Confirm:$false
        Get-ChildItem -Path $env:APPDATA"Microsoftteamsblob_storage" | Remove-Item -Confirm:$false
        Get-ChildItem -Path $env:APPDATA"Microsoftteamsdatabases" | Remove-Item -Confirm:$false
        Get-ChildItem -Path $env:APPDATA"Microsoftteamscache" | Remove-Item -Confirm:$false
        Get-ChildItem -Path $env:APPDATA"Microsoftteamsgpucache" | Remove-Item -Confirm:$false
        Get-ChildItem -Path $env:APPDATA"MicrosoftteamsIndexeddb" | Remove-Item -Confirm:$false
        Get-ChildItem -Path $env:APPDATA"MicrosoftteamsLocal Storage" | Remove-Item -Confirm:$false
        Get-ChildItem -Path $env:APPDATA"Microsoftteamstmp" | Remove-Item -Confirm:$false
        Write-Host "Teams Disk Cache Cleaned" -ForegroundColor Green
    }catch{
        echo $_
    }

    Write-Host "Stopping Chrome Process" -ForegroundColor Yellow

    try{
        Get-Process -ProcessName Chrome| Stop-Process -Force
        Start-Sleep -Seconds 3
        Write-Host "Chrome Process Sucessfully Stopped" -ForegroundColor Green
    }catch{
        echo $_
    }

    Write-Host "Clearing Chrome Cache" -ForegroundColor Yellow

    try{
        Get-ChildItem -Path $env:LOCALAPPDATA"GoogleChromeUser DataDefaultCache" | Remove-Item -Confirm:$false
        Get-ChildItem -Path $env:LOCALAPPDATA"GoogleChromeUser DataDefaultCookies" -File | Remove-Item -Confirm:$false
        Get-ChildItem -Path $env:LOCALAPPDATA"GoogleChromeUser DataDefaultWeb Data" -File | Remove-Item -Confirm:$false
        Write-Host "Chrome Cleaned" -ForegroundColor Green
    }catch{
        echo $_
    }

    Write-Host "Stopping IE Process" -ForegroundColor Yellow

    try{
        Get-Process -ProcessName MicrosoftEdge | Stop-Process -Force
        Get-Process -ProcessName IExplore | Stop-Process -Force
        Write-Host "Internet Explorer and Edge Processes Sucessfully Stopped" -ForegroundColor Green
    }catch{
        echo $_
    }

    Write-Host "Clearing IE Cache" -ForegroundColor Yellow

    try{
        RunDll32.exe InetCpl.cpl, ClearMyTracksByProcess 8
        RunDll32.exe InetCpl.cpl, ClearMyTracksByProcess 2
        Write-Host "IE and Edge Cleaned" -ForegroundColor Green
    }catch{
        echo $_
    }

    Write-Host "Cleanup Complete... Launching Teams" -ForegroundColor Green
    Start-Process -FilePath $env:LOCALAPPDATAMicrosoftTeamscurrentTeams.exe
    Stop-Process -Id $PID
}
This script will only clear the cache of Microsoft Teams and restart Teams when done.
You can also combine the cleanup and delete script to do everything in one run:
# Clearing Teams Cache by Mark Vale
# Uninstall Teams by Rudy Mens

$clearCache = Read-Host "Do you want to delete the Teams Cache (Y/N)?"
$clearCache = $clearCache.ToUpper()

$uninstall= Read-Host "Do you want to uninstall Teams completely (Y/N)?"
$uninstall= $uninstall.ToUpper()


if ($clearCache -eq "Y"){
    Write-Host "Stopping Teams Process" -ForegroundColor Yellow

    try{
        Get-Process -ProcessName Teams | Stop-Process -Force
        Start-Sleep -Seconds 3
        Write-Host "Teams Process Sucessfully Stopped" -ForegroundColor Green
    }catch{
        echo $_
    }

    Write-Host "Clearing Teams Disk Cache" -ForegroundColor Yellow

    try{
        Get-ChildItem -Path $env:APPDATA"Microsoftteamsapplication cachecache" | Remove-Item -Confirm:$false
        Get-ChildItem -Path $env:APPDATA"Microsoftteamsblob_storage" | Remove-Item -Confirm:$false
        Get-ChildItem -Path $env:APPDATA"Microsoftteamsdatabases" | Remove-Item -Confirm:$false
        Get-ChildItem -Path $env:APPDATA"Microsoftteamscache" | Remove-Item -Confirm:$false
        Get-ChildItem -Path $env:APPDATA"Microsoftteamsgpucache" | Remove-Item -Confirm:$false
        Get-ChildItem -Path $env:APPDATA"MicrosoftteamsIndexeddb" | Remove-Item -Confirm:$false
        Get-ChildItem -Path $env:APPDATA"MicrosoftteamsLocal Storage" | Remove-Item -Confirm:$false
        Get-ChildItem -Path $env:APPDATA"Microsoftteamstmp" | Remove-Item -Confirm:$false
        Write-Host "Teams Disk Cache Cleaned" -ForegroundColor Green
    }catch{
        echo $_
    }

    Write-Host "Stopping Chrome Process" -ForegroundColor Yellow

    try{
        Get-Process -ProcessName Chrome| Stop-Process -Force
        Start-Sleep -Seconds 3
        Write-Host "Chrome Process Sucessfully Stopped" -ForegroundColor Green
    }catch{
        echo $_
    }

    Write-Host "Clearing Chrome Cache" -ForegroundColor Yellow

    try{
        Get-ChildItem -Path $env:LOCALAPPDATA"GoogleChromeUser DataDefaultCache" | Remove-Item -Confirm:$false
        Get-ChildItem -Path $env:LOCALAPPDATA"GoogleChromeUser DataDefaultCookies" -File | Remove-Item -Confirm:$false
        Get-ChildItem -Path $env:LOCALAPPDATA"GoogleChromeUser DataDefaultWeb Data" -File | Remove-Item -Confirm:$false
        Write-Host "Chrome Cleaned" -ForegroundColor Green
    }catch{
        echo $_
    }

    Write-Host "Stopping IE Process" -ForegroundColor Yellow

    try{
        Get-Process -ProcessName MicrosoftEdge | Stop-Process -Force
        Get-Process -ProcessName IExplore | Stop-Process -Force
        Write-Host "Internet Explorer and Edge Processes Sucessfully Stopped" -ForegroundColor Green
    }catch{
        echo $_
    }

    Write-Host "Clearing IE Cache" -ForegroundColor Yellow

    try{
        RunDll32.exe InetCpl.cpl, ClearMyTracksByProcess 8
        RunDll32.exe InetCpl.cpl, ClearMyTracksByProcess 2
        Write-Host "IE and Edge Cleaned" -ForegroundColor Green
    }catch{
        echo $_
    }

    Write-Host "Cleanup Complete..." -ForegroundColor Green
}

if ($uninstall -eq "Y"){
    Write-Host "Removing Teams Machine-wide Installer" -ForegroundColor Yellow
    $MachineWide = Get-WmiObject -Class Win32_Product | Where-Object{$_.Name -eq "Teams Machine-Wide Installer"}
    $MachineWide.Uninstall()


    function unInstallTeams($path) {

	$clientInstaller = "$($path)Update.exe"

	 try {
        $process = Start-Process -FilePath "$clientInstaller" -ArgumentList "--uninstall /s" -PassThru -Wait -ErrorAction STOP

        if ($process.ExitCode -ne 0)
		{
			Write-Error "UnInstallation failed with exit code  $($process.ExitCode)."
        }
    }
    catch {
        Write-Error $_.Exception.Message
    }

    }


    #Locate installation folder
    $localAppData = "$($env:LOCALAPPDATA)MicrosoftTeams"
    $programData = "$($env:ProgramData)$($env:USERNAME)MicrosoftTeams"


    If (Test-Path "$($localAppData)CurrentTeams.exe")
    {
	    unInstallTeams($localAppData)

    }
    elseif (Test-Path "$($programData)CurrentTeams.exe") {
	    unInstallTeams($programData)
    }
    else {
	    Write-Warning  "Teams installation not found"
    }

}
Wrapping Up
I hope these scripts helped you remove and clean up Microsoft Teams. If you want to re-install Microsoft Teams, then make sure you check out this article.
If you have any questions just drop a comment below.
Again thanks to Mark Vale for the clean-up script!
Background.
The Microsoft Teams Client fails to install on Windows 10 with the error message Installation has failed, Failed to extract installer.

A bit of searching on the internet reveals this seems to be a fairly common issue but no fix has been provided. Now I tried the same client on Windows 7, it worked absolutely fine, on Windows 10, computer says no.
The workaround.
I am not calling this a fix as although this will get Teams working, it will not appear in the list of installed applications, and you will not be able to take advantage of the silent install switch.
To perform this workaround, I grabbed a copy of 7ZIP Portable which is available here.
Open 7ZIP and browse to the location the Team’s client has been downloaded to. Highlight the file and click extract. Make note of the extracted folder location.

Now browse to the extracted folder within 7ZIP and locate the *.nupkg file as shown below. Perform the same extract operation as before.

Now browse to the folder the *.nupkg file was extracted to and copy all the contents

Now navigate to the hidden appdata folder in the user account folder. In my example, the folder path is c:usersian.sandersonappdatalocalmicrosoft. You will need to either show hidden files or type the path to appdata n the address bar. Create a new folder called Teams. This is the standard installation location for the Teams client.

And voila, run the Teams application.

Create a shortcut to the app so it is easier to access in future.
Ian