
Во многих веб-приложениях есть формы, на которых пользователь вводит данные (например, форма регистрации на сайте). Почти всегда нужно проводить валидацию этих данных: заполнены ли обязательные поля, записан ли email и телефон в нужном формате и так далее.
В первую очередь валидация выполняется на фронтенде, однако при желании подкованный пользователь может её обойти и послать запрос с невалидными данными. Таким образом бэкенд не может быть уверен в корректности данных, полученных от пользователя. Соответственно необходимо валидировать данные на бэкенде.
В данной статье будет рассмотрена валидация полей ДТО (DTO – Data Transfer Object) с использованием пакета javax.validation.
Создание приложения
Для создания приложения воспользуемся Spring Initializr по адресу https://start.spring.io. Заполним поля group и artifact, а затем добавим в проект зависимости Spring Web и Lombok. Скачаем проект и откроем его в IDE.
Мы разработаем простое приложение, которое будет имитировать сохранение информации о сотрудниках некой организации. Состоять наше приложение будет из следующих частей:
- DTO с данными, которые мы будем валидировать
- Тест контроллера для демонстрации работы
- REST-контроллер, который будет обрабатывать HTTP-запрос и запускать валидацию
ДТО
Создадим в проекте класс EmployeeDto:
import lombok.AllArgsConstructor;
import lombok.Data;

import javax.validation.constraints.Email;
import javax.validation.constraints.NotBlank;
import javax.validation.constraints.Past;
import javax.validation.constraints.Pattern;
import java.util.Date;

@Data
@AllArgsConstructor
public class EmployeeDto {

    @NotBlank(message = "Необходимо указать имя")
    private String name;

    @Email(message = "Email должен быть корректным адресом электронной почты")
    private String email;

    @Pattern(regexp = "+7[0-9]{10}", message = "Телефонный номер должен начинаться с +7, затем - 10 цифр")
    private String phone;

    @Past(message = "Дата приёма на работу не должна быть больше текущей")
    private Date hireDate;
}
Аннотации над классом относятся к библиотеке Lombok. Благодаря @Data будут сгенерированы геттеры и сеттеры для всех полей, а @AllArgsConstructor создаст конструктор, инициализирующий все поля класса.
Аннотации над полями – это основа нашей валидации. Каждая аннотация задаёт своё правило:
@NotBlank: поле обязательно для заполнения.
@Email: значение должно по формату подходить для использования в качестве email.
@Pattern: значение должно удовлетворять регулярному выражению.
@Past: дата/время должно быть в прошлом
REST-контроллер
Создим класс EmployeeController:
import lombok.AllArgsConstructor;
import org.springframework.http.ResponseEntity;
import org.springframework.web.bind.annotation.PostMapping;
import org.springframework.web.bind.annotation.RequestBody;
import org.springframework.web.bind.annotation.RestController;
import EmployeeDto;

import javax.validation.Valid;

@RestController
public class EmployeeController {

    @PostMapping("/employees")
    public ResponseEntity<Void> add(@RequestBody @Valid EmployeeDto dto) {
        // Сохранение...
        return ResponseEntity.ok().build();
    }
}
Это простой контроллер, который обрабатывает запросы, поступающие методом POST на адрес http://localhost:8080/employees.
Аннотация @Valid – ключевой момент: благодаря ей будет запускаться валидация аргумента dto в соответствии с аннотациями @NotBlank, @Email и т.д, которые мы описали в EmployeeDto.
Тест контроллера
Создадим класс EmployeeControllerTest для проверки работы контроллера:
@WebMvcTest(controllers = EmployeeController.class)
public class EmployeeControllerTest {

    @Autowired
    MockMvc mockMvc;

}
Использование аннотации @WebMvcTest над классом позволяет не поднимать весь Spring-контекст, а инициализировать только веб-слой приложения (в частности создать контроллеры). Параметр controllers говорит о том, что нужно создать только указанные контроллеры. Если его не указывать, то будут созданы все контроллеры приложения.
Класс MockMvc, входящий состав в Spring, предоставляет удобные средства для тестирования контроллеров. Используя его можно не поднимать реальный сервер, такой как Tomcat, а тестировать с того момента, где Spring передаёт запрос в наш контроллер. Таким образом для контроллера всё будет выглядеть так, как будто был отправлен и получен реальный HTTP-запрос, но при этом не нужно тратить ресурсы на поднятие сервера.
Добавим тест, в котором будем проверять поведение контроллера, когда в ДТО нет поля name:
@WebMvcTest(controllers = EmployeeController.class)
public class EmployeeControllerTest {

    @Autowired
    MockMvc mockMvc;

    @Test
    @DisplayName("Если нет поля name, то возвращается код 400")
    void addTest() throws Exception {
        mockMvc.perform(MockMvcRequestBuilders.post("/employees")
                .contentType(MediaType.APPLICATION_JSON_UTF8)
                .content("{"email":"user@server.com"}"))
                .andExpect(MockMvcResultMatchers.status().isBadRequest());
    }
}
В этом тесте отправляется неполная версия EmployeeDto в виде JSON на адрес /employees. В отправляемом JSON нет поля name. А поскольку это поле обязательно для заполнения, то валидация ДТО должна “свалиться” с кодом 400 (Bad Request). Запустите тест – он должен пройти успешно.
Если мы хотим убедиться, что ошибка валидации вызвана именно отсутствием поля name, а не чем-то другим, мы можем модифицировать наш тест:
@Test
@DisplayName("Передача объекта без поля name возвращает код 400")
void addTest() throws Exception {
    MvcResult response = mockMvc.perform(MockMvcRequestBuilders.post("/employees")
            .contentType(MediaType.APPLICATION_JSON_UTF8)
            .content("{"email":"user@server.com"}"))
            .andExpect(MockMvcResultMatchers.status().isBadRequest())
            .andReturn();

    String message = response.getResolvedException().getMessage();
    assertTrue(message.contains("default message [name]"));
    assertTrue(message.contains("default message [Необходимо указать имя]"));
}
Также мы можем предусмотреть ситуацию, когда контроллер ничего не вернёт:
@Test
@DisplayName("Передача объекта без поля name возвращает код 400")
void addTest() throws Exception {
    MvcResult response = mockMvc.perform(MockMvcRequestBuilders.post("/employees")
            .contentType(MediaType.APPLICATION_JSON_UTF8)
            .content("{"email":"user@server.com"}"))
            .andExpect(MockMvcResultMatchers.status().isBadRequest())
            .andReturn();

    String message = requireNonNull(response.getResolvedException(), "Не получено сообщение от контроллера").getMessage();
    assertTrue(message.contains("default message [name]"));
    assertTrue(message.contains("default message [Необходимо указать имя]"));
}
Принудительный запуск валидации
Аннотация @Valid выглядит так, будто одно лишь её наличие запускает валидацию, однако это не совсем так. Убедиться в этом можно, “вручную” вызвав метод контроллера.
Напишем новый тест:
@Test
@DisplayName("add бросает исключение, если поле name = null")
void manualValidationTest() {
    EmployeeController controller = new EmployeeController();
    EmployeeDto emp = new EmployeeDto(null, "email@server.com", null, null);
    assertThrows(MethodArgumentNotValidException.class, () -> controller.add(emp));
}
Он “свалится”, поскольку исключение MethodArgumentNotValidException не будет брошено. В чём же причина? Дело в том, что просто добавить аннотации @Valid и @NotBlank – недостаточно. Вся “магия” происходит внутри Spring, а когда мы вызываем метод “вручную”, то Spring не задействован.
Но мы можем принудительно запустить валидацию. Изменим тест:
@Test
@DisplayName("Принудительная валидация находит ошибку")
void manualValidationTest() {
    EmployeeDto emp = new EmployeeDto(null, "email@server.com", null, null);
    Validator validator = Validation.buildDefaultValidatorFactory().getValidator();
    Set<ConstraintViolation<EmployeeDto>> violations = validator.validate(emp);

    ConstraintViolation<EmployeeDto> violation = violations.stream().findFirst().orElseThrow(() -> new RuntimeException("Отсутствует ошибка валидации"));
    assertEquals("name", violation.getPropertyPath().toString());
    assertEquals("Необходимо указать имя", violation.getMessageTemplate());
}
Этот тест пройдёт успешно, а в переменной violations будет один элемент с информацией об ошибке валидации поля name.
Заключение
Рассмотренные варианты валидации – это неполный список того, что умеет пакет javax.validation. Благодаря ему можно быстро настроить валидацию в Spring Boot-приложении и сократить время разработки.
Код приложения из этой статьи можно взять на Github.
Удачной разработки!
Содержание
- Исправление ошибки «Please enter setup to recover BIOS setting»
- Значение ошибки «Please enter setup to recover BIOS setting»
- Исправление проблемы
- Please enter Setup to recover BIOS setting что делать?
- Что это за ошибка Please enter Setup to recover BIOS setting
- Что может вызвать ошибку Please enter Setup
- Что делать, если при загрузке компьютера возникает сообщение
- Event Log
- Принцип работы
- Стоит ли включать опцию?
- why this error?
- Guest
- phsstpok
- Entering setup что делать
- Значение ошибки «Please enter setup to recover BIOS setting»
- Исправление проблемы
- Что это за ошибка Please enter Setup to recover BIOS setting
- Что может вызвать ошибку Please enter Setup to recover BIOS setting
- Что делать, если при загрузке компьютера возникает сообщение Please enter Setup to recover BIOS setting
- Что значит «Please enter setup to recover bios setting»?
- Что делать, чтобы убрать ошибку?
Исправление ошибки «Please enter setup to recover BIOS setting»

При запуске компьютера всегда производится проверка на различные программные и аппаратные неполадки, в частности, с BIOS. И если таковые будут обнаружены, то пользователь получит сообщение на экране компьютера или услышит звуковой сигнал.
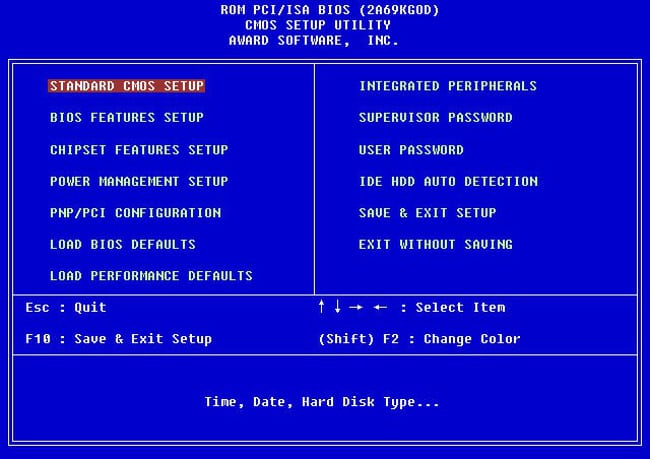
Значение ошибки «Please enter setup to recover BIOS setting»
Когда вместо загрузки ОС на экране отображается логотип производителя BIOS или материнской платы с текстом «Please enter setup to recover BIOS setting», то это может значить, что произошли какие-то программные неполадке при запуске БИОС. Такое сообщение говорит о том, что компьютер не может загрузиться с текущей конфигурацией BIOS.
Причин этому может быть много, но самыми основными являются следующие:
- Проблемы с совместимостью некоторых устройств. В основном, если такое случается, то пользователь получает несколько другое сообщение, но если установка и запуск несовместимого элемента вызвали программный сбой в BIOS, то пользователь вполне может увидеть предупреждение «Please enter setup to recover BIOS setting».
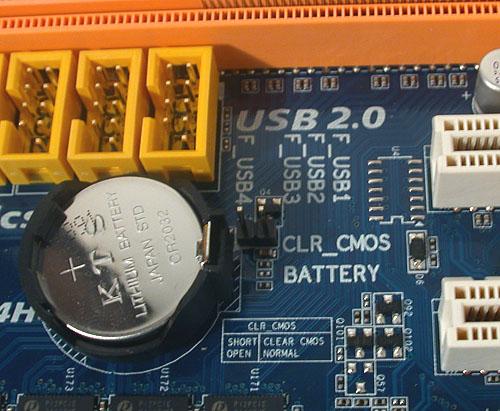
- Разрядка батарейки CMOS. На старых материнских платах часто можно встретить такую батарейку. В ней хранятся все настройки конфигураций BIOS, что позволяет избежать их потерю при отключении компьютера от сети. Однако если батарейка разрядилась, то они сбрасываются, что может повлечь за собой невозможность нормальной загрузки ПК.
- Неверные настройки BIOS, выставленные пользователем. Самый распространённый вариант развития событий.
- Неправильное замыкание контактов. На некоторых материнских платах есть специальные CMOS-контакты, которые нужно замкнуть для сброса настроек, но если вы их замкнули неправильно или забыли вернуть в исходное положение, то скорее всего вместо запуска ОС вы увидите такое сообщение.
Исправление проблемы
Процесс возвращения компьютера в рабочее состояние может выглядеть немного по-разному в зависимости от ситуации, но так как чаще всего причиной подобной ошибки является некорректная настройка BIOS, всё можно решить простым сбросом настроек до заводского состояния.
Если же проблема связана с аппаратной частью, то рекомендуется воспользоваться следующими советами:
- Когда есть подозрения на то, что ПК не запускается из-за несовместимости определённых компонентов, то демонтируйте проблемный элемент. Как правило, проблемы с запуском начинаются сразу после его установки в систему, поэтому выявить дефектный компонент не составит труда;
- При условии, что вашему компьютеру/ноутбуку уже более 2 лет, и на его материнской плате есть специальная CMOS-батарейка (выглядит как серебристый блин), то это значит, что её нужно заменить. Найти и произвести замену несложно;

- Если на материнской плате есть специальные контакты для сброса настроек BIOS, то проверьте правильно ли установлены на них джамперы. Верную расстановку можно посмотреть в документации к материнской плате или найти в сети под вашу модель. Если вы не можете найти схему, где было бы нарисовано правильное расположение джампера, то попробуйте его переставлять до тех пор, пока компьютер не заработает нормально.
Исправить данную проблему не так трудно, как это может показаться на первый взгляд. Однако, если ничего из этой статьи вам не помогло, то рекомендуется отдать компьютер в сервисный центр или обратиться к специалисту, так как проблема может лежать глубже, чем в рассмотренных вариантах.
Источник
Please enter Setup to recover BIOS setting что делать?
Компьютер – сложная система, в которой каждая ошибка может быть обусловлена одной из десятков или даже сотен причин. Но если с программными неполадками справиться относительно легко (в крайнем случае, всегда можно переустановить систему), то с аппаратными многие не знают, что делать.
Одной из ошибок, при возникновении которой становится невозможно пользоваться ПК, является Please enter Setup to recover BIOS setting, и как исправить данную проблему знают далеко не все. Однако когда она возникает не нужно впадать в панику – проблема решается достаточно легко.
Что это за ошибка Please enter Setup to recover BIOS setting

Проблема является скорее системным сообщением, чем ошибкой. Подобным образом компьютер говорит пользователю, что с существующей конфигурацией BIOS компьютер не может продолжать загрузку.
В связи с этим он просит пользователя загрузить настройки BIOS по умолчанию (предустановленные производителем материнской платы).
Что может вызвать ошибку Please enter Setup

Причин для возникновения этого сообщения множество. Если материнская плата старая, то, вероятно, его появление обусловлено севшей батарейкой. Да, на материнке присутствует отдельный элемент питания, который обеспечивает работу часов и поддерживает сохранение конфигурации BIOS.
Другой вариант – это неправильная настройка BIOS. Если пользователь допустил ошибки при конфигурации этой системы, то ПК может перестать загружаться, и начать выводит сообщение «Please enter Setup to recover BIOS setting».
И третий вариант – снятые или неправильно расставленные джамперы на материнской плате. В современных платах они почти не используются, однако, на более старых их достаточно много. Отвечают они, также как и BIOS, за конфигурацию оборудования.
Что делать, если при загрузке компьютера возникает сообщение

Если возникает соответствующая ошибка, в первую очередь необходимо выполнить действия, которые предлагает компьютер.
- Чаще всего он говорит: нажмите на F1, чтобы открыть настройки («to Run Setup»), нажмите «F2», чтобы загрузить конфигурацию по умолчанию («to load default…»).
- Чтобы вернуть работоспособность компьютера попробуйте нажать на F2. В результате компьютер перезагрузится, и начнет нормально загружаться.
- Если компьютер не отреагировал на нажатие «F2», то, вероятно, BIOS выставил в настройках для клавиатуры значение Legacy, тогда как пользователь использует USB. В этом случае нужно найти клавиатуру, которая подключается по PS/2, и попробовать выполнить соответствующие действия с нее.
Однако если компьютер выполнил соответствующие действия, но после того, как он был выдернут из розетки, ошибка Please enter Setup to recover BIOS setting опять появилась, то, скорее всего, села батарейка. Этот элемент питания можно купить почти в любом магазине электроники. Понадобится приобрести батарейку, открыть корпус системного блока и на место старой поставить новую.

Если неправильно расставлены джамперы, что, впрочем, маловероятно, то нужно найти схему соответствующих переключателей для своей модели платы и расставить перемычки в правильном порядке.
Источник
Event Log
Другие идентичные по назначению опции: Event Logging, Event Log Capacity.

Опция Event Log относится к категории опций, предназначенных для настройки журнала событий BIOS. Обычно данная опция позволяет включить или выключить этот журнал.
Принцип работы
Далеко не всегда наши компьютеры работают безупречно, как часы, и нередко возникают такие ситуации, когда пользователю ПК приходится иметь дело с той или иной неисправностью, связанной с аппаратной частью компьютера или с его программным обеспечением. И в подобных ситуациях зачастую трудно обойтись без такой вещи, как журнал событий (Event Log).
Журнал (лог) событий является важным инструментом, позволяющим пользователю или системному администратору разобраться в причинах произошедшей неполадки и впоследствии устранить ее. Данный журнал представляет собой комплекс записей, расположенных в хронологическом порядке и описывающих важные события, происходящие в системе.
Большинству опытных пользователей операционных систем семейства Windows, наверное, знакома программа просмотра событий этой операционной системы (Event Viewer), в которой отображаются самые важные вещи, происходящие во время работы ОС, такие, как запуск приложений, события, связанные с безопасностью, а также возникающие в ходе работы ОС ошибки. В случае возникновения проблем в функционировании операционной системы анализ этого журнала поможет выявить причину возникновения неисправности и устранить ее.
Тем не менее, далеко не все пользователи персонального компьютера, наверное, знают о том, что некоторые материнские платы также оснащены возможностью вести и записывать в память лог событий, связанных с аппаратной частью компьютера. В частности, в лог могут записываться события, происходящие во время процедуры проверки работоспособности отдельных элементов компьютера (процедуры POST). Эта функция может быть полезной как для обычных пользователей, так и для системных администраторов. В том случае, если во время процедуры POST возникают ошибки, то далеко не всегда пользователь имеет возможность увидеть соответствующее сообщение об ошибке на экране. А при использовании лога пользователь может просмотреть необходимую запись в BIOS и определить причину неисправности.
Включение функции записи лога событий осуществляется при помощи выбора варианта Enabled, а выключение – при помощи выбора варианта Disabled. Также в BIOS обычно присутствуют и другие опции, позволяющие работать с журналом, например, осуществлять его просмотр или очистку.
Стоит ли включать опцию?
Ответ на данный вопрос зависит исключительно от ваших предпочтений. В большинстве случаев журнал событий может быть полезен пользователю или системному администратору, как эффективный инструмент для анализа и исправления возникших аварийных ситуаций, поэтому лучше всего будет включить данную опцию.
Источник
why this error?
Guest
Guest
HI
I HAVE A P2 350 MHZ TODAY I DIASSAMBLED IT SO THAT I COULD CLEAN IT WITH A SOFT BRUSH FROM DUST ,I REASSAMBLED IT AGAIN AS IT WAS BUT WHEN THE CPU STARTED DOING THE TEST THIS MESSAGE CAME OUT:
«EVENT LOG MESSAGES,ENTER SETUP TO VIEW
ERROR
02B2:INCORRECT DRIVE TYPE-RUN SETUP»
I TRIED TO ADJUST THINGS FROM BIOS BUT I THINK SOMETHING IS MESSY
IF I PRESS F1 TO CONTINUE WINDOWS STARTS BUT WHEN I REBOOT THE SAME THING HAPPENS AGAIN
CAN SOMEONE TELL ME WHAT TO DO TO FIX THE PROBLEM
THANKS
ANTVEL@YAHOO.COM
phsstpok
Splendid


Sounds like your CMOS battery is dead or loose. Check it. Replace it.
Источник
Entering setup что делать
При запуске компьютера всегда производится проверка на различные программные и аппаратные неполадки, в частности, с BIOS. И если таковые будут обнаружены, то пользователь получит сообщение на экране компьютера или услышит звуковой сигнал.
Значение ошибки «Please enter setup to recover BIOS setting»
Когда вместо загрузки ОС на экране отображается логотип производителя BIOS или материнской платы с текстом «Please enter setup to recover BIOS setting», то это может значить, что произошли какие-то программные неполадке при запуске БИОС. Такое сообщение говорит о том, что компьютер не может загрузиться с текущей конфигурацией BIOS.
Причин этому может быть много, но самыми основными являются следующие:
- Проблемы с совместимостью некоторых устройств. В основном, если такое случается, то пользователь получает несколько другое сообщение, но если установка и запуск несовместимого элемента вызвали программный сбой в BIOS, то пользователь вполне может увидеть предупреждение «Please enter setup to recover BIOS setting».
- Разрядка батарейки CMOS. На старых материнских платах часто можно встретить такую батарейку. В ней хранятся все настройки конфигураций BIOS, что позволяет избежать их потерю при отключении компьютера от сети. Однако если батарейка разрядилась, то они сбрасываются, что может повлечь за собой невозможность нормальной загрузки ПК.
- Неверные настройки BIOS, выставленные пользователем. Самый распространённый вариант развития событий.
- Неправильное замыкание контактов. На некоторых материнских платах есть специальные CMOS-контакты, которые нужно замкнуть для сброса настроек, но если вы их замкнули неправильно или забыли вернуть в исходное положение, то скорее всего вместо запуска ОС вы увидите такое сообщение.
Исправление проблемы
Процесс возвращения компьютера в рабочее состояние может выглядеть немного по-разному в зависимости от ситуации, но так как чаще всего причиной подобной ошибки является некорректная настройка BIOS, всё можно решить простым сбросом настроек до заводского состояния.
Если же проблема связана с аппаратной частью, то рекомендуется воспользоваться следующими советами:
- Когда есть подозрения на то, что ПК не запускается из-за несовместимости определённых компонентов, то демонтируйте проблемный элемент. Как правило, проблемы с запуском начинаются сразу после его установки в систему, поэтому выявить дефектный компонент не составит труда;
- При условии, что вашему компьютеру/ноутбуку уже более 2 лет, и на его материнской плате есть специальная CMOS-батарейка (выглядит как серебристый блин), то это значит, что её нужно заменить. Найти и произвести замену несложно;
Если на материнской плате есть специальные контакты для сброса настроек BIOS, то проверьте правильно ли установлены на них джамперы. Верную расстановку можно посмотреть в документации к материнской плате или найти в сети под вашу модель. Если вы не можете найти схему, где было бы нарисовано правильное расположение джампера, то попробуйте его переставлять до тех пор, пока компьютер не заработает нормально.
![]()
Исправить данную проблему не так трудно, как это может показаться на первый взгляд. Однако, если ничего из этой статьи вам не помогло, то рекомендуется отдать компьютер в сервисный центр или обратиться к специалисту, так как проблема может лежать глубже, чем в рассмотренных вариантах.
Отблагодарите автора, поделитесь статьей в социальных сетях.
Компьютер – сложная система, в которой каждая ошибка может быть обусловлена одной из десятков или даже сотен причин. Но если с программными неполадками справиться относительно легко (в крайнем случае, всегда можно переустановить систему), то с аппаратными многие не знают, что делать.
Одной из ошибок, при возникновении которой становится невозможно пользоваться ПК, является Please enter Setup to recover BIOS setting, что делать с этой проблемой знают далеко не все. Однако когда она возникает не нужно впадать в панику – проблема решается достаточно легко.
Что это за ошибка Please enter Setup to recover BIOS setting
«Please enter Setup to recover BIOS setting» является скорее системным сообщением, чем ошибкой. Подобным образом компьютер говорит пользователю, что с существующей конфигурацией BIOS компьютер не может продолжать загрузку.
В связи с этим он просит пользователя загрузить настройки BIOS по умолчанию (предустановленные производителем материнской платы).
Что может вызвать ошибку Please enter Setup to recover BIOS setting
Батарейка на материнской плате
Причин для возникновения этого сообщения множество. Если материнская плата старая, то, вероятно, его появление обусловлено севшей батарейкой. Да, на материнке присутствует отдельный элемент питания, который обеспечивает работу часов и поддерживает сохранение конфигурации BIOS.
Другой вариант – это неправильная настройка BIOS. Если пользователь допустил ошибки при конфигурации этой системы, то ПК может перестать загружаться, и начать выводит сообщение «Please enter Setup to recover BIOS setting».
И третий вариант – снятые или неправильно расставленные джамперы на материнской плате. В современных платах они почти не используются, однако, на более старых их достаточно много. Отвечают они, также как и BIOS, за конфигурацию оборудования.
Что делать, если при загрузке компьютера возникает сообщение Please enter Setup to recover BIOS setting
Please enter Setup to recover BIOS setting
Если возникает соответствующая ошибка, в первую очередь необходимо выполнить действия, которые предлагает компьютер. Чаще всего он говорит: нажмите на F1, чтобы открыть настройки («to Run Setup»), нажмите «F2», чтобы загрузить конфигурацию по умолчанию («to load default…»). Чтобы вернуть работоспособность компьютера попробуйте нажать на F2. В результате компьютер перезагрузится, и начнет нормально загружаться.
Если компьютер не отреагировал на нажатие «F2», то, вероятно, BIOS выставил в настройках для клавиатуры значение Legacy, тогда как пользователь использует USB. В этом случае нужно найти клавиатуру, которая подключается по PS/2, и попробовать выполнить соответствующие действия с нее.
Однако если компьютер выполнил соответствующие действия, но после того, как он был выдернут из розетки, ошибка Please enter Setup to recover BIOS setting опять появилась, то, скорее всего, села батарейка. Этот элемент питания можно купить почти в любом магазине электроники. Понадобится приобрести батарейку, открыть корпус системного блока и на место старой поставить новую.
Джамперы на материнской плате
Если неправильно расставлены джамперы, что, впрочем, маловероятно, то нужно найти схему соответствующих переключателей для своей модели платы и расставить перемычки в правильном порядке.
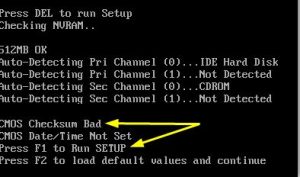
Данное сообщение при включении компьютера является довольно частым, особенно на компьютерах 4-ех летней давности и более. Сразу после фразы «Please enter setup to recover bios setting» обычно идут слова «press f1 to run setup» и «Press f2 to load default values and continue».
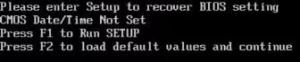
Сообщение please enter setup to recover bios setting
В данной статье мы расскажем вам о значении данного сообщения при включении компьютера , а также что сделать, чтобы оно больше не появлялось.
Что значит «Please enter setup to recover bios setting»?
Традиционно начнем с перевода на русский язык. Он звучит так: «Пожалуйста, войдите в настройки для восстановление параметров BIOS».
Получается, что по каким — то причинам сбились настройки BIOS, и компьютер просит их восстановить.
Что делать, чтобы убрать ошибку?
А наиболее вероятной причиной, как правило, является севшая батарейка на материнской плате. В этом случае также отображается ошибка Cmos CheckSum bad. Если вы давно или ни разу не меняли батарейку, то самое время это сделать.
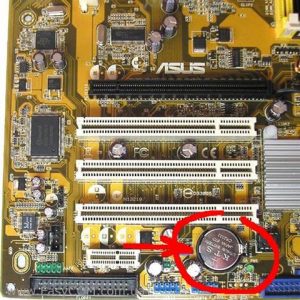
Как найти батарейку в компьютере. Ее вид.
Чтобы убрать ошибку и попробовать запустить операционную систему, нужно нажать кнопку F2 на клавиатуре. Этим вы установите настройки BIOS по умолчанию.
Если при загрузке Windows появляется экран и компьютер уходит на перезагрузку, то очень вероятно, что из сбоя настроек BIOS параметру «sata controller mode» (Режим работы жесткого диска) было присвоено неправильное значение и его нужно изменить вручную. Подробнее о значениях данного параметра читайте здесь.
Чтобы более точно определить причину появления сообщения «Please enter setup to recover bios setting» нужно обратить внимание на другие строчки, присутствующие выше или ниже этой фразы. Среди них могут быть:
- Cmos Checksum Bad (Cmos date/time not set) — появляется из-за севшей батарейки или ее плохого контакта с материнской платой;
Ошибка при загрузке Cmos checksum bad
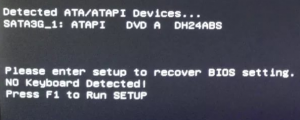
- No Keyboard Detected — проблема с определением клавиатуры. Попробуйте ее переключить в другой разъем или вовсе заменить на заведомо рабочую;
No Keyboard Detected
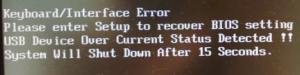
- Usb device over current status detected computer shut down over 15 sec — На одном или нескольких USB портах имеется замыкание. Отключите все устройства, подключенные по USB, а также проверьте нет ли повреждений или застрявших штекеров в usb разъемах (Спереди и сзади);
Usb device over current status detected computer shut down over 15 sec
Источник
Here are the examples of how to test default error msg with kwargs in python. These are taken from open source projects. By voting up you can indicate which examples are most useful and appropriate.
    def test_default_error_msg_with_kwargs(self):
        class FakeClimateException(exceptions.ClimateException):
            msg_fmt = "default message: %(code)s"

        exc = FakeClimateException(code=500)
        self.assertEqual(unicode(exc), 'default message: 500')
        self.assertEqual(exc.message, 'default message: 500')
    def test_default_error_msg_with_kwargs(self):
        class FakeCinderException(exception.CinderException):
            message = "default message: %(code)s"

        exc = FakeCinderException(code=500)
        self.assertEqual('default message: 500', six.text_type(exc))
    def test_default_error_msg_with_kwargs(self):
        class FakeGlanceException(exception.GlanceException):
            message = "default message: %(code)s"

        exc = FakeGlanceException(code=http.INTERNAL_SERVER_ERROR)
        self.assertEqual("default message: 500",
                         encodeutils.exception_to_unicode(exc))
    def test_default_error_msg_with_kwargs(self):
        class FakeKarborException(exception.KarborException):
            message = "default message: %(code)s"

        exc = FakeKarborException(code=500)
        self.assertEqual('default message: 500', six.text_type(exc))
    def test_default_error_msg_with_kwargs(self):
        class FakeManilaException(exception.ManilaException):
            message = "default message: %(code)s"

        exc = FakeManilaException(code=500)
        self.assertEqual('default message: 500', six.text_type(exc))
    def test_default_error_msg_with_kwargs(self):
        class FakeBrickException(exception.BrickException):
            message = "default message: %(code)s"

        exc = FakeBrickException(code=500)
        self.assertEqual(six.text_type(exc), 'default message: 500')
    def test_default_error_msg_with_kwargs(self):
        class FakeTricircleException(exceptions.TricircleException):
            message = "default message: %(code)s"

        exc = FakeTricircleException(code=500)
        self.assertEqual('default message: 500', six.text_type(exc))
package main

import (
	"fmt"
	"github.com/go-redis/redis"
)


func main() {
	client := redis.NewClient(&redis.Options{
		Addr:     "localhost:6379",
		Password: "", // no password set
		DB:       0,  // use default DB
	})
	handlSub(*client)
}

func handlSub(client redis.Client){
	sub := client.Subscribe("1_message")
	for{
		iface, err := sub.Receive()
		if err != nil {
			fmt.Println(err)
		}

		// Should be *Subscription, but others are possible if other actions have been
		// taken on sub since it was created.
		switch iface.(type) {
		case *redis.Subscription:
			fmt.Println("sub")
		case *redis.Message:
			fmt.Println(iface)
		case *redis.Pong:
			fmt.Println("pong")
		default:
			fmt.Println("err")
		}
	}
}
redis-go возвращает сообщение в таком формате. Как получить сообщение (test)?
Message<1_message: test>
[ERROR] Failed to execute goal org.apache.maven.plugins:maven-surefire-plugin:3.0.0-M3:test (default-test) on project plsql-custom-rules: There are test failures.
There are some more errors in the log:
[INFO] Running com.company.plsql.ForbiddenDmlCheckTest
[ERROR] Tests run: 1, Failures: 0, Errors: 1, Skipped: 0, Time elapsed: 0.284 s <<< FAILURE! - in com.company.plsql.ForbiddenDmlCheckTest
[ERROR] test(com.company.plsql.ForbiddenDmlCheckTest)  Time elapsed: 0.181 s  <<< ERROR!
java.lang.NoSuchMethodError: org.assertj.core.api.Assertions.assertThat(Ljava/lang/String;)Lorg/assertj/core/api/AbstractStringAssert;
at com.company.plsql.ForbiddenDmlCheckTest.test(ForbiddenDmlCheckTest.java:10)
Does someone know any solution to this particular problem?
I want to create a jar for testing it in my SonarQube Server. But, before changing anything in the code, I wanted to test it first as it is; because I reckon that there is a sample rule already provided in the downloaded Project template. I can make further changes in the code once I get to test it as a jar file at first place.
Now that you have read Primer and learned how to write tests
using Google Test, it’s time to learn some new tricks. This document
will show you more assertions as well as how to construct complex
failure messages, propagate fatal failures, reuse and speed up your
test fixtures, and use various flags with your tests.
More Assertions
This section covers some less frequently used, but still significant,
assertions.
Explicit Success and Failure
These three assertions do not actually test a value or expression. Instead,
they generate a success or failure directly. Like the macros that actually
perform a test, you may stream a custom failure message into the them.
SUCCEED(); |
|---|
Generates a success. This does NOT make the overall test succeed. A test is
considered successful only if none of its assertions fail during its execution.
Note: SUCCEED() is purely documentary and currently doesn’t generate any
user-visible output. However, we may add SUCCEED() messages to Google Test’s
output in the future.
FAIL(); |
ADD_FAILURE(); |
ADD_FAILURE_AT("file_path", line_number); |
|---|
FAIL() generates a fatal failure, while ADD_FAILURE() and ADD_FAILURE_AT() generate a nonfatal
failure. These are useful when control flow, rather than a Boolean expression,
deteremines the test’s success or failure. For example, you might want to write
something like:
switch(expression) {
  case 1: ... some checks ...
  case 2: ... some other checks
  ...
  default: FAIL() << "We shouldn't get here.";
}
Note: you can only use FAIL() in functions that return void. See the Assertion Placement section for more information.
Availability: Linux, Windows, Mac.
Exception Assertions
These are for verifying that a piece of code throws (or does not
throw) an exception of the given type:
| Fatal assertion | Nonfatal assertion | Verifies |
|---|---|---|
ASSERT_THROW(statement, exception_type); |
EXPECT_THROW(statement, exception_type); |
statement throws an exception of the given type |
ASSERT_ANY_THROW(statement); |
EXPECT_ANY_THROW(statement); |
statement throws an exception of any type |
ASSERT_NO_THROW(statement); |
EXPECT_NO_THROW(statement); |
statement doesn’t throw any exception |
Examples:
ASSERT_THROW(Foo(5), bar_exception);

EXPECT_NO_THROW({
  int n = 5;
  Bar(&n);
});
Availability: Linux, Windows, Mac; since version 1.1.0.
Predicate Assertions for Better Error Messages
Even though Google Test has a rich set of assertions, they can never be
complete, as it’s impossible (nor a good idea) to anticipate all the scenarios
a user might run into. Therefore, sometimes a user has to use EXPECT_TRUE()
to check a complex expression, for lack of a better macro. This has the problem
of not showing you the values of the parts of the expression, making it hard to
understand what went wrong. As a workaround, some users choose to construct the
failure message by themselves, streaming it into EXPECT_TRUE(). However, this
is awkward especially when the expression has side-effects or is expensive to
evaluate.
Google Test gives you three different options to solve this problem:
Using an Existing Boolean Function
If you already have a function or a functor that returns bool (or a type
that can be implicitly converted to bool), you can use it in a predicate
assertion to get the function arguments printed for free:
| Fatal assertion | Nonfatal assertion | Verifies |
|---|---|---|
ASSERT_PRED1(pred1, val1); |
EXPECT_PRED1(pred1, val1); |
pred1(val1) returns true |
ASSERT_PRED2(pred2, val1, val2); |
EXPECT_PRED2(pred2, val1, val2); |
pred2(val1, val2) returns true |
| … | … | … |
In the above, predn is an n-ary predicate function or functor, where
val1, val2, …, and valn are its arguments. The assertion succeeds
if the predicate returns true when applied to the given arguments, and fails
otherwise. When the assertion fails, it prints the value of each argument. In
either case, the arguments are evaluated exactly once.
Here’s an example. Given
// Returns true iff m and n have no common divisors except 1.
bool MutuallyPrime(int m, int n) { ... }
const int a = 3;
const int b = 4;
const int c = 10;
the assertion EXPECT_PRED2(MutuallyPrime, a, b); will succeed, while the
assertion EXPECT_PRED2(MutuallyPrime, b, c); will fail with the message
!MutuallyPrime(b, c) is false, where

b is 4

c is 10
Notes:
- If you see a compiler error «no matching function to call» when using
ASSERT_PRED*orEXPECT_PRED*, please see this FAQ for how to resolve it. - Currently we only provide predicate assertions of arity <= 5. If you need a higher-arity assertion, let us know.
Availability: Linux, Windows, Mac
Using a Function That Returns an AssertionResult
While EXPECT_PRED*() and friends are handy for a quick job, the
syntax is not satisfactory: you have to use different macros for
different arities, and it feels more like Lisp than C++. The
::testing::AssertionResult class solves this problem.
An AssertionResult object represents the result of an assertion
(whether it’s a success or a failure, and an associated message). You
can create an AssertionResult using one of these factory
functions:
namespace testing {

// Returns an AssertionResult object to indicate that an assertion has
// succeeded.
AssertionResult AssertionSuccess();

// Returns an AssertionResult object to indicate that an assertion has
// failed.
AssertionResult AssertionFailure();

}
You can then use the << operator to stream messages to the
AssertionResult object.
To provide more readable messages in Boolean assertions
(e.g. EXPECT_TRUE()), write a predicate function that returns
AssertionResult instead of bool. For example, if you define
IsEven() as:
::testing::AssertionResult IsEven(int n) {
  if ((n % 2) == 0)
    return ::testing::AssertionSuccess();
  else
    return ::testing::AssertionFailure() << n << " is odd";
}
instead of:
bool IsEven(int n) {
  return (n % 2) == 0;
}
the failed assertion EXPECT_TRUE(IsEven(Fib(4))) will print:
Value of: IsEven(Fib(4))

Actual: false (*3 is odd*)

Expected: true
instead of a more opaque
Value of: IsEven(Fib(4))

Actual: false

Expected: true
If you want informative messages in EXPECT_FALSE and ASSERT_FALSE
as well, and are fine with making the predicate slower in the success
case, you can supply a success message:
::testing::AssertionResult IsEven(int n) {
  if ((n % 2) == 0)
    return ::testing::AssertionSuccess() << n << " is even";
  else
    return ::testing::AssertionFailure() << n << " is odd";
}
Then the statement EXPECT_FALSE(IsEven(Fib(6))) will print
Value of: IsEven(Fib(6))

Actual: true (8 is even)

Expected: false
Availability: Linux, Windows, Mac; since version 1.4.1.
Using a Predicate-Formatter
If you find the default message generated by (ASSERT|EXPECT)_PRED* and
(ASSERT|EXPECT)_(TRUE|FALSE) unsatisfactory, or some arguments to your
predicate do not support streaming to ostream, you can instead use the
following predicate-formatter assertions to fully customize how the
message is formatted:
| Fatal assertion | Nonfatal assertion | Verifies |
|---|---|---|
ASSERT_PRED_FORMAT1(pred_format1, val1); |
EXPECT_PRED_FORMAT1(pred_format1, val1); |
pred_format1(val1) is successful |
ASSERT_PRED_FORMAT2(pred_format2, val1, val2); |
EXPECT_PRED_FORMAT2(pred_format2, val1, val2); |
pred_format2(val1, val2) is successful |
... |
... |
... |
The difference between this and the previous two groups of macros is that instead of
a predicate, (ASSERT|EXPECT)_PRED_FORMAT* take a predicate-formatter
(pred_formatn), which is a function or functor with the signature:
::testing::AssertionResult PredicateFormattern(const char* expr1, const char* expr2, ... const char* exprn, T1 val1, T2 val2, ... Tn valn);
where val1, val2, …, and valn are the values of the predicate
arguments, and expr1, expr2, …, and exprn are the corresponding
expressions as they appear in the source code. The types T1, T2, …, and
Tn can be either value types or reference types. For example, if an
argument has type Foo, you can declare it as either Foo or const Foo&,
whichever is appropriate.
A predicate-formatter returns a ::testing::AssertionResult object to indicate
whether the assertion has succeeded or not. The only way to create such an
object is to call one of these factory functions:
As an example, let’s improve the failure message in the previous example, which uses EXPECT_PRED2():
// Returns the smallest prime common divisor of m and n,
// or 1 when m and n are mutually prime.
int SmallestPrimeCommonDivisor(int m, int n) { ... }

// A predicate-formatter for asserting that two integers are mutually prime.
::testing::AssertionResult AssertMutuallyPrime(const char* m_expr,
                                               const char* n_expr,
                                               int m,
                                               int n) {
  if (MutuallyPrime(m, n))
    return ::testing::AssertionSuccess();

  return ::testing::AssertionFailure()
      << m_expr << " and " << n_expr << " (" << m << " and " << n
      << ") are not mutually prime, " << "as they have a common divisor "
      << SmallestPrimeCommonDivisor(m, n);
}
With this predicate-formatter, we can use
EXPECT_PRED_FORMAT2(AssertMutuallyPrime, b, c);
to generate the message
b and c (4 and 10) are not mutually prime, as they have a common divisor 2.
As you may have realized, many of the assertions we introduced earlier are
special cases of (EXPECT|ASSERT)_PRED_FORMAT*. In fact, most of them are
indeed defined using (EXPECT|ASSERT)_PRED_FORMAT*.
Availability: Linux, Windows, Mac.
Floating-Point Comparison
Comparing floating-point numbers is tricky. Due to round-off errors, it is
very unlikely that two floating-points will match exactly. Therefore,
ASSERT_EQ ‘s naive comparison usually doesn’t work. And since floating-points
can have a wide value range, no single fixed error bound works. It’s better to
compare by a fixed relative error bound, except for values close to 0 due to
the loss of precision there.
In general, for floating-point comparison to make sense, the user needs to
carefully choose the error bound. If they don’t want or care to, comparing in
terms of Units in the Last Place (ULPs) is a good default, and Google Test
provides assertions to do this. Full details about ULPs are quite long; if you
want to learn more, see
this article on float comparison.
Floating-Point Macros
| Fatal assertion | Nonfatal assertion | Verifies |
|---|---|---|
ASSERT_FLOAT_EQ(val1, val2); |
EXPECT_FLOAT_EQ(val1, val2); |
the two float values are almost equal |
ASSERT_DOUBLE_EQ(val1, val2); |
EXPECT_DOUBLE_EQ(val1, val2); |
the two double values are almost equal |
By «almost equal», we mean the two values are within 4 ULP’s from each
other.
The following assertions allow you to choose the acceptable error bound:
| Fatal assertion | Nonfatal assertion | Verifies |
|---|---|---|
ASSERT_NEAR(val1, val2, abs_error); |
EXPECT_NEAR(val1, val2, abs_error); |
the difference between val1 and val2 doesn’t exceed the given absolute error |
Availability: Linux, Windows, Mac.
Floating-Point Predicate-Format Functions
Some floating-point operations are useful, but not that often used. In order
to avoid an explosion of new macros, we provide them as predicate-format
functions that can be used in predicate assertion macros (e.g.
EXPECT_PRED_FORMAT2, etc).
EXPECT_PRED_FORMAT2(::testing::FloatLE, val1, val2);
EXPECT_PRED_FORMAT2(::testing::DoubleLE, val1, val2);
Verifies that val1 is less than, or almost equal to, val2. You can
replace EXPECT_PRED_FORMAT2 in the above table with ASSERT_PRED_FORMAT2.
Availability: Linux, Windows, Mac.
Windows HRESULT assertions
These assertions test for HRESULT success or failure.
| Fatal assertion | Nonfatal assertion | Verifies |
|---|---|---|
ASSERT_HRESULT_SUCCEEDED(expression); |
EXPECT_HRESULT_SUCCEEDED(expression); |
expression is a success HRESULT |
ASSERT_HRESULT_FAILED(expression); |
EXPECT_HRESULT_FAILED(expression); |
expression is a failure HRESULT |
The generated output contains the human-readable error message
associated with the HRESULT code returned by expression.
You might use them like this:
CComPtr shell;
ASSERT_HRESULT_SUCCEEDED(shell.CoCreateInstance(L"Shell.Application"));
CComVariant empty;
ASSERT_HRESULT_SUCCEEDED(shell->ShellExecute(CComBSTR(url), empty, empty, empty, empty));
Availability: Windows.
Type Assertions
You can call the function
::testing::StaticAssertTypeEq<T1, T2>();
to assert that types T1 and T2 are the same. The function does
nothing if the assertion is satisfied. If the types are different,
the function call will fail to compile, and the compiler error message
will likely (depending on the compiler) show you the actual values of
T1 and T2. This is mainly useful inside template code.
Caveat: When used inside a member function of a class template or a
function template, StaticAssertTypeEq<T1, T2>() is effective only if
the function is instantiated. For example, given:
template <typename T> class Foo {
 public:
  void Bar() { ::testing::StaticAssertTypeEq<int, T>(); }
};
the code:
void Test1() { Foo<bool> foo; }
will not generate a compiler error, as Foo<bool>::Bar() is never
actually instantiated. Instead, you need:
void Test2() { Foo<bool> foo; foo.Bar(); }
to cause a compiler error.
Availability: Linux, Windows, Mac; since version 1.3.0.
Assertion Placement
You can use assertions in any C++ function. In particular, it doesn’t
have to be a method of the test fixture class. The one constraint is
that assertions that generate a fatal failure (FAIL* and ASSERT_*)
can only be used in void-returning functions. This is a consequence of
Google Test not using exceptions. By placing it in a non-void function
you’ll get a confusing compile error like
"error: void value not ignored as it ought to be".
If you need to use assertions in a function that returns non-void, one option
is to make the function return the value in an out parameter instead. For
example, you can rewrite T2 Foo(T1 x) to void Foo(T1 x, T2* result). You
need to make sure that *result contains some sensible value even when the
function returns prematurely. As the function now returns void, you can use
any assertion inside of it.
If changing the function’s type is not an option, you should just use
assertions that generate non-fatal failures, such as ADD_FAILURE* and
EXPECT_*.
Note: Constructors and destructors are not considered void-returning
functions, according to the C++ language specification, and so you may not use
fatal assertions in them. You’ll get a compilation error if you try. A simple
workaround is to transfer the entire body of the constructor or destructor to a
private void-returning method. However, you should be aware that a fatal
assertion failure in a constructor does not terminate the current test, as your
intuition might suggest; it merely returns from the constructor early, possibly
leaving your object in a partially-constructed state. Likewise, a fatal
assertion failure in a destructor may leave your object in a
partially-destructed state. Use assertions carefully in these situations!
Teaching Google Test How to Print Your Values
When a test assertion such as EXPECT_EQ fails, Google Test prints the
argument values to help you debug. It does this using a
user-extensible value printer.
This printer knows how to print built-in C++ types, native arrays, STL
containers, and any type that supports the << operator. For other
types, it prints the raw bytes in the value and hopes that you the
user can figure it out.
As mentioned earlier, the printer is extensible. That means
you can teach it to do a better job at printing your particular type
than to dump the bytes. To do that, define << for your type:
#include <iostream>

namespace foo {

class Bar { ... };  // We want Google Test to be able to print instances of this.

// It's important that the << operator is defined in the SAME
// namespace that defines Bar.  C++'s look-up rules rely on that.
::std::ostream& operator<<(::std::ostream& os, const Bar& bar) {
  return os << bar.DebugString();  // whatever needed to print bar to os
}

}  // namespace foo
Sometimes, this might not be an option: your team may consider it bad
style to have a << operator for Bar, or Bar may already have a
<< operator that doesn’t do what you want (and you cannot change
it). If so, you can instead define a PrintTo() function like this:
#include <iostream>

namespace foo {

class Bar { ... };

// It's important that PrintTo() is defined in the SAME
// namespace that defines Bar.  C++'s look-up rules rely on that.
void PrintTo(const Bar& bar, ::std::ostream* os) {
  *os << bar.DebugString();  // whatever needed to print bar to os
}

}  // namespace foo
If you have defined both << and PrintTo(), the latter will be used
when Google Test is concerned. This allows you to customize how the value
appears in Google Test’s output without affecting code that relies on the
behavior of its << operator.
If you want to print a value x using Google Test’s value printer
yourself, just call ::testing::PrintToString(x), which
returns an std::string:
vector<pair<Bar, int> > bar_ints = GetBarIntVector();

EXPECT_TRUE(IsCorrectBarIntVector(bar_ints))
    << "bar_ints = " << ::testing::PrintToString(bar_ints);
Death Tests
In many applications, there are assertions that can cause application failure
if a condition is not met. These sanity checks, which ensure that the program
is in a known good state, are there to fail at the earliest possible time after
some program state is corrupted. If the assertion checks the wrong condition,
then the program may proceed in an erroneous state, which could lead to memory
corruption, security holes, or worse. Hence it is vitally important to test
that such assertion statements work as expected.
Since these precondition checks cause the processes to die, we call such tests
death tests. More generally, any test that checks that a program terminates
(except by throwing an exception) in an expected fashion is also a death test.
Note that if a piece of code throws an exception, we don’t consider it «death»
for the purpose of death tests, as the caller of the code could catch the exception
and avoid the crash. If you want to verify exceptions thrown by your code,
see Exception Assertions.
If you want to test EXPECT_*()/ASSERT_*() failures in your test code, see Catching Failures.
How to Write a Death Test
Google Test has the following macros to support death tests:
| Fatal assertion | Nonfatal assertion | Verifies |
|---|---|---|
ASSERT_DEATH(statement, regex); |
EXPECT_DEATH(statement, regex); |
statement crashes with the given error |
ASSERT_DEATH_IF_SUPPORTED(statement, regex); |
EXPECT_DEATH_IF_SUPPORTED(statement, regex); |
if death tests are supported, verifies that statement crashes with the given error; otherwise verifies nothing |
ASSERT_EXIT(statement, predicate, regex); |
EXPECT_EXIT(statement, predicate, regex); |
statement exits with the given error and its exit code matches predicate |
where statement is a statement that is expected to cause the process to
die, predicate is a function or function object that evaluates an integer
exit status, and regex is a regular expression that the stderr output of
statement is expected to match. Note that statement can be any valid
statement (including compound statement) and doesn’t have to be an
expression.
As usual, the ASSERT variants abort the current test function, while the
EXPECT variants do not.
Note: We use the word «crash» here to mean that the process
terminates with a non-zero exit status code. There are two
possibilities: either the process has called exit() or _exit()
with a non-zero value, or it may be killed by a signal.
This means that if statement terminates the process with a 0 exit
code, it is not considered a crash by EXPECT_DEATH. Use
EXPECT_EXIT instead if this is the case, or if you want to restrict
the exit code more precisely.
A predicate here must accept an int and return a bool. The death test
succeeds only if the predicate returns true. Google Test defines a few
predicates that handle the most common cases:
::testing::ExitedWithCode(exit_code)
This expression is true if the program exited normally with the given exit
code.
::testing::KilledBySignal(signal_number) // Not available on Windows.
This expression is true if the program was killed by the given signal.
The *_DEATH macros are convenient wrappers for *_EXIT that use a predicate
that verifies the process’ exit code is non-zero.
Note that a death test only cares about three things:
- does statement abort or exit the process?
- (in the case of
ASSERT_EXITandEXPECT_EXIT) does the exit status satisfy predicate? Or (in the case ofASSERT_DEATHandEXPECT_DEATH) is the exit status non-zero? And - does the stderr output match regex?
In particular, if statement generates an ASSERT_* or EXPECT_* failure, it will not cause the death test to fail, as Google Test assertions don’t abort the process.
To write a death test, simply use one of the above macros inside your test
function. For example,
TEST(MyDeathTest, Foo) {
  // This death test uses a compound statement.
  ASSERT_DEATH({ int n = 5; Foo(&n); }, "Error on line .* of Foo()");
}
TEST(MyDeathTest, NormalExit) {
  EXPECT_EXIT(NormalExit(), ::testing::ExitedWithCode(0), "Success");
}
TEST(MyDeathTest, KillMyself) {
  EXPECT_EXIT(KillMyself(), ::testing::KilledBySignal(SIGKILL), "Sending myself unblockable signal");
}
verifies that:
- calling
Foo(5)causes the process to die with the given error message, - calling
NormalExit()causes the process to print"Success"to stderr and exit with exit code 0, and - calling
KillMyself()kills the process with signalSIGKILL.
The test function body may contain other assertions and statements as well, if
necessary.
Important: We strongly recommend you to follow the convention of naming your
test case (not test) *DeathTest when it contains a death test, as
demonstrated in the above example. The Death Tests And Threads section below
explains why.
If a test fixture class is shared by normal tests and death tests, you
can use typedef to introduce an alias for the fixture class and avoid
duplicating its code:
class FooTest : public ::testing::Test { ... };

typedef FooTest FooDeathTest;

TEST_F(FooTest, DoesThis) {
  // normal test
}

TEST_F(FooDeathTest, DoesThat) {
  // death test
}
Availability: Linux, Windows (requires MSVC 8.0 or above), Cygwin, and Mac (the latter three are supported since v1.3.0). (ASSERT|EXPECT)_DEATH_IF_SUPPORTED are new in v1.4.0.
Regular Expression Syntax
On POSIX systems (e.g. Linux, Cygwin, and Mac), Google Test uses the
POSIX extended regular expression
syntax in death tests. To learn about this syntax, you may want to read this Wikipedia entry.
On Windows, Google Test uses its own simple regular expression
implementation. It lacks many features you can find in POSIX extended
regular expressions. For example, we don’t support union ("x|y"),
grouping ("(xy)"), brackets ("[xy]"), and repetition count
("x{5,7}"), among others. Below is what we do support (Letter A denotes a
literal character, period (.), or a single \ escape sequence; x
and y denote regular expressions.):
c |
matches any literal character c |
|---|---|
\d |
matches any decimal digit |
\D |
matches any character that’s not a decimal digit |
\f |
matches f |
\n |
matches n |
\r |
matches r |
\s |
matches any ASCII whitespace, including n |
\S |
matches any character that’s not a whitespace |
\t |
matches t |
\v |
matches v |
\w |
matches any letter, _, or decimal digit |
\W |
matches any character that \w doesn’t match |
\c |
matches any literal character c, which must be a punctuation |
\. |
matches the . character |
. |
matches any single character except n |
A? |
matches 0 or 1 occurrences of A |
A* |
matches 0 or many occurrences of A |
A+ |
matches 1 or many occurrences of A |
^ |
matches the beginning of a string (not that of each line) |
$ |
matches the end of a string (not that of each line) |
xy |
matches x followed by y |
To help you determine which capability is available on your system,
Google Test defines macro GTEST_USES_POSIX_RE=1 when it uses POSIX
extended regular expressions, or GTEST_USES_SIMPLE_RE=1 when it uses
the simple version. If you want your death tests to work in both
cases, you can either #if on these macros or use the more limited
syntax only.
How It Works
Under the hood, ASSERT_EXIT() spawns a new process and executes the
death test statement in that process. The details of of how precisely
that happens depend on the platform and the variable
::testing::GTEST_FLAG(death_test_style) (which is initialized from the
command-line flag --gtest_death_test_style).
- On POSIX systems,
fork()(orclone()on Linux) is used to spawn the child, after which:- If the variable’s value is
"fast", the death test statement is immediately executed. - If the variable’s value is
"threadsafe", the child process re-executes the unit test binary just as it was originally invoked, but with some extra flags to cause just the single death test under consideration to be run.
- If the variable’s value is
- On Windows, the child is spawned using the
CreateProcess()API, and re-executes the binary to cause just the single death test under consideration to be run — much like thethreadsafemode on POSIX.
Other values for the variable are illegal and will cause the death test to
fail. Currently, the flag’s default value is "fast". However, we reserve the
right to change it in the future. Therefore, your tests should not depend on
this.
In either case, the parent process waits for the child process to complete, and checks that
- the child’s exit status satisfies the predicate, and
- the child’s stderr matches the regular expression.
If the death test statement runs to completion without dying, the child
process will nonetheless terminate, and the assertion fails.
Death Tests And Threads
The reason for the two death test styles has to do with thread safety. Due to
well-known problems with forking in the presence of threads, death tests should
be run in a single-threaded context. Sometimes, however, it isn’t feasible to
arrange that kind of environment. For example, statically-initialized modules
may start threads before main is ever reached. Once threads have been created,
it may be difficult or impossible to clean them up.
Google Test has three features intended to raise awareness of threading issues.
- A warning is emitted if multiple threads are running when a death test is encountered.
- Test cases with a name ending in «DeathTest» are run before all other tests.
- It uses
clone()instead offork()to spawn the child process on Linux (clone()is not available on Cygwin and Mac), asfork()is more likely to cause the child to hang when the parent process has multiple threads.
It’s perfectly fine to create threads inside a death test statement; they are
executed in a separate process and cannot affect the parent.
Death Test Styles
The «threadsafe» death test style was introduced in order to help mitigate the
risks of testing in a possibly multithreaded environment. It trades increased
test execution time (potentially dramatically so) for improved thread safety.
We suggest using the faster, default «fast» style unless your test has specific
problems with it.
You can choose a particular style of death tests by setting the flag
programmatically:
::testing::FLAGS_gtest_death_test_style = "threadsafe";
You can do this in main() to set the style for all death tests in the
binary, or in individual tests. Recall that flags are saved before running each
test and restored afterwards, so you need not do that yourself. For example:
TEST(MyDeathTest, TestOne) {
  ::testing::FLAGS_gtest_death_test_style = "threadsafe";
  // This test is run in the "threadsafe" style:
  ASSERT_DEATH(ThisShouldDie(), "");
}

TEST(MyDeathTest, TestTwo) {
  // This test is run in the "fast" style:
  ASSERT_DEATH(ThisShouldDie(), "");
}

int main(int argc, char** argv) {
  ::testing::InitGoogleTest(&argc, argv);
  ::testing::FLAGS_gtest_death_test_style = "fast";
  return RUN_ALL_TESTS();
}
Caveats
The statement argument of ASSERT_EXIT() can be any valid C++ statement.
If it leaves the current function via a return statement or by throwing an exception,
the death test is considered to have failed. Some Google Test macros may return
from the current function (e.g. ASSERT_TRUE()), so be sure to avoid them in statement.
Since statement runs in the child process, any in-memory side effect (e.g.
modifying a variable, releasing memory, etc) it causes will not be observable
in the parent process. In particular, if you release memory in a death test,
your program will fail the heap check as the parent process will never see the
memory reclaimed. To solve this problem, you can
- try not to free memory in a death test;
- free the memory again in the parent process; or
- do not use the heap checker in your program.
Due to an implementation detail, you cannot place multiple death test
assertions on the same line; otherwise, compilation will fail with an unobvious
error message.
Despite the improved thread safety afforded by the «threadsafe» style of death
test, thread problems such as deadlock are still possible in the presence of
handlers registered with pthread_atfork(3).
Using Assertions in Sub-routines
Adding Traces to Assertions
If a test sub-routine is called from several places, when an assertion
inside it fails, it can be hard to tell which invocation of the
sub-routine the failure is from. You can alleviate this problem using
extra logging or custom failure messages, but that usually clutters up
your tests. A better solution is to use the SCOPED_TRACE macro:
SCOPED_TRACE(message); |
|---|
where message can be anything streamable to std::ostream. This
macro will cause the current file name, line number, and the given
message to be added in every failure message. The effect will be
undone when the control leaves the current lexical scope.
For example,
10: void Sub1(int n) {
11:   EXPECT_EQ(1, Bar(n));
12:   EXPECT_EQ(2, Bar(n + 1));
13: }
14:
15: TEST(FooTest, Bar) {
16:   {
17:     SCOPED_TRACE("A");  // This trace point will be included in
18:                         // every failure in this scope.
19:     Sub1(1);
20:   }
21:   // Now it won't.
22:   Sub1(9);
23: }
could result in messages like these:
path/to/foo_test.cc:11: Failure
Value of: Bar(n)
Expected: 1
  Actual: 2
   Trace:
path/to/foo_test.cc:17: A

path/to/foo_test.cc:12: Failure
Value of: Bar(n + 1)
Expected: 2
  Actual: 3
Without the trace, it would’ve been difficult to know which invocation
of Sub1() the two failures come from respectively. (You could add an
extra message to each assertion in Sub1() to indicate the value of
n, but that’s tedious.)
Some tips on using SCOPED_TRACE:
- With a suitable message, it’s often enough to use
SCOPED_TRACEat the beginning of a sub-routine, instead of at each call site. - When calling sub-routines inside a loop, make the loop iterator part of the message in
SCOPED_TRACEsuch that you can know which iteration the failure is from. - Sometimes the line number of the trace point is enough for identifying the particular invocation of a sub-routine. In this case, you don’t have to choose a unique message for
SCOPED_TRACE. You can simply use"". - You can use
SCOPED_TRACEin an inner scope when there is one in the outer scope. In this case, all active trace points will be included in the failure messages, in reverse order they are encountered. - The trace dump is clickable in Emacs’ compilation buffer — hit return on a line number and you’ll be taken to that line in the source file!
Availability: Linux, Windows, Mac.
Propagating Fatal Failures
A common pitfall when using ASSERT_* and FAIL* is not understanding that
when they fail they only abort the current function, not the entire test. For
example, the following test will segfault:
void Subroutine() {
  // Generates a fatal failure and aborts the current function.
  ASSERT_EQ(1, 2);
  // The following won't be executed.
  ...
}

TEST(FooTest, Bar) {
  Subroutine();
  // The intended behavior is for the fatal failure
  // in Subroutine() to abort the entire test.
  // The actual behavior: the function goes on after Subroutine() returns.
  int* p = NULL;
  *p = 3; // Segfault!
}
Since we don’t use exceptions, it is technically impossible to
implement the intended behavior here. To alleviate this, Google Test
provides two solutions. You could use either the
(ASSERT|EXPECT)_NO_FATAL_FAILURE assertions or the
HasFatalFailure() function. They are described in the following two
subsections.
Asserting on Subroutines
As shown above, if your test calls a subroutine that has an ASSERT_*
failure in it, the test will continue after the subroutine
returns. This may not be what you want.
Often people want fatal failures to propagate like exceptions. For
that Google Test offers the following macros:
| Fatal assertion | Nonfatal assertion | Verifies |
|---|---|---|
ASSERT_NO_FATAL_FAILURE(statement); |
EXPECT_NO_FATAL_FAILURE(statement); |
statement doesn’t generate any new fatal failures in the current thread. |
Only failures in the thread that executes the assertion are checked to
determine the result of this type of assertions. If statement
creates new threads, failures in these threads are ignored.
Examples:
ASSERT_NO_FATAL_FAILURE(Foo());

int i;
EXPECT_NO_FATAL_FAILURE({
  i = Bar();
});
Availability: Linux, Windows, Mac. Assertions from multiple threads
are currently not supported.
Checking for Failures in the Current Test
HasFatalFailure() in the ::testing::Test class returns true if an
assertion in the current test has suffered a fatal failure. This
allows functions to catch fatal failures in a sub-routine and return
early.
class Test {
 public:
  ...
  static bool HasFatalFailure();
};
The typical usage, which basically simulates the behavior of a thrown
exception, is:
TEST(FooTest, Bar) {
  Subroutine();
  // Aborts if Subroutine() had a fatal failure.
  if (HasFatalFailure())
    return;
  // The following won't be executed.
  ...
}
If HasFatalFailure() is used outside of TEST() , TEST_F() , or a test
fixture, you must add the ::testing::Test:: prefix, as in:
if (::testing::Test::HasFatalFailure())
  return;
Similarly, HasNonfatalFailure() returns true if the current test
has at least one non-fatal failure, and HasFailure() returns true
if the current test has at least one failure of either kind.
Availability: Linux, Windows, Mac. HasNonfatalFailure() and
HasFailure() are available since version 1.4.0.
Logging Additional Information
In your test code, you can call RecordProperty("key", value) to log
additional information, where value can be either a string or an int. The last value recorded for a key will be emitted to the XML output
if you specify one. For example, the test
TEST_F(WidgetUsageTest, MinAndMaxWidgets) {
  RecordProperty("MaximumWidgets", ComputeMaxUsage());
  RecordProperty("MinimumWidgets", ComputeMinUsage());
}
will output XML like this:
...
  <testcase name="MinAndMaxWidgets" status="run" time="6" classname="WidgetUsageTest"
            MaximumWidgets="12"
            MinimumWidgets="9" />
...
Note:
RecordProperty()is a static member of theTestclass. Therefore it needs to be prefixed with::testing::Test::if used outside of theTESTbody and the test fixture class.keymust be a valid XML attribute name, and cannot conflict with the ones already used by Google Test (name,status,time,classname,type_param, andvalue_param).- Calling
RecordProperty()outside of the lifespan of a test is allowed. If it’s called outside of a test but between a test case’sSetUpTestCase()andTearDownTestCase()methods, it will be attributed to the XML element for the test case. If it’s called outside of all test cases (e.g. in a test environment), it will be attributed to the top-level XML element.
Availability: Linux, Windows, Mac.
Sharing Resources Between Tests in the Same Test Case
Google Test creates a new test fixture object for each test in order to make
tests independent and easier to debug. However, sometimes tests use resources
that are expensive to set up, making the one-copy-per-test model prohibitively
expensive.
If the tests don’t change the resource, there’s no harm in them sharing a
single resource copy. So, in addition to per-test set-up/tear-down, Google Test
also supports per-test-case set-up/tear-down. To use it:
- In your test fixture class (say
FooTest), define asstaticsome member variables to hold the shared resources. - In the same test fixture class, define a
static void SetUpTestCase()function (remember not to spell it asSetupTestCasewith a smallu!) to set up the shared resources and astatic void TearDownTestCase()function to tear them down.
That’s it! Google Test automatically calls SetUpTestCase() before running the
first test in the FooTest test case (i.e. before creating the first
FooTest object), and calls TearDownTestCase() after running the last test
in it (i.e. after deleting the last FooTest object). In between, the tests
can use the shared resources.
Remember that the test order is undefined, so your code can’t depend on a test
preceding or following another. Also, the tests must either not modify the
state of any shared resource, or, if they do modify the state, they must
restore the state to its original value before passing control to the next
test.
Here’s an example of per-test-case set-up and tear-down:
class FooTest : public ::testing::Test {
 protected:
  // Per-test-case set-up.
  // Called before the first test in this test case.
  // Can be omitted if not needed.
  static void SetUpTestCase() {
    shared_resource_ = new ...;
  }

  // Per-test-case tear-down.
  // Called after the last test in this test case.
  // Can be omitted if not needed.
  static void TearDownTestCase() {
    delete shared_resource_;
    shared_resource_ = NULL;
  }

  // You can define per-test set-up and tear-down logic as usual.
  virtual void SetUp() { ... }
  virtual void TearDown() { ... }

  // Some expensive resource shared by all tests.
  static T* shared_resource_;
};

T* FooTest::shared_resource_ = NULL;

TEST_F(FooTest, Test1) {
  ... you can refer to shared_resource here ...
}
TEST_F(FooTest, Test2) {
  ... you can refer to shared_resource here ...
}
Availability: Linux, Windows, Mac.
Global Set-Up and Tear-Down
Just as you can do set-up and tear-down at the test level and the test case
level, you can also do it at the test program level. Here’s how.
First, you subclass the ::testing::Environment class to define a test
environment, which knows how to set-up and tear-down:
class Environment {
 public:
  virtual ~Environment() {}
  // Override this to define how to set up the environment.
  virtual void SetUp() {}
  // Override this to define how to tear down the environment.
  virtual void TearDown() {}
};
Then, you register an instance of your environment class with Google Test by
calling the ::testing::AddGlobalTestEnvironment() function:
Environment* AddGlobalTestEnvironment(Environment* env);
Now, when RUN_ALL_TESTS() is called, it first calls the SetUp() method of
the environment object, then runs the tests if there was no fatal failures, and
finally calls TearDown() of the environment object.
It’s OK to register multiple environment objects. In this case, their SetUp()
will be called in the order they are registered, and their TearDown() will be
called in the reverse order.
Note that Google Test takes ownership of the registered environment objects.
Therefore do not delete them by yourself.
You should call AddGlobalTestEnvironment() before RUN_ALL_TESTS() is
called, probably in main(). If you use gtest_main, you need to call
this before main() starts for it to take effect. One way to do this is to
define a global variable like this:
::testing::Environment* const foo_env = ::testing::AddGlobalTestEnvironment(new FooEnvironment);
However, we strongly recommend you to write your own main() and call
AddGlobalTestEnvironment() there, as relying on initialization of global
variables makes the code harder to read and may cause problems when you
register multiple environments from different translation units and the
environments have dependencies among them (remember that the compiler doesn’t
guarantee the order in which global variables from different translation units
are initialized).
Availability: Linux, Windows, Mac.
Value Parameterized Tests
Value-parameterized tests allow you to test your code with different
parameters without writing multiple copies of the same test.
Suppose you write a test for your code and then realize that your code is affected by a presence of a Boolean command line flag.
TEST(MyCodeTest, TestFoo) {
  // A code to test foo().
}
Usually people factor their test code into a function with a Boolean parameter in such situations. The function sets the flag, then executes the testing code.
void TestFooHelper(bool flag_value) {
  flag = flag_value;
  // A code to test foo().
}

TEST(MyCodeTest, TestFoo) {
  TestFooHelper(false);
  TestFooHelper(true);
}
But this setup has serious drawbacks. First, when a test assertion fails in your tests, it becomes unclear what value of the parameter caused it to fail. You can stream a clarifying message into your EXPECT/ASSERT statements, but it you’ll have to do it with all of them. Second, you have to add one such helper function per test. What if you have ten tests? Twenty? A hundred?
Value-parameterized tests will let you write your test only once and then easily instantiate and run it with an arbitrary number of parameter values.
Here are some other situations when value-parameterized tests come handy:
- You want to test different implementations of an OO interface.
- You want to test your code over various inputs (a.k.a. data-driven testing). This feature is easy to abuse, so please exercise your good sense when doing it!
How to Write Value-Parameterized Tests
To write value-parameterized tests, first you should define a fixture
class. It must be derived from both ::testing::Test and
::testing::WithParamInterface<T> (the latter is a pure interface),
where T is the type of your parameter values. For convenience, you
can just derive the fixture class from ::testing::TestWithParam<T>,
which itself is derived from both ::testing::Test and
::testing::WithParamInterface<T>. T can be any copyable type. If
it’s a raw pointer, you are responsible for managing the lifespan of
the pointed values.
class FooTest : public ::testing::TestWithParam<const char*> {
  // You can implement all the usual fixture class members here.
  // To access the test parameter, call GetParam() from class
  // TestWithParam<T>.
};

// Or, when you want to add parameters to a pre-existing fixture class:
class BaseTest : public ::testing::Test {
  ...
};
class BarTest : public BaseTest,
                public ::testing::WithParamInterface<const char*> {
  ...
};
Then, use the TEST_P macro to define as many test patterns using
this fixture as you want. The _P suffix is for «parameterized» or
«pattern», whichever you prefer to think.
TEST_P(FooTest, DoesBlah) {
  // Inside a test, access the test parameter with the GetParam() method
  // of the TestWithParam<T> class:
  EXPECT_TRUE(foo.Blah(GetParam()));
  ...
}

TEST_P(FooTest, HasBlahBlah) {
  ...
}
Finally, you can use INSTANTIATE_TEST_CASE_P to instantiate the test
case with any set of parameters you want. Google Test defines a number of
functions for generating test parameters. They return what we call
(surprise!) parameter generators. Here is a summary of them,
which are all in the testing namespace:
Range(begin, end[, step]) |
Yields values {begin, begin+step, begin+step+step, ...}. The values do not include end. step defaults to 1. |
|---|---|
Values(v1, v2, ..., vN) |
Yields values {v1, v2, ..., vN}. |
ValuesIn(container) and ValuesIn(begin, end) |
Yields values from a C-style array, an STL-style container, or an iterator range [begin, end). container, begin, and end can be expressions whose values are determined at run time. |
Bool() |
Yields sequence {false, true}. |
Combine(g1, g2, ..., gN) |
Yields all combinations (the Cartesian product for the math savvy) of the values generated by the N generators. This is only available if your system provides the <tr1/tuple> header. If you are sure your system does, and Google Test disagrees, you can override it by defining GTEST_HAS_TR1_TUPLE=1. See comments in include/gtest/internal/gtest-port.h for more information. |
For more details, see the comments at the definitions of these functions in the source code.
The following statement will instantiate tests from the FooTest test case
each with parameter values "meeny", "miny", and "moe".
INSTANTIATE_TEST_CASE_P(InstantiationName,
                        FooTest,
                        ::testing::Values("meeny", "miny", "moe"));
To distinguish different instances of the pattern (yes, you can
instantiate it more than once), the first argument to
INSTANTIATE_TEST_CASE_P is a prefix that will be added to the actual
test case name. Remember to pick unique prefixes for different
instantiations. The tests from the instantiation above will have these
names:
InstantiationName/FooTest.DoesBlah/0for"meeny"InstantiationName/FooTest.DoesBlah/1for"miny"InstantiationName/FooTest.DoesBlah/2for"moe"InstantiationName/FooTest.HasBlahBlah/0for"meeny"InstantiationName/FooTest.HasBlahBlah/1for"miny"InstantiationName/FooTest.HasBlahBlah/2for"moe"
You can use these names in —gtest_filter.
This statement will instantiate all tests from FooTest again, each
with parameter values "cat" and "dog":
const char* pets[] = {"cat", "dog"};
INSTANTIATE_TEST_CASE_P(AnotherInstantiationName, FooTest,
                        ::testing::ValuesIn(pets));
The tests from the instantiation above will have these names:
AnotherInstantiationName/FooTest.DoesBlah/0for"cat"AnotherInstantiationName/FooTest.DoesBlah/1for"dog"AnotherInstantiationName/FooTest.HasBlahBlah/0for"cat"AnotherInstantiationName/FooTest.HasBlahBlah/1for"dog"
Please note that INSTANTIATE_TEST_CASE_P will instantiate all
tests in the given test case, whether their definitions come before or
after the INSTANTIATE_TEST_CASE_P statement.
You can see
these
files for more examples.
Availability: Linux, Windows (requires MSVC 8.0 or above), Mac; since version 1.2.0.
Creating Value-Parameterized Abstract Tests
In the above, we define and instantiate FooTest in the same source
file. Sometimes you may want to define value-parameterized tests in a
library and let other people instantiate them later. This pattern is
known as abstract tests. As an example of its application, when you
are designing an interface you can write a standard suite of abstract
tests (perhaps using a factory function as the test parameter) that
all implementations of the interface are expected to pass. When
someone implements the interface, he can instantiate your suite to get
all the interface-conformance tests for free.
To define abstract tests, you should organize your code like this:
- Put the definition of the parameterized test fixture class (e.g.
FooTest) in a header file, sayfoo_param_test.h. Think of this as declaring your abstract tests. - Put the
TEST_Pdefinitions infoo_param_test.cc, which includesfoo_param_test.h. Think of this as implementing your abstract tests.
Once they are defined, you can instantiate them by including
foo_param_test.h, invoking INSTANTIATE_TEST_CASE_P(), and linking
with foo_param_test.cc. You can instantiate the same abstract test
case multiple times, possibly in different source files.
Typed Tests
Suppose you have multiple implementations of the same interface and
want to make sure that all of them satisfy some common requirements.
Or, you may have defined several types that are supposed to conform to
the same «concept» and you want to verify it. In both cases, you want
the same test logic repeated for different types.
While you can write one TEST or TEST_F for each type you want to
test (and you may even factor the test logic into a function template
that you invoke from the TEST), it’s tedious and doesn’t scale:
if you want m tests over n types, you’ll end up writing m*n
TESTs.
Typed tests allow you to repeat the same test logic over a list of
types. You only need to write the test logic once, although you must
know the type list when writing typed tests. Here’s how you do it:
First, define a fixture class template. It should be parameterized
by a type. Remember to derive it from ::testing::Test:
template <typename T>
class FooTest : public ::testing::Test {
 public:
  ...
  typedef std::list<T> List;
  static T shared_;
  T value_;
};
Next, associate a list of types with the test case, which will be
repeated for each type in the list:
typedef ::testing::Types<char, int, unsigned int> MyTypes;
TYPED_TEST_CASE(FooTest, MyTypes);
The typedef is necessary for the TYPED_TEST_CASE macro to parse
correctly. Otherwise the compiler will think that each comma in the
type list introduces a new macro argument.
Then, use TYPED_TEST() instead of TEST_F() to define a typed test
for this test case. You can repeat this as many times as you want:
TYPED_TEST(FooTest, DoesBlah) {
  // Inside a test, refer to the special name TypeParam to get the type
  // parameter.  Since we are inside a derived class template, C++ requires
  // us to visit the members of FooTest via 'this'.
  TypeParam n = this->value_;

  // To visit static members of the fixture, add the 'TestFixture::'
  // prefix.
  n += TestFixture::shared_;

  // To refer to typedefs in the fixture, add the 'typename TestFixture::'
  // prefix.  The 'typename' is required to satisfy the compiler.
  typename TestFixture::List values;
  values.push_back(n);
  ...
}

TYPED_TEST(FooTest, HasPropertyA) { ... }
You can see samples/sample6_unittest.cc for a complete example.
Availability: Linux, Windows (requires MSVC 8.0 or above), Mac;
since version 1.1.0.
Type-Parameterized Tests
Type-parameterized tests are like typed tests, except that they
don’t require you to know the list of types ahead of time. Instead,
you can define the test logic first and instantiate it with different
type lists later. You can even instantiate it more than once in the
same program.
If you are designing an interface or concept, you can define a suite
of type-parameterized tests to verify properties that any valid
implementation of the interface/concept should have. Then, the author
of each implementation can just instantiate the test suite with his
type to verify that it conforms to the requirements, without having to
write similar tests repeatedly. Here’s an example:
First, define a fixture class template, as we did with typed tests:
template <typename T>
class FooTest : public ::testing::Test {
  ...
};
Next, declare that you will define a type-parameterized test case:
TYPED_TEST_CASE_P(FooTest);
The _P suffix is for «parameterized» or «pattern», whichever you
prefer to think.
Then, use TYPED_TEST_P() to define a type-parameterized test. You
can repeat this as many times as you want:
TYPED_TEST_P(FooTest, DoesBlah) {
  // Inside a test, refer to TypeParam to get the type parameter.
  TypeParam n = 0;
  ...
}

TYPED_TEST_P(FooTest, HasPropertyA) { ... }
Now the tricky part: you need to register all test patterns using the
REGISTER_TYPED_TEST_CASE_P macro before you can instantiate them.
The first argument of the macro is the test case name; the rest are
the names of the tests in this test case:
REGISTER_TYPED_TEST_CASE_P(FooTest,
                           DoesBlah, HasPropertyA);
Finally, you are free to instantiate the pattern with the types you
want. If you put the above code in a header file, you can #include
it in multiple C++ source files and instantiate it multiple times.
typedef ::testing::Types<char, int, unsigned int> MyTypes;
INSTANTIATE_TYPED_TEST_CASE_P(My, FooTest, MyTypes);
To distinguish different instances of the pattern, the first argument
to the INSTANTIATE_TYPED_TEST_CASE_P macro is a prefix that will be
added to the actual test case name. Remember to pick unique prefixes
for different instances.
In the special case where the type list contains only one type, you
can write that type directly without ::testing::Types<...>, like this:
INSTANTIATE_TYPED_TEST_CASE_P(My, FooTest, int);
You can see samples/sample6_unittest.cc for a complete example.
Availability: Linux, Windows (requires MSVC 8.0 or above), Mac;
since version 1.1.0.
Testing Private Code
If you change your software’s internal implementation, your tests should not
break as long as the change is not observable by users. Therefore, per the
black-box testing principle, most of the time you should test your code
through its public interfaces.
If you still find yourself needing to test internal implementation code,
consider if there’s a better design that wouldn’t require you to do so. If you
absolutely have to test non-public interface code though, you can. There are
two cases to consider:
- Static functions (not the same as static member functions!) or unnamed namespaces, and
- Private or protected class members
Static Functions
Both static functions and definitions/declarations in an unnamed namespace are
only visible within the same translation unit. To test them, you can #include
the entire .cc file being tested in your *_test.cc file. (#includeing .cc
files is not a good way to reuse code — you should not do this in production
code!)
However, a better approach is to move the private code into the
foo::internal namespace, where foo is the namespace your project normally
uses, and put the private declarations in a *-internal.h file. Your
production .cc files and your tests are allowed to include this internal
header, but your clients are not. This way, you can fully test your internal
implementation without leaking it to your clients.
Private Class Members
Private class members are only accessible from within the class or by friends.
To access a class’ private members, you can declare your test fixture as a
friend to the class and define accessors in your fixture. Tests using the
fixture can then access the private members of your production class via the
accessors in the fixture. Note that even though your fixture is a friend to
your production class, your tests are not automatically friends to it, as they
are technically defined in sub-classes of the fixture.
Another way to test private members is to refactor them into an implementation
class, which is then declared in a *-internal.h file. Your clients aren’t
allowed to include this header but your tests can. Such is called the Pimpl
(Private Implementation) idiom.
Or, you can declare an individual test as a friend of your class by adding this
line in the class body:
FRIEND_TEST(TestCaseName, TestName);
For example,
// foo.h
#include "gtest/gtest_prod.h"

// Defines FRIEND_TEST.
class Foo {
  ...
 private:
  FRIEND_TEST(FooTest, BarReturnsZeroOnNull);
  int Bar(void* x);
};

// foo_test.cc
...
TEST(FooTest, BarReturnsZeroOnNull) {
  Foo foo;
  EXPECT_EQ(0, foo.Bar(NULL));
  // Uses Foo's private member Bar().
}
Pay special attention when your class is defined in a namespace, as you should
define your test fixtures and tests in the same namespace if you want them to
be friends of your class. For example, if the code to be tested looks like:
namespace my_namespace {

class Foo {
  friend class FooTest;
  FRIEND_TEST(FooTest, Bar);
  FRIEND_TEST(FooTest, Baz);
  ...
  definition of the class Foo
  ...
};

}  // namespace my_namespace
Your test code should be something like:
namespace my_namespace {
class FooTest : public ::testing::Test {
 protected:
  ...
};

TEST_F(FooTest, Bar) { ... }
TEST_F(FooTest, Baz) { ... }

}  // namespace my_namespace
Catching Failures
If you are building a testing utility on top of Google Test, you’ll
want to test your utility. What framework would you use to test it?
Google Test, of course.
The challenge is to verify that your testing utility reports failures
correctly. In frameworks that report a failure by throwing an
exception, you could catch the exception and assert on it. But Google
Test doesn’t use exceptions, so how do we test that a piece of code
generates an expected failure?
"gtest/gtest-spi.h" contains some constructs to do this. After
#includeing this header, you can use
EXPECT_FATAL_FAILURE(statement, substring); |
|---|
to assert that statement generates a fatal (e.g. ASSERT_*) failure
whose message contains the given substring, or use
EXPECT_NONFATAL_FAILURE(statement, substring); |
|---|
if you are expecting a non-fatal (e.g. EXPECT_*) failure.
For technical reasons, there are some caveats:
- You cannot stream a failure message to either macro.
- statement in
EXPECT_FATAL_FAILURE()cannot reference local non-static variables or non-static members ofthisobject. - statement in
EXPECT_FATAL_FAILURE()cannot return a value.
Note: Google Test is designed with threads in mind. Once the
synchronization primitives in "gtest/internal/gtest-port.h" have
been implemented, Google Test will become thread-safe, meaning that
you can then use assertions in multiple threads concurrently. Before
that, however, Google Test only supports single-threaded usage. Once
thread-safe, EXPECT_FATAL_FAILURE() and EXPECT_NONFATAL_FAILURE()
will capture failures in the current thread only. If statement
creates new threads, failures in these threads will be ignored. If
you want to capture failures from all threads instead, you should use
the following macros:
EXPECT_FATAL_FAILURE_ON_ALL_THREADS(statement, substring); |
|---|
EXPECT_NONFATAL_FAILURE_ON_ALL_THREADS(statement, substring); |
Getting the Current Test’s Name
Sometimes a function may need to know the name of the currently running test.
For example, you may be using the SetUp() method of your test fixture to set
the golden file name based on which test is running. The ::testing::TestInfo
class has this information:
namespace testing {

class TestInfo {
 public:
  // Returns the test case name and the test name, respectively.
  //
  // Do NOT delete or free the return value - it's managed by the
  // TestInfo class.
  const char* test_case_name() const;
  const char* name() const;
};

}  // namespace testing
To obtain a
TestInfoobject for the currently running test, call
current_test_info()on theUnitTestsingleton object:
// Gets information about the currently running test.
// Do NOT delete the returned object - it's managed by the UnitTest class.
const ::testing::TestInfo* const test_info =
  ::testing::UnitTest::GetInstance()->current_test_info();
printf("We are in test %s of test case %s.n",
       test_info->name(), test_info->test_case_name());
current_test_info() returns a null pointer if no test is running. In
particular, you cannot find the test case name in TestCaseSetUp(),
TestCaseTearDown() (where you know the test case name implicitly), or
functions called from them.
Availability: Linux, Windows, Mac.
Extending Google Test by Handling Test Events
Google Test provides an event listener API to let you receive
notifications about the progress of a test program and test
failures. The events you can listen to include the start and end of
the test program, a test case, or a test method, among others. You may
use this API to augment or replace the standard console output,
replace the XML output, or provide a completely different form of
output, such as a GUI or a database. You can also use test events as
checkpoints to implement a resource leak checker, for example.
Availability: Linux, Windows, Mac; since v1.4.0.
Defining Event Listeners
To define a event listener, you subclass either
testing::TestEventListener
or testing::EmptyTestEventListener.
The former is an (abstract) interface, where each pure virtual method
can be overridden to handle a test event (For example, when a test
starts, the OnTestStart() method will be called.). The latter provides
an empty implementation of all methods in the interface, such that a
subclass only needs to override the methods it cares about.
When an event is fired, its context is passed to the handler function
as an argument. The following argument types are used:
- UnitTest reflects the state of the entire test program,
- TestCase has information about a test case, which can contain one or more tests,
- TestInfo contains the state of a test, and
- TestPartResult represents the result of a test assertion.
An event handler function can examine the argument it receives to find
out interesting information about the event and the test program’s
state. Here’s an example:
  class MinimalistPrinter : public ::testing::EmptyTestEventListener {
    // Called before a test starts.
    virtual void OnTestStart(const ::testing::TestInfo& test_info) {
      printf("*** Test %s.%s starting.n",
             test_info.test_case_name(), test_info.name());
    }

    // Called after a failed assertion or a SUCCEED() invocation.
    virtual void OnTestPartResult(
        const ::testing::TestPartResult& test_part_result) {
      printf("%s in %s:%dn%sn",
             test_part_result.failed() ? "*** Failure" : "Success",
             test_part_result.file_name(),
             test_part_result.line_number(),
             test_part_result.summary());
    }

    // Called after a test ends.
    virtual void OnTestEnd(const ::testing::TestInfo& test_info) {
      printf("*** Test %s.%s ending.n",
             test_info.test_case_name(), test_info.name());
    }
  };
Using Event Listeners
To use the event listener you have defined, add an instance of it to
the Google Test event listener list (represented by class
TestEventListeners
- note the «s» at the end of the name) in your
main()function, before callingRUN_ALL_TESTS():
int main(int argc, char** argv) {
  ::testing::InitGoogleTest(&argc, argv);
  // Gets hold of the event listener list.
  ::testing::TestEventListeners& listeners =
      ::testing::UnitTest::GetInstance()->listeners();
  // Adds a listener to the end.  Google Test takes the ownership.
  listeners.Append(new MinimalistPrinter);
  return RUN_ALL_TESTS();
}
There’s only one problem: the default test result printer is still in
effect, so its output will mingle with the output from your minimalist
printer. To suppress the default printer, just release it from the
event listener list and delete it. You can do so by adding one line:
  ...
  delete listeners.Release(listeners.default_result_printer());
  listeners.Append(new MinimalistPrinter);
  return RUN_ALL_TESTS();
Now, sit back and enjoy a completely different output from your
tests. For more details, you can read this
sample.
You may append more than one listener to the list. When an On*Start()
or OnTestPartResult() event is fired, the listeners will receive it in
the order they appear in the list (since new listeners are added to
the end of the list, the default text printer and the default XML
generator will receive the event first). An On*End() event will be
received by the listeners in the reverse order. This allows output by
listeners added later to be framed by output from listeners added
earlier.
Generating Failures in Listeners
You may use failure-raising macros (EXPECT_*(), ASSERT_*(),
FAIL(), etc) when processing an event. There are some restrictions:
- You cannot generate any failure in
OnTestPartResult()(otherwise it will causeOnTestPartResult()to be called recursively). - A listener that handles
OnTestPartResult()is not allowed to generate any failure.
When you add listeners to the listener list, you should put listeners
that handle OnTestPartResult() before listeners that can generate
failures. This ensures that failures generated by the latter are
attributed to the right test by the former.
We have a sample of failure-raising listener
here.
Running Test Programs: Advanced Options
Google Test test programs are ordinary executables. Once built, you can run
them directly and affect their behavior via the following environment variables
and/or command line flags. For the flags to work, your programs must call
::testing::InitGoogleTest() before calling RUN_ALL_TESTS().
To see a list of supported flags and their usage, please run your test
program with the --help flag. You can also use -h, -?, or /?
for short. This feature is added in version 1.3.0.
If an option is specified both by an environment variable and by a
flag, the latter takes precedence. Most of the options can also be
set/read in code: to access the value of command line flag
--gtest_foo, write ::testing::GTEST_FLAG(foo). A common pattern is
to set the value of a flag before calling ::testing::InitGoogleTest()
to change the default value of the flag:
int main(int argc, char** argv) {
  // Disables elapsed time by default.
  ::testing::GTEST_FLAG(print_time) = false;

  // This allows the user to override the flag on the command line.
  ::testing::InitGoogleTest(&argc, argv);

  return RUN_ALL_TESTS();
}
Selecting Tests
This section shows various options for choosing which tests to run.
Listing Test Names
Sometimes it is necessary to list the available tests in a program before
running them so that a filter may be applied if needed. Including the flag
--gtest_list_tests overrides all other flags and lists tests in the following
format:
TestCase1.
  TestName1
  TestName2
TestCase2.
  TestName
None of the tests listed are actually run if the flag is provided. There is no
corresponding environment variable for this flag.
Availability: Linux, Windows, Mac.
Running a Subset of the Tests
By default, a Google Test program runs all tests the user has defined.
Sometimes, you want to run only a subset of the tests (e.g. for debugging or
quickly verifying a change). If you set the GTEST_FILTER environment variable
or the --gtest_filter flag to a filter string, Google Test will only run the
tests whose full names (in the form of TestCaseName.TestName) match the
filter.
The format of a filter is a ‘:‘-separated list of wildcard patterns (called
the positive patterns) optionally followed by a ‘-‘ and another
‘:‘-separated pattern list (called the negative patterns). A test matches the
filter if and only if it matches any of the positive patterns but does not
match any of the negative patterns.
A pattern may contain '*' (matches any string) or '?' (matches any single
character). For convenience, the filter '*-NegativePatterns' can be also
written as '-NegativePatterns'.
For example:
./foo_testHas no flag, and thus runs all its tests../foo_test --gtest_filter=*Also runs everything, due to the single match-everything*value../foo_test --gtest_filter=FooTest.*Runs everything in test caseFooTest../foo_test --gtest_filter=*Null*:*Constructor*Runs any test whose full name contains either"Null"or"Constructor"../foo_test --gtest_filter=-*DeathTest.*Runs all non-death tests../foo_test --gtest_filter=FooTest.*-FooTest.BarRuns everything in test caseFooTestexceptFooTest.Bar.
Availability: Linux, Windows, Mac.
Temporarily Disabling Tests
If you have a broken test that you cannot fix right away, you can add the
DISABLED_ prefix to its name. This will exclude it from execution. This is
better than commenting out the code or using #if 0, as disabled tests are
still compiled (and thus won’t rot).
If you need to disable all tests in a test case, you can either add DISABLED_
to the front of the name of each test, or alternatively add it to the front of
the test case name.
For example, the following tests won’t be run by Google Test, even though they
will still be compiled:
// Tests that Foo does Abc.
TEST(FooTest, DISABLED_DoesAbc) { ... }

class DISABLED_BarTest : public ::testing::Test { ... };

// Tests that Bar does Xyz.
TEST_F(DISABLED_BarTest, DoesXyz) { ... }
Note: This feature should only be used for temporary pain-relief. You still
have to fix the disabled tests at a later date. As a reminder, Google Test will
print a banner warning you if a test program contains any disabled tests.
Tip: You can easily count the number of disabled tests you have
using grep. This number can be used as a metric for improving your
test quality.
Availability: Linux, Windows, Mac.
Temporarily Enabling Disabled Tests
To include disabled tests in test
execution, just invoke the test program with the
--gtest_also_run_disabled_tests flag or set the
GTEST_ALSO_RUN_DISABLED_TESTS environment variable to a value other
than 0. You can combine this with the
—gtest_filter flag to further select
which disabled tests to run.
Availability: Linux, Windows, Mac; since version 1.3.0.
Repeating the Tests
Once in a while you’ll run into a test whose result is hit-or-miss. Perhaps it
will fail only 1% of the time, making it rather hard to reproduce the bug under
a debugger. This can be a major source of frustration.
The --gtest_repeat flag allows you to repeat all (or selected) test methods
in a program many times. Hopefully, a flaky test will eventually fail and give
you a chance to debug. Here’s how to use it:
$ foo_test --gtest_repeat=1000 |
Repeat foo_test 1000 times and don’t stop at failures. |
|---|---|
$ foo_test --gtest_repeat=-1 |
A negative count means repeating forever. |
$ foo_test --gtest_repeat=1000 --gtest_break_on_failure |
Repeat foo_test 1000 times, stopping at the first failure. This is especially useful when running under a debugger: when the testfails, it will drop into the debugger and you can then inspect variables and stacks. |
$ foo_test --gtest_repeat=1000 --gtest_filter=FooBar |
Repeat the tests whose name matches the filter 1000 times. |
If your test program contains global set-up/tear-down code registered
using AddGlobalTestEnvironment(), it will be repeated in each
iteration as well, as the flakiness may be in it. You can also specify
the repeat count by setting the GTEST_REPEAT environment variable.
Availability: Linux, Windows, Mac.
Shuffling the Tests
You can specify the --gtest_shuffle flag (or set the GTEST_SHUFFLE
environment variable to 1) to run the tests in a program in a random
order. This helps to reveal bad dependencies between tests.
By default, Google Test uses a random seed calculated from the current
time. Therefore you’ll get a different order every time. The console
output includes the random seed value, such that you can reproduce an
order-related test failure later. To specify the random seed
explicitly, use the --gtest_random_seed=SEED flag (or set the
GTEST_RANDOM_SEED environment variable), where SEED is an integer
between 0 and 99999. The seed value 0 is special: it tells Google Test
to do the default behavior of calculating the seed from the current
time.
If you combine this with --gtest_repeat=N, Google Test will pick a
different random seed and re-shuffle the tests in each iteration.
Availability: Linux, Windows, Mac; since v1.4.0.
Controlling Test Output
This section teaches how to tweak the way test results are reported.
Colored Terminal Output
Google Test can use colors in its terminal output to make it easier to spot
the separation between tests, and whether tests passed.
You can set the GTEST_COLOR environment variable or set the --gtest_color
command line flag to yes, no, or auto (the default) to enable colors,
disable colors, or let Google Test decide. When the value is auto, Google
Test will use colors if and only if the output goes to a terminal and (on
non-Windows platforms) the TERM environment variable is set to xterm or
xterm-color.
Availability: Linux, Windows, Mac.
Suppressing the Elapsed Time
By default, Google Test prints the time it takes to run each test. To
suppress that, run the test program with the --gtest_print_time=0
command line flag. Setting the GTEST_PRINT_TIME environment
variable to 0 has the same effect.
Availability: Linux, Windows, Mac. (In Google Test 1.3.0 and lower,
the default behavior is that the elapsed time is not printed.)
Generating an XML Report
Google Test can emit a detailed XML report to a file in addition to its normal
textual output. The report contains the duration of each test, and thus can
help you identify slow tests.
To generate the XML report, set the GTEST_OUTPUT environment variable or the
--gtest_output flag to the string "xml:_path_to_output_file_", which will
create the file at the given location. You can also just use the string
"xml", in which case the output can be found in the test_detail.xml file in
the current directory.
If you specify a directory (for example, "xml:output/directory/" on Linux or
"xml:outputdirectory" on Windows), Google Test will create the XML file in
that directory, named after the test executable (e.g. foo_test.xml for test
program foo_test or foo_test.exe). If the file already exists (perhaps left
over from a previous run), Google Test will pick a different name (e.g.
foo_test_1.xml) to avoid overwriting it.
The report uses the format described here. It is based on the
junitreport Ant task and can be parsed by popular continuous build
systems like Hudson. Since that format
was originally intended for Java, a little interpretation is required
to make it apply to Google Test tests, as shown here:
<testsuites name="AllTests" ...>
  <testsuite name="test_case_name" ...>
    <testcase name="test_name" ...>
      <failure message="..."/>
      <failure message="..."/>
      <failure message="..."/>
    </testcase>
  </testsuite>
</testsuites>
- The root
<testsuites>element corresponds to the entire test program. <testsuite>elements correspond to Google Test test cases.<testcase>elements correspond to Google Test test functions.
For instance, the following program
TEST(MathTest, Addition) { ... }
TEST(MathTest, Subtraction) { ... }
TEST(LogicTest, NonContradiction) { ... }
could generate this report:
<?xml version="1.0" encoding="UTF-8"?>
<testsuites tests="3" failures="1" errors="0" time="35" name="AllTests">
  <testsuite name="MathTest" tests="2" failures="1" errors="0" time="15">
    <testcase name="Addition" status="run" time="7" classname="">
      <failure message="Value of: add(1, 1)
 Actual: 3
Expected: 2" type=""/>
      <failure message="Value of: add(1, -1)
 Actual: 1
Expected: 0" type=""/>
    </testcase>
    <testcase name="Subtraction" status="run" time="5" classname="">
    </testcase>
  </testsuite>
  <testsuite name="LogicTest" tests="1" failures="0" errors="0" time="5">
    <testcase name="NonContradiction" status="run" time="5" classname="">
    </testcase>
  </testsuite>
</testsuites>
Things to note:
- The
testsattribute of a<testsuites>or<testsuite>element tells how many test functions the Google Test program or test case contains, while thefailuresattribute tells how many of them failed. - The
timeattribute expresses the duration of the test, test case, or entire test program in milliseconds. - Each
<failure>element corresponds to a single failed Google Test assertion. - Some JUnit concepts don’t apply to Google Test, yet we have to conform to the DTD. Therefore you’ll see some dummy elements and attributes in the report. You can safely ignore these parts.
Availability: Linux, Windows, Mac.
Controlling How Failures Are Reported
Turning Assertion Failures into Break-Points
When running test programs under a debugger, it’s very convenient if the
debugger can catch an assertion failure and automatically drop into interactive
mode. Google Test’s break-on-failure mode supports this behavior.
To enable it, set the GTEST_BREAK_ON_FAILURE environment variable to a value
other than 0 . Alternatively, you can use the --gtest_break_on_failure
command line flag.
Availability: Linux, Windows, Mac.
Disabling Catching Test-Thrown Exceptions
Google Test can be used either with or without exceptions enabled. If
a test throws a C++ exception or (on Windows) a structured exception
(SEH), by default Google Test catches it, reports it as a test
failure, and continues with the next test method. This maximizes the
coverage of a test run. Also, on Windows an uncaught exception will
cause a pop-up window, so catching the exceptions allows you to run
the tests automatically.
When debugging the test failures, however, you may instead want the
exceptions to be handled by the debugger, such that you can examine
the call stack when an exception is thrown. To achieve that, set the
GTEST_CATCH_EXCEPTIONS environment variable to 0, or use the
--gtest_catch_exceptions=0 flag when running the tests.
Availability: Linux, Windows, Mac.
Letting Another Testing Framework Drive
If you work on a project that has already been using another testing
framework and is not ready to completely switch to Google Test yet,
you can get much of Google Test’s benefit by using its assertions in
your existing tests. Just change your main() function to look
like:
#include "gtest/gtest.h"

int main(int argc, char** argv) {
  ::testing::GTEST_FLAG(throw_on_failure) = true;
  // Important: Google Test must be initialized.
  ::testing::InitGoogleTest(&argc, argv);

  ... whatever your existing testing framework requires ...
}
With that, you can use Google Test assertions in addition to the
native assertions your testing framework provides, for example:
void TestFooDoesBar() {
  Foo foo;
  EXPECT_LE(foo.Bar(1), 100);     // A Google Test assertion.
  CPPUNIT_ASSERT(foo.IsEmpty());  // A native assertion.
}
If a Google Test assertion fails, it will print an error message and
throw an exception, which will be treated as a failure by your host
testing framework. If you compile your code with exceptions disabled,
a failed Google Test assertion will instead exit your program with a
non-zero code, which will also signal a test failure to your test
runner.
If you don’t write ::testing::GTEST_FLAG(throw_on_failure) = true; in
your main(), you can alternatively enable this feature by specifying
the --gtest_throw_on_failure flag on the command-line or setting the
GTEST_THROW_ON_FAILURE environment variable to a non-zero value.
Death tests are not supported when other test framework is used to organize tests.
Availability: Linux, Windows, Mac; since v1.3.0.
Distributing Test Functions to Multiple Machines
If you have more than one machine you can use to run a test program,
you might want to run the test functions in parallel and get the
result faster. We call this technique sharding, where each machine
is called a shard.
Google Test is compatible with test sharding. To take advantage of
this feature, your test runner (not part of Google Test) needs to do
the following:
- Allocate a number of machines (shards) to run the tests.
- On each shard, set the
GTEST_TOTAL_SHARDSenvironment variable to the total number of shards. It must be the same for all shards. - On each shard, set the
GTEST_SHARD_INDEXenvironment variable to the index of the shard. Different shards must be assigned different indices, which must be in the range[0, GTEST_TOTAL_SHARDS - 1]. - Run the same test program on all shards. When Google Test sees the above two environment variables, it will select a subset of the test functions to run. Across all shards, each test function in the program will be run exactly once.
- Wait for all shards to finish, then collect and report the results.
Your project may have tests that were written without Google Test and
thus don’t understand this protocol. In order for your test runner to
figure out which test supports sharding, it can set the environment
variable GTEST_SHARD_STATUS_FILE to a non-existent file path. If a
test program supports sharding, it will create this file to
acknowledge the fact (the actual contents of the file are not
important at this time; although we may stick some useful information
in it in the future.); otherwise it will not create it.
Here’s an example to make it clear. Suppose you have a test program
foo_test that contains the following 5 test functions:
TEST(A, V)
TEST(A, W)
TEST(B, X)
TEST(B, Y)
TEST(B, Z)
and you have 3 machines at your disposal. To run the test functions in
parallel, you would set GTEST_TOTAL_SHARDS to 3 on all machines, and
set GTEST_SHARD_INDEX to 0, 1, and 2 on the machines respectively.
Then you would run the same foo_test on each machine.
Google Test reserves the right to change how the work is distributed
across the shards, but here’s one possible scenario:
- Machine #0 runs
A.VandB.X. - Machine #1 runs
A.WandB.Y. - Machine #2 runs
B.Z.
Availability: Linux, Windows, Mac; since version 1.3.0.
Fusing Google Test Source Files
Google Test’s implementation consists of ~30 files (excluding its own
tests). Sometimes you may want them to be packaged up in two files (a
.h and a .cc) instead, such that you can easily copy them to a new
machine and start hacking there. For this we provide an experimental
Python script fuse_gtest_files.py in the scripts/ directory (since release 1.3.0).
Assuming you have Python 2.4 or above installed on your machine, just
go to that directory and run
python fuse_gtest_files.py OUTPUT_DIR
and you should see an OUTPUT_DIR directory being created with files
gtest/gtest.h and gtest/gtest-all.cc in it. These files contain
everything you need to use Google Test. Just copy them to anywhere
you want and you are ready to write tests. You can use the
scripts/test/Makefile
file as an example on how to compile your tests against them.
Where to Go from Here
Congratulations! You’ve now learned more advanced Google Test tools and are
ready to tackle more complex testing tasks. If you want to dive even deeper, you
can read the Frequently-Asked Questions.