
Произошла ошибка
Если во время печати происходит ошибка (например, в принтере заканчивается или застревает бумага), мигает индикатор Аварийный сигнал (Alarm) или поочередно мигают индикаторы ВКЛ (ON) и Аварийный сигнал (Alarm). На экране компьютера с ОС Windows отображается код поддержки (номер ошибки) (см. пример ниже).
Проверьте состояние индикатора Аварийный сигнал (Alarm) и наличие сообщения, а затем выполните соответствующее действие.
Код поддержки, соответствующий количеству миганий индикатора Аварийный сигнал (Alarm)
Пример 2 миганий:
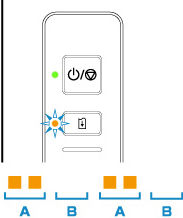
(A) мигает;
(B) перестает.
|
Количество миганий |
Причина |
Код поддержки |
|---|---|---|
|
2 мигания |
В принтере отсутствует бумага, или бумага не подается. |
1000 |
|
Если также мигает индикатор Бумага (Paper): Параметры бумаги отличаются от значений для заднего лотка, зарегистрированных на принтере. |
2114 |
|
|
3 мигания |
Крышка открыта. |
1203 |
|
Застряла бумага в лотке приема бумаги или в заднем лотке. |
1300 |
|
|
4 мигания |
Картридж FINE установлен неправильно, либо установленный картридж FINE несовместим с этим принтером. |
168A |
|
5 миганий |
Картридж FINE не установлен. |
1401 |
|
Картридж FINE не определяется. |
1403 |
|
|
Проблема с картриджем FINE. |
1430 |
|
|
Соответствующий картридж не установлен. |
1485 |
|
|
8 миганий |
Абсорбер чернил почти полон. |
1700 1712 1714 |
|
9 миганий |
На держателе картриджа FINE может оставаться защитный материал. |
1890 |
|
11 миганий |
Параметры типа и размера бумаги неправильны. |
4102 |
|
Не удается выполнить печать с текущими параметрами печати. |
4103 |
|
|
12 миганий |
Печать указанных данных невозможна. |
4100 |
|
13 миганий |
Возможно, чернила закончились. |
1686 |
|
14 миганий |
Картридж не определяется. |
1684 |
|
15 миганий |
Картридж FINE не определяется. |
1682 |
|
16 миганий |
Чернила закончились. |
1688 |
Если на экране компьютера отображается код поддержки и сообщение (Windows):
![]() Примечание.
Примечание.
-
Подробнее об устранении ошибок без кодов поддержки см. в разделе Отображается сообщение (код поддержки).
У вас уже есть продукция Canon? Зарегистрируйте свои продукты для доступа к программному обеспечению и обновлениям встроенного ПО, а также подпишитесь на рассылку, чтобы получать персонализированные советы и эксклюзивные предложения

Поддержка
Canon PIXMA TS304
Загружайте драйверы, ПО, встроенное ПО и руководства, а также получите доступ к материалам поддержки для вашего продукта серии PIXMA.
Драйверы
Для выполнения подключения некоторых устройств к компьютеру может потребоваться драйвер. На этой вкладке вы найдете соответствующие драйверы для своего устройства или, в случае отсутствия драйверов, описание совместимости устройства с каждой операционной системой.
Полезная информация. Доступ к программному обеспечению, руководствам и другим материалам можно получить с помощью вкладок, расположенных выше.
Операционная система Обнаруженная операционная система
Программное обеспечение
Программное обеспечение загружать необязательно, но оно обеспечивает дополнительные функции и позволяет максимально эффективно пользоваться возможностями устройства. На этой вкладке можно просмотреть и загрузить доступное программное обеспечение для вашего устройства.
Операционная система Обнаруженная операционная система
Руководства пользователя
Руководства для вашего устройства или программного обеспечения перечислены ниже.
Приложения и функции
На этой вкладке можно посмотреть доступные приложения и функции, совместимые с вашим устройством.
Встроенное ПО
Встроенное ПО — это постоянное программное обеспечение, установленное на устройстве и обеспечивающее его корректную работу. Canon может периодически выпускать обновления для этого встроенного ПО, и если обновление доступно, его можно загрузить ниже.
FAQs
На этой вкладке вы найдете ответы на часто задаваемые вопросы и другую полезную информацию, которая поможет вам в решении вопросов и проблем.
Важная информация
На этой вкладке вы найдете подборку часто задаваемых вопросов, которые, на наш взгляд, будут вам интересны.
Коды ошибок
Код ошибки или сообщение об ошибке может появиться на устройстве по различным причинам. С помощью поля поиска можно найти полезную информацию о конкретном коде ошибки, где будут указаны причина ошибки и необходимые действия по ее устранению.
Технические характеристики
Ниже приведены все технические характеристики данного продукта.
Полезные ссылки
-
-
Ремонт
Поиск центров по ремонту оборудования, полезная информация по процессу ремонта
-
Переработка
Узнайте больше о программе утилизации картриджей Canon
-
Canon ID
Регистрация продукта и управление аккаунтом Canon ID
Что означают коды ошибок принтеров Canon Pixma вы можете посмотреть в этой статье. Обычно в сообщении это “Support code” или “Код поддержки”. Если ваш принтер не имеет экрана, код ошибки можно увидеть при подключении к компьютеру или, подсчитывая количество миганий светодиодов на передней панели устройства (но цветовая индикация показывает не все коды). По номерам можно определить неисправность на большинстве современных принтеров и МФУ Canon: iP2700, iP4700, iP7240, MG5340, MG5140, MG5540, iP4940, MG5440, MG6440, MX924, iP4840, MG5240, iX6540, iX6840, MG6140, MG6240, MG6450, MX884, MG5640, MG6640, MG8140, MG6240, MG8240, MG6140, MP980, MP990, MP620, MP630, iP2840, MG6840, MG5740, TS5040, TS6040, MG7740, TS8040, TS9040, TS6140, TS6240, TS8140, TS8240, TS9140, TS9540, TS9541C, TR7540, TR8540, iP100, iP110 и многих других.

Коды ошибок (Support/Service code)
|
|
|
|
|
Сообщения об ошибках
|
|
|
Коды ошибок для Canon Pixma MP190, MP240, MP250, MP260, MP270, MP490, MP540, MP550, MP560, MP620,PIXMA MP630, MP640, MP980, MP990, MX320, MX330, MX700, MX7600, MX850, MX860:
| Код | Описание |
|---|---|
| #001 | Paper Jam – замятие бумаги |
| #037 | Image Memory Full – переполнение памяти |
| ##111 | Memory error – ошибка памяти |
| ##322 | Printer (LBP) Fixing Unit Trouble – неисправность термоблока (печки) |
| ##323 | Printer (LBP) BD (Beam Detect) Trouble – невозможность детектирования луча лазера |
| ##324 | Printer (LBP) Scanner Trouble – неиcправность лазерного блока |
| ##335 | Data transmission error between the system control section and printer control section – ошибка обмена данными между главной платой и блоком управления печати (ошибка может возникать и из-за некорректно работающего драйвера) |
| ##336 | BJ head abnormal temperature error – ненормальная температура печатающей головки |
| ##337 | BJ head temperature sensor error – ошибка термодатчика печатающей головки |
| ##342, 343 | Cleaning absorption waste ink capacity full – переполнение чернильного абсорбера |
| ##345 | BJ cartridge head cleaning error – ошибка очистки печатающей головки (ошибка парковки) |
| ##346 | Inside temperature error – ошибка внутренней температуры (перегрев) |
| ##348 | Ink detection sensor error – ошибка датчика определения уровня чернил |
| ##352 | Printer control EEPROM head information error – ошибка контроля EEPROM головки |
| ##355 | A motor to lift up for CD-R print is malfunctioned – неисправен мотор лифта для печати на CD (узел «раскрытия» тракта протяжки для прохождения «подставки» CD) |
| ##356 | ASF cam sensor error – ошибка сенсора кулачка (эксцентрика) узла ручной подачи |
| ##357 | ASF paper feed (AP) position error – An error occurred in the AP motor during purging operation – Ошибка позиции (исходного положения) узла подачи. Связана с работой двигателя узла прокачки |
| ##358 | USB Host VBUS overcurrent error – перегрузка по току линий USB |
| ##359 | Paper feed position error – ошибка узла переключения подачи бумаги |
| ##360 | Paper feed cam sensor error – ошибка сенсора кулачка (эксцентрика) узла переключения подачи при подаче из передней кассеты. Также возникает при замятии в верхней (ручной) подаче, если значение счетчика отработки более 60% |
| ##361 | Valve sensor error – ошибка датчика клапанов блокировки кап при прочистке (прокачке) сопел |
| ##362 | Motor driver malfunctioned error – неисправность м/сх драйвера двигателя |
Расшифровка основных ошибок
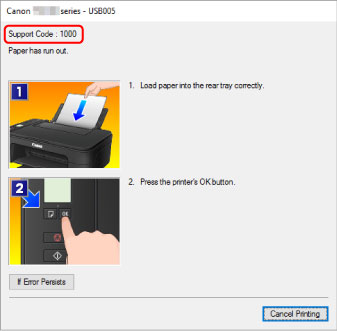
Ошибка: код поддержки 1000 – Оранжевый индикатор мигает 2 раза
В заднем лотке принтера для бумаги нет бумаги.
Решение
- Вставьте бумагу в задний лоток.
- Нажмите кнопку [Возобновить/Отмена] на устройстве, чтобы продолжить работу.
Если эти действия не помогли устранить ошибку, обратитесь в сервисный центр для ремонта.
^ Вверх
Ошибка: код поддержки 1001 – Оранжевый индикатор мигает 2 раза
В принтер не вставлен лоток для CD/DVD.
Решение
- Откройте лоток для подачи бумаги в передней части устройства.
- Поместите CD/DVD (стороной для печати вверх) в лоток для CD/DVDПРИМЕЧАНИЕ: Убедитесь, что лоток для CD/DVD чистый
- Вставьте лоток для CD/DVD под внутренней крышкой и убедитесь, что он встал ровно.

На рисунке вверху изображен лоток для CD/DVD - Нажмите кнопку [Возобновить/Отмена] на устройстве, чтобы продолжить работу.

Если эти действия не помогли устранить ошибку, обратитесь в сервисный центр для ремонта.
^ Вверх
Ошибка: код поддержки 1002 Оранжевый индикатор мигает 2 раза
В лотке для CD/DVD отсутствует CD- или DVD-диск.
Решение
- Откройте лоток для подачи бумаги в передней части устройства.
- Поместите CD/DVD (стороной для печати вверх) в лоток для CD/DVDПРИМЕЧАНИЕ: Убедитесь, что лоток для CD/DVD чистый
- Вставьте лоток для CD/DVD под внутренней крышкой и убедитесь, что он встал ровно.
На рисунке вверху изображен лоток для CD/DVD - Нажмите кнопку [Возобновить/Отмена] на устройстве, чтобы продолжить работу.
Если эти действия не помогли устранить ошибку, обратитесь в сервисный центр для ремонта.
^ Вверх
Ошибка: код поддержки 1003/E02 – Оранжевый индикатор мигает 2 раза
Отсутствует бумага в кассете (лотке для бумаги).
Решение:
- Вставьте бумагу в кассету (лоток для бумаги).
- Нажмите кнопку [Возобновить/Отмена] на устройстве, чтобы продолжить работу.
Если эти действия не помогли устранить ошибку, обратитесь в сервисный центр для ремонта.
^ Вверх
Ошибка: код поддержки 1007
Описание:
Ошибка произошла по одной из следующих причин —
- В кассете (верхней) отсутствует бумага.
- Неправильный источник бумаги.
- Бумага не загружена должным образом.
Решение:
- Загрузите бумагу в кассету (верхнюю).
- Загрузите бумагу в подходящий по размеру источник бумаги.Фотобумага небольшого формата, например, 4″ x 6″ (10 x 15 см) или 5″ x 7″ (13 x 18 см), или Hagaki, загружается в кассету (верхнюю).ПРИМЕЧАНИЕ – Использование для пробной печати обычной бумаги, нарезанной на листы формата 4″ x 6″ (10 x 15 см) или 5″ x 7″ (13 x 18 см) может привести к замятию.
- Выровняйте направляющие по обеим сторонам бумаги во время загрузки.
- Нажмите кнопку [OK] для сброса ошибки.
Если эти действия не помогли устранить ошибку, обратитесь в ближайший сервисный центр для ремонта..
^ Вверх
Ошибка: код поддержки 1008
Описание:
Ошибка произошла по одной из следующих причин —
- В кассете (нижней) отсутствует бумага.
- Неправильный источник бумаги.
- Бумага не загружена должным образом.
Решение
- Загрузите бумагу в кассету (нижнюю).
- Загрузите бумагу в подходящий по размеру источник бумаги.В кассету (нижнюю) можно загрузить фотобумагу большого размера, обычную бумагу формата A4, B5, A5, 8″ x 10″ (20 x 25 см), Letter, Legal или конверты.
- Выровняйте направляющие по обеим сторонам бумаги во время загрузки.
- Нажмите кнопку [OK] для сброса ошибки.
Если эти действия не помогли устранить ошибку, обратитесь в ближайший сервисный центр для ремонта..
^ Вверх
Ошибка: код поддержки 1200
Описание
Открыта крышка отсека чернильниц.
Решение
- Закройте крышку отсека чернильниц и подождите некоторое время. Не закрывайте крышку отсека чернильниц во время замены чернильницы.
Если эти действия не помогли устранить ошибку, обратитесь в ближайший сервисный центр для ремонта..
^ Вверх
Ошибка: код поддержки 1202/E06
Описание
Крышка приема бумаги открыта.
Решение
- Закройте заднюю крышку.
Если эти действия не помогли устранить ошибку, обратитесь в ближайший сервисный центр для ремонта..
^ Вверх
Ошибка: код поддержки 1203
Крышка была открыта во время печати.
Действия
- Если в устройстве осталась бумага, медленно извлеките ее, удерживая обеими руками, и закройте крышку.
- Нажмите кнопку [Black/Ч/б] или [Colour/Цвет] для сброса ошибки.
- Пустые страницы будут выведены, и печать возобновится со следующего листа.
- Страница, которая распечатывалась при открытой крышке, повторно распечатана не будет. Повторите печать.
ПРИМЕЧАНИЕ – Не открывайте и не закрывайте крышку во время печати, так как это может повредить устройство.
Если эти действия не помогли устранить ошибку, обратитесь в ближайший сервисный центр для ремонта..
^ Вверх
Ошибка: код поддержки 1240
Панель управления закрыта.
Решение:
- Откройте панель управления, а затем выдвиньте лоток приема бумаги.
Выберите OK на ЖК-дисплее для возобновления печати.
Примечание – Чтобы отменить печать, нажмите на принтере кнопку Стоп (Stop).
^ Вверх
Ошибка: код поддержки 1250/E17 – Оранжевый индикатор мигает 3 раза
Передняя дверца закрыта.
Решение:
- Откройте переднюю дверцу, чтобы из нее могла выходить отпечатанная бумага.
Примечание – Эта ошибка выводится в начале или во время печати.
Если эти действия не помогли устранить ошибку, обратитесь в сервисный центр для ремонта.
^ Вверх
Ошибка: код поддержки 1270
Открыта крышка отверстия для подачи.
Решение:
- Медленно закройте крышку отверстия для подачи и выберите OK на ЖК-дисплее.
Примечание – После закрытия крышки отверстия для подачи отображается экран настройки информации о бумаге в заднем лотке. Настройте информацию о бумаге в заднем лотке. Чтобы отменить печать, нажмите на принтере кнопку Стоп (Stop).
^ Вверх
Ошибка: код поддержки 1300/E03 – Оранжевый индикатор мигает 3 раза
Во время печати произошло замятие бумаги.
Решение:
- Найдите и удалите замятую бумагу из принтера.
- Нажмите кнопку [Возобновить/Отмена] на устройстве, чтобы продолжить печать.
Если эти действия не помогли устранить ошибку, обратитесь в сервисный центр для ремонта.
^ Вверх
Ошибка: код поддержки 1303 – Оранжевый индикатор мигает 3 раза
В заднем лотке произошло замятие бумаги.
Решение
- Удалите замятую бумагу из заднего лотка.
- Нажмите кнопку [Возобновить/Отмена] на устройстве, чтобы продолжить печать.
Если эти действия не помогли устранить ошибку, обратитесь в сервисный центр для ремонта.
^ Вверх
Ошибка: код поддержки 1304 – Оранжевый индикатор мигает 3 раза
В нижнем лотке в передней части устройства произошло замятие бумаги.
Решение
- Удалите замятую бумагу из нижнего лотка.
- Нажмите кнопку [Возобновить/Отмена] на устройстве.
Если эти действия не помогли устранить ошибку, обратитесь в сервисный центр для ремонта.
^ Вверх
Ошибка: код поддержки 1310/E10 – Оранжевый индикатор мигает 10 раз
Невозможно выполнить двустороннюю печать. Часто эта ошибка возникает из-за несоответствия реального формата бумаги, формату, установленному в настройках печати
Решение:
- При двусторонней печати поддерживается бумага форматов: A4, Letter, A5 и 5″x7″
- Вставьте бумагу правильного размера и нажмите кнопку [Возобновить/Отмена].
Если эти действия не помогли устранить ошибку, обратитесь в сервисный центр для ремонта.
^ Вверх
Ошибка: код поддержки 1311
Произошло замятие бумаги, загруженной в кассету (верхнюю).
Решение
Удалите замятую бумагу, выполнив следующие действия —
ПРИМЕЧАНИЕ – Не допускается отключение питания во время отправки или приема факса, либо когда полученный факс или неотправленные факсы хранятся в памяти устройства. Перед отсоединением кабеля питания убедитесь, что устройство завершило отправку или получение факсов. Если отключить кабель питания, все неотправленные документы, сохраненные в памяти устройства, будут утеряны.
- Для отмены заданий печати нажмите кнопку [Stop/Стоп] и выключите устройство.
- Снимите заднюю крышку.
- Отсоедините крышку модуля подачи.
- Аккуратно извлеките замятую бумагу.ПРИМЕЧАНИЕ – Не прикасайтесь к внутренним частям устройства. Если не удается вытянуть бумагу, откройте лоток приема бумаги.
- Установите крышку модуля подачи.
- Установите заднюю крышку.Если не удается извлечь бумагу в шаге 4, выполните действия, описанные ниже:
- Снимите нижнюю и верхнюю кассеты.
- Аккуратно извлеките замятую бумагу.
- Если бумага не загружается в кассету должным образом, извлеките бумагу и загрузите ее снова, выровняв края листов.ПРИМЕЧАНИЕ – При повторной загрузке бумаги убедитесь, что для печати используется подходящая бумага и загрузка выполняется правильно.
- Установите кассеты в устройство, затем нажмите кнопку [OK].
Если эти действия не помогли устранить ошибку, обратитесь в ближайший сервисный центр для ремонта..
^ Вверх
Ошибка: код поддержки 1312
Произошло замятие бумаги, загруженной в кассету (нижнюю).
Решение
Удалите замятую бумагу, выполнив следующие действия —
ПРИМЕЧАНИЕ – Не допускается отключение питания во время отправки или приема факса, либо когда полученный факс или неотправленные факсы хранятся в памяти устройства. Перед отсоединением кабеля питания убедитесь, что устройство завершило отправку или получение факсов. Если отключить кабель питания, все неотправленные документы, сохраненные в памяти устройства, будут утеряны.
- Для отмены заданий печати нажмите кнопку [Stop/Стоп] и выключите устройство.
- Снимите заднюю крышку.
- Аккуратно извлеките замятую бумагу.ПРИМЕЧАНИЕ – Не прикасайтесь к внутренним частям устройства. Если не удается вытянуть бумагу, откройте лоток приема бумаги.
- Установите заднюю крышку.Если не удается извлечь бумагу в шаге 3, выполните действия, описанные ниже:
- Снимите нижнюю и верхнюю кассеты.
- Аккуратно извлеките замятую бумагу.
- Если бумага не загружается в кассету должным образом, извлеките бумагу и загрузите ее снова, выровняв края листов.ПРИМЕЧАНИЕ – При повторной загрузке бумаги убедитесь, что используется подходящая для печати бумага и загрузка выполняется правильно.
- Установите кассеты в устройство, затем нажмите кнопку [OK].
- Если эти действия не помогли устранить ошибку, обратитесь в ближайший сервисный центр для ремонта..
^ Вверх
Ошибка: код поддержки 1313
Бумага замялась при втягивании отпечатка в устройство.
Решение
Удалите замятую бумагу, выполнив следующие действия —
ПРИМЕЧАНИЕ – Если отпечатанные листы скапливаются в отверстии для выхода бумаги, устройство может втянуть их внутрь, после чего бумага замнется внутри устройства. Извлекайте бумагу после печати из лотка приема бумаги, прежде чем в нем накопится 50 листов.
Не допускается отключение питания во время отправки или приема факса, либо когда полученный факс или неотправленные факсы хранятся в памяти устройства. Перед отсоединением кабеля питания убедитесь, что устройство завершило отправку или получение факсов. Если отключить кабель питания, все неотправленные документы, сохраненные в памяти устройства, будут утеряны.
- Для отмены заданий печати нажмите кнопку [Stop/Стоп] и выключите устройство.
- Снимите заднюю крышку.
- Отсоедините крышку модуля подачи.
- Аккуратно извлеките замятую бумагу.ПРИМЕЧАНИЕ – Не прикасайтесь к внутренним частям устройства. Если не удается вытянуть бумагу, откройте лоток приема бумаги.
- Установите крышку модуля подачи.
- Установите заднюю крышку.Если не удается извлечь бумагу в шаге 4, выполните действия, описанные ниже:
- Снимите нижнюю и верхнюю кассеты.
- Аккуратно извлеките замятую бумагу.
- Если бумага не загружается в кассету должным образом, извлеките бумагу и загрузите ее снова, выровняв края листов.ПРИМЕЧАНИЕ – При повторной загрузке бумаги убедитесь, что используется подходящая для печати бумага и загрузка выполняется правильно.
- Установите кассеты в устройство, затем нажмите кнопку [OK].
Если эти действия не помогли устранить ошибку, обратитесь в ближайший сервисный центр для ремонта..
^ Вверх
Ошибка: код поддержки 1401/E05 – Оранжевый индикатор мигает 5 раз
Печатная головка не установлена или установлена неправильно.
Решение:
Для устранения этой проблемы требуется обратиться в сервисный центр для ремонта или установить исправную ПГ.
^ Вверх
Ошибка: код поддержки 1403 – Оранжевый индикатор мигает 5 раз
Произошла ошибка температурного датчика печатной головки (возможно установлена печатающая головка, не подходящая для данной модели принтера) .
Решение
Для устранения этой проблемы требуется обратиться в сервисный центр для ремонта.
^ Вверх
Ошибка: код поддержки 1405 – Оранжевый индикатор мигает 5 раз
Ошибочные данные печатной головки или некорректный обмен данными с прошивкой EEPROM (возможно, установлена печатающая головка, не подходящая для данной модели принтера).
Решение
- Переустановить печатающую головку.
- Протрите контакты шлейфа, подключенного к головке.
- Проверьте шлейф на целостность.
- Если ничего не помогает, головку нужно заменить.
^ Вверх
Ошибка: код поддержки 140B
Возможно, печатающая головка повреждена. Обратитесь в ближайший сервисный центр Canon для устранения этой проблемы.
^ Вверх
Ошибка: код поддержки 1410/1411/1412/1413/1414
Описание
Данный картридж не распознается устройством из-за его неисправности (подробнее). Причиной может быть плохой контакт с чипом или вышедший из строя чип картриджа (например, если микросхема на картридже была залита чернилами).
Решение
Откройте крышку отсека чернильниц и замените чернильницу, индикатор которой не горит.
Если эти действия не помогли устранить ошибку, обратитесь в ближайший сервисный центр.
^ Вверх
Ошибка: код поддержки 1485
Печать невозможна из-за несовместимости установленного картриджа с устройством или плохой контакт с картриджем.
Решение (как убрать)
Переустановите картридж; не помогло – почистите контакты картриджа (и ответные в каретке); не помогло – проверьте шлейф каретки на обрыв; шлейф цел – замените картридж на исправный или совместимый (проверьте, какой нужен вашему устройству, возможно, у вас чернильница для другого региона).
^ Вверх
Ошибка: код поддержки 1486/E07
Картридж FINE установлен в неправильное положение (не на свое место).
Решение
- Убедитесь, что каждый картридж FINE установлен в правильное положение.
Если эти действия не помогли устранить ошибку, обратитесь в ближайший сервисный центр для ремонта..
^ Вверх
Ошибка: код поддержки 1487 – Оранжевый индикатор мигает 7 раз
В принтере установлено более одного картриджа одинакового цвета.
Решение
- Поднимите крышку принтера.
- Найдите дублирующий цветной картридж (цвет указан на этикетке в верхней части картриджа). Также подробности можно посмотреть в мониторе состояния на компьютере. Ошибка также может быть связана с неверно установленными чипами на ПЗК или СНПЧ.
- Удалите картридж и вставьте новый с нужным цветом.
- Нажмите кнопку [Возобновить/Отмена] на устройстве, чтобы продолжить печать.
Если эти действия не помогли устранить ошибку, обратитесь в сервисный центр для ремонта.
^ Вверх
Ошибка: код поддержки 1551
Обнаружены оригинальные чернильные контейнеры Canon.
- Выберите OK на ЖК-дисплее.
^ Вверх
Ошибка: код поддержки 1552
Установлены оригинальные чернильные контейнеры Canon.
- Выберите OK на ЖК-дисплее.
^ Вверх
Ошибка: код поддержки 1600 – Оранжевый индикатор мигает 4 раза
Закончились чернила в картридже.

Решение
Замените пустую чернильницу или нажмите «Resume/Cancel/ОК», чтобы допечатать на остатках чернил (примечание: данная функция используется для отключения слежения за уровнем чернил).
Если эти действия не помогли устранить ошибку, обратитесь в сервисный центр для ремонта.
^ Вверх
Ошибка: код поддержки 1660 – Оранжевый индикатор мигает 4 раза
Не удается распознать чернильные контейнеры. Неправильно установлен картридж, неисправен чип картриджа, плохой контакт чипа и картриджа.
Решение
- Поднимите крышку принтера.
- Убедитесь, что на всех картриджах горит красный индикатор.
- Если на одном из картриджей не горит красный индикатор, убедитесь, что картридж установлен правильно, и поправьте его при необходимости.
- Убедитесь, что удалили защитный оранжевый колпачок с нижней части картриджа.
- Нажмите кнопку [Возобновить/Отмена] на устройстве, чтобы продолжить печать.
Если эти действия не помогли – замените картридж или чип на картридже. При использовании неоригинальных расходных материалов на TS6140, TS6240, TS6340, TS9540, TS8140, TS8240, TS8340, TS9140, TR7540, TR8540 такая ошибка возникает при попытке отключить слежение чернил, неоригинальные чипы на этих МФУ работают только один цикл.

^ Вверх
Ошибка: код поддержки 1680 – Оранжевый индикатор мигает 7 раз
Картридж установлен не на свое место (например, зеленый картридж установлен в гнездо для желтого картриджа).
Решение
- Поднимите крышку принтера.
- Убедитесь, что все картриджи находятся на своих местах.При необходимости поменяйте картриджи местами. Какие чернильницы находятся не на своём месте – смотрите в мониторе состояния на компьютере.
- Нажмите кнопку [Возобновить/Отмена] на устройстве, чтобы продолжить печать.
^ Вверх
Ошибка: код поддержки 1681
Описание
Установлено больше одной чернильницы одного цвета. Индикатор чернильницы будет мигать.
Действия
- Проверьте, что чернильницы установлены на соответствующие места.
^ Вверх
Ошибка: код поддержки 1682/E15 – Оранжевый индикатор мигает 15 раз
Устройство не распознает картридж из за фатальной неисправности картриджа. Также ошибка может быть связана с неисправностью ПГ: установлена несовместимая ПГ или некорректный обмен данными ПГ с прошивкой EEPROM.
Решение:
- Поднимите крышку принтера.
- Убедитесь, что в принтере установлены картриджи Canon. При необходимости замените картриджи других производителей картриджами Canon.
- Замените картриджи и нажмите кнопку [Возобновить/Отмена] на устройстве, чтобы продолжить печать.
- Если не помогло:
- Переустановить печатающую головку.
- Протрите контакты шлейфа, подключенного к головке.
- Проверьте шлейф на целостность.
- Если ничего не помогает, головку нужно заменить.
^ Вверх
Ошибка: код поддержки 1683 – Оранжевый индикатор мигает 13 раз
Невозможно определить уровень чернил.
Решение
- В принтере установлен картридж, который ранее уже был пустым.
- Замените такой картридж на новый или отключите слежение за уровнем чернил.
После замены картриджа нажмите кнопку [Возобновить/Отмена] на устройстве, чтобы продолжить печать.
Если эти действия не помогли устранить ошибку, обратитесь в сервисный центр для ремонта.
^ Вверх
Ошибка: код поддержки 1684/E14 – Оранжевый индикатор мигает 14 раз
Картридж не поддерживается (картридж и принтер приобретены в разных регионах).
Решение:
- Поднимите крышку принтера.
- Найдите картридж, на котором не горит красный индикатор, и замените его подходящим.
- Нажмите кнопку [Возобновить/Отмена] на устройстве, чтобы продолжить печать.
^ Вверх
Ошибка: код поддержки 1686/E13
Принтер не может определить оставшееся количество чернил (установлен заправленный или б/у картридж)
Решение
Замените картридж или отключите слежение за уровнем чернил. Для отключения слежения за уровнем чернил – нажать и удерживать нажатой более 5-ти секунд кнопку «Resume/Cancel».
^ Вверх
Ошибка: код поддержки 1687/E04
Картридж FINE установлен неправильно.
Решение
- Переустановите картриджи FINE, нажимая на них до щелчка, пока они не встанут на место и закройте крышку.
- Если не помогло – протрите контактные площадки на картридже и ответные в каретке. Проверьте, чтобы при установке картриджа он устанавливался без перекоса, и защёлка крышки при установленном картридже была защёлкнута.
Если ничего не помогло – картридж неисправен, замените его на исправный.
^ Вверх
Ошибка: код поддержки 1688/E16
Закончились чернила.
Решение
Замените чернильницу или отключите слежение за уровнем чернил также как при ошибке 1689 (нажать и удерживать нажатой более 5-ти секунд кнопку «Resume/Cancel» (обозначенную треугольником в круге). Убедитесь, что в картридже есть краска.
^ Вверх
Ошибка: код поддержки 1689
Принтер определил, что закончились чернила по счетчику в чипе (индикатор на чернильнице мигает или появляется соответствующее сообщение на ЖК-дисплее).

Решения
- Замените чернильницу и закройте модуль сканирования / крышку.
- Если необходимо продолжить печать, отключите функцию определения оставшегося запаса чернил. Чтобы отключить данную функцию, нажмите и не отпускайте не менее 5 секунд клавишу Стоп (Stop) на принтере, после чего отпустите ее. Для моделей на картриджах PGI-480/CLI-481 следует сначала нажать ОК и следовать инструкциям на экране компьютера. В результате принтер продолжит печать без отображения уровня краски.
Если функция определения оставшегося запаса чернил отключена, на экране проверки текущего оставшегося запаса чернил ЖК-дисплея этот чернильный контейнер отображается серым цветом или в виде пустого прямоугольника.
^ Вверх
Ошибка: код поддержки 1699
Чернила закончились. Замените чернильный контейнер. Принтер определил, что закончились чернила по счетчику в чипе.
Решения
- Замените картридж.
- Если необходимо продолжить печать (например, вы перезаправили картридж или это неоригинальный картридж с чипом без отображения уровня чернил), отключите функцию определения оставшегося запаса чернил. Чтобы отключить данную функцию, нажмите и не отпускайте не менее 5 секунд клавишу Стоп (Stop) на принтере, после чего отпустите ее. Для некоторых моделей нужно сначала нажать ОК и следовать инструкциям на экране компьютера. В результате принтер продолжит печать без отображения уровня краски.
^ Вверх
Ошибка: код поддержки 1700/1701 – Оранжевый индикатор мигает 8 раз
Контейнер для использованных чернил практически заполнен (уровень – 95%).
Определение:
Контейнер для использованных чернил собирает чернила, применяемые при очистке. Для поддержания оптимального качества печати используемые при очистке чернила поглощаются контейнером для использованных чернил, расположенном внутри принтера. Когда счётчик заполненности достигнет 100% – принтер заблокируется и не будет работать, пока счётчик не будет сброшен.
Решение
Нажмите «Resume/Cancel» для продолжения работы.
Также можно попробовать сбросить счётчик памперса (на свой страх и риск, сброс ведёт к потере гарантии).
^ Вверх
Ошибка: код поддержки 1702/1703/1704/1705/1710/1711/1712/1713/1714/1715/E08
Контейнер для использованных чернил почти полон.
Решение
Нажмите кнопку [OK] на устройстве, чтобы продолжить печать.
Также можно попробовать сбросить счётчик памперса (на свой страх и риск, сброс ведёт к потере гарантии).
^ Вверх
Ошибка: код поддержки 1730/1731
Обнаружен перезаправленный или неоригинальный чернильный конейнер Canon.
- Чтобы печатать, замените чернильный контейнер или отключите функцию определения уровня оставшегося запаса чернил. Чтобы отключить функцию определения уровня оставшегося запаса чернил, нажмите и не отпускайте не менее 5 секунд клавишу Стоп (Stop) на принтере, после чего отпустите ее.
Если функция определения оставшегося запаса чернил отключена, на экране проверки оставшегося запаса чернил ЖК-дисплея этот чернильный контейнер отображается серым цветом или пустым квадратом.
^ Вверх
Ошибка: код поддержки 1750
Соответствующая чернильница не установлена.
- Невозможно выполнить печать — чернильница несовместима с данным принтером.
- Установите соответствующую чернильницу.
Чтобы отменить печать, нажмите кнопку Стоп (Stop) на принтере.
^ Вверх
Ошибка: код поддержки 1810
Разряжен аккумулятор (для мобильных принтеров). Замените или зарядите аккумулятор.
^ Вверх
Ошибка: код поддержки 1890/E40
Возможно, защитный материал держателя картриджа FINE или лента остались на держателе.
Решение
- Откройте крышку лотка приема бумаги и проверьте наличие защитного материала или ленты на держателе картриджа FINE.
- Удалите защитный материал или ленту и закройте крышку лотка приема бумаги.
Если эти действия не помогли устранить ошибку, обратитесь в ближайший сервисный центр для ремонта..
^ Вверх
Ошибка: код поддержки 1830 *1 – Оранжевый индикатор мигает 6 раз
При выполнении печати на CD/DVD-диске истек срок ожидания: печать не была произведена в течение 12-ти минут с момента отправки задания.
Решение
- Нажмите кнопку [Возобновить/Отмена] на устройстве, чтобы сбросить ошибку и возобновить печать.
- Убедитесь, что CD/DVD-диск правильно установлен в лотке для CD/DVD.
Если эти действия не помогли устранить ошибку, обратитесь в сервисный центр для ремонта.
^ Вверх
Ошибка: код поддержки 1841 *2/1846 *2 Оранжевый индикатор мигает 6 раз
Открыта внутренняя крышка.
Решение
- Закройте внутреннюю крышку.
![[MASTER] Общее_Код ошибки_1](data:image/svg+xml,%3Csvg%20xmlns='http://www.w3.org/2000/svg'%20viewBox='0%200%20358%20224'%3E%3C/svg%3E "[MASTER] Общее_Код ошибки_1")
На рисунке вверху изображена внутренняя крышка. - Нажмите кнопку [Возобновить/Отмена] на устройстве, чтобы продолжить печать.
![[MASTER] Общее_Код ошибки_1](https://mnogochernil.ru/newsroom/wp-content/uploads/2014/10/cover-2-canon.jpg "[MASTER] Общее_Код ошибки_1")
Если эти действия не помогли устранить ошибку, обратитесь в сервисный центр для ремонта.
^ Вверх
Ошибка: код поддержки 1856 *1 – Оранжевый индикатор мигает 6 раз
Произошла ошибка, связанная с внутренней крышкой.
Решение
- Откройте внутреннюю крышку.
На рисунке вверху изображена внутренняя крышка. - Закройте внутреннюю крышку.
- Нажмите кнопку [Возобновить/Отмена] на устройстве, чтобы продолжить печать.
Если эти действия не помогли устранить ошибку, обратитесь в сервисный центр для ремонта.
^ Вверх
Ошибка: код поддержки 2001 – Оранжевый индикатор мигает 9 раз
Подсоединенная цифровая фото- или видеокамера не поддерживает прямую печать с камеры.
Решение
- Отключите устройство от принтера, отсоединив кабель из принтера и устройства.
Если эти действия не помогли устранить ошибку, обратитесь в сервисный центр для ремонта.
^ Вверх
Ошибка: код поддержки 2002 – Оранжевый индикатор мигает 19 раз
Данный концентратор не поддерживается, подключено несовместимое устройство к порту USB.
Решение
- Отключите устройство, отсоединив коннектор USB из принтера и устройства, проверьте кабель и подключаемое оборудование.
Если эти действия не помогли устранить ошибку, обратитесь в сервисный центр для ремонта.
^ Вверх
Ошибка: код поддержки 2100
Размер загруженной в устройство бумаги превышает размер, установленный в настройках печати.
Решение
- Проверьте размер загруженной бумаги и нажмите кнопку [OK] на устройстве.
- Экран выбора метода обработки отобразится на ЖК-экране.
- При необходимости загрузите бумагу еще раз, с помощью кнопок [ < >] выберите метод обработки, и нажмите кнопку [OK].ПРИМЕЧАНИЕ- Устройство не распознает ширину бумаги, которая находится в печати, если функция “Печатать с поданной бумагой” включена. Чтобы отключить функцию распознавания ширины страницы для всех последующих заданий на печать, установите настройку, при которой устройство не распознает ширину страницы с помощью панели управления, драйвера принтера или удаленного пользовательского интерфейса (Remote UI).
Если эти действия не помогли устранить ошибку, обратитесь в ближайший сервисный центр для ремонта..
^ Вверх
Ошибка: код поддержки 2101
Размер загруженной в устройство бумаги меньше размера, установленного в настройках печати.
Решение
- Проверьте размер загруженной бумаги и нажмите кнопку [OK] на устройстве.
- Экран выбора метода обработки отобразится на ЖК-экране.
- При необходимости загрузите бумагу еще раз, с помощью кнопок [ < >] выберите метод обработки, и нажмите кнопку [OK].
Если эти действия не помогли устранить ошибку, обратитесь в ближайший сервисный центр для ремонта..
^ Вверх
Ошибка: код поддержки 2102
Принтер обнаружил, что бумага при подаче была выровнена только по одной стороне.
Решение
- Загрузите бумагу посередине переднего лотка и сдвиньте направляющие для бумаги, чтобы выровнять оба края стопки бумаги.
- Нажмите кнопку [OK] для сброса ошибки.
Если эти действия не помогли устранить ошибку, обратитесь в ближайший сервисный центр для ремонта..
^ Вверх
Ошибка: код поддержки 2103
Устройство не может определить формат бумаги.
Решение
- Нажмите кнопку [Stop/Стоп] для сброса ошибки и повторите попытку печати.
- При повторном возникновении ошибки после печати задайте настройку, при которой устройство не распознает ширину страницы с помощью панели управления, драйвера принтера или удаленного пользовательского интерфейса (Remote UI).Примечание— В зависимости от типа бумаги устройство может не распознавать ширину страницы. Кроме того, устройство может не распознавать ширину страницы, если крышка приема бумаги открыта во время печати.
Если эти действия не помогли устранить ошибку, обратитесь в ближайший сервисный центр для ремонта..
^ Вверх
Ошибка: код поддержки 2114
Параметры бумаги в режиме печати или копирования отличаются от информации о бумаге в заднем лотке, установленной в принтере.
- Cогласитесь с предупреждением принтера два раза нажав ОК.
- Выберите “Печать загруженной бумагой”,”Замену бумаги” или “Отмену”.
- Подтвердите действие кнопкой ОК.
Печать с загруженной бумагой. (Print with the loaded paper.)
Выберите этот вариант, если требуется выполнить печать или копирование на бумаге, загруженной в задний лоток, без изменения параметров бумаги.
Например, если установлен параметр печати или копирования на бумаге формата A5, а в информации о бумаге в заднем лотке установлен параметр A4, для печати или копирования на бумаге в заднем лотке будет использоваться параметр A5.
Замените бумагу и печатайте (Replace the paper and print)
Выберите этот параметр после замены бумаги в заднем лотке.
Например, если установлен параметр печати или копирования на бумаге формата A5, а в информации о бумаге в заднем лотке установлен параметр A4, замените бумагу в заднем лотке на A5 и перейдите к печати или копированию.
После изменения бумаги отображается экран настройки информации о бумаге в заднем лотке. Настройте информацию о бумаге в заднем лотке.
Отмена (Cancel)
Отменяет печать.
Выберите этот параметр, чтобы изменить параметры бумаги для печати или копирования. Измените параметры бумаги и повторите печать.
^ Вверх
Ошибка: код поддержки 2123
Открыта крышка отверстия для подачи или параметры бумаги в заднем лотке заданы неполностью.
- Если крышка отверстия для подачи открыта, закройте ее и выберите OK на ЖК-дисплее.
- Если отображается следующий экран, параметры бумаги в заднем лотке заданы неполностью.

- Выберите элемент Зарегистрир. (Register), чтобы завершить настройку параметров бумаги в заднем лотке.

^ Вверх
Ошибка: код поддержки 2500 – Оранжевый индикатор мигает 11 раз
Ошибка автоматического выравнивания печатающей головки. Эта ошибка возникает, когда на распечатанном образце отсутствует изображение, или датчик AD ( расположенный на каретке ) не “видит” это изображение
Решение
- Нажмите кнопку [Возобновить/Отмена] на устройстве, чтобы сбросить ошибку (отмените выравнивание).
- Выполните процесс автоматического выравнивания печатающей головки. Затем просмотрите список доступных часто задаваемых вопросов или загрузите руководство пользователя при необходимости.
Если эти действия не помогли устранить ошибку, обратитесь в сервисный центр для ремонта.
^ Вверх
Ошибка: код поддержки 2700
Ошибка произошла по одной из следующих причин —
- Ошибка возникла во время копирования.
- Документ остался в АПД.
- Ошибка возникла во время сканирования, документ остался в АПД.
Решение
- Во время копирования нажмите кнопку [OK] для сброса ошибки и попробуйте снова выполнить операцию копирования.
- Если документ остался в АПД, нажмите кнопку [OK], чтобы вывести бумагу из принтера.
- Во время сканирования нажмите кнопку [Stop/Стоп] для отмены и попытайтесь снова выполнить операцию сканирования.
Если эти действия не помогли устранить ошибку, обратитесь в ближайший сервисный центр для ремонта..
^ Вверх
Ошибка: код поддержки 2800
Открыта крышка устройства подачи документов.
Решение
- Закройте крышку устройства подачи документов и нажмите кнопку [OK].
Если эти действия не помогли устранить ошибку, обратитесь в ближайший сервисный центр для ремонта..
^ Вверх
Ошибка: код поддержки 2801
Замятие документа в АПД.
Решение
ПРИМЕЧАНИЕ — Не допускается отключение питания во время отправки или приема факса, либо когда полученный факс или неотправленные факсы хранятся в памяти устройства. Перед отсоединением кабеля питания убедитесь, что устройство завершило отправку или получение факсов. Если отключить кабель питания, все неотправленные документы, сохраненные в памяти устройства, будут утеряны.
- При нажатии кнопки [Stop/Стоп] во время сканирования документ остается в АПД и на ЖК-дисплее появляется сообщение. Нажмите кнопку [OK] для вывода документа из АПД.
- Если произошло замятие исходного документа в АПД, нажмите кнопку [Stop/Стоп] для отмены печати.
- Выключите устройство.
- Извлеките все страницы, кроме тех, что застряли в устройстве АПД, и откройте крышку устройства подачи документов.
![[MASTER] Picture_1](data:image/svg+xml,%3Csvg%20xmlns='http://www.w3.org/2000/svg'%20viewBox='0%200%20238%20202'%3E%3C/svg%3E)
- Вытащите замятый документ из АПД.
![[MASTER] Picture_2](data:image/svg+xml,%3Csvg%20xmlns='http://www.w3.org/2000/svg'%20viewBox='0%200%20238%20239'%3E%3C/svg%3E)
- Закройте крышку устройства подачи документов и включите устройство.
- Если документ застрял в отверстии для выхода бумаги, закройте лоток для документов, как показано на рисунке ниже, и вытащите документ. Примечание —Ошибки подачи документов могут возникать из-за типа носителя или условий окружающей среды, например, высоких или низких значений температуры и влажности. В этом случае следует уменьшить число подаваемых страниц примерно наполовину. Если замятия не устраняются, используйте стекло сканера.При повторном сканировании документа после исправления ошибки сканирование следует повторить с первой страницы.
![[MASTER] Picture_1](https://mnogochernil.ru/newsroom/wp-content/uploads/2014/10/image5464564640.jpeg)
![[MASTER] Picture_2](https://mnogochernil.ru/newsroom/wp-content/uploads/2014/10/image4363463.jpeg)
![[MASTER] Picture_3](https://mnogochernil.ru/newsroom/wp-content/uploads/2014/10/image12-4087219.jpeg "[MASTER] Picture_3") Примечание —Ошибки подачи документов могут возникать из-за типа носителя или условий окружающей среды, например, высоких или низких значений температуры и влажности. В этом случае следует уменьшить число подаваемых страниц примерно наполовину. Если замятия не устраняются, используйте стекло сканера.При повторном сканировании документа после исправления ошибки сканирование следует повторить с первой страницы.
Примечание —Ошибки подачи документов могут возникать из-за типа носителя или условий окружающей среды, например, высоких или низких значений температуры и влажности. В этом случае следует уменьшить число подаваемых страниц примерно наполовину. Если замятия не устраняются, используйте стекло сканера.При повторном сканировании документа после исправления ошибки сканирование следует повторить с первой страницы.Если эти действия не помогли устранить ошибку, обратитесь в ближайший сервисный центр для ремонта..
^ Вверх
Ошибка: код поддержки 2802
Отсутствие документа в АПД.
Решение
- Нажмите кнопку [OK] для исправления ошибки, загрузите документ и повторите попытку.
Если эти действия не помогли устранить ошибку, обратитесь в ближайший сервисный центр для ремонта..
^ Вверх
Ошибка: код поддержки 2803
Документ слишком длинный или произошло замятие в АПД.
Решение
- Нажмите кнопку [OK] для сброса ошибки. Перед возобновлением операции убедитесь, что документ, загруженный в устройство, соответствует требованиям устройства.
- Если произошло замятие в АПД, нажмите кнопку [Stop/Стоп] для отмены печати.
- Выключите устройство.
- При загрузке многостраничного документа извлеките все страницы, кроме тех, что застряли в устройстве АПД, а затем откройте крышку устройства подачи документов.
- Вытащите замятый документ из АПД.
- Закройте крышку устройства подачи документов и включите устройство.
- Если документ застрял в отверстии для выхода бумаги, закройте лоток для документов, как показано на рисунке ниже, и вытащите документ.
- ПРИМЕЧАНИЕ —Ошибки подачи документов могут возникать из-за типа носителя или условий окружающей среды, например, высоких или низких значений температуры и влажности. В этом случае следует уменьшить число подаваемых страниц примерно наполовину. Если замятия не устраняются, используйте стекло сканера.При повторном сканировании документа после исправления ошибки сканирование следует повторить с первой страницы.
Если эти действия не помогли устранить ошибку, обратитесь в ближайший сервисный центр для ремонта..
^ Вверх
Ошибка: код поддержки 2804
Неподходящий размер документа для двустороннего сканирования.
Решение
- Нажмите кнопку [OK]для сброса ошибки.Перед возобновлением операции убедитесь, что загруженный документ соответствует требованиям устройства. Для автоматического двустороннего сканирования подходят документы формата A4 и Letter.
Если эти действия не помогли устранить ошибку, обратитесь в ближайший сервисный центр для ремонта..
^ Вверх
Ошибка: код поддержки 2900
Ошибка сканирования диаграммы выравнивания печатающей головки.
Решение
- Нажмите кнопку [OK] для сброса ошибки.
- Убедитесь, что печатающая головка установлена в правильном положении и имеет правильную ориентацию на стекле сканера.
- Убедитесь, что стекло сканера и диаграмма выравнивания печатающей головки не загрязнены.
- Убедитесь, что тип бумаги и формат бумаги подходят для автоматического выравнивания печатающей головки. Для автоматического выравнивания печатающей головки всегда загружайте один лист обычной бумаги формата A4 или Letter.
- Проверьте состояние печатающей головки, распечатав образец для проверки работы сопел.
- Если ошибка не устранена, выполните выравнивание печатающей головки вручную.
Если эти действия не помогли устранить ошибку, обратитесь в ближайший сервисный центр для ремонта..
^ Вверх
Ошибка: код поддержки 2901
Печать образца для выравнивания печатающей головки завершена, устройство находится в режиме ожидания сканирования документа.
Что делать
Загрузите лист выравнивания печатающей головки на стекло сканера. Поместите лист выравнивания печатающей головки отпечатанной стороной вниз и следуйте инструкциям на экране компьютера. После укладки листа для сканирования осторожно закройте крышку отсека для документов и нажмите кнопку [Black/Ч/б] или [Colour/Цвет]на устройстве. Устройство начнет сканирование листа выравнивания печатающей головки, и положение печатающей головки будет отрегулировано автоматически.
^ Вверх
Ошибка: код поддержки 4100/E12
Указанные данные невозможно вывести на печать.
Решение
- При печати содержимого из CREATIVE PARK PREMIUM убедитесь, что все необходимые фирменные картриджи Canon FINE установлены в устройство правильно и повторите печать.
Если эти действия не помогли устранить ошибку, обратитесь в ближайший сервисный центр для ремонта..
^ Вверх
Ошибка: код поддержки 4101
Устройство не поддерживает указанный размер бумаги.
Решение
- Нажмите кнопку [Stop/Стоп], укажите правильный размер бумаги и повторите печать.ПРИМЕЧАНИЕ – При печати на бумаге нестандартных размеров можно задать размеры для печати в следующих диапазонах —
- Загрузка в кассету (верхнюю):
o Ширина: от 89,0 мм до 200 мм (от 3,5 дюйма до 7,87 дюйма)
o Высота: от 127,0 мм до 184,9 мм (от 5 дюймов до 7,28 дюйма)
- Загрузка в кассету (нижнюю):
o Ширина: от 90,0 мм до 215,9 мм (от 3,54 дюйма до 8,5 дюйма)
o Высота: от 185,0 мм до 355,6 мм (от 7,29 дюйма до 14 дюймов)
Если эти действия не помогли устранить ошибку, обратитесь в ближайший сервисный центр для ремонта..
^ Вверх
Ошибка: код поддержки 4102
Тип носителя и размер бумаги установлены неправильно.
Решение
- Нажмите кнопку [ON/RESUME/ВКЛ/ВОЗОБНОВИТЬ]для отмены печати, измените настройки типа носителя или размера бумаги и повторите печать.ПРИМЕЧАНИЕ – Типы носителей и размеры бумаги указаны ниже —
- Если тип носителя Глянцевая фотобумага Photo Paper Plus Glossy II:Задайте размер бумаги 4″x6″ 10 см x 15 см (Windows)/4×6 (Mac) или 5″x7″ 13 см x 18 см (Windows)/ 5×7 (Mac).
- Если тип носителя Глянцевая фотобумага:Задайте размер бумаги 4″x6″ 10 см x 15 см (Windows)/4×6 (Mac)
- Если тип носителя Конверт:Задайте размер бумаги Конверт Com 10 (Windows)/Конверт #10 (Mac) или Конверт DL (Windows/Mac).
Если эти действия не помогли устранить ошибку, обратитесь в ближайший сервисный центр для ремонта..
^ Вверх
Ошибка: код поддержки 4103
Печать с использованием текущих настроек невозможна.
Решение
- Для отмены печати нажмите кнопку [Stop/Стоп] на устройстве.
- Измените настройки печати и повторите печать.
Если эти действия не помогли устранить ошибку, обратитесь в ближайший сервисный центр для ремонта..
^ Вверх
Ошибки
5010/5011/5012/5040/5050/5C02/5C20
6900/6901/6902/6910/6911/6920/6921/6930/6931/6932/6933
6936/6937/6938/6939/693A/6940/6941/6942/6943/6944/6945/6946
6004/6A00/6A81/6A82/6B20/9500
B201/B202/B203/B204/B205/P22/P26/P27/P28/P29
Световые индикаторы перемигиваются желтым-зелёным, с разделяющим серии миганий продолжительным зелёным свечением
Возникла серьезная ошибка функционирования принтера, в большинстве случаев не исправен узел прочистки, плата управления, печатающая головка или блок питания, ремонт в домашних условиях обычно невозможен. Ремонт возможен, только если проблема связана с видимым механическим повреждением и износом деталей (осмотрите устройство и замените их) или залитыми жидкостью электронными компонентами или шлейфами (может помочь высушиванием и протирка чистым спиртом). Также иногда ошибку B200/B201/B202/B203 можно сбросить на время, однако если сбой серьезный, вскоре всё повториться.
6900 обычно означает проблему с сетевой картой принтера.
Решение (как убрать)
- Отключите устройство и отключите кабель питания от электрической розетки. Снова подключите кабель к розетке и включите устройство. Если отключить кабель питания, все неотправленные документы, сохраненные в памяти устройства, будут утеряны.
- Можно разобрать принтер и проверить все соединения электронных шлейфов, возможно, что-то где-то залито. Также можно попробовать смазать движущиеся детали и подтянуть пружину, которая держит ПГ (просто растяните пружину и зацепите её за фиксатор в положении “на несколько витков меньше”).
- Сбросить ошибку B203 на большинстве принтеров Pixma можно так: выключаете принтер, не вынимая провод питания, открываете крышку принтера для доступа к картриджам, затем нажимаете подряд 5 раз кнопку включения и закрываете крышку. Как правило, такой метод срабатывает, если ошибка вызвана перегревом головки при ее засоре или работе без краски.
Если эти действия не помогли устранить ошибку, обратитесь в сервисный центр для ремонта, чаще всего требуется замена головки.
^ Вверх
Ошибка: код поддержки 5100/E2/P02 – Оранжевый и зеленый индикаторы мигают 2 раза
Произошла ошибка перемещения каретки.
Решение:
- Выключите принтер.
- Отсоедините кабель питания.
- Откройте крышку принтера.
- Найдите и при необходимости удалите оранжевую защитную ленту или белый пенопласт.
- Убедитесь, что в принтере отсутствуют посторонние объекты (например, скрепки для бумаги), и при необходимости устраните их. Также проверьте состояние места парковки – каретка может застревать из-за скопившейся грязи и отсутствия смазки (лучше всего демонтировать место парковки, промыть его и смазать направляющие заново).
- Закройте крышку.
- Снова подсоедините кабель питания и включите принтер.
Если эти действия не помогли устранить ошибку, обратитесь в сервисный центр для ремонта.
^ Вверх
Ошибка: код поддержки 5101
Возникла ошибка принтера.
Решение
- Удалите защитный материал, препятствующий движению держателя печатающей головки, выключите устройство и затем снова включите его.
Если эти действия не помогли устранить ошибку, обратитесь в ближайший сервисный центр для ремонта..
^ Вверх
Ошибка: код поддержки 5110 – Оранжевый и зеленый индикаторы мигают 11 раз
Произошла сервисная ошибка.
Решение
- Выключите принтер.
- Отсоедините кабель питания.
- Откройте крышку принтера.
- Найдите и при необходимости удалите оранжевую защитную ленту или белый пенопласт.
- Убедитесь, что в принтере отсутствуют посторонние объекты (например, скрепки для бумаги), и при необходимости устраните их.
- Закройте крышку.
- Снова подсоедините кабель питания и включите принтер.
Если эти действия не помогли устранить ошибку, обратитесь в сервисный центр для ремонта.
^ Вверх
Ошибка: код поддержки 5200/P08 – Оранжевый и зеленый индикаторы мигают 8 раза
Произошла сервисная ошибка (скорее всего перегрев печатающий головки).
Решение:
- Выключите принтер.
- Отсоедините кабель питания.
- Откройте крышку принтера.
- Найдите и при необходимости удалите оранжевую защитную ленту или белый пенопласт.
- Убедитесь, что в принтере отсутствуют посторонние объекты (например, скрепки для бумаги), и при необходимости устраните их.
- Закройте крышку.
- Снова подсоедините кабель питания и включите принтер.
Если эти действия не помогли устранить ошибку, обратитесь в сервисный центр для ремонта.
^ Вверх
Ошибка: код поддержки 520E
Произошла сервисная ошибка принтера.
Решение:
- Отсоедините кабель питания.
- Подождите 10 секунд
- Снова подсоедините кабель питания и включите принтер.
Если эти действия не помогли устранить ошибку, обратитесь в сервисный центр для ремонта.
^ Вверх
Ошибка: код поддержки 5400/P06 – Оранжевый и зеленый индикаторы мигают 6 раза
Произошла сервисная ошибка (Internal temperature abnormal error – перегрев принтера).
Решение:
- Выключите принтер.
- Отсоедините кабель питания.
- Откройте крышку принтера.
- Найдите и при необходимости удалите оранжевую защитную ленту или белый пенопласт.
- Убедитесь, что в принтере отсутствуют посторонние объекты (например, скрепки для бумаги), и при необходимости устраните их.
- Закройте крышку.
- Снова подсоедините кабель питания и включите принтер.
Если эти действия не помогли устранить ошибку, обратитесь в сервисный центр для ремонта.
^ Вверх
Ошибка: код поддержки 5700/P05 – Оранжевый и зеленый индикаторы мигают 5 раза
Произошла сервисная ошибка (ASF cam sensor error).
Решение:
- Выключите принтер.
- Отсоедините кабель питания.
- Откройте крышку принтера.
- Найдите и при необходимости удалите оранжевую защитную ленту или белый пенопласт.
- Убедитесь, что в принтере отсутствуют посторонние объекты (например, скрепки для бумаги), и при необходимости устраните их.
- Закройте крышку.
- Снова подсоедините кабель питания и включите принтер.
Если эти действия не помогли устранить ошибку, обратитесь в сервисный центр для ремонта.
^ Вверх
Ошибка: код поддержки 5B00/5B01 – Оранжевый и зеленый индикаторы мигают 7 раз
Произошла сервисная ошибка: Waste ink full (переполнение абсорбера-”памперса”).
Как убрать (снять) ошибку 5B00
Отнесите принтер в сервисный центра.
Также можно попробовать сбросить памперс (на свой страх и риск, ведёт к потере гарантии).
Ошибка: код поддержки 5B02/5B03/5B04/5B05/5B10/5B11/5B12/5B13/5B14/5B15/P07
Возникла ошибка принтера.
Действия
- Обратитесь в ближайший сервисный центр для ремонта..
^ Вверх
Ошибка: код поддержки 5C00 – Оранжевый и зеленый индикаторы мигают 4 раза
Произошла сервисная ошибка (Purge unit error – ошибка устройства прочистки).
Решение
- Выключите принтер.
- Отсоедините кабель питания.
- Откройте крышку принтера.
- Найдите и при необходимости удалите оранжевую защитную ленту или белый пенопласт.
- Убедитесь, что в принтере отсутствуют посторонние объекты (например, скрепки для бумаги), и при необходимости устраните их.
- Закройте крышку.
- Снова подсоедините кабель питания и включите принтер.
Если эти действия не помогли устранить ошибку, обратитесь в сервисный центр для ремонта.
^ Вверх
Ошибка: код поддержки 6000/P03 – Оранжевый и зеленый индикаторы мигают 3 раза
Произошла сервисная ошибка (LF error – ошибка протяжки бумаги).
Решение:
- Выключите принтер.
- Отсоедините кабель питания.
- Откройте крышку принтера.
- Найдите и при необходимости удалите оранжевую защитную ленту или белый пенопласт.
- Убедитесь, что в принтере отсутствуют посторонние объекты (например, скрепки для бумаги), и при необходимости устраните их.
- Закройте крышку.
- Снова подсоедините кабель питания и включите принтер.
Если эти действия не помогли устранить ошибку, обратитесь в сервисный центр для ремонта.
^ Вверх
Ошибка: код поддержки 6001/6002
Возникла ошибка принтера.
Решение
- Если лоток приема бумаги закрыт, откройте его.
- Выключите устройство и отключите кабель питания от электрической розетки.
- Снова подключите кабель к розетке и включите устройство. Не закрывайте лоток приема бумаги при работе устройства, в противном случае появится сообщение об ошибке. Если отключить кабель питания, все неотправленные документы, сохраненные в памяти устройства, будут утеряны.
Если эти действия не помогли устранить ошибку, обратитесь в сервисный центр для ремонта.
^ Вверх
Ошибка: код поддержки 6010 – Оранжевый и зеленый индикаторы мигают 17 раз
Произошла сервисная ошибка: неисправность, которую принтер при самодиагностике не может определить с точностью до узла/блока. Чаще всего при этой ошибке бывает неисправен блок питания или плата управления
Решение
- Выключите принтер.
- Отсоедините кабель питания.
- Откройте крышку принтера.
- Найдите и при необходимости удалите оранжевую защитную ленту или белый пенопласт.
- Убедитесь, что в принтере отсутствуют посторонние объекты (например, скрепки для бумаги), и при необходимости устраните их.
- Закройте крышку.
- Снова подсоедините кабель питания и включите принтер.
Если эти действия не помогли устранить ошибку, обратитесь в сервисный центр для ремонта.
^ Вверх
Ошибка: код поддержки 6500/P20 – Оранжевый и зеленый индикаторы мигают 20 раза
Произошла сервисная ошибка. Неисправность, которую принтер при самодиагностике не может определить с точностью до узла/блока. Чаще всего при этой ошибке бывает неисправен блок питания или плата управления
Решение:
- Выключите принтер.
- Отсоедините кабель питания.
- Откройте крышку принтера.
- Найдите и при необходимости удалите оранжевую защитную ленту или белый пенопласт.
- Убедитесь, что в принтере отсутствуют посторонние объекты (например, скрепки для бумаги), и при необходимости устраните их.
- Закройте крышку.
- Снова подсоедините кабель питания и включите принтер.
Если эти действия не помогли устранить ошибку, обратитесь в сервисный центр для ремонта.
^ Вверх
Ошибка: код поддержки 6502 – Оранжевый и зеленый индикаторы мигают 19 раз
Произошла сервисная ошибка (Ink tank position sensor error: на датчик света от светодиодов чипов картриджей попадает посторонний свет). Решения – в этой статье.
Решение
- Выключите принтер.
- Отсоедините кабель питания.
- Откройте крышку принтера.
- Проверьте, что чипы картриджей чистые и светодиоды на них не испачканы.
- Найдите и при необходимости удалите оранжевую защитную ленту или белый пенопласт. Убедитесь, что в принтере отсутствуют посторонние объекты (например, скрепки для бумаги), и при необходимости устраните их.
- Закройте крышку и уберите устройство прочь с яркого света, выключите настольную лампу, уберите принтер от окна.
- Снова подсоедините кабель питания и включите принтер.
Если эти действия не помогли устранить ошибку, обратитесь в сервисный центр для ремонта.
^ Вверх
Ошибка: код поддержки 6800/6801/P09 – Оранжевый и зеленый индикаторы мигают 9 раз
Произошла сервисная ошибка (EEPROM error – в большинстве случаев неисправна плата управления).
Решение:
- Выключите принтер.
- Отсоедините кабель питания.
- Откройте крышку принтера.
- Найдите и при необходимости удалите оранжевую защитную ленту или белый пенопласт.
- Убедитесь, что в принтере отсутствуют посторонние объекты (например, скрепки для бумаги), и при необходимости устраните их.
- Закройте крышку.
- Снова подсоедините кабель питания и включите принтер.
Если эти действия не помогли устранить ошибку, обратитесь в сервисный центр для ремонта.
^ Вверх
Ошибка: код поддержки 6A80 – Оранжевый и зеленый индикаторы мигают 12 раз
Произошла сервисная ошибка (APP position error — в большинстве случаев неисправен узел прочистки).
Решение
- Выключите принтер.
- Отсоедините кабель питания.
- Откройте крышку принтера.
- Найдите и при необходимости удалите оранжевую защитную ленту или белый пенопласт.
- Убедитесь, что в принтере отсутствуют посторонние объекты (например, скрепки для бумаги), и при необходимости устраните их.
- Закройте крышку.
- Снова подсоедините кабель питания и включите принтер.
Если эти действия не помогли устранить ошибку, обратитесь в сервисный центр для ремонта.
^ Вверх
Ошибка: код поддержки 6A90 – Оранжевый и зеленый индикаторы мигают 14 раз
Произошла сервисная ошибка (APP sensor error — в большинстве случаев неисправен узел прочистки ПГ).
Решение
- Выключите принтер.
- Отсоедините кабель питания.
- Откройте крышку принтера.
- Найдите и при необходимости удалите оранжевую защитную ленту или белый пенопласт.
- Убедитесь, что в принтере отсутствуют посторонние объекты (например, скрепки для бумаги), и при необходимости устраните их.
- Закройте крышку.
- Снова подсоедините кабель питания и включите принтер.
Если эти действия не помогли устранить ошибку, обратитесь в сервисный центр для ремонта.
^ Вверх
Ошибка: код поддержки 6B10 – Оранжевый и зеленый индикаторы мигают 14 раз
Произошла сервисная ошибка (PF (paper feed) cam sensor error).
Решение
- Выключите принтер.
- Отсоедините кабель питания.
- Откройте крышку принтера.
- Найдите и при необходимости удалите оранжевую защитную ленту или белый пенопласт.
- Убедитесь, что в принтере отсутствуют посторонние объекты (например, скрепки для бумаги), и при необходимости устраните их.
- Закройте крышку.
- Снова подсоедините кабель питания и включите принтер.
Если эти действия не помогли устранить ошибку, обратитесь в сервисный центр для ремонта.
^ Вверх
Ошибка: код поддержки 6C10 – Оранжевый и зеленый индикаторы мигают 23 раза
Произошла сервисная ошибка (Valve cam sensor error — в большинстве случаев неисправен узел прочистки ПГ).
Решение
- Выключите принтер.
- Отсоедините кабель питания.
- Откройте крышку принтера.
- Найдите и при необходимости удалите оранжевую защитную ленту или белый пенопласт.
- Убедитесь, что в принтере отсутствуют посторонние объекты (например, скрепки для бумаги), и при необходимости устраните их.
- Закройте крышку.
- Снова подсоедините кабель питания и включите принтер.
Если эти действия не помогли устранить ошибку, обратитесь в сервисный центр для ремонта.
Если в печатном устройстве не обнаружилось посторонних предметов, либо их удаление никак не повлияло на возникновение ошибки, проще доверить ремонт специалистам. Для самостоятельного устранения ошибки требуется иметь богатый опыт в разборке печатной техники и хорошее представление о её внутреннем устройстве.
Если ошибка возникает периодически, может быть виноват микропереключатель контроля клапанов механизма прочистки (расположен с лицевой стороны очистного узла). Либо его контакты окислились, либо он оказался забрызган чернилами – в таком случае, может помочь очистка микропереключателя.
^ Вверх
Ошибки: код поддержки 7500, 7600, 7700, 7800
Произошла серьезная ошибка, требующая ремонта.
Решение
- Выключите принтер.
- Отсоедините кабель питания.
- Откройте крышку принтера.
- Убедитесь, что в принтере отсутствуют посторонние объекты (например, скрепки для бумаги), и при необходимости устраните их.
- Закройте крышку.
- Снова подсоедините кабель питания и включите принтер.
Если эти действия не помогли устранить ошибку, обратитесь в сервисный центр Canon, так как ошибка свидетельствует о серьезной проблеме, требующей ремонта.
^ Вверх
Ошибка: код поддержки 9000 – Оранжевый и зеленый индикаторы мигают 15 раз
Произошла сервисная ошибка (USB host UBAS overcurrent – в большинстве случаев – неисправна плата управления).
Решение
- Выключите принтер.
- Отсоедините кабель питания.
- Откройте крышку принтера.
- Найдите и при необходимости удалите оранжевую защитную ленту или белый пенопласт.
- Убедитесь, что в принтере отсутствуют посторонние объекты (например, скрепки для бумаги), и при необходимости устраните их.
- Закройте крышку.
- Снова подсоедините кабель питания и включите принтер.
Если эти действия не помогли устранить ошибку, обратитесь в сервисный центр Canon, так как вероятно повреждена плата управления.
^ Вверх
Ошибка: код поддержки B200/P10 – Оранжевый и зеленый индикаторы мигают 10 раз
Произошла сервисная ошибка (VH monitor error – ошибка контроля питания печатающей головки, в том числе из-за ошибки одного из картриджей). Причиной может быть неисправность платы управления, чипа картриджа, печатающей головки (в том числе просто перегрев ПГ), в редких случаях свидетельствует о сбое в блоке питания.
Варианты решения:
- Извлеките и снова вставьте печатающую головку и картриджи.
- Проверьте, что в картриджах есть чернила и они штатно поступают в печатающую головку. Выключите и включите принтер.
- Убедитесь, что в принтере отсутствуют посторонние объекты (например, скрепки для бумаги, пенопласт, бумага), и при необходимости устраните их. Выключите и включите принтер.
- Попробуйте заменить картриджи.
- При перегреве печатающей головки на старых принтерах может помочь такой метод:
- Выключить принтер. Открыть крышку и передвинуть каретку максимально влево.
- 5 раз нажать кнопку включения (не дожидаясь полного включения/выключения)
- После последнего нажатия закрыть крышку.
Если эти действия не помогли устранить ошибку, обратитесь в сервисный центр для ремонта.
^ Вверх
Ошибка: код поддержки C000 – Оранжевый и зеленый индикаторы мигают 21 раз
Произошла сервисная ошибка (Drive switch error – cскорее всего неисправность в узле прочистки (purge unit) или подачи бумаги ASF).
Решение
- Выключите принтер.
- Отсоедините кабель питания.
- Откройте крышку принтера.
- Найдите и при необходимости удалите оранжевую защитную ленту или белый пенопласт.
- Убедитесь, что в принтере отсутствуют посторонние объекты (например, скрепки для бумаги), и при необходимости устраните их.
- Закройте крышку.
- Снова подсоедините кабель питания и включите принтер.
Если эти действия не помогли устранить ошибку, обратитесь в сервисный центр для ремонта.
^ Вверх
Ошибка: код поддержки НИЗКИЙ УРОВЕНЬ ЧЕРНОГО КАРТРИДЖА
Низкий уровень чернил в черном картридже.
Решение:
- Такое сообщение указывает, что скоро в картридже закончатся чернила.
- Если устройство останавливает печать при копировании или печати фотографий, вы можете продолжить печать, нажав [OK].
- Если в черном картридже заканчиваются чернила, убедитесь, что у вас есть новый черный картридж Canon, готовый к установке.
Если эти действия не помогли устранить ошибку, обратитесь в сервисный центр для ремонта.
^ Вверх
Ошибка: код поддержки ЧЕРНЫЙ КАРТРИДЖ ЗАМЕНЕН
Устройство спрашивает, заменили ли вы черный картридж.
Решение:
- Если вы заменили черный картридж, нажмите на принтере на стрелку, указывающую влево.
- Если вы не заменили черный картридж, то нажмите на стрелку, указывающую вправо. Печать возобновится.
Если эти действия не помогли устранить ошибку, обратитесь в сервисный центр для ремонта.
^ Вверх
Ошибка: код поддержки НЕВОЗМОЖНО ИСПОЛЬЗОВАТЬ КАРТУ ВКЛЮЧИТЕ И ВКЛЮЧИТЕ СНОВА
Вы вставили в гнездо карты памяти поврежденную или несовместимую карту памяти.
Решение:
- Извлеките карту памяти из гнезда.
- Выключите и включите принтер.
Если эти действия не помогли устранить ошибку, обратитесь в сервисный центр для ремонта.
^ Вверх
Ошибка: код поддержки ЧТЕНИЯ КАРТЫ ВЫКЛЮЧИТЕ И ВКЛЮЧИТЕ СНОВА
Возникла проблема с гнездом для карты памяти.
Решение
- Извлеките карту памяти из гнезда.
- Выключите и снова включите устройство.
- Установите карту памяти в гнездо.
Если эти действия не помогли устранить ошибку, обратитесь в сервисный центр для ремонта.
^ Вверх
Ошибка: код поддержки УСТРОЙСТВО ДЛЯ ЧТЕНИЯ КАРТ ЗАНЯТО
Вы попытались начать печать фотографий, когда гнезда карт памяти использовались компьютером.
Решение:
- Подождите, пока компьютер перестанет использовать гнездо карты памяти (это может занять несколько минут), а затем снова начните печать фотографий.
Если эти действия не помогли устранить ошибку, обратитесь в сервисный центр для ремонта.
^ Вверх
Ошибка: код поддержки ЗАСТРЕВАНИЕ КАРТРИДЖА
Перемещение держателя печатающей головки невозможно.
Решение:
- Откройте крышку принтера.
- Удалите препятствия на пути держателя печатающей головки и нажмите [OK].
Примечание – Не пытайтесь перемещать держатель печатающей головки вручную.
Если эти действия не помогли устранить ошибку, обратитесь в сервисный центр для ремонта.
^ Вверх
Ошибка: код поддержки ИЗМЕНИТЕ РАЗМЕР БУМАГИ НАЖМИТЕ [OK]
Размер бумаги в устройстве подачи бумаги отличается от размера, указанного в настройках.
Решение:
- Загрузите бумагу правильного размера или измените настройки размера бумаги.
- Нажмите [OK].
Если эти действия не помогли устранить ошибку, обратитесь в сервисный центр для ремонта.
^ Вверх
Ошибка: код поддержки ПРОВЕРЬТЕ ПРИНТЕР
По какой-то причине устройство не функционирует.
Решение:
- Выключите и снова включите устройство.
Если эти действия не помогли устранить ошибку, обратитесь в сервисный центр для ремонта.
^ Вверх
Ошибка: код поддержки ЦВЕТНОЙ КАРТРИДЖ ЗАМЕНЕН?
Description:
Устройство спрашивает, заменили ли вы цветной картридж.
Решение:
- Если вы заменили цветной картридж, нажмите на принтере на стрелку, указывающую влево.
- Если вы не заменили цветной картридж, то нажмите на стрелку, указывающую вправо. Печать возобновится.
Если эти действия не помогли устранить ошибку, обратитесь в сервисный центр для ремонта.
^ Вверх
Ошибка: код поддержки НИЗКИЙ УРОВЕНЬ ЦВЕТНОГО КАРТРИДЖА
Низкий уровень чернил в цветном картридже.
Решение:
- Такое сообщение указывает, что скоро в цветном картридже закончатся чернила.
- Если устройство останавливает печать при копировании или печати фотографий, вы можете продолжить печать, нажав [OK].
Примечание: Если в цветном картридже заканчиваются чернила, убедитесь, что у вас есть новый цветной картридж Canon, готовый к установке.
Если эти действия не помогли устранить ошибку, обратитесь в сервисный центр для ремонта.
^ Вверх
Ошибка: код поддержки КРЫШКА ОТКРЫТА
Блок сканирования был открыт во время работы.
Решение:
- Возвратите блок сканирования в первоначальное положение.
Если эти действия не помогли устранить ошибку, обратитесь в сервисный центр для ремонта.
^ Вверх
Ошибка: код поддержки ДАННЫЕ В ПАМЯТИ НЕВОЗМОЖНО ОТКЛЮЧИТЬ ПИТАНИЕ
Вы не можете выключить устройство, нажав на кнопку [ON/OFF], если в памяти устройства сохранены документы.
Решение:
- Устройство выполняет операцию.
- Дождитесь завершения операции, а затем выключите и включите устройство.
Если эти действия не помогли устранить ошибку, обратитесь в сервисный центр для ремонта.
^ Вверх
Ошибка: код поддержки УСТРОЙСТВО ИСПОЛЬЗУЕТСЯ НЕВОЗМОЖНО ОТКЛЮЧИТЬ ПИТАНИЕ
Вы не можете выключить устройство с помощью кнопки [ON/OFF], поскольку устройство выполняет операцию.
Решение:
- Устройство выполняет операцию.
- Дождитесь завершения операции, а затем выключите и включите его.
Если эти действия не помогли устранить ошибку, обратитесь в сервисный центр для ремонта.
^ Вверх
Ошибка: код поддержки КАРТА НЕ СОДЕРЖИТ ФАЙЛОВ
На карте памяти отсутствуют поддерживаемые файлы.
Решение:
- Убедитесь, что сохранили фотографии на карте памяти в надлежащем формате.
Если эти действия не помогли устранить ошибку, обратитесь в сервисный центр для ремонта.
^ Вверх
Ошибка: код поддержки УСТРАНИТЕ ЗАМЯТИЕ БУМАГИ И НАЖМИТЕ [OK] или [START]
Произошло замятие бумаги.
Решение:
- Найдите и удалите замятую бумагу из принтера.
- Нажмите кнопку [Возобновить/Отмена] на устройстве, чтобы продолжить печать.
Если эти действия не помогли устранить ошибку, обратитесь в сервисный центр для ремонта.
^ Вверх
Ошибка: код поддержки ЗАГРУЗИТЕ БУМАГУ И НАЖМИТЕ [OK] или [START]
Устройство подачи бумаги пусто.
Решение:
- Загрузите бумагу в устройство подачи бумаги.
- Убедитесь, что высота стопки не превышает максимальную отметку.
- Нажмите [OK] или [Start].
Если эти действия не помогли устранить ошибку, обратитесь в сервисный центр для ремонта.
^ Вверх
Ошибка: код поддержки ВСТАВЬТЕ КАРТРИДЖ
В устройство не установлена печатающая головка.
Решение:
Для устранения этой проблемы требуется обратиться в сервисный центр для ремонта.
^ Вверх

TS300 series
Онлайн-руководство
Основные операции
Сеть
Обслуживание
Обзор устройства
Сведения о бумаге
Печать
Копирование
Сканирование
Часто задаваемые вопросы
Список кодов поддержки для ошибок
Русский (Russian)

Содержание
Использование документа Онлайн-руководство. . . . . . . . . . . . . . . . . . . . . . . 9
Обозначения, используемые в настоящем документе. . . . . . . . . . . . . . . . . . . . . . . . . 10
Пользователи устройства с активированными сенсорными функциями (Windows). . 11
Товарные знаки и лицензии. . . . . . . . . . . . . . . . . . . . . . . . . . . . . . . . . . . . . . . . . . . . . . . 12
Основные операции. . . . . . . . . . . . . . . . . . . . . . . . . . . . . . . . . . . . . . . . . . . . . . 23
Печать фотографий с компьютера. . . . . . . . . . . . . . . . . . . . . . . . . . . . . . . . . . . . . . . . . 24
Печать фотографий со смартфона или планшета. . . . . . . . . . . . . . . . . . . . . . . . . . . . . 28
Руководство по Easy-PhotoPrint+. . . . . . . . . . . . . . . . . . . . . . . . . . . . . . . . . . . . . . . . . . . . . . . . . . .
Руководство по Easy-PhotoPrint+. . . . . . . . . . . . . . . . . . . . . . . . . . . . . . . . . . . . . . . . . . . . . . . . . . .
Сеть. . . . . . . . . . . . . . . . . . . . . . . . . . . . . . . . . . . . . . . . . . . . . . . . . . . . . . . . . . . 33
Ограничения. . . . . . . . . . . . . . . . . . . . . . . . . . . . . . . . . . . . . . . . . . . . . . . . . . . . . . . . . . . 36
Рекомендации по сетевому подключению. . . . . . . . . . . . . . . . . . . . . . . . . . . . . . . . . . . 38
Параметры сети по умолчанию. . . . . . . . . . . . . . . . . . . . . . . . . . . . . . . . . . . . . . . . . . . . . . . . . . . . . . 39
Обнаружен еще один принтер с таким же именем. . . . . . . . . . . . . . . . . . . . . . . . . . . . . . . . . . . . . . . 40
Подключение к другому компьютеру через локальную сеть/Изменение способа подключения с
USB на локальную сеть. . . . . . . . . . . . . . . . . . . . . . . . . . . . . . . . . . . . . . . . . . . . . . . . . . . . . . . . . . . . . 41
Печать параметров сети. . . . . . . . . . . . . . . . . . . . . . . . . . . . . . . . . . . . . . . . . . . . . . . . . . . . . . . . . . . . 42
Изменение способа подключения по беспроводной сети. . . . . . . . . . . . . . . . . . . . . . . . . . . . . . . . . 47
Обращение с бумагой, картриджами FINE и т. д.. . . . . . . . . . . . . . . . . . . . . . 48
Загрузка бумаги. . . . . . . . . . . . . . . . . . . . . . . . . . . . . . . . . . . . . . . . . . . . . . . . . . . . . . . . . 49
Загрузка обычной бумаги или фотобумаги. . . . . . . . . . . . . . . . . . . . . . . . . . . . . . . . . . . . . . . . . . . . . 50
Замена картриджа FINE. . . . . . . . . . . . . . . . . . . . . . . . . . . . . . . . . . . . . . . . . . . . . . . . . . 54
Замена картриджа FINE. . . . . . . . . . . . . . . . . . . . . . . . . . . . . . . . . . . . . . . . . . . . . . . . . . . . . . . . . . . . 55
Советы по чернилам. . . . . . . . . . . . . . . . . . . . . . . . . . . . . . . . . . . . . . . . . . . . . . . . . . . . . . . . . . . . . . . 61
Обслуживание. . . . . . . . . . . . . . . . . . . . . . . . . . . . . . . . . . . . . . . . . . . . . . . . . . 62
Если печать стала бледной или неравномерной. . . . . . . . . . . . . . . . . . . . . . . . . . . . . . 63
Процедура обслуживания. . . . . . . . . . . . . . . . . . . . . . . . . . . . . . . . . . . . . . . . . . . . . . . . . . . . . . . . . . . 64
Печать образца для проверки сопел. . . . . . . . . . . . . . . . . . . . . . . . . . . . . . . . . . . . . . . . . . . . . . . . . . 67
Оценка образца для проверки сопел. . . . . . . . . . . . . . . . . . . . . . . . . . . . . . . . . . . . . . . . . . . . . . . . . . 68
Очистка печатающей головки. . . . . . . . . . . . . . . . . . . . . . . . . . . . . . . . . . . . . . . . . . . . . . . . . . . . . . . . 69

Глубокая очистка печатающих головок. . . . . . . . . . . . . . . . . . . . . . . . . . . . . . . . . . . . . . . . . . . . . . . . 70
Очистка. . . . . . . . . . . . . . . . . . . . . . . . . . . . . . . . . . . . . . . . . . . . . . . . . . . . . . . . . . . . . . . 71
Очистка подающих роликов. . . . . . . . . . . . . . . . . . . . . . . . . . . . . . . . . . . . . . . . . . . . . . . . . . . . . . . . . 72
Очистка внутренних компонентов принтера (очистка поддона). . . . . . . . . . . . . . . . . . . . . . . . . . . . . 74
Обзор. . . . . . . . . . . . . . . . . . . . . . . . . . . . . . . . . . . . . . . . . . . . . . . . . . . . . . . . . 76
Безопасность. . . . . . . . . . . . . . . . . . . . . . . . . . . . . . . . . . . . . . . . . . . . . . . . . . . . . . . . . . . 77
Меры предосторожности. . . . . . . . . . . . . . . . . . . . . . . . . . . . . . . . . . . . . . . . . . . . . . . . . . . . . . . . . . . . 78
Нормативная информация. . . . . . . . . . . . . . . . . . . . . . . . . . . . . . . . . . . . . . . . . . . . . . . . . . . . . . . . . . 79
WEEE (EU&EEA). . . . . . . . . . . . . . . . . . . . . . . . . . . . . . . . . . . . . . . . . . . . . . . . . . . . . . . . . . . . . . . . . . 80
Предосторожности при обращении. . . . . . . . . . . . . . . . . . . . . . . . . . . . . . . . . . . . . . . . . 81
Юридические ограничения на печать/копирование. . . . . . . . . . . . . . . . . . . . . . . . . . . . . . . . . . . . . . 82
Меры предосторожности при обращении с принтером. . . . . . . . . . . . . . . . . . . . . . . . . . . . . . . . . . . 83
Перемещение принтера. . . . . . . . . . . . . . . . . . . . . . . . . . . . . . . . . . . . . . . . . . . . . . . . . . . . . . . . . . . . 84
При ремонте, предоставлении во временное пользование или утилизации принтера. . . . . . . . . . 85
Сохранение высокого качества печати. . . . . . . . . . . . . . . . . . . . . . . . . . . . . . . . . . . . . . . . . . . . . . . . 86
Основные компоненты и их использование. . . . . . . . . . . . . . . . . . . . . . . . . . . . . . . . . . 87
Основные компоненты. . . . . . . . . . . . . . . . . . . . . . . . . . . . . . . . . . . . . . . . . . . . . . . . . . . . . . . . . . . . . . 88
Вид спереди. . . . . . . . . . . . . . . . . . . . . . . . . . . . . . . . . . . . . . . . . . . . . . . . . . . . . . . . . . . . . . . . . . 89
Вид сзади. . . . . . . . . . . . . . . . . . . . . . . . . . . . . . . . . . . . . . . . . . . . . . . . . . . . . . . . . . . . . . . . . . . . 90
Вид внутренних частей. . . . . . . . . . . . . . . . . . . . . . . . . . . . . . . . . . . . . . . . . . . . . . . . . . . . . . . . . 91
Панель управления. . . . . . . . . . . . . . . . . . . . . . . . . . . . . . . . . . . . . . . . . . . . . . . . . . . . . . . . . . . . 92
Электропитание. . . . . . . . . . . . . . . . . . . . . . . . . . . . . . . . . . . . . . . . . . . . . . . . . . . . . . . . . . . . . . . . . . . 94
Проверка включения питания. . . . . . . . . . . . . . . . . . . . . . . . . . . . . . . . . . . . . . . . . . . . . . . . . . . . 95
Включение и выключение Принтера. . . . . . . . . . . . . . . . . . . . . . . . . . . . . . . . . . . . . . . . . . . . . . 96
Проверка штепселя и кабеля питания. . . . . . . . . . . . . . . . . . . . . . . . . . . . . . . . . . . . . . . . . . . . . 98
Отключение принтера. . . . . . . . . . . . . . . . . . . . . . . . . . . . . . . . . . . . . . . . . . . . . . . . . . . . . . . . . . 99
Изменение параметров. . . . . . . . . . . . . . . . . . . . . . . . . . . . . . . . . . . . . . . . . . . . . . . . . 100
Изменение параметров принтера с компьютера (Windows). . . . . . . . . . . . . . . . . . . . . . . . . . . . . . . 101
Изменение параметров печати. . . . . . . . . . . . . . . . . . . . . . . . . . . . . . . . . . . . . . . . . . . . . . . . . . 102
Регистрация профиля часто используемой конфигурации печати. . . . . . . . . . . . . . . . . . . . . 104
Выбор используемого картриджа FINE. . . . . . . . . . . . . . . . . . . . . . . . . . . . . . . . . . . . . . . . . . . 106
Управление питанием Принтера. . . . . . . . . . . . . . . . . . . . . . . . . . . . . . . . . . . . . . . . . . . . . . . . 107
Изменение режима работы Принтера. . . . . . . . . . . . . . . . . . . . . . . . . . . . . . . . . . . . . . . . . . . . 109

Изменение параметров с помощью панели управления. . . . . . . . . . . . . . . . . . . . . . . . . . . . . . . . . 111
Инициализация параметров принтера. . . . . . . . . . . . . . . . . . . . . . . . . . . . . . . . . . . . . . . . . . . . 112
Включение/выключение функции беспроводного соединения. . . . . . . . . . . . . . . . . . . . . . . . 113
Технические характеристики. . . . . . . . . . . . . . . . . . . . . . . . . . . . . . . . . . . . . . . . . . . . . 114
Сведения о бумаге. . . . . . . . . . . . . . . . . . . . . . . . . . . . . . . . . . . . . . . . . . . . . 118
Поддерживаемые типы носителей. . . . . . . . . . . . . . . . . . . . . . . . . . . . . . . . . . . . . . . . 119
Предел загрузки бумаги. . . . . . . . . . . . . . . . . . . . . . . . . . . . . . . . . . . . . . . . . . . . . . . . . . . . . . . . . . . 121
Неподдерживаемые типы носителей. . . . . . . . . . . . . . . . . . . . . . . . . . . . . . . . . . . . . . 122
Обращение с бумагой. . . . . . . . . . . . . . . . . . . . . . . . . . . . . . . . . . . . . . . . . . . . . . . . . . 123
Печать. . . . . . . . . . . . . . . . . . . . . . . . . . . . . . . . . . . . . . . . . . . . . . . . . . . . . . . . 124
Печать с компьютера. . . . . . . . . . . . . . . . . . . . . . . . . . . . . . . . . . . . . . . . . . . . . . . . . . . 125
Печать с помощью прикладной программы (драйвер принтера Windows). . . . . . . . . . . . . . . . . . . 126
Настройка основной печати. . . . . . . . . . . . . . . . . . . . . . . . . . . . . . . . . . . . . . . . . . . . . . . . . . . . 127
Параметры бумаги в драйвере принтера. . . . . . . . . . . . . . . . . . . . . . . . . . . . . . . . . . . . . 130
Различные способы печати. . . . . . . . . . . . . . . . . . . . . . . . . . . . . . . . . . . . . . . . . . . . . . . . . . . . . 131
Настройка «Размер стр.» и «Ориентация». . . . . . . . . . . . . . . . . . . . . . . . . . . . . . . . . . . . . . 132
Настройка количества копий и порядка печати страниц. . . . . . . . . . . . . . . . . . . . . . . . . 134
Выполнение печати без полей. . . . . . . . . . . . . . . . . . . . . . . . . . . . . . . . . . . . . . . . . . . . . . 136
Печать с масштабированием. . . . . . . . . . . . . . . . . . . . . . . . . . . . . . . . . . . . . . . . . . . . . . . 139
Печать на развороте. . . . . . . . . . . . . . . . . . . . . . . . . . . . . . . . . . . . . . . . . . . . . . . . . . . . . . 142
Печать в виде плитки/постера. . . . . . . . . . . . . . . . . . . . . . . . . . . . . . . . . . . . . . . . . . . . . . 144
Двухсторонняя печать. . . . . . . . . . . . . . . . . . . . . . . . . . . . . . . . . . . . . . . . . . . . . . . . . . . . . 147
Печать на открытках. . . . . . . . . . . . . . . . . . . . . . . . . . . . . . . . . . . . . . . . . . . . . . . . . . . . . . 149
Общие сведения о драйвере принтера. . . . . . . . . . . . . . . . . . . . . . . . . . . . . . . . . . . . . . . . . . . 151
Драйвер принтера Canon IJ. . . . . . . . . . . . . . . . . . . . . . . . . . . . . . . . . . . . . . . . . . . . . . . . 152
Открытие экрана настройки драйвера принтера. . . . . . . . . . . . . . . . . . . . . . . . . . . 153
Монитор состояния Canon IJ. . . . . . . . . . . . . . . . . . . . . . . . . . . . . . . . . . . . . . . . . . . . . . . . 154
Проверка состояния чернил с компьютера. . . . . . . . . . . . . . . . . . . . . . . . . . . . . . . . 156
Инструкции по эксплуатации (Драйвер принтера). . . . . . . . . . . . . . . . . . . . . . . . . . . . . . 157
Описание драйвера принтера. . . . . . . . . . . . . . . . . . . . . . . . . . . . . . . . . . . . . . . . . . . . . . . . . . . 159
Описание вкладки «Быстрая установка». . . . . . . . . . . . . . . . . . . . . . . . . . . . . . . . . . . . . . 160
Описание вкладки «Главная». . . . . . . . . . . . . . . . . . . . . . . . . . . . . . . . . . . . . . . . . . . . . . . 167

Описание вкладки «Страница». . . . . . . . . . . . . . . . . . . . . . . . . . . . . . . . . . . . . . . . . . . . . . 173
Описание вкладки «Обслуживание». . . . . . . . . . . . . . . . . . . . . . . . . . . . . . . . . . . . . . . . . . 187
Описание функции «Монитор состояния Canon IJ». . . . . . . . . . . . . . . . . . . . . . . . . . . . . . 189
Установка драйвера принтера. . . . . . . . . . . . . . . . . . . . . . . . . . . . . . . . . . . . . . . . . . . . . . 192
Печать с помощью прикладной программы Canon. . . . . . . . . . . . . . . . . . . . . . . . . . . . . . . . . . . . . . 193
Руководство по Easy-PhotoPrint+. . . . . . . . . . . . . . . . . . . . . . . . . . . . . . . . . . . . . . . . . . . . . . . . . . .
Печать с помощью веб-службы. . . . . . . . . . . . . . . . . . . . . . . . . . . . . . . . . . . . . . . . . . . . . . . . . . . . . 195
Печать со смартфона или планшета. . . . . . . . . . . . . . . . . . . . . . . . . . . . . . . . . . . . . . 196
Печать с iPhone/iPad/iPod touch (iOS). . . . . . . . . . . . . . . . . . . . . . . . . . . . . . . . . . . . . . . . . . . . . . . . 197
Печать со смартфона или планшета (Android). . . . . . . . . . . . . . . . . . . . . . . . . . . . . . . . . . . . . . . . . 198
Печать в режиме беспроводного прямого подключения. . . . . . . . . . . . . . . . . . . . . . . . . . . . . . . . . 199
Параметры бумаги. . . . . . . . . . . . . . . . . . . . . . . . . . . . . . . . . . . . . . . . . . . . . . . . . . . . . 201
Создание копий с помощью смартфона или планшета (копирование с
помощью смартфона). . . . . . . . . . . . . . . . . . . . . . . . . . . . . . . . . . . . . . . . . . . 204
Изменение параметров с помощью веб-браузера. . . . . . . . . . . . . . . . . . . . . . . . . . . . 208
Часто задаваемые вопросы. . . . . . . . . . . . . . . . . . . . . . . . . . . . . . . . . . . . . . 210
Параметры сети и распространенные неполадки. . . . . . . . . . . . . . . . . . . . . . . . . . . . 212
Проблемы сетевого взаимодействия. . . . . . . . . . . . . . . . . . . . . . . . . . . . . . . . . . . . . . 214
Не удается обнаружить принтер в сети. . . . . . . . . . . . . . . . . . . . . . . . . . . . . . . . . . . . . . . . . . . . . . . 215
Не удается обнаружить принтер на экране Проверить параметры принтера во время
настройки (Windows). . . . . . . . . . . . . . . . . . . . . . . . . . . . . . . . . . . . . . . . . . . . . . . . . . . . . . . . . . 216
Не удается обнаружить принтер на экране Проверить параметры принтера во время
настройки беспроводной сети (Windows) — проверка состояния питания. . . . . . . . . . . 217
Не удается обнаружить принтер на экране Проверить параметры принтера во время
настройки беспроводной сети (Windows) — проверка подключения компьютера к сети. .
. . . . . . . . . . . . . . . . . . . . . . . . . . . . . . . . . . . . . . . . . . . . . . . . . . . . . . . . . . . . . . . . . . . . . . . . 218
Не удается обнаружить принтер на экране Проверить параметры принтера во время
настройки беспроводной сети (Windows) — проверка настроек беспроводной сети
принтера. . . . . . . . . . . . . . . . . . . . . . . . . . . . . . . . . . . . . . . . . . . . . . . . . . . . . . . . . . . . . . . . 219
Не удается обнаружить принтер на экране Проверить параметры принтера во время
настройки беспроводной сети (Windows) — проверка среды беспроводной сети. . . . . 220
Не удается обнаружить принтер на экране Проверить параметры принтера во время
настройки беспроводной сети (Windows) — проверка IP-адреса принтера. . . . . . . . . . 222
Не удается обнаружить принтер на экране Проверить параметры принтера во время
настройки беспроводной сети (Windows) — проверка параметров защитного
программного обеспечения. . . . . . . . . . . . . . . . . . . . . . . . . . . . . . . . . . . . . . . . . . . . . . . . . 223
5

Не удается обнаружить принтер на экране Проверить параметры принтера во время
настройки беспроводной сети (Windows) — проверка параметров маршрутизатора
беспроводной сети. . . . . . . . . . . . . . . . . . . . . . . . . . . . . . . . . . . . . . . . . . . . . . . . . . . . . . . 225
Невозможно продолжить работу после появления экрана Подключение принтера. . . . . . . 226
Не удается найти Принтер при использовании беспроводной локальной сети. . . . . . . . . . . 228
Не удается обнаружить принтер после поиска на экране Обнаружение принтера во время
настройки. . . . . . . . . . . . . . . . . . . . . . . . . . . . . . . . . . . . . . . . . . . . . . . . . . . . . . . . . . . . . . . . . . . 231
Поиск принтера по IP-адресу или имени узла во время настройки. . . . . . . . . . . . . . . . . . . . . 232
Проблемы сетевого подключения. . . . . . . . . . . . . . . . . . . . . . . . . . . . . . . . . . . . . . . . . . . . . . . . . . . 235
Принтер внезапно прекратил работу по неизвестной причине. . . . . . . . . . . . . . . . . . . . . . . . 236
Неизвестный ключ сети. . . . . . . . . . . . . . . . . . . . . . . . . . . . . . . . . . . . . . . . . . . . . . . . . . . . . . . . 242
Не удается использовать принтер после замены маршрутизатора беспроводной сети или
изменения его параметров. . . . . . . . . . . . . . . . . . . . . . . . . . . . . . . . . . . . . . . . . . . . . . . . . . . . . 245
Неизвестный пароль администратора, установленный на Принтере. . . . . . . . . . . . . . . . . . . 247
Низкая скорость печати. . . . . . . . . . . . . . . . . . . . . . . . . . . . . . . . . . . . . . . . . . . . . . . . . . . . . . . . 248
Не удается получить доступ к Интернету по беспроводной сети с помощью устройства связи.
. . . . . . . . . . . . . . . . . . . . . . . . . . . . . . . . . . . . . . . . . . . . . . . . . . . . . . . . . . . . . . . . . . . . . . . . . . . . 249
Уровень чернил не отображается на мониторе состояния принтера (Windows). . . . . . . . . . 250
Не удается выполнить печать или подключиться. . . . . . . . . . . . . . . . . . . . . . . . . . . . . . . . . . . 251
Другие проблемы с сетью. . . . . . . . . . . . . . . . . . . . . . . . . . . . . . . . . . . . . . . . . . . . . . . . . . . . . . . . . . 252
Проверка сведений о сети. . . . . . . . . . . . . . . . . . . . . . . . . . . . . . . . . . . . . . . . . . . . . . . . . . . . . 253
Восстановление заводских настроек по умолчанию. . . . . . . . . . . . . . . . . . . . . . . . . . . . . . . . 256
Во время настройки на компьютере отображается сообщение. . . . . . . . . . . . . . . . . . . . . . . 257
Подключение принтера к маршрутизатору беспроводной сети с помощью простого
беспроводного подключения. . . . . . . . . . . . . . . . . . . . . . . . . . . . . . . . . . . . . . . . . . . . . . . . . . . 259
Не удается подключить смартфон или планшет к маршрутизатору беспроводной сети. . . 260
Загрузка Canon PRINT Inkjet/SELPHY. . . . . . . . . . . . . . . . . . . . . . . . . . . . . . . . . . . . . . . . . . . . 261
Проверка SSID и ключа маршрутизатора беспроводной сети. . . . . . . . . . . . . . . . . . . . . . . . . 262
Проверка SSID маршрутизатора беспроводной сети для смартфона или планшета. . . . . . 263
Функция ограничения видимости, разделения SSID или разделения сетей. . . . . . . . . . . . . 264
Настройка с помощью смартфона или планшета. . . . . . . . . . . . . . . . . . . . . . . . . . . . . . . . . . . 265
При настройке беспроводной сети произошла ошибка. . . . . . . . . . . . . . . . . . . . . . . . . . . . . . 266
Проверка кода состояния. . . . . . . . . . . . . . . . . . . . . . . . . . . . . . . . . . . . . . . . . . . . . . . . . . . . . . 268
Проблемы при печати со смартфона или планшета. . . . . . . . . . . . . . . . . . . . . . . . . . 269
Не удается выполнить печать со смартфона или планшета. . . . . . . . . . . . . . . . . . . . . . . . . . . . . . 270
Не удается найти принтер со смартфона или с планшета при использовании Bluetooth. . . . . . . 274
Проблемы с печатью. . . . . . . . . . . . . . . . . . . . . . . . . . . . . . . . . . . . . . . . . . . . . . . . . . . 277

Печать не начинается. . . . . . . . . . . . . . . . . . . . . . . . . . . . . . . . . . . . . . . . . . . . . . . . . . . . . . . . . . . . . 278
Чернила не поступают. . . . . . . . . . . . . . . . . . . . . . . . . . . . . . . . . . . . . . . . . . . . . . . . . . . . . . . . . . . . . 280
Бумага подается неправильно, или появилось сообщение об отсутствии бумаги. . . . . . . . . . . . 282
Неудовлетворительные результаты печати. . . . . . . . . . . . . . . . . . . . . . . . . . . . . . . . . . . . . . . . . . . 284
Пустая бумага/Нечеткая печать/Неверные цвета/Белые полосы. . . . . . . . . . . . . . . . . . . . . . 286
Неверные цвета. . . . . . . . . . . . . . . . . . . . . . . . . . . . . . . . . . . . . . . . . . . . . . . . . . . . . . . . . . . . . . 289
Линии не выровнены. . . . . . . . . . . . . . . . . . . . . . . . . . . . . . . . . . . . . . . . . . . . . . . . . . . . . . . . . . 291
Бумага испачкана / Отпечатанная поверхность поцарапана. . . . . . . . . . . . . . . . . . . . . . . . . . 292
Не удается выполнить печать. . . . . . . . . . . . . . . . . . . . . . . . . . . . . . . . . . . . . . . . . . . . . . . . . . . 296
Неполные или отсутствующие линии (Windows). . . . . . . . . . . . . . . . . . . . . . . . . . . . . . . . . . . . 297
Неполные или отсутствующие изображения (Windows). . . . . . . . . . . . . . . . . . . . . . . . . . . . . . 298
Чернильные пятна / Сворачивание бумаги. . . . . . . . . . . . . . . . . . . . . . . . . . . . . . . . . . . . . . . . 299
Обратная сторона бумаги испачкана. . . . . . . . . . . . . . . . . . . . . . . . . . . . . . . . . . . . . . . . . . . . . 300
Цвета передаются неравномерно. . . . . . . . . . . . . . . . . . . . . . . . . . . . . . . . . . . . . . . . . . . . . . . 301
Остановка печати. . . . . . . . . . . . . . . . . . . . . . . . . . . . . . . . . . . . . . . . . . . . . . . . . . . . . . . . . . . . . . . . . 303
Не удается выполнить печать с помощью AirPrint. . . . . . . . . . . . . . . . . . . . . . . . . . . . . . . . . . . . . . 304
Механические неисправности. . . . . . . . . . . . . . . . . . . . . . . . . . . . . . . . . . . . . . . . . . . . 305
Принтер не включается. . . . . . . . . . . . . . . . . . . . . . . . . . . . . . . . . . . . . . . . . . . . . . . . . . . . . . . . . . . . 306
Питание выключается автоматически. . . . . . . . . . . . . . . . . . . . . . . . . . . . . . . . . . . . . . . . . . . . . . . . 307
Проблемы подключения USB. . . . . . . . . . . . . . . . . . . . . . . . . . . . . . . . . . . . . . . . . . . . . . . . . . . . . . . 308
Не удается подключиться к принтеру по USB. . . . . . . . . . . . . . . . . . . . . . . . . . . . . . . . . . . . . . . . . . 309
Проблемы при установке и загрузке. . . . . . . . . . . . . . . . . . . . . . . . . . . . . . . . . . . . . . . 310
Невозможно установить драйвер принтера (Windows). . . . . . . . . . . . . . . . . . . . . . . . . . . . . . . . . . . 311
Ошибки и сообщения. . . . . . . . . . . . . . . . . . . . . . . . . . . . . . . . . . . . . . . . . . . . . . . . . . . 313
Произошла ошибка. . . . . . . . . . . . . . . . . . . . . . . . . . . . . . . . . . . . . . . . . . . . . . . . . . . . . . . . . . . . . . . 314
Отображается сообщение (код поддержки). . . . . . . . . . . . . . . . . . . . . . . . . . . . . . . . . . . . . . . . . . . . 318
Список кодов поддержки для ошибок. . . . . . . . . . . . . . . . . . . . . . . . . . . . . . 325
Список кодов поддержки для ошибок (замятия бумаги). . . . . . . . . . . . . . . . . . . . . . . 327
1300. . . . . . . . . . . . . . . . . . . . . . . . . . . . . . . . . . . . . . . . . . . . . . . . . . . . . . . . . . . . . . . . . . . . . . . . . . . . 328
Бумага замялась внутри принтера. . . . . . . . . . . . . . . . . . . . . . . . . . . . . . . . . . . . . . . . . . . . . . . . . . . 330
1000. . . . . . . . . . . . . . . . . . . . . . . . . . . . . . . . . . . . . . . . . . . . . . . . . . . . . . . . . . . . . . . . . 333
1200. . . . . . . . . . . . . . . . . . . . . . . . . . . . . . . . . . . . . . . . . . . . . . . . . . . . . . . . . . . . . . . . . 334
1203. . . . . . . . . . . . . . . . . . . . . . . . . . . . . . . . . . . . . . . . . . . . . . . . . . . . . . . . . . . . . . . . . 335
1401. . . . . . . . . . . . . . . . . . . . . . . . . . . . . . . . . . . . . . . . . . . . . . . . . . . . . . . . . . . . . . . . . 336

1430. . . . . . . . . . . . . . . . . . . . . . . . . . . . . . . . . . . . . . . . . . . . . . . . . . . . . . . . . . . . . . . . . 337
1485. . . . . . . . . . . . . . . . . . . . . . . . . . . . . . . . . . . . . . . . . . . . . . . . . . . . . . . . . . . . . . . . . 338
1682. . . . . . . . . . . . . . . . . . . . . . . . . . . . . . . . . . . . . . . . . . . . . . . . . . . . . . . . . . . . . . . . . 339
1686. . . . . . . . . . . . . . . . . . . . . . . . . . . . . . . . . . . . . . . . . . . . . . . . . . . . . . . . . . . . . . . . . 340
1688. . . . . . . . . . . . . . . . . . . . . . . . . . . . . . . . . . . . . . . . . . . . . . . . . . . . . . . . . . . . . . . . . 341
168A. . . . . . . . . . . . . . . . . . . . . . . . . . . . . . . . . . . . . . . . . . . . . . . . . . . . . . . . . . . . . . . . . 342
1700. . . . . . . . . . . . . . . . . . . . . . . . . . . . . . . . . . . . . . . . . . . . . . . . . . . . . . . . . . . . . . . . . 343
1890. . . . . . . . . . . . . . . . . . . . . . . . . . . . . . . . . . . . . . . . . . . . . . . . . . . . . . . . . . . . . . . . . 344
4102. . . . . . . . . . . . . . . . . . . . . . . . . . . . . . . . . . . . . . . . . . . . . . . . . . . . . . . . . . . . . . . . . 345
4103. . . . . . . . . . . . . . . . . . . . . . . . . . . . . . . . . . . . . . . . . . . . . . . . . . . . . . . . . . . . . . . . . 346
5100. . . . . . . . . . . . . . . . . . . . . . . . . . . . . . . . . . . . . . . . . . . . . . . . . . . . . . . . . . . . . . . . . 347
5200. . . . . . . . . . . . . . . . . . . . . . . . . . . . . . . . . . . . . . . . . . . . . . . . . . . . . . . . . . . . . . . . . 348
5B00. . . . . . . . . . . . . . . . . . . . . . . . . . . . . . . . . . . . . . . . . . . . . . . . . . . . . . . . . . . . . . . . . 349
6000. . . . . . . . . . . . . . . . . . . . . . . . . . . . . . . . . . . . . . . . . . . . . . . . . . . . . . . . . . . . . . . . . 350

Использование документа Онлайн-руководство
Условия эксплуатации
Обозначения, используемые в настоящем документе
Пользователи устройства с активированными сенсорными функциями
(Windows)
Печать онлайн-руководства
Товарные знаки и лицензии
Снимки экранов в данном руководстве
9

Обозначения, используемые в настоящем документе
Предупреждение!
Несоблюдение этих указаний может привести к тяжелым травмам, вплоть до смертельного
исхода, вследствие неправильной эксплуатации оборудования. Обязательно следуйте этим
указаниям в целях безопасной эксплуатации.
Осторожно!
Несоблюдение этих указаний может привести к травмам или материальному ущербу вследствие
неправильной эксплуатации оборудования. Обязательно следуйте этим указаниям в целях
безопасной эксплуатации.
Внимание!
Инструкции, содержащие важные сведения. Во избежание причинения повреждений и нанесения
травмы или ненадлежащего использования изделия обязательно прочтите эти указания.
Примечание.
Инструкции, в том числе примечания о работе устройства и дополнительные пояснения.
Основные сведения
Инструкции, разъясняющие основные операции с продуктом.
Примечание.
• Значки могут быть другими — это зависит от модели продукта.
10

Пользователи устройства с активированными сенсорными
функциями (Windows)
Для касаний необходимо заменить действие «щелчок правой кнопкой мыши» в этом документе на
действие, установленное в операционной системе. Например, если в операционной системе
установлено действие «нажатие и удерживание», замените «щелчок правой кнопкой мыши» на
«нажатие и удерживание».
11

Товарные знаки и лицензии
• Microsoft является охраняемым товарным знаком Microsoft Corporation.
• Windows является товарным знаком или зарегистрированным товарным знаком Microsoft
Corporation в США и других странах.
• Windows Vista является товарным знаком или зарегистрированным товарным знаком Microsoft
Corporation в США и других странах.
• Internet Explorer является товарным знаком или зарегистрированным товарным знаком Microsoft
Corporation в США и других странах.
• Mac, Mac OS, AirPort, App Store, AirPrint, логотип AirPrint, Safari, Bonjour, iPad, iPhone и iPod touch
являются товарными знаками компании Apple Inc., зарегистрированными в США и других
странах. macOS является товарным знаком компании Apple Inc.
• IOS является товарным знаком или зарегистрированным товарным знаком компании Cisco в
США, других странах и используется по лицензии.
• Google Cloud Print, Google Chrome, Chrome OS, Chromebook, Android, Google Play, Google Drive,
Google Apps и Google Analytics являются зарегистрированными товарными знаками или
товарными знаками компании Google Inc.
• Adobe, Flash, Photoshop, Photoshop Elements, Lightroom, Adobe RGB и Adobe RGB (1998)
являются зарегистрированными товарными знаками или товарными знаками компании Adobe
Systems Incorporated в США и/или других странах.
• Bluetooth является товарным знаком корпорации Bluetooth SIG, Inc. в США, предоставленным по
лицензии корпорации Canon Inc.
• Autodesk и AutoCAD являются зарегистрированными товарными знаками или товарными знаками
компании Autodesk, Inc. и/или ее дочерних компаний и/или филиалов в США и/или других
странах.
Примечание.
• Официальное название Windows Vista — операционная система Microsoft Windows Vista.
Copyright (c) 2003-2015 Apple Inc. All rights reserved.
Redistribution and use in source and binary forms, with or without modification, are permitted provided
that the following conditions are met:
1. Redistributions of source code must retain the above copyright notice, this list of conditions and the
following disclaimer.
2. Redistributions in binary form must reproduce the above copyright notice, this list of conditions and
the following disclaimer in the documentation and/or other materials provided with the distribution.
3. Neither the name of Apple Inc. («Apple») nor the names of its contributors may be used to endorse or
promote products derived from this software without specific prior written permission.
THIS SOFTWARE IS PROVIDED BY APPLE AND ITS CONTRIBUTORS «AS IS» AND ANY EXPRESS
OR IMPLIED WARRANTIES, INCLUDING, BUT NOT LIMITED TO, THE IMPLIED WARRANTIES OF
MERCHANTABILITY AND FITNESS FOR A PARTICULAR PURPOSE ARE DISCLAIMED. IN NO
EVENT SHALL APPLE OR ITS CONTRIBUTORS BE LIABLE FOR ANY DIRECT, INDIRECT,
INCIDENTAL, SPECIAL, EXEMPLARY, OR CONSEQUENTIAL DAMAGES (INCLUDING, BUT NOT
LIMITED TO, PROCUREMENT OF SUBSTITUTE GOODS OR SERVICES; LOSS OF USE, DATA, OR
PROFITS; OR BUSINESS INTERRUPTION) HOWEVER CAUSED AND ON ANY THEORY OF
LIABILITY, WHETHER IN CONTRACT, STRICT LIABILITY, OR TORT (INCLUDING NEGLIGENCE OR
12

OTHERWISE) ARISING IN ANY WAY OUT OF THE USE OF THIS SOFTWARE, EVEN IF ADVISED OF
THE POSSIBILITY OF SUCH DAMAGE.
Apache License
Version 2.0, January 2004
http://www.apache.org/licenses/
TERMS AND CONDITIONS FOR USE, REPRODUCTION, AND DISTRIBUTION
1. Definitions.
«License» shall mean the terms and conditions for use, reproduction, and distribution as defined by
Sections 1 through 9 of this document.
«Licensor» shall mean the copyright owner or entity authorized by the copyright owner that is granting
the License.
«Legal Entity» shall mean the union of the acting entity and all other entities that control, are controlled
by, or are under common control with that entity. For the purposes of this definition, «control» means
(i) the power, direct or indirect, to cause the direction or management of such entity, whether by
contract or otherwise, or (ii) ownership of fifty percent (50%) or more of the outstanding shares, or (iii)
beneficial ownership of such entity.
«You» (or «Your») shall mean an individual or Legal Entity exercising permissions granted by this
License.
«Source» form shall mean the preferred form for making modifications, including but not limited to
software source code, documentation source, and configuration files.
«Object» form shall mean any form resulting from mechanical transformation or translation of a Source
form, including but not limited to compiled object code, generated documentation, and conversions to
other media types.
«Work» shall mean the work of authorship, whether in Source or Object form, made available under
the License, as indicated by a copyright notice that is included in or attached to the work (an example
is provided in the Appendix below).
«Derivative Works» shall mean any work, whether in Source or Object form, that is based on (or
derived from) the Work and for which the editorial revisions, annotations, elaborations, or other
modifications represent, as a whole, an original work of authorship. For the purposes of this License,
Derivative Works shall not include works that remain separable from, or merely link (or bind by name)
to the interfaces of, the Work and Derivative Works thereof.
«Contribution» shall mean any work of authorship, including the original version of the Work and any
modifications or additions to that Work or Derivative Works thereof, that is intentionally submitted to
Licensor for inclusion in the Work by the copyright owner or by an individual or Legal Entity
authorized to submit on behalf of the copyright owner. For the purposes of this definition, «submitted»
means any form of electronic, verbal, or written communication sent to the Licensor or its
representatives, including but not limited to communication on electronic mailing lists, source code
control systems, and issue tracking systems that are managed by, or on behalf of, the Licensor for
the purpose of discussing and improving the Work, but excluding communication that is
conspicuously marked or otherwise designated in writing by the copyright owner as «Not a
Contribution.»
13

«Contributor» shall mean Licensor and any individual or Legal Entity on behalf of whom a Contribution
has been received by Licensor and subsequently incorporated within the Work.
2. Grant of Copyright License. Subject to the terms and conditions of this License, each Contributor
hereby grants to You a perpetual, worldwide, non-exclusive, no-charge, royalty-free, irrevocable
copyright license to reproduce, prepare Derivative Works of, publicly display, publicly perform,
sublicense, and distribute the Work and such Derivative Works in Source or Object form.
3. Grant of Patent License. Subject to the terms and conditions of this License, each Contributor hereby
grants to You a perpetual, worldwide, non-exclusive, no-charge, royalty-free, irrevocable (except as
stated in this section) patent license to make, have made, use, offer to sell, sell, import, and
otherwise transfer the Work, where such license applies only to those patent claims licensable by
such Contributor that are necessarily infringed by their Contribution(s) alone or by combination of
their Contribution(s) with the Work to which such Contribution(s) was submitted. If You institute patent
litigation against any entity (including a cross-claim or counterclaim in a lawsuit) alleging that the
Work or a Contribution incorporated within the Work constitutes direct or contributory patent
infringement, then any patent licenses granted to You under this License for that Work shall terminate
as of the date such litigation is filed.
4. Redistribution. You may reproduce and distribute copies of the Work or Derivative Works thereof in
any medium, with or without modifications, and in Source or Object form, provided that You meet the
following conditions:
1. You must give any other recipients of the Work or Derivative Works a copy of this License; and
2. You must cause any modified files to carry prominent notices stating that You changed the files;
and
3. You must retain, in the Source form of any Derivative Works that You distribute, all copyright,
patent, trademark, and attribution notices from the Source form of the Work, excluding those
notices that do not pertain to any part of the Derivative Works; and
4. If the Work includes a «NOTICE» text file as part of its distribution, then any Derivative Works that
You distribute must include a readable copy of the attribution notices contained within such
NOTICE file, excluding those notices that do not pertain to any part of the Derivative Works, in at
least one of the following places: within a NOTICE text file distributed as part of the Derivative
Works; within the Source form or documentation, if provided along with the Derivative Works; or,
within a display generated by the Derivative Works, if and wherever such third-party notices
normally appear. The contents of the NOTICE file are for informational purposes only and do not
modify the License. You may add Your own attribution notices within Derivative Works that You
distribute, alongside or as an addendum to the NOTICE text from the Work, provided that such
additional attribution notices cannot be construed as modifying the License.
You may add Your own copyright statement to Your modifications and may provide additional or
different license terms and conditions for use, reproduction, or distribution of Your modifications,
or for any such Derivative Works as a whole, provided Your use, reproduction, and distribution of
the Work otherwise complies with the conditions stated in this License.
5. Submission of Contributions. Unless You explicitly state otherwise, any Contribution intentionally
submitted for inclusion in the Work by You to the Licensor shall be under the terms and conditions of
this License, without any additional terms or conditions. Notwithstanding the above, nothing herein
shall supersede or modify the terms of any separate license agreement you may have executed with
Licensor regarding such Contributions.
14

6. Trademarks. This License does not grant permission to use the trade names, trademarks, service
marks, or product names of the Licensor, except as required for reasonable and customary use in
describing the origin of the Work and reproducing the content of the NOTICE file.
7. Disclaimer of Warranty. Unless required by applicable law or agreed to in writing, Licensor provides
the Work (and each Contributor provides its Contributions) on an «AS IS» BASIS, WITHOUT
WARRANTIES OR CONDITIONS OF ANY KIND, either express or implied, including, without
limitation, any warranties or conditions of TITLE, NON-INFRINGEMENT, MERCHANTABILITY, or
FITNESS FOR A PARTICULAR PURPOSE. You are solely responsible for determining the
appropriateness of using or redistributing the Work and assume any risks associated with Your
exercise of permissions under this License.
8. Limitation of Liability. In no event and under no legal theory, whether in tort (including negligence),
contract, or otherwise, unless required by applicable law (such as deliberate and grossly negligent
acts) or agreed to in writing, shall any Contributor be liable to You for damages, including any direct,
indirect, special, incidental, or consequential damages of any character arising as a result of this
License or out of the use or inability to use the Work (including but not limited to damages for loss of
goodwill, work stoppage, computer failure or malfunction, or any and all other commercial damages
or losses), even if such Contributor has been advised of the possibility of such damages.
9. Accepting Warranty or Additional Liability. While redistributing the Work or Derivative Works thereof,
You may choose to offer, and charge a fee for, acceptance of support, warranty, indemnity, or other
liability obligations and/or rights consistent with this License. However, in accepting such obligations,
You may act only on Your own behalf and on Your sole responsibility, not on behalf of any other
Contributor, and only if You agree to indemnify, defend, and hold each Contributor harmless for any
liability incurred by, or claims asserted against, such Contributor by reason of your accepting any
such warranty or additional liability.
END OF TERMS AND CONDITIONS
—- Part 1: CMU/UCD copyright notice: (BSD like) ——
Copyright 1989, 1991, 1992 by Carnegie Mellon University
Derivative Work — 1996, 1998-2000
Copyright 1996, 1998-2000 The Regents of the University of California
All Rights Reserved
Permission to use, copy, modify and distribute this software and its documentation for any purpose and
without fee is hereby granted, provided that the above copyright notice appears in all copies and that both
that copyright notice and this permission notice appear in supporting documentation, and that the name of
CMU and The Regents of the University of California not be used in advertising or publicity pertaining to
distribution of the software without specific written permission.
CMU AND THE REGENTS OF THE UNIVERSITY OF CALIFORNIA DISCLAIM ALL WARRANTIES
WITH REGARD TO THIS SOFTWARE, INCLUDING ALL IMPLIED WARRANTIES OF
MERCHANTABILITY AND FITNESS. IN NO EVENT SHALL CMU OR THE REGENTS OF THE
UNIVERSITY OF CALIFORNIA BE LIABLE FOR ANY SPECIAL, INDIRECT OR CONSEQUENTIAL
DAMAGES OR ANY DAMAGES WHATSOEVER RESULTING FROM THE LOSS OF USE, DATA OR
PROFITS, WHETHER IN AN ACTION OF CONTRACT, NEGLIGENCE OR OTHER TORTIOUS ACTION,
ARISING OUT OF OR IN CONNECTION WITH THE USE OR PERFORMANCE OF THIS SOFTWARE.
15

—- Part 2: Networks Associates Technology, Inc copyright notice (BSD) ——
Copyright (c) 2001-2003, Networks Associates Technology, Inc
All rights reserved.
Redistribution and use in source and binary forms, with or without modification, are permitted provided
that the following conditions are met:
* Redistributions of source code must retain the above copyright notice, this list of conditions and the
following disclaimer.
* Redistributions in binary form must reproduce the above copyright notice, this list of conditions and the
following disclaimer in the documentation and/or other materials provided with the distribution.
* Neither the name of the Networks Associates Technology, Inc nor the names of its contributors may be
used to endorse or promote products derived from this software without specific prior written permission.
THIS SOFTWARE IS PROVIDED BY THE COPYRIGHT HOLDERS AND CONTRIBUTORS «AS IS»
AND ANY EXPRESS OR IMPLIED WARRANTIES, INCLUDING, BUT NOT LIMITED TO, THE IMPLIED
WARRANTIES OF MERCHANTABILITY AND FITNESS FOR A PARTICULAR PURPOSE ARE
DISCLAIMED. IN NO EVENT SHALL THE COPYRIGHT HOLDERS OR CONTRIBUTORS BE LIABLE
FOR ANY DIRECT, INDIRECT, INCIDENTAL, SPECIAL, EXEMPLARY, OR CONSEQUENTIAL
DAMAGES (INCLUDING, BUT NOT LIMITED TO, PROCUREMENT OF SUBSTITUTE GOODS OR
SERVICES; LOSS OF USE, DATA, OR PROFITS; OR BUSINESS INTERRUPTION) HOWEVER
CAUSED AND ON ANY THEORY OF LIABILITY, WHETHER IN CONTRACT, STRICT LIABILITY, OR
TORT (INCLUDING NEGLIGENCE OR OTHERWISE) ARISING IN ANY WAY OUT OF THE USE OF
THIS SOFTWARE, EVEN IF ADVISED OF THE POSSIBILITY OF SUCH DAMAGE.
—- Part 3: Cambridge Broadband Ltd. copyright notice (BSD) ——
Portions of this code are copyright (c) 2001-2003, Cambridge Broadband Ltd.
All rights reserved.
Redistribution and use in source and binary forms, with or without modification, are permitted provided
that the following conditions are met:
* Redistributions of source code must retain the above copyright notice, this list of conditions and the
following disclaimer.
* Redistributions in binary form must reproduce the above copyright notice, this list of conditions and the
following disclaimer in the documentation and/or other materials provided with the distribution.
* The name of Cambridge Broadband Ltd. may not be used to endorse or promote products derived from
this software without specific prior written permission.
THIS SOFTWARE IS PROVIDED BY THE COPYRIGHT HOLDER «AS IS» AND ANY EXPRESS OR
IMPLIED WARRANTIES, INCLUDING, BUT NOT LIMITED TO, THE IMPLIED WARRANTIES OF
MERCHANTABILITY AND FITNESS FOR A PARTICULAR PURPOSE ARE DISCLAIMED. IN NO
EVENT SHALL THE COPYRIGHT HOLDER BE LIABLE FOR ANY DIRECT, INDIRECT, INCIDENTAL,
SPECIAL, EXEMPLARY, OR CONSEQUENTIAL DAMAGES (INCLUDING, BUT NOT LIMITED TO,
PROCUREMENT OF SUBSTITUTE GOODS OR SERVICES; LOSS OF USE, DATA, OR PROFITS; OR
BUSINESS INTERRUPTION) HOWEVER CAUSED AND ON ANY THEORY OF LIABILITY, WHETHER
IN CONTRACT, STRICT LIABILITY, OR TORT (INCLUDING NEGLIGENCE OR OTHERWISE) ARISING
IN ANY WAY OUT OF THE USE OF THIS SOFTWARE, EVEN IF ADVISED OF THE POSSIBILITY OF
SUCH DAMAGE.
16

—- Part 4: Sun Microsystems, Inc. copyright notice (BSD) ——
Copyright c 2003 Sun Microsystems, Inc., 4150 Network Circle, Santa Clara, California 95054, U.S.A. All
rights reserved.
Use is subject to license terms below.
This distribution may include materials developed by third parties.
Sun, Sun Microsystems, the Sun logo and Solaris are trademarks or registered trademarks of Sun
Microsystems, Inc. in the U.S. and other countries.
Redistribution and use in source and binary forms, with or without modification, are permitted provided
that the following conditions are met:
* Redistributions of source code must retain the above copyright notice, this list of conditions and the
following disclaimer.
* Redistributions in binary form must reproduce the above copyright notice, this list of conditions and the
following disclaimer in the documentation and/or other materials provided with the distribution.
* Neither the name of the Sun Microsystems, Inc. nor the names of its contributors may be used to
endorse or promote products derived from this software without specific prior written permission.
THIS SOFTWARE IS PROVIDED BY THE COPYRIGHT HOLDERS AND CONTRIBUTORS «AS IS»
AND ANY EXPRESS OR IMPLIED WARRANTIES, INCLUDING, BUT NOT LIMITED TO, THE IMPLIED
WARRANTIES OF MERCHANTABILITY AND FITNESS FOR A PARTICULAR PURPOSE ARE
DISCLAIMED. IN NO EVENT SHALL THE COPYRIGHT HOLDERS OR CONTRIBUTORS BE LIABLE
FOR ANY DIRECT, INDIRECT, INCIDENTAL, SPECIAL, EXEMPLARY, OR CONSEQUENTIAL
DAMAGES (INCLUDING, BUT NOT LIMITED TO, PROCUREMENT OF SUBSTITUTE GOODS OR
SERVICES; LOSS OF USE, DATA, OR PROFITS; OR BUSINESS INTERRUPTION) HOWEVER
CAUSED AND ON ANY THEORY OF LIABILITY, WHETHER IN CONTRACT, STRICT LIABILITY, OR
TORT (INCLUDING NEGLIGENCE OR OTHERWISE) ARISING IN ANY WAY OUT OF THE USE OF
THIS SOFTWARE, EVEN IF ADVISED OF THE POSSIBILITY OF SUCH DAMAGE.
—- Part 5: Sparta, Inc copyright notice (BSD) ——
Copyright (c) 2003-2012, Sparta, Inc
All rights reserved.
Redistribution and use in source and binary forms, with or without modification, are permitted provided
that the following conditions are met:
* Redistributions of source code must retain the above copyright notice, this list of conditions and the
following disclaimer.
* Redistributions in binary form must reproduce the above copyright notice, this list of conditions and the
following disclaimer in the documentation and/or other materials provided with the distribution.
* Neither the name of Sparta, Inc nor the names of its contributors may be used to endorse or promote
products derived from this software without specific prior written permission.
THIS SOFTWARE IS PROVIDED BY THE COPYRIGHT HOLDERS AND CONTRIBUTORS «AS IS»
AND ANY EXPRESS OR IMPLIED WARRANTIES, INCLUDING, BUT NOT LIMITED TO, THE IMPLIED
WARRANTIES OF MERCHANTABILITY AND FITNESS FOR A PARTICULAR PURPOSE ARE
DISCLAIMED. IN NO EVENT SHALL THE COPYRIGHT HOLDERS OR CONTRIBUTORS BE LIABLE
FOR ANY DIRECT, INDIRECT, INCIDENTAL, SPECIAL, EXEMPLARY, OR CONSEQUENTIAL
DAMAGES (INCLUDING, BUT NOT LIMITED TO, PROCUREMENT OF SUBSTITUTE GOODS OR
17

SERVICES; LOSS OF USE, DATA, OR PROFITS; OR BUSINESS INTERRUPTION) HOWEVER
CAUSED AND ON ANY THEORY OF LIABILITY, WHETHER IN CONTRACT, STRICT LIABILITY, OR
TORT (INCLUDING NEGLIGENCE OR OTHERWISE) ARISING IN ANY WAY OUT OF THE USE OF
THIS SOFTWARE, EVEN IF ADVISED OF THE POSSIBILITY OF SUCH DAMAGE.
—- Part 6: Cisco/BUPTNIC copyright notice (BSD) ——
Copyright (c) 2004, Cisco, Inc and Information Network Center of Beijing University of Posts and
Telecommunications.
All rights reserved.
Redistribution and use in source and binary forms, with or without modification, are permitted provided
that the following conditions are met:
* Redistributions of source code must retain the above copyright notice, this list of conditions and the
following disclaimer.
* Redistributions in binary form must reproduce the above copyright notice, this list of conditions and the
following disclaimer in the documentation and/or other materials provided with the distribution.
* Neither the name of Cisco, Inc, Beijing University of Posts and Telecommunications, nor the names of
their contributors may be used to endorse or promote products derived from this software without specific
prior written permission.
THIS SOFTWARE IS PROVIDED BY THE COPYRIGHT HOLDERS AND CONTRIBUTORS «AS IS»
AND ANY EXPRESS OR IMPLIED WARRANTIES, INCLUDING, BUT NOT LIMITED TO, THE IMPLIED
WARRANTIES OF MERCHANTABILITY AND FITNESS FOR A PARTICULAR PURPOSE ARE
DISCLAIMED. IN NO EVENT SHALL THE COPYRIGHT HOLDERS OR CONTRIBUTORS BE LIABLE
FOR ANY DIRECT, INDIRECT, INCIDENTAL, SPECIAL, EXEMPLARY, OR CONSEQUENTIAL
DAMAGES (INCLUDING, BUT NOT LIMITED TO, PROCUREMENT OF SUBSTITUTE GOODS OR
SERVICES; LOSS OF USE, DATA, OR PROFITS; OR BUSINESS INTERRUPTION) HOWEVER
CAUSED AND ON ANY THEORY OF LIABILITY, WHETHER IN CONTRACT, STRICT LIABILITY, OR
TORT (INCLUDING NEGLIGENCE OR OTHERWISE) ARISING IN ANY WAY OUT OF THE USE OF
THIS SOFTWARE, EVEN IF ADVISED OF THE POSSIBILITY OF SUCH DAMAGE.
—- Part 7: Fabasoft R&D Software GmbH & Co KG copyright notice (BSD) ——
Copyright (c) Fabasoft R&D Software GmbH & Co KG, 2003 [email protected]
Redistribution and use in source and binary forms, with or without modification, are permitted provided
that the following conditions are met:
* Redistributions of source code must retain the above copyright notice, this list of conditions and the
following disclaimer.
* Redistributions in binary form must reproduce the above copyright notice, this list of conditions and the
following disclaimer in the documentation and/or other materials provided with the distribution.
* The name of Fabasoft R&D Software GmbH & Co KG or any of its subsidiaries, brand or product names
may not be used to endorse or promote products derived from this software without specific prior written
permission.
THIS SOFTWARE IS PROVIDED BY THE COPYRIGHT HOLDER «AS IS» AND ANY EXPRESS OR
IMPLIED WARRANTIES, INCLUDING, BUT NOT LIMITED TO, THE IMPLIED WARRANTIES OF
18

MERCHANTABILITY AND FITNESS FOR A PARTICULAR PURPOSE ARE DISCLAIMED. IN NO
EVENT SHALL THE COPYRIGHT HOLDER BE LIABLE FOR ANY DIRECT, INDIRECT, INCIDENTAL,
SPECIAL, EXEMPLARY, OR CONSEQUENTIAL DAMAGES (INCLUDING, BUT NOT LIMITED TO,
PROCUREMENT OF SUBSTITUTE GOODS OR SERVICES; LOSS OF USE, DATA, OR PROFITS; OR
BUSINESS INTERRUPTION) HOWEVER CAUSED AND ON ANY THEORY OF LIABILITY, WHETHER
IN CONTRACT, STRICT LIABILITY, OR TORT (INCLUDING NEGLIGENCE OR OTHERWISE) ARISING
IN ANY WAY OUT OF THE USE OF THIS SOFTWARE, EVEN IF ADVISED OF THE POSSIBILITY OF
SUCH DAMAGE.
—- Part 8: Apple Inc. copyright notice (BSD) ——
Copyright (c) 2007 Apple Inc. All rights reserved.
Redistribution and use in source and binary forms, with or without modification, are permitted provided
that the following conditions are met:
1. Redistributions of source code must retain the above copyright notice, this list of conditions and the
following disclaimer.
2. Redistributions in binary form must reproduce the above copyright notice, this list of conditions and
the following disclaimer in the documentation and/or other materials provided with the distribution.
3. Neither the name of Apple Inc. («Apple») nor the names of its contributors may be used to endorse or
promote products derived from this software without specific prior written permission.
THIS SOFTWARE IS PROVIDED BY APPLE AND ITS CONTRIBUTORS «AS IS» AND ANY EXPRESS
OR IMPLIED WARRANTIES, INCLUDING, BUT NOT LIMITED TO, THE IMPLIED WARRANTIES OF
MERCHANTABILITY AND FITNESS FOR A PARTICULAR PURPOSE ARE DISCLAIMED. IN NO
EVENT SHALL APPLE OR ITS CONTRIBUTORS BE LIABLE FOR ANY DIRECT, INDIRECT,
INCIDENTAL, SPECIAL, EXEMPLARY, OR CONSEQUENTIAL DAMAGES (INCLUDING, BUT NOT
LIMITED TO, PROCUREMENT OF SUBSTITUTE GOODS OR SERVICES; LOSS OF USE, DATA, OR
PROFITS; OR BUSINESS INTERRUPTION) HOWEVER CAUSED AND ON ANY THEORY OF
LIABILITY, WHETHER IN CONTRACT, STRICT LIABILITY, OR TORT (INCLUDING NEGLIGENCE OR
OTHERWISE) ARISING IN ANY WAY OUT OF THE USE OF THIS SOFTWARE, EVEN IF ADVISED OF
THE POSSIBILITY OF SUCH DAMAGE.
—- Part 9: ScienceLogic, LLC copyright notice (BSD) ——
Copyright (c) 2009, ScienceLogic, LLC
All rights reserved.
Redistribution and use in source and binary forms, with or without modification, are permitted provided
that the following conditions are met:
* Redistributions of source code must retain the above copyright notice, this list of conditions and the
following disclaimer.
* Redistributions in binary form must reproduce the above copyright notice, this list of conditions and the
following disclaimer in the documentation and/or other materials provided with the distribution.
* Neither the name of ScienceLogic, LLC nor the names of its contributors may be used to endorse or
promote products derived from this software without specific prior written permission.
THIS SOFTWARE IS PROVIDED BY THE COPYRIGHT HOLDERS AND CONTRIBUTORS «AS IS» AND
ANY EXPRESS OR IMPLIED WARRANTIES, INCLUDING, BUT NOT LIMITED TO, THE IMPLIED
19

WARRANTIES OF MERCHANTABILITY AND FITNESS FOR A PARTICULAR PURPOSE ARE
DISCLAIMED. IN NO EVENT SHALL THE COPYRIGHT HOLDERS OR CONTRIBUTORS BE LIABLE
FOR ANY DIRECT, INDIRECT, INCIDENTAL, SPECIAL, EXEMPLARY, OR CONSEQUENTIAL
DAMAGES (INCLUDING, BUT NOT LIMITED TO, PROCUREMENT OF SUBSTITUTE GOODS OR
SERVICES; LOSS OF USE, DATA, OR PROFITS; OR BUSINESS INTERRUPTION) HOWEVER
CAUSED AND ON ANY THEORY OF LIABILITY, WHETHER IN CONTRACT, STRICT LIABILITY, OR
TORT (INCLUDING NEGLIGENCE OR OTHERWISE) ARISING IN ANY WAY OUT OF THE USE OF
THIS SOFTWARE, EVEN IF ADVISED OF THE POSSIBILITY OF SUCH DAMAGE.
LEADTOOLS
Copyright (C) 1991-2009 LEAD Technologies, Inc.
CMap Resources
————————————————————
Copyright 1990-2009 Adobe Systems Incorporated.
All rights reserved.
Copyright 1990-2010 Adobe Systems Incorporated.
All rights reserved.
Redistribution and use in source and binary forms, with or
without modification, are permitted provided that the
following conditions are met:
Redistributions of source code must retain the above
copyright notice, this list of conditions and the following
disclaimer.
Redistributions in binary form must reproduce the above
copyright notice, this list of conditions and the following
disclaimer in the documentation and/or other materials
provided with the distribution.
Neither the name of Adobe Systems Incorporated nor the names
of its contributors may be used to endorse or promote
products derived from this software without specific prior
written permission.
THIS SOFTWARE IS PROVIDED BY THE COPYRIGHT HOLDERS AND
CONTRIBUTORS «AS IS» AND ANY EXPRESS OR IMPLIED WARRANTIES,
INCLUDING, BUT NOT LIMITED TO, THE IMPLIED WARRANTIES OF
MERCHANTABILITY AND FITNESS FOR A PARTICULAR PURPOSE ARE
DISCLAIMED. IN NO EVENT SHALL THE COPYRIGHT HOLDER OR
CONTRIBUTORS BE LIABLE FOR ANY DIRECT, INDIRECT, INCIDENTAL,
SPECIAL, EXEMPLARY, OR CONSEQUENTIAL DAMAGES (INCLUDING, BUT
NOT LIMITED TO, PROCUREMENT OF SUBSTITUTE GOODS OR SERVICES;
LOSS OF USE, DATA, OR PROFITS; OR BUSINESS INTERRUPTION)
HOWEVER CAUSED AND ON ANY THEORY OF LIABILITY, WHETHER IN
CONTRACT, STRICT LIABILITY, OR TORT (INCLUDING NEGLIGENCE OR
20
-
Page 1: Online Manual
TS3100 series Online Manual Basic Operation Network Handling Paper, Originals, FINE Cartridges, etc. Maintenance Overview of the Machine Information about Paper Printing Copying Scanning Frequently Asked Questions List of Support Code for Error English…
-
Page 2: Table Of Contents
Contents Using Online Manual……….9 Symbols Used in This Document.
- Page 3
Examining the Nozzle Check Pattern……….. 75 Cleaning the Print Head. - Page 4
Canon IJ Status Monitor…….. - Page 5
Canon IJ Status Monitor Description…….. - Page 6
Frequently Asked Questions……..261 Network Settings and Common Problems. - Page 7
Paper Is Smudged / Printed Surface Is Scratched……..311 Scanning Problems (Windows). - Page 8
2900…………..360 2901. -
Page 9: Using Online Manual
Using Online Manual Operating Environment Symbols Used in This Document Touch-enabled Device Users (Windows) Printing Online Manual Trademarks and Licenses Screenshots in This Manual…
-
Page 10: Symbols Used In This Document
Symbols Used in This Document Warning Instructions that, if ignored, could result in death or serious personal injury caused by incorrect operation of the equipment. These must be observed for safe operation. Caution Instructions that, if ignored, could result in personal injury or material damage caused by incorrect operation of the equipment.
-
Page 11: Touch-Enabled Device Users (Windows)
Touch-enabled Device Users (Windows) For touch actions, you need to replace «right-click» in this document with the action set on the operating system. For example, if the action is set to «press and hold» on your operating system, replace «right-click» with «press and hold.»…
-
Page 12: Trademarks And Licenses
Adobe Systems Incorporated in the United States and/or other countries. • Bluetooth is a trademark of Bluetooth SIG, Inc., U.S.A. and licensed to Canon Inc. • Autodesk and AutoCAD are registered trademarks or trademarks of Autodesk, Inc., and/or its subsidiaries and/or affiliates in the USA and/or other countries.
- Page 13
Apache License Version 2.0, January 2004 http://www.apache.org/licenses/ TERMS AND CONDITIONS FOR USE, REPRODUCTION, AND DISTRIBUTION 1. Definitions. «License» shall mean the terms and conditions for use, reproduction, and distribution as defined by Sections 1 through 9 of this document. «Licensor» shall mean the copyright owner or entity authorized by the copyright owner that is granting the License. - Page 14
2. Grant of Copyright License. Subject to the terms and conditions of this License, each Contributor hereby grants to You a perpetual, worldwide, non-exclusive, no-charge, royalty-free, irrevocable copyright license to reproduce, prepare Derivative Works of, publicly display, publicly perform, sublicense, and distribute the Work and such Derivative Works in Source or Object form. 3. - Page 15
7. Disclaimer of Warranty. Unless required by applicable law or agreed to in writing, Licensor provides the Work (and each Contributor provides its Contributions) on an «AS IS» BASIS, WITHOUT WARRANTIES OR CONDITIONS OF ANY KIND, either express or implied, including, without limitation, any warranties or conditions of TITLE, NON-INFRINGEMENT, MERCHANTABILITY, or FITNESS FOR A PARTICULAR PURPOSE. - Page 16
Redistribution and use in source and binary forms, with or without modification, are permitted provided that the following conditions are met: * Redistributions of source code must retain the above copyright notice, this list of conditions and the following disclaimer. * Redistributions in binary form must reproduce the above copyright notice, this list of conditions and the following disclaimer in the documentation and/or other materials provided with the distribution. - Page 17
Use is subject to license terms below. This distribution may include materials developed by third parties. Sun, Sun Microsystems, the Sun logo and Solaris are trademarks or registered trademarks of Sun Microsystems, Inc. in the U.S. and other countries. Redistribution and use in source and binary forms, with or without modification, are permitted provided that the following conditions are met: * Redistributions of source code must retain the above copyright notice, this list of conditions and the following disclaimer. - Page 18
TORT (INCLUDING NEGLIGENCE OR OTHERWISE) ARISING IN ANY WAY OUT OF THE USE OF THIS SOFTWARE, EVEN IF ADVISED OF THE POSSIBILITY OF SUCH DAMAGE. —- Part 6: Cisco/BUPTNIC copyright notice (BSD) —— Copyright (c) 2004, Cisco, Inc and Information Network Center of Beijing University of Posts and Telecommunications. - Page 19
SPECIAL, EXEMPLARY, OR CONSEQUENTIAL DAMAGES (INCLUDING, BUT NOT LIMITED TO, PROCUREMENT OF SUBSTITUTE GOODS OR SERVICES; LOSS OF USE, DATA, OR PROFITS; OR BUSINESS INTERRUPTION) HOWEVER CAUSED AND ON ANY THEORY OF LIABILITY, WHETHER IN CONTRACT, STRICT LIABILITY, OR TORT (INCLUDING NEGLIGENCE OR OTHERWISE) ARISING IN ANY WAY OUT OF THE USE OF THIS SOFTWARE, EVEN IF ADVISED OF THE POSSIBILITY OF SUCH DAMAGE. - Page 20
FOR ANY DIRECT, INDIRECT, INCIDENTAL, SPECIAL, EXEMPLARY, OR CONSEQUENTIAL DAMAGES (INCLUDING, BUT NOT LIMITED TO, PROCUREMENT OF SUBSTITUTE GOODS OR SERVICES; LOSS OF USE, DATA, OR PROFITS; OR BUSINESS INTERRUPTION) HOWEVER CAUSED AND ON ANY THEORY OF LIABILITY, WHETHER IN CONTRACT, STRICT LIABILITY, OR TORT (INCLUDING NEGLIGENCE OR OTHERWISE) ARISING IN ANY WAY OUT OF THE USE OF THIS SOFTWARE, EVEN IF ADVISED OF THE POSSIBILITY OF SUCH DAMAGE. - Page 21
MIT License Copyright (c) 1998, 1999, 2000 Thai Open Source Software Center Ltd Permission is hereby granted, free of charge, to any person obtaining a copy of this software and associated documentation files (the «Software»), to deal in the Software without restriction, including without limitation the rights to use, copy, modify, merge, publish, distribute, sublicense, and/or sell copies of the Software, and to permit persons to whom the Software is furnished to do so, subject to the following conditions:… - Page 22
* Redistributions of source code must retain the above copyright notice, this list of conditions and the following disclaimer. * Redistributions in binary form must reproduce the above copyright notice, this list of conditions and the following disclaimer in the documentation and/or other materials provided with the distribution. * Neither the name of the University nor the names of its contributors may be used to endorse or promote products derived from this software without specific prior written permission. -
Page 23: Basic Operation
Basic Operation Printing Photos from a Computer Printing Photos from a Smartphone/Tablet Copying…
-
Page 24: Printing Photos From A Computer
Printing Photos from a Computer This section describes how to print photos with My Image Garden. 1. Open the paper support (A). 2. Pull out the paper output tray (B) and the output tray extension (C). 3. Load paper vertically WITH THE PRINT SIDE FACING YOU. 4.
- Page 25
After loading paper on the rear tray, the Paper status and the current paper size flash on the LCD. 5. Press Paper Select button (E) to select a paper size according to the paper loaded on the rear tray and press OK button (F). - Page 26
6. Click the My Image Garden icon (G) in Quick Menu. The Guide Menu screen is displayed. Note • The number and types of icons displayed vary depending on your region, the registered printer/ scanner and the installed applications. 7. Click the Photo Print icon (H). - Page 27
8. Click the folder (I) with photos you want to print. 9. Click the photos (J) you want to print. For Windows: To select two or more photos at a time, click photos while pressing the Ctrl key. For Mac OS: To select two or more photos at a time, click photos while pressing the command key. - Page 28
For Mac OS: Specify the number of copies. 12. Start printing. For Windows: Click Print. For Mac OS: Click Print. When the Print dialog starts, specify your printer name, paper size, etc., then click Print. Note • My Image Garden lets you use images on your computer, such as photos taken with a digital camera, in a number of ways. -
Page 29: Printing Photos From A Smartphone/Tablet
Printing Photos from a Smartphone/Tablet This section describes how to print photos with Canon PRINT Inkjet/SELPHY. For details on how to download Canon PRINT Inkjet/SELPHY, see below. Print Easily from a Smartphone or Tablet with Canon PRINT Inkjet/SELPHY 1. Open the paper support (A).
- Page 30
After loading paper on the rear tray, the Paper status and the current paper size flash on the LCD. 5. Press Paper Select button (E) to select a paper size according to the paper loaded on the rear tray and press OK button (F). - Page 31
6. Start (Canon PRINT Inkjet/SELPHY) from your smartphone/tablet. 7. Select Photo Print on Canon PRINT Inkjet/SELPHY. The list of photos saved on your smartphone/tablet is displayed. 8. Select a photo. You can also select multiple photos at once. 9. Specify the number of copies, paper size, etc. -
Page 32: Copying
Copying This section describes how to load originals and copy them to plain paper. 1. Open the paper support (A). 2. Pull out the paper output tray (B) and the output tray extension (C). 3. Load paper vertically WITH THE PRINT SIDE FACING YOU. 4.
- Page 33
After loading paper on the rear tray, the Paper status and the current paper size flash on the LCD. 5. Press Paper Select button (E) to select a paper size according to the paper loaded on the rear tray and press OK button (F). - Page 34
6. Open the document cover (G). 7. Load the original WITH THE SIDE TO COPY FACING DOWN and align it with the alignment mark (H). 8. Close the document cover. 9. Press the Black button (I) or Color button (J). - Page 35
Important • Do not open the document cover until copying is complete. Note • Your printer is equipped with many other convenient copy features. Copying… -
Page 36: Network
Network Available Connection Methods The following connection methods are available on the printer. • Wireless Connection Connect the printer and devices (e.g. computer/smartphone/tablet) using a wireless router. If you have a wireless router, we recommend you use one for wireless connection. ◦…
- Page 37
Changing Wireless LAN Connection Method Changing Connection Mode • To add computer/smartphone/tablet to the printer: Connecting to Another Computer via LAN/Changing from USB to LAN Connection • To use Wireless Direct temporarily: Printing/Scanning with Wireless Direct IJ Network Device Setup Utility IJ Network Device Setup Utility checks or diagnoses the settings of the printer and those of computer and restores the status of them if anything is wrong with network connection. -
Page 38: Restrictions
Restrictions When connecting another device while a device (such as a smartphone) is already connected to the printer, connect it using the same connection method as the connected device. If you connect using a different connection method, the connection to the device in use will be disabled. Connect via wireless router •…
- Page 39
• In Wireless Direct mode, you can connect up to five devices at the same time. If you try to connect a sixth device while five devices are already connected, an error will appear. If an error appears, disconnect a device that does not use the printer, then configure settings again. •… -
Page 40: Network Connection Tips
Network Connection Tips Default Network Settings Another Printer Found with Same Name Connecting to Another Computer via LAN/Changing from USB to LAN Connection Printing Network Settings Changing Wireless LAN Connection Method…
-
Page 41: Default Network Settings
Enable/disable IPv6 Enable Enable/disable WSD Enable Timeout setting 15 minutes Enable/disable Bonjour Enable Service name Canon TS3100 series LPR protocol setting Enable RAW protocol Enable LLMNR Active PictBridge communication Enable («XX» represents alphanumeric characters.) * Default value depends on printer.
-
Page 42: Another Printer Found With Same Name
Another Printer Found with Same Name When the printer is found during setup, other printers with the same name may appear on the results screen. Select a printer with checking the printer settings against those on detection result screen. • For Windows: Check the printer’s MAC address or serial to select the correct printer from the results.
-
Page 43: Connecting To Another Computer Via Lan/Changing From Usb To Lan Connection
Connecting to Another Computer via LAN/Changing from USB to LAN Connection For Windows: For Mac OS: For Windows: To add a computer to connect to the printer on a LAN or to change from USB to LAN connection, perform setup using the Setup CD-ROM or from the web page. For Mac OS: To connect an additional computer to the printer via LAN, or to change from USB to LAN connection, perform setup from the web page.
-
Page 44: Printing Network Settings
Network Diagnostics Network diagnostics ― Diagnostic Result Diagnostic result XXXXXXXX Result Codes Result codes XXXXXXXX Result Code Details Result code details http://canon.com/ijnwt Wireless LAN Wireless LAN Enable/Disable WPS PIN CODE WPS PIN code XXXXXXXX Infrastructure Infrastructure Enable/Disable 3-2-1 Signal Strength…
- Page 45
3-2-7 Channel Channel XX (1 to 13) 3-2-8 Encryption Encryption method None/WEP/TKIP/AES 3-2-9 WEP Key Length WEP key length (bits) Inactive/128/64 3-2-10 Authentication Authentication method None/auto/open/shared/WPA-PSK/WPA2-PSK 3-2-11 TCP/IPv4 TCP/IPv4 Enable 3-2-12 IP Address IP address XXX.XXX.XXX.XXX 3-2-13 Subnet Mask Subnet mask XXX.XXX.XXX.XXX 3-2-14 Default Gateway… - Page 46
3-2-28 Default Gateway3 Default gateway 3 XXXX:XXXX:XXXX:XXXX XXXX:XXXX:XXXX:XXXX 3-2-29 Default Gateway4 Default gateway 4 XXXX:XXXX:XXXX:XXXX XXXX:XXXX:XXXX:XXXX 3-2-33 IPsec IPsec setting Active 3-2-34 Security Protocol Security method ESP/ESP & AH/AH Access Point Mode Operation mode for Enable/Disable Wireless Direct 3-3-1 MAC Address MAC address XX:XX:XX:XX:XX:XX 3-3-2… - Page 47
RAW Printing RAW printing setting Enable/Disable Bonjour Bonjour setting Enable/Disable 5-10 Bonjour Service Bonjour service name Bonjour service name (Up to 52 alphanumeric charac- Name ters) 5-11 LLMNR LLMNR setting Enable/Disable 5-12 SNMP SNMP setting Enable/Disable 5-13 PictBridge Commun. PictBridge Communi- Enable/Disable cation 5-14… -
Page 48: Changing Wireless Lan Connection Method
Changing Wireless LAN Connection Method Follow either procedure below to change wireless LAN connection method (infrastructure or Wireless Direct). • For Windows: ◦ Redo setup using the Setup CD-ROM or from the web page. ◦ Perform settings on the Network Settings screen on IJ Network Device Setup Utility. Important •…
-
Page 49: Handling Paper, Originals, Fine Cartridges, Etc
Handling Paper, Originals, FINE Cartridges, etc. Loading Paper Loading Originals Replacing a FINE Cartridge…
-
Page 50: Loading Paper
Loading Paper Loading Plain Paper / Photo Paper…
-
Page 51: Loading Plain Paper / Photo Paper
For details on the Canon genuine paper, see Supported Media Types. • You can use general copy paper or Canon Red Label Superior WOP111/Canon Océ Office Colour Paper SAT213. For the page size and paper weight you can use for this printer, see Supported Media Types.
- Page 52
2. Pull out the paper output tray (B) and the output tray extension (C). 3. Load paper vertically against the far right of the rear tray WITH THE PRINT SIDE FACING YOU. 4. Adjust the paper guide (D) with the paper left side. Do not slide the paper guide too hard against the paper. - Page 53
Important • Always load paper in the portrait orientation (E). Loading paper in the landscape orientation (C) can cause paper jams. Note • Do not load sheets of paper higher than the load limit mark (G). After loading paper on the rear tray, the Paper status and the current paper size flash on the LCD. - Page 54
5. Press Paper Select button (H) to select a paper size according to the paper loaded on the rear tray and press OK button (I). Note • After loading paper, select the size and type of the loaded paper on the print settings screen of the computer. - Page 55
and an error code are displayed if these settings do not match to prevent incorrect printing. When the error message and the error code are displayed, check and correct the paper settings. -
Page 56: Loading Originals
Loading Originals Loading Originals on the Platen Glass Supported Originals…
-
Page 57: Loading Originals On The Platen Glass
Loading Originals on the Platen Glass 1. Load an original on the platen glass. 1. Open the document cover. 2. Load the original WITH THE SIDE TO SCAN FACING DOWN on the platen glass. Align the corner of the original with the alignment mark Important •…
- Page 58
2. Close the document cover gently. Important • After loading the original on the platen glass, be sure to close the document cover before starting to copy or scan. -
Page 59: Supported Originals
Supported Originals Item Details Types of originals — Text document, magazine, or newspaper — Printed photo, postcard, business card, or disc (BD/DVD/CD, etc.) Size (width x height) Max. 8.5 x 11.7 inches (216 x 297 mm)
-
Page 60: Replacing A Fine Cartridge
Replacing a FINE Cartridge Replacing a FINE Cartridge Checking the Ink Status with the Ink Lamps on the Operation Panel Ink Tips…
-
Page 61: Replacing A Fine Cartridge
Replacing a FINE Cartridge When remaining ink cautions or errors occur, the error code will appear on the LCD to inform you of the error. In this state, the printer cannot print or scan. Check the error code and take appropriate action. An Error Occurs While using the printer, the periphery of the paper output slot may become dirty with ink.
- Page 62
• Color ink may be consumed even when printing a black-and-white document or when black-and- white printing is specified. Both color ink and black ink are also consumed in the standard cleaning and deep cleaning of the print head, which may be necessary to maintain the performance of the printer. When ink runs out, replace the FINE cartridge immediately with a new one. - Page 63
2. Remove the FINE cartridge. Important • Handle the FINE cartridge carefully to avoid staining of clothing or the surrounding area. • Discard the empty FINE cartridge according to the local laws and regulations regarding disposal of consumables. 5. Prepare a new FINE cartridge. 1. - Page 64
Important • If you shake a FINE cartridge, ink may spill out and stain your hands and the surrounding area. Handle a FINE cartridge carefully. • Be careful not to stain your hands and the surrounding area with ink on the removed protective tape. - Page 65
2. Push the FINE cartridge in and up firmly until it snaps into place. Important • Check if the FINE cartridge is installed correctly. - Page 66
• The printer cannot print unless both the color FINE cartridge and black FINE cartridge are installed. Be sure to install both cartridges. 7. Close the cover. Note • If the error code is displayed on the LCD after the cover is closed, take appropriate action. An Error Occurs •… -
Page 67: Checking The Ink Status With The Ink Lamps On The Operation Panel
Checking the Ink Status with the Ink Lamps on the Operation Panel Note • The ink level detector is mounted on the printer to detect the remaining ink level. The printer considers as ink is full when a new FINE cartridge is installed, and then starts to detect a remaining ink level. If you install a used FINE cartridge, the indicated ink level of it may not be correct.
-
Page 68: Ink Tips
Ink Tips How is ink used for various purposes other than printing? Ink may be used for purposes other than printing. Ink is not only used for printing, but also for cleaning the print head to maintain the optimal printing quality. The printer has the function to automatically clean the ink jet nozzles to prevent clogging.
-
Page 69: Maintenance
Maintenance If Printing Is Faint or Uneven Performing Maintenance Functions from Your Computer (Windows) Performing Maintenance Functions from Your Computer (Mac OS) Cleaning…
-
Page 70: If Printing Is Faint Or Uneven
If Printing Is Faint or Uneven Maintenance Procedure Printing the Nozzle Check Pattern Examining the Nozzle Check Pattern Cleaning the Print Head Deep Print Head Cleaning Aligning the Print Head…
-
Page 71: Maintenance Procedure
Maintenance Procedure If print results are blurred, colors are not printed correctly, or print results are unsatisfactory (e.g. misaligned printed ruled lines), perform the maintenance procedure below. Important • Do not rinse or wipe the FINE cartridge. This can cause trouble with the FINE cartridge. Note •…
- Page 72
Replacing a FINE Cartridge Note • If the problem is still not resolved after replacing the FINE cartridge, contact your nearest Canon service center to request a repair. When the Print Results Are Not Even such as the Ruled Lines Are Misaligned: Align the print head. - Page 73
From the computer • For Windows: Adjusting Print Head Position • For Mac OS: Adjusting Print Head Position… -
Page 74: Printing The Nozzle Check Pattern
Printing the Nozzle Check Pattern Print the nozzle check pattern to determine whether the ink ejects properly from the print head nozzle. Note • If the remaining ink level is low, the nozzle check pattern will not be printed correctly. Replace the FINE cartridge whose ink is low.
-
Page 75: Examining The Nozzle Check Pattern
Examining the Nozzle Check Pattern Examine the nozzle check pattern, and clean the print head if necessary. 1. Check if there are missing lines in the pattern (A) or horizontal white streaks in the pattern (B). If there are missing lines in the pattern (A): Cleaning the print head is required.
-
Page 76: Cleaning The Print Head
Cleaning the Print Head Clean the print head if lines are missing or if horizontal white streaks are present in the printed nozzle check pattern. Cleaning unclogs the nozzles and restores the print head condition. Cleaning the print head consumes ink, so clean the print head only when necessary. 1.
-
Page 77: Deep Print Head Cleaning
If the problem is not resolved, turn off the power and clean the print head deeply again after 24 hours. If the problem is still not resolved, replace the FINE cartridge with a new one. If the problem is still not resolved after replacing the FINE cartridge, contact your nearest Canon service center to request a repair.
-
Page 78: Aligning The Print Head
Aligning the Print Head If printed ruled lines are misaligned or print results are otherwise unsatisfactory, adjust the print head position. Note • If the remaining ink level is low, the print head alignment sheet will not be printed correctly. Replace the FINE cartridge whose ink is low.
- Page 79
Important • Do not touch any printed part on the print head alignment sheet. If the sheet is stained or wrinkled, it may not be scanned properly. • If the print head alignment sheet was not printed correctly, press the Stop button, then redo this procedure from the beginning. - Page 80
7. Close the document cover gently, then press the Black button or the Color button. The printer starts scanning the print head alignment sheet, and the print head position will be adjusted automatically. The print head position adjustment will be complete when the ON lamp lights after flashing. Remove the print head alignment sheet on the platen glass. -
Page 81: Cleaning
Cleaning Cleaning Exterior Surfaces Cleaning the Platen Glass and Document Cover Cleaning Paper Feed Rollers Cleaning Inside the Printer (Bottom Plate Cleaning)
-
Page 82: Cleaning Paper Feed Rollers
Cleaning Paper Feed Rollers If the paper feed rollers are dirty or paper powder is attached to it, paper may not be fed properly. In this case, clean the paper feed rollers. You need to prepare: a sheet of A4 or Letter-sized plain paper or cleaning sheet available on the market 1.
- Page 83
After cleaning the paper feed rollers, turn on the power, then clean the paper feed rollers again. If the problem is not resolved after cleaning the paper feed rollers, contact your nearest Canon service center to request a repair. -
Page 84: Cleaning Inside The Printer (Bottom Plate Cleaning)
Cleaning Inside the Printer (Bottom Plate Cleaning) Remove stains from the inside of the printer. If the inside of the printer becomes dirty, printed paper may get dirty, so we recommend performing cleaning regularly. You need to prepare: a sheet of A4 or Letter-sized plain paper* * Be sure to use a new piece of paper.
-
Page 86: Overview
Overview Safety Safety Precautions Regulatory Information WEEE (EU & EEA) Handling Precautions Canceling Print Jobs Storing Printed Images Legal Restrictions on Scanning/Copying Printer Handling Precautions Transporting Your Printer When repairing, lending, or disposing of the printer Keeping Print Quality High Main Components and Their Use Main Components Power Supply…
-
Page 87: Safety
Safety Safety Precautions Regulatory Information WEEE (EU&EEA)
-
Page 88: Safety Precautions
Safety Precautions Choosing a location • Do not install the printer in a location that is unstable or subject to excessive vibration. • Do not install the printer in locations that are very humid or dusty, in direct sunlight, outdoors, or close to a heating source.
-
Page 89: Regulatory Information
20cm between the radiator and persons body (excluding extremities: hands, wrists, feet and ankles) and must not be colocated or operated with any other antenna or transmitter. Canon U.S.A., Inc. One Canon Park Melville, New York 11747…
-
Page 90: Users In Canada
Users in Canada This device complies with Industry Canada license-exempt RSS standard(s). Operation is subject to the following two conditions: (1) this device may not cause interference, and (2) this device must accept any interference, including interference that may cause undesired operation of the device. This equipment complies with IC radiation exposure limits set forth for an uncontrolled environment and meets RSS-102 of the IC radio frequency (RF) Exposure rules.
-
Page 92: Weee (Eu&Eea)
For more information about where you can drop off your waste equipment for recycling, please contact your local city office, waste authority, approved WEEE scheme or your household waste disposal service. For more information regarding return and recycling of WEEE products, please visit www.canon- europe.com/weee.
- Page 93
U kunt ook het schema voor de afvoer van afgedankte elektrische en elektronische apparatuur (AEEA) raadplegen. Ga voor meer informatie over het inzamelen en recyclen van afgedankte elektrische en elektronische apparatuur naar www.canon- europe.com/weee. - Page 94
Si desea más información acerca de la devolución y reciclado de RAEE, visite la web www.canon-europe.com/weee. Només per a la Unió Europea i a l’Espai Econòmic Europeu (Noruega, Islàndia i Liechtenstein) Aquest símbol indica que aquest producte no s’ha de llençar a les escombraries de la llar, d’acord amb la… - Page 95
Yderligere oplysninger om, hvor du kan bortskaffe dit elektronikaffald med henblik på genanvendelse, får du hos de kommunale renovationsmyndigheder. Yderligere oplysninger om returnering og genanvendelse af affald af elektrisk og elektronisk udstyr får du ved at besøge www.canon- europe.com/weee. - Page 96
Du kan få mer informasjon om hvor du kan avhende utrangert utstyr til resirkulering ved å kontakte lokale myndigheter, et godkjent WEEE-program eller husholdningens renovasjonsselskap. Du finner mer informasjon om retur og resirkulering av WEEE-produkter på www.canon-europe.com/weee. Vain Euroopan unionin sekä ETA:n (Norja, Islanti ja Liechtenstein) alueelle. - Page 97
úřad vaší obce, správní orgán vykonávající dozor nad likvidací odpadu, sběrny OEEZ nebo služba pro odvoz komunálního odpadu. Další informace týkající se vracení a recyklace OEEZ naleznete na adrese www.canon-europe.com/weee. Csak az Európai Unió és az EGT (Norvégia, Izland és Liechtenstein) országaiban… - Page 98
WEEE lub skontaktować się z przedsiębiorstwem zajmującym się wywozem odpadów domowych. Więcej informacji o zwracaniu i recyklingu zużytego sprzętu elektrycznego i elektronicznego znajduje się w witrynie www.canon-europe.com/weee. Platí len pre štáty Európskej únie a EHP (Nórsko, Island a Lichtenštajnsko) Tento symbol znamená, že podľa Smernice 2012/19/EÚ… - Page 99
į savo miesto valdžios institucijas, atliekų tvarkymo organizacijas, patvirtintų EEĮ atliekų sistemų arba jūsų buitinių atliekų tvarkymo įstaigų atstovus. Išsamesnės informacijos apie EEĮ atliekų grąžinimo ir perdirbimo tvarką galite rasti apsilankę tinklalapyje www.canon- europe.com/weee. Samo za Evropsko unijo in EGP (Norveška, Islandija in Lihtenštajn) - Page 100
OEEO. Če želite več informacij o vračanju in recikliranju izdelkov v skladu z direktivo OEEO, obiščite www.canon-europe.com/weee. Само за Европейския съюз и ЕИП (Норвегия, Исландия и Лихтенщайн) Този… - Page 101
şi reciclarea produselor DEEE, vizitaţi www.canon-europe.com/ weee. Samo za Europsku uniju i EEZ (Norveška, Island i Lihtenštajn) Ovaj simbol pokazuje da se ovaj proizvod ne smije odlagati s kućnim otpadom sukladno WEEE Direktivi (2012/19/EC) i vašem nacionalnom zakonu. Ovaj proizvod je potrebno predati na posebno mjesto za sakupljanje otpada, npr. -
Page 102: Handling Precautions
Handling Precautions Canceling Print Jobs Storing Printed Images Legal Restrictions on Scanning/Copying Printer Handling Precautions Transporting Your Printer When repairing, lending, or disposing of the printer Keeping Print Quality High…
-
Page 103: Legal Restrictions On Scanning/Copying
Legal Restrictions on Scanning/Copying Scanning, printing, copying, or modifying copies of the following may be punishable under law. This list is non-exhaustive. When in doubt, check with a local legal representative. • Paper money • Money orders • Certificates of deposit •…
-
Page 104: Printer Handling Precautions
Printer Handling Precautions Do not place any object on the document cover! Do not place any object on the document cover. It will fall into the rear tray when the document cover is opened and cause the printer to malfunction. Also, place the printer where objects will not fall on it.
-
Page 105: Transporting Your Printer
Transporting Your Printer When relocating the printer, make sure of the following. Important • Pack the printer in a sturdy box so that it is placed with its bottom facing down, using sufficient protective material to ensure safe transport. • With the FINE cartridge left installed in the printer, press the ON button to turn off the power. This allows the printer to automatically cap the print head, thus preventing it from drying.
-
Page 106: When Repairing, Lending, Or Disposing Of The Printer
When repairing, lending, or disposing of the printer If you have entered personal data, passwords and/or other security settings on the printer, such information may be stored in the printer. When sending the printer for repair, lending or transferring the printer to another person, or disposing of the printer, please be sure to follow the steps below in order to delete such information and prevent third parties from accessing it.
-
Page 107: Keeping Print Quality High
Keeping Print Quality High The key to printing with the optimal printing quality is to prevent the print head from drying or clogging. Always observe the following rules for optimal printing quality. Note • Depending on the type of paper, ink may blur if you trace the printed area with a highlight pen or paint- stick, or bleed if water or sweat comes in contact with the printed area.
-
Page 108: Main Components And Their Use
Main Components and Their Use Main Components Power Supply Indication of LCD…
-
Page 109: Main Components
Main Components Front View Rear View Inside View Operation Panel…
-
Page 110: Front View
Front View (1) document cover Open to load an original on the platen glass. (2) paper support Open to load paper on the rear tray. (3) paper guide Align with the left side of the paper stack. (4) rear tray Load paper here.
- Page 111
(8) operation panel Use to change the settings of the printer or to operate it. Operation Panel (9) platen glass Load an original here. -
Page 112: Rear View
Rear View (1) power cord connector Plug in the supplied power cord. (2) USB port Plug in the USB cable to connect the printer with a computer. Important • Do not touch the metal casing. • Do not plug in or unplug the USB cable while the printer is printing or scanning originals with the computer.
-
Page 113: Inside View
Inside View (1) FINE cartridge (ink cartridges) A replaceable cartridge that integrates print head and ink tank. (2) FINE cartridge holder Install the FINE cartridge. The color FINE cartridge should be installed into the left slot and the black FINE cartridge should be installed into the right slot.
-
Page 114: Operation Panel
Operation Panel * All lamps on the operation panel are shown lit in the figure below for explanatory purposes. (1) ON button Turns the power on or off. Before turning on the power, make sure that the document cover is closed. (2) ON lamp Lights after flashing when the power is turned on.
- Page 115
(10) Paper Select button Select the paper size of the printer. (11) OK button Finalizes the selection of paper size setting. This button is also used to resolve an error. (12) Stop button Cancels operations. You can press this button to cancel a print, copy, or scan job in progress. Holding this button down lets you select maintenance options or printer settings. -
Page 116: Power Supply
Power Supply Confirming that the Power Is On Turning the Printer On and Off Checking the Power Plug/Power Cord Unplugging the Printer…
-
Page 117: Confirming That The Power Is On
Confirming that the Power Is On The ON lamp is lit when the printer is turned on. Even if the LCD is off, if the ON lamp is lit, the printer is on. Note • It may take a while for the printer to start printing immediately after you turn on the printer. •…
-
Page 118: Turning The Printer On And Off
Turning the Printer On and Off Turning on the printer 1. Press the ON button to turn on the printer. The ON lamp flashes and then remains lit. Confirming that the Power Is On Note • It may take a while for the printer to start printing immediately after you turn on the printer. •…
- Page 119
Important • When you unplug the power cord after turning off the printer, be sure to confirm that the ON lamp is off. Note • You can set the printer to automatically turn off when no operations are performed or no print jobs are sent to the printer for a certain interval. -
Page 120: Checking The Power Plug/Power Cord
Checking the Power Plug/Power Cord Unplug the power cord once a month to confirm that the power plug/power cord does not have anything unusual described below. • The power plug/power cord is hot. • The power plug/power cord is rusty. •…
-
Page 121: Unplugging The Printer
Unplugging the Printer To unplug the power cord, follow the procedure below. Important • When you unplug the power cord, press the ON button, then confirm that the ON lamp is off. Unplugging the power cord while the ON lamp is lit or flashing may cause drying or clogging of the print head and print quality may be reduced.
-
Page 122: Indication Of Lcd
Indication of LCD The number of copies, maintenance code, error code or various icons is displayed on the LCD. (1) Network status Appears when Wireless LAN is enabled. (2) Current network status Displays the current network status. The icon differs depending on the network of use or the network status. (Signal strength: 81 % or more): You can use the printer over a wireless LAN without any problems.
- Page 123
(7) Paper size Displays the current paper size. The paper size also flashes while you select the paper size after pressing the Paper Select button. -
Page 124: Changing Settings
Changing Settings Changing Printer Settings from Your Computer (Windows) Changing Printer Settings from Your Computer (Mac OS) Changing Settings from Operation Panel…
-
Page 125: Changing Printer Settings From Your Computer (Windows)
Changing Printer Settings from Your Computer (Windows) Changing the Print Options Registering a Frequently Used Printing Profile Setting the FINE Cartridge to be Used Managing the Printer Power Changing the Printer Operation Mode…
-
Page 126: Changing The Print Options
Changing the Print Options You can change the detailed printer driver settings for print data that is sent from an application software. Specify this option if you encounter print failures such as part of an image data being cut off. 1.
-
Page 127: Registering A Frequently Used Printing Profile
Registering a Frequently Used Printing Profile You can register the frequently used printing profile to Commonly Used Settings on the Quick Setup tab. Unnecessary printing profiles can be deleted at any time. Registering a Printing Profile 1. Open the printer driver setup window 2.
- Page 128
Quick Setup tab. The name and icon are displayed in Commonly Used Settings. Important • To save the page size, orientation, and number of copies that was set in each sheet, click Options…, and check each item. Note • When you re-install the printer driver or upgrade the printer driver version, the print settings that are already registered will be deleted from Commonly Used Settings. -
Page 129: Setting The Fine Cartridge To Be Used
Setting the FINE Cartridge to be Used This feature enables you to specify the most appropriate FINE cartridge among installed cartridges according to an intended use. 1. Open the printer driver setup window 2. Click Print Options… on the Page Setup tab The Print Options dialog box appears.
-
Page 130: Managing The Printer Power
Managing the Printer Power This function allows you to manage the printer power from the Canon IJ Printer Assistant Tool. Power Off The Power Off function turns off the printer. When you use this function, you will not be able to turn the printer on from the Canon IJ Printer Assistant Tool.
- Page 131
Note • When the printer is turned off, the Canon IJ Status Monitor message varies depending on the Auto Power On setting. When the setting is Enable, «Printer is standing by» is displayed. When the setting is Disable,… -
Page 132: Changing The Printer Operation Mode
3. If necessary, complete the following settings: Align heads manually Usually, the Print Head Alignment function in the Canon IJ Printer Assistant Tool is set to automatic head alignment, but you can change it to manual head alignment. If the printing results of automatic print head alignment are not satisfactory, perform manual head alignment.
- Page 133
4. Apply the settings Click OK and when the confirmation message appears, click OK. The printer operates with the modified settings hereafter. -
Page 134: Changing Settings From Operation Panel
Changing Settings from Operation Panel Quiet setting Turning on/off Printer Automatically Initializing Printer Settings Switching/Disabling Wireless Connection Function…
-
Page 135: Quiet Setting
Quiet setting Enables this function on the printer if you want to reduce the operating noise, such as when printing at night. Follow the procedure below to perform setting. Make sure that the printer is turned on. 2. Press the Setup button until «12» appears on the LCD. 3.
-
Page 136: Initializing Printer Settings
Initializing Printer Settings You can initialize the printer settings. Important • For Windows: When using the printer over wireless LAN, note that initialization erases all network settings on the printer, and printing operation from a computer over network may become impossible. To use the printer over network, perform setup with the Setup CD-ROM or perform it according to the instructions on our website.
-
Page 137: Switching/Disabling Wireless Connection Function
Switching/Disabling Wireless Connection Function Follow the procedure below to switch the wireless connection function or to disable it. Make sure that the printer is turned on. 2. Press the Network button. 3. Make sure that the icon has disappeared on the LCD.
-
Page 138: Specifications
Specifications General Specifications Printing resolution (dpi) 4800* (horizontal) x 1200 (vertical) * Ink droplets can be placed with a pitch of 1/4800 inch at minimum. Interface USB Port: Hi-Speed USB *1 LAN Port: Wireless LAN: IEEE802.11n / IEEE802.11g / IEEE802.11b *2 *1 A computer that complies with Hi-Speed USB standard is required.
-
Page 139: Copy Specifications
* With the Paper Support and Paper Output Tray retracted. Weight Approx. 8.5 lb (Approx. 3.9 kg) * With the FINE Cartridges installed. Canon FINE Cartridge Total 1280 nozzles (BK 320 nozzles, C/M/Y each 320 nozzles) Copy Specifications Multiple copy max.
-
Page 140: Minimum System Requirements
Wireless LAN Supported Standards: IEEE802.11n / IEEE802.11g / IEEE802.11b Frequency bandwidth: 2.4 GHz Channel: 1-11 or 1-13 * Frequency bandwidth and available channels differ depending on country or region. Communication distance: Indoors 164 feet/50 m * Effective range varies depending on the installation environment and location. Security: WEP (64/128 bits) WPA-PSK (TKIP/AES)
- Page 141
Other Supported OS iOS, Android, Windows 10 Mobile Some functions may not be available with the supported OS. Refer to the Canon web site for details. Mobile Printing Capability Apple AirPrint Google Cloud Print PIXMA Cloud Link • Internet connection or CD-ROM drive is required to install the software for Windows. -
Page 142: Information About Paper
Information about Paper Supported Media Types Paper Load Limit Unsupported Media Types Handling Paper Print Area…
-
Page 143: Supported Media Types
• For details on page sizes and media types, access the Canon website. • Genuine Canon paper is not available in some countries or regions. Note that in the United States, Canon paper is not sold by model number. Instead, purchase paper by name.
-
Page 144: Paper Weight
• Maximum size: 8.50 x 26.61 inches (215.9 x 676.0 mm) Paper Weight You can use paper in the following weight range. • 17 to 28 lb (64 to 105 g /m ) (plain paper other than genuine Canon paper)
-
Page 145: Paper Load Limit
Rear Tray Paper Output Tray Canon Red Label Superior <WOP111> Approx. 60 sheets Approx. 10 sheets Canon Océ Office Colour Paper <SAT213> Approx. 50 sheets Approx. 10 sheets Paper for printing photos: Note • For best results in continuous printing, remove printed sheets from the paper output tray to avoid smearing or discoloration.
-
Page 146: Unsupported Media Types
• Paper that is too thin (weighing less than 17 lb (64 g /m • Paper that is too thick (plain paper weighing more than 28 lb (105 g /m ), except for Canon genuine paper) • Paper thinner than a postcard, including plain paper or notepad paper cut to a small size (when printing on paper smaller than A5) •…
-
Page 147: Handling Paper
Handling Paper • Be careful not to rub or scratch the surfaces of any types of paper when handling. • Hold the paper as closely as possible to its edges and try not to touch the printing surface. The print quality may be degraded if the printing surface is smudged with sweat or oil that comes from your hands.
-
Page 148: Printing
Printing Printing from Computer Printing from Smartphone/Tablet Printing from Digital Camera Paper Settings…
-
Page 149: Printing From Computer
Printing from Computer Printing from Application Software (Windows Printer Driver) Printing from Application Software (AirPrint) Printing Using Canon Application Software Printing Using a Web Service…
-
Page 150: Printing From Application Software (Windows Printer Driver)
Printing from Application Software (Windows Printer Driver) Basic Printing Setup Basic Various Printing Methods Changing the Print Quality and Correcting Image Data Overview of the Printer Driver Printer Driver Description Updating the MP Drivers…
-
Page 151: Basic Printing Setup
Basic Printing Setup This section describes settings on the Quick Setup tab used for basic printing. Check that printer power is on Load paper in printer 3. Open printer driver’s setup screen 4. Select frequently used settings On the Quick Setup tab, use Commonly Used Settings to select from predefined print settings. When you select a print setting, the settings for Additional Features, Media Type, and Printer Paper Size automatically switch to the predefined values.
- Page 152
Important • The print quality selections will differ depending on which print setting you select. 6. Click OK The printer will now print using these settings. Important • When you select Always Print with Current Settings, the settings on the Quick Setup, Main, and Page Setup tabs are saved, and those settings are used in subsequent printings. - Page 153
Note • If the paper size in the printer driver does not match the one registered on the printer, an error may occur. For instructions on what to do if an error occurs, see «Paper Settings.»… -
Page 154: Paper Settings On The Printer Driver
Media name <Model No.> Media Type in the printer driver Canon Red Label Superior <WOP111> Plain Paper Canon Océ Office Colour Paper <SAT213> Plain Paper Canon genuine papers (Photo Printing) Media name <Model No.> Media Type in the printer driver Photo Paper Plus Glossy II <PP-201/PP-301>…
-
Page 155: Various Printing Methods
Various Printing Methods Setting a Page Size and Orientation Setting the Number of Copies and Printing Order Execute Borderless Printing Scaled Printing Page Layout Printing Tiling/Poster Printing Duplex Printing Printing on Postcards…
-
Page 156: Setting A Page Size And Orientation
Setting a Page Size and Orientation The paper size and orientation are essentially determined by the application software. When the page size and orientation set for Page Size and Orientation on the Page Setup tab are same as those set with the application software, you do not need to select them on the Page Setup tab.
-
Page 157: Setting The Number Of Copies And Printing Order
Setting the Number of Copies and Printing Order You can also set the number of copies on the Quick Setup tab. 1. Open the printer driver setup window 2. Specify the number of copies to be printed For Copies on the Page Setup tab, specify the number of copies to be printed. 3.
- Page 158
• Print from Last Page: /Collate: • Print from Last Page: /Collate: 4. Click OK When you execute print, the specified number of copies will be printed with the specified printing order. Important • When the application software that you used to create the document has the same function, specify the settings on the printer driver. -
Page 159: Execute Borderless Printing
Execute Borderless Printing The borderless printing function allows you to print data without any margin by enlarging the data so that it extends slightly off the paper. In standard printing, margins are created around the document area. However, in borderless printing function, these margins are not created. When you want to print data such as a photo without providing any margin around it, set borderless printing.
- Page 160
Check the Page Size list. When you want to change it, select another page size from the list. The list displays only sizes that can be used for borderless printing. 4. Adjust the amount of extension from the paper If necessary, adjust the amount of extension using the Amount of Extension slider. Moving the slider to the right increases the amount extending off the paper, and moving the slider to the left decreases the amount. - Page 161
Note • When the Amount of Extension slider is set to the leftmost position, image data will be printed in the full size. If you set this when printing the address side of a postcard, the postal code of the sender is printed in the correct position. -
Page 162: Scaled Printing
Scaled Printing 1. Open the printer driver setup window 2. Set scaled printing Select Scaled from the Page Layout list on the Page Setup tab. 3. Select the paper size of the document Using Page Size, select the page size that is set with your application software. 4.
- Page 163
• Specify a scaling factor Directly type in a value into the Scaling box. The current settings are displayed in the settings preview on the left side of the printer driver. 5. Click OK When you execute print, the document will be printed with the specified scale. Important •… - Page 164
Note • Selecting Scaled changes the printable area of the document. -
Page 165: Page Layout Printing
Page Layout Printing The page layout printing function allows you to print more than one page image on a single sheet of paper. 1. Open the printer driver setup window 2. Set page layout printing Select Page Layout from the Page Layout list on the Page Setup tab. The current settings are displayed in the settings preview on the left side of the printer driver.
- Page 166
Page Layout To change the number of pages to be printed on a single sheet of paper, select the number of pages from the list. Page Order To change the page arrangement order, select a placement method from the list. Page Border To print a page border around each document page, check this check box. -
Page 167: Tiling/Poster Printing
Tiling/Poster Printing The tiling/poster printing function allows you to enlarge image data, divide it into several pages, and print these pages on separate sheets of paper. You can also paste the pages together to create a large print like a poster. Setting Tiling/Poster Printing 1.
- Page 168
If necessary, click Specify…, specify the following settings in the Tiling/Poster Printing dialog box, and then click OK. Image Divisions Select the number of divisions (vertical x horizontal). As the number of divisions increases, the number of sheets used for printing increases. If you are pasting pages together to create a poster, increasing the number of divisions allows you to create a larger poster. - Page 169
Note • Click the deleted pages to display them again. • Right-click the settings preview to select Print all pages or Delete all pages. 2. Complete the setup After completing the page selection, click OK. When you execute print, only specified pages will be printed. Important •… -
Page 170: Duplex Printing
Duplex Printing You can also set duplex printing in Additional Features on the Quick Setup tab. 1. Open the printer driver setup window 2. Set duplex printing Check the Duplex Printing (Manual) check box on the Page Setup tab. 3. Select the layout Select Normal-size, Fit-to-Page, Scaled, or Page Layout from the Page Layout list.
- Page 171
(Manual) and Stapling Side appear grayed out and are unavailable. Note • If the back side of the paper becomes smudged during duplex printing, perform Bottom Plate Cleaning in the Canon IJ Printer Assistant Tool. Related Topics Cleaning Inside the Printer… -
Page 172: Printing On Postcards
To display guide messages again, open the Maintenance tab and click View Printer Status to start the Canon IJ Status Monitor. On the Option menu, choose Display Guide Message and click Hagaki Printing to enable the setting.
-
Page 173: Overview Of The Printer Driver
Overview of the Printer Driver Canon IJ Printer Driver Opening Printer Driver’s Setup Screen Canon IJ Status Monitor Checking Ink Status from Your Computer Instructions for Use (Printer Driver)
-
Page 174: Canon Ij Printer Driver
Canon IJ Printer Driver The Canon IJ printer driver (simply called printer driver below) is software that you install onto your computer so that it can communicate with the printer. The printer driver converts the print data created by your application software into data that your printer can understand, and sends the converted data to the printer.
-
Page 175: Opening Printer Driver’s Setup Screen
Opening Printer Driver’s Setup Screen You can display the printer driver’s setup screen from your application software or by clicking the printer icon. Displaying the Printer Driver’s Setup Screen from Your Application Software Perform this procedure to set up the print settings during printing. 1.
-
Page 176: Canon Ij Status Monitor
Canon IJ Status Monitor The Canon IJ Status Monitor is an application software that shows the status of the printer and the progress of printing. You will know the status of the printer with graphics, icons, and messages. Launching the Canon IJ Status Monitor The Canon IJ Status Monitor launches automatically when print data is sent to the printer.
- Page 177
In such cases, take the appropriate action as described. -
Page 178: Checking Ink Status From Your Computer
Ink status is displayed as an illustration. Note • The information displayed on the Canon IJ Status Monitor may differ depending on the country or region where you are using your printer. • When you receive a notice about the remaining ink level, a mark appears on the left of the ink icon.
-
Page 179: Instructions For Use (Printer Driver)
Instructions for Use (Printer Driver) This printer driver is subject to the following restrictions. Keep the following points in mind when using the printer driver. Restrictions on the Printer Driver • With some applications, the Copies setting in the Page Setup tab of the printer driver may not be enabled.
- Page 180
3. Set the Page Layout that you want, and then click OK to close the window. 4. Without starting printing, close the Print dialog box. 5. Open Word’s Print dialog box again. 6. Open the printer driver setup window and click OK. 7. -
Page 181: Printer Driver Description
Printer Driver Description Quick Setup tab Description Main tab Description Page Setup tab Description Maintenance tab Description Canon IJ Status Monitor Description…
-
Page 182: Quick Setup Tab Description
Quick Setup tab Description The Quick Setup tab is for registering commonly used print settings. When you select a registered setting, the printer automatically switches to the preset items. Commonly Used Settings The names and icons of frequently used printing profiles are registered. When you select a printing profile according to the purpose of the document, settings that match the purpose are applied.
- Page 183
Check this check box to display a preview before printing. Uncheck this check box if you do not want to display a preview. Important • To use the Canon IJ XPS Preview, you must have Microsoft .NET Framework 4.5.2 or later installed on your computer. Additional Features Displays the frequently used, convenient functions for the printing profile that you selected for Commonly Used Settings on the Quick Setup tab. - Page 184
4-on-1 Printing Prints four pages of the document, side by side, on one sheet of paper. To change the page sequence, click the Page Setup tab, select Page Layout for Page Layout, and click Specify..Then in the Page Layout Printing dialog box that appears, specify the Page Order. - Page 185
Prints the document by rotating it 90 degrees relative to the paper feed direction. You can change the rotation direction by going to the Canon IJ Printer Assistant Tool, opening the Custom Settings dialog box, and then using Rotate 90 degrees left when orientation is [Landscape] check box. - Page 186
Defaults Restores all the settings you have changed to their default values. Click this button to return all settings on the Quick Setup, Main, and Page Setup tabs to their default values (factory settings). Save Commonly Used Settings dialog box This dialog box allows you to save the information that you set on the Quick Setup, Main, and Page Setup tabs and add the information to the Commonly Used Settings list on the Quick Setup tab. - Page 187
Custom Paper Size dialog box This dialog box allows you to specify the size (width and height) of the custom paper. Units Select the unit for entering a user-defined paper size. Paper Size Specifies the Width and the Height of the custom paper. Measurement is shown according to the units specified in Units. -
Page 188: Main Tab Description
Main tab Description The Main tab allows you to create a basic print setup in accordance with the media type. Unless special printing is required, normal printing can be performed just by setting the items on this tab. Settings Preview The paper illustration shows how the original will be laid out on a sheet of paper.
- Page 189
Shows what the print result will look like before you actually print the data. Check this check box to display a preview before printing. Important • To use the Canon IJ XPS Preview, you must have Microsoft .NET Framework 4.5.2 or later installed on your computer. Defaults Restores all the settings you have changed to their default values. -
Page 190: Color Adjustment Tab
Important • Certain print quality levels cannot be selected depending on the settings of Media Type. Note • The High, Standard, or Draft print quality modes are linked with the slider bar. Therefore when the slider bar is moved, the corresponding quality and value are displayed on the left. This is the same as when the corresponding radio button is selected for Print Quality on the Main tab.
- Page 191
contrast. You can also directly enter a value linked to the slider. Enter a value in the range from -50 to 50. Print a pattern for color adjustment When the color balance or intensity/contrast is changed, the pattern printing function prints a list of the adjustment results along with the adjustment values. - Page 192
• When Grayscale Printing is checked on the Main tab, Color Correction appears grayed out and is unavailable. Driver Matching With Canon Digital Photo Color, you can print sRGB data with color tints that most people prefer. ICM (ICC Profile Matching) Adjusts the colors by using an ICC profile when printing. - Page 193
Adjusting Color Balance Using Sample Patterns (Printer Driver) Adjusting Intensity/Contrast Using Sample Patterns (Printer Driver) Specifying Color Correction Adjusting Colors with the Printer Driver Printing with ICC Profiles Printing a Color Document in Monochrome Displaying the Print Results before Printing… -
Page 194: Page Setup Tab Description
Prints the document by rotating it 90 degrees relative to the paper feed direction. You can change the rotation direction by going to the Canon IJ Printer Assistant Tool, opening the Custom Settings dialog box, and then using Rotate 90 degrees left when orientation is [Landscape] check box.
- Page 195
Rotate 180 degrees Prints the document by rotating it 180 degrees against the paper feed direction. The width of print area and the amount of extension that are configured in other application software will be reversed vertically and horizontally. Printer Paper Size Selects the size of paper actually loaded into the printer. - Page 196
Specify… Opens the Page Layout Printing dialog box. Click this button to set details on page layout printing. Tiling/Poster This function enables you to enlarge the image data and divide the enlarged data into several pages to be printed. You can also glue together these sheets of paper to create large printed matter, such as a poster. - Page 197
Important • When the application software that you used to create the document has the same function, give priority to the printer driver settings. However, if the print results are not acceptable, specify the function settings on the application software. When you specify the number of copies and the printing order with both the application and this printer driver, the number of copies may be multiplied numbers of the two settings or the specified printing order may not be enabled. - Page 198
Page Border Prints a page border line around each document page. Check this check box to print the page border line. Tiling/Poster Printing dialog box This dialog box allows you to select the size of the image to be printed. You can also make settings for cut lines and paste markers which are convenient for pasting together the pages into a poster. - Page 199
Preview Icon Shows the settings made on the Booklet Printing dialog box. You can check what the document will look like when printed as a booklet. Margin for stapling Specifies which side of the booklet is to be stapled. Insert blank page Selects whether to print the document on one side or both sides of the booklet. - Page 200
Disable the color profile setting of the application software Checking this check box disables information in the color profile that was set on the application software. When the information in the color profile set on the application software is output to the printer driver, the print result may contain unexpected colors. - Page 201
Prevention of Print Data Loss You can reduce the size of the print data that was created with the application software and then print the data. Depending on the application software being used, the image data may be cut off or may not be printed properly. -
Page 202: Stamp Tab
Place stamp over text Sets how the stamp is to be printed over the document. Check the Stamp check box to enable this. Check this check box to print a stamp over the printed document page. The printed data may be hidden behind the stamp.
- Page 203
Date/Time/User Name to display the creation date/time and user name of the printed document. The setting items in the Stamp tab change depending on the selected type. When Stamp Type is Text or Date/Time/User Name Stamp Text Specifies the stamp text string. Up to 64 characters can be entered. - Page 204
Placement Tab The Placement tab allows you to set the position where the stamp is to be printed. Preview Window Shows the status of the stamp configured in each tab. Position Specifies the stamp position on the page. Selecting Custom from the list allows you to enter values for the X-Position and Y-Position coordinates directly. - Page 205
Preview Window Shows the status of the bitmap set on the Background tab. File Specifies the name of the bitmap file to be used as the background. Select File… Opens the dialog box to open a file. Click this button to select a bitmap file (.bmp) to be used as the background. Layout Method Specifies how the background image is to be placed on the paper. -
Page 206: Maintenance Tab Description
Maintenance tab Description The Maintenance tab allows you to start the Canon IJ Printer Assistant Tool or check the status of the printer. Maintenance and Preferences Canon IJ Printer Assistant Tool is started. You can perform printer maintenance or change the settings of the printer.
- Page 207
About dialog box When you click About, the About dialog box is displayed. This dialog box displays the version, copyright, and module list of the printer driver. You can select the language to be used and switch the language displayed in the setup window. Modules Lists the printer driver modules. -
Page 208: Canon Ij Status Monitor Description
Overview of the Canon IJ Status Monitor The Canon IJ Status Monitor uses images and messages to display the printer status and the ink status. During printing, you can check information about the document being printed and the print progress.
- Page 209
Ink Model Number You can look up the correct FINE cartridge for your printer. Option Menu If a printer message appears, select Enable Status Monitor to start the Canon IJ Status Monitor. Select Enable Status Monitor to use the following commands: Always Display Current Job Displays the Canon IJ Status Monitor whenever a document is being printed. - Page 210
Displays the For secure communication window. This window allows you to download the route certificate, register it to the browser, and disable warning displays. Help Menu Select this menu to display Help information for the Canon IJ Status Monitor including version and copyright information. -
Page 211: Installing The Mp Drivers
Installing the MP Drivers You can access our web site through the Internet and download the latest MP Drivers and XPS printer driver for your model. 1. Turn off the printer 2. Start the installer Double-click the icon of the downloaded file. The installation program starts.
-
Page 212: Printing From Smartphone/Tablet
Printing from Smartphone/Tablet Printing from iPhone/iPad/iPod touch (iOS) Printing from Smartphone/Tablet (Android) Printing from Windows 10 Mobile Device Printing/Scanning with Wireless Direct…
-
Page 213: Printing/Scanning With Wireless Direct
Printing/Scanning with Wireless Direct You can connect devices (e.g. smartphone or tablet) to the printer by two methods below. • Wireless connection (connecting devices via a wireless router) • Direct wireless connection (connecting devices using Wireless Direct) This section describes Wireless Direct, which allows you to print by connecting the devices to the printer directly.
- Page 214
2. Select «XXXXXX-TS3100 series» («XXXXXX» represents last six digits of printer’s MAC address.) from list displayed on device. Note • If «XXXXXX-TS3100 series» does not appear on the list, Wireless Direct is not enabled. Enabling Wireless Direct of Printer to enable Wireless Direct. -
Page 215: Paper Settings
Paper Settings By registering the paper size of paper loaded on the rear tray, you can prevent the printer from misprinting by displaying the error code before printing starts when the paper size of the loaded paper differs from the print settings.
- Page 216
When the paper size setting for printing is different from the paper size setting set to the printer: • Paper size setting for printing: A5 • Paper size setting set to the printer: A4 When you start printing, an error code appears on the LCD. Select one of the operations below. - Page 217
For example, when the paper size setting for printing is A5 and the paper size setting set to A4 on the LCD, the printer starts printing with A5 on the paper loaded. • Printing after replacing paper You print after replacing paper loaded on the rear tray. For example, when the paper size setting for printing is A5 and the paper size setting set to A4 on the LCD, you load A5 sized paper before you start printing. -
Page 218: Copying
Copying Making Copies on Plain Paper Basics Copying on Photo Paper Copying Using Smartphone or Tablet…
-
Page 219: Making Copies On Plain Paper
Making Copies on Plain Paper Load the original on the platen glass to copy on the A4, Letter, B5, or A5 sized plain paper. Make sure that the printer is turned on. Load paper. Load A4, Letter, B5, or A5 sized plain paper. Select A4, LTR, B5, or A5 size for paper size setting on the LCD.
-
Page 220: Print Quality
Copying on Photo Paper • If you press the Color button or the Black button when the paper size is not selected on the LCD, an error code appears on the LCD. An Error Occurs Note • The original is copied at the same magnification on plain paper. The original is copied on plain paper with borders.
-
Page 221: Copying On Photo Paper
Copying on Photo Paper Load the original on the platen glass to copy on the KG/10x15cm(4×6), 13x18cm(5×7), or Square size (127x127mm) photo paper. Make sure that the printer is turned on. Load paper. Load KG/10x15cm(4×6), 13x18cm(5×7), or Square size (127x127mm) photo paper. Select KG, 4″x6″/10x15cm, 5″x7″/13x18cm, or 5″x5″/13x13cm size for paper size setting on the LCD.
- Page 222
An Error Occurs Note • The original is copied automatically by reducing/enlarging to fit the paper size of photo paper. The original is copied on photo paper without borders. • If you copy the rectangular original on the square size paper, it will be copied with missing the top and bottom edges or the left and right edges. -
Page 223: Scanning
Scanning Scanning from Computer (AirPrint) Scanning from Computer (Windows) Scanning Using Smartphone/Tablet…
-
Page 224: Scanning From Computer (Windows)
Scanning from Computer (Windows) Scanning According to Item Type or Purpose (IJ Scan Utility) IJ Scan Utility Features Scanning Easily (Auto Scan) Basics Scanning Documents and Photos Scanning Using Application Software (ScanGear) Scanning Tips Positioning Originals (Scanning from Computer) Network Scan Settings IJ Network Scanner Selector EX2 Menu and Setting Screen…
-
Page 225: Scanning According To Item Type Or Purpose (Ij Scan Utility)
Scanning According to Item Type or Purpose (IJ Scan Utility) IJ Scan Utility Features Scanning Easily (Auto Scan) Basics Scanning Documents and Photos…
-
Page 226: Ij Scan Utility Features
IJ Scan Utility Features Use IJ Scan Utility to scan and save documents, photos, or other items at one time by simply clicking the corresponding icon. Multiple Scanning Modes Auto allows for one click scanning with default settings for various items. Document will sharpen text in a document or magazine for better readability, and Photo is best suited for scanning photos.
- Page 227
Note • To set the applications to integrate with, see Settings Dialog Box. -
Page 228: Scanning Easily (Auto Scan)
Scanning Easily (Auto Scan) Auto Scan allows for automatic detection of the type of the item placed on the platen. Important • The following types of items may not be scanned correctly. In that case, adjust the cropping frames (scan areas) in whole image view of ScanGear (scanner driver), and then scan again. •…
-
Page 229: Scanning Documents And Photos
Scanning Documents and Photos Scan items placed on the platen with settings suitable for documents or photos. Save documents in formats such as PDF and JPEG, and photos in formats such as JPEG and TIFF. 1. Place the item on the platen. Positioning Originals (Scanning from Computer) 2.
-
Page 230: Scanning Using Application Software (Scangear)
Scanning Using Application Software (ScanGear) What Is ScanGear (Scanner Driver)? Starting ScanGear (Scanner Driver) Scanning in Basic Mode ScanGear (Scanner Driver) Screens General Notes (Scanner Driver) Important • Available functions and settings vary depending on your scanner or printer.
-
Page 231: What Is Scangear (Scanner Driver)
What Is ScanGear (Scanner Driver)? ScanGear (scanner driver) is software required for scanning documents. Use the software to specify the output size, image corrections, and other settings. ScanGear can be started from IJ Scan Utility or applications that are compatible with the standard TWAIN interface.
-
Page 232: Advanced Mode
Advanced Mode Use the Advanced Mode tab to scan by specifying the color mode, output resolution, image brightness, color tone, and other settings.
-
Page 233: Starting Scangear (Scanner Driver)
Starting ScanGear (Scanner Driver) Use ScanGear (scanner driver) to make image corrections and color adjustments when scanning. Start ScanGear from IJ Scan Utility or other applications. Note • If you have more than one scanner or have a network compatible model and changed the connection from USB connection to network connection, set up the network environment.
-
Page 234: Scanning In Basic Mode
Scanning in Basic Mode Use the Basic Mode tab to scan easily by following these simple on-screen steps. To scan multiple documents at one time from the Platen, see Scanning Multiple Documents at One Time with ScanGear (Scanner Driver). When scanning from the ADF (Auto Document Feeder), preview is not available. Important •…
- Page 235
Important • Some applications do not support continuous scanning from the ADF. For details, see the application’s manual. Note • To scan magazines containing many color photos, select Magazine (Color). 3. Click Preview. Preview image appears in the Preview area. Important •… - Page 236
7. Set Image corrections as needed. 8. Click Scan. Scanning starts. Note • Click (Information) to display a dialog box showing the document type and other details of the current scan settings. • How ScanGear behaves after scanning is complete can be set from Status of ScanGear dialog after scanning on the Scan tab of the Preferences dialog box. -
Page 237: Scangear (Scanner Driver) Screens
ScanGear (Scanner Driver) Screens Basic Mode Tab Advanced Mode Tab…
-
Page 238: Basic Mode Tab
Basic Mode Tab Use the Basic Mode tab to scan easily by following these simple on-screen steps. This section describes the settings and functions available on the Basic Mode tab. (1) Settings and Operation Buttons (2) Toolbar (3) Preview Area Note •…
- Page 239
Document (Grayscale) ADF Duplex (only for models supporting ADF duplex scanning) Scan both sides of documents from the ADF in black and white. Important • Some applications do not support continuous scanning from the ADF. For details, see the application’s manual. Note •… - Page 240
Output Size Select an output size. Output size options vary by the item selected in Destination. Flexible Adjust the cropping frames (scan areas) freely. In thumbnail view: Drag the mouse over a thumbnail to display a cropping frame. When a cropping frame is displayed, the portion within the cropping frame will be scanned. - Page 241
Important • Predefined output sizes such as A4 and 1024 x 768 pixels cannot be deleted. Note • Save up to 10 items. • An error message appears when you enter a value outside the setting range. Enter a value within the setting range. - Page 242
Important • Be sure to see Gutter Shadow Correction for precautions and other information on using this function. Color Pattern… Adjust the image’s overall color. Correct colors that have faded due to colorcast or other reasons and reproduce natural colors while previewing color changes. Adjusting Colors Using a Color Pattern Important •… - Page 243
(Rotate Right) Rotates the preview image 90 degrees clockwise. • The result will be reflected in the scanned image. • The image returns to its original state when you preview again. (Auto Crop) Displays and adjusts the cropping frame automatically to the size of the document displayed in the Preview area. - Page 244
When (Thumbnail) is displayed on Toolbar: Cropping frames are specified according to the document size, and thumbnails of scanned images appear. Only the images with the checkbox selected will be scanned. Note • When multiple images are previewed, different outlines indicate different selection status. •… - Page 245
Note • Create cropping frame(s) on the displayed image. In thumbnail view, one cropping frame can be created per image. In whole image view, multiple cropping frames can be created. Adjusting Cropping Frames (ScanGear) Related Topic Scanning in Basic Mode… -
Page 246: Advanced Mode Tab
Advanced Mode Tab This mode allows you to make advanced scan settings such as the color mode, output resolution, image brightness, and color tone. This section describes the settings and functions available on the Advanced Mode tab. (1) Settings and Operation Buttons (2) Toolbar (3) Preview Area Note…
- Page 247
Enter Setting Name and click Add; the name appears in Favorite Settings List. When you click Save, the item appears in the Favorite Settings list and can be selected, along with the predefined items. To delete an item, select it in Favorite Settings List and click Delete. Click Save to save the settings displayed in Favorite Settings List. - Page 248
Note • Zoom rescans the document and displays high-resolution image in Preview. • (Enlarge/Reduce) on the Toolbar zooms in on the preview image quickly. However, the resolution of the displayed image will be low. Preview Performs a trial scan. Scan Starts scanning. - Page 249
In thumbnail view: In whole image view: (Thumbnail) / (Whole Image) Switches the view in the Preview area. (3) Preview Area (Clear) Deletes the preview image from the Preview area. It also resets the Toolbar and color adjustment settings. (Crop) Allows you to specify the scan area by dragging the mouse. - Page 250
(Uncheck All Frames) Available when two or more frames are displayed. Deselects the checkboxes of the images in thumbnail view. (Select All Frames) Available when two or more frames are displayed. Selects the images in thumbnail view and outlines them in blue. (Select All Cropping Frames) Available when two or more cropping frames are specified. - Page 251
Note • When multiple images are previewed, different outlines indicate different selection status. • Focus Frame (thick blue outline): The displayed settings will be applied. • Selected Frame (thin blue outline): The settings will be applied to the Focus Frame and Selected Frames simultaneously. -
Page 252: General Notes (Scanner Driver)
General Notes (Scanner Driver) ScanGear (scanner driver) is subject to the following restrictions. Keep these points in mind when using it. Scanner Driver Restrictions • When using the NTFS file system, the TWAIN data source may not be invoked. This is because the TWAIN module cannot be written to the winnt folder for security reasons.
- Page 253
• Images may not be scanned correctly in some applications. In that case, increase the operating system’s virtual memory and retry. • When image size is too large (such as when scanning large images at high resolution), your computer may not respond or the progress bar may remain at 0 % depending on the application. In that case, cancel the action (for example by clicking Cancel on the progress bar), then increase the operating system’s virtual memory or reduce the image size/resolution and retry. -
Page 254: Scanning Tips
Scanning Tips Positioning Originals (Scanning from Computer) Network Scan Settings IJ Network Scanner Selector EX2 Menu and Setting Screen…
-
Page 255: Positioning Originals (Scanning From Computer)
Positioning Originals (Scanning from Computer) This section describes how to load originals on the platen for scanning. If items are not placed correctly they may not be scanned correctly. Important • Do not place objects on the document cover. When you open the document cover, the objects may fall into your scanner or printer, resulting in malfunction.
- Page 256
Multiple items: Allow 0.4 inch (1 cm) or more space between the edges (di- agonally striped area) of the platen and items, and between items. Portions placed on the diagonally striped area cannot be scanned. 0.4 inch (1 cm) or more Note •… -
Page 257: Network Scan Settings
• If the icon is not displayed in the notification area on the desktop, follow the procedure below to start. • Windows 10: From the Start menu, click All apps > Canon Utilities > IJ Network Scanner Selector EX2. • Windows 8.1: Click IJ Network Scanner Selector EX2 on the Start screen.
- Page 258
• Windows 7: From the Start menu, click All Programs > Canon Utilities > IJ Network Scanner Selector EX2 > IJ Network Scanner Selector EX2. The icon appears in the notification area on the desktop, and the Scan-from-PC Settings screen appears. - Page 259
Note • If your scanner or printer does not appear, check the following, click OK to close the screen, then reopen it and try selecting again. • MP Drivers is installed • Network settings of your scanner or printer is completed after installing the MP Drivers •… -
Page 260: Scanning Using Smartphone/Tablet
Scanning Using Smartphone/Tablet Using PIXMA/MAXIFY Cloud Link Printing/Scanning with Wireless Direct…
-
Page 261: Frequently Asked Questions
Frequently Asked Questions Cannot Find Printer on Network Cannot Find Printer while Using Wireless LAN Network Key Unknown Network Cannot Print or Connect For other questions about network, click here. Printing Does Not Start Paper Is Blank/Printing Is Blurry/Colors Are Wrong/White Streaks Appear Print Results Are Unsatisfactory Print List of Support Code for Error (Paper Jams)
- Page 262
Scan Results Are Unsatisfactory (Mac OS) Cannot Print/Scan from Smartphone/Tablet Cannot Set Correctly (Network) Cannot Find Printer on Check Printer Settings Screen During Setup (Windows) Cannot Find Printer while Using Wireless LAN Printer Suddenly Cannot Be Used Network Key Unknown Administrator Password Set for Printer Unknown Printer Cannot Be Used After Replacing Wireless Router or Changing Its Settings Message Appears on Computer During Setup… -
Page 263: Network Settings And Common Problems
Network Settings and Common Problems Here are frequently asked questions on network. Select a connection method you are using, or you want to use. Wireless LAN Wireless Direct Wireless LAN Cannot Find Printer Cannot Find Printer while Using Wireless LAN Cannot Find Printer on Check Printer Settings Screen During Setup (Windows) Cannot Proceed beyond Printer Connection Screen Cannot Find Printer after Searching it on Printer Detection Screen During Setup…
- Page 264
Cannot Connect Smartphone/Tablet to Wireless Router Checking Wireless Router SSID for Smartphone/Tablet Setting Up Using Smartphone/Tablet Cannot Print/Scan from Smartphone/Tablet Downloading Canon PRINT Inkjet/SELPHY Problems while Using Printer Message Appears on Computer During Setup Printing Is Slow Ink Level Not Shown on Printer Status Monitor (Windows) -
Page 265: Network Communication Problems
Network Communication Problems Cannot Find Printer on Network Network Connection Problems Other Network Problems…
-
Page 266: Cannot Find Printer On Network
Cannot Find Printer on Network While performing printer setup: Cannot Find Printer on Check Printer Settings Screen During Setup (Windows) Cannot Proceed beyond Printer Connection Screen While using printer: Cannot Find Printer while Using Wireless LAN…
-
Page 267: Cannot Find Printer On Check Printer Settings Screen During Setup (Windows)
Cannot Find Printer on Check Printer Settings Screen During Setup (Windows) If the printer cannot be found and the Check Printer Settings screen appears after searching the printer by Automatic search on the Search for Printers screen, click Redetect and search for the printer again by the IP address on the Search for Printers screen.
-
Page 268: Checking Power Status
Cannot Find Printer on Check Printer Settings Screen During Wireless LAN Setup (Windows)-Checking Power Status Are printer and network device (router, etc.) turned on? Make sure the printer is turned on. Confirming that the Power Is On Make sure network device (router, etc.) is turned on. If printer or network device is off: Turn on printer or network device.
-
Page 269: Checking Pc Network Connection
Cannot Find Printer on Check Printer Settings Screen During Wireless LAN Setup (Windows)-Checking PC Network Connection Can you view any web pages on your computer? Make sure the computer and network device (router, etc.) are configured and the computer is connected to the network.
-
Page 270: Cannot Find Printer On Check Printer Settings Screen During Wireless Lan Setup (Windows)-Checking Printer’s Wireless Lan Settings
Cannot Find Printer on Check Printer Settings Screen During Wireless LAN Setup (Windows)-Checking Printer’s Wireless LAN Settings Is printer set to allow wireless communication? Make sure the icon is displayed on the LCD. If icon is not displayed: The printer is not set to allow wireless communication. Turn on wireless communication on the printer. If icon is displayed: Cannot Find Printer on Check Printer Settings Screen During Wireless LAN Setup (Windows)- Checking Wireless LAN Environment…
-
Page 271: Cannot Find Printer On Check Printer Settings Screen During Wireless Lan Setup (Windows)-Checking Wireless Lan Environment
Cannot Find Printer on Check Printer Settings Screen During Wireless LAN Setup (Windows)-Checking Wireless LAN Environment Is the printer connected to the wireless router? Check the connection status between the printer and wireless router using the sign on the right of the icon.
- Page 272
Important • Note that some wireless routers distinguish SSIDs by the last alphanumeric character according to their bandwidth (2.4 GHz or 5 GHz) or purpose (for computer or game machine). To check the SSID of the wireless router the printer is connected to, print the network settings. Printing Network Settings For details, see the instruction manual supplied with the wireless router or contact the manufacturer. -
Page 273: Checking Printer’s Ip Address
Cannot Find Printer on Check Printer Settings Screen During Wireless LAN Setup (Windows)-Checking Printer’s IP Address Is printer’s IP address specified correctly? If printer’s IP address is not specified correctly, the printer may not be found. Make sure whether printer’s IP address is not used for another device.
-
Page 274: Cannot Find Printer On Check Printer Settings Screen During Wireless Lan Setup (Windows)-Checking Security Software Settings
• If no message appears: Cancel the setup, and then set the security software to allow Canon software to access the network. The file Setup.exe or Setup64.exe in the win > Driver > DrvSetup folder on the Setup CD-ROM After setting the security software, redo the network communication setup from the beginning.
-
Page 275: Cannot Find Printer On Check Printer Settings Screen During Wireless Lan Setup (Windows)-Checking Wireless Router Settings
Cannot Find Printer on Check Printer Settings Screen During Wireless LAN Setup (Windows)-Checking Wireless Router Settings Check wireless router settings. Check wireless router network connection settings, such as IP address filtering, MAC address filtering, encryption key, and DHCP function. Make sure the same radio channel is assigned to the wireless router and the printer. To check the settings of the wireless router, see the instruction manual supplied with the wireless router or contact the manufacturer.
-
Page 276: Cannot Proceed Beyond Printer Connection Screen
Cannot Proceed beyond Printer Connection Screen If you cannot proceed beyond the Printer Connection screen, check the following. Make sure USB cable is securely plugged in to printer and computer. Check1 Connect the printer and the computer using a USB cable as the illustration below. The USB port is located at the back of the printer.
- Page 277
5. Restart computer. 6. Make sure you have no application software running. 7. Perform setup on web page. Note • You can use the Setup CD-ROM to redo setup. • For Mac OS: 1. Click Next. ◦ If the screen telling you that installation has not been completed appears, click Abort on displayed screen and finish setup. -
Page 278: Cannot Find Printer While Using Wireless Lan
Cannot Find Printer while Using Wireless LAN Make sure the printer is turned on. Check1 Check the (Network status) icon on LCD. Check2 If the icon is not displayed, press and hold the Network button for more than 2 seconds to enable wireless LAN. If the icon is displayed, see Check 3 or later checking items to make sure whether printer setup is complete or the settings of wireless router to connect are correct.
- Page 279
Note • IJ Network Device Setup Utility allows you to diagnose and repair the network status. Select the link below to download IJ Network Device Setup Utility and install it. Checking Printer Connection Status Using IJ Network Device Setup Utility See below for starting up IJ Network Device Setup Utility. - Page 280
Make sure security software’s firewall is off. Check9 If your security software’s firewall is on, a message may appear warning you that Canon software is attempting to access the network. If this warning message appears, set security software to always allow access. -
Page 281: Network Connection Problems
Network Connection Problems Printer Suddenly Cannot Be Used Network Key Unknown Printer Cannot Be Used After Replacing Wireless Router or Changing Its Settings…
-
Page 282: Printer Suddenly Cannot Be Used
Printer Suddenly Cannot Be Used Cannot Communicate with Printer Following Network Settings Change Cannot Communicate with Printer via Wireless LAN Cannot Communicate with Printer Using Wireless Direct Cannot Print or Scan from a Computer Connected to the Network Cannot Communicate with Printer Following Network Settings Change It may take a while for the computer to obtain an IP address, or you may need to restart your computer.
- Page 283
To check the current network settings of the printer, print out the network setting information. Printing Network Settings Note • IJ Network Device Setup Utility allows you to diagnose and repair the network status. Select the link below to download IJ Network Device Setup Utility and install it. Checking Printer Connection Status Using IJ Network Device Setup Utility See below for starting up IJ Network Device Setup Utility. - Page 284
Make sure security software’s firewall is off. Check9 If your security software’s firewall is on, a message may appear warning you that Canon software is attempting to access the network. If this warning message appears, set security software to always allow access. - Page 285
For more on how to check the computer settings or connection status, see your computer instruction manual or contact its manufacturer. If MP Drivers are not installed, install them. (Windows) Check2 Install the MP Drivers using the Setup CD-ROM or install them from the Canon website. - Page 286
Make sure wireless router does not restrict which computers can access it. Check3 For more on connecting to and setting up your wireless router, see the wireless router instruction manual or contact its manufacturer. Note • To check the MAC address or IP address of your computer, see Checking Computer IP Address or MAC Address. -
Page 287: Network Key Unknown
Network Key Unknown WPA/WPA2 or WEP Key Set for Wireless Router Unknown, Cannot Connect Setting an Encryption Key WPA/WPA2 or WEP Key Set for Wireless Router Unknown, Cannot Connect For more on setting up a wireless router, see the instruction manual provided with the wireless router or contact its manufacturer.
- Page 288
Selecting WPA, WPA2, or WPA/WPA2 is recommended for security reason. If your wireless router is compatible with WPA/WPA2, you can also use WPA2 or WPA. • Using WPA/WPA2 The authentication method, passphrase, and dynamic encryption type must be the same for the wireless router, the printer, and your computer. -
Page 289: Printer Cannot Be Used After Replacing Wireless Router Or Changing Its Settings
Printer Cannot Be Used After Replacing Wireless Router or Changing Its Settings When you replace a wireless router, redo the network setup for the printer. • For Windows: Perform setup using the Setup CD-ROM or from the web page. • For Mac OS: Perform setup from the web page.
- Page 290
If filtering MAC addresses or IP addresses at wireless router, check that MAC Check2 addresses or IP addresses for computer, network device, and printer are registered. If using WPA/WPA2 or WEP key, make sure encryption key for computer, Check3 network device, and printer matches key set for wireless router. Not only the WEP key itself, but also the key length, key format, the key ID to use, and the authentication method must be the same for the printer, the wireless router, and the computer. -
Page 291: Other Network Problems
Other Network Problems Checking Network Information Restoring to Factory Defaults…
-
Page 292: Checking Network Information
Printing Network Settings For Windows, you can check the network setting information on the computer screen. Canon IJ Network Device Setup Utility Screen Checking Computer IP Address or MAC Address To check the IP Address or MAC address of your computer, follow the instructions below.
- Page 293
Checking Communication Between the Computer, the Printer, and the Wireless Router Perform a ping test to check if communication is taking place. • For Windows: 1. Select Command Prompt as shown below. In Windows 10, right-click Start button and select Command Prompt. In Windows 8.1, select Command Prompt from the Start screen. - Page 294
Checking Network Setting Information To check the printer’s network settings information, print out the network settings information. Printing Network Settings… -
Page 295: Restoring To Factory Defaults
Restoring to Factory Defaults Important • For Windows: Initialization erases all network settings on the printer, making printing or scanning operation from a computer over a network impossible. To use the printer over a network again after restoring it to the factory defaults, redo setup using the Setup CD-ROM or from the web page.
-
Page 296: Printing Problems
Printing Problems Printing Does Not Start No Ink Comes Out Paper Does Not Feed Properly/»No Paper» Error Print Results Are Unsatisfactory…
-
Page 297: Printing Does Not Start
Printing Does Not Start Make sure printer is securely plugged in and press ON button to turn it on. Check1 The ON lamp flashes while the printer is initializing. Wait until the ON lamp stops flashing and remains lit. Note •…
- Page 298
• For Windows: Make sure «Canon XXX series» (where «XXX» is your printer’s name) is selected in the Print dialog box. Note • To make the printer the one selected by default, select Set as Default Printer. • For Mac OS: Make sure your printer’s name is selected in Printer in the Print dialog. -
Page 299: No Ink Comes Out
No Ink Comes Out When a FINE cartridge runs out of ink, replace it with a new one. Check1 Is the FINE cartridge installed properly? Check2 If the FINE cartridge is not installed securely, ink may not be ejected correctly. Retract the output tray extension and the paper output tray, open the cover, then remove the FINE cartridges.
- Page 300
• If problem is not resolved after performing print head deep cleaning twice: Ink may have run out. Replace the FINE cartridge. -
Page 301: Paper Does Not Feed Properly/»No Paper» Error
Paper Does Not Feed Properly/»No Paper» Error Make sure paper is loaded. Check1 Loading Paper When loading paper, consider the following. Check2 • When loading two or more sheets of paper, align the edges of the sheets before loading the paper. •…
- Page 302
Clean paper feed roller. Check6 Cleaning Paper Feed Rollers If the measures above do not solve the problem, contact your nearest Canon service center to request a repair. -
Page 303: Print Results Are Unsatisfactory
Print Results Are Unsatisfactory If the print results are unsatisfactory due to white streaks, misaligned lines, or uneven colors, check the paper and print quality settings first. Do page size and media type settings match size and type of loaded paper? Check1 If these settings do not match, it is not possible to obtain the proper result.
- Page 304
Uneven or Streaked Colors If Printed Paper Has Been Discolored Colors may fade with time if the printed paper is left for a long period of time. After printing, dry the paper sufficiently, avoid high temperatures, high humidity, and direct sunlight, and store or display indoors at room temperature and normal humidity. -
Page 305: Paper Is Blank/Printing Is Blurry/Colors Are Wrong/White Streaks Appear
Paper Is Blank/Printing Is Blurry/Colors Are Wrong/White Streaks Appear Printing Is Blurry Colors Are Wrong…
- Page 306
White Streaks Appear Check paper and print quality settings. Check1 Print Results Are Unsatisfactory Are the print head nozzles clogged? Check2 Print the nozzle check pattern to determine whether the ink ejects properly from the print head nozzles. For details on printing the nozzle check pattern, print head cleaning, and print head deep cleaning, see If Printing Is Faint or Uneven. - Page 307
Then install the FINE cartridges again. Push up the FINE cartridge until it clicks into place. After confirming that the FINE cartridge is installed properly, close the cover. • When copying, see also the sections below: Is platen glass dirty? Check6 Clean the platen glass. -
Page 308: Colors Are Unclear
Colors Are Unclear Is nozzle check pattern printed properly? Check1 Print the nozzle check pattern to determine whether the ink ejects properly from the print head nozzles. For details on printing the nozzle check pattern, print head cleaning, and print head deep cleaning, see If Printing Is Faint or Uneven.
- Page 309
After confirming that the FINE cartridge is installed properly, close the cover. Note • Printed colors may not match screen colors due to basic differences in the methods used to produce colors. Color control settings and environmental differences can also affect how colors appear on the screen. -
Page 310: Lines Are Misaligned
Lines Are Misaligned Check paper and print quality settings. Check1 Print Results Are Unsatisfactory Perform print head alignment. Check2 If printed lines are misaligned or print results are otherwise unsatisfactory, adjust the print head position. Aligning the Print Head Note •…
-
Page 311: Paper Is Smudged / Printed Surface Is Scratched
Paper Is Smudged / Printed Surface Is Scratched Paper Is Smudged Smudged Edges Smudged Surface Printed Surface Is Scratched Check paper and print quality settings. Check1 Print Results Are Unsatisfactory Check paper type. Check2 Make sure you are using the right paper for what you are printing. Supported Media Types Correct curl before loading paper.
- Page 312
1. Roll up paper in opposite direction to paper curl as shown below. 2. Check that paper is now flat. We recommend printing curl-corrected paper one sheet at a time. Note • Depending on paper type, the paper may smudge or may not feed properly even if it is not curled inward. Follow the instructions below to curl the paper outward up to 0.1 inch / 3 mm (B) in height before printing. - Page 313
Check the intensity setting in the printer driver. Adjusting Intensity Do not print outside recommended printing area. Check6 If you print outside the recommended printing area of your paper, ink may stain the lower edge of the paper. Resize the document using application software. Print Area Is platen glass dirty? Check7… -
Page 314: Scanning Problems (Windows)
Scanning Problems (Windows) Scanning Problems…
-
Page 315: Scanning Problems
Scanning Problems Scanner Does Not Work ScanGear (Scanner Driver) Does Not Start…
-
Page 316: Scanner Does Not Work
Scanner Does Not Work Make sure that your scanner or printer is turned on. Check 1 Connect the USB cable to a different USB port on the computer. Check 2 If the USB cable is connected to a USB hub, remove it from the USB hub and Check 3 connect it to a USB port on the computer.
-
Page 317: Scangear (Scanner Driver) Does Not Start
ScanGear (Scanner Driver) Does Not Start Make sure MP Drivers is installed. Check 1 If not installed, install MP Drivers from the Setup CD-ROM or our website. Select your scanner or printer on the application’s menu. Check 2 Important • If your scanner or printer name is displayed multiple times, select the one that does not include WIA. Note •…
-
Page 318: Mechanical Problems
Mechanical Problems Power Does Not Come On Power Shuts Off By Itself USB Connection Problems Cannot Communicate with Printer via USB…
-
Page 319: Power Does Not Come On
Make sure power plug is securely connected to printer, and then turn it back on. Check2 Unplug printer, leave it for at least 2 minutes, and then plug it back in and turn it Check3 on again. If this does not solve the problem, contact your nearest Canon service center to request a repair.
-
Page 320: Power Shuts Off By Itself
The setting to shut off the power automatically is disabled. • To disable the setting from the computer: For Windows, use Canon IJ Printer Assistant Tool or ScanGear (scanner driver) to disable the setting. Follow the procedure below to disable the setting using Canon IJ Printer Assistant Tool.
-
Page 321: Usb Connection Problems
USB Connection Problems Printing or Scanning Is Slow/Hi-Speed USB Connection Does Not Work/»This device can perform faster» Message Appears (Windows) If your system environment does not support Hi-Speed USB, the printer operates at the slower speed of USB 1.1. In this case, the printer works properly but printing or scanning speed may slow down due to the communication speed.
-
Page 322: Cannot Communicate With Printer Via Usb
Cannot Communicate with Printer via USB Make sure printer is turned on. Check1 Connect USB cable properly. Check2 As the illustration below, the USB port is at the back of the printer. Important • Connect the «Type-B» terminal to the printer with the notched side facing UP. For details, refer to the instruction manual supplied with the USB cable.
-
Page 323: Installation And Download Problems
Installation and Download Problems Cannot Install MP Drivers (Windows) Updating MP Drivers in Network Environment (Windows)
-
Page 324: Cannot Install Mp Drivers (Windows)
CD-ROM icon in the window that appears. If the contents of the CD-ROM appear, double-click MSETUP4.EXE. If you cannot install the MP Drivers with the Setup CD-ROM, install them from the Canon website. Note • If the CD-ROM icon does not appear, try the following: •…
- Page 325
MP Drivers. Deleting the Unnecessary MP Drivers Reinstall the MP Drivers with the Setup CD-ROM or install them from the Canon website. Note • If the installer was stopped due to a Windows error, Windows operation may be unstable, and you… -
Page 326: Updating Mp Drivers In Network Environment (Windows)
Updating MP Drivers in Network Environment (Windows) Download the latest MP Drivers. Download the latest MP Drivers for your model on the download page of the Canon website. Uninstall the existing MP Drivers and follow the installation instructions to install the latest MP Drivers that you downloaded.
-
Page 327: Errors And Messages
Errors and Messages An Error Occurs Message (Support Code) Appears…
-
Page 328: An Error Occurs
An Error Occurs If an error occurs in printing, for example if the paper runs out or jams, a troubleshooting message appears automatically. Take the appropriate action described in the message. When an error occurs, a message appears on the computer screen and an error code on the LCD. For some errors, a support code (error number) appears.
- Page 329
The error code appears on the LCD one by one. If the error code is «E03»: Check the error code on the LCD and the support code corresponding with it. See the table below for details. Error Support Cause Action Code Code 1000… - Page 330
3445 Prepare to print the other side following the instructions on the computer screen. 1203 The cover is open. • If the cover is open: 1300 Paper is jammed. 1203 • If paper is jammed: 1300 168A FINE cartridge is not installed properly. 168A 1401 FINE cartridge cannot be recognized. - Page 331
– Cannot connect because multiple wireless Press the printer’s Black or Color button to re- routers are connecting to the printer. solve the error. Perform wireless LAN setup again after a while (about 2 minutes). If the above does not resolve the problem, re- fer to the instruction manual supplied with the wireless router. - Page 332
– Cannot connect to server. Press the printer’s OK button to resolve the er- ror and perform operations after a while. If you are using Google Cloud Print, it is possi- ble that your printer is not registered. Make sure your printer is registered. Printing with Google Cloud Print –… - Page 333
Turn off printer and unplug it. 5012 Plug in the printer again and turn it back on. 5050 If this does not solve the problem, contact your nearest Canon service center to request a re- 5200 pair. 6000 6500 6800… - Page 334
6945 6946 B202 Printer error has occurred. Turn off printer and unplug it. B203 Contact your nearest Canon service center to request a repair. B204 B205 Note • For details on how to resolve errors without Support Codes, see Message (Support Code) -
Page 335: Message (Support Code) Appears
Message (Support Code) Appears This section describes some of the errors and messages that may appear. Note • A support code (error number) is displayed on the computer for some errors. For details on errors that have support code, see List of Support Code for Error.
- Page 336
Uninstall the MP Drivers following the procedure described in Deleting the Unnecessary MP Drivers and reinstall them from the Setup CD-ROM or the Canon website. When printer is connected to your computer with a USB cable, check device Check4 status from your computer. - Page 337
Inkjet Printer/Scanner/Fax Extended Survey Program Screen Is Displayed (Windows) If the Inkjet Printer/Scanner/Fax Extended Survey Program is installed, a screen appears asking for permission to send the printer and application usage information every month for about ten years. Read the information on the screen and follow the instructions below. •… - Page 338
If you are logged in on an account with administrator privileges, follow the on-screen instructions. 2. Select Canon Inkjet Printer/Scanner/Fax Extended Survey Program. 3. Select Change. If you select Yes after you have followed the on-screen instructions, the confirmation screen will appear at the time of the next survey. - Page 339
• If you agree to participate in survey program: Click Agree and follow the on-screen instructions. The printer usage information is sent via the Internet. Once you have completed the procedure, the information is subsequently sent automatically and the confirmation screen does not reappear. Note •… - Page 340
2. Select Applications from Go menu of Finder, double-click the Canon Utilities folder and Inkjet Extended Survey Program folder. 3. Move Canon Inkjet Printer/Scanner/Fax Extended Survey Program.app to Trash. 4. Restart computer. Empty Trash and restart your computer. • Changing setting: To display the confirmation screen every time the printer usage information is sent or to resume surveying, follow the procedure below. -
Page 341: List Of Support Code For Error
List of Support Code for Error Support code appears on your computer screen when errors occur. A «support code» is an error number, and appears along with an error message. When an error occurs, check the support code displayed on the computer screen and take the appropriate action in response.
- Page 342
• A000 to ZZZZ B202 B203 B204 B205 For paper jam support codes, see also List of Support Code for Error (Paper Jams). -
Page 343: List Of Support Code For Error (Paper Jams)
List of Support Code for Error (Paper Jams) If paper jams, remove it following the appropriate procedure as shown below. • If you can see the jammed paper at the paper output slot or the rear tray: 1300 • If you cannot see the jammed paper at the paper output slot or the rear tray: Paper Is Jammed inside Printer •…
- Page 344
• We recommend using paper sizes other than A5 to print documents with photos or graphics. A5 paper may curl and jam as it leaves the printer. If the measures above do not solve the problem, contact your nearest Canon service center to request a repair. -
Page 345: Paper Is Jammed Inside Printer
Paper Is Jammed inside Printer If the jammed paper tears and you cannot remove the paper either from the paper output slot or from the rear tray, or if the jammed paper remains inside the printer, remove the paper following the instructions below.
- Page 346
4. Hold jammed paper firmly in both hands. If the paper is rolled up, pull out it. 5. Slowly pull out paper, so as not to tear it. 6. Make sure all jammed paper is removed. If the paper tears when you pull out it, a bit of paper may remain in the printer. Check the following and remove any remaining paper. - Page 347
Check the printer again for any remaining bits of paper. If the measures above do not solve the problem, contact your nearest Canon service center to request a repair. - Page 348
1000 Cause Possible causes include the following. • There is no paper in the rear tray. • Paper is not loaded in the rear tray properly. What to Do Take the corresponding actions below. • Load paper in the rear tray. •… - Page 349
1200 Cause Cover is open. What to Do Close the cover and wait for a while. Do not close it while you are replacing a FINE cartridge. - Page 350
1203 Cause Cover is opened during printing. What to Do If paper remains inside the printer, slowly pull out the paper with both hands and close the cover. Press the printer’s OK button to resolve the error. The printer ejects one blank sheet of paper and resumes printing from the next paper. The printer will not reprint the page that was printed when the cover is opened. - Page 351
1401 Cause FINE cartridge is not installed. What to Do Install the FINE cartridge. If the error is not resolved, the FINE cartridge may be damaged. Contact your nearest Canon service center to request a repair. - Page 352
Remove the FINE cartridge and reinstall it. If the error is not resolved, the FINE cartridge may be damaged. Replace the FINE cartridge with a new one. If this still does not solve the problem, contact your nearest Canon service center to request a repair. - Page 353
1485 Cause Appropriate ink cartridge is not installed. What to Do Printing cannot be executed because the ink cartridge is not compatible with this printer. Install the appropriate ink cartridge. If you want to cancel printing, press the printer’s Stop button. - Page 354
1682 Cause FINE cartridge cannot be recognized. What to Do Replace the FINE cartridge. If the error is not resolved, the FINE cartridge may be damaged. Contact your nearest Canon service center to request a repair. - Page 355
If you want to continue printing without this function, press the printer’s Stop button for at least 5 seconds. Canon recommends to use new genuine Canon cartridges in order to obtain optimum qualities. Please be advised that Canon shall not be liable for any malfunction or trouble caused by continuation of printing under the ink out condition. - Page 356
1688 Cause The ink has run out. What to Do Replace the ink cartridge and close the cover. If printing is in progress and you want to continue printing, press the printer’s Stop button for at least 5 seconds with the ink cartridge installed. Then printing can continue under the ink out condition. The function for detecting the remaining ink level will be disabled. - Page 357
168A Cause FINE cartridge is not installed properly, or FINE cartridge not compatible with this printer is installed. What to Do Retract the output tray extension and the paper output tray, open the cover, and then remove the FINE cartridges. Make sure the FINE cartridge compatible with the printer is installed. - Page 358
Cause Ink absorber is almost full. What to Do Press the printer’s OK button to continue printing. Contact your nearest Canon service center to request a repair. Note • In the case of warnings or errors caused by remaining ink levels, the printer cannot print or scan. - Page 359
If the protective material or tape is still there, retract the output tray extension and the paper output tray to remove it. Pull down the tape to remove the protective material. If the cover is open, close it. If this does not solve the problem, contact your nearest Canon service center to request a repair. - Page 360
2900 Cause Scanning print head alignment sheet failed. What to Do Press the printer’s OK button and check the following. • Make sure the print head alignment sheet is set in the correct position and orientation on the platen glass. •… - Page 361
2901 Cause Print head alignment pattern has been printed and printer is waiting to scan sheet. What to Do Scan the printed alignment pattern. 1. Load print head alignment sheet on platen glass. Place the printed side down and align the mark in the bottom right corner of the sheet with the alignment mark 2. - Page 362
4102 Cause Media type and paper size are not set correctly. What to Do Press the printer’s Stop button to cancel printing, change the media type or paper size setting, and then retry printing. • When the media type is set to Photo Paper Plus Glossy II: Set the paper size to 4″… - Page 363
4103 Cause Cannot perform printing with current print settings. What to Do Press the printer’s Stop button to cancel printing. Then change the print settings and retry printing. - Page 364
Printer error has occurred. What to Do Turn off printer and unplug it. Plug in the printer again and turn it back on. If this does not solve the problem, contact your nearest Canon service center to request a repair. - Page 365
Printer error has occurred. What to Do Turn off printer and unplug it. Plug in the printer again and turn it back on. If this does not solve the problem, contact your nearest Canon service center to request a repair. - Page 366
Push up the FINE cartridge until it clicks into place. Turn the printer back on. If this does not solve the problem, contact your nearest Canon service center to request a repair. Important • When clearing an impediment to FINE cartridge holder motion, be careful not to touch clear film (A). - Page 367
Printer error has occurred. What to Do Turn off printer and unplug it. After a while, plug in the printer again and turn it back on. If this does not solve the problem, contact your nearest Canon service center to request a repair. - Page 368
5B00 Cause Printer error has occurred. What to Do Contact your nearest Canon service center to request a repair. Note • In the case of warnings or errors caused by remaining ink levels, the printer cannot print or scan. - Page 369
List of Support Code for Error (Paper Jams) Turn off printer and unplug it. Plug in the printer again and turn it back on. If this does not solve the problem, contact your nearest Canon service center to request a repair.
Модераторы: KOT, Женька 116
-
-
Canon G1010 series, G2010 series, G3010 series, G4010 series
Verter в форуме Файлообменник
- 0
- 3572
Verter

Ср авг 19, 2020 12:00 pm
-
Canon G1010 series, G2010 series, G3010 series, G4010 series
-
-
Canon IR 2018 выдает ошибку «out of toner change toner»
Sveterkom в форуме Принтеры, МФУ, копиры формата A3
- 11
- 10000
Goldwater
Чт окт 08, 2020 11:29 pm
-
Canon IR 2018 выдает ошибку «out of toner change toner»
-
-
Canon G1000 series, G2000 series, G3000 series Service Manua
Verter в форуме Файлообменник
- 10
- 5871
Azelus
Пт июн 12, 2020 4:46 am
-
Canon G1000 series, G2000 series, G3000 series Service Manua
-
-
Canon IR 3225 «засыпает»
johnnybravo в форуме Принтеры, МФУ, копиры формата A3
- 4
- 7158
johnnybravo
Пн июл 23, 2012 1:32 pm
-
Canon IR 3225 «засыпает»
-
-
Canon LaserBase MF6540PL «НЕТ ТОНЕРА»
GSA в форуме Принтеры, МФУ, факсы, копиры формата A4
- 4
- 10455
GSA
Пт сен 23, 2011 8:36 pm
-
Canon LaserBase MF6540PL «НЕТ ТОНЕРА»
Вернуться в Принтеры струйные
Кто сейчас на форуме
Сейчас этот форум просматривают: нет зарегистрированных пользователей и гости: 8