
I read the answers «unable to locate adb» using Android Studio and Error:Unable to locate adb within SDK in Android Studio and it didn’t solve my problem.
I use the 4.0 android-studio and Ubuntu 18.04
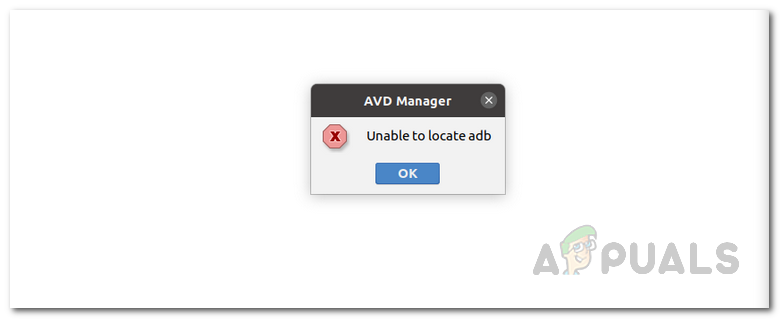
When I click on «launch this AVD in the emulator», I get an error message «Unable to locate adb».
I did look in the Android/Sdk/platform-tools, I have an «adb» executable.
After the «unable to locate adb» error message, the AVD still launches. But, when I try to run my react native app on it, I get the error
error Failed to install the app. Make sure you have the Android development environment set up: https://facebook.github.io/react-native/docs/getting-started.html#android-development-environment. Run CLI with —verbose flag for more details.
Error: Command failed: ./gradlew app:installDebug -PreactNativeDevServerPort=8081
I’m pretty sure the react-native part is fine, but that route to the emulator is not the same as before.
It was working before. Yesterday, out of the blue, when I launched my android-studio, it «restarted» (showing me the install wizard, etc), and it seems it messed up its configuration.
EDIT: [bad way] I created a new ubuntu user, re-install android studio + react-native. I still get the error message, still the AVD launches, but now React-native can install the app on it. So, now I can work with my new user, but I did not fix the problem.
EDIT2: [good way] @jpatmore fixed the android-studio part (see his answer).
The react-native was still not working. There was probably some parameter of android-studio 3.6 still in the [my project]/android/[gradle or something]
I cloned my repo in another folder, do another «npm install», «react-native link», and it was working.
Android Debug Bridge or ADB allows you to communicate with your devices via a command-line interface. It can be used for various purposes as it facilitates a bunch of actions including installing and debugging apps on your device. While trying to run your app via the Android Studio, you might face the “Unable to Locate ADB” error message that stops the simulation. As it turns out, the error message appears when Android Studio is not able to locate the ADB.exe file that is located in the platform-tools folder.
This can happen due to several reasons including when your antivirus software removes the adb.exe file due to a false alarm. Issues like these are pretty common with antivirus software and thus, while using one, you need to make sure that it isn’t triggering a false positive on the files that you are working with. In addition to that, your project settings can also cause this error message to pop up. To understand and establish a better understanding of the error message in question, let us discuss the different reasons the issue may arise in more detail. However, do remember that the causes include but are not limited to the ones mentioned down below.
- Third-Party Antivirus — Antivirus softwares are known to cause several issues where they remove a file from your system due to a false positive. Avast antivirus has been known to cause this a lot with ADB where it locks the file in the virus chest. If this is applicable, you will have to restore the file from there and everything should be good. However, keep in mind that it may not only be limited to Avast if you are using a different third-party antivirus, but it could also likely be causing the issue and thus you should look at the files that have been quarantined by the application.
- Project Settings — As it turns out, in some cases, the error message may arise due to your project settings. The Android SDK by default does not give projects a default SDK. In such a scenario, you will have to go to the project settings and give the project an SDK which by default is set to No SDK.
- Corrupted Platform Tools — In addition to the aforementioned reasons, if your platform tools are damaged or corrupted, that might result in the error message as well. If this scenario is applicable, Windows Defender or any third-party software likely quarantines it, and as a result, you no longer have the adb.exe file in the platform-tools folder. In such a case, you will simply have to reinstall platform tools to resolve the issue.
Now that we have gone through the possible causes of the issue, let us get started by mentioning down the different workarounds that are available to you to get the issue sorted. So, without further ado, let us dive right into it.
Restore ADB From Third-Party Antivirus
As it turns out, the first thing that you should do when you face the error message in question is to check the third-party antivirus software that is installed on your system. More often than not, antivirus software can trigger false-positive and quarantine files that are not dangerous at all. In this case, the adb.exe would be the targeted file that is regarded as a dangerous or potential threat by the antivirus software and as a result removed from your system.
If this case applies to you, especially if you are using the Avast antivirus, you should check the virus chest of your antivirus software to see if the file has been quarantined by it. In case it is, simply restore the file and then try running the application. To do this, follow the instructions given down below:
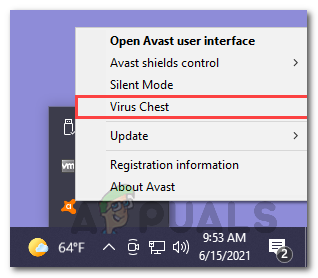
- First of all, right-click your antivirus icon on the taskbar, and then from the menu that appears, choose Virus Chest.

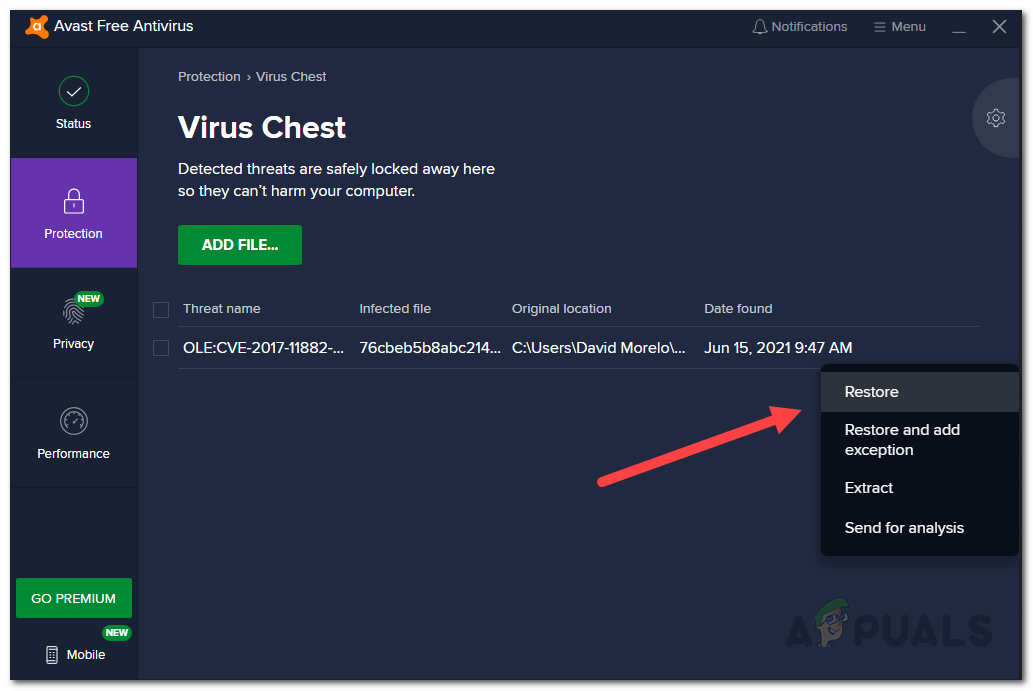
Opening Virus Chest - Here, check if the ABD.exe file is present. In case it is, go ahead and click the three horizontal dots in front of the file.
- From the drop-down menu that appears, choose the Restore option. This will remove the file from Virus Chest and you will be able to use it.

Restoring File from Virus Chest - Alternatively, you can also choose the Restore and add exception option to make sure that it isn’t put away in the Virus Chest again.
Change Project Settings
If your antivirus software is not the culprit or if it doesn’t apply to you, the error message is likely being triggered due to your project settings. This happens when your project has no SDK assigned to it and as a result, it does not have access to ADB which is why you face the error message in question. To resolve this, you will have to change the default project settings which are set to No SDK by default. These settings can be found under Project Structure. To do this, follow the instructions given down below:
- First of all, make sure Android Studio is open.
- Then, make your way to File > Project Structure. Alternatively, you can click the Project Structure icon as shown in the picture down below.
- Once the Project Structure window is open, click on Project under Project Settings.
- Then, go ahead with what Project SDK is set to. If it is set to No SDK, go ahead and change it to Android API XX Platform from the drop-down menu.

Changing Default Project SDK - In case there are no options in the drop-down menu, you can click the New button, choose Android SDK and then choose the directory where Android SDK is present.
- Once you have done that, you will be able to select Android API XX Platform from the drop-down menu.
- After you have done that, click the OK button and try running your application to see if the issue persists.

Install Android SDK from SDK Manager
As it turns out, if you are missing the relevant Android version SDK on your system, that will also cause the error message to arise. If this case is applicable, you can easily resolve the error message by installing the respective Android SDK from the SDK Manager found in the Android Studio. To do this, follow the instructions given down below:
- In the Android Studio window, open up the Preferences window by going to File > Settings.
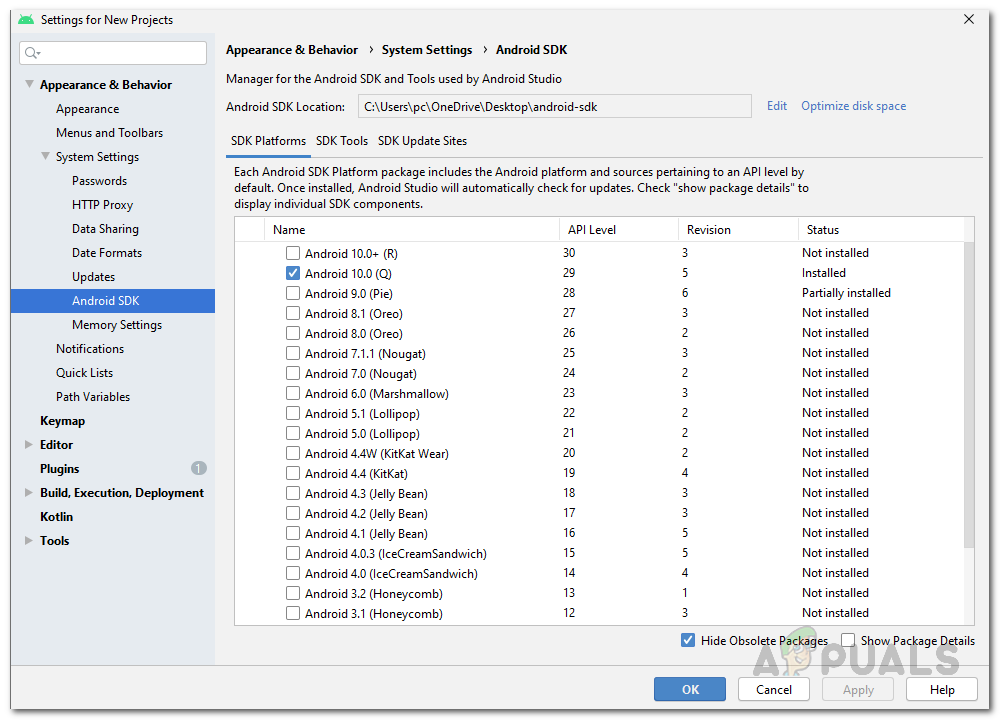
- Then, on the left-hand side, make your way to Appearance & Behavior > System Settings > Android SDK.

SDK Manager - Once you are in the SDK Manager, under SDK Platforms, install the SDK Platform for your respective Android version.
- After you have done that, go ahead and try running the application to see if you still face the error message.
Reinstall Platform Tools
Finally, if you are still facing the error message in question after trying the methods mentioned above, it could be that the issue is being triggered by damaged or corrupted platform tools files. If this scenario applies to you, you will have to reinstall the platform tools on your system to get rid of this error message. This can be done easily via the SDK Manager. You can uninstall platform tools via the SDK Manager and after that, you can easily install it again via a few clicks. To do this, follow the instructions given down below:
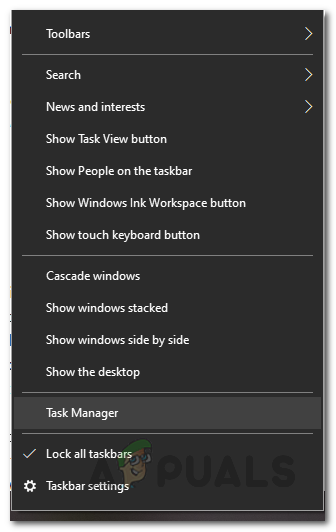
- First of all, close the Android Studio and then open up the Task Manager by right-clicking your taskbar. From the menu that appears, choose Task Manager.

Opening Task Manager - In the Task Manager window, under Processes, look for the ADB.exe process and end it.
- Once you have done that, go ahead and open up the Android Studio again.
- Now, you will have to open up the SDK Manager. For this, click the box icon with a down arrow as shown in the picture.

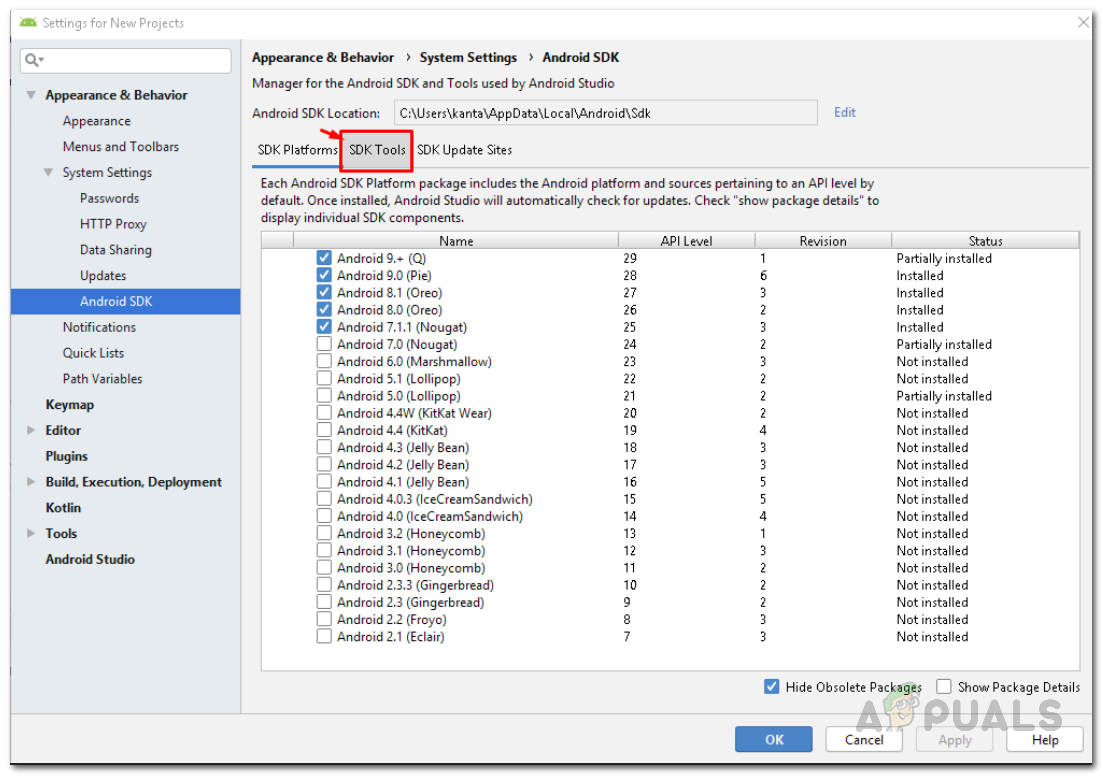
Opening SDK Manager - Once the SDK Manager is open, switch to the SDK Tools tab.

Switching to the SDK Tools Tab - In the SDK Tools tab, scroll down until you see Android SDK Platform-Tools. Uncheck it and then click OK.

Android Platform-Tools in SDK Manager - This will uninstall platform-tools from your IDE. Wait for it to finish uninstalling.
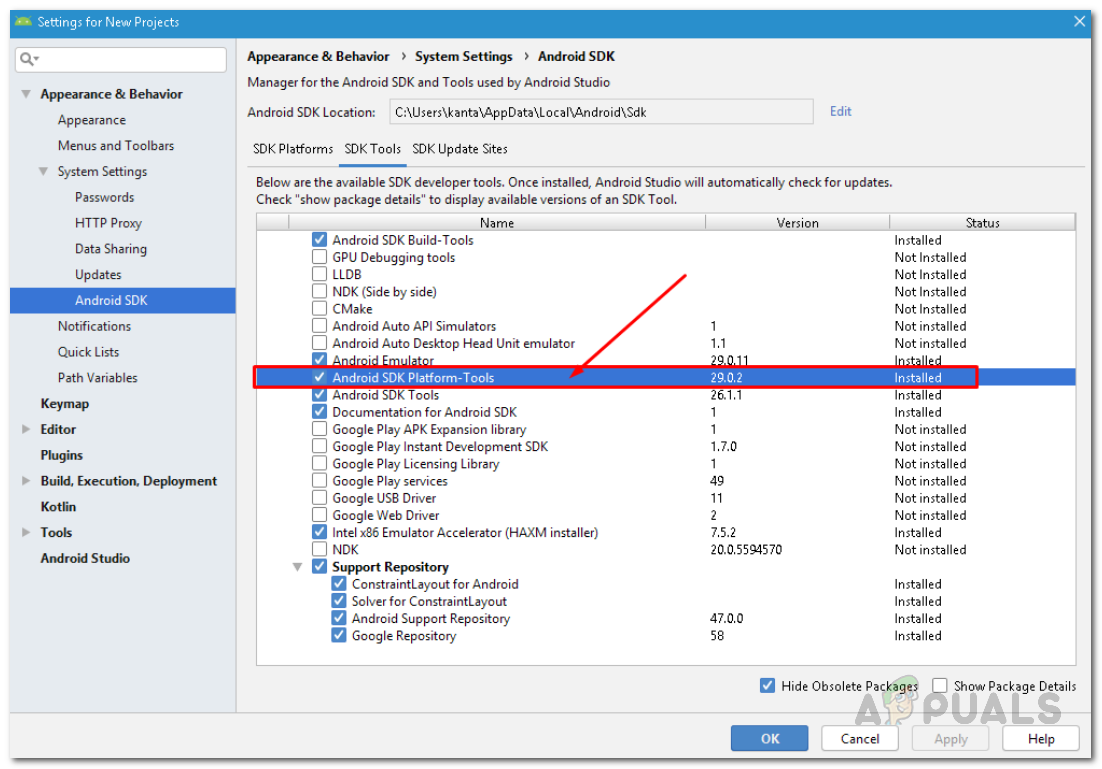
- Once it has been uninstalled and the Gradle is synced, open up the SDK Manager again and switch to the SDK Tools tab again. Here, look for Android SDK Platform-Tools again and tick it. Finally, click OK and wait for it to finish, and then sync your project.
- After all that is done, go ahead and try running your application to see if the error message pops up.


Muhammad Zubyan
Muhammad Zubyan is a certified Google IT Support Professional with over 7 years of extensive experience. He has worked on more than 1500 computers, gaining valuable insights that enable him to detect and troubleshoot any complicated root cause of Windows-related issues and errors. In addition to managing Appuals as a Senior Editor, he is currently developing his own Game Optimization program that caters to both gamers and casual users alike.
AVG Manager Unable to locate ADB Android Studio on Windows 11/10
The unable to locate ADB error is quite common to encounter while trying to run an app through the Android Studio on Windows 10 or above. The ADB or Android Debug Bridge, as its name suggests, acts as a bridge between you and the various applications installed on your system.
However, due to some reasons that I’ll discuss next, users reported the unable to locate ADB error. If you’re looking for its solutions, you’ve landed in the right place.
Read on as I discuss what causes the above error and offer the top six working solutions for the same.
Reasons of Error “unable to locate ADB”
As aforementioned, the unable to locate ADB error message can be triggered by various reasons, besides your AV removing the ADB.exe file which is stored in the platforms tools folder. Here are the other common reasons that contribute to the above.
- If no SDK (Software Development Kit) is assigned to the project, it can’t access the ADB file. As a result, you get the error.
- Your third-party AV removed the ADB.exe file due to false security issues.
- The relevant Android SDK version is absent on your PC.
- Damaged or corrupt platform-tools files.
So, these are the common reasons behind the AVG manager unable to locate ADB error message on your Windows 10/11.
AVG Manager Unable to locate ADB Android Studio on Windows 11 10
Now that you’ve understood why you’re unable to locate ADB in the Android Studio, let’s work around the following eight solutions to solve it.
-
Look for the ADB.exe file
As aforementioned, if you can’t find the adb.exe file on your system, the unable to locate ADB error is inevitable. Hence, I recommend checking the file before trying out any other solution.
To check the adb.exe file, follow these steps.
- Launch the File Explorer on your device.
- Under Device and drives, click on Local Disk (C:).
- Next, follow this path: Username > AppData > Local > Android > SDK > Platform-Tools.
- Inside the Platform Tools folder, look for the adb.exe file.
-
Use the PC Repair Tool
Since you may have damaged or corrupt ADB files on your system that are contributing to the error, you can also use any PC Repair tool to scan and repair those files.
A PC repair tool is a software application that monitors your system performance and optimizes it to avoid issues going forward. Since there are tons of PC repair tools online, I recommend Restoro.
It’s an easy-to-use tool designed for Windows. And guess what? It has a free trial as well. So, you can check its performance to solve the flutter unable to locate the ADB error message on Windows 10/11.
If the PC repair tool doesn’t work, try the next method.
-
Check your AV
An antivirus may protect your system from malicious files, programs, applications, and other malware attacks. However, it can also trigger a false positive report for certain files that are not at all dangerous for your system in any way.
As a result, the AV quarantines the files, including the adb.exe file to cause the above error. As a resolution, restore the file from the virus chest. Follow these steps to do so.
- Go to the taskbar and right-click on the AV icon. You can find it in the taskbar’s right-hand corner.
- A small menu will open. Click on the Virus Chest (I’ve Avast AV installed on my PC.)
- On the next screen, click on the Protection option on the left panel.
- Here, you’ll find the files, programs, and applications that the antivirus suspects as harmful to your device. Look for the adb.exe file.
- If the file is present there, click on the three horizontal dots next to the file.
- A small context menu will open. Click on the Restore
- The adb.exe file will now be restored and ready to use.
Note: Although you’ve restored the adb.exe file for now. The antivirus will again add it to the threat list after scanning it. To avoid this, in the last step, select Restore and add exception from the drop-down menu. Now, the adb.exe file will never appear in the Virus Chest.
-
Modify the Project Settings
Another common reason for the unable to locate ADB on Android Studio error message is the project settings. By default, the setting is set to No SDK. Due to this, no SDK is assigned to the project, and thus, it can’t locate the ADB.
Follow the given steps to modify the project settings.
- Launch the Android Studio on your PC.
- Click on the Project Structure This will open the Project Structure window.
- On the current window, click on the Project option under the Project Settings section on the left panel.
- Under Project SDK:, you will find that SDK is set to NO SDK.
- Click on the downward arrow and select Android API 30 Platform (java version “1.8.0_242”) from the drop-down menu.
- Once completed, click on OK.
Now, check again whether you’re getting the error message or not. If yes, try installing Android SDK from the SDK manager. It’s discussed below.
-
Install Android SDK from SDK Manager
If your system lacks the latest version of Android SDK, the unable to locate the ADB error message is inevitable. Thus, I recommend installing the latest version of the Software Development Kit.
Follow these steps to do so.
- First of all, let’s install the latest version of Android Studio on the system. For this, visit the official website of Android Studio.
install the latest version of Android Studio
- On the home screen, click on Download options.
- You’ll be taken to the downloads page. Find the latest .exe file for your system and download it.
- Once downloaded, install it by following the on-screen instructions.
Now that you’ve installed the latest version of Android Studio, let’s install the latest version of the SDK as well.
- Launch the Android Studio app on your system.
- On the landing page, click on More Actions, and select SDK Manager from the drop-down menu.
- Once you’re on the SDK Manager window, you’ll find three tabs – SDK Platforms, SDK Tools, and SDK Update Sites. Click on SDK Platforms.
- Find the latest SDK platform for your Android Studio, and install it.
- Hit the OK
Now, check if the error is gone or not. If it persists, work around the next solution of reinstalling Android SDK Platform Tools.
-
Reinstall Android SDK Platform Tools files
As the last remedy, I suggest reinstalling Android SDK Platform Tools files as damaged or corrupt files can also be another reason behind the unable to locate ADB error message on Windows 10/11.
Follow the given steps to do so.
- Close the Android Studio for now.
- Go to the taskbar and right-click on it.
- A menu will open. Select Task Manager from it.
- When the Task Manager window opens, click on the Processes tab, navigate to the exe process, and end it.
- Launch the Android Studio again.
- Open the SDK Manager again from the Android Studio. For this, click on the cube-like icon with a downward arrow.
- On the SDK Manager window, click on the SDK Tools
- Navigate to the Android SDK Platform-Tools option, uncheck it, and click on OK. This will uninstall the Platform Tools.
- Once uninstalled, reopen the SDK Manager window, and click on the SDK Tools
- Navigate to the Android SDK Platform-Tools option, check it, and click on OK.
This way, you’ve reinstalled the Android SDK Platform Tools files.
So, here you go. These were the best tried and tested methods to solve the flutter unable to locate ADB issue.
Conclusion
ADB or Android Debug Bridge is a command-line tool that helps you interact with a device. It is automatically installed on your system along with the Android Studio when you install Android SDK. Sometimes, due to some reasons, the adb.exe file may get damaged, corrupted, or lost.
In such a case, you get the unable to locate ADB error on your Windows system. Several culprits contribute to this and they are discussed above. Further in this article, you get the top 8 solutions to solve.
So, were you able to solve the issue? Let’s know in the comments.
Update:
On versions of macOS > 10.15.x (Catalina), the file to use is:
¨/.zshrc as Apple switched to ZSH as the default login-shell starting with 10.15.
—- Original Answer Follows + small adjustments for clarity —-
This worked for me, on my Mac.
Install platform-tools, and update your $PATH environment variable:
Using your text editor of choice:
nano ~/.zshrc # ~/.bashrc for macOS < 10.15
Edit existing PATH or add the following:
export PATH="$PATH:[PLATFORM-TOOLS-PATH-HERE]"
Save the file and refresh Zsh’s configuration:
source ~/.zshrc # (~/.bashrc if macOS < 10.15) Or zsh -l to re-read login scripts
Hope this helps.
The following error occurs when the adb file is not found within the SDK system folder. A software development kit (SDK) provides the software required to build your applications for a target platform.
Firstly check if the adb is present in the SDK folder. For this, open C:UsersUsernameAppDataLocalAndroidSdkplatform-tools and check if adb.exe is present.
Method 1: Using Android Studio IDE
Case 1: If adb is not present
Installing the platform-tools resolves the problem. For this, open Android Studio, then open SDK Manager (top-right in the toolbar), then open SDK Tools, then check-mark ✅ Android-SDK Platform-Tools and apply the changes (As shown below).
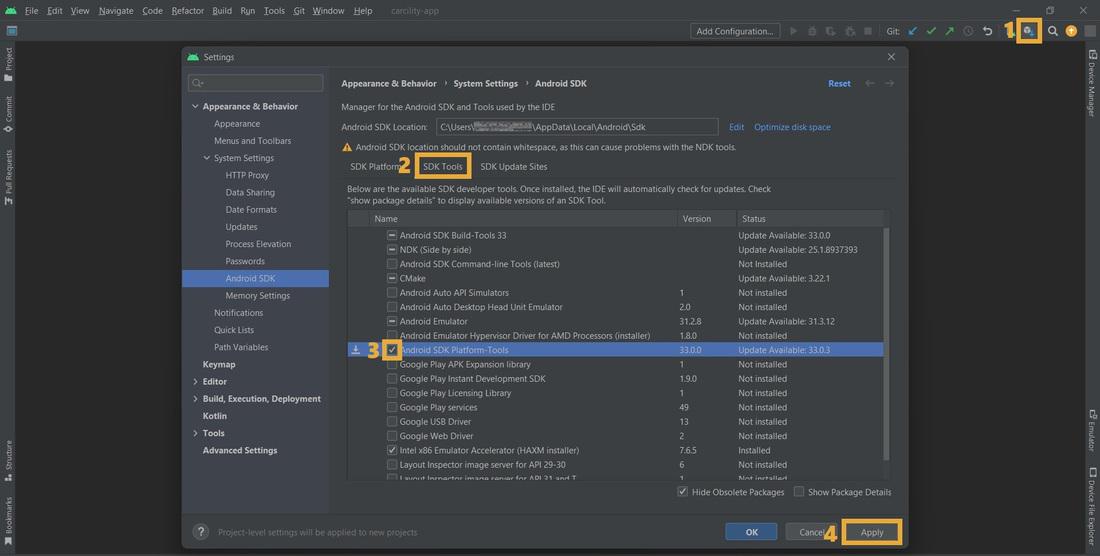
Steps to add/remove Android-SDK Platform-Tools
Case 2: If adb is present
Reinstalling the platform-tools resolves the problem. For this, open Android Studio, then open SDK Manager (top-right in the toolbar), then open SDK Tools, then uncheck ⬜ Android-SDK Platform-Tools and apply the changes (As shown above).
After this, open C:UsersUsernameAppDataLocalAndroidSdk and delete the platform-tools folder.
Then go back to Android Studio and in the SDK Tools, check-mark ✅ Android-SDK Platform-Tools and apply the changes.
Method 2: Using sdkmanager command-line tool
If Android Studio IDE is installed, follow Method 1 instead.
Case 1: If adb is not present
Installing the platform-tools resolves the problem. For this, open Terminal, switch to C:UsersUsernameAppDataLocalAndroidSdktoolsbinsdkmanager and run the following command:
sdkmanager "platform-tools"
Case 2: If adb is present
Reinstalling the platform-tools resolves the problem. For this, open Terminal, switch to C:UsersUsernameAppDataLocalAndroidSdktoolsbinsdkmanager and run the following command:
sdkmanager --uninstall "platform-tools"
After this, open C:UsersUsernameAppDataLocalAndroidSdk and delete the platform-tools folder.
Then go back to Terminal and run the following command:
sdkmanager "platform-tools"
Method 3: Check your anti-virus
Windows security might have quarantined adb.exe. Allowing adb.exe on the system resolves this problem. For this, open Windows security, then open Current threats and allow adb.exe on device (As shown below).

Step to allow adb.exe on the system
Last Updated :
18 Nov, 2022
Like Article
Save Article