
Всем привет! 
Лежала давно неисправная приставка T95Q S905X2.
Так вот, решил ради интереса заняться его ремонтом, в итоге причиной его неработаспособности оказался процессор.
Ради интереса заказал процессор с Алика, и заменил.
И ВУалЯ, приставка включилась и запустилась.
Стояла стоковая прошивка 20003.
С целью обновится на другую прошивку, получил кирпич.
Теперь, опознается компом не с первого раза и без замыкания пятоков, для ввода в режим раскирпичивания.
Делал все по инструкции, скачал стоковую 20003, запустил USB Burning Tool, открыл файл aml_upgrade_package.img, нажал старт, подключаю и сразу как опознается, получаю ошибки
[0x00101004] Erase bootloader/Lowper/Identify/Error result
или
[0x10101002] Romcode/Initialize DDR/Identify/USB Control setup
Пробовал в нескольких версиях USB Burning Tool.
Так-же пробовал разные прошивки.
Так-же пробовал на другом ПК.
Подключал через UART, чтоб увидеть что происходит.
Если просто включить приставку, вот что мы видим:
Цитата:
G12A:BL:0253b8:61aa2d;FEAT:C0F97000:802000;POC:F;RCY:0;EMMC:0;READ:0;CHK:1F;READ:0;CHK:1F;READ:0;CHK:1F;SD?:20000;USB:8;
или
Цитата:
LOOP:8;EMMC:0;READ:0;CHK:1F;READ:0;CHK:1F;READ:0;CHK:1F;SD?:0;SD:800;USB:8;
LOOP:9;EMMC:0;READ:0;CHK:1F;READ:0;CHK:1F;READ:0;CHK:1F;SD?:0;SD:800;USB:8;
LOOP:A;EMMC:0;READ:0;CHK:1F;READ:0;CHK:1F;READ:0;CHK:1F;SD?:0;SD:800;USB:8;
LOOP:B;EMMC:0;READ:0;CHK:1F;READ:0;CHK:1F;READ:0;CHK:1F;SD?:0;SD:800;USB:8;
и т.д…
А когда процесс обрывается на 2% [0x10101002] Romcode/Initialize DDR/Identify/USB Control setup
Вот что происходит в логе:
Так-же где то читал, что не прошивается так-как был стерт bootloader, перед началом прошивки нужно было убрать галку Erase bootloader, о чем я и не знал.
Так как, ранее прошивал много приставок S809, S905X, S905W, такой проблемы не было.
Думаю нужно найти способ прошить bootloader.
Или-же, проблема в железе, может где-то не хватает необходимого питания, или оно отсутствует.
Прилагаю фото платы с замерами.
Думал может проц. плохо сел, решил его пошатать, не это не помогло.
Так-же, приставка отказывается запускаться с SD-карты.
Пробовал создать CoreELEC, на SD-карту.
P.S. Распаковал стоковую прошивку и обнаружил что в нем нет файла bootloader.PARTITION
Сравнивал между прошивкой от T95M которую прошивал ранее после замены eMMC, там после распаковки я обнаружил наличие файла bootloader.PARTITION
Не знаю имеет ли это отношения к тому что оно не прошивается.
Так-же обращался в ветку T95Q на 4PDA, там помочь никто не смог.
Содержание
- atvXperience : The Forum
- [HELP] h96 pro+ How to solve Romcode/Initialize DDR/Read initialize status.
- atvXperience : The Forum
- [INSTALL] Common USB Burning Tool Errors and Fixes
- Announcement
- USB Burning Tool errors
- USB Burning Tool errors
- Comment
- Comment
- Comment
- Comment
- Comment
- Comment
- Comment
- Comment
- Comment
- Romcode Initialize/USB Control Setup Error
- Attachments
- Villa
- Announcement
- USB Burning Tool problem
- USB Burning Tool problem
- Comment
- Comment
atvXperience : The Forum
One of the Biggest Android TV Box Forums on the internet!
[HELP] h96 pro+ How to solve Romcode/Initialize DDR/Read initialize status.
I’m trying to recover my tv box, but whenever I try, the same error appears.
[Romcode / Initialize DDR / Read initialize status / USB Control setup error]
I tried some roms from atvxperience but they all return the same problem, at 2% for and return the mentioned error. 
My Tv Box (h96 pro + (s32-v6 lpddr3)), can someone help me?


Try one of these versions for LPDDR3:

Put your device in MASK Rom mode by shortening the pins on NAND chip and flash good working stock ROM or atvX LPDDR3 image from post above.
em3ka wrote: ↑ Mon May 25, 2020 11:19 am Put your device in MASK Rom mode by shortening the pins on NAND chip and flash good working stock ROM or atvX LPDDR3 image from post above.
em3ka wrote: ↑ Mon May 25, 2020 11:19 am Put your device in MASK Rom mode by shortening the pins on NAND chip and flash good working stock ROM or atvX LPDDR3 image from post above.
I’m having the same problem..
do I have to pinch those 2 pins and keep pinching them while I’m connecting the USB cable to my box and then press the Start button on the program ( USB burning tool ) or I have to keep pinching the pins even after I click the start button .
also please give me the URL link for the correct firmware for my box ..because when I download the ones in the google drive that you added, the USB burning tool is giving me this message (( Parse burning image fail )) .
it’s like the USB burning tool is not accepting that image file.
Источник
atvXperience : The Forum
One of the Biggest Android TV Box Forums on the internet!
So, having problems with usb burning tool?
Well, here’s how you do it. Don’t forget to reply to this topic if you want to add anything.
1. Don’t forget to plug in power cable if you get lowper error.
2. If your device isn’t getting detected, even after pushing the reset button, try shorting nand pins. You can find a video tutorial on mxq project YouTube channel.
3. DDR Error? Tried using different ddr version atvX? DDR3, DDR4, LPDDR to name a few.
4. Flashed but not working? Try flashing again, or a different image. Still getting a black screen?
a) If you see the bootlogo but not the UI after booting, try atvx on a 1080p tv.
b) If you don’t see anything at all, the device is incompatible, Sorry
5. 7% Uboot error? Try another image or version. Chances are, your box uses a modded uboot which doesn’t accept other original uboot partitions. Fix? Point 6.
6. 2GB/3GB RAM but after flashing it’s 1GB/2GB? You’ve got a fake box. Your uboot was modified to read wrong dtb header to show more RAM than the actual physical one(maybe). The only way to fix(fake your ram) this is unpacking atvx and your stock rom to level 1 with Ricky’s customization tool and replacing your stock’s system, boot, recovery and bootloader partitions with atvx’s and re-packing.
Источник
Announcement
![]()
I have been using USB burning tool v2.0.6.2 to update my OTT MXQ Pro 4K box a couple of times but recently I have been getting these errors below and have not been able to flash the firmware:
— Romcode/Initialize DDR/Initialize PLL/USB Control setup error
— Erase bootloader/Lowper/Identify/ Error result
I have tried using a few other PCs with USB 2 ports but were getting the same errors and I only managed to erase the bootloader once.
Can any one help?
![]()
I had the same problem, but ended up getting it to work by doing the following. Frustrated, I tried different versions of USB Burning tool with no success. The 2.0.5.15 works just fine. You click the middle (2nd) Chinese writing on the upper left corner and select «English.» Remember to open, load, start, then, connect.
1. Open the USB Burning Tool as an Administrator
2. Load the Firmware image file
3. Press «Start»
4. Connect your box via USB
How.did you load the license in the flastool i cant get i right
Sent from my SM-N9300 using Tapatalk
- Join Date: Jun 2014
- Posts: 6441
And were can i find the license it doent come with the rar compressed file
Sent from my SM-N9300 using Tapatalk
- Join Date: Jun 2014
- Posts: 6441
We have a bricked T95u Pro 3/32. USB burning tool now sees the box after a pin short. It goes to 7 percent and then errors out. Any help to get it running again would be greatly appreciated
this is the error we see
[10:12:07 517][Global][Inf]—DevPath:?pci#ven_8086&dev_293c&subsys_02be1028& rev_03#3&11583659&0&d7#<3abf6f2d-71c4-462a-8a92-1e6861e6af27>
[10:12:07 517][Global][Inf]—->Roothub:USB#ROOT_HUB20#4&13e35410&0#
[10:12:07 589][Global][Inf]———>[Port0]NoDeviceConnected
[10:12:07 589][Global][Inf]———>[Port1]NoDeviceConnected
[10:12:07 589][Global][Inf]———>[Port2]NoDeviceConnected
[10:12:07 589][Global][Inf]———>[Port3]NoDeviceConnected
[10:12:07 589][Global][Inf]———>[Port4]NoDeviceConnected
[10:12:07 590][Global][Inf]———>[Port5]Other device
[10:12:07 590][Global][Inf]—Scan USB host controller complete
[10:12:07 591][Global][Inf]—Update data center with HubMap
[10:12:13 935][Global][Inf]—User click open button
[10:12:58 786][Global][Inf]—Image path C:UsersajcdnDownloadsT95UT95U_S912_03092017_A ndroidTVBox.euT95U_S912_03092017_AndroidTVBox.eu aml_upgrade_package.img
[10:13:22 934][Global][Inf]—Parsing burning package
[10:13:22 934][Global][Inf]—Load configuration file C:Program Files (x86)AmlogicUSB_Burning_Tooltemp
[10:13:22 935][Global][Inf]—Parse burning configuration file C:Program Files (x86)AmlogicUSB_Burning_Tooltempburn_config.xm l
[10:13:22 938][Global][Inf]—Get burning key
can you advise us please?
![]()
I had the same problem, but ended up getting it to work by doing the following. Frustrated, I tried different versions of USB Burning tool with no success. The 2.0.5.15 works just fine. You click the middle (2nd) Chinese writing on the upper left corner and select «English.» Remember to open, load, start, then, connect.
1. Open the USB Burning Tool as an Administrator
2. Load the Firmware image file
3. Press «Start»
4. Connect your box via USB
I have a Mecool M8s PRO L and i got this 2% error when i try to connect only with USB male to male to the pc:
«Romcode/Initialize DDR/Read initialize status/USB Control setup error»
Even if i try to short the reset pins out. Blue LED on the box stays allways on.
If i plug the power cable when we tries to pass the 2% error, we reaches 7% and the following error:
UBOOT/Disk initialize/Send command/Error result’
Источник
Romcode Initialize/USB Control Setup Error
Member
Hi Guys
I have this problem while flashing my U9H:
[12:11:25 210][HUB1-6][Inf]—2-2-0-0
[12:11:25 210][HUB1-6][Inf]—Control write pll reg1 0xd9000000:0x000000b1
[12:11:25 713][HUB1-6][Inf]—Control write pll reg1 0xd9000000:0x00005183
[12:11:26 217][HUB1-6][Inf]—Control write pll reg1 0xd9000000:0x000000b1
[12:11:26 719][HUB1-6][Inf]—Control write pll reg1 0xd9000000:0x00005183
[12:11:27 223][HUB1-6][Inf]—Write initial succeed
[12:11:27 223][HUB1-6][Inf]—Upload encrypt at 0xc8100228
[12:11:27 225][HUB1-6][Inf]—ulValue = 0xadfd718c
[12:11:27 225][HUB1-6][Inf]—Read encrypt value succeed
[12:11:27 225][HUB1-6][Inf]—Download DDR.USB,size: 49152!
[12:11:27 238][HUB1-6][Inf]—Transfer complete 49152
[12:11:27 240][HUB1-6][Inf]—Run at address 0xd9000000
[12:11:27 246][HUB1-6][Inf]—RunInRam success
[12:11:27 271][HUB1-6][Inf]—2-2-0-0-0-1-0-0
[12:11:27 271][HUB1-6][Inf]—CheckFileRunState succeed
[12:11:42 275][HUB1-6][Err]—usbReadFile failed ret = -116
[12:11:42 275][HUB1-6][Err]—ReadPara failed
[12:11:42 282][HUB1-6][Err]—[0x10105002]Romcode/Initialize DDR/Read initialize status/USB Control setup error
[12:11:42 283][HUB1-6][Inf]—Close device handle 0x00000b44
Is there somebody else, with the same problem? Actually tried to flash the Latest Official Firmware because (after a long pause while it was offline) my box didnt want to boot (splash screen appear with Android logo and then nothing happened). For additional info there is a screenshot attached.
Attachments

Villa
Hi Guys
I have this problem while flashing my U9H:
[12:11:25 210][HUB1-6][Inf]—2-2-0-0
[12:11:25 210][HUB1-6][Inf]—Control write pll reg1 0xd9000000:0x000000b1
[12:11:25 713][HUB1-6][Inf]—Control write pll reg1 0xd9000000:0x00005183
[12:11:26 217][HUB1-6][Inf]—Control write pll reg1 0xd9000000:0x000000b1
[12:11:26 719][HUB1-6][Inf]—Control write pll reg1 0xd9000000:0x00005183
[12:11:27 223][HUB1-6][Inf]—Write initial succeed
[12:11:27 223][HUB1-6][Inf]—Upload encrypt at 0xc8100228
[12:11:27 225][HUB1-6][Inf]—ulValue = 0xadfd718c
[12:11:27 225][HUB1-6][Inf]—Read encrypt value succeed
[12:11:27 225][HUB1-6][Inf]—Download DDR.USB,size: 49152!
[12:11:27 238][HUB1-6][Inf]—Transfer complete 49152
[12:11:27 240][HUB1-6][Inf]—Run at address 0xd9000000
[12:11:27 246][HUB1-6][Inf]—RunInRam success
[12:11:27 271][HUB1-6][Inf]—2-2-0-0-0-1-0-0
[12:11:27 271][HUB1-6][Inf]—CheckFileRunState succeed
[12:11:42 275][HUB1-6][Err]—usbReadFile failed ret = -116
[12:11:42 275][HUB1-6][Err]—ReadPara failed
[12:11:42 282][HUB1-6][Err]—[0x10105002]Romcode/Initialize DDR/Read initialize status/USB Control setup error
[12:11:42 283][HUB1-6][Inf]—Close device handle 0x00000b44
Is there somebody else, with the same problem? Actually tried to flash the Latest Official Firmware because (after a long pause while it was offline) my box didnt want to boot (splash screen appear with Android logo and then nothing happened). For additional info there is a screenshot attached.
Why do you have «Erase flash» set to «Erase all»? «Normal erase» should be sufficient!
Also you shouldn’t have «Reset after success» and «Whether overwrite key» Enabled.
Источник
Announcement
![]()
I have H96 pro tv box, I’m trying to install a new firmware but I have a problem with the usb connection.
Whenever I try to connect the box to usb ,it recognized for 1-2 seconds and then disconnecting.
I tried it with 4 different computers (including desktop), I installed the driver, I tried 2 different usb cables — all with the same results.
I tried to press the reset button and then to start the box — it doesn’t recognized at all.
I tried to connect it to the power adapter ,then to start the box and then to connect it to usb- it doesn’t recognized at all.
I tried to connect the hdmi cable so I can see what happens when it starts ,I see that when i press the reset button it goes into the recovery menu — but it seems that when it in this menu it doesn’t recognized by usb.
this is the error that I get:
[2018-11-23 13:50:21 662][HUB2-2][0x10102002]Romcode/Initialize DDR/Initialize PLL/USB Control setup error
[2018-11-23 13:51:36 983][HUB2-2][0x10105002]Romcode/Initialize DDR/Read initialize status/USB Control setup error
![]()
- Join Date: May 2014
- Posts: 1316
Which version of USB Burn Tool?
Which version of Windows?
(Which China Box revision. update to which firmware? (Not immediately important to your question.)
Do you have a firewall running?
Do you have Anti-Virus running?
I suggest that you you give more info.
(All 4 computers only recognize connection (1-2 sec.)?
![]()
USB burn tool v.2.0.7.2, I also use the usbview.exe to see if the box recognized.
I tried on win7 and win10
box version you can see attached, trying to install h96pro.H96PRO+_2G(16)_HS2734A_1000M_7.1.2018.04.10 .20.38
I don’t have a firewall
I have Symantec Endpoint Protection
I attached the log files
![]()
- Join Date: May 2014
- Posts: 1316
Amlogic Worldcup Drivers..no longer installed properly??
«Romcode/Initialize DDR/Initialize PLL/USB Control setup error
Romcode/Initialize DDR/Read initialize status/USB Control setup error.»
2018-11-23. «attempting to erase bootloader». Did USB Burn Tool succeed in seeing and flashing your China Box?
Источник
Приставка X96 mini 2/16 Gb широко распространена. Данный экземпляр при подключении к телевизору не выдает изображение и не реагирует на пульт.

Светодиод горит тускло красным цветом и не меняет свой цвет на синий.

Маркировка используемого блока питания — RSF-DY009-0502000.

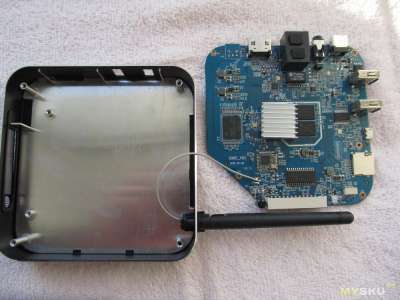
Приставка со стороны задней крышки выглядит следующим образом. На ней наклейка с точным названием модели.
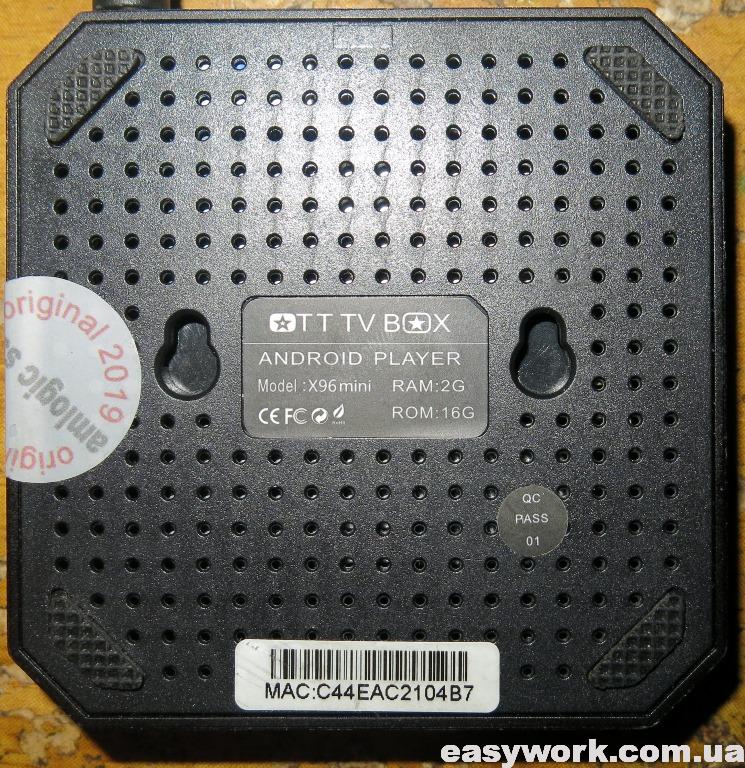
Крышка отщелкивается и мы можем получить доступ к плате. Запоминаем расположение крышки, т.к. на ней находится термопрокладка, которая должна попасть на процессор Amlogic S905W.

Маркировка платы Q6X V2.2 17355. По отзывам на 4PDA данная маркировка имеет проблемы при прошивке.

С обратной стороны плата выглядит следующим образом.

Входное напряжение равно 5.2 В и поэтому неисправность внешнего блока питания исключается.

Далее входное напряжение понижается при помощи DC/DC преобразователей с маркировкой S15BLQ.

Напряжения на плате распределены следующим образом. Также необходимо обратить внимание на исправность электролитического конденсатора 100 мкФ х 10 В. Он один на плате.

Для прошивки устройства я использовал программу USB Burning Tool 2.09. При подключении необходимо выполнить сброс приставки. Для этого удобно использовать спичку (токонепроводящий предмет). USB шнур необходимо вставлять в белый разъем. Вот подробная инструкция по прошивке через ПК. Если кому-то не нравится — то вот другая.

После этого в программе отображается устройство с пометкой Connect success.

Однако прошивка прерывалась на 7%. Ошибка была либо [0x30201004]UBOOT/Disk initialize/Send command/Error result.
![Ошибка [0x30201004]](https://easywork.com.ua/wp-content/uploads/2020/01/remont-pristavki-x96-mini-2-16-gb-ne-vklyuchaetsya-13.jpg)
В версии программы USB Burning Tool 2.12 код ошибки сменился на [0x32030201]Uboot/Get result/DiskInitial error.
![Ошибка [0x32030201]](https://easywork.com.ua/wp-content/uploads/2020/01/remont-pristavki-x96-mini-2-16-gb-ne-vklyuchaetsya-14.jpg)
Кому-то помог при прошивке выбор опции «Force Erase All». Однако при этом придется в дальнейшем восстанавливать MAC-адрес. Такая проблема может быть при проблемах с флеш-памятью.
В таком случае можно попробовать воспользоваться оболочкой LibreELEC. По следующей ссылке описана штатная установка LibreELEC — KODI — 8.2.3.1 на X96 Mini Amlogic S905W. Нас интересует вариант полноценной загрузки LibreELEC с miniSD карты, описанный тут и тут.

Задействованные программы Win32DiskImager и Burn_Card_Maker. Однако мне это не помогло, т.к. неисправность была где-то гораздо глубже. Возможно кому-то данная инструкция и вышеуказанные ссылки помогут.
Ранее прошивал TV Box X96 mini, которая зависала на заставке.

Тема: Восстановление андроид телеприставки GI Uni (Прочитано 12757 раз)
0 Пользователей и 1 Гость просматривают эту тему.
Иногда некоторые пользователи сталкиваются когда телеприставка с программной оболочкой андроид перестает загружаться в рабочий режим и пользователю лишь печально наблюдает загрузочное bootlogo на экране своего ТВ, происходят такие случаи с любой телеприставкой на андроид, в случае с GI Uni также есть такие прецеденты. Первый случай восстановления мы будем рассматривать более легкий, если не всё так плохо и телеприставка загружается до bootlogo как на скриншоте ниже:

Что требуется подготовить:
1) Нам потребуется USB накопитель с файловой системой FAT32
2) И файл aml_sdc_burn.ini который я прикреплю к данному сообщению в архиве (это обычный пустой текстовый файл имеющий название aml_sdc_burn.ini, так что его можно создать без скачивания, внутри файла ничего не прописано он пуст).
Включаем блок питания в розетку и ожидаем появления на экране recovery меню, выглядеть оно будет следующим образом.
Подробней по каждому из пунктов:
Android system recovery <3e> K0T49H.20160908 test-keys
Volume up/down to move highlight;
enter button to select.
reboot system now — перезагрузка устройства
apply update from ADB — обновление через отладочный мост андроид.
apply update from EXT — — установка обновлений из внешний носителей sdcard и udisk (этот пункт нам и потребуется для восстановления).
apply update from cache — установка обновлений из кеша внутренней памяти устройства
wipe data/factory reset — полный сброс настроек и данных, при этом очищаются разделы /data и /cache во внутренней памяти устройства и очищается системная папка «.android_secure» на карте памяти
wipe cache partition — очистка раздела /cache во внутренней памяти устройства
Первоначальным этапом восстановления можно просто обнулить устройство выполнив пункты wipe data/factory reset и wipe cache partition, а после очистки данных выполняем пункт reboot system now, после проверить загружается телеприставка в рабочий режим или снова висит на загрузочном экране.
Не забываем вытащить USB накопитель перед проверкой, потому как будет повторно загружаться в recovery.
В том числе данный вариант очистки базы данных подойдет в случаях когда вы изменили родительский контроль и забыли пароль.
Если GI Uni загрузился в рабочий режим, то отлично, можно заканчивать операции по восстановлению и пользоваться устройством дальше.
Второй этап.
Если опять загрузка зависает на bootlogo и не продвигается дальше, то требуется выполнить обновление ПО при помощи меню recovery, для этого нам нужно скачать файл программного обеспечения который можно загрузить из темы: Программное обеспечение GI Uni ( БЕЗ ОБСУЖДЕНИЯ ) и также переместить в корневую директорию накопителя, например файл UNI-RU-20170713.zip
И так выбираем пункт apply update from EXT при помощи джойстика пульта ДУ и нажимаем ОК, и в следующем подменю появятся новые пункты меню recovery:
Android system recovery <3e> K0T49H.20160908 test-keys
Confirm update?
THIS CAN NOT BE UNDONE.
Update from sdcard — обновление выполняется с sdcard карты памяти, нам этот пункт совершенно в данном случае неинтересен.
Update from udisk — обновление выполняется с USB накопителя, выбираем данный пункт для старта обновления программного обеспечения.
Если всё сделали правильно, то в следующем меню мы увидим наш файл обновления который мы загружали в корневую директорию накопителя USB, выбираем его и нажимаем ОК для старта обновления.
Далее можно наблюдать процесс обновления по шкале прогресса в центре экрана и списку выполнения команд.
После завершения успешного обновления у вас будет следующий вид меню recovery.
Можно вытаскивать USB накопитель и выполнять перезагрузку выбрав пункт reboot system now.
Следующая загрузка будет выполнена в рабочий режим, если всё именно так, то поздравляю вас вы оживили GI Uni, если вопрос не решился, то переходим к следующему пункту данной инструкции.
Данный вариант восстановления будет производится через программу Amlogic USB Burning Tool, я уже не раз описывал работу с данной программой для других моделей медиа приставок Galaxy Innovations, таких как GI Lunn и GI itv912, тут будут немного этапы действий отличаться, но в целом всё также.
Итак что потребуется для восстановления:
1) Самое необходимое, это конечно кабель для подключения к ПК, он должен быть типа USB type A — USB type A, на фото ниже такой как у меня например:
Извините, вам запрещён просмотр содержимого спойлеров.
2) Программа для обновления: Amlogic USB Burning Tool
3) Образ обновления, скачать его можно по ссылке: UNI-RU-20171227-key.img
4) Файл mac_ether.ini который потребуется переместить в C:Program Files (x86)AmlogicUSB_Burning_Toollicense, скачать файл можно в прикреплении к сообщению.
Если все условия выполнили, то далее приступаем к выполнению операций восстановления, первое и самое необходимое это вскрытие корпуса и подготовка устройства, на нижней части находится два винта которые держат верхнюю часть корпуса, откручиваем их и вскрываем осторожно дабы не оторвать антенну от Wi-Fi модуля, впоследствии её можно аккуратно отсоединить.
Открываем директорию с установленной программой C:Program Files (x86)AmlogicUSB_Burning_Toollicense, если у вас отсутствует папка license, то кидаем файл mac_ether.ini в корневую директорию после чего запускаем программы и закрываем её сразу, после того как закрыли возвращаемся и видим что папка license появилась, туда перемещаем файл mac_ether.ini и соглашаемся с заменой.
Повторно запускаем программу Amlogic USB Burning Tool в обязательном с правами администратора, и загружаем образ .img файла прошивки через: File —> Import image
После выбора пойдет верификация образа на ошибки, если всё нормально, то внизу программы появится строка с указанием пути к файлу, а сообщение «Image checking, it will take loger time if the image file is larger, please wait» исчезнет. Больше никакие галочки в программе не трогаем.
У нас должно окно программы выглядеть следующим образом как на скриншоте ниже, более ничего не трогаем!
У данной модели нет кнопки reset и аварийного входа при помощи пульта ДУ, собственно для чего мы и выполнили разбор устройства, для определения программой Amlogic USB Burning Tool подключения к GI Uni, требуется выполнить перевод флэш памяти в тестовый режим, внимательно смотрим на изображение ниже.

Поскольку сделать это визуально очень тяжело, то требуется использовать увеличительное стекло или как в моём случае лупа с креплением на голову фирмы STAYER и тогда становится всё прекрасно видно, замыкаем 29 и 30 ноги флэш памяти очень осторожно, я делал это обычной иголкой.
Затем, не размыкая контактов подключаем наш кабель для обновления USB type A — USB type A который подключен к ПК, второй конец требуется воткнуть к разъему на тыльной стороне корпуса телеприставки и если всё удачно то раздастся звуковой сигнал и появится надпись Connected в окне программы.
Далее в окне программы USB_Burning_Tool нажимаем Start и следом подключаем адаптер питания к телеприставке, начнётся процесс обновления (кроме USB шнура и блока питания больше ничего не должно быть подключено).
Следим за процессом восстановления.
Строка Status должна заполниться до 100% без ошибок.
И по удачному завершению в строке Result программа отрапортует [0x00000000]Burning successfully, после чего процесс обновления можно считать завершенным и ожидать на экране полное прохождение инициализации до загрузки в рабочий режим.
Извините, вам запрещён просмотр содержимого спойлеров.
Эти пользователи сказали Вам СПАСИБО:

Записан
GI ET11000, GI ET7000mini, GI iTV912, GI Uni, GI Spark2&3Combo, VU+ Duo2, VU+ Solo2, VU+ SoloSE, GI 9995, GI 9895, GI 8895, GI 8180, GI 8120, GI HD Slim& Plus& Combo
Satellite: 4w, 1.9е, 4.9e, 7e, 9e, 13e, 16е, 19e, 23.5e, 36e, 53e, 55e, 75e, 85.2e, 90e
Большое человеческое СПАСИБО! Стало намного легче жить после данной инфы! 
Эти пользователи сказали Вам СПАСИБО:
Записан
Добрый день. Подскажите пожалуйста, после прошивки Gi Uni на DQC8UNIR-20170329 приставка при попытках зайти в Обновление системы вылетает в режим просмотра Т2. Я сбрасывал к заводским настройкам, приставка остается на прошивке DQC8UNIR-20170329 и отказывается обновлять прошивку. Что я делаю неправильно, и как можно откатиться на предыдущую прошивку, при том что приставка упорно на хочет входить в режим recovery меню?
Записан
Цыпляк, так читайте выше описанное, вроде доступно в несколько разных и первоначальных действиях описал, всё делал на своём опыте и всё это работает.
Записан
GI ET11000, GI ET7000mini, GI iTV912, GI Uni, GI Spark2&3Combo, VU+ Duo2, VU+ Solo2, VU+ SoloSE, GI 9995, GI 9895, GI 8895, GI 8180, GI 8120, GI HD Slim& Plus& Combo
Satellite: 4w, 1.9е, 4.9e, 7e, 9e, 13e, 16е, 19e, 23.5e, 36e, 53e, 55e, 75e, 85.2e, 90e
Добрый вечер всем , особенно вам господин OOOLEXA . Этот метод восстановления с первого поста мне помог { причина : не вызывалось приложение KODI кнопкой вверху слева , нужно было нажимать раза три. И так иногда зависал при переключении каналов} . Я только сделал два пункта { wipe data/factory reset и wipe cache partition} … Все-таки форум поддержки крайне необходим !
Эти пользователи сказали Вам СПАСИБО:
Записан
Все-таки форум поддержки крайне необходим !
Безусловно, тут можно получить информацию как на текущий момент так и в будущем, некоторые пользователи по ошибке до сих пор постят свои файлы на непонятных ресурсах и потом всё исчезает бесследно и ничего не найти. У нас правда подобная ситуация с прошивками для адроид, большой объем памяти и приходится заливать на сторонние файлохранилища.
Эти пользователи сказали Вам СПАСИБО:
Записан
GI ET11000, GI ET7000mini, GI iTV912, GI Uni, GI Spark2&3Combo, VU+ Duo2, VU+ Solo2, VU+ SoloSE, GI 9995, GI 9895, GI 8895, GI 8180, GI 8120, GI HD Slim& Plus& Combo
Satellite: 4w, 1.9е, 4.9e, 7e, 9e, 13e, 16е, 19e, 23.5e, 36e, 53e, 55e, 75e, 85.2e, 90e
Что делать если в ребут-меню с указанным файлом не выходит? Заставка-выключение-перезагрузка циклично.
Записан
l_evgenii, добрый вечер . Попробуйте поменять флешкарту , либо отформатировать . Должна быть флешкарта только с одним файлом .
Записан
И еще один вопрос. На 94% программа прошивки закрывается без объяснения причин. Что делать?
Записан
Lemonade92, это тема для Gi Uni, а у вас GI UNI 2
Эти пользователи сказали Вам СПАСИБО:
Записан
GI ET11000, GI ET7000mini, GI iTV912, GI Uni, GI Spark2&3Combo, VU+ Duo2, VU+ Solo2, VU+ SoloSE, GI 9995, GI 9895, GI 8895, GI 8180, GI 8120, GI HD Slim& Plus& Combo
Satellite: 4w, 1.9е, 4.9e, 7e, 9e, 13e, 16е, 19e, 23.5e, 36e, 53e, 55e, 75e, 85.2e, 90e
Есть такая же процедура для GI UNI 2?
Записан
Есть такая же процедура для GI UNI 2
только контакты возможно другие,в любом случае надо смотреть
Эти пользователи сказали Вам СПАСИБО:
Записан

При попытке прошить выдает такое сообщение. Не подскажите, что можно предпринять для перепрошивки? Пробовал 2 разных кабеля, на разных портах компьютера — результат один и тот же.
Добавлено: 27 Декабрь 2020, 10:27:06
C утра процесс продвинулся немного дальше, но всё равно ошибка. 
Записан
Здравствуйте , прошу помощи. Пытаюсь раскирпичить GI UNI , делаю все по инструкции , но на 2-х процентах идет ошибка [0x10105002]Romcode/Initialize DDR/Read initialize status/USB Control setup error . Пробовал менять порты , пробовал на ноуте и на ПК , правда и там и там WIN 7 64 бита , и ничего не получается . Подскажите пожалуйста в какую сторону искать.
Записан
Pegasuss, если не получается своими силами, тогда обращаться в сервисный центр, выше описана подробная инструкция, обновление выполняли на Windows XP и Windows 8.1, ошибки, которые могли возникнуть по отсутствию файлов описаны, почему у вас такая ошибка…..
В сети нашел несколько предположений, сам кабель USB type A — USB type A может отличаться, длина этого кабеля играет большую роль, пробуйте, гуглите может ещё какую инфу найдёте. Да! Не забываем потом поделиться на форуме.
Вот комментарий одного из товарищей, он восстанавливал не Uni, но проблемы у него примерно такие же.
Далее запустил Amlogic USB Burning Tool, скормил ей скаченный родной образ, выставил Force erase all — чтобы всё стёрлось к чёртовой матери =), нажал старт и замкул пины (маленькой крестовой отвёрткой, там достаточно просто дотронуться и сразу происходит коннект, если случайно задеть другие ничего страшного не произойдёт, по крайней мере я так 100 раз делал). Процесс пошёл, но на 4% выдало уже такую ерунду: Romcode/Switch status/Check connect/Enum device error
но всё отключив (питание и USB), закрыв программу, а затем снова подключив, открыв программу, скормив ей файл прошивки, замкнув пины — прошивка удалась!
Записан
GI ET11000, GI ET7000mini, GI iTV912, GI Uni, GI Spark2&3Combo, VU+ Duo2, VU+ Solo2, VU+ SoloSE, GI 9995, GI 9895, GI 8895, GI 8180, GI 8120, GI HD Slim& Plus& Combo
Satellite: 4w, 1.9е, 4.9e, 7e, 9e, 13e, 16е, 19e, 23.5e, 36e, 53e, 55e, 75e, 85.2e, 90e
- Giclub.tv »
- Galaxy Innovations Spark 3 Combo, GI Spark 2 Combo, GI Spark 2, Gi Fly, Gi Uni, Gi Fly T2 »
- Gi Uni (Android 4.4.2, DVB-T2, HD, Wi-Fi, LAN, PVR, DLNA, IPTV, KODI, Wi-Fi hotspot) (Модераторы: ooolexa, -WadimArt-, Ednaz, wolow) »
- Восстановление андроид телеприставки GI Uni
-
witt
- Posts: 4
- Joined: Sun Jun 24, 2018 2:54 am
Sun Jun 24, 2018 3:16 am
I wanted to try this rom but I’m unable to flash it to my box. It’s a Sunvell T95 S1 box, with a S905W. Trying the microSD card option makes the screen restart the process twice and stalls on the first few sections. Doing it from USB burning tool gives me an error about DiskInitial, trying from TWRP only gives me the option to install either to logo, recovery or bootloader.
I’m attaching a capture of the usb burning tool, if it helps.
You do not have the required permissions to view the files attached to this post.
-
Nayam
- Administrator & Developer
- Posts: 1263
- Joined: Mon Jun 11, 2018 11:58 pm
- Has thanked: 192 times
- Been thanked: 429 times
- Contact:
#2
Sun Jun 24, 2018 10:06 am
witt wrote: ↑Sun Jun 24, 2018 3:16 am
Trying the microSD card option makes the screen restart the process twice and stalls on the first few sections.
Once the device flashes fully, quickly remove the sd card.
witt wrote: ↑Sun Jun 24, 2018 3:16 am
Doing it from USB burning tool gives me an error about DiskInitial
Open USB Burning Tool -> Import the firmware image -> take the box, hold the reset button -> INSERT THE POWER CORD -> release the recovery button (After about 5 sec 7 not to peel it) > Insert the USB cable, if box is detected, press START. USB port and USB cable may have an impact.
Also, make sure you don’t have anything else attached to the box.
witt wrote: ↑Sun Jun 24, 2018 3:16 am
trying from TWRP only gives me the option to install either to logo, recovery or bootloader.
THIS IS NOT THE TWRP VERSION
BE NICE, BE RESPECTFUL
RESPECT THE MODERATORS
PM ONLY WHEN IMPORTANT
ENJOY!
My Devices:
X96 Mini, A95X Pro, H96 Pro Stick, A95X Max
-
witt
- Posts: 4
- Joined: Sun Jun 24, 2018 2:54 am
#3
Mon Jun 25, 2018 5:42 am
Nayam wrote: ↑Sun Jun 24, 2018 10:06 am
Once the device flashes fully, quickly remove the sd card.
I tried that, but at first, it goes to a silver of starting, then it restarts.
Nayam wrote: ↑Sun Jun 24, 2018 10:06 am
Open USB Burning Tool -> Import the firmware image -> take the box, hold the reset button -> INSERT THE POWER CORD -> release the recovery button (After about 5 sec 7 not to peel it) > Insert the USB cable, if box is detected, press START. USB port and USB cable may have an impact.
Also, make sure you don’t have anything else attached to the box.
I did it without anything but the cable: no hmi cable, no remote, only the ac adapter and the USB Cable. I got now another error:
[0x10302001]Romcode/Switch Status/Check connect/Enum device error
I tried with another USB cable I bought today and nothing changed on the flashing department so I can’t get even started.
Nayam wrote: ↑Sun Jun 24, 2018 10:06 am
THIS IS NOT THE TWRP VERSION
Sorry.
Edit: it errors when it goes to the «7%:Download meson1» part, fwiw
-
Carmine
- Posts: 4
- Joined: Thu Jun 21, 2018 4:19 pm
#4
Mon Jun 25, 2018 6:03 am
@witt
Try this:
1.Disconnect everything from your box , remove sd and cables
2.Open USB Burning Tool , select the amlogic image , select erase all and START (with disconnected box)
3.At this point connect your box to your pc via usb flashing port (dont click anything , dont plug power ac , just usb flashing cable)
Let me know if starts flashing ![]()
-
witt
- Posts: 4
- Joined: Sun Jun 24, 2018 2:54 am
#5
Mon Jun 25, 2018 6:38 am
[DEV] Carmine wrote: ↑Mon Jun 25, 2018 6:03 am
@witt
Try this:
1.Disconnect everything from your box , remove sd and cables
2.Open USB Burning Tool , select the amlogic image , select erase all and START (with disconnected box)
3.At this point connect your box to your pc via usb flashing port (dont click anything , dont plug power ac , just usb flashing cable)Let me know if starts flashing
It still won’t flash anyway ![]()
USB Burning tool returns the error in OP when I try that.
-
Carmine
- Posts: 4
- Joined: Thu Jun 21, 2018 4:19 pm
#6
Mon Jun 25, 2018 6:55 am
witt wrote: ↑Mon Jun 25, 2018 6:38 am
It still won’t flash anyway
USB Burning tool returns the error in OP when I try that.
Hmm weird , try the same with pressed recovery button while connecting flash cable
Edit: also try another usb port on your pc
-
witt
- Posts: 4
- Joined: Sun Jun 24, 2018 2:54 am
#7
Mon Jun 25, 2018 7:51 am
[DEV] Carmine wrote: ↑Mon Jun 25, 2018 6:55 am
Hmm weird , try the same with pressed recovery button while connecting flash cableEdit: also try another usb port on your pc
Same stuff, no matter what port I use on my pc or on my box, the same error happens. Since the error happens in a specific place, maybe I got a corrupt image? the md5 for the atvXperience v2B.img I have is 669d82eba248422d5dcc55c35c9eef00 but I don’t know if it’s the correct one.
-
Nayam
- Administrator & Developer
- Posts: 1263
- Joined: Mon Jun 11, 2018 11:58 pm
- Has thanked: 192 times
- Been thanked: 429 times
- Contact:
#8
Mon Jun 25, 2018 8:38 am
witt wrote: ↑Mon Jun 25, 2018 7:51 am
[DEV] Carmine wrote: ↑Mon Jun 25, 2018 6:55 am
Hmm weird , try the same with pressed recovery button while connecting flash cableEdit: also try another usb port on your pc
Same stuff, no matter what port I use on my pc or on my box, the same error happens. Since the error happens in a specific place, maybe I got a corrupt image? the md5 for the atvXperience v2B.img I have is 669d82eba248422d5dcc55c35c9eef00 but I don’t know if it’s the correct one.
Try this.
Insert Power cable. Disconnect everything.
In the tool, select flash erase all.
Hit the start button and connect usbs. Wait for 45 seconds and it will start flashing. If it gives error in between, press reset button a couple of times. I was getting the same 7% error, it turned out to be loose wire.
BE NICE, BE RESPECTFUL
RESPECT THE MODERATORS
PM ONLY WHEN IMPORTANT
ENJOY!
My Devices:
X96 Mini, A95X Pro, H96 Pro Stick, A95X Max
Содержание
- 0x10302001 romcode switch status check connect enum device error
- 0x10302001 romcode switch status check connect enum device error
- atvXperience : The Forum
- Version for Sunvell T95 S1?
- 0x10302001 romcode switch status check connect enum device error
- 0x10302001 romcode switch status check connect enum device error
Обсуждение Sunvell T95 / T95M / T95 Max
 [Android][TV Box][S905]
Обсуждение »
- Для сравнения устройства с конкурентами и по вопросам выбора устройств обращайтесь в раздел:Выбор и сравнение.
- Перед размещением фотографии ознакомьтесь с темойРабота с изображениями на форуме
- Сообщения, не относящиеся к теме обсуждения (оффтоп), удаляются без предупреждения.
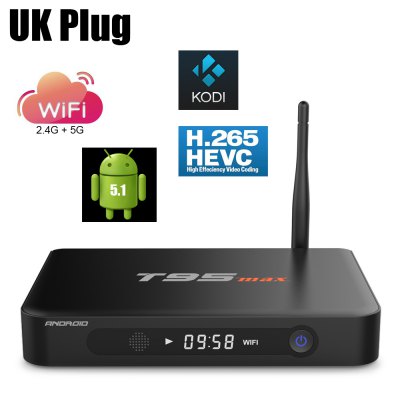
Процессор (CPU): Amlogic S905
Видеочип (GPU): Mali-450MP
Оперативная память (RAM): 1 ГБ DDR3L / 2 ГБ DDR3L
Внутренняя память (Internal Flash): 8 ГБ / 32 Гб
Разъемы: Micro SD, 2xUSB 2.0, MicroUSB (OTG), AV, Ethernet (100Mbit), HDMI 1.4, Optical S/P-DIF / Coaxial S/P-DIF
ОС: Android 5.1
Отличия T95, T95M, T95 Max:
T95 Max внутренняя память 32Гб, у остальных 8Гб,
T95, T95M есть с 1 ГБ оперативная памятью, T95 Max только с 2 Гб,
T95, T95 Max имеют внешнюю Wi-Fi-антенну, T95M внутреннюю.
T95M имеет разъем Optical S/P-DIF, T95 Max имеет Coaxial S/P-DIF, у T95 разъема нет.
T95 и T95 Max имеют металлический корпус, а T95M — пластиковый.
T95M 2G прошивается и работает на прошивках от T95 2G, однако не работает штатный ИК-пульт (работает только вкл/выкл питания).
В теме нет куратора. По вопросам наполнения шапки обращайтесь к модераторам раздела через кнопку  под сообщениями, на которые необходимо добавить ссылки.
Сообщение отредактировал DemonikD — 12.08.20, 15:58
Sunvell T95 TV Box Amlogic S905 Quad Core
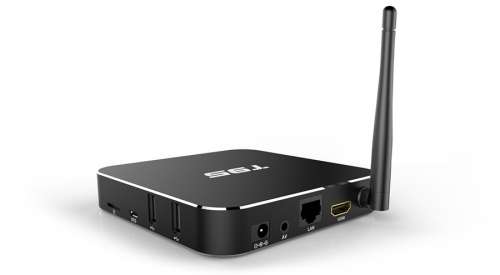
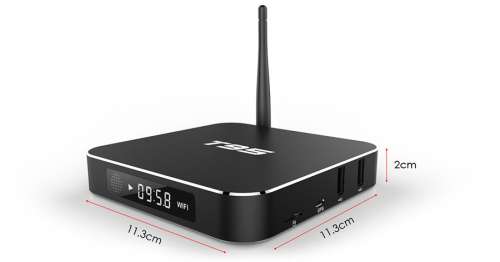
Особенность Sunvell T95-корпус из металла, что улучшает теплопроводность и нет необходимости делать дополнительное охлаждение.
Корпус сделан очень качественно, всё подогнано идеально, внешний вид приставки заслуживает внимания.
После выключения приставки с пульта-порты USB отключаются.
64-битный четырёхядерный процессор Amlogic S905 (ядра Cortex-A53) до 2 ГГц
графика Mali-450MP
оперативная память 1 ГБ DDR3L (2 ГБ DDR3L)
встроенная память 8 ГБ + 32 ГБ с помощью Micro SD
ОС Android 5.1
предустановленный плеер KODI 16.0
Wi-Fi (рабочая частота 2,4)
Bluetooth 4.0 (опционально)
Габариты 11.3 х 11.3 х 2 см
вес 500 г
Micro SD
2 USB-порта 2.0
Micro USB (поддержка OTG)
AV-порт
LAN (сетевой разъем RJ-45)
HDMI 1.4
Сообщение отредактировал koordinator — 25.07.16, 10:13
Благодаря пользователю aslanet прошивки есть на обе версии приставки-1 ГБ DDR3L (2 ГБ DDR3L)
Надеюсь он позже даст ссылку на скачивание прошивок.
Некоторые прошивки уже идут с РУТ.
Получить рут отдельно пока не получилось.
Сообщение отредактировал jenyabrat — 05.03.16, 02:55
Общими усилиями решили очередную проблему с приставкой, найден способ получения ROOT.
Учитывая что уже есть прошивки для приставки, есть пользователь который на своём Sunvell проверил их работоспособность, то можно смело заявить-приставка заслуживает внимания.
Когда приставка только вышла, то многие боялись покупать данную приставку, так как не было по ней информации и софта.
Сейчас с этим проблем НЕТ, приставка уже обкатана, недостатки выявлены, способы их решения найдены.
У меня приставка в пользовании около месяца, работала иногда сутками, особых проблем замечено не было.
Самый главный плюс, за всё время приставка не разу не зависла, что бы была необходимость её перегрузить холодным стартом.
Приставка довольно быстро грузится, быстрее многих других приставок, это скорее всего благодаря Андроид 5.1.
Сеть подхватывает тоже быстро, скорость работы в интернете хорошая.
Больше всего мне нравится качество изображения.
В приставке два режима выключения, первый режим-сон, второй полное отключение.
Если приставка согласована с ТВ по HDMI СЕС, то после выключения ТВ, приставка уходит в сон, при включении ТВ, приставка выходит из сна.
Что бы выключить приставку полностью надо нажать кнопку на пульте приставки, но в таком случае включение приставки так же надо будет делать с родного пульта, с пульта ТВ она не включится.
Если ТВ работает, то после включения приставки автоматически включится HDMI вход к которому подключена приставка.
У меня ТВ LG, поэтому сказать как ведёт себя управление по HDMI в других ТВ не могу, надеюсь пользователи проверят на других ТВ.
Источник
0x10302001 romcode switch status check connect enum device error
TV Box X96 Mini — Официальные прошивки (OS Android 9.0)
 SoC Amlogic S905W
Прошивки » | Обсуждение » | Брак и ремонт » | Прошивка (OS Android 7.1.2) » | Клуб владельцев |
- Переход с 7 на 9 Android и обратно пока не возможен без ПК(Альтернативный метод)
- Имейте ввиду что перед прошивкой приставки с ATV XPERIENCE V4.1 на какую либо другую нужно выполнить инструкцию 1 или Инструкцию 2, а иначе при игнорировании можно получить кирпич. Будьте осторожны!
- Видео Гайд по самостоятельной модификации прошивки
- Прошивку проводить лучше версией UBT 2.2.4 — на высокой версии даёт сбой.
SoC — Amlogic S905W четырехядерный процессор ARM Cortex-A53 @ до 1,5 ГГц с пятиядерным графическим процессором Mali-450MP с частотой 750 МГц
Системная память — 1 или 2 ГБ DDR3
Хранилище — 8 или 16 ГБ флэш-памяти eMMC + микро SD-карты
Поддержка карт памяти до 32 Гб (microSD)
Видео и аудиовыход — выход HDMI 2.0a с HDR, AV-портом (композитный + стерео аудио)
Video Codecs — 4K @ 30fps H.265 [email protected], 4K @ 30fps VP9 Profile-2, MPEG1 / 2/4, H.264, HD AVC / VC-1, RM / RMVB, Xvid / DivX3 / 4/5/6, RealVideo8 / 9/10
Возможности подключения — 10 / 100M Ethernet, 802.11 b / g / n Wi-Fi (без Bluetooth)
USB — 2 порта USB 2.0: 1x хост, 1x устройство (OTG?)
Разное — ИК-приемник, порт ИК-расширения
Электропитание — 5V / 2A
Размеры — 82 x 82 x 17 мм
В теме нет куратора. По вопросам наполнения шапки обращайтесь к модераторам раздела через кнопку  под сообщениями, на которые необходимо добавить ссылки.
Сообщение отредактировал Silver8025 — 09.01.23, 06:58
У меня кастомная прошивка на Android 7.1.2, установленная через TWRP. Есть ли такой вариант стоковой прошивки Android 9, которую можно прошить через TWRP, а потом сделать переход на кастомную Android 9? То есть сделать переход с 7 на 9 без сноса TWRP.
Сообщение отредактировал Dimony84 — 11.12.19, 18:37
Сегодня проверил на атв 9 смену mac адреса способом модификации прошивки через customization tool. Всё получилось.
Сообщение отредактировал F🐼23 — 11.12.19, 23:02
Предоставьте, ей права доступа.
Сообщение отредактировал woхhan — 12.12.19, 13:05
 woхhan,
Все права выставил, всё равно крашится (когда с ошибкой, когда без).
Использую Х96мах_V311.
Даже скриншот не даёт сделать, пишет — недостаточно места
Сообщение отредактировал van`ka — 12.12.19, 13:34
Поставил прошивку androidtv. В целом сделано красиво. После часа пользования решил рассказать что меня смутило в этой прошивке. Может кто подскажет как исправить эти пункты:
1. Почему-то MX Player, даже тот что в комплекте идёт, запускается только если открыть видео через сторонний файл менеджер. При нажатии на программу ничего не происходит.
2. Раньше пользовался на стоке клавишей ESC на пульте (возврат назад). А в atv она не задействована. Подозреваю что где-то можно эту клавишу включить. Подскажите кто знает.
3. Если войти в меню выключения, и нажать любой из пунктов, то на экране в этот момент ничего не происходит. Кажется что устройство зависло. Помнится что на других прошивках писало в этот момент «выключение», и т.д.
P.S.: разрешение экрана у меня выставлено 720p, так как на моём мониторе другое не работает.
Сообщение отредактировал Dimony84 — 14.12.19, 13:52
Источник
atvXperience : The Forum
One of the Biggest Android TV Box Forums on the internet!
Version for Sunvell T95 S1?
I wanted to try this rom but I’m unable to flash it to my box. It’s a Sunvell T95 S1 box, with a S905W. Trying the microSD card option makes the screen restart the process twice and stalls on the first few sections. Doing it from USB burning tool gives me an error about DiskInitial, trying from TWRP only gives me the option to install either to logo, recovery or bootloader.
I’m attaching a capture of the usb burning tool, if it helps.
I did it without anything but the cable: no hmi cable, no remote, only the ac adapter and the USB Cable. I got now another error:
[0x10302001]Romcode/Switch Status/Check connect/Enum device error
I tried with another USB cable I bought today and nothing changed on the flashing department so I can’t get even started.
Edit: it errors when it goes to the «7%:Download meson1» part, fwiw
@witt
Try this:
1.Disconnect everything from your box , remove sd and cables
2.Open USB Burning Tool , select the amlogic image , select erase all and START (with disconnected box)
3.At this point connect your box to your pc via usb flashing port (dont click anything , dont plug power ac , just usb flashing cable)
Let me know if starts flashing 
[DEV] Carmine wrote: ↑ Mon Jun 25, 2018 6:03 am @witt
Try this:
1.Disconnect everything from your box , remove sd and cables
2.Open USB Burning Tool , select the amlogic image , select erase all and START (with disconnected box)
3.At this point connect your box to your pc via usb flashing port (dont click anything , dont plug power ac , just usb flashing cable)
Let me know if starts flashing
Hmm weird , try the same with pressed recovery button while connecting flash cable
Edit: also try another usb port on your pc
[DEV] Carmine wrote: ↑ Mon Jun 25, 2018 6:55 am Hmm weird , try the same with pressed recovery button while connecting flash cable
Источник
0x10302001 romcode switch status check connect enum device error
Обсуждение Magicsee N5
N5
Описание | Обсуждение » | Каталог программ для Android медиа-приставок »

Особенности
— Android 7.1.2 операционная система
— Процессор Amlogic S905W, четырехъядерный, Cortex A53 1200 МГц
— Видео Мali-450, 5 ядер, 750 мГц
— 2 ГБ DDR3L оперативная память + 16 ГБ встроенная память
— 2,4 ГГц + 5 ГГц двухдиапазонный WiFi
— Bluetooth 4.1
Декодер Формат : H.263, H.264 H.265, HD MPEG4
Формат видео:1080 P, 4 К, H.264 H.265
Формат аудио:AAC, APE, DDP, FLAC, HD, MP3, OGG, TrueHD, WAV, WMA
Формат фото : BMP, GIF, JPEG, PNG, TIFF
Поддержка 5.1 выходного звука : Да, через коаксиальный кабель
Интерфейсы : AV, HDMI, RJ45, SPDIF, TF card, 2хUSB2.0
Источник информации
Новинка от производителя Magicsee — ТВ бокс Magicsee N5.
Купил себе 2 недели назад, впечатления положительные, пользуюсь X96 mini — отличий по работе нет, у Magicsee N5 с коробки есть кнопки-навбар и верхняя панель уведомлений (в X96 mini их не было — прошил его прошивкой, в которой эти плюшки были — пришлось помучаться, пока пользовался ТВ боксом без навбара и верхней панельки). Есть обновления по воздуху (обновлений пока не было).
ВАЖНО ! После покупки бокс нужно сбросить в заводские настройки, потом удалить предустановленные программы, вы ими вряд ли будете пользоваться. Потом настраивать и устанавливать свои приложения. Без этой процедуры возможно плохое качество изображения — картинка будет дерганой, рывками. Проверено мной на 2х боксах, на обоих после покупки были установлены приложения, картинка была дерганой везде, помог сброс в заводские и установка приложений.
Magicsee N5 — с Bluetooth 4.1 .
Из недостатков — слабый WiFi (может, такая попалась, не знаю) и пришлось разобрать ТВ бокс и перевенруть радиатор, так как он с завода прикручен так, что не закрывает по площади примерно 30% процессор, наблюдался нагрев до 60-70 гадусов, после разборки и переворачивания радиатора — температура не более 60 градусов.
На Ютубе есть несколько обзоров на русском языке и отзывы.
Источник
0x10302001 romcode switch status check connect enum device error
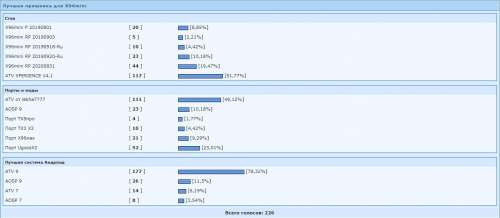
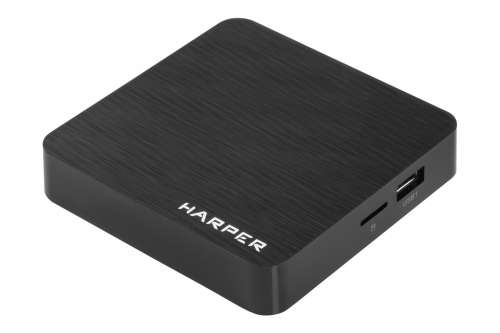
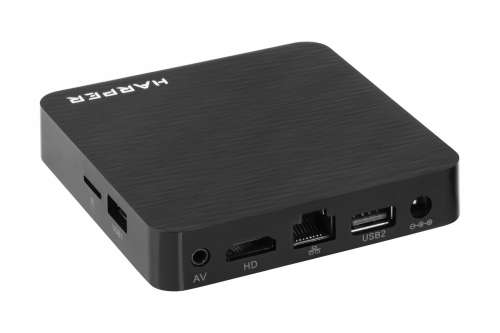
Обсуждение Harper ABX-110
TV Box
Обсуждение »
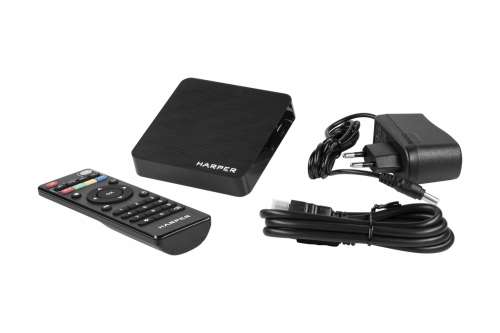
Harper ABX-110 — мультимедийная приставка начального уровня.
Операционная система — Android 7.1.2
Процессор — AmLogic S905W (Quad-core Cortex-A53; [email protected] DVFS*; GPU ARM Mali-450MP5 up to 750MHz)
Оперативная память — 1GB LPDDR3
Встроенная память — 8GB eMMC+TF card(microSD)
Wi-Fi — 2,4Ghz — 802.11 a/b/g/n
Ethernet 8c8p 10/100MB (aka RJ-45)
Bluetooth — не присутствует.
Интерфейсы (выходы и входы):
— HDMI — 1 порт версии 2.0 (Указана поддержка 4K, HDR, HLG, CEC, HDCP 2.2)
— AV (CVBS)
— S/PDIF
— MicroSD Slot
— USB-Host 2.0 x 2 (Поддержка FAT16FAT32NTFS)
— DC 5V/2A
Комплектация:
Коробка с руководством пользователя и гарантийным талоном, медиаплеер, блок питания 5V/2A, IR пульт ДУ, 2 батарейки ААА, HDMI-кабель.
Габариты:
92х92х20мм, вес брутто — 300 гнетто — 160 г.
Процессор S905W является облегченной версией процессора S905X, и главным отличием является именно отсутствие декодирования 60 кадров в секунду. Заявлена поддержка декодирования для всего контента 4К в 30fps (для всех декодеров: H.264, 10-bit H.265, VP9 Profile2, VP10**). Чтобы реализовать максимальные возможности вашего 4K [email protected], необходим SoC более высокого уровня — S905X, S905D, S912 для первого поколения, или S905X2, S905Y2, S922X для второго поколения и выше.
Инфракрасный пульт является программируемым и позволяет на две-три кнопки запрограммировать функцию с основного пульта ТВ или ресивера. Также пульт частично реализует функцию компьютерной мыши.
* DVFS — dynamic overvolting (Dynamic Voltage and Frequency Scaling aka Dynamic Voltage Scaling).
** Указывают производители ТВ-приставок на данном чипе.
В теме нет куратора. По вопросам наполнения шапки обращайтесь к модераторам раздела через кнопку  под сообщениями, на которые необходимо добавить ссылки.
Сообщение отредактировал Silver8025 — 26.11.22, 15:39
Немного инфы о данной приставке из первых рук.
Купил данный аппарат к старой плазме. Всё подключилось, обновилась прошивка, но программы обновляются ТОЛЬКО когда их откроешь (после первого юзания). Плей Маркет не находит обнов для них. Проще говоря, он их вообще не видит. Отображаются только те программы, которые установлены руками. Например, 4пда, Балда . скачанные именно из самого Маркета с самого устройства.
Конечно, это подбешивает, но на функционал не влияет.
Ещё напрягло отсутствие возможности поменять иконки на рабочем столе. Можно выбрать лишь нижний ряд (мелкие значки для пользовательского набора), но большие (по типу Ютуба, Проводника) не поменять.
Сразу проверил данный девайс на всеядность. Кушает всё, что потребно неискушённому потребителю. Видео 1080 на 60 фпс тянет без лагов. 4К не проверял, т.к. плазма лишь HDReady (720) и смысла не вижу смотреть на ней такое разрешение.
В общем, вполне рабочая лошадка за вполне разумный прайс (покупал в начале июля 19 года за 2400).
Официальная прошивка и инструкция на сей аппарат.
Adeptuz, с первым, видимо, это надо включить повтор в плеере, по аналогии с музыкальными. А со вторым, можно попробовать AnyDesk. Либо другую прогу, что даёт доступ (именно) к андроиду с пк, ведь обычно это наоборот происходит.
Но скорее всего, заменить файл удалённо не прокатит.
Подскажите, какие настройки нужно выполнить на роутере (ZTE F660) чтобы приставка ABX-110 видела интернет по Wi-Fi подключению?
Сейчас приставка коннектится к домашней сети по Wi-Fi, но интернет на приставке отсутствует.
При этом, без проблем могу раздать на эту приставку интернет через Wi-Fi телефона.
Предполагаю, что дело в настройках роутера. На что обратить внимание?
fmjazz, возможно дело в фильтрах роутера. На некоторых роутерах, пока не добавишь новое подключённое устройство в «зарегистрированные», интернета на устройстве не будет, хотя роутер его будет показывать и само устройство будет видеть вай-фай.
Вот инструкция от вашего роутера: PDF, правда я ничего не нашёл, что бы мешало работе приставке.
Спасибо, попробую. Надо добавить MAC в Associated devices?
Странно, что все остальные домашние девайсы подключаются к роутеру без проблем и без плясок с бубном.
Сегодня купил в МСК С**иЛ**к за 2380руб.
Ну такое себе. Ждал большего.
Цели покупки (логическое И):
1) Просмотр домашнего фото/видео/музыки с DLNA. Современная билайновская приставка этого не может.
2) Просмотр ЮТуба.
3) Просмотр цифрового ТВ от Билайн.
В принципе, все цели достигнуты, но в той или иной степени коряво.
Ощущения:
1) Рутована из коробки. Я не уверен что это хорошо. Лучше бы из коробки нормальный функционал был.
2) Все приложения поставлены через АппИнсталлер. Почему то забыли снести Плей Маркет. Что многих смущает — типа как так, прога есть, а в маркете ее не видно. А вот так — не видно потому что не из маркета она, а ставилась АПК.
3) Тупой пульт не смог запрограммироваться на старый панасоник. В итоге, для включения всего нужно ДВА пульта (хотя, это не вина приставки, что панас не выключается и не включается в зависимости от состояния ХДМА — старенький он, но я его люблю).
4) Сколько же гуано понаставлено. Устал удалять. Как удалил? См ниже.
5) Установил придожение Билайн ТВ. Долго тупило, но вроде отдуплилось. Зарегал приставку, посмотрел. Выключил. Включил заново — и мы снова тупили. Долго. Минут 5. Расхотел смотреть уже, если честно.
6) ЮТую из коробки не заработал. Ошибка, запрет. В общем не сложилось. Установил из Маркета — все ништяк.
7) В главном меню можно добавлять/удалять только то что внизу и маленькое. После удаления встроенного ЮТуба — так и осталась огромная иконка которая пишет ошибку. А вниз я добавил рабочий ютуб — он работает.
Езернет старенький — 10/100. Это уже диагноз. Но всяко лучше вифи. Я кстати, вифи сразу выключил — боялся выкину приставку в окно.
9) Иногда выскакивает окно что какое-то приложение (маркет, например) зависло и надо или грохнуть или подождать.
10) Пришлось лезть на чердак и искать юсб-мыша. Без него пультом рулить — сдохнуть можно от неврастении.
Теперь порядок действий, который я с ней произвел. Пропустим пару сбросов — с кем не бывает 🙂
0) Заходим в My Apps — Droid Setting — Display — Screen Resolution. Ползунок Auto делаем ВКЛ.
00) Шаг назад Screen Position и Zoom In/Out доводим картинку под экран.
1) На компе заводим посторонний акк в гугле (на приставке у меня не получилось).
2) На приставке заходим в маркет — вводим акк.
3) Проверяем обновления в маркете — их нет.
4) Качаем Assistant for Android.
5) Мочим из AA предустановленный мусор. Чистим кеш и все такое.
6) Из Маркета ставим ЮТуб.
7) Заходим в ЮТуб — типа воркает.
Качаем Total Commander и плагин для LAN (вам не надо -а мне нужно).
9) Качаем BeelineTV. Заходим. Ждем пенсию, логинимся, проверяем.
10) Отключаем везде где можно автообновление. Когда гугл обновит ютуб — можно будет ручками обновиться.
В принципе все.
Буду искренне благодарен, если поделитесь опытом с БилайнТВ (блин, ради этого приставку и покупал) или вразумите что там подкрутить чтоб не тупило.
Источник
Всем привет!
Лежала давно неисправная приставка T95Q S905X2.
Так вот, решил ради интереса заняться его ремонтом, в итоге причиной его неработаспособности оказался процессор.
Ради интереса заказал процессор с Алика, и заменил.
И ВУалЯ, приставка включилась и запустилась.
Стояла стоковая прошивка 20003.
С целью обновится на другую прошивку, получил кирпич.
Теперь, опознается компом не с первого раза и без замыкания пятоков, для ввода в режим раскирпичивания.
Делал все по инструкции, скачал стоковую 20003, запустил USB Burning Tool, открыл файл aml_upgrade_package.img, нажал старт, подключаю и сразу как опознается, получаю ошибки
[0x00101004] Erase bootloader/Lowper/Identify/Error result
или
[0x10101002] Romcode/Initialize DDR/Identify/USB Control setup
Пробовал в нескольких версиях USB Burning Tool.
Так-же пробовал разные прошивки.
Так-же пробовал на другом ПК.
Подключал через UART, чтоб увидеть что происходит.
Если просто включить приставку, вот что мы видим:
Цитата:
G12A:BL:0253b8:61aa2d;FEAT:C0F97000:802000;POC:F;RCY:0;EMMC:0;READ:0;CHK:1F;READ:0;CHK:1F;READ:0;CHK:1F;SD?:20000;USB:8;
или
Цитата:
LOOP:8;EMMC:0;READ:0;CHK:1F;READ:0;CHK:1F;READ:0;CHK:1F;SD?:0;SD:800;USB:8;
LOOP:9;EMMC:0;READ:0;CHK:1F;READ:0;CHK:1F;READ:0;CHK:1F;SD?:0;SD:800;USB:8;
LOOP:A;EMMC:0;READ:0;CHK:1F;READ:0;CHK:1F;READ:0;CHK:1F;SD?:0;SD:800;USB:8;
LOOP:B;EMMC:0;READ:0;CHK:1F;READ:0;CHK:1F;READ:0;CHK:1F;SD?:0;SD:800;USB:8;
и т.д…
А когда процесс обрывается на 2% [0x10101002] Romcode/Initialize DDR/Identify/USB Control setup
Вот что происходит в логе:
Так-же где то читал, что не прошивается так-как был стерт bootloader, перед началом прошивки нужно было убрать галку Erase bootloader, о чем я и не знал.
Так как, ранее прошивал много приставок S809, S905X, S905W, такой проблемы не было.
Думаю нужно найти способ прошить bootloader.
Или-же, проблема в железе, может где-то не хватает необходимого питания, или оно отсутствует.
Прилагаю фото платы с замерами.
Думал может проц. плохо сел, решил его пошатать, не это не помогло.
Так-же, приставка отказывается запускаться с SD-карты.
Пробовал создать CoreELEC, на SD-карту.
P.S. Распаковал стоковую прошивку и обнаружил что в нем нет файла bootloader.PARTITION
Сравнивал между прошивкой от T95M которую прошивал ранее после замены eMMC, там после распаковки я обнаружил наличие файла bootloader.PARTITION
Не знаю имеет ли это отношения к тому что оно не прошивается.
Так-же обращался в ветку T95Q на 4PDA, там помочь никто не смог.
Содержание
- atvXperience : The Forum
- [HELP] h96 pro+ How to solve Romcode/Initialize DDR/Read initialize status.
- atvXperience : The Forum
- [INSTALL] Common USB Burning Tool Errors and Fixes
- Announcement
- USB Burning Tool errors
- USB Burning Tool errors
- Comment
- Comment
- Comment
- Comment
- Comment
- Comment
- Comment
- Comment
- Comment
- Romcode Initialize/USB Control Setup Error
- Attachments
- Villa
- Announcement
- USB Burning Tool problem
- USB Burning Tool problem
- Comment
- Comment
atvXperience : The Forum
One of the Biggest Android TV Box Forums on the internet!
[HELP] h96 pro+ How to solve Romcode/Initialize DDR/Read initialize status.
I’m trying to recover my tv box, but whenever I try, the same error appears.
[Romcode / Initialize DDR / Read initialize status / USB Control setup error]
I tried some roms from atvxperience but they all return the same problem, at 2% for and return the mentioned error.
My Tv Box (h96 pro + (s32-v6 lpddr3)), can someone help me?
Try one of these versions for LPDDR3:
Put your device in MASK Rom mode by shortening the pins on NAND chip and flash good working stock ROM or atvX LPDDR3 image from post above.
em3ka wrote: ↑ Mon May 25, 2020 11:19 am Put your device in MASK Rom mode by shortening the pins on NAND chip and flash good working stock ROM or atvX LPDDR3 image from post above.
em3ka wrote: ↑ Mon May 25, 2020 11:19 am Put your device in MASK Rom mode by shortening the pins on NAND chip and flash good working stock ROM or atvX LPDDR3 image from post above.
I’m having the same problem..
do I have to pinch those 2 pins and keep pinching them while I’m connecting the USB cable to my box and then press the Start button on the program ( USB burning tool ) or I have to keep pinching the pins even after I click the start button .
also please give me the URL link for the correct firmware for my box ..because when I download the ones in the google drive that you added, the USB burning tool is giving me this message (( Parse burning image fail )) .
it’s like the USB burning tool is not accepting that image file.
Источник
atvXperience : The Forum
One of the Biggest Android TV Box Forums on the internet!
So, having problems with usb burning tool?
Well, here’s how you do it. Don’t forget to reply to this topic if you want to add anything.
1. Don’t forget to plug in power cable if you get lowper error.
2. If your device isn’t getting detected, even after pushing the reset button, try shorting nand pins. You can find a video tutorial on mxq project YouTube channel.
3. DDR Error? Tried using different ddr version atvX? DDR3, DDR4, LPDDR to name a few.
4. Flashed but not working? Try flashing again, or a different image. Still getting a black screen?
a) If you see the bootlogo but not the UI after booting, try atvx on a 1080p tv.
b) If you don’t see anything at all, the device is incompatible, Sorry
5. 7% Uboot error? Try another image or version. Chances are, your box uses a modded uboot which doesn’t accept other original uboot partitions. Fix? Point 6.
6. 2GB/3GB RAM but after flashing it’s 1GB/2GB? You’ve got a fake box. Your uboot was modified to read wrong dtb header to show more RAM than the actual physical one(maybe). The only way to fix(fake your ram) this is unpacking atvx and your stock rom to level 1 with Ricky’s customization tool and replacing your stock’s system, boot, recovery and bootloader partitions with atvx’s and re-packing.
Источник
Announcement
![]()
I have been using USB burning tool v2.0.6.2 to update my OTT MXQ Pro 4K box a couple of times but recently I have been getting these errors below and have not been able to flash the firmware:
— Romcode/Initialize DDR/Initialize PLL/USB Control setup error
— Erase bootloader/Lowper/Identify/ Error result
I have tried using a few other PCs with USB 2 ports but were getting the same errors and I only managed to erase the bootloader once.
Can any one help?
![]()
I had the same problem, but ended up getting it to work by doing the following. Frustrated, I tried different versions of USB Burning tool with no success. The 2.0.5.15 works just fine. You click the middle (2nd) Chinese writing on the upper left corner and select «English.» Remember to open, load, start, then, connect.
1. Open the USB Burning Tool as an Administrator
2. Load the Firmware image file
3. Press «Start»
4. Connect your box via USB
How.did you load the license in the flastool i cant get i right
Sent from my SM-N9300 using Tapatalk
- Join Date: Jun 2014
- Posts: 6441
And were can i find the license it doent come with the rar compressed file
Sent from my SM-N9300 using Tapatalk
- Join Date: Jun 2014
- Posts: 6441
We have a bricked T95u Pro 3/32. USB burning tool now sees the box after a pin short. It goes to 7 percent and then errors out. Any help to get it running again would be greatly appreciated
this is the error we see
[10:12:07 517][Global][Inf]—DevPath:?pci#ven_8086&dev_293c&subsys_02be1028& rev_03#3&11583659&0&d7#<3abf6f2d-71c4-462a-8a92-1e6861e6af27>
[10:12:07 517][Global][Inf]—->Roothub:USB#ROOT_HUB20#4&13e35410&0#
[10:12:07 589][Global][Inf]———>[Port0]NoDeviceConnected
[10:12:07 589][Global][Inf]———>[Port1]NoDeviceConnected
[10:12:07 589][Global][Inf]———>[Port2]NoDeviceConnected
[10:12:07 589][Global][Inf]———>[Port3]NoDeviceConnected
[10:12:07 589][Global][Inf]———>[Port4]NoDeviceConnected
[10:12:07 590][Global][Inf]———>[Port5]Other device
[10:12:07 590][Global][Inf]—Scan USB host controller complete
[10:12:07 591][Global][Inf]—Update data center with HubMap
[10:12:13 935][Global][Inf]—User click open button
[10:12:58 786][Global][Inf]—Image path C:UsersajcdnDownloadsT95UT95U_S912_03092017_A ndroidTVBox.euT95U_S912_03092017_AndroidTVBox.eu aml_upgrade_package.img
[10:13:22 934][Global][Inf]—Parsing burning package
[10:13:22 934][Global][Inf]—Load configuration file C:Program Files (x86)AmlogicUSB_Burning_Tooltemp
[10:13:22 935][Global][Inf]—Parse burning configuration file C:Program Files (x86)AmlogicUSB_Burning_Tooltempburn_config.xm l
[10:13:22 938][Global][Inf]—Get burning key
can you advise us please?
![]()
I had the same problem, but ended up getting it to work by doing the following. Frustrated, I tried different versions of USB Burning tool with no success. The 2.0.5.15 works just fine. You click the middle (2nd) Chinese writing on the upper left corner and select «English.» Remember to open, load, start, then, connect.
1. Open the USB Burning Tool as an Administrator
2. Load the Firmware image file
3. Press «Start»
4. Connect your box via USB
I have a Mecool M8s PRO L and i got this 2% error when i try to connect only with USB male to male to the pc:
«Romcode/Initialize DDR/Read initialize status/USB Control setup error»
Even if i try to short the reset pins out. Blue LED on the box stays allways on.
If i plug the power cable when we tries to pass the 2% error, we reaches 7% and the following error:
UBOOT/Disk initialize/Send command/Error result’
Источник
Romcode Initialize/USB Control Setup Error
Member
Hi Guys
I have this problem while flashing my U9H:
[12:11:25 210][HUB1-6][Inf]—2-2-0-0
[12:11:25 210][HUB1-6][Inf]—Control write pll reg1 0xd9000000:0x000000b1
[12:11:25 713][HUB1-6][Inf]—Control write pll reg1 0xd9000000:0x00005183
[12:11:26 217][HUB1-6][Inf]—Control write pll reg1 0xd9000000:0x000000b1
[12:11:26 719][HUB1-6][Inf]—Control write pll reg1 0xd9000000:0x00005183
[12:11:27 223][HUB1-6][Inf]—Write initial succeed
[12:11:27 223][HUB1-6][Inf]—Upload encrypt at 0xc8100228
[12:11:27 225][HUB1-6][Inf]—ulValue = 0xadfd718c
[12:11:27 225][HUB1-6][Inf]—Read encrypt value succeed
[12:11:27 225][HUB1-6][Inf]—Download DDR.USB,size: 49152!
[12:11:27 238][HUB1-6][Inf]—Transfer complete 49152
[12:11:27 240][HUB1-6][Inf]—Run at address 0xd9000000
[12:11:27 246][HUB1-6][Inf]—RunInRam success
[12:11:27 271][HUB1-6][Inf]—2-2-0-0-0-1-0-0
[12:11:27 271][HUB1-6][Inf]—CheckFileRunState succeed
[12:11:42 275][HUB1-6][Err]—usbReadFile failed ret = -116
[12:11:42 275][HUB1-6][Err]—ReadPara failed
[12:11:42 282][HUB1-6][Err]—[0x10105002]Romcode/Initialize DDR/Read initialize status/USB Control setup error
[12:11:42 283][HUB1-6][Inf]—Close device handle 0x00000b44
Is there somebody else, with the same problem? Actually tried to flash the Latest Official Firmware because (after a long pause while it was offline) my box didnt want to boot (splash screen appear with Android logo and then nothing happened). For additional info there is a screenshot attached.
Attachments
Villa
Hi Guys
I have this problem while flashing my U9H:
[12:11:25 210][HUB1-6][Inf]—2-2-0-0
[12:11:25 210][HUB1-6][Inf]—Control write pll reg1 0xd9000000:0x000000b1
[12:11:25 713][HUB1-6][Inf]—Control write pll reg1 0xd9000000:0x00005183
[12:11:26 217][HUB1-6][Inf]—Control write pll reg1 0xd9000000:0x000000b1
[12:11:26 719][HUB1-6][Inf]—Control write pll reg1 0xd9000000:0x00005183
[12:11:27 223][HUB1-6][Inf]—Write initial succeed
[12:11:27 223][HUB1-6][Inf]—Upload encrypt at 0xc8100228
[12:11:27 225][HUB1-6][Inf]—ulValue = 0xadfd718c
[12:11:27 225][HUB1-6][Inf]—Read encrypt value succeed
[12:11:27 225][HUB1-6][Inf]—Download DDR.USB,size: 49152!
[12:11:27 238][HUB1-6][Inf]—Transfer complete 49152
[12:11:27 240][HUB1-6][Inf]—Run at address 0xd9000000
[12:11:27 246][HUB1-6][Inf]—RunInRam success
[12:11:27 271][HUB1-6][Inf]—2-2-0-0-0-1-0-0
[12:11:27 271][HUB1-6][Inf]—CheckFileRunState succeed
[12:11:42 275][HUB1-6][Err]—usbReadFile failed ret = -116
[12:11:42 275][HUB1-6][Err]—ReadPara failed
[12:11:42 282][HUB1-6][Err]—[0x10105002]Romcode/Initialize DDR/Read initialize status/USB Control setup error
[12:11:42 283][HUB1-6][Inf]—Close device handle 0x00000b44
Is there somebody else, with the same problem? Actually tried to flash the Latest Official Firmware because (after a long pause while it was offline) my box didnt want to boot (splash screen appear with Android logo and then nothing happened). For additional info there is a screenshot attached.
Why do you have «Erase flash» set to «Erase all»? «Normal erase» should be sufficient!
Also you shouldn’t have «Reset after success» and «Whether overwrite key» Enabled.
Источник
Announcement
![]()
I have H96 pro tv box, I’m trying to install a new firmware but I have a problem with the usb connection.
Whenever I try to connect the box to usb ,it recognized for 1-2 seconds and then disconnecting.
I tried it with 4 different computers (including desktop), I installed the driver, I tried 2 different usb cables — all with the same results.
I tried to press the reset button and then to start the box — it doesn’t recognized at all.
I tried to connect it to the power adapter ,then to start the box and then to connect it to usb- it doesn’t recognized at all.
I tried to connect the hdmi cable so I can see what happens when it starts ,I see that when i press the reset button it goes into the recovery menu — but it seems that when it in this menu it doesn’t recognized by usb.
this is the error that I get:
[2018-11-23 13:50:21 662][HUB2-2][0x10102002]Romcode/Initialize DDR/Initialize PLL/USB Control setup error
[2018-11-23 13:51:36 983][HUB2-2][0x10105002]Romcode/Initialize DDR/Read initialize status/USB Control setup error
![]()
- Join Date: May 2014
- Posts: 1316
Which version of USB Burn Tool?
Which version of Windows?
(Which China Box revision. update to which firmware? (Not immediately important to your question.)
Do you have a firewall running?
Do you have Anti-Virus running?
I suggest that you you give more info.
(All 4 computers only recognize connection (1-2 sec.)?
![]()
USB burn tool v.2.0.7.2, I also use the usbview.exe to see if the box recognized.
I tried on win7 and win10
box version you can see attached, trying to install h96pro.H96PRO+_2G(16)_HS2734A_1000M_7.1.2018.04.10 .20.38
I don’t have a firewall
I have Symantec Endpoint Protection
I attached the log files
![]()
- Join Date: May 2014
- Posts: 1316
Amlogic Worldcup Drivers..no longer installed properly??
«Romcode/Initialize DDR/Initialize PLL/USB Control setup error
Romcode/Initialize DDR/Read initialize status/USB Control setup error.»
2018-11-23. «attempting to erase bootloader». Did USB Burn Tool succeed in seeing and flashing your China Box?
Источник
Приставка X96 mini 2/16 Gb широко распространена. Данный экземпляр при подключении к телевизору не выдает изображение и не реагирует на пульт.
Светодиод горит тускло красным цветом и не меняет свой цвет на синий.
Маркировка используемого блока питания — RSF-DY009-0502000.
Приставка со стороны задней крышки выглядит следующим образом. На ней наклейка с точным названием модели.
Крышка отщелкивается и мы можем получить доступ к плате. Запоминаем расположение крышки, т.к. на ней находится термопрокладка, которая должна попасть на процессор Amlogic S905W.
Маркировка платы Q6X V2.2 17355. По отзывам на 4PDA данная маркировка имеет проблемы при прошивке.
С обратной стороны плата выглядит следующим образом.
Входное напряжение равно 5.2 В и поэтому неисправность внешнего блока питания исключается.
Далее входное напряжение понижается при помощи DC/DC преобразователей с маркировкой S15BLQ.
Напряжения на плате распределены следующим образом. Также необходимо обратить внимание на исправность электролитического конденсатора 100 мкФ х 10 В. Он один на плате.
Для прошивки устройства я использовал программу USB Burning Tool 2.09. При подключении необходимо выполнить сброс приставки. Для этого удобно использовать спичку (токонепроводящий предмет). USB шнур необходимо вставлять в белый разъем. Вот подробная инструкция по прошивке через ПК. Если кому-то не нравится — то вот другая.
После этого в программе отображается устройство с пометкой Connect success.
Однако прошивка прерывалась на 7%. Ошибка была либо [0x30201004]UBOOT/Disk initialize/Send command/Error result.
В версии программы USB Burning Tool 2.12 код ошибки сменился на [0x32030201]Uboot/Get result/DiskInitial error.
Кому-то помог при прошивке выбор опции «Force Erase All». Однако при этом придется в дальнейшем восстанавливать MAC-адрес. Такая проблема может быть при проблемах с флеш-памятью.
В таком случае можно попробовать воспользоваться оболочкой LibreELEC. По следующей ссылке описана штатная установка LibreELEC — KODI — 8.2.3.1 на X96 Mini Amlogic S905W. Нас интересует вариант полноценной загрузки LibreELEC с miniSD карты, описанный тут и тут.
Задействованные программы Win32DiskImager и Burn_Card_Maker. Однако мне это не помогло, т.к. неисправность была где-то гораздо глубже. Возможно кому-то данная инструкция и вышеуказанные ссылки помогут.
Ранее прошивал TV Box X96 mini, которая зависала на заставке.
#3
Wed Apr 03, 2019 10:50 pm
Read the tutorials section already for installations?
Trying a different USB port on your PC, restart Tool software, try again holding reset before connecting USB and don’t release till computer chimes. Maybe box needs power supply also plugged into box. Or sometimes Burning Tool is the problem, so install a different version.
BE KIND, BE NICE, BE RESPECTFUL TO OTHERS, RESPECT THE MODERATORS,
*IMPORTANT NOTE* ONLY PM MODERATORS OR DEVELOPERS AS A LAST RESORT!!!
 My test device: H96 Pro+ 3gb/32gb DDR4 Plus own Tanix, Beelink, Alfawise, X96S, Odroid-N2, Khadas VIM3L, X3, ADT-3, X96-Air
GEARBEST.com
PLEASE ENJOY ATVX!
- Giclub.tv »
- GI Premier, GI iTV912, GI Lunn 18, GI Lunn 28, GI Lunn 216 »
- GI Lunn 18, GI Lunn 28, GI Lunn 216 (Модераторы: ooolexa, -WadimArt-, wolow) »
- Обновление прошивки GI Lunn с ПК через программу USB Burning Tool
 Внимание! Исходя из последних событий по блокировке ресурсов в сети. Хочу предупредить всех наших пользователей!
Публикация любых плейлистов содержащих телеканал «Наш Футбол» (эфирное название «Матч!Премьер» и «Матч! Футбол») ЗАПРЕЩЕНА!
К пользователям которые нарушат правила могут быть применены штрафные санкции!
Тема: Обновление прошивки GI Lunn с ПК через программу USB Burning Tool (Прочитано 17463 раз)
0 Пользователей и 1 Гость просматривают эту тему.
Прошиться можно с помощью microSD карты.
Инструкцию по подготовке такой карты найдёте в сети.
Один важный момент.
Вставляем в слот подготовленную microSD карту, направляем пульт на приставку, начинаем быстро нажимать на пульте кнопку включения и в это время подключаем бокс к сети, увидев на экране ТВ что прошивка началась, откладываем пульт в сторону.
Восстанавливал этим способом такие приставки много раз, всегда успешно.
Эти пользователи сказали Вам СПАСИБО:
Записан
попробовал. всё без толку. изображение на тв не появилось… пробовал даже два разных пульта. один от INVIN KM5 он практически такой же. и проц тотже. фокус не удался… видимо трупик )….
Записан
Эти пользователи сказали Вам СПАСИБО:
Записан
GI ET11000, GI ET7000mini, GI iTV912, GI Uni, GI Spark2&3Combo, VU+ Duo2, VU+ Solo2, VU+ SoloSE, GI 9995, GI 9895, GI 8895, GI 8180, GI 8120, GI HD Slim& Plus& Combo
Satellite: 4w, 1.9е, 4.9e, 7e, 9e, 13e, 16е, 19e, 23.5e, 36e, 53e, 55e, 75e, 85.2e, 90e
Всем привет, приставка Gi Lunn 28,
Подскажите…
при прошивке ….при пороге 4% появляется сообщение:
Device is removed
[15:13:04 618][HUB1-2][Inf]—Detect Device connect timeout
[15:13:04 618][HUB1-2][Inf]—Close device handle 0x00000914
[15:13:04 680][HUB1-2][Err]—Device path is null or device connect status is error
[15:13:04 770][HUB1-2][Err]—[0x10302001]Romcode/Switch status/Check connect/Enum device error
Чем лечится?
Записан
Записан
bassalex, cuc333, если не выходит выполнить восстановление, то отправляйте в сервисный центр.
Эти пользователи сказали Вам СПАСИБО:
Записан
GI ET11000, GI ET7000mini, GI iTV912, GI Uni, GI Spark2&3Combo, VU+ Duo2, VU+ Solo2, VU+ SoloSE, GI 9995, GI 9895, GI 8895, GI 8180, GI 8120, GI HD Slim& Plus& Combo
Satellite: 4w, 1.9е, 4.9e, 7e, 9e, 13e, 16е, 19e, 23.5e, 36e, 53e, 55e, 75e, 85.2e, 90e
Что можно сделать?
Версия UBT не подходит, старее надо
Добавлено: 24 Январь 2021, 18:11:14
Парни, всем здравствовать!
Какая версия прошивки самая стабильная?
Записан
Прошиться можно с помощью microSD карты.
Инструкцию по подготовке такой карты найдёте в сети.
Один важный момент.
Вставляем в слот подготовленную microSD карту, направляем пульт на приставку, начинаем быстро нажимать на пульте кнопку включения и в это время подключаем бокс к сети, увидев на экране ТВ что прошивка началась, откладываем пульт в сторону.
Восстанавливал этим способом такие приставки много раз, всегда успешно.Ну Так почему бы не обьяснить добрым людям подробно как ты это делал ,подготовка карты и все по шагам.
Записан
Версия UBT не подходит, старее надо
Добавлено: 24 Январь 2021, 18:11:14
Парни, всем здравствовать!
Какая версия прошивки самая стабильная?
я пробовал всеми версиями бурнинг тула , ошибка или на 2% или на 4% и отключается , видимо сдохла память. а товарищу выше можно попробовать с этого поста. человек так поднял кирпичь. https://4pda.to/forum/index.php?showtopic=703938&view=findpost&p=46784379
Записан
- Giclub.tv »
- GI Premier, GI iTV912, GI Lunn 18, GI Lunn 28, GI Lunn 216 »
- GI Lunn 18, GI Lunn 28, GI Lunn 216 (Модераторы: ooolexa, -WadimArt-, wolow) »
- Обновление прошивки GI Lunn с ПК через программу USB Burning Tool
Всем привет!
Лежала давно неисправная приставка T95Q S905X2.
Так вот, решил ради интереса заняться его ремонтом, в итоге причиной его неработаспособности оказался процессор.
Ради интереса заказал процессор с Алика, и заменил.
И ВУалЯ, приставка включилась и запустилась.
Стояла стоковая прошивка 20003.
С целью обновится на другую прошивку, получил кирпич.
Теперь, опознается компом не с первого раза и без замыкания пятоков, для ввода в режим раскирпичивания.
Делал все по инструкции, скачал стоковую 20003, запустил USB Burning Tool, открыл файл aml_upgrade_package.img, нажал старт, подключаю и сразу как опознается, получаю ошибки
[0x00101004] Erase bootloader/Lowper/Identify/Error result
или
[0x10101002] Romcode/Initialize DDR/Identify/USB Control setup
Пробовал в нескольких версиях USB Burning Tool.
Так-же пробовал разные прошивки.
Так-же пробовал на другом ПК.
Подключал через UART, чтоб увидеть что происходит.
Если просто включить приставку, вот что мы видим:
Цитата:
G12A:BL:0253b8:61aa2d;FEAT:C0F97000:802000;POC:F;RCY:0;EMMC:0;READ:0;CHK:1F;READ:0;CHK:1F;READ:0;CHK:1F;SD?:20000;USB:8;
или
Цитата:
LOOP:8;EMMC:0;READ:0;CHK:1F;READ:0;CHK:1F;READ:0;CHK:1F;SD?:0;SD:800;USB:8;
LOOP:9;EMMC:0;READ:0;CHK:1F;READ:0;CHK:1F;READ:0;CHK:1F;SD?:0;SD:800;USB:8;
LOOP:A;EMMC:0;READ:0;CHK:1F;READ:0;CHK:1F;READ:0;CHK:1F;SD?:0;SD:800;USB:8;
LOOP:B;EMMC:0;READ:0;CHK:1F;READ:0;CHK:1F;READ:0;CHK:1F;SD?:0;SD:800;USB:8;
и т.д…
А когда процесс обрывается на 2% [0x10101002] Romcode/Initialize DDR/Identify/USB Control setup
Вот что происходит в логе:
Так-же где то читал, что не прошивается так-как был стерт bootloader, перед началом прошивки нужно было убрать галку Erase bootloader, о чем я и не знал.
Так как, ранее прошивал много приставок S809, S905X, S905W, такой проблемы не было.
Думаю нужно найти способ прошить bootloader.
Или-же, проблема в железе, может где-то не хватает необходимого питания, или оно отсутствует.
Прилагаю фото платы с замерами.
Думал может проц. плохо сел, решил его пошатать, не это не помогло.
Так-же, приставка отказывается запускаться с SD-карты.
Пробовал создать CoreELEC, на SD-карту.
P.S. Распаковал стоковую прошивку и обнаружил что в нем нет файла bootloader.PARTITION
Сравнивал между прошивкой от T95M которую прошивал ранее после замены eMMC, там после распаковки я обнаружил наличие файла bootloader.PARTITION
Не знаю имеет ли это отношения к тому что оно не прошивается.
Так-же обращался в ветку T95Q на 4PDA, там помочь никто не смог.
Содержание
- atvXperience : The Forum
- [HELP] h96 pro+ How to solve Romcode/Initialize DDR/Read initialize status.
- atvXperience : The Forum
- [INSTALL] Common USB Burning Tool Errors and Fixes
- Announcement
- USB Burning Tool errors
- USB Burning Tool errors
- Comment
- Comment
- Comment
- Comment
- Comment
- Comment
- Comment
- Comment
- Comment
- Romcode Initialize/USB Control Setup Error
- Attachments
- Villa
- Announcement
- USB Burning Tool problem
- USB Burning Tool problem
- Comment
- Comment
atvXperience : The Forum
One of the Biggest Android TV Box Forums on the internet!
[HELP] h96 pro+ How to solve Romcode/Initialize DDR/Read initialize status.
I’m trying to recover my tv box, but whenever I try, the same error appears.
[Romcode / Initialize DDR / Read initialize status / USB Control setup error]
I tried some roms from atvxperience but they all return the same problem, at 2% for and return the mentioned error.
My Tv Box (h96 pro + (s32-v6 lpddr3)), can someone help me?
Try one of these versions for LPDDR3:
Put your device in MASK Rom mode by shortening the pins on NAND chip and flash good working stock ROM or atvX LPDDR3 image from post above.
em3ka wrote: ↑ Mon May 25, 2020 11:19 am Put your device in MASK Rom mode by shortening the pins on NAND chip and flash good working stock ROM or atvX LPDDR3 image from post above.
em3ka wrote: ↑ Mon May 25, 2020 11:19 am Put your device in MASK Rom mode by shortening the pins on NAND chip and flash good working stock ROM or atvX LPDDR3 image from post above.
I’m having the same problem..
do I have to pinch those 2 pins and keep pinching them while I’m connecting the USB cable to my box and then press the Start button on the program ( USB burning tool ) or I have to keep pinching the pins even after I click the start button .
also please give me the URL link for the correct firmware for my box ..because when I download the ones in the google drive that you added, the USB burning tool is giving me this message (( Parse burning image fail )) .
it’s like the USB burning tool is not accepting that image file.
Источник
atvXperience : The Forum
One of the Biggest Android TV Box Forums on the internet!
So, having problems with usb burning tool?
Well, here’s how you do it. Don’t forget to reply to this topic if you want to add anything.
1. Don’t forget to plug in power cable if you get lowper error.
2. If your device isn’t getting detected, even after pushing the reset button, try shorting nand pins. You can find a video tutorial on mxq project YouTube channel.
3. DDR Error? Tried using different ddr version atvX? DDR3, DDR4, LPDDR to name a few.
4. Flashed but not working? Try flashing again, or a different image. Still getting a black screen?
a) If you see the bootlogo but not the UI after booting, try atvx on a 1080p tv.
b) If you don’t see anything at all, the device is incompatible, Sorry
5. 7% Uboot error? Try another image or version. Chances are, your box uses a modded uboot which doesn’t accept other original uboot partitions. Fix? Point 6.
6. 2GB/3GB RAM but after flashing it’s 1GB/2GB? You’ve got a fake box. Your uboot was modified to read wrong dtb header to show more RAM than the actual physical one(maybe). The only way to fix(fake your ram) this is unpacking atvx and your stock rom to level 1 with Ricky’s customization tool and replacing your stock’s system, boot, recovery and bootloader partitions with atvx’s and re-packing.
Источник
Announcement
![]()
I have been using USB burning tool v2.0.6.2 to update my OTT MXQ Pro 4K box a couple of times but recently I have been getting these errors below and have not been able to flash the firmware:
— Romcode/Initialize DDR/Initialize PLL/USB Control setup error
— Erase bootloader/Lowper/Identify/ Error result
I have tried using a few other PCs with USB 2 ports but were getting the same errors and I only managed to erase the bootloader once.
Can any one help?
![]()
I had the same problem, but ended up getting it to work by doing the following. Frustrated, I tried different versions of USB Burning tool with no success. The 2.0.5.15 works just fine. You click the middle (2nd) Chinese writing on the upper left corner and select «English.» Remember to open, load, start, then, connect.
1. Open the USB Burning Tool as an Administrator
2. Load the Firmware image file
3. Press «Start»
4. Connect your box via USB
How.did you load the license in the flastool i cant get i right
Sent from my SM-N9300 using Tapatalk
- Join Date: Jun 2014
- Posts: 6441
And were can i find the license it doent come with the rar compressed file
Sent from my SM-N9300 using Tapatalk
- Join Date: Jun 2014
- Posts: 6441
We have a bricked T95u Pro 3/32. USB burning tool now sees the box after a pin short. It goes to 7 percent and then errors out. Any help to get it running again would be greatly appreciated
this is the error we see
[10:12:07 517][Global][Inf]—DevPath:?pci#ven_8086&dev_293c&subsys_02be1028& rev_03#3&11583659&0&d7#<3abf6f2d-71c4-462a-8a92-1e6861e6af27>
[10:12:07 517][Global][Inf]—->Roothub:USB#ROOT_HUB20#4&13e35410&0#
[10:12:07 589][Global][Inf]———>[Port0]NoDeviceConnected
[10:12:07 589][Global][Inf]———>[Port1]NoDeviceConnected
[10:12:07 589][Global][Inf]———>[Port2]NoDeviceConnected
[10:12:07 589][Global][Inf]———>[Port3]NoDeviceConnected
[10:12:07 589][Global][Inf]———>[Port4]NoDeviceConnected
[10:12:07 590][Global][Inf]———>[Port5]Other device
[10:12:07 590][Global][Inf]—Scan USB host controller complete
[10:12:07 591][Global][Inf]—Update data center with HubMap
[10:12:13 935][Global][Inf]—User click open button
[10:12:58 786][Global][Inf]—Image path C:UsersajcdnDownloadsT95UT95U_S912_03092017_A ndroidTVBox.euT95U_S912_03092017_AndroidTVBox.eu aml_upgrade_package.img
[10:13:22 934][Global][Inf]—Parsing burning package
[10:13:22 934][Global][Inf]—Load configuration file C:Program Files (x86)AmlogicUSB_Burning_Tooltemp
[10:13:22 935][Global][Inf]—Parse burning configuration file C:Program Files (x86)AmlogicUSB_Burning_Tooltempburn_config.xm l
[10:13:22 938][Global][Inf]—Get burning key
can you advise us please?
![]()
I had the same problem, but ended up getting it to work by doing the following. Frustrated, I tried different versions of USB Burning tool with no success. The 2.0.5.15 works just fine. You click the middle (2nd) Chinese writing on the upper left corner and select «English.» Remember to open, load, start, then, connect.
1. Open the USB Burning Tool as an Administrator
2. Load the Firmware image file
3. Press «Start»
4. Connect your box via USB
I have a Mecool M8s PRO L and i got this 2% error when i try to connect only with USB male to male to the pc:
«Romcode/Initialize DDR/Read initialize status/USB Control setup error»
Even if i try to short the reset pins out. Blue LED on the box stays allways on.
If i plug the power cable when we tries to pass the 2% error, we reaches 7% and the following error:
UBOOT/Disk initialize/Send command/Error result’
Источник
Romcode Initialize/USB Control Setup Error
Member
Hi Guys
I have this problem while flashing my U9H:
[12:11:25 210][HUB1-6][Inf]—2-2-0-0
[12:11:25 210][HUB1-6][Inf]—Control write pll reg1 0xd9000000:0x000000b1
[12:11:25 713][HUB1-6][Inf]—Control write pll reg1 0xd9000000:0x00005183
[12:11:26 217][HUB1-6][Inf]—Control write pll reg1 0xd9000000:0x000000b1
[12:11:26 719][HUB1-6][Inf]—Control write pll reg1 0xd9000000:0x00005183
[12:11:27 223][HUB1-6][Inf]—Write initial succeed
[12:11:27 223][HUB1-6][Inf]—Upload encrypt at 0xc8100228
[12:11:27 225][HUB1-6][Inf]—ulValue = 0xadfd718c
[12:11:27 225][HUB1-6][Inf]—Read encrypt value succeed
[12:11:27 225][HUB1-6][Inf]—Download DDR.USB,size: 49152!
[12:11:27 238][HUB1-6][Inf]—Transfer complete 49152
[12:11:27 240][HUB1-6][Inf]—Run at address 0xd9000000
[12:11:27 246][HUB1-6][Inf]—RunInRam success
[12:11:27 271][HUB1-6][Inf]—2-2-0-0-0-1-0-0
[12:11:27 271][HUB1-6][Inf]—CheckFileRunState succeed
[12:11:42 275][HUB1-6][Err]—usbReadFile failed ret = -116
[12:11:42 275][HUB1-6][Err]—ReadPara failed
[12:11:42 282][HUB1-6][Err]—[0x10105002]Romcode/Initialize DDR/Read initialize status/USB Control setup error
[12:11:42 283][HUB1-6][Inf]—Close device handle 0x00000b44
Is there somebody else, with the same problem? Actually tried to flash the Latest Official Firmware because (after a long pause while it was offline) my box didnt want to boot (splash screen appear with Android logo and then nothing happened). For additional info there is a screenshot attached.
Attachments
Villa
Hi Guys
I have this problem while flashing my U9H:
[12:11:25 210][HUB1-6][Inf]—2-2-0-0
[12:11:25 210][HUB1-6][Inf]—Control write pll reg1 0xd9000000:0x000000b1
[12:11:25 713][HUB1-6][Inf]—Control write pll reg1 0xd9000000:0x00005183
[12:11:26 217][HUB1-6][Inf]—Control write pll reg1 0xd9000000:0x000000b1
[12:11:26 719][HUB1-6][Inf]—Control write pll reg1 0xd9000000:0x00005183
[12:11:27 223][HUB1-6][Inf]—Write initial succeed
[12:11:27 223][HUB1-6][Inf]—Upload encrypt at 0xc8100228
[12:11:27 225][HUB1-6][Inf]—ulValue = 0xadfd718c
[12:11:27 225][HUB1-6][Inf]—Read encrypt value succeed
[12:11:27 225][HUB1-6][Inf]—Download DDR.USB,size: 49152!
[12:11:27 238][HUB1-6][Inf]—Transfer complete 49152
[12:11:27 240][HUB1-6][Inf]—Run at address 0xd9000000
[12:11:27 246][HUB1-6][Inf]—RunInRam success
[12:11:27 271][HUB1-6][Inf]—2-2-0-0-0-1-0-0
[12:11:27 271][HUB1-6][Inf]—CheckFileRunState succeed
[12:11:42 275][HUB1-6][Err]—usbReadFile failed ret = -116
[12:11:42 275][HUB1-6][Err]—ReadPara failed
[12:11:42 282][HUB1-6][Err]—[0x10105002]Romcode/Initialize DDR/Read initialize status/USB Control setup error
[12:11:42 283][HUB1-6][Inf]—Close device handle 0x00000b44
Is there somebody else, with the same problem? Actually tried to flash the Latest Official Firmware because (after a long pause while it was offline) my box didnt want to boot (splash screen appear with Android logo and then nothing happened). For additional info there is a screenshot attached.
Why do you have «Erase flash» set to «Erase all»? «Normal erase» should be sufficient!
Also you shouldn’t have «Reset after success» and «Whether overwrite key» Enabled.
Источник
Announcement
![]()
I have H96 pro tv box, I’m trying to install a new firmware but I have a problem with the usb connection.
Whenever I try to connect the box to usb ,it recognized for 1-2 seconds and then disconnecting.
I tried it with 4 different computers (including desktop), I installed the driver, I tried 2 different usb cables — all with the same results.
I tried to press the reset button and then to start the box — it doesn’t recognized at all.
I tried to connect it to the power adapter ,then to start the box and then to connect it to usb- it doesn’t recognized at all.
I tried to connect the hdmi cable so I can see what happens when it starts ,I see that when i press the reset button it goes into the recovery menu — but it seems that when it in this menu it doesn’t recognized by usb.
this is the error that I get:
[2018-11-23 13:50:21 662][HUB2-2][0x10102002]Romcode/Initialize DDR/Initialize PLL/USB Control setup error
[2018-11-23 13:51:36 983][HUB2-2][0x10105002]Romcode/Initialize DDR/Read initialize status/USB Control setup error
![]()
- Join Date: May 2014
- Posts: 1316
Which version of USB Burn Tool?
Which version of Windows?
(Which China Box revision. update to which firmware? (Not immediately important to your question.)
Do you have a firewall running?
Do you have Anti-Virus running?
I suggest that you you give more info.
(All 4 computers only recognize connection (1-2 sec.)?
![]()
USB burn tool v.2.0.7.2, I also use the usbview.exe to see if the box recognized.
I tried on win7 and win10
box version you can see attached, trying to install h96pro.H96PRO+_2G(16)_HS2734A_1000M_7.1.2018.04.10 .20.38
I don’t have a firewall
I have Symantec Endpoint Protection
I attached the log files
![]()
- Join Date: May 2014
- Posts: 1316
Amlogic Worldcup Drivers..no longer installed properly??
«Romcode/Initialize DDR/Initialize PLL/USB Control setup error
Romcode/Initialize DDR/Read initialize status/USB Control setup error.»
2018-11-23. «attempting to erase bootloader». Did USB Burn Tool succeed in seeing and flashing your China Box?
Источник
Приставка X96 mini 2/16 Gb широко распространена. Данный экземпляр при подключении к телевизору не выдает изображение и не реагирует на пульт.
Светодиод горит тускло красным цветом и не меняет свой цвет на синий.
Маркировка используемого блока питания — RSF-DY009-0502000.
Приставка со стороны задней крышки выглядит следующим образом. На ней наклейка с точным названием модели.
Крышка отщелкивается и мы можем получить доступ к плате. Запоминаем расположение крышки, т.к. на ней находится термопрокладка, которая должна попасть на процессор Amlogic S905W.
Маркировка платы Q6X V2.2 17355. По отзывам на 4PDA данная маркировка имеет проблемы при прошивке.
С обратной стороны плата выглядит следующим образом.
Входное напряжение равно 5.2 В и поэтому неисправность внешнего блока питания исключается.
Далее входное напряжение понижается при помощи DC/DC преобразователей с маркировкой S15BLQ.
Напряжения на плате распределены следующим образом. Также необходимо обратить внимание на исправность электролитического конденсатора 100 мкФ х 10 В. Он один на плате.
Для прошивки устройства я использовал программу USB Burning Tool 2.09. При подключении необходимо выполнить сброс приставки. Для этого удобно использовать спичку (токонепроводящий предмет). USB шнур необходимо вставлять в белый разъем. Вот подробная инструкция по прошивке через ПК. Если кому-то не нравится — то вот другая.
После этого в программе отображается устройство с пометкой Connect success.
Однако прошивка прерывалась на 7%. Ошибка была либо [0x30201004]UBOOT/Disk initialize/Send command/Error result.
В версии программы USB Burning Tool 2.12 код ошибки сменился на [0x32030201]Uboot/Get result/DiskInitial error.
Кому-то помог при прошивке выбор опции «Force Erase All». Однако при этом придется в дальнейшем восстанавливать MAC-адрес. Такая проблема может быть при проблемах с флеш-памятью.
В таком случае можно попробовать воспользоваться оболочкой LibreELEC. По следующей ссылке описана штатная установка LibreELEC — KODI — 8.2.3.1 на X96 Mini Amlogic S905W. Нас интересует вариант полноценной загрузки LibreELEC с miniSD карты, описанный тут и тут.
Задействованные программы Win32DiskImager и Burn_Card_Maker. Однако мне это не помогло, т.к. неисправность была где-то гораздо глубже. Возможно кому-то данная инструкция и вышеуказанные ссылки помогут.
Ранее прошивал TV Box X96 mini, которая зависала на заставке.
|
beelink
Administrator
|
Go to Page No.
#1
|
GT1_708N0 modify Additional explanation: OTA function has been enabled, you can upgrade from GT1_705N0_LTM8830, GT1_707N0_LTM8830 version to GT1_708N0_LTM8830 version; if you need antutu test, please download the latest version Youtube: Best regards |
|||
|
|
||||
|
Use magic |
||||


 Favorites
 Shares
|
Phant0m«
Moderator
|
Recommend
Hi Chan. Not to be funny.., I have a few people’s Beelink GT1 Ultimate G912 boxes and I didn’t want to give their boxes if there was an update coming in a few days. Any estimate to how long before G912 see’s new update? Thanks in advance. |
|||
|
Beelink GT1 Mini (95X2) w/CoreELEC & Android 9 (Pie) |
||||
|
Use magic |
||||


|
perkas
Full Member
|
#3
When you will release another firmware for this model? (708N0 is from February) |
|||
|
Use magic |
||||

|
ROUL25
Newbie
|
#4
Dear Support, how I can deal with the «6. Add root switch», I would like to unroot my device. |
|||
|
Use magic |
||||
|
XanoVFR
Newbie
|
5#
Many thanks for the quick support. I will try to do the update from a SD Card, if I have any doubt Iwill contact you again. Kind Regards |
|||
|
Use magic |
||||
|
Dr_MHQ
Member
|
6#
The link for SD card method only shows old firmware that was released back in Feb 2018 |
|||
|
Use magic |
||||
|
beelink
Administrator
|
7#
hi |
|||
|
Use magic |
||||

|
Phant0m«
Moderator
|
8#
Edited by Phant0m« at 2019-01-12 15:04 Seems GT1 Ultimate G912 boxes are slowing up with firmware upgrades. |
|||
|
Beelink GT1 Mini (95X2) w/CoreELEC & Android 9 (Pie) |
||||
|
Use magic |
||||
|
aspendos
Newbie
|
9#
GT1 Ultemate G912GS ürnüme GT1_708N0_LTM8830 |
|||
|
Use magic |
||||
|
bappy
Newbie
|
10#
Hello, Now I wanted to update to the latest Android 7 based firmware GT1_708N0_LTM8830 Could you please help? What do I need to do to update from 111MO to the latest (708NO) using the USB burning tool? I am unable to find the firmware 701NO on beelink website — so maybe it has been removed? Please assist… Thanks heaps |
|||
|
Use magic |
||||
My MINIX died on me. tried everything even the FW update and i got Romcode/Switch status/Check connect/Enum device error when running the burning tool.
the blue light is on but noting is happening
Are u using the right version usb burning tool? You need to flash it with 2.0.9..
This is good to know really, i was worried about my atmos and dts X sound
Hello Friends, I’m new to this forum. I got new NEO U9-h. Need help on my observations. I had observed that
1.signal lost to tv (HDMI) and screen goes blank for few seconds while changing live channels/ watching online streaming ( not using Kodi)
2. IR remote instructions not processed sometimes like hung for sometime
3. WiFi buffering- device is next to router
4. when I start the device it shows android update/ optimizing apps sometimes
5. is there a minix official Android 7.1.2 to upgrade Available?
pls share your expert advices. Thnx in advance
1. It’s because you have the adaptive refresh rate change enabled. It makes the tv to switch the refresh rate to match the source material fps and the playback smoother. You can turn it off in android settings.
2. It’s a basic remote, mostly for initial setup. I recommend buying an airmouse like A2 or A3 or to use a wireless keyboard.
3. Can you connect it with ethernet cable to see if there is a difference?
4. How long does it last?

Hello Notrui, thank you for the guidance, will go through and get back if in case of any further help needed. May I request your help to understand the benefits of 7.1.2 compare to current pls. Thank you
1. It’s because you have the adaptive refresh rate change enabled. It makes the tv to switch the refresh rate to match the source material fps and the playback smoother. You can turn it off in android settings.
2. It’s a basic remote, mostly for initial setup. I recommend buying an airmouse like A2 or A3 or to use a wireless keyboard.
3. Can you connect it with ethernet cable to see if there is a difference?
4. How long does it last?
Hello Endrjupl, thank you for the response. pls find my updates below for your further suggestions
3. it happened with Ethernet connection with cat6 cable
4. it lasts about 30 sec to a minit
2. i guess I need to set to HDMI level2 to check and feedback the outcome pls
Thank you
Regards,
Hi, I am also new to this forum. I bought a minix Neo U9 to stream a club TV app which is running on a TV in our clubhouse. The media player is on 24×7 but is not working fine. After a few days it freezes and has to be restarted by taking off the power and full restart. Is there a way to keep the minix working or to auto restart it once every 24 hours?
Regards, Marcel.
In the first instance, try clearing the cache for the main apps you use or clear the system cache/partition.
Failing that, try clearing the data or uninstalling/reinstalling your mainly used apps.
Hopefully one or both of these will help to clear your issues. However, failing that, you may need to consider a factory reset.
Although, let us know if you’re still having problems after clearing the cache/data before proceeding with the factory reset & provide additional details if you can, (unless you’re happy to just go ahead with a reset). Others may have additional input for you as well .

Hi, I am also new to this forum. I bought a minix Neo U9 to stream a club TV app which is running on a TV in our clubhouse. The media player is on 24×7 but is not working fine. After a few days it freezes and has to be restarted by taking off the power and full restart. Is there a way to keep the minix working or to auto restart it once every 24 hours?
Regards, Marcel.
You could try a scheduler that does not require root and set it to reboot when everyone is tucked up in bed….
For example, this is a powerful piece of software: https://play.google.com/store/apps/details?id=com.llamalab.automate&hl=en
Edit: Ah, I stand corrected, Reboot will require root.
There is also one called Tasker. Highly recommend.
I have u9h with community edition rom. But I always get a message android tv remote app has stopped working. I have uninstalled reinstalled factory reset but still the same.
I wish to go back to official few 008 but the usb burning tool will not recognize my box.i have tried everything different PC’s different ports and I am using the cable that was provided with the box
So I am looking for another way to revert to fw 08
Maybe an img I can install at boot
Thanks in advance
as you have CE edition then i asume that you have previously «updated» succesfully already at some time ??
you could aslo try burn card method >> https://theminixforum.com/index.php…are-update-with-burn-card-maker.234/post-1149
Can you please tell me which firmware to download is it the one in post 1
Can you please tell me which firmware to download is it the one in post 1
for FW008, then yes


I’m noticing that the audio is a tiny bit out of sync when watching videos in Kodi (the audio is slightly behind the video). It seems to happen in most videos, not all. I’m not using any receiver or sound system. The U9 is directly connected to the tv and the audio is coming from the tv.
Any idea which setting I need to check to fix this? When I test with CoreElec there is no audio sync issue, so I think there’s something wrong with my settings, but I can’t seem find it.
Any idea which setting I need to check to fix this? When I test with CoreElec there is no audio sync issue, so I think there’s something wrong with my settings, but I can’t seem find it.
go to the settings cog on the OSD when playing and you can change the audio offset
Hi. Need help here. Tried to install firmware but as reached 7% progress, then become error per attached image. Anyone know why?
Hi Folks, I am having issues while burning the ROM. I have tried different versions of the Burning Tool, and different ROMs as well. But it seems to get stuck in the initial stage of burning. I have attached 2 pics. please let me now if anyone has any clue.
I have installed quite a few ROMs with the same method, not sure what the issue is this time. Currently I am running Android TV OS v7.1.2 un official version.
TIA!
-
120.2 KB
Views: 43 -
104.9 KB
Views: 42


-
kszaq -
Jul 8th 2016 -
Closed -
Thread is Unresolved
-
- #595
Say you wanted to map that red button to ‘up’.
So you want to replace the line:
0x16 396
with
0x16 103In simple terms (‘cos I have a simple understanding of this!) the first column of numbers in your remote.conf (the ones in hex) is a list of the remote keys, the second column is the list of what they’re read as.
Long presses are mapped within kodi, not in remote.conf.
Display More
Yeah, i’ve got that sorted thanks to your explanation. Just want to explore what’s going on in the default configuration file and what 396 initally should trigger. As it’s labeled «KODI» on the remote in android it will probably just start Kodi, if installed. Looks like a modification to me.
Anyway, still don’t know what the «repeat_key_begin» section in the remote.conf usually does. In my understanding the «key_begin» section simply defines the press key action, while «repeat_key_begin» performs an action after the given value «repeat_delay» for the already pressed key.
If that’s the case, one could raise the delay a bit and set actions to apply as you would use in your longpress modifications in keyboard.xml.
By default, it looks like «repeat_key_begin» has exactly the same defiinitions as «key_begin».
Anyway, this get’s a bit offtopic in here. Thank you for your help so far.
-
- #596
You don’t need to power the box as the computer usb will do that.
Load up the buring tool > load image > click start > plug in usb into box > plug in the cable to the computer > image should start to flash.
I already know that USB will power box when using tool. I tried your method but tool doesn’t detect box. Don’t know why because I flashed it this way before.
That’s why I was asking about way for getting into the console before Kodi is loading up.Edit: Ok, I’ve manage to make it detect by resintalling tool so the drivers would be reinstalled as well. But when I try to flash it with image that previously worked I’m getting error:
[0x00301001]Erease bootloader/Switch status/Enum device/Enum errorEdit2: I’m trying without Erease bootloader option checked to see what’s going to happen…
Edit3: Funny…It worked. This time I forced Android to be in 1080p but after flashing LE I still can’t switch GUI to 1080p. The same is with playing anything above 720p.
-
- #597
You can probably use this udev rule to set the MAC accress, until kszaq gets a chance to correct it permanently
I’ve tried this and confirmed it’s working. Phew

-
- #598
A little offtopic maybe not only s905 related.
I have got some problems with hyperion — SOLVED — LibreElec Amlogic S905 + Arduino | Hyperion — Forum
Anyone was able to run it correctly?EDIT: After reboot (made with unplug/plug DC) i’m stuck with a lot of errors and LE doesn’t boot at all.
-
- #599
The search function on this site is absolute crap! Can someone help me out and point me where I read about using the ‘Reboot to Nand’ option in skins other than Confluence ?
-
- #600
Hello kszaq
I wanted to consult with you about buying a new device.
just sold my device last week (beelink mini mx 1gb ram), because the problem of memory management (heavy skin & several addons couse to freeze)
Are you going to support newer devices based on amlogic 905x, 912, (and maybe dvb-t tuner device’s).
If so, what do you recommend to purchased.Thanks in advance.
-
- #601
The search function on this site is absolute crap! Can someone help me out and point me where I read about using the ‘Reboot to Nand’ option in skins other than Confluence ?
Hello,
just add «site:forum.libreeelec.tv» to your search terms to search the forums using google. Best result, from our thread here: LibreELEC
Reboot from nand is a binary ( /usr/sbin/rebootfromnand ) — if your skin allows you to execute binaries by selecting menu options or clicking buttons, you can add the functionality.
-
- #602
All :-
Has anyone worked out how to get the Moonlight add-on and xbox wired controller working properly with this build of LE?
Thanks
Kevin -
- #603
just add «site:forum.libreeelec.tv» to your search terms to search the forums using google. Best result, from our thread here: LibreELEC
Reboot from nand is a binary ( /usr/sbin/rebootfromnand ) — if your skin allows you to execute binaries by selecting menu options or clicking buttons, you can add the functionality.
Thanks & thanks

-
- #604
Has anyone else experienced playback starts 5-6 seconds into the video? I can confirm this on every OE/LE builds with Jarvis. On my Minix NEO X8-H plus and now on my new MiniMXIII.
-
- #605
Has anyone else experienced playback starts 5-6 seconds into the video? I can confirm this on every OE/LE builds with Jarvis. On my Minix NEO X8-H plus and now on my new MiniMXIII.
Yes, I get this on my MiniMXIII mainly with HEVC files. Often occurs with stuttering, see here: LibreELEC
-
- #606
Yes, I get this on my MiniMXIII mainly with HEVC files. Often occurs with stuttering, see here: LibreELEC
Thank you for confirmation. Also when playing next file automatically, few seconds is missing at the end and playback jump into the next file but again few seconds in.
-
- #607
Hello kszaq
I wanted to consult with you about buying a new device.
just sold my device last week (beelink mini mx 1gb ram), because the problem of memory management (heavy skin & several addons couse to freeze)
Are you going to support newer devices based on amlogic 905x, 912, (and maybe dvb-t tuner device’s).
If so, what do you recommend to purchased.Thanks in advance.
Display More
I am using a Beelink Mini MXIII (2/16GB) since the 5th of July daily without any serious Problems…so I can’t join the diskussion about the issues, mentioned here.
Anyway HEVC is not supported propper until Kodi 17.
Cheers
Mark[emoji6]Gesendet von meinem H60-L04 mit Tapatalk
-
- #608
Now I found that missing start of the playback was solved in SPMC 16.4.2. I had previous SPMC Jarvis builds on my Android tablet and the bug was there. Now on 16.4.2. it is finally solved. Maybe devs could use Koying patch for LE builds too. Very excited about that.
-
- #609
Now I found that missing start of the playback was solved in SPMC 16.4.2. I had previous SPMC Jarvis builds on my Android tablet and the bug was there. Now on 16.4.2. it is finally solved. Maybe devs could use Koying patch for LE builds too. Very excited about that.
If you have a link to the patch, then maybe Kszaq can include it in the next release.
-
- #610
I have already included the patch for the next build, just noticed it at SPMC today morning. Thanks for the heads up.
-
- #611
Thank you Kszaq, we all appreciate your hard work.
-
- #612
So I got a A95X and a MicroSD card with the img dd’ed to it in the slot. Those 5 files show up fine if I open the file browser in Android. I installed Quick Boot because I couldn’t find anything else that would allow rebooting to recovery mode on it, but then that just gives me the recovery menu after reboot. Both «reboot to bootloader» and the other one just send me straight back into Android. I have no idea where to go from here. Any help would be greatly appreciated.

