
![]()
WE ACCEPT

1-800-243-3418
sales@profastinc.com
We reply within 24 hours
Contact
us
Employee Login
Corporate Office
6 Poulson Ave
P.O. Box 156
Essington PA 19029
Phone —
610-521-3404
Fax — 610-521-4717
Central PA
Office
7917 Derry St
Suite 106
Harrisburg PA 17111
Phone —
717-458-5610
Fax — 717-458-5614
Western PA
Office
770 Vista Park Drive
Pittsburgh PA 15205
Phone —
412-259-8449
Fax — 412-291-3188
Baltimore Office
717 Hammonds Ferry Rd.
Linthicum Heights, MD 21090
Phone: 410-589-3369
© ProFast Inc. All Rights
Reserved. Privacy Policy | Catalog Index | Site Map
3. Work Mode
3.9 Standby
• If the welding nozzle (9) is not in the welding position and no key entry is made
during a certain time, the standby process will start automatically after the standby
time has passed (5 – 120 min., see Chapter 4.2 Standby Setup) A time of 40 minutes
is set ex works. A symbol and a counter (counts down from 180 seconds) appears on
the display (5). During this time, the heating is switched on.
• If the time has expired without the controls (4) having been pressed, the display (5)
will automatically change to Cool Down mode (Chapter 3.8, Cooling Down).
• If the e-Drive
state.
3.10 Error Messages
• If a malfunction occurs in the hot-air welding
machine VARIMAT V2, a message will appear on
the display (5), which is also provided with an
error code. This code stands for a more exact
definition of the error which can be seen in the
lower list.
• In case of error 02 and error 40, separate
symbols are displayed.
• In case of all other errors, the spanner is displayed for the service prompt.
Error
Type of error
Err01
Interruption or short-circuit of the temperature probe
Err02
Heating element defective (interruption in one/both winding(s)
Err04
Triac defective (one or both Triacs are defective)
Err08
Blower motor defective
Err40
Undervoltage (mains voltage -25%)
is pressed before the countdown has finished, the display will change back to the initial
13
- Manuals
- Brands
- Leister Manuals
- Welding System
- VARIMAT V2
- User manual
-
Contents
-
Table of Contents
-
Bookmarks
Quick Links
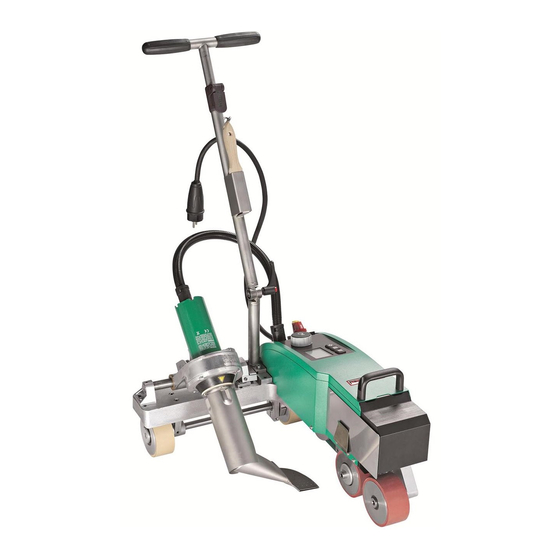
VARIMAT V2
Leister Process Technologies
Galileo-Strasse 10
CH-6056 Kaegiswil/Switzerland
Tel.
+41-41662 74 74
Fax
+41-41662 74 16
www.leister.com
sales@leister.com
®
GB
USA
Related Manuals for Leister VARIMAT V2
Summary of Contents for Leister VARIMAT V2
-
Page 1
® VARIMAT V2 Leister Process Technologies Galileo-Strasse 10 CH-6056 Kaegiswil/Switzerland Tel. +41-41662 74 74 +41-41662 74 16 www.leister.com sales@leister.com… -
Page 2: Table Of Contents
6. Carry out a test weld according to the welding instruction of the material manufacturer and national standards or guidelines. Check test weld. 7. Welding How do I switch off the hot-air welding machine VARIMAT V2 ? 1. Press e-Drive 2. Press «Cool down OK» e-Drive and allow to cool approx.
-
Page 3
(Translation of the original operating instructions) Please read operating instructions carefully before use and keep for future reference. Leister VARIMAT V2 Hot-Air welding machine Application • Overlap welding of roof sheeting made from PVC, TPO, ECB, EPDM, CSPE for basic weld seams. -
Page 4
Conformity Leister Process Technologies, Galileo-Strasse 10, CH-6056 Kaegiswil/Switzerland confirms that this product, in the version as brought into circulation through us, fulfils the requirements of the following EC directives. Directives : 98/37, 89/336, 73/23 Harmonised standards: EN 292-1, EN 292-2, EN 60204-1, EN 55014-1, EN 55014-2, EN 61000-3-2, EN 61000-3-3, EN 50366, EN 60335-2-45 Kaegiswil, 28.08.2009… -
Page 5
24. Carrying handle Controls (4) Main switch (3) Drive For switching the hot-air Setting the drive speed welding machine VARIMAT V2 on/off Heating e-Drive Setting the welding temperature The e-Drive serves as a navigator. It has two functions Turn left or right, in order to… -
Page 6: Sensor Setting
– Position the hot air blower (8) by pulling the locking lever (11) and swivel it up until it locks. • Connect VARIMAT V2 to the electrical mains. The mains voltage must correspond to the device voltage. Sensor Setting Automatic starter reason for fault •…
-
Page 7
Tool positioning • Lift hot-air welding machine with pressure onto guide bar (27) and move to weld position. Take welding plate (34) from holder and position according to Illustration H. WARNING: The welding plate (34) may only be removed from the holder and positioned if the wel- ding nozzle (9) has cooled down. -
Page 8: Work Mode (Chapter 3)
Startup Combination Main switch ON Work mode Chapter 3 Keys Drive and Heating buttons pressed down at the same time and the main switch ON Profile setup Chapter 4 Keys Heating and Blower buttons pressed down at the same time and the main switch ON Percent mode Chapter 5…
-
Page 9: Setpoint Value Display
(230V or 400V), this is displayed with the symbol and the measured undervoltage / overvoltage. • The VARIMAT V2 continues the work. • Depending on the undervoltage/overvoltage, the welding result can be affected. If the blower power is less than 100%, the set blower power changes with the symbol.
-
Page 10: Setting The Drive Speed
3. Work Mode 3.3 Setting the Drive Speed • The Drive key can be used to adjust the welding speed or the drive speed. This can be set by turning the e-Drive in 0.1m/min. increments from 0.7m/min. – 12.0m/min. This setting can be carried out with the drive switched on or switched off.
-
Page 11: Setting The Air Volume
3. Work Mode 3.5 Setting the Air Volume • Work mode allows the power of the blower to be changed using the Blower key The blower power can be set in 5% increments from 50% – 100% by turning the e-Drive .
-
Page 12: Selecting Profiles
3. Work Mode 3.7 Selecting Profiles • If the display at the bottom right of the display (5) is activated, profiles can be loaded by pressing the e-Drive . The display «Select Profile» then appears. A profile can be selected by turning the e-Drive .
-
Page 13: Standby
3.10 Error Messages • If a malfunction occurs in the hot-air welding machine VARIMAT V2, a message will appear on the display (5), which is also provided with an error code. This code stands for a more exact definition of the error which can be seen in the lower list.
-
Page 14: Creating Profiles
4. Profile Setup (see Startup Combination) 4.1 Creating Profiles • In the Profile Setup, 3 individual profiles can be created in which all three parameters can be freely set and then saved. • The various menu items can be selected using the controls (4) Pressing the e-Drive will take you back to the Profile Setup selection.
-
Page 15
• Welding plate article no. 132.429 Training • Leister Process Technologies and its authorised Service Centres offer free welding courses and training. Maintenance • The air inlet on the hot-air blower (8) must be cleaned with a brush if soiled. -
Page 16
® © Copyright by Leister Your authorised Service Centre is: Leister Process Technologies Galileo-Strasse 10 CH-6056 Kaegiswil/Switzerland Tel. +41-41662 74 74 +41-41662 74 16 www.leister.com sales@leister.com…
If a malfunction occurs with your Leister VARIMAT V2 automatic hot-air welding machine, a message will appear on the display (5). The error will include an icon, error code and in the event of a serious error, an acoustic warning signal will sound.
Following are error code definitions to help diagnosing issues, and to identify when you need to contact an authorized Leister service center.
| Error | Type of error |
| Err01 | Interruption or short circuit of the temperature probe. |
| Err02 | Heating element defective (interruption in one/both winding(s)). |
| Err04 | Triac defective (one or both triacs are defective). |
| Err08 | Blower motor defective. |
| Err40 | Undervoltage 25% (mains voltage 75%) |
If the set / actual welding temperature differ is greater than 20°C, then an acoustic warning signal will sound.
If you don’t encounter an error, contact your Leister authorized service center. They can advise you on potential fixes and next steps.
LEISTER
Сварочные автоматы горячего воздуха LEISTER серии VARIMAT V2 для сварки внахлест горячим воздухом полимерных и полимерно-битумных кровельных покрытий. Инструкция по эксплуатации.
Скачать
Pdf 2.68 Mb
Язык: RU