
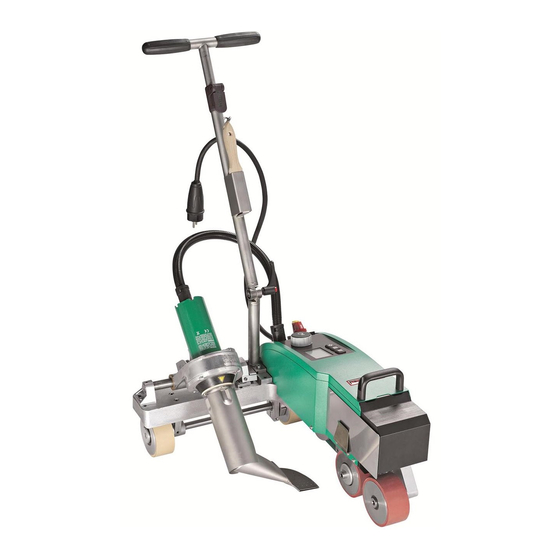
Error 08: Blower motor defective
Solution Requires a Leister Service Center
Pro-Fast is an Authorized Service Repair Center of Leister.
Call 717-458-5610 to get your parts ordered, or to speak to one of our service techs to get your machine up and running.![]()
Перейти к контенту
- Manuals
- Brands
- Leister Manuals
- Welding System
- VARIMAT V2
- User manual
-
Contents
-
Table of Contents
-
Bookmarks
Quick Links
VARIMAT V2
Leister Process Technologies
Galileo-Strasse 10
CH-6056 Kaegiswil/Switzerland
Tel.
+41-41662 74 74
Fax
+41-41662 74 16
www.leister.com
sales@leister.com
®
GB
USA
Related Manuals for Leister VARIMAT V2
Summary of Contents for Leister VARIMAT V2
- Page 1
® VARIMAT V2 Leister Process Technologies Galileo-Strasse 10 CH-6056 Kaegiswil/Switzerland Tel. +41-41662 74 74 +41-41662 74 16 www.leister.com sales@leister.com… -
Page 2: Table Of Contents
6. Carry out a test weld according to the welding instruction of the material manufacturer and national standards or guidelines. Check test weld. 7. Welding How do I switch off the hot-air welding machine VARIMAT V2 ? 1. Press e-Drive 2. Press «Cool down OK» e-Drive and allow to cool approx.
- Page 3
(Translation of the original operating instructions) Please read operating instructions carefully before use and keep for future reference. Leister VARIMAT V2 Hot-Air welding machine Application • Overlap welding of roof sheeting made from PVC, TPO, ECB, EPDM, CSPE for basic weld seams. - Page 4
Conformity Leister Process Technologies, Galileo-Strasse 10, CH-6056 Kaegiswil/Switzerland confirms that this product, in the version as brought into circulation through us, fulfils the requirements of the following EC directives. Directives : 98/37, 89/336, 73/23 Harmonised standards: EN 292-1, EN 292-2, EN 60204-1, EN 55014-1, EN 55014-2, EN 61000-3-2, EN 61000-3-3, EN 50366, EN 60335-2-45 Kaegiswil, 28.08.2009… - Page 5
24. Carrying handle Controls (4) Main switch (3) Drive For switching the hot-air Setting the drive speed welding machine VARIMAT V2 on/off Heating e-Drive Setting the welding temperature The e-Drive serves as a navigator. It has two functions Turn left or right, in order to… -
Page 6: Sensor Setting
– Position the hot air blower (8) by pulling the locking lever (11) and swivel it up until it locks. • Connect VARIMAT V2 to the electrical mains. The mains voltage must correspond to the device voltage. Sensor Setting Automatic starter reason for fault •…
- Page 7
Tool positioning • Lift hot-air welding machine with pressure onto guide bar (27) and move to weld position. Take welding plate (34) from holder and position according to Illustration H. WARNING: The welding plate (34) may only be removed from the holder and positioned if the wel- ding nozzle (9) has cooled down. -
Page 8: Work Mode (Chapter 3)
Startup Combination Main switch ON Work mode Chapter 3 Keys Drive and Heating buttons pressed down at the same time and the main switch ON Profile setup Chapter 4 Keys Heating and Blower buttons pressed down at the same time and the main switch ON Percent mode Chapter 5…
-
Page 9: Setpoint Value Display
(230V or 400V), this is displayed with the symbol and the measured undervoltage / overvoltage. • The VARIMAT V2 continues the work. • Depending on the undervoltage/overvoltage, the welding result can be affected. If the blower power is less than 100%, the set blower power changes with the symbol.
-
Page 10: Setting The Drive Speed
3. Work Mode 3.3 Setting the Drive Speed • The Drive key can be used to adjust the welding speed or the drive speed. This can be set by turning the e-Drive in 0.1m/min. increments from 0.7m/min. – 12.0m/min. This setting can be carried out with the drive switched on or switched off.
-
Page 11: Setting The Air Volume
3. Work Mode 3.5 Setting the Air Volume • Work mode allows the power of the blower to be changed using the Blower key The blower power can be set in 5% increments from 50% – 100% by turning the e-Drive .
-
Page 12: Selecting Profiles
3. Work Mode 3.7 Selecting Profiles • If the display at the bottom right of the display (5) is activated, profiles can be loaded by pressing the e-Drive . The display «Select Profile» then appears. A profile can be selected by turning the e-Drive .
-
Page 13: Standby
3.10 Error Messages • If a malfunction occurs in the hot-air welding machine VARIMAT V2, a message will appear on the display (5), which is also provided with an error code. This code stands for a more exact definition of the error which can be seen in the lower list.
-
Page 14: Creating Profiles
4. Profile Setup (see Startup Combination) 4.1 Creating Profiles • In the Profile Setup, 3 individual profiles can be created in which all three parameters can be freely set and then saved. • The various menu items can be selected using the controls (4) Pressing the e-Drive will take you back to the Profile Setup selection.
- Page 15
• Welding plate article no. 132.429 Training • Leister Process Technologies and its authorised Service Centres offer free welding courses and training. Maintenance • The air inlet on the hot-air blower (8) must be cleaned with a brush if soiled. - Page 16
® © Copyright by Leister Your authorised Service Centre is: Leister Process Technologies Galileo-Strasse 10 CH-6056 Kaegiswil/Switzerland Tel. +41-41662 74 74 +41-41662 74 16 www.leister.com sales@leister.com…
3. Work Mode
3.9 Standby
• If the welding nozzle (9) is not in the welding position and no key entry is made
during a certain time, the standby process will start automatically after the standby
time has passed (5 – 120 min., see Chapter 4.2 Standby Setup) A time of 40 minutes
is set ex works. A symbol and a counter (counts down from 180 seconds) appears on
the display (5). During this time, the heating is switched on.
• If the time has expired without the controls (4) having been pressed, the display (5)
will automatically change to Cool Down mode (Chapter 3.8, Cooling Down).
• If the e-Drive
state.
3.10 Error Messages
• If a malfunction occurs in the hot-air welding
machine VARIMAT V2, a message will appear on
the display (5), which is also provided with an
error code. This code stands for a more exact
definition of the error which can be seen in the
lower list.
• In case of error 02 and error 40, separate
symbols are displayed.
• In case of all other errors, the spanner is displayed for the service prompt.
Error
Type of error
Err01
Interruption or short-circuit of the temperature probe
Err02
Heating element defective (interruption in one/both winding(s)
Err04
Triac defective (one or both Triacs are defective)
Err08
Blower motor defective
Err40
Undervoltage (mains voltage -25%)
is pressed before the countdown has finished, the display will change back to the initial
13
1. Режим работы 1.9 Режим ожидания • Если сварочное сопло (9) не находится в сварочной позиции и в течение определенного времени не производится ввод с кнопок, то по прошествии времени ожидания автоматически включается режим «Cool Down» (охлаждение). Запускается процесс охлаждения. • Если до окончания обратного отсчета (180 секунд) в режиме ожидания нажимается e-Drive , индикация возвращается в исходное состояние. • Настройка времени ожидания (глава 2.2 «Настройки режима ожидания») 1.10 Сообщения об ошибках • При возникновении неисправности сварочного автомата для сварки горячим воздухом <strong>VARIMAT</strong> <strong>V2</strong> на дисплее (5) появляется сообщение с кодом ошибки. Этот код указывает на точное описание ошибки, приведенное в нижеследующем списке. • При возникновении ошибки 02 и ошибки 40 отображаются отдельные символы • При критических ошибках раздается предупреждающий звуковой сигнал • Если отклонение заданной / фактической температуры сварки > 20 °C, раздается предупреждающий звуковой сигнал • При возникновении любых других ошибок отображается гаечный ключ, указывающий на необходимость сервисного обслуживания Ошибка Вид ошибки Err01 Разрыв или короткое замыкание на температурном датчике Err02 Поврежден нагревательный элемент / электроника (разрыв в одной/двух обмотках) Err04 Поврежден Triac (повреждено одно или два устройства Triac) Err08 Поврежден двигатель вентилятора Err40 Понижение напряжения на 25% (напряжение сети 75%) 2. Настройки профиля (см. комбинации клавиш) 2.1 Создание профилей • В настройках профиля (Profil Setup) разрешается создавать 3 собственных профиля, в которых можно произвольно установить все три параметра, а затем сохранить их нажатием e-Drive . • Различные пункты меню вызываются с помощью элементов управления (4). При нажатии e-Drive происходит возврат к выбору настроек профиля (Profil Setup). Провести пробную сварку в соответствии с инструкциями по сварке производителя материала, а также национальными нормами или директивами. Проконтролировать пробную сварку. www.mikst.ru — Leister в России. 45
2. Настройки профиля (см. комбинации клавиш) 2.2 Настройки режима ожидания • Эти настройки позволяют устанавливать время ожидания. – Вращением e-Drive можно устанавливать время от 5 до 120 минут. По умолчанию установлено 40 минут. • При нажатии e-Drive (Profil Setup). происходит возврат к выбору настроек профиля Часто задаваемые вопросы Неисправность – Причина – Устранение •Машина автоматически отключается – Машина автоматически отключается и переходит в режим ожидания через установленное время (по умолчанию 40 минут). •Недостаточное качество сварки – Проверить скорость привода, температуру сварки и расход воздуха – Очистить сварочное сопло (9) с помощью проволочной щетки (33) – Сварочное сопло (9) неправильно отрегулировано (Готовность к эксплуатации, стр. 38) •Не достигается установленная температура сварки – Установлен слишком высокий расход воздуха – Пониженное напряжение •Не работает пусковая автоматика – Настроить пусковой датчик (стр. 38) •Прибор катится не прямо – Позиционирование прибора (стр. 39) •На индикаторе расхода воздуха появляется звездочка – Вентилятор работает не по заданной характеристике, а находится в ручном режиме (см. характеристику вентилятора) •Почему при температурах сварки выше 500°C автоматически снижается расход воздуха (см. характеристику вентилятора)? – Достижение температуры сварки при слишком большом расходе воздуха не обеспечивается Расход воздуха V [%] Характеристика вентилятора <strong>VARIMAT</strong> <strong>V2</strong> Ручной режим Заданная характеристика Автоматический режим Температура сварки T [°C] 46 www.mikst.ru — Leister в России.
- Page 1 and 2: ® RUS VARIMAT V2 Leister Process T
- Page 3 and 4: RUS Инструкция по эк
- Page 5 and 6: Описание прибора 27
- Page 7 and 8: Усилие стыковки •У
- Page 9 and 10: Комбинации клавиш
- Page 11 and 12: 1. Режим работы 1.3 На
- Page 13: 1. Режим работы 1.7 Вы
- Статус темы:
-
Закрыта.
-

- Регистрация:
- 30.01.13
- Сообщения:
-
306
- Благодарности:
- 195
Lexx1xxx
Живу здесь
- Регистрация:
- 30.01.13
- Сообщения:
- 306
- Благодарности:
- 195
- Адрес:
- Новосибирск
Еще по дешевым фенам, у одного фена ручку отпиливали, везде подлезли.
-
- Регистрация:
- 08.03.13
- Сообщения:
-
1.728
- Благодарности:
- 2.336
Nikitab900
Живу здесь
- Регистрация:
- 08.03.13
- Сообщения:
- 1.728
- Благодарности:
- 2.336
- Адрес:
- Дубна
@Михаил-snabss, за парапет большое спасибо! Все остальное весьма спорно, но спорить не стану…
-
- Регистрация:
- 30.01.13
- Сообщения:
-
306
- Благодарности:
- 195
Lexx1xxx
Живу здесь
- Регистрация:
- 30.01.13
- Сообщения:
- 306
- Благодарности:
- 195
- Адрес:
- Новосибирск
Вот еще более дешевые варианты около 15000, проблемы с запчастями. Если вы меня спросите чем лучше спаять, я конечно скажу что профессиональными фенами, но если вы меня спросите чем еще можно, я вам уже ответил. Профессиональным феном быстрее и чуть удобней, у меня их 8 шт, все без нагревателей, вот сидишь и думаешь, что брать! Шов 25 метров варю: лястером за 7-10 минут, простым феном 1500 вт за 15 мин. где то. А еще я вам так скажу что рядовые швы нужно машинкой паять «лиастер варимат в» он варит где то 5-7 м/мин. Он вообще 9500 евро стоит но варит гарантированно, если привезти его, то варить 60 м2 с парапетами 2 часа, потом еще феном поработать с углами 4 шт, воронки 2 шт еще 4 часа, все. Я конечно не брал укладку пирога и установку металла на парапеты.
Вложения:
-
- Регистрация:
- 11.11.09
- Сообщения:
-
1.258
- Благодарности:
- 1.353
Михаил-snabss
Живу здесь
- Регистрация:
- 11.11.09
- Сообщения:
- 1.258
- Благодарности:
- 1.353
- Адрес:
- Москва
Не хочу обидеть, но вы согласились и с фартуком который нарисовал человек. Это и дает мне понимание почему я беру за свою работу больше а вы стесняетесь. Да вы правы работа рук и головы это самое главное, именно по этому наша работа стоит дорого.
Не стоит сравнивать промобъекты и частные. У нас редко когда коттеджи за день получалось сделать. 70 м2 один раз паяли 4 дня. площадь меньше, а количество примыканий в соотношение к площади больше. рулон длиной 20-25 метров если крыша будет 6х10 то уже придется рулон резать 3 раза, и рулон перекатывать с места на место, а еще поднять на крышу его скорее всего в ручную или с помощью каких то легких подъемных механизмов, в общем это не промобъект где краном или пикканиской все разом поднял и только успевай рулоны катать. Еще инструмент и какие либо подсобные принадлежности и материалы нужно перекладывать с место на место. Вся эта возня на пяточке занимает тоже время. Плюс если соблюдать технологию монтажа и скорость. За день не сделать маленькую кровлю. это факт. -
- Регистрация:
- 11.11.09
- Сообщения:
-
1.258
- Благодарности:
- 1.353
Михаил-snabss
Живу здесь
- Регистрация:
- 11.11.09
- Сообщения:
- 1.258
- Благодарности:
- 1.353
- Адрес:
- Москва
-
- Регистрация:
- 08.03.13
- Сообщения:
-
1.728
- Благодарности:
- 2.336
Nikitab900
Живу здесь
- Регистрация:
- 08.03.13
- Сообщения:
- 1.728
- Благодарности:
- 2.336
- Адрес:
- Дубна
Тот человек, который объявил мне 50 тыс. сказал, что темп работы для таких кровель примерно 140 м2 за 10 часов (это он сказал из опыта последнего объекта).
И да, 50 тыс. это ТОЛЬКО за сварку мембраны, при условии, что все основание уже готово. -
- Регистрация:
- 11.11.09
- Сообщения:
-
1.258
- Благодарности:
- 1.353
Михаил-snabss
Живу здесь
- Регистрация:
- 11.11.09
- Сообщения:
- 1.258
- Благодарности:
- 1.353
- Адрес:
- Москва
И я когда то варил и мои ребята щас варят шов 25 метров минут 15-20. Вариматом не льзя варить на скорости больше 2,5 м. Будет некачественный провар мембраны. Средняя скорость сварки мембраны 2 м/мин. Если вы этого не знаете, тогда нам не о чем разговаривать. Без обид.
-
- Регистрация:
- 08.03.13
- Сообщения:
-
1.728
- Благодарности:
- 2.336
Nikitab900
Живу здесь
- Регистрация:
- 08.03.13
- Сообщения:
- 1.728
- Благодарности:
- 2.336
- Адрес:
- Дубна
@Михаил-snabss, я наверное не внимательно смотрю, про какие последствия на фото идет речь? Там вроде не дострой еще?
-
- Регистрация:
- 11.11.09
- Сообщения:
-
1.258
- Благодарности:
- 1.353
Михаил-snabss
Живу здесь
- Регистрация:
- 11.11.09
- Сообщения:
- 1.258
- Благодарности:
- 1.353
- Адрес:
- Москва
если только сварка мембраны, да не вопрос. мы и 1000 м2 в смену делаем полный пирог с вариматом. Но это на площадях по несколько тыс. м2. Там места навалом есть куда разогнаться. Но прежде чем разогнаться до такой скорости еще 2 дня поднимается и разносится материал. И работает 10 человек.
https://www.forumhouse.ru/useralbums/9327/view вот эту крышу 180 м2 бригада из четырех человек с вариматом и 2 фенами собрали за 4 дня + устройство балластного слоя из гравия 1 день. Вроде бы и не быстро, а вроде и быстро. Все равно из-за каких то нюансов, типа установки ливневой канализации в сложных условиях и других мелких допработах. Кровля была сдана через 12 дней с начала монтажа. Да и стоило это 250 тыс. за работу. И гарантия по кровле 10 лет.
Просто не надо строить иллюзий. Реально оценивайте стройку. -
- Регистрация:
- 11.11.09
- Сообщения:
-
1.258
- Благодарности:
- 1.353
Михаил-snabss
Живу здесь
- Регистрация:
- 11.11.09
- Сообщения:
- 1.258
- Благодарности:
- 1.353
- Адрес:
- Москва
там уже ремонт
реально не каждый увидет. плюс на фото как то плохо видно. Вот например одна из частых проблем текущей кровли, которая пока вроде не течет
видно что в месте примыкания парапета с плитой перекрытия идут протечки что аж сквозь парапет до фасада дошло.
-
- Регистрация:
- 08.03.13
- Сообщения:
-
1.728
- Благодарности:
- 2.336
Nikitab900
Живу здесь
- Регистрация:
- 08.03.13
- Сообщения:
- 1.728
- Благодарности:
- 2.336
- Адрес:
- Дубна
-
- Регистрация:
- 11.11.09
- Сообщения:
-
1.258
- Благодарности:
- 1.353
Михаил-snabss
Живу здесь
- Регистрация:
- 11.11.09
- Сообщения:
- 1.258
- Благодарности:
- 1.353
- Адрес:
- Москва
Да что тут спорить, время всегда все на места расставляет.
-
- Регистрация:
- 08.03.13
- Сообщения:
-
1.728
- Благодарности:
- 2.336
Nikitab900
Живу здесь
- Регистрация:
- 08.03.13
- Сообщения:
- 1.728
- Благодарности:
- 2.336
- Адрес:
- Дубна
-
- Регистрация:
- 30.01.13
- Сообщения:
-
306
- Благодарности:
- 195
Lexx1xxx
Живу здесь
- Регистрация:
- 30.01.13
- Сообщения:
- 306
- Благодарности:
- 195
- Адрес:
- Новосибирск
@Михаил-snabss, Про варимат вы зря так говорите, температура и скорость для сварки разная и подбирается чуть ли не каждый день, в зависимости от окружающей среды, у нас есть старый аппарат фортсхов, у него одна спираль в нагревателе сгорела, осталось 2 кВт, на не варим в экстренных случаях, скорость 1,5-2 м/мин. А гарантию на кровлю можно и 15 лет давать если у мастера руки из нужного места ростут. Я так понимаю и я и вы подрядчики и прекрасно знаем, кто сколько зарабатывает, эта тема создана не для тех кто готов заплатить по 2000-2500 р/м2 за работу, предлагаю не спорить об этом, а помогать людям. Вы приводите прекрасные доводы, но качество производства работ зависит не от того что бы платить заоблачные деньги, а от порядочности и технической, интеллектуальной подготовленностью производителя работ и руководителя предприятия. Понятно что на малых объемах хочется заработать, но больше чем 2500 р/м2 с материалами + работа + доставка, это перебор, если пирог более менее стандартный.
-
- Регистрация:
- 30.01.13
- Сообщения:
-
306
- Благодарности:
- 195
Lexx1xxx
Живу здесь
- Регистрация:
- 30.01.13
- Сообщения:
- 306
- Благодарности:
- 195
- Адрес:
- Новосибирск
@Михаил-snabss, Еще немного добавлю, Вы приводите в приме кровлю 180 м2, не хочу говорить по компетенцию ваших специалистов, но что сразу мне бросилось в глаза, это высота на которую поднята мембрана на парапет (причина намокания блоков), в снипах пишется, да и журналах по монтажу не менее 40см, на колоннах нет хомутов обжимных или хотя бы ленты на саморезах с герметиком, не утеплен парапет (не сильно страшно). Разделительный слой есть или нет. Парапеты желательно оштукатурить и пропитать гидроизаляционной пропиткой, перед установкой краевой планки, что бы прилип герметик хорошо (закладывается на и под краевую планку). Все эти ошибки, допускаются проектировщиками, от незнания, не исправляются подрядчиками, либо по не знанию, либо из за пофигизма.


")

- Статус темы:
-
Закрыта.
3. Work Mode
3.9 Standby
• If the welding nozzle (9) is not in the welding position and no key entry is made
during a certain time, the standby process will start automatically after the standby
time has passed (5 – 120 min., see Chapter 4.2 Standby Setup) A time of 40 minutes
is set ex works. A symbol and a counter (counts down from 180 seconds) appears on
the display (5). During this time, the heating is switched on.
• If the time has expired without the controls (4) having been pressed, the display (5)
will automatically change to Cool Down mode (Chapter 3.8, Cooling Down).
• If the e-Drive
state.
3.10 Error Messages
• If a malfunction occurs in the hot-air welding
machine VARIMAT V2, a message will appear on
the display (5), which is also provided with an
error code. This code stands for a more exact
definition of the error which can be seen in the
lower list.
• In case of error 02 and error 40, separate
symbols are displayed.
• In case of all other errors, the spanner is displayed for the service prompt.
Error
Type of error
Err01
Interruption or short-circuit of the temperature probe
Err02
Heating element defective (interruption in one/both winding(s)
Err04
Triac defective (one or both Triacs are defective)
Err08
Blower motor defective
Err40
Undervoltage (mains voltage -25%)
is pressed before the countdown has finished, the display will change back to the initial
13
- Manuals
- Brands
- Leister Manuals
- Welding System
- VARIMAT V2
- User manual
-
Contents
-
Table of Contents
-
Bookmarks
Quick Links
VARIMAT V2
Leister Process Technologies
Galileo-Strasse 10
CH-6056 Kaegiswil/Switzerland
Tel.
+41-41662 74 74
Fax
+41-41662 74 16
www.leister.com
sales@leister.com
®
GB
USA
Related Manuals for Leister VARIMAT V2
Summary of Contents for Leister VARIMAT V2
-
Page 1
® VARIMAT V2 Leister Process Technologies Galileo-Strasse 10 CH-6056 Kaegiswil/Switzerland Tel. +41-41662 74 74 +41-41662 74 16 www.leister.com sales@leister.com… -
Page 2: Table Of Contents
6. Carry out a test weld according to the welding instruction of the material manufacturer and national standards or guidelines. Check test weld. 7. Welding How do I switch off the hot-air welding machine VARIMAT V2 ? 1. Press e-Drive 2. Press «Cool down OK» e-Drive and allow to cool approx.
-
Page 3
(Translation of the original operating instructions) Please read operating instructions carefully before use and keep for future reference. Leister VARIMAT V2 Hot-Air welding machine Application • Overlap welding of roof sheeting made from PVC, TPO, ECB, EPDM, CSPE for basic weld seams. -
Page 4
Conformity Leister Process Technologies, Galileo-Strasse 10, CH-6056 Kaegiswil/Switzerland confirms that this product, in the version as brought into circulation through us, fulfils the requirements of the following EC directives. Directives : 98/37, 89/336, 73/23 Harmonised standards: EN 292-1, EN 292-2, EN 60204-1, EN 55014-1, EN 55014-2, EN 61000-3-2, EN 61000-3-3, EN 50366, EN 60335-2-45 Kaegiswil, 28.08.2009… -
Page 5
24. Carrying handle Controls (4) Main switch (3) Drive For switching the hot-air Setting the drive speed welding machine VARIMAT V2 on/off Heating e-Drive Setting the welding temperature The e-Drive serves as a navigator. It has two functions Turn left or right, in order to… -
Page 6: Sensor Setting
– Position the hot air blower (8) by pulling the locking lever (11) and swivel it up until it locks. • Connect VARIMAT V2 to the electrical mains. The mains voltage must correspond to the device voltage. Sensor Setting Automatic starter reason for fault •…
-
Page 7
Tool positioning • Lift hot-air welding machine with pressure onto guide bar (27) and move to weld position. Take welding plate (34) from holder and position according to Illustration H. WARNING: The welding plate (34) may only be removed from the holder and positioned if the wel- ding nozzle (9) has cooled down. -
Page 8: Work Mode (Chapter 3)
Startup Combination Main switch ON Work mode Chapter 3 Keys Drive and Heating buttons pressed down at the same time and the main switch ON Profile setup Chapter 4 Keys Heating and Blower buttons pressed down at the same time and the main switch ON Percent mode Chapter 5…
-
Page 9: Setpoint Value Display
(230V or 400V), this is displayed with the symbol and the measured undervoltage / overvoltage. • The VARIMAT V2 continues the work. • Depending on the undervoltage/overvoltage, the welding result can be affected. If the blower power is less than 100%, the set blower power changes with the symbol.
-
Page 10: Setting The Drive Speed
3. Work Mode 3.3 Setting the Drive Speed • The Drive key can be used to adjust the welding speed or the drive speed. This can be set by turning the e-Drive in 0.1m/min. increments from 0.7m/min. – 12.0m/min. This setting can be carried out with the drive switched on or switched off.
-
Page 11: Setting The Air Volume
3. Work Mode 3.5 Setting the Air Volume • Work mode allows the power of the blower to be changed using the Blower key The blower power can be set in 5% increments from 50% – 100% by turning the e-Drive .
-
Page 12: Selecting Profiles
3. Work Mode 3.7 Selecting Profiles • If the display at the bottom right of the display (5) is activated, profiles can be loaded by pressing the e-Drive . The display «Select Profile» then appears. A profile can be selected by turning the e-Drive .
-
Page 13: Standby
3.10 Error Messages • If a malfunction occurs in the hot-air welding machine VARIMAT V2, a message will appear on the display (5), which is also provided with an error code. This code stands for a more exact definition of the error which can be seen in the lower list.
-
Page 14: Creating Profiles
4. Profile Setup (see Startup Combination) 4.1 Creating Profiles • In the Profile Setup, 3 individual profiles can be created in which all three parameters can be freely set and then saved. • The various menu items can be selected using the controls (4) Pressing the e-Drive will take you back to the Profile Setup selection.
-
Page 15
• Welding plate article no. 132.429 Training • Leister Process Technologies and its authorised Service Centres offer free welding courses and training. Maintenance • The air inlet on the hot-air blower (8) must be cleaned with a brush if soiled. -
Page 16
® © Copyright by Leister Your authorised Service Centre is: Leister Process Technologies Galileo-Strasse 10 CH-6056 Kaegiswil/Switzerland Tel. +41-41662 74 74 +41-41662 74 16 www.leister.com sales@leister.com…
If a malfunction occurs with your Leister VARIMAT V2 automatic hot-air welding machine, a message will appear on the display (5). The error will include an icon, error code and in the event of a serious error, an acoustic warning signal will sound.
Following are error code definitions to help diagnosing issues, and to identify when you need to contact an authorized Leister service center.
| Error | Type of error |
| Err01 | Interruption or short circuit of the temperature probe. |
| Err02 | Heating element defective (interruption in one/both winding(s)). |
| Err04 | Triac defective (one or both triacs are defective). |
| Err08 | Blower motor defective. |
| Err40 | Undervoltage 25% (mains voltage 75%) |
If the set / actual welding temperature differ is greater than 20°C, then an acoustic warning signal will sound.
If you don’t encounter an error, contact your Leister authorized service center. They can advise you on potential fixes and next steps.