
Moderators: Lily Lee, jc_3u, Moderators
-
GSM-win
- Posts: 2
- Joined: 16 Jan 2019 19:12
- like: 2
verify failed problem
hi, anyone encounter this verify failed after 99% of downloading firmware in 3utools. it happened in both two pc. how to solve this problem?
-
james
- Posts: 1
- Joined: 16 Mar 2019 19:02
- like: 0
Re: verify failed problem
Postby james » 16 Mar 2019 19:11
this is happening to me as well , if you have fixed it please tell me how can I fix it
(and it still doesn’t work when I download it online)
-
AlbertLes
- Posts: 1
- Joined: 16 Jun 2020 10:37
- like: 0
View first unread post
Postby AlbertLes » 17 Jun 2020 22:50
Yes, really. It was and with me. We can communicate on this theme.
-
lider75
- Posts: 11
- Joined: 18 Jun 2020 00:01
- like: 0
Re: verify failed problem
Postby lider75 » 18 Jun 2020 00:37
still havin the same prob?
-
lider75
- Posts: 11
- Joined: 18 Jun 2020 00:01
- like: 0
Re: verify failed problem
Postby lider75 » 18 Jun 2020 02:22
i have «cellular update failed» problem on 11 promax
-
Tiana11
- Posts: 31
- Joined: 10 Sep 2020 17:14
- like: 0
Re: verify failed problem
Postby Tiana11 » 07 Dec 2020 15:30
Yes, I met with this problem several days ago and I used professional iOS system recovery tools to fix it. Finally, the TunesKit iOS System Repair helped me to get out of trouble and no data lost in the end.
Return to “Help & Support”
Go to jailbreak_
r/jailbreak_
Welcome to /r/jailbreak_, home to all things jailbreak-related.
We are much less strict than other similar subreddits; you can discuss anything related to jailbreaking, within reason.
See the rules for more information.
Members
Online
•
3uTools jailbreak error(verifying the downloaded files)
hi. can anyone help me with that problem?
i already tried to reinstall 3utools, itunes, drivers and deleting 3utools download folder, but that didnt help me yet. Does anyone know how to fix that?
Пользователи Twitter активно жалуются на проблемы с обновлением и восстановлением прошивки iPhone и iPad.
Кажется, у Apple проблемы с TSS-серверами. Во время установки прошивки происходит сбой и выводится ошибка 3503.
UPD: по последним данным, проблема затронула только владельцев Windows-ПК. И только во время установки обновления через iTunes.
UPD 2: временное решение заключается в установке бесплатной утилиты 3uTools. Это аналог iTunes, через который можно установить прошивку.
Повезёт, если установка не начнётся. Некоторые уже «словили кирпич».
@AppleSupport cannot restore iPhone error 3503.Please check your signature server
— Peerasak Longchit (@assert55150) September 25, 2017
@AppleSupport my iphone is always in UMD mode and I can´t restore it because there is an 3503 error. That happens since iOS 11. Help please.
— Fernando Guil (@fernandoguil98) September 25, 2017
trying to restore iPhone7 to 10.3.3 but getting (ERROR 3503) >?
— muzzy (@muzzy2022) September 25, 2017
#ICYMI the #iTunes error 3503 is not your fault. Wait until #Apple fix it pic.twitter.com/bdfQ1jChjV
— Jairo Serrano (@jairodsl) September 25, 2017
Ошибка 3503 в тунце при откате, да что за черт блэт
— Иван Наймушин (@uselesstech1) September 25, 2017
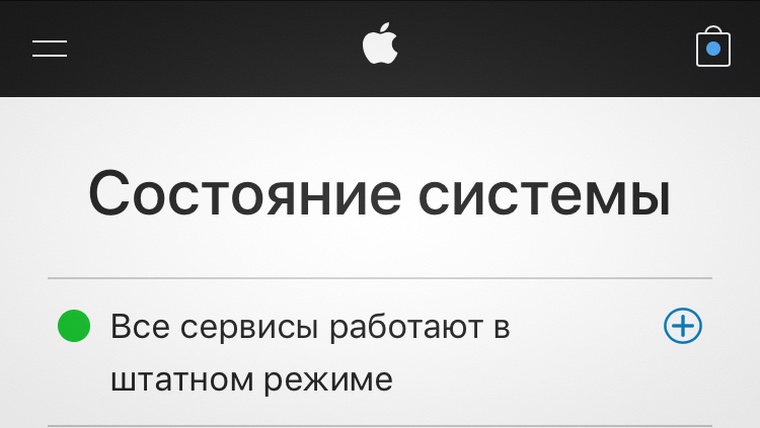
Что интересно, на сайте Apple не указано, что какие-то сервисы дают сбой. «Всё работает в штатном режиме».

Проблема актуальна по всему миру и четкого решения пока нет. Рекомендуем не перестанавливать прошивку до тех пор, пока Apple не исправит проблему.
P.S. Спасибо читателю Lexonaft за наводку.
 (1 голосов, общий рейтинг: 5.00 из 5)
🤓 Хочешь больше? Подпишись на наш Telegram.
![]()
iPhones.ru
У Apple упали сервера подписки прошивки.
- Apple,
- iOS,
- это печально
![]()
Артём Баусов
@Dralker
Главный по новостям, кликбейту и опечаткам. Люблю электротехнику и занимаюсь огненной магией.
Telegram: @TemaBausov
Содержание
- How to Fix Error Unable to Request SHSH on 3uTools or iTunes Error 3503?
- How to Fix Error Unable to Request SHSH on 3uTools or iTunes Error 3503?
- Unable to request shsh 3utools что это
- Что такое SHSH? Зачем сохранять SHSH? Как сохранить SHSH? [IFAQ]
- Внимание! Не пытайтесь обновить или восстановить прошивку iPhone через Windows-ПК
- Тема: ошибка 3503
How to Fix Error Unable to Request SHSH on 3uTools or iTunes Error 3503?
Recently, many iOS users complained that there is an annoying unknown error 3503 in iTunes, which stop them from restoring and updating. In fact, Apple isn’t made a full explanation of iTunes error code 3503 yet.
On 3uTools, the error is “Unable to request SHSH”. And on iTunes, it is an unknown error (3503). After we tested and researched, our developer team find out that this issue may be caused by Apple server. As a result, users can not restore their iDevices using iTunes or earlier versions of 3uTools.


3u Team try our best to solve this issue as soon as possible. And finally, we released a new version of 3uTools, V2.16 to fix this.
#Update log of V2.16 3uTools
Fix the error unable to request SHSH while restoring.
Support flashing iPhone 8 and iPhone 8 Plus.
Fix a bug that iPhone 6s and 6s Plus fail to downgrade back to iOS 10.3.3 from iOS 11.
Solutions
1. Please click “Check Update” at the right bottom of 3uTools, and then update to the latest version of 3uTools, V2.16.
2. Then you can restore on 3uTools. Please check the network connection and USB connection before you easy flash on 3uTools.
The reasons of the error “Unable to request SHSH”
1. It could be the network problem. Please check the network to see if it is available.
2. The iOS version you want to restore may be closed by Apple, please check.
3. If you try the above solutions but still meets the same error, then please update to latest version of 3uTools and try to restore again.
Источник
How to Fix Error Unable to Request SHSH on 3uTools or iTunes Error 3503?
Recently, many iOS users complained that there is an annoying unknown error 3503 in iTunes, which stop them from restoring and updating. In fact, Apple isn’t made a full explanation of iTunes error code 3503 yet.
On 3uTools, the error is “Unable to request SHSH”. And on iTunes, it is an unknown error (3503). After we tested and researched, our developer team find out that this issue may be caused by Apple server. As a result, users can not restore their iDevices using iTunes or earlier versions of 3uTools.
3u Team try our best to solve this issue as soon as possible. And finally, we released a new version of 3uTools, V2.16 to fix this.
#Update log of V2.16 3uTools
Fix the error unable to request SHSH while restoring.
Support flashing iPhone 8 and iPhone 8 Plus.
Fix a bug that iPhone 6s and 6s Plus fail to downgrade back to iOS 10.3.3 from iOS 11.
Solutions
1. Please click “Check Update” at the right bottom of 3uTools, and then update to the latest version of 3uTools, V2.16.
2. Then you can restore on 3uTools. Please check the network connection and USB connection before you easy flash on 3uTools.
The reasons of the error “Unable to request SHSH”
1. It could be the network problem. Please check the network to see if it is available.
2. The iOS version you want to restore may be closed by Apple, please check.
3. If you try the above solutions but still meets the same error, then please update to latest version of 3uTools and try to restore again.
Источник
Что такое SHSH? Зачем сохранять SHSH? Как сохранить SHSH? [IFAQ]
Эта статья адресуется только тем пользователям, для которых обязателен джейлбрейк на мобильных девайсах от Apple. Лично для меня, iPhone или iPad без джейлбрейка, даже пусть «привязанного» — мало интересен. И добавлю, что именно из-за возможности «побега из тюрьмы», который позволяет превратить устройство в более функциональное и удобное, я и полюбил эти замечательные устройства, и из множества представленных на рынке, выбрал именно их.
Что такое SHSH?
При изучении вопросов, о том, как сделать джейлбрейк или как откатить (понизить) версию iOS-прошивки, Вы обязательно столкнетесь с понятием SHSH. В этой статье мы постараемся подробно описать, что это такое и для чего сохранять SHSH.
И так, немного теории: SHSH или ECID SHSH, SHSH blobs это уникальная цифровая подпись (сертификат) каждого мобильного устройства, работающего на iOS. Как известно Apple позволяет перепрошить i-устройство не на любую, а ТОЛЬКО на последнюю версию прошивки, которая доступна в iTunes. При восстановлении прошивки, iTunes связывается с серверами Apple, на которые отсылает некоторый, соответствующий код ПО и ECID (уникальный идентификатор устройства), в ответ приходит сертификат SHSH, необходимый для модуля iBoot, отвечающего за загрузку, а он в свое время и определит возможность восстановления (перепрошивки). Если же присланный SHSH окажется не допустимым для восстанавливаемой версии ПО, то iTunes выдаст Вам ошибку, как правило 3194 и единственным легким способом возврата «к жизни» Вашего устройства, будет являться восстановление на версию прошивки, предложенную iTunes. Как правило для последней версии iOS, на которую Вы восстановитесь хакеры еще не выпустят джейлбрейк и Вам придется только ждать релиза или в лучшем случае использовать «привязанный джейлбрейк». В последнее время Apple обеспечивает более серьезную защиту своего ПО, об этом говорят и сроки разработки очередной версии полного джейлбрейка от хакеров.
При восстановлении ПО Apple проверяет SHSH на iPhone 3GS, iPhone 4, iPod Touch 3G, iPad, iPad 2, а начиная с iOS 4 — и на iPhone 3G. Если Вы не имея сохраненных SHSH обновите прошивку одного из этих устройств, то вернуться на более старую Вам не удастся. Исключение составляет только iPhone 3G — даже не имея сохраненных SHSH можно всегда откатиться на версию прошивки 3.х
Зачем сохранять SHSH?
Сохраненные сертификаты SHSH предоставляют возможность восстановления ПО Вашего устройства на ту версию прошивки, для которой сохранены SHSH.
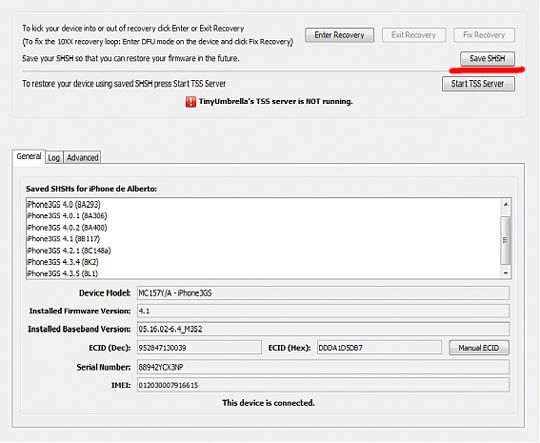
Например Вы приобрели iPhone 4 с версией ПО 4.3.3. На тот момент это была самая последняя прошивка, которую подписывала Apple. Когда же хакеры выпустили джейлбрейк для этой прошивки, то Вы сразу же его применили к Вашему устройству с сохранением SHSH в Cydia или с помощью других программ (например TinyUmbrella для Windows или TinyUmbrella для Mac OS X). Через некоторое время Apple выпускает версию прошивки 4.3.4, тем самым закрывая уязвимости прошивки 4.3.3, с помощью которых хакеры смогли сделать утилиту для джейлбрейка. Вы восстановились на новую прошивку 4.3.4, но после того, как долгое время хакеры не могли найти решения для взлома этой прошивки Вы решили откатиться обратно на 4.3.3. И так, как у Вас имеются сохраненные цифровые подписи SHSH для прошивки 4.3.3, то с помощью программы TinyUmbrella и затем FixRecovery (Win и Mac) Вы легко откатываетесь на 4.3.3 и делаете процедуру отвязанного джейлбрейка!
Способы сохранения SHSH
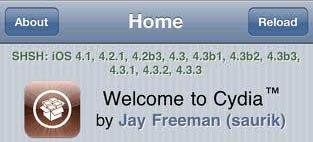
Цифровые подписи SHSH, для подписываемых Apple версий прошивок можно сохранить следующими способами:
— автоматически при открытии Cydia и наличии Интернет соединения;
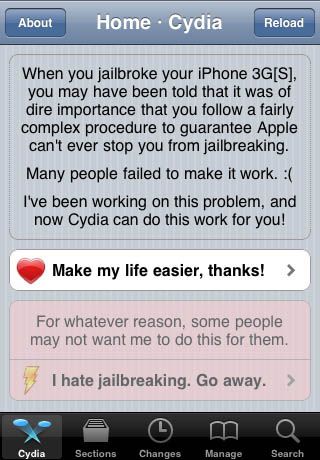
— нажатием на кнопку «Make My Life Easier» в Cydia (если она появилась);
— нажатием на кнопку «Save SHSH» в программе TinyUmbrella;
Цифровые подписи SHSH для версии прошивки установленной на Вашем устройстве и НЕ подписываемой Apple можно сохранить с помощью программы iFaith.
Внимание! Не пытайтесь обновить или восстановить прошивку iPhone через Windows-ПК
 В закладки
Пользователи Twitter активно жалуются на проблемы с обновлением и восстановлением прошивки iPhone и iPad.
Кажется, у Apple проблемы с TSS-серверами. Во время установки прошивки происходит сбой и выводится ошибка 3503.
UPD: по последним данным, проблема затронула только владельцев Windows-ПК. И только во время установки обновления через iTunes.
UPD 2: временное решение заключается в установке бесплатной утилиты 3uTools. Это аналог iTunes, через который можно установить прошивку.
Повезёт, если установка не начнётся. Некоторые уже «словили кирпич».
@AppleSupport cannot restore iPhone error 3503.Please check your signature server
— Peerasak Longchit (@assert55150) September 25, 2017
@AppleSupport my iphone is always in UMD mode and I can´t restore it because there is an 3503 error. That happens since iOS 11. Help please.
— Fernando Guil (@fernandoguil98) September 25, 2017
trying to restore iPhone7 to 10.3.3 but getting (ERROR 3503) >?
— muzzy (@muzzy2022) September 25, 2017
Ошибка 3503 в тунце при откате, да что за черт блэт
— Иван Наймушин (@uselesstech1) September 25, 2017
Что интересно, на сайте Apple не указано, что какие-то сервисы дают сбой. «Всё работает в штатном режиме».
Проблема актуальна по всему миру и четкого решения пока нет. Рекомендуем не перестанавливать прошивку до тех пор, пока Apple не исправит проблему.
P.S. Спасибо читателю Lexonaft за наводку.
В закладки
Тема: ошибка 3503
Mega Member 
 Регистрация 09.03.2006 Адрес Tilsit 39Rus Нарушения: 114 Сообщений 1,229 Спасибо 160 Благодарностей: 475 : 213
- Просмотр профиля
- Сообщения форума
- View Blog Entries
- Просмотр статей
Member Регистрация 13.03.2007 Адрес Кыргызстан Сообщений 520 Спасибо 159 Благодарностей: 47 : 27
- Просмотр профиля
- Сообщения форума
- View Blog Entries
- Просмотр статей
Newbie Регистрация 27.05.2016 Адрес Москва Сообщений 3 Спасибо 2 Благодарностей: 0 : 0
Сообщение от Benutzer
- Просмотр профиля
- Сообщения форума
- View Blog Entries
- Просмотр статей
Newbie Регистрация 12.04.2010 Сообщений 16 Спасибо 17 Благодарностей: 13 : 4
- Просмотр профиля
- Сообщения форума
- View Blog Entries
- Просмотр статей
Newbie  Регистрация 25.07.2005 Адрес РФ Сообщений 26 Спасибо 6 Благодарностей: 0 : 0
- Просмотр профиля
- Сообщения форума
- View Blog Entries
- Просмотр статей
Member Регистрация 05.11.2003 Адрес Москва Сообщений 662 Спасибо 102 Благодарностей: 85 : 60
Сообщение от Benutzer
- Просмотр профиля
- Сообщения форума
- View Blog Entries
- Просмотр статей
Member Регистрация 05.09.2015 Адрес Харьков Сообщений 345 Спасибо 30 Благодарностей: 62 : 44
- Просмотр профиля
- Сообщения форума
- View Blog Entries
- Просмотр статей
Moderator Регистрация 08.04.2008 Адрес Барнаул Сообщений 5,510 Спасибо 812 Благодарностей: 1,601 : 867
Сообщение от GERynew
- Просмотр профиля
- Сообщения форума
- View Blog Entries
- Просмотр статей
Moderator Регистрация 12.07.2008 Адрес Пермь Сообщений 1,559 Спасибо 59 Благодарностей: 4,835 : 756
Сообщение от GERynew
вначале делаем экстракт, затем как раньше через Write со всеми галочками стираем создаем разделы и прописываем инфу и сразу на 11 ОС
должно прокатить
если не с чего считывать вбиваем ручками всю инфу
Источник
 Всем привет сегодня рассмотрим, как прошить iPhone двумя способами первый стандарты через iTunes в двух режимах Recovery Mode и DFU Mode второй через программу 3uTools.
При каких случиях нужно прошивать iPhone
- Когда забыли пароль для разблакировки iPhone (не путать c Aplle ID);
- Для полной очистки системы при продаже;
- Если iPhone не запускается а «Экран черный» ;
- Когда iPhone завис на логотипе Apple;
- Исправление ошибок при обновлении iPhone;
- При застраивании в цикле при запуске;
Прошивка iPhone через iTunes
- Стоит отключить функцию найти iPhone иногда iTunes из-за него выдает ошибку;
- Скачиваем на официальном сайте последнюю версию iTunes;
- Скачиваем прошивку для вашего iPhone.
Прошивка через RecoveryMode: программный режим прошивки, подобен откату Windows на созданную ранее точку восстановления. Основные системные файлы не затрагиваются, а только происходит восстановление настроек и параметров. В этом режиме на дисплее отображается заначек iTunes и шнурок.
Выключите телефон и дождитесь, когда погаснет экран и после чего зажимите кнопку «Домой» для iPhone, которые выпускались до 7-й модели. Для новых моделей активировать режим можно удерживанием кнопки «Уменьшения громкости» и подключите iPhone к компьютеру. iTunes распознает смартфон в режиме восстановления из-за чего предложит провести обновление или восстановление. При обновлении данные не потеряются, а при восстановлении установиться текущая версия iOS.

Если не хотите устанавливать текущую версию iOS: отмените всплывающее окно при подключении смартфона и зажав клавишу «Shift» на клавиатуре кликните «Восстановить iPhone» файловый менеджер предложит выбрать файл прошивки, выбираем скаченынй нами файл и как только это будет сделано, восстановление начнется в конце телефон самостоятельно перезагрузится и откроется меню активации.
Прошивка iPhone через DFU Mode При режиме DFU экран ничего не демонстрирует, и определить его активность можно только через iTunes. DFU (device firmware update) — особый режим, предназначенный для полной переустановки прошивки вашего устройства. В процессе переустановки через DFU на девайсе выполняется:
- Прошивка загрузчика;
- Старт загрузчика;
- Прошивка всех дополнительных модулей;
- Создание разделов файловой системы;
- Прошивка системных разделов.
Перед тем, как прошить iPhone его нужно вести режим DFU для разных версий iPhone это делается по-разному в данном случаи, посмотрим на примере iPhone 7 а вот инструкция для остальных смартфонов.
- Выключаем iPhone и подключаем к компьютеру:
- Зажимаем кнопку питания на три секунды;
- Не отпуская ее, нажимаем кнопку «Домой» или уменьшения громкости, удерживать 10 секунд потом отпускаем;
- Вторую же кнопку удерживаем еще пять секунд.
- После iTunes сообщит, что обнаружил айфон в режиме восстановления и предложит его восстановить.

Обновление в этом режиме будет недоступно, а восстановить можно по тому же принципу, что и для режима Recovery. Можно нажать просто «Восстановить iPhone» и система восстановить текущую версию iOS или закрываем окошко и в меню управления находим «Восстановить iPhone» нажимаем на этот пункт удерживая клавишу Shift (для ОС Windows) или ALT для MAC в открывшемся окне выбираем файл с прошивкой. Ждем завершения процесса прошивки.
Прошивка iPhone через 3uTools
- Скачиваем 3uTools запускаем установочный файл.
- Также для работы программы нужно будет установить iTunes или последние драйвера Apple на ПК. Скачать драйвера можно отсюда Windows x64 или x86
- После чего подключаем iPhone к компьютеру и запускаем 3uTools он автоматически определит устройство и запросит доступ к устройству, при всплывании окна с запросом на доверие ПК, кликните доверять.
- Перейдите на вкладку «Прошивка и JB» «Прошивка», выберите нужную прошивку. Если вы хотите сохранить данные на устройстве, поставьте галочку напротив Quick Flash Mode. Затем нажимаем зеленую кнопку «Прошивка».

- 3uTools автоматически прошьет ваше устройство. Прошивка займет примерно от 5 до 10 минут.
-
По окончанию процесса прошивки устройство перезагрузится автоматически, после чего нужно перейти в пункт «Прошивка и JB» «Расширенная прошивка» «Activate iDevice» и вы сможете активировать устройство.


На это, пожалуй, все если есть вопросы или пожелания пишем в комментариях. Спасибо!
- Добавить свои
Оставьте свой комментарий
iOS 10.3 comes with great new features. And many iPhone and iPad users tried to download and install iOS 10.3 soon after it was released. However, not everyone can smoothly install iOS 10.3 software update as expected. You will be annoyed while getting stuck on verifying update screen.

Before we start, you need to make sure your device is connected to a steady Wi-Fi network and has enough storage space to install iOS 10.3 update. Then, try the followings fixes to solve iPhone or iPad stuck on verifying update screen during iOS 10.3 update process.
1. Lock and unlock your iPhone iPad screen for 5+ times.
The first way to get off iOS 10.3 “verifying update” issue is simple but proved to be effective by many people. All you need do is just press the power button to lock your device and then wake it up. Repeat this for at least 5 times till you see a progress bar.
2. Hard reboot your device.
If the power button trick does not work for you, force restart your iPhone/iPad and try to install iOS 10.3 software again. To force reboot your device:
On an iPhone 7 or iPhone 7 Plus: Press and hold both the Sleep/Wake and Volume Down buttons for at least ten seconds, until you see the Apple logo.
On an iPhone 6s and earlier, iPad, or iPod touch: Press and hold both the Sleep/Wake and Home buttons for at least ten seconds, until you see the Apple logo.
After rebooting your device, go to Settings > General > Software Update and choose Install Now.
3. Restore your iPhone/iPad with 3uTools.
If you have backed up your device with 3uTools before updating to iOS 10.3, you can restore your device from that backup. If not, make an 3uTools backup for your device, then restore from that backup.
4. Update your iPhone iPad to iOS 10.3 with 3uTools.
If none of above ways works, you can try to update your device with 3uTools from your computer:
Install V2.10 3uTools on your computer and launch 3uTools.
Plug in your device.
Click on Flash & JB → Flash.

Check original post on: http://www.3u.com/tutorial/articles/1760/how-to-fix-idevice-stuck-on-verifying-update-during-ios-103-update
Some jailbreakers asked 3uTools’s team, which iOS or which iPhone model can be jailbreak using 3uTools or other third-party tools.
Below you can see if your device and firmware is currently jailbreakable(iOS 9- iOS 10).
How to Jailbreak iOS 10.0 — 10.2 Using 3uTools?

Home Depot 32-bit Jailbreak Update Released
How to Jailbreak iOS 9.2 — 9.3.3 Using 3uTools?

You can use 3uTools to jailbreak your iDevice if available.

We have listed iOS 9 & iOS 10 for some users, but if your iDevice and iOS are not on the list, you could visit our website at www.3u.com easily and choose your iDevice model to check again. Green dot means you can jailbreak.
Here is the screenshot for your reference:

Original Post you may check on 3uTools website: http://www.3u.com/tutorial/articles/1713/can-i-jailbreak-my-device
Note: It’s just SEMI RESTORE ! Your iPhone will still be jailbroken.
1. Delete all your tweaks by deleting Cydia Substrate Mode ! ( IMPORTANT )
2. Go to find my iphone, login your apple ID. Then click erase iPhone
your iphone will start restore. Just wait a few minutes
3. After done. you need to resign the original yalu. Then rejailbreak.
Now when you open cydia. you will get this error
«Could not open file /var/lib/dpkg/status — open (2: No such file or directory)» error
Now how to fix it
1. Download the latest 3uTools.
2. Download this ‘lib.zip’ from here: http://download637.mediafire.com/c5d7s7xuc38g/k0ad6gm28927lam/lib.zip
3. Lauch 3uTools, and click iDevice → Files → File System(Jailbreak)

4. Drag/Paste the ‘lib’ folder to /var
5. Restart your device and rejailbreak. Done 
More tweaks you can visit 3uTools Blogger ;more iPhone tips, you can visit 3uTools.
There are a variety of errors when connecting iPhone or iPad to iTunes. And one of the connection errors that frequently occurs is iTunes invalid response error.
How to Fix iTunes Invalid Response When Connecting iDevice
This usually happens to those users who just updated their iPhone to new operation system ( iOS 10.2.1/10.3 beta) or who updated iTunes software on Mac/PC recently. And iTunes says: “iTunes could not connect to the iPhone because an invalid response was received form the device.” So how to fix iTunes invalid response when connecting to iPhone? Read this article and you’ll get some basic steps to solve this problem.
1. Check your USB connection
The most common reason leading to iTunes “Invalid Response” is the USB connection issue. Therefore, you can firstly check your USB cable with the following ways:
Directly plug your iPhone into a USB port on your computer.
Use the original USB cable of you iPhone.
Try a different USB port on your computer.
Plug into a different computer.
2. Check for iTunes software updates
If you are sure that there is nothing wrong with USB connection, you can check if new version of iTunes is available (currently the latest iTunes version is 12.5.5.5).
3. Restart your iPhone and computer
In most cases, a restart can wipe away the current state of the software. You can restart your iPhone and computer and then open iTunes to check if the “Invalid Response” error still exists.
4. Check issues with third-party security software
Sometimes, security software created by companies other than Apple can prevent iTunes from connecting to your iPhone. In this case, you can check your hosts file to make sure that it’s not blocking iTunes from communicating with Apple’s servers. If it is the security software on your computer that interferes with your computer’s connection with iTunes, you can temporarily uninstall the security software to fix iTunes invalid response.
5. Use iTunes alternatives.
You can use other tools instead ot iTunes. It may decrease these errors.
Check more iTips on 3uTools website: http://www.3u.com/tutorial/articles/1640/how-to-fix-itunes-invalid-response-when-connectiong-idevice
A lot of jailbreak users have been getting errors while using Cydia Impactor, a tool that allows users to install unsigned apps on their iPhone, iPad or iPod touch, and can be used to install the Yalu Jailbreak IPA file to ultimately jailbreak the iPhone, iPad or iPod touch.
The good news is that Saurik has released a new version of Cydia Impactor (0.9.39), which should fix the issue. Saurik has said that it fixes the SSL certificate verification error seen while signing IPA files on Windows.
If you’re facing the CPP: 158 error, then delete Cydia Impactor from your computer and redownload the latest version of Cydia Impactor from this link to avoid the issue.

If you need help on how to jailbreak your iPhone, iPad or iPod touch using Yalu Jailbreak, then check out our step-by-step guide:
How to Jailbreak iOS 10.2 on iPhone or iPad Using Yalu Jailbreak and Cydia Impactor
If you’re facing provision.cpp:150 error then check our post on how to fix it:
How to Fix “provision.cpp:150” Error in Cydia Impactor When Jailbreaking iOS 10 – iOS 10.2 Using Yalu
Don’t forget to join our Facebook User’s group, or our 3uTools official site for the latest iPhone and jailbreak news.
Check orginal post on 3uTools Blogger
What is unlocking?
Unlocking is the removal of SIM restrictions on the modem, allowing the use of the iPhone on any carrier. The main reason to unlock your iPhone is if you want to use it with a different service provider (ie. T-Mobile).

If you still not sure you may refer what we worted on our 3uTools website:
What’s the Difference Between Jailbreaking and Unlocking?
There are two ways to unlock an iPhone. You can either do a software unlock, which usually requires some kind of hacking, or you can do a factory unlock.
Official Factory Unlock for iPhone
The difference between a locked iPhone and an officially unlocked one relies on the addition of the device’s IMEI number to a database of officially unlocked iPhones. The IMEI is like a fingerprint, completely unique to your device. When officially unlocked, your IMEI is officially recognized in Apple’s database as unlocked. There are now a few providers that have the ability to get iPhones permanently unlocked for a small fee.
To our knowledge, this is currently the best way to permanently unlock an iPhone, especially since there is no software unlocks available for the latest iOS versions.
The main benefits of a permanent IMEI unlock are:
it’s simple, and official (registered as officially unlocked in Apple’s database)
it works with any iPhone, even on-contract (iPhone 2G, 3G, 3GS, 4, 4S, 5, 5s, iPhone 6 and iPhone 6 Plus)
it’s 100% guaranteed to unlock your iPhone
the iPhone can’t be locked again, even if you update your device in iTunes
it does not void your iPhone warranty
no jailbreak or hacking required
Software Unlock
This page is a reference guide for anyone looking to unlock the iPhone using software. Simply look for your firmware version and your iPhone model on 3uTools website- firmware section, then find the appropriate tutorial. Note that at this time, software unlocks only work with older iPhone models that haven’t been updated to the latest software. If you’re looking for a reliable, permanent unlock, we can only recommend you do a factory unlock of your device (see details above).
Software unlocks used to be available for older iPhones all the way to iPhone 4. Devices that have been released after the iPhone 4 cannot benefit from a software unlock.
Original post and more tweaks you can visit 3uTools Blogger ;more iPhone tips, you can visit 3uTools.
Unlock iPhone 6.1
Unlock with UltraSn0w 1.2.8
Unlock iPhone 5.0.1
Unlock iPhone with UltraSn0w
Unlock iPhone iOS 5
Unlock iPhone with UltraSn0w
Unlock iPhone iOS 4.3.3
Unlock iPhone with UltraSn0w
Unlock iPhone iOS 4.3.2
Unlock iPhone with UltraSn0w
Unlock iPhone iOS 4.3.1
Unlock iPhone 4 4.3.1 with UltraSn0w
Unlock iPhone 3GS 4.3.1 with UltraSn0w
Unlock iPhone iOS 4.2.1
Unlock iPhone 4.2.1 with UltraSn0w
Unlock iPhone iOS 4.1
Go from iOS 4/4.0.1 to iOS 4.1 while preserving the baseband to unlock iPhone 4, 3GS, and 3G
Unlock iPhone iOS 4.0.2
no unlock for iPhone 4 4.0.2 yet
no unlock for iPhone 3GS 4.0.2 yet
unlock iPhone 3G 4.0.2 with UltraSn0w
Unlock iPhone iOS 4.0.1
iPhone 4 unlock with UltraSn0w
iPhone 3GS unlock with UltraSn0w
iPhone 3G unlock with UltraSn0w
Unlock iPhone iOS 4
Unlock iPhone 3GS iOS 4 with RedSn0w
Unlock iPhone 3G iOS 4 with RedSn0w
Unlock iPhone 3.1.3
Unlock iPhone 3GS 3.1.3 with UltraSn0w
Unlock iPhone 3GS 3.1.3 baseband 05.11.07 with BlackSn0w
Unlock iPhone 3G 3.1.3 with UltraSn0w
Unlock iPhone 3G 3.1.3 baseband 05.11.07 with BlackSn0w
Unlock iPhone 2G 3.1.3 with RedSn0w
Unlock iPhone 3.1.2
How to unlock iPhone 3GS 3.1.2
Unlock iPhone 3GS 3.1.2 with BlackSn0w tutorial
How to unlock iPhone 3G 3.1.2
Unlock iPhone 3G 3.1.2 with BlackSn0w tutorial
Unlock iPhone 2G 3.1.2 with PwnageTool
Unlock iPhone 3.1
iPhone 3GS 3.1 unlock with UltraSn0w
iPhone 3G 3.1 unlock with UltraSn0w
iPhone 2G 3.1 unlock with PwnageTool for Mac OS X
Unlocking iPhone 3.0.1
Unlock iPhone 3GS 3.0.1 with UltraSn0w
Unlock iPhone 3G 3.0.1 with UltraSn0w
RedSn0w iPhone 2G 3.0.1 unlocking tutorial for Windows and Mac
Unlocking iPhone 3.0
Unlock iPhone 3GS 3.0 using UltraSn0w (recommended)
PurpleSn0w unlock for iPhone 3GS 3.0
Unlock your iPhone 3GS 3.0 using PurpleRa1n and UltraSn0w
Unlocking the iPhone 3G 3.0 with UltraSn0w
PwnageTool unlock tutorial for iPhone 2G 3.0 on Mac
RedSn0w unlocking tutorial for iPhone 2G 3.0 on Windows and Mac
There is a lot of confusion among noobies about jailbreaking and unlocking. One of our readers recently asked for a clear «non geeky»definition of both terms.
If you don’t know what jailbreaking or unlocking means, then read on because you’re just about to get a crash course on iPhone hacking.
What’s the difference in a nutshell?
The difference between jailbreak and unlock is that jailbreaking allows you to gain access to files on your device that Apple wouldn’t normally let you access, while unlocking is the removal of carrier restrictions allowing you to use your iPhone on any carrier. These are two very different things which we will explain in more details below.
What is Jailbreaking?
Jailbreaking is the process by which an iPhone firmware is modified to allow unsigned code to be run to gain access to files that Apple wouldn’t normally let you access. Jailbreaking adds unofficial application installers to your iPhone such as Cydia or Icy (I personally only use Cydia), which let you download many 3rd-party applications previously unavailable through the App Store.
Is Jailbreaking Legal?
Yes and no. The legality of jailbreaking is very unclear. Most iPhone owners including myself think that since we own the iPhone, we should be able to do whatever we want with it.
Apple’s lawyers think differently as they consider jailbreaking to be a violation of copyright. To these days, I don’t think anyone has had legal issues with Apple due to jailbreaking.
How Do I Jailbreak My iPhone?
I wrote many tutorials on how to jailbreak your iPhone, depending on what iPhone and what firmware you have. Check them out, follow the instructions, and have fun.
Jailbreak iOS 9.2-9.3.3, you can click here.
If you want to jailbreak iOS 10.0-10.2, you can click here.
More jailbreak tutorials, you can find on «Tutorials»-«Jailbreak» section from 3u website, or you can put your keywords to search.

What Is Unlocking?
Unlocking is the removal of SIM restrictions on the modem, allowing the use of the iPhone on any carrier. There are 2 types of iPhone unlocks:
software unlock: the iPhone is unlocked by a software
hardware unlock: modification have to be made to the actual hardware to unlock the phone
Software unlocks are safer because they do not modify your device and can easily be reverted back. Soft unlocks are mostly developed for free by the Dev Team, an international group of iPhone hackers. Hardware unlocks are a little tricky and usually cost money. In clear, if you want to unlock your iPhone, you can do it for free by with a safe software unlock. If you’re good with your phone carrier and will not use your iPhone internationally, there is absolutely no reason for you to unlock your iPhone.
Is Unlocking Legal?
According to Wikipedia, “unlocking a phone without the permission or unlocking code from the provider is usually in breach of the agreement with the provider, though most countries do not make specific laws prohibiting the removal of SIM locks.
How Do I Unlock My iPhone?
Before unlocking your iPhone, you will have to jailbreak it. The unlock can either be done from a computer, or directly from the iPhone. We will write some tutorials about this, please stay tuned.
In Short…
Let me put it in very simple words. Jailbreaking an iPhone means that 3rd party applications can be installed on it (ie. apps from other developers than Apple). Unlocking an iPhone means that any SIM card can be used on it.
If you have questions or anything you want to say, follow us on Facebook/Twitter.
Check original post on 3uTools with images
Despite that there are still times when you’re effectively caught short, resulting in a desperate need to charge your phone quickly. There are a number of hidden tricks that you can employ which will make a huge difference to how fast your iPhone charges:
A few small tricks can make a big difference. A team member from 3uTools has tried all three methods.
1. Turn On Airplane Mode
Turn on Airplane Mode on iPhone Control Center, this is the single best thing you can do to make sure your iPhone charges faster. Please noted that you wouldn’t receive any call or message, and App notification when your opened Airplan Mode.
Mobile networks, WiFi and Bluetooth are all features which constantly drain your battery. Turning them off reduces a huge amount of strain on the phone and allows the battery to charge a LOT faster.
2. Turn On Low Power Mode
Apple’s battery-saving feature isn’t just useful for when you’re running out of battery, it’s also handy for emergency charging too. It effectively turns off a number of processor-heavy tasks including some visual effects.
While its main job is negated by you turning on Airplane Mode, Low Power Mode does decrease the screen’s power consumption. Find from «Settings»-«Battery»
3. Use The iPad Charger
Apple has three different types of USB charger available, the 5W foldable plug charger, the 5W fixed pin charger and finally the larger 12W USB charger.
Unsurprisingly the 12W charger is a lot more powerful, as it should be. It’s originally released as the standard charger for the iPad and iPad Pro but there’s nothing to stop you using it for your iPhone as well.
There are some common sense tricks that you can employ such as keeping your phone’s screen brightness down, disabling notifications or just turning your phone off.
Check original post on : 3uTools
Apple makes it simple to sync and restore your iPhone, iPad or iPod with iTunes. But sometimes, when you use iTunes on Windows/ Mac computer, an iTunes error “The iPhone cannot be synced. An unknown error occurred (-39)” might pop up as we show below.
According to feedback, many Apple users are stuck in iTunes error -39 especially when trying to delete photos or videos from iOS device, or download photos or videos from iTunes library to iOS device. What’s worse, once iTunes error -39 occurs, you can’t keep your iOS data like photos and videos updated to iTunes, or restore your iOS device from iTunes after any damage or data loss on your device, which is very frustrating. Therefore, this tutorial will offer multiple solutions that may be helpful in fixing iTunes error -39 when syncing and restoring iOS device.

1. Change another USB cable or port.
2. Restart your computer and iOS device.
3. Update your iTunes version (iTunes error -39 may be caused by outdated iTunes version, so you can download and install the latest version of iTunes to your Windows/ Mac to solve).
4. If your iTunes version is the latest, try to restart your iTunes.
5. Quit or uninstall any web accelerator software because some web accelerator software may conflict with the iTunes syncing process.
6. Check security software on your computer to see if the security software prevented iTunes from a network connection.
7. Try to restore your iOS device.
8. Find and remove the Photo Cache folders on your Windows/Mac ( iTunes error -39 may be related to the Photo Cache folders on your computer).
If your computer is Windows, follow the below steps to find and remove the Photo Cache folders on your computer.
1. Press the Windows key on your keyboard, type “iPod Photo Cache” or “Apple TV Photo Cache” in the search field, and press Return.
2. Then the Photo Cache folder on your computer will appear, and just remove it.
If your computer is Mac, please do the followings:
1. Go to Username/ Pictures/ iPhoto Library.
2. Right click the iPhoto Library to show package contents.
3. Now you are in the package contents, go to iPhone Photo Cache and delete it.
Note: if you remove the Photo Cache folders on your Windows/Mac, your original photos are still safe. And your photo cache folders will be restored next time when you sync photos on your iOS device with iTunes.
If iTunes error -39 still occurs
After you tried all the solutions we showed above, if you still can’t fix iTunes error -39 during syncing and restoring your iPhone 6/6s/7/7 plus, iPad, or iPod, you can rely on iCloud or other iTunes alternatives, like 3uTools to sync and restore your iOS device, or simply contact Apple for help.

Check original post on 3uTools: fix error -39
iOS 10.3 is currently only available in beta for registered developers and public beta testers. Here’s an overview of changes discovered so far.
Support Models:
iPhone 7, iPhone7 Plus, iPhone 5, iPhone 5c, iPhone 5s, iPhone SE, iPhone 6, iPhone 6 Plus, iPhone 6s, iPhone 6s Plus; iPad4, iPad Air, iPad Air 2, iPad Pro (9.7/12.9), iPad mini 2, iPad mini 3, iPad mini 4; iPod Touch 6.
If you are a new user about 3uTools, you can check the available firmwares for your iDevice on 3uTools website —Firmware section.
Notes:
1. Please backup your iDevice’s important data files using 3uTools before flash.
2. Please make sure your mobile device has no activation lock. Ensure that you know iDevice’s Apple ID account and password. Otherwise, you can not enter activation system after flash.
3. If you want downgrade iDevice to a lower iOS version after upgrading it to iOS10.3, please don’t select the option «Retain User’s data While Flashing». Or some unknown errors may arise on your iDevice.
Step1: Download and install the latest 3uTools on your PC. Connect your iPhone to PC using the USB cable. After it’s connected, please click the button «Flash & JB”→click the button“Easy flash».
Step2: As shown below, 3uTools will automatically show you the matching firmwares. Select the firmware 10.3beta5 -> click Flash. If you have downloaded the matching firmware, you need to import it to your iDevice first.

Step3: Keep a good connection between your iDevice and PC, and then just wait until this process is completed.
Step4: After iDevice is turned on, please click Pro Falsh→ Activate. Or, you can activate your iDevice manually.
Check Original Post on 3uTools website here.
 3uTools – это общедоступный, бесплатный софт, в нём находится много разных инструментов, которые помогут вам выполнить взлом (джейлбрейк) своим гаджетом от iOS и делать с ним много того, что не входит в функции вашего устройства. Инструмент делает управление вашей музыкой, приложениями, файлами, фотографиями и видео намного легче, чем это было заложено при создании.
Джейлбрейк (Jailbreak) – это процесс эксплуатации слабостей заблокированного гаджета для скачивания пакета прикладных программ, который отличается от того, что предлагает разработчик. Эта программа позволяет обладателю устройства заполучить весь доступ к системе самого устройства и всем её функциям.
Такой процесс ещё называют «взломом», так как он предполагает полнейшее освобождение владельца гаджета от тюремной решетки, созданной ограничениями». Взлом бывает двух видов: 1) привязанный, требует, чтобы устройство было соединено с компьютером. 2) отвязанный, подключение к компьютеру не требуется, всё необходимое находится в самом гаджете.
Инструкция по установке джейлбрейк на iPhone через 3utools
Из названия можно понять, что для установки Jailbreak нам понадобится приложение 3utools
Настройка джейлбрейк
Включаем свой смартфон и в настройках выбираем отказ от пароля, это нужно для полноценной работы Unc0ver . Стоит сделать резервную копию своих данных, для этого на телефоне нажимаете «Настройки», далее в раздел «Основные», там находим пункт «Управление устройством», после этого нажимаете кнопку «Доверять “Имя приложения”. После этого нужно перезагрузить устройство с помощью зажатия нужных кнопок.
Далее после перезагрузке на вашем телефоне должно появится Unc0ver, найдите его и запустите, это может занять некоторое время. Когда приложение открылось нужно нажать на «Jailbreak» cогласиться с условиями. До нажатия этой кнопки над ней было написано 0/30, теперь же, после нажатия запустится процесс, который будет длится до того момента, пока все 30 пунктов не будут заполнены.
После окончания вылезет табличка с надписью «Jailbreak Соmpleted», что означает что джейлбрейк установлен и готов к работе. Нажимаете «ок», после этого телефон автоматически начнёт перезагрузку и у вас высветится иконка Cydia, нажимаем на неё.
Для использования взломанных приложений нужно установить AppSync, для этого нажимаем на нижней панели кнопку «Источники». После этого нажимаем «Правка» и ищем кнопку добавить. В пустой строке вписываем cydia.akemi.ai и нажимаем «Добавить», начнётся установка. После её завершения возвращаемся в Cydia там нажимаем кнопку поиск и ищем «AppSync Unified»
Запускаем его установку после её окончания жмём перезапуск SpringBoard и всё готово!
{youtube}_MWFfdYqtfw{/youtube}
- Добавить свои