
Let’s look at this from a troubleshooting perspective. The number one thing to do instead of guessing is diagnose and the best way to do that when you don’t know what the problem is. I’ll take you through the steps for my particular use case but it should give you a general idea on how to look at the problem in order to find the correct solution.
a.-Have a look at the actual logs of the VM:
Click on the Menu Item, you should see three choices:
- Details
- Snapshots
- Logs
Look for this error code:
VMSetError and look for the matching RETURN CODE (rc)
rc=VERR_VD_IMAGE_READ_ONLY
In the example below the file under /build/virtualbox….is in read only mode.
VMSetError: /build/virtualbox-8vePuu/virtualbox-6.1.16-dfsg/src/VBox/Devices/Storage/DrvVD.cpp(5228) int drvvdConstruct(PPDMDRVINS, PCFGMNODE, uint32_t); rc=VERR_VD_IMAGE_READ_ONLY
b.-Interpret what that means:
But the problem is the /build directory does not exist at all. So what the rc above really means is that it cannot FIND that file, because /build doesn’t even exist (nor it seems to be supposed to).
cd: /build/virtualbox-8vePuu/virtualbox-6.1.16-dfsg/src/VBox/Devices/Storage/: No such file or directory
root@pop-os:~# cd /build/virtualbox-8vePuu/virtualbox-6.1.16-dfsg/
-bash: cd: /build/virtualbox-8vePuu/virtualbox-6.1.16-dfsg/: No such file or directory
root@pop-os:~# cd /build
-bash: cd: /build: No such file or directory
root@pop-os:~# ls /
bin   dev  home  lib32  libx32      media  opt   root  sbin  sys  usr
boot  etc  lib   lib64  lost+found  mnt    proc  run   srv   tmp  var
Another thing to notice is that for my case other VMs with VDIs in the same location don’t have the problem.
That completely discards two possibilities:
- There’s a problem with the install of Virtual Box
- There’s an actual file permissions issue
The possibility is that the VM got corrupted at some point during shut down and that created the config corruption, not a VDI corruption at the VM level, not VirtualBox level.
Unless you power off your VM the «Close» function on your Vm window will ALWAYS save the state of the machine, so «Discarding» the state is only possible when you have two or more states because in that case at a minimum there is always the LAST state.
The conclusion is then that the corruption is at the VM state level and we need to get rid of that.
c.-Solution:
Go to VM-> Menu->Snapshots -> Clone
Create a linked Clone. That will simply copy the config files to the right place and link with the same VDI.
Start that one.
If it starts you know you have a problem with the original VM. You can either re-create the VM and point to the existing VDI or create a full clone (it will take longer) and the delete the original.
To prevent this (at least for my case), avoid sending the Power Off Message to your VM when closing, better use the ACPI Shutdown method as Power off can leave (as we saw) your machine on an unwanted state.
After a long, friendly and fruitful chat with @DavidFoerster, it turned out that Microsoft and its weird update policy was the culprit!
David patiently guided me through the reinstallation of the VirtualBox packages from the Ubuntu repositories and check out the configuration (dkms, extension packages, etc.). At last, he asked me to try a new installation with a live ISO. It was then that I noticed that my «Default Machine Folder» defined in VirtualBox - File - Preferences - General was not usable. I knew that it was on a mounted NTFS used by the dualboot Win10 system. A closer look showed that at present it was mounted read-only, which prevented the virtual machines from starting (with a not very helpful error message).
As I recalled then, shortly after I had last successfully booted the VirtualBox guests, I had not only got Ubuntu updates, but I had also booted for the first time since long my native Win10 system. Apparently, Microsoft had then installed updates AND had reactivated the ‘fast startup’ option (which certainly had been deactivated before!) — so that later, back in Ubuntu, the NTFS file system was mounted in read-only mode, as Windows had not properly shut down.
Now that I have again deactivated the ‘fast startup’ option in Windows10, my guest systems are running again.
Thank you, David, for asking the right question which set me on the right track!
Problem
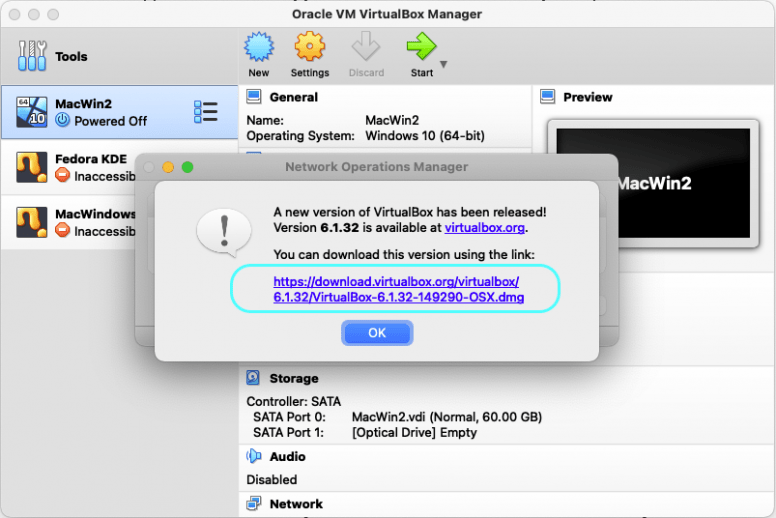
After updating my MacBook macOS Big Sur to version 11.6.5, I was getting the below NS_ERROR_FAILURE error while trying to launch the Windows virtual machine on VirtualBox 6.1. I was unable to launch the virtual machine. I got the same error after updating macOS Big Sur to version 11.6.8 as well.
Errors
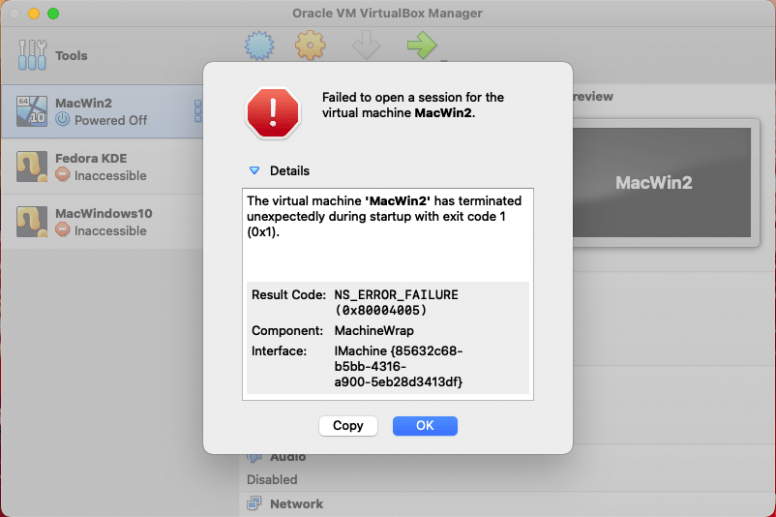
Failed to open a session for the virtual machine MacWin2.
The virtual machine ‘MacWin2’ has terminated unexpectedly during startup with exit code 1 (0x1).
Result Code: NS_ERROR_FAILURE (0x80004005)
Component: MachineWrap
Interface: IMachine {85632c68-b5bb-4316-a900-5eb28d3413df}
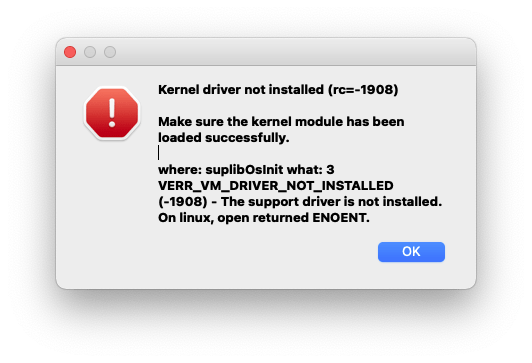
At the same time another error window appeared with the below error:
Kernel driver not installed (rc=-1908)
Make sure the kernel module has been loaded successfully.
where: suplibOsInit what: 3 VERR_VM_DRIVER_NOT_INSTALLED (-1908) – The support driver is not installed. On linux, open returned ENOENT.
Solution 1: (Restart The Mac)
Before thinking too much, make sure you have restarted your Mac after completing the OS update.
In my case, after updating the OS, even before restarting my Mac, I tried to launch the virtual machine and got the errors. After restarting the Mac, the errors vanished. So, before trying anything dramatic, try restarting the Mac. If you are still getting the error, then try the below solutions one by one.
Solution 2: (Re-enable SIP)
The next thing to do is to check and make sure SIP (System Integrity Protection) is enabled. To check it, run this command in the terminal.
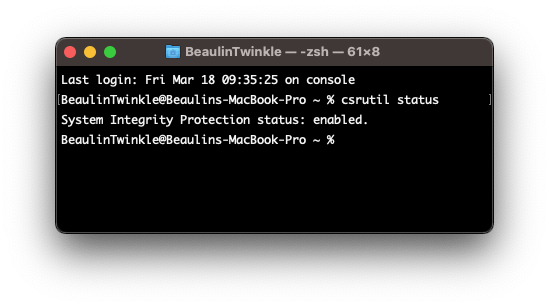
System Integrity Protection should be in enabled state. If it is in disabled state for some reason, then enable it by following these steps:
- Restart the Mac by holding the Command and R keys together.
- Leave the keys when the apple logo appears.
- In the recovery mode, go to the Utilities menu.
- Select Terminal.
- In the terminal window, run the below command to enable SIP and reboot the Mac.
- Allow the mack to launch in normal mode.
- Launch terminal and run the command csrutil status and make sure SIS is enabled.
Solution 3: (Access Device Permission)
- Quit VirtualBox.
- In the Mac, launch the System Preferences.
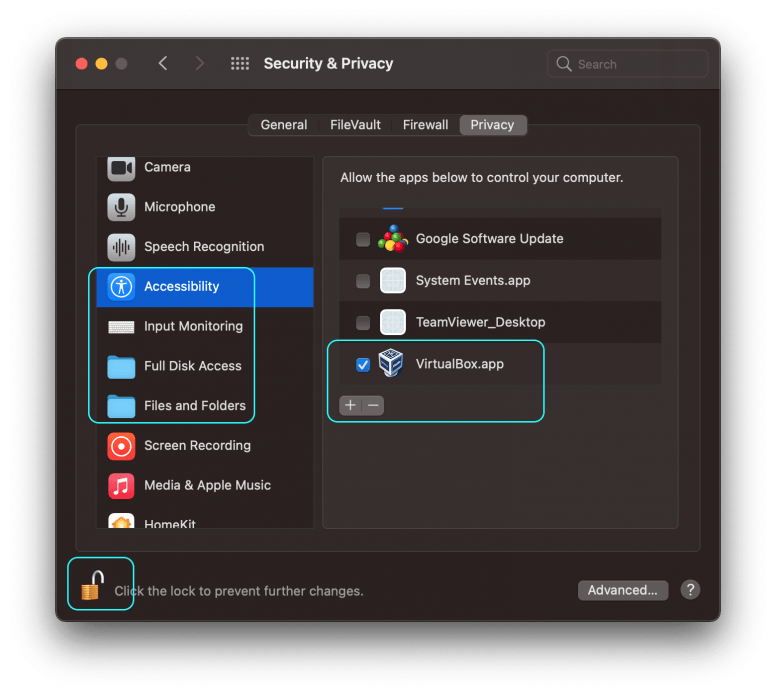
- Go to Security & Privacy.
- Go to the Privacy tab.
- Unlock the privacy screen to make changes by pressing the lock icon at the bottom left of the screen and provide your authentication.
- From the left panel, go through the permissions Accessibility, Input Monitoring, Full Disk Access, Files and Folders and make sure VirtualBox.app is listed under the allow list (right panel) and the checkbox is selected. If not then add it to the list using the + button and select the check boxes.
- Launch VirtualBox and the virtual machine.
If you are still getting the NS_ERROR_FAILURE (0x80004005) error, then try the below solution.
Solution 4: (Allow identified developer in Security & Privacy)
Usually this solution is needed when you get errors after installing VirtualBox. As we are discussing the errors obtained after updating macOS, this solution may be irrelevant. Still I’m adding this solution here, just to check the settings before moving to the next solution.
- Quit VirtualBox.
- Launch the System Preferences.
- Go to Security & Privacy >> General tab.
- In the General tab, Unlock the security and privacy screen to make changes by clicking on the lock icon at the bottom of the screen and provide your authentication.
- Under the Allow apps downloaded from section, make sure the App Store and identified developers option is selected.
- Keep the System Preferences screen open and launch the virtual box and then the virtual machine. If the errors appear again, check the System Preferences >> Security & Privacy >> General tab and see if there is a warning like System software from developer “Oracle America, Inc.” was blocked from loading along with an Allow button that appears below the App Store and identified developers option. If so, press the Allow button.
- Quit the VirtualBox and launch it again.
Solution 5: (Update VirtualBox)
If the above solution were not fixing the problem, then see if there is any update available for the VirtualBox and install the update if there is any. To update the VirtualBox to its latest version follow these steps:
- Launch VirtualBox.
- From the menu select VirtualBox >> Check for updates…
- A small screen will popup and check for any update.
- If there is any update available, another window will popup and display the available update and the link of the dmg file.
- Download the dmg and follow the installation process.
- Once installed, perform the steps listed in Solution 4 above.
Solution 6: (Re-install VirtualBox)
If none of the above solutions are not fixing the NS_ERROR_FAILURE (0x80004005) error, then uninstall the VirtualBox and re-install it again.
Uninstalling VirtualBox
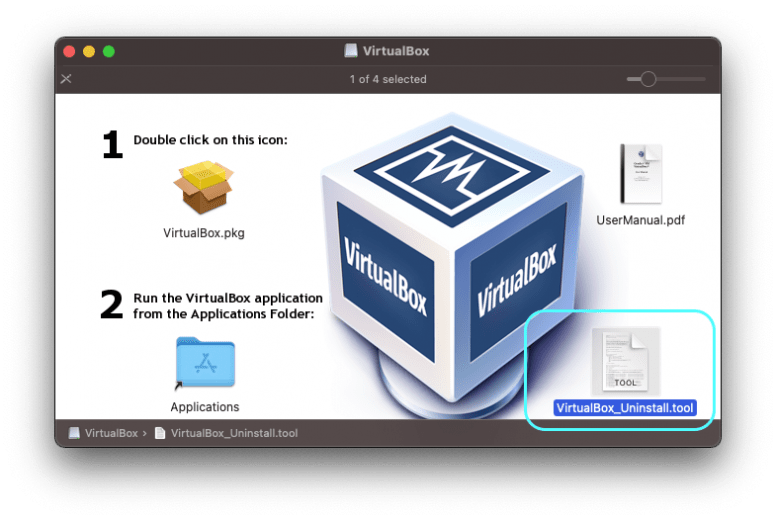
- To uninstall the VirtualBox, download the latest version from https://www.virtualbox.org/wiki/Downloads. Open the installation package. In the installation screen, you can see the uninstallation package VistualBox_Uninstall.tool at the bottom right corner.
- Right click VistualBox_Uninstall.tool and select Open with >> Terminal.
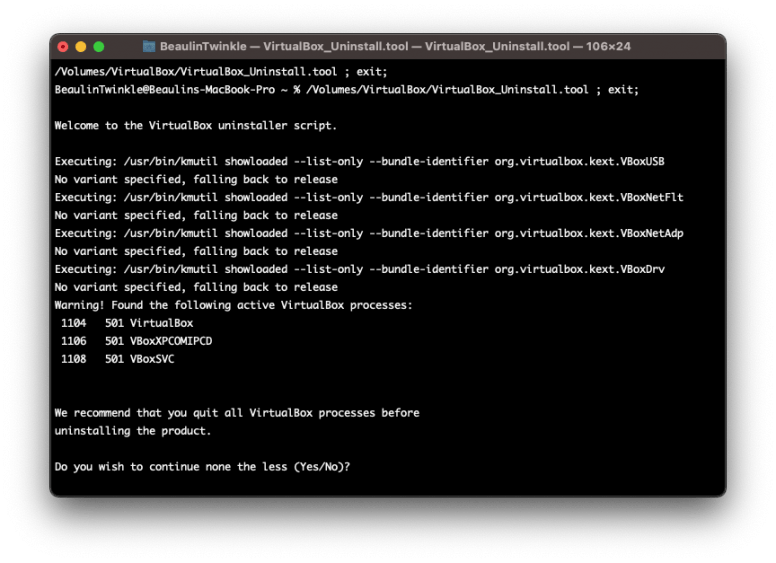
- In the terminal window, the uninstallation scripts will be opened and executed. Finally displays the list of VirtualBox programs installed in the Mac.
- Type Yes to confirm the installation process.
Clear existing permissions
- Restart the Mac in recovery mode by holding the Command and R keys together.
- Leave the keys when the apple logo appears.
- In the recovery mode, go to the Utilities menu.
- Select Terminal.
- In the terminal window, run the below command to clear all the existing permissions and then reboot the Mac.
Instal VirtualBox
Finally install the fresh copy of the VirtualBox using the dmg file downloaded earlier. After installation, if needed, perform the steps mentioned in Solution 4 and then Solution 3 above.
Reference
- Details about NS_ERROR_FAILURE error at VirtualBox.org Forums.
Related Topics
- Shrinking VirtualBox virtual machine vdi on macOS with Windows 10 guest OS.
- Increasing the disk space of Windows guest OS In VirtualBox on macOS.
-
Joshua Schlichting
- Posts: 4
- Joined: 8. Feb 2019, 17:36
[Resolved] Details: code NS_ERROR_FAILURE (0x80004005), component MachineWrap, interface IMachine
Hello, all! This is my first post here, and I’d like to note that I’ve searched this problem for a few hours, coming across mostly «Vagrant» related posts/solutions. Nothing has quite been what I need. With that said, I apologize if this same issue has been solved here. I did attempt to search different keywords from my error, but I didn’t run into anything that was what I needed.
I’m attempting to install a virtual machine via SSH on a server using VBoxManage. The server is running Ubuntu 18.10. The goal is to set this up completely via SSH, so that in the future, I can do this on a server without any sort of GUI. So, let’s just pretend I don’t have physical access to this server to use the qt virtual box package.
VDI Image being used from: osboxes centos-7-1804-vbox (no link allowed on first post ¯_(ツ)_/¯ )
Code: Select all
$ vboxmanage -version
6.0.4r128413
$ id reflects that the current user IS in vboxusers
Here’s what I’ve done so far:
Code: Select all
$ VBoxManage createvm --name "CentOS7" --ostype Linux_64 --register
$ VBoxManage storagectl CentOS7 --name SATA --add sata --controller IntelAhci --bootable on --hostiocache off
$ VBoxManage storageattach CentOS7 --storagectl SATA --port 0 --device 0 --type hdd --medium '/path/to/VirtualBox VMs/CentOS7/centos7.vdi'
$ VBoxManage modifyvm CentOS7 --memory 10240 --cpus 2 --chipset piix3
$ VBoxManage startvm CentOS7 --type headless
Waiting for VM "CentOS7" to power on...
VBoxManage: error: The virtual machine 'CentOS7' has terminated unexpectedly during startup with exit code 1 (0x1)
VBoxManage: error: Details: code NS_ERROR_FAILURE (0x80004005), component MachineWrap, interface IMachine
I’m really not sure where I should be searching next. I’m thinking that there are probably some necessary settings that I’m missing. Would anyone mind pointing me in the right direction? Thanks in advance!
Last edited by Joshua Schlichting on 8. Feb 2019, 21:56, edited 1 time in total.
-
socratis
- Site Moderator
- Posts: 27689
- Joined: 22. Oct 2010, 11:03
- Primary OS: Mac OS X other
- VBox Version: PUEL
- Guest OSses: Win(*>98), Linux*, OSX>10.5
- Location: Greece
Re: Details: code NS_ERROR_FAILURE (0x80004005), component MachineWrap, interface IMachine
Post
by socratis » 8. Feb 2019, 18:29
Joshua Schlichting wrote:I’m thinking that there are probably some necessary settings that I’m missing
First of all, CentOS is not «Linux_64», that’s the generic Linux template. CentOS is «RedHat_64». And since you’re missing a lot of defaults changes, a lot of defaults are going to be wrong.
But, 99.9% you’re right. Here’s a technique that you can try while you have the GUI as well. Create a «CentOS-GUI» VM from… the GUI, with the settings that you want and then compare the output of «VBoxManage showvminfo <VMname>» for the two VMs.
Another thing is to try starting the VM from the GUI, before going «VBoxHeadless«. See what’s the error that you get there. Do *NOT* touch the settings before starting it.
Do NOT send me Personal Messages (PMs) for troubleshooting, they are simply deleted.
Do NOT reply with the «QUOTE» button, please use the «POST REPLY«, at the bottom of the form.
If you obfuscate any information requested, I will obfuscate my response. These are virtual UUIDs, not real ones.
-
Joshua Schlichting
- Posts: 4
- Joined: 8. Feb 2019, 17:36
Re: Details: code NS_ERROR_FAILURE (0x80004005), component MachineWrap, interface IMachine
Post
by Joshua Schlichting » 8. Feb 2019, 21:40
Alright, I ended up walking over to the server and trying to run the VDI from the GUI. I got the exact error posted here:
askubuntu dot com /questions/837427/virtualbox-kernel-modules-do-not-match-this-version-of-virtualbox ( I’m still too new to this forum to post legitimate hyperlinks ¯_(ツ)_/¯ )
RTR3InitEx failed with rc=-1912 (rc=-1912)
The VirtualBox kernel modules do not match this version of VirtualBox. The installation of VirtualBox was apparently not successful. Executing ‘/sbin/vboxconfig’ may correct this. Make sure that you do not mix the OSE version and the PUEL version of VirtualBox.where: supR3HardenedMainInitRuntime what: 4
VERR_VM_DRIVER_VERSION_MISMATCH (-1912) — The installed support driver doesn’t match the version of the user.
and the accepted answer worked for me!!!
Code: Select all
$ sudo apt remove --purge virtualbox
$ sudo apt install virtualbox
$ sudo apt install virtualbox-dkms-
socratis
- Site Moderator
- Posts: 27689
- Joined: 22. Oct 2010, 11:03
- Primary OS: Mac OS X other
- VBox Version: PUEL
- Guest OSses: Win(*>98), Linux*, OSX>10.5
- Location: Greece
Re: Details: code NS_ERROR_FAILURE (0x80004005), component MachineWrap, interface IMachine
Post
by socratis » 8. Feb 2019, 21:51
So it was a broken VirtualBox installation after all? Is it working now? Can we close this?
Do NOT send me Personal Messages (PMs) for troubleshooting, they are simply deleted.
Do NOT reply with the «QUOTE» button, please use the «POST REPLY«, at the bottom of the form.
If you obfuscate any information requested, I will obfuscate my response. These are virtual UUIDs, not real ones.
-
soyouzz
- Posts: 1
- Joined: 9. May 2019, 17:48
Re: [Resolved] Details: code NS_ERROR_FAILURE (0x80004005), component MachineWrap, interface IMachin
Post
by soyouzz » 9. May 2019, 17:55
Hello,
I have exactly the same issue (NS_ERROR_FAILURE (0x80004005), component MachineWrap, interface IMachine) with VirtualBox 6.0.6r130049 after upgrading to Ubuntu 18.04. The .deb file is installed from the website directly. What I’ve tried:
— I tried to run the command:
it restart the service and rebuild the kernel modules but no success
— I tried to uninstall it and install virtualbox and virtualbox-dkms from the repository but no success also.
What can I do ?

Всем привет сегодня поговорим о ошибке 0x80004005 Linux которая в основном связана с VirtualBox. У этой ошибки есть различные причины так что разберём несколько из них.
Ошибка: Не удалось создать COM-объект VirtualBox. NS_ERROR_FAILURE (0x80004005)
Решение:
- Отключите машину и в свойствах отключите подмонтированный привод.
- Удалите полностью VirtualBox и установите заново
- Попробуйте скопировать старые конфигурации VirtualBox
- Попробуй заново создать виртуальную машину
- Иногда помогает удаление /home/maksim/.VirtualBox/VirtualBox.xml
- При загрузке Ubuntu, есть экран с выбором «Обычная загрузка», «Загрузка консоли» и «Memory Test». Запускаем в режиме Memory Test и ждем окончания проверки.
- Полностью обновите систему
- Создайте заново виртуальную машину выберите старый жесткий диск, потом запустите sudo /etc/init.d/vboxdrv setup
Ошибка: Не удалось открыть файл VMDK имеется несоответствие между таблицами VERR_VD_VMDK_INVALID_HEADER (0x80004005)
Решение:
- Загрузите комплект VDD с VMWare выполните следующую команду: vmware-vdiskmanager -R
- В главном окне Oracle VM VirtualBox Manager выберите виртуальную машину, которая не запускается. Нажмите на снимки в правом верхнем углу. Выберите предпоследнию запись. Щелкните правой кнопкой мыши по нему и выберите «Восстановить»
Ошибка: VT-x отключен в BIOS для всех режимов процессора VERR_VMX_MSR_ALL_VMX_DISABLED (0x80004005)
Решение: Включите в биосе поддержку vt-x
Ошибка: Не удалось открыть сессию для виртуальной машины WInXP NS_ERROR_FAILURE (0x80004005)
Решение:
Установите все репаки
- Сommunity/virtualbox 4.1.8-1
- Powerful x86 virtualization for enterprise as well home use community/virtualbox-additions 4.1.8-1
- The official all-in-one VirtualBox Guest Additions ISO/CD image local/virtualbox-ext-oracle 4.1.8-1
- Oracle VM VirtualBox Extension Pack community/virtualbox-modules 4.1.8-1
- Kernel modules for VirtualBox community/virtualbox-source 4.1.8-1
- VirtualBox kernel modules source
Выполните команду modprobe vboxdrv
Ошибка:Виртуальная машина неожиданно прервалась во время запуска NS_ERROR_FAILURE (0x80004005)
Решение: Попробуйте обновить пакет virtualbox-host-modules или лучше запустить полное обновление.
- Для этого просто запустите: $ sudo pacman -Syu
- Перезагружаем модуль ядра: $ sudo / sbin / rcvboxdrv setup
- Загрузка модулей: vboxnetadp vboxnetflt vboxpci vboxdrv
Если не помогло то найдите установленные модули хоста virtualbox:
- $ pacman -Q | grep
- virtual virtualbox 5.2.18-1
- virtualbox-guest-iso 5.2.18-1
- virtualbox-host-modules-arch 5.2.18-8
- virtualbox-sdk 5.2.18-1
И замените пакет virtualbox-host-modules-arch на пакет virtualbox-host-dkms как показано ниже.
- $ sudo pacman -Syu
- $ sudo pacman -S virtualbox-host-dkms
Вам будет предложено удалить пакет virtualbox-host-modules-arch . Просто введите Y и нажмите ENTER, чтобы установить virtualbox-host-dkms .Убедитесь, что вы установили заголовки ядра:
- $ sudo pacman -S linux-заголовки
Наконец, выполните следующие команды:
- $ sudo modprobe vboxdrv
- $ sudo / sbin / rcvboxdrv setup
Перезагрузите систему, и теперь VirtualBox должен работать.
Еще один вариант убеждаемся что virtualbox-dkms был установлен выполнив команду: dpkg -l | grep virtualbox-dkms
Потом очищаем и переустанавливаем dkms:
- apt-get purge virtualbox-dkms &
- & sudo apt-get install dkms
Далее делаем перестройку ядра:
- sudo /sbin/vboxconfig
Ну и последний вариант переходим в папку ~/.config/VirtualBox ищем файл VirtualBox.xml-prev и переименовываем его в VirtualBox.xml
Ошибка: The installer failed with exit code 254 Используйте —help для вывода списка доступных параметров..
Решение: обновлением VirtualBox до актуальной версии: командой
VBoxManage extpack install —replace Oracle_VM_VirtualBox_Extension_Pack-<версия_плагина>.vbox-extpack
На этом все надеюсь данные советы вам помогут. В комментариях пишите свое мнение о этой ошибке и как вы ее побороли будет интересно почитать. Спасибо!
{youtube}WmXoqwkqiQQ{/youtube}