
For Oculus Quest, if you want to be a developer:
1. Create the organization on the Oculus Website, using a regular web browser, from your PC.
2. Enable the Developer Mode on the Android App, having the Oculus Quest connected and online at this point.
3. Restart your Oculus Quest.
4. Developer option should be now available on the left column in your All settings menu.
5. Download all the tools and drivers like in the guides you’re following for sure and start programming !
GL !
Cannot enable developer mode in Oculus App for my Quest 2
Every time I try to toggle the developer mode option in more settings in my Oculus App connected to my Quest 2 I get a pop-up saying «Become a Developer» with two options — No Thanks, and Start Creating. Start Creating takes me to a browser web page that tells me how to toggle developer mode, make a development org, and install Win driver, all of which I have done already. I had this all working on a different Quest 2 successfully but I cannot figure out how to get past this roadblock on this one.
Any ideas? Thanks.
Edit: I finally got Developer Mode to toggle. I am not sure which of the following allowed it to happen, or if it was some combination of them. I had created a number of Oculus «Development Organizations» tied to my FB account in my attempts to make this work. I authorized my credit card on my original one. I also made a point to sign all legal forms on every organization I made. I created a separate Oculus Developer account (scroll all the way down and click «Create an Unmerged Oculus Developer Account»), added my Oculus user name to the new organization as a developer, and authorized my credit card with that account, also signing the legal forms.
Again, I do not know which of these were involved in convincing the app that I had a developer account, and none of this was a problem with the first Quest 2 I did this on, but at least I can stream via Virtual Desktop now. I never authorized a credit card to make this work on my first Quest 2, so I would guess it wasn’t that.
Archived post. New comments cannot be posted and votes cannot be cast.
![]()
Download Article
![]()
Download Article
Do you have an Oculus Quest 2? Do you want to install unofficial games, not in the Oculus Store? Maybe you want to mod your existing games. Or perhaps you want to change the headset resolution or record and stream at a higher resolution. Maybe you are a developer and want to create and publish games for Oculus Quest 2. To do any of this, you will need to put the Oculus Quest 2 in Developer Mode. You can easily do this using the mobile app or Oculus Developer Hub. This wikiHow article teaches you how to put your Oculus Quest 2 in Developer Mode.
Things You Should Know
- Before you can put your Oculus Quest 2 in Developer Mode, you need to register as a developer account.
- If you have a Windows computer, you need to install the Oculus ABD Drivers in order to install APK files from your computer.
- Some unofficial apps may contain viruses and malware, or may just be uncomfortable to use. Install unknown apps at your own risk.
-

1
-
2
Log in with your Meta account. You can log in using your Facebook, Instagram, or Meta account. Click whichever option you want to use to log in and log in with the account you use on your Oculus Quest 2.
Advertisement
-
3
Enter a credit card or phone number (if needed). You’ll need to do this in order to verify your account. If you haven’t already added a credit card or phone number to your account, click Add next to whichever method you want to use to verify your account. Then enter a credit card number or phone number. Once you enter a phone number, you will need to verify your account using a confirmation code sent to your text messages. Once your account is verified, click Back to Home to return to the main developer page.
- If you want stay private, try using a Google Voice account for your phone number.
-
4
Enter the name of your developer organization. If you are an app developer, enter the name of your company on the line below «What is the legal name of your organization?». If you are not a game developer, enter anything you want.
-
5
Click the checkbox next to «I Understand» and click Submit. After entering a developer name, click the checkbox below the text box and click the green button that says Submit.
-
6
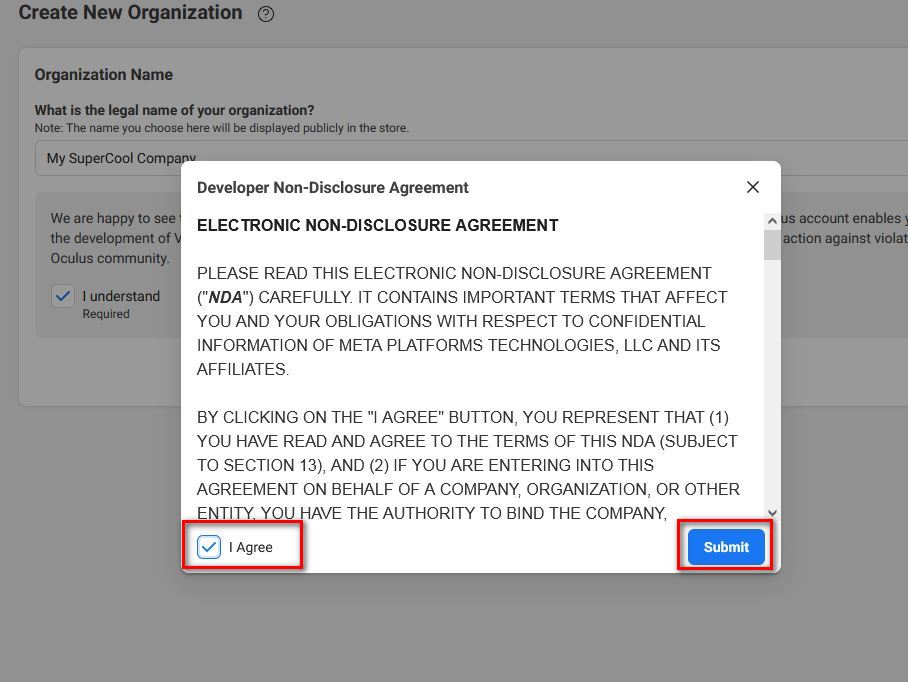
Agree to the Non-disclosure agreement. After submitting your developer name, read through the NDA in the pop-up. Then click the checkbox next to «I agree» in the lower-left corner of the pop-up, and click Submit in the lower-right corner. You are now a registered developer.
-
7
Verify your Account. To do so, go to https://developer.oculus.com/manage/verify/ in a web browser. Log in to your Oculus account if needed. Then either add a credit or debit card or enter the confirmation code you received via text message to confirm your mobile number. [1]


Advertisement
-
1
Bring your Oculus headset close to your smartphone. It needs to be close enough that you can connect your phone to your Oculus headset using Bluetooth. Make sure your phone and your headset are close together.
-
2
Open the Oculus App on your smartphone. You should already have the Oculus App installed on your smartphone as it is required to set up your Oculus Quest 2. If you do not have the Oculus app installed. If you do not currently have the Oculus app installed on your mobile phone, go ahead and download the Oculus app from the App Store on iPhone, or the Google Play Store on Android. Then sign in with your Oculus account.
- Additionally, make sure the Oculus App has been updated to the latest version. You can update apps in the App Store on iPhone or the Google Play Store on Android.
-
3
Tap Menu ☰. It’s the icon with three horizontal lines in the lower-right corner of the Oculus app. This displays the menu.
-
4
Tap Devices. It’s the grey icon with an image that resembles a face mask. Tap the Devices button to connect to your Oculus headset.
-
5
Select your device. If you have more than one Oculus device on your account, tap the drop-down menu at the top and select your device. Then wait until you see a green dot next to «Connected» in the upper-left corner.
- If it is not connecting to your headset, make sure your phone has Bluetooth turned on and make sure your phone and headset are close together. Also, make sure the headset is powered on.
-
6
Scroll down and tap Developer Mode. It’s next to an icon that resembles a circle with an «i.» It’s the fourth option below «Headset Settings.»
-
7
Tap the toggle switch
next to «Developer Mode.» It’s the only option at the top of the Developer Settings menu. This enables Developer Mode on your Oculus headset.
- With Developer Mode enabled, you can develop your own Oculus apps, side-load unofficial apps using the Side Quest app on your PC, or change the resolution on your device using Ocular Migraine.[2]
- To find unofficial apps installed on your Oculus Quest, click the Apps icon in the Oculus menu. It has an icon that resembles 9 squares. Then click the drop-down menu in the upper-right corner (the one that says «All» by default). Then select Unknown Sources.
- With Developer Mode enabled, you can develop your own Oculus apps, side-load unofficial apps using the Side Quest app on your PC, or change the resolution on your device using Ocular Migraine.[2]


Advertisement
-
1
Download and install Oculus Developer Hub. Oculus Developer Hub is an app you can download and install for Windows or macOS that allows you to develop applications for your Oculus Quest 2 and enable Developer Mode. Use the following steps to download and install Oculus Developer Hub on your computer:
- Go to https://developer.oculus.com/documentation/unity/ts-odh/ in a web browser.
- Click Windows or macOS below «Install ODH.»
- Click Download on the right side of the screen.
- Agree to the Terms of Service and click Download.
- Unzip to the Oculus Developer Hub Setup zip file in your Downloads folder.
- Open the Oculus Developer Hub Setup file.
- Follow the instructions to complete the installation.
-
2
Open the Oculus Developer Hub app and click Continue. The Oculus Developer Hub app has a purple icon with an elongated «o.» Open the Oculus Development Hub and click continue in the lower-right corner.
-
3
Log in to your Oculus account. To do so, click the option to log in to your Facebook/Meta/Oculus account on the screen. This will redirect you to a website you can use to log in. Log in with the account associated with your Oculus Quest 2headset.
-
4
Connect your headset to your computer. Use the USB-C cable that came with your Oculus headset and connect it to your computer.
-
5
Click Device Manager. It’s the first option in the menu to the left.
-
6
Select Set up New Device. It’s in the upper-right corner. Click Set Up New Device in the upper-right corner to display a drop-down menu. Then click Set Up New Device in the drop-down menu. Click Next at the bottom of the pop-up.
-
7
Select your Quest 2 headset. To do so, click Quest 2 in the menu. Then click the serial number that matches your Quest 2 headset and click Next.
-
8
Click Next to sign in with your ODH account. Verify that the email address displayed in the pop-up is the correct account and then click Next at the bottom of the pop-up.
-
9
Connect your headset to Wi-Fi. To do so, click your Wi-Fi network and then enter your Wi-Fi password. Then click Connect.
-
10
Click the toggle switch
next to «Developer Mode» and click Next. This enables developer mode on your device.
-
11
Click Next and then Finish. To finish the setup process, click Next on the page that confirms your device has been set up. Then click Finish.
- To find unofficial apps installed on your Oculus Quest, click the Apps icon in the Oculus menu. It has an icon that resembles 9 squares. Then click the drop-down menu in the upper-right corner (the one that says «All» by default). Then select Unknown Sources.


Advertisement
-
1
Log in to your Oculus Headset. To do so, put your Oculus headset on and log in to your account. Create a stationary guardian if needed. In order to connect your Oculus headset to a computer and transfer data, you need to enable USB debugging.
-
2
Press the Oculus button. It’s the flat button with an elongated «O» no the right controller. This displays the menu bar.
-
3
Open the Quick Settings menu. To do so, aim at the clock at the far left side of the menu bar and click the trigger. This opens the Quick Settings menu.
-
4
Click Settings
. It’s next to the icon that resembles a gear in the upper-right corner of the Quick Settings menu.
-
5
Click System. It’s the first option in the Settings menu.
-
6
Click Developer. It’s in the menu to the left next to an icon that resembles a cube.
-
7
Click the toggle switch
next to «USB Connection Dialogue.» It’s the second option in the Developer menu. This allows your Oculus headset to communicate with your computer via a USB connection.
-
8
Connect the headset to a computer. Use the USB-C cable that came with your Oculus Quest 2 headset to connect your Oculus headset to the computer you plan on using to side-load or develop apps from.
-
9
Click Allow on your computer. This allows your computer to access data from your Oculus Quest.
-
10
Allow USB Debugging on your Oculus Quest 2 headset. To do so, put your Oculus headset on. When connected to your computer, you should see a pop-up asking if you want to allow USB Debugging. Click Ok to allow USB Debugging. USB debugging mode allows your computer to install apps and make changes to your system using a USB connection.
- Click the checkbox next to «Always allow from this computer» to avoid having to click this dialogue box every time you connect your Oculus Quest to your computer.


Advertisement
-
1
Go to https://developer.oculus.com/downloads/package/oculus-adb-drivers/ in a web browser. This is the website to download and install Oculus ADB drivers for Windows. Since the Oculus Quest is an Android system at it’s core, you need the Android Debug Bridge drivers in order to install APK files on your Oculus headset.[3]
- If you are using a Mac computer, you do not need to install this file.
-
2
Download the Oculus ABD Driver. To do so, click Download in the upper-right corner. Agree to the Terms and Conditions and click Download.
-
3
Unzip the downloaded files. Use a program like WinZIP or WinRAR to Unzip the file you just downloaded. This will create a new folder with several files inside.
-
4
Install the Oculus ABD driver. To do so, open the folder you just extracted from the zip file. Then right-click the «android_winusb.inf» file and click Install. This installs the Oculus ABD driver on your Windows computer.


Advertisement
Ask a Question
200 characters left
Include your email address to get a message when this question is answered.
Submit
Advertisement
-
To download and install unofficial games on your Oculus Quest, download and install Side Quest on your computer. Connect your headset to your computer and use Side Quest to search for apps and game mods and install them.
-
To download custom music and maps for Beat Saber, download and install an app called «BMBF» using Side Quest. You may have to downgrade to the most recent compatible version of Beat Saber. Use the BMBF app on your Oculus Quest to search for and install custom maps and music.
-
To change the resolution on your headset or change the video recording resolution, download and install Ocular Migraine on your computer and use it to change the settings.
Thanks for submitting a tip for review!
Advertisement
-
Unofficial apps you install on your Oculus Quest have not gone through a quality control process. Some may not have the comfort levels that official Oculus apps have. They may also contain viruses and malware. Check the comments and do some research before installing an unofficial app. Install unofficial apps at your own risk.
Advertisement
References
About This Article
Article SummaryX
1. Register as a developer at https://developer.oculus.com/manage/organizations/create/.
2. Open the Oculus App on your mobile phone.
3. Tap Menu in the lower-right corner.
4. Tap Devices.
5. Select your Oculus Quest 2 headset and make sure it is connected.
6. Tap Developer Mode.
7. Tap the toggle switch next to «Developer Mode.»
8. Install the Oculus ABD driver from https://developer.oculus.com/downloads/package/oculus-developer-hub-win (Windows Only).
Did this summary help you?
Thanks to all authors for creating a page that has been read 37,868 times.
Did this article help you?
Every time I try to toggle the developer mode option in more settings in my Oculus App connected to my Quest 2 I get a pop-up saying «Become a Developer» with two options — No Thanks, and Start Creating. Start Creating takes me to a browser web page that tells me how to toggle developer mode, make a development org, and install Win driver, all of which I have done already. I had this all working on a different Quest 2 successfully but I cannot figure out how to get past this roadblock on this one.
Any ideas? Thanks.
Edit: I finally got Developer Mode to toggle. I am not sure which of the following allowed it to happen, or if it was some combination of them. I had created a number of Oculus «Development Organizations» tied to my FB account in my attempts to make this work. I authorized my credit card on my original one. I also made a point to sign all legal forms on every organization I made. I created a separate Oculus Developer account (scroll all the way down and click «Create an Unmerged Oculus Developer Account»), added my Oculus user name to the new organization as a developer, and authorized my credit card with that account, also signing the legal forms.
Again, I do not know which of these were involved in convincing the app that I had a developer account, and none of this was a problem with the first Quest 2 I did this on, but at least I can stream via Virtual Desktop now. I never authorized a credit card to make this work on my first Quest 2, so I would guess it wasn’t that.

![]()
Download Article
![]()
Download Article
Do you have an Oculus Quest 2? Do you want to install unofficial games, not in the Oculus Store? Maybe you want to mod your existing games. Or perhaps you want to change the headset resolution or record and stream at a higher resolution. Maybe you are a developer and want to create and publish games for Oculus Quest 2. To do any of this, you will need to put the Oculus Quest 2 in Developer Mode. You can easily do this using the mobile app or Oculus Developer Hub. This wikiHow article teaches you how to put your Oculus Quest 2 in Developer Mode.
Things You Should Know
- Before you can put your Oculus Quest 2 in Developer Mode, you need to register as a developer account.
- If you have a Windows computer, you need to install the Oculus ABD Drivers in order to install APK files from your computer.
- Some unofficial apps may contain viruses and malware, or may just be uncomfortable to use. Install unknown apps at your own risk.
-
1
-
2
Log in with your Meta account. You can log in using your Facebook, Instagram, or Meta account. Click whichever option you want to use to log in and log in with the account you use on your Oculus Quest 2.
Advertisement
-
3
Enter a credit card or phone number (if needed). You’ll need to do this in order to verify your account. If you haven’t already added a credit card or phone number to your account, click Add next to whichever method you want to use to verify your account. Then enter a credit card number or phone number. Once you enter a phone number, you will need to verify your account using a confirmation code sent to your text messages. Once your account is verified, click Back to Home to return to the main developer page.
- If you want stay private, try using a Google Voice account for your phone number.
-
4
Enter the name of your developer organization. If you are an app developer, enter the name of your company on the line below «What is the legal name of your organization?». If you are not a game developer, enter anything you want.
-
5
Click the checkbox next to «I Understand» and click Submit. After entering a developer name, click the checkbox below the text box and click the green button that says Submit.
-
6
Agree to the Non-disclosure agreement. After submitting your developer name, read through the NDA in the pop-up. Then click the checkbox next to «I agree» in the lower-left corner of the pop-up, and click Submit in the lower-right corner. You are now a registered developer.
-
7
Verify your Account. To do so, go to https://developer.oculus.com/manage/verify/ in a web browser. Log in to your Oculus account if needed. Then either add a credit or debit card or enter the confirmation code you received via text message to confirm your mobile number. [1]
Advertisement
-
1
Bring your Oculus headset close to your smartphone. It needs to be close enough that you can connect your phone to your Oculus headset using Bluetooth. Make sure your phone and your headset are close together.
-
2
Open the Oculus App on your smartphone. You should already have the Oculus App installed on your smartphone as it is required to set up your Oculus Quest 2. If you do not have the Oculus app installed. If you do not currently have the Oculus app installed on your mobile phone, go ahead and download the Oculus app from the App Store on iPhone, or the Google Play Store on Android. Then sign in with your Oculus account.
- Additionally, make sure the Oculus App has been updated to the latest version. You can update apps in the App Store on iPhone or the Google Play Store on Android.
-
3
Tap Menu ☰. It’s the icon with three horizontal lines in the lower-right corner of the Oculus app. This displays the menu.
-
4
Tap Devices. It’s the grey icon with an image that resembles a face mask. Tap the Devices button to connect to your Oculus headset.
-
5
Select your device. If you have more than one Oculus device on your account, tap the drop-down menu at the top and select your device. Then wait until you see a green dot next to «Connected» in the upper-left corner.
- If it is not connecting to your headset, make sure your phone has Bluetooth turned on and make sure your phone and headset are close together. Also, make sure the headset is powered on.
-
6
Scroll down and tap Developer Mode. It’s next to an icon that resembles a circle with an «i.» It’s the fourth option below «Headset Settings.»
-
7
Tap the toggle switch
next to «Developer Mode.» It’s the only option at the top of the Developer Settings menu. This enables Developer Mode on your Oculus headset.
- With Developer Mode enabled, you can develop your own Oculus apps, side-load unofficial apps using the Side Quest app on your PC, or change the resolution on your device using Ocular Migraine.[2]
- To find unofficial apps installed on your Oculus Quest, click the Apps icon in the Oculus menu. It has an icon that resembles 9 squares. Then click the drop-down menu in the upper-right corner (the one that says «All» by default). Then select Unknown Sources.
- With Developer Mode enabled, you can develop your own Oculus apps, side-load unofficial apps using the Side Quest app on your PC, or change the resolution on your device using Ocular Migraine.[2]
Advertisement
-
1
Download and install Oculus Developer Hub. Oculus Developer Hub is an app you can download and install for Windows or macOS that allows you to develop applications for your Oculus Quest 2 and enable Developer Mode. Use the following steps to download and install Oculus Developer Hub on your computer:
- Go to https://developer.oculus.com/documentation/unity/ts-odh/ in a web browser.
- Click Windows or macOS below «Install ODH.»
- Click Download on the right side of the screen.
- Agree to the Terms of Service and click Download.
- Unzip to the Oculus Developer Hub Setup zip file in your Downloads folder.
- Open the Oculus Developer Hub Setup file.
- Follow the instructions to complete the installation.
-
2
Open the Oculus Developer Hub app and click Continue. The Oculus Developer Hub app has a purple icon with an elongated «o.» Open the Oculus Development Hub and click continue in the lower-right corner.
-
3
Log in to your Oculus account. To do so, click the option to log in to your Facebook/Meta/Oculus account on the screen. This will redirect you to a website you can use to log in. Log in with the account associated with your Oculus Quest 2headset.
-
4
Connect your headset to your computer. Use the USB-C cable that came with your Oculus headset and connect it to your computer.
-
5
Click Device Manager. It’s the first option in the menu to the left.
-
6
Select Set up New Device. It’s in the upper-right corner. Click Set Up New Device in the upper-right corner to display a drop-down menu. Then click Set Up New Device in the drop-down menu. Click Next at the bottom of the pop-up.
-
7
Select your Quest 2 headset. To do so, click Quest 2 in the menu. Then click the serial number that matches your Quest 2 headset and click Next.
-
8
Click Next to sign in with your ODH account. Verify that the email address displayed in the pop-up is the correct account and then click Next at the bottom of the pop-up.
-
9
Connect your headset to Wi-Fi. To do so, click your Wi-Fi network and then enter your Wi-Fi password. Then click Connect.
-
10
Click the toggle switch
next to «Developer Mode» and click Next. This enables developer mode on your device.
-
11
Click Next and then Finish. To finish the setup process, click Next on the page that confirms your device has been set up. Then click Finish.
- To find unofficial apps installed on your Oculus Quest, click the Apps icon in the Oculus menu. It has an icon that resembles 9 squares. Then click the drop-down menu in the upper-right corner (the one that says «All» by default). Then select Unknown Sources.
Advertisement
-
1
Log in to your Oculus Headset. To do so, put your Oculus headset on and log in to your account. Create a stationary guardian if needed. In order to connect your Oculus headset to a computer and transfer data, you need to enable USB debugging.
-
2
Press the Oculus button. It’s the flat button with an elongated «O» no the right controller. This displays the menu bar.
-
3
Open the Quick Settings menu. To do so, aim at the clock at the far left side of the menu bar and click the trigger. This opens the Quick Settings menu.
-
4
Click Settings
. It’s next to the icon that resembles a gear in the upper-right corner of the Quick Settings menu.
-
5
Click System. It’s the first option in the Settings menu.
-
6
Click Developer. It’s in the menu to the left next to an icon that resembles a cube.
-
7
Click the toggle switch
next to «USB Connection Dialogue.» It’s the second option in the Developer menu. This allows your Oculus headset to communicate with your computer via a USB connection.
-
8
Connect the headset to a computer. Use the USB-C cable that came with your Oculus Quest 2 headset to connect your Oculus headset to the computer you plan on using to side-load or develop apps from.
-
9
Click Allow on your computer. This allows your computer to access data from your Oculus Quest.
-
10
Allow USB Debugging on your Oculus Quest 2 headset. To do so, put your Oculus headset on. When connected to your computer, you should see a pop-up asking if you want to allow USB Debugging. Click Ok to allow USB Debugging. USB debugging mode allows your computer to install apps and make changes to your system using a USB connection.
- Click the checkbox next to «Always allow from this computer» to avoid having to click this dialogue box every time you connect your Oculus Quest to your computer.
Advertisement
-
1
Go to https://developer.oculus.com/downloads/package/oculus-adb-drivers/ in a web browser. This is the website to download and install Oculus ADB drivers for Windows. Since the Oculus Quest is an Android system at it’s core, you need the Android Debug Bridge drivers in order to install APK files on your Oculus headset.[3]
- If you are using a Mac computer, you do not need to install this file.
-
2
Download the Oculus ABD Driver. To do so, click Download in the upper-right corner. Agree to the Terms and Conditions and click Download.
-
3
Unzip the downloaded files. Use a program like WinZIP or WinRAR to Unzip the file you just downloaded. This will create a new folder with several files inside.
-
4
Install the Oculus ABD driver. To do so, open the folder you just extracted from the zip file. Then right-click the «android_winusb.inf» file and click Install. This installs the Oculus ABD driver on your Windows computer.
Advertisement
Ask a Question
200 characters left
Include your email address to get a message when this question is answered.
Submit
Advertisement
-
To download and install unofficial games on your Oculus Quest, download and install Side Quest on your computer. Connect your headset to your computer and use Side Quest to search for apps and game mods and install them.
-
To download custom music and maps for Beat Saber, download and install an app called «BMBF» using Side Quest. You may have to downgrade to the most recent compatible version of Beat Saber. Use the BMBF app on your Oculus Quest to search for and install custom maps and music.
-
To change the resolution on your headset or change the video recording resolution, download and install Ocular Migraine on your computer and use it to change the settings.
Thanks for submitting a tip for review!
Advertisement
-
Unofficial apps you install on your Oculus Quest have not gone through a quality control process. Some may not have the comfort levels that official Oculus apps have. They may also contain viruses and malware. Check the comments and do some research before installing an unofficial app. Install unofficial apps at your own risk.
Advertisement
References
About This Article
Article SummaryX
1. Register as a developer at https://developer.oculus.com/manage/organizations/create/.
2. Open the Oculus App on your mobile phone.
3. Tap Menu in the lower-right corner.
4. Tap Devices.
5. Select your Oculus Quest 2 headset and make sure it is connected.
6. Tap Developer Mode.
7. Tap the toggle switch next to «Developer Mode.»
8. Install the Oculus ABD driver from https://developer.oculus.com/downloads/package/oculus-developer-hub-win (Windows Only).
Did this summary help you?
Thanks to all authors for creating a page that has been read 31,039 times.
Did this article help you?
Необходимые условия для создания организации:
- Прошивка вашего шлема не ниже v43. Узнать версию прошивки можно так, или в Настройках шлема, также могут оказаться полезными различные Руководства по прошивке
- Сайты Meta/Oculus открываются нормально, ничего не заблокировано. Если это не так, вам сможет помочь наша статья Платные и бесплатные VPN клиенты и сервисы.
- Вы перешли с аккаунта Facebook на аккаунт Meta. Если нет и не знаете как, то смотрите здесь.
- Мобильное приложение Meta Quest обновлено до последней версии.
Обновление: если способ ниже не помогает, зайдите в своем профиле в управлении аккаунтами, и добавьте к аккаунту Meta свой аккаунт Facebook.
После этого в форме появится третий пункт: «Подтвердить телефон через Facebook». В этом случае СМС должно прийти нормально и можно продолжать.
Если все так, приступим.
- Запускаем дефолтный браузер и идем по ссылке:
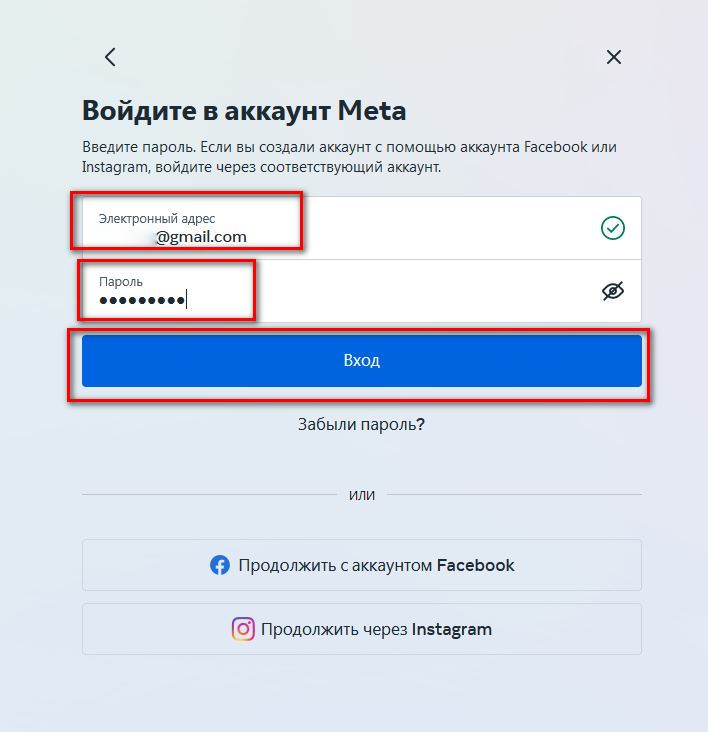
https://developer.oculus.com/manage/organizations/create/ - Логинимся со своим емайл, который мы подцепили к Мете:


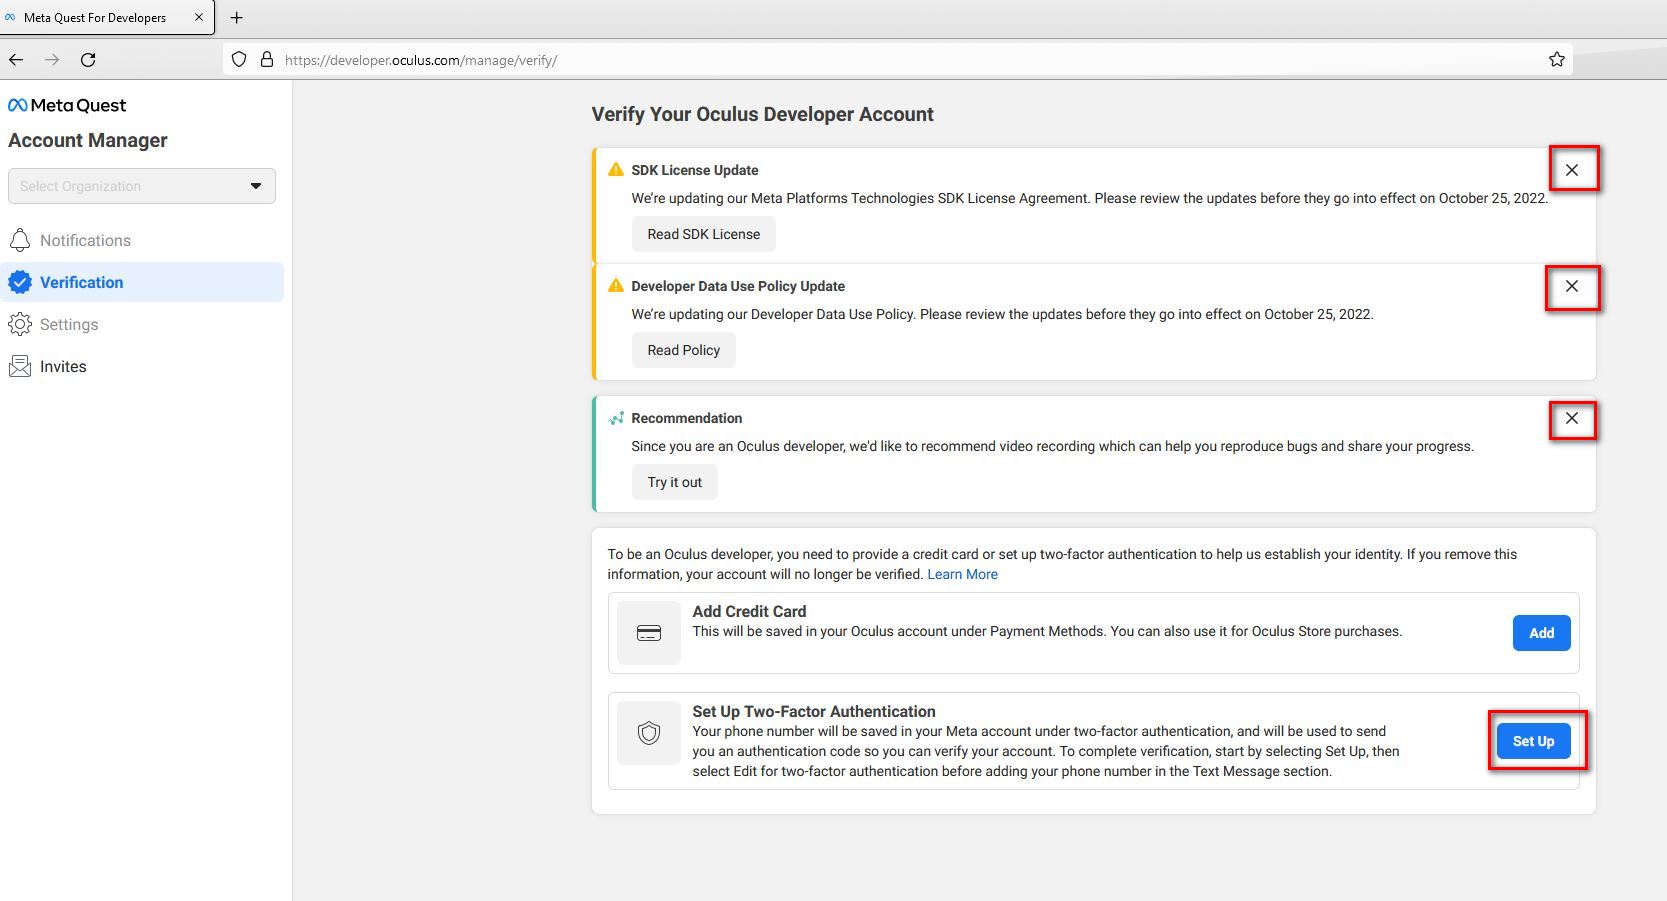
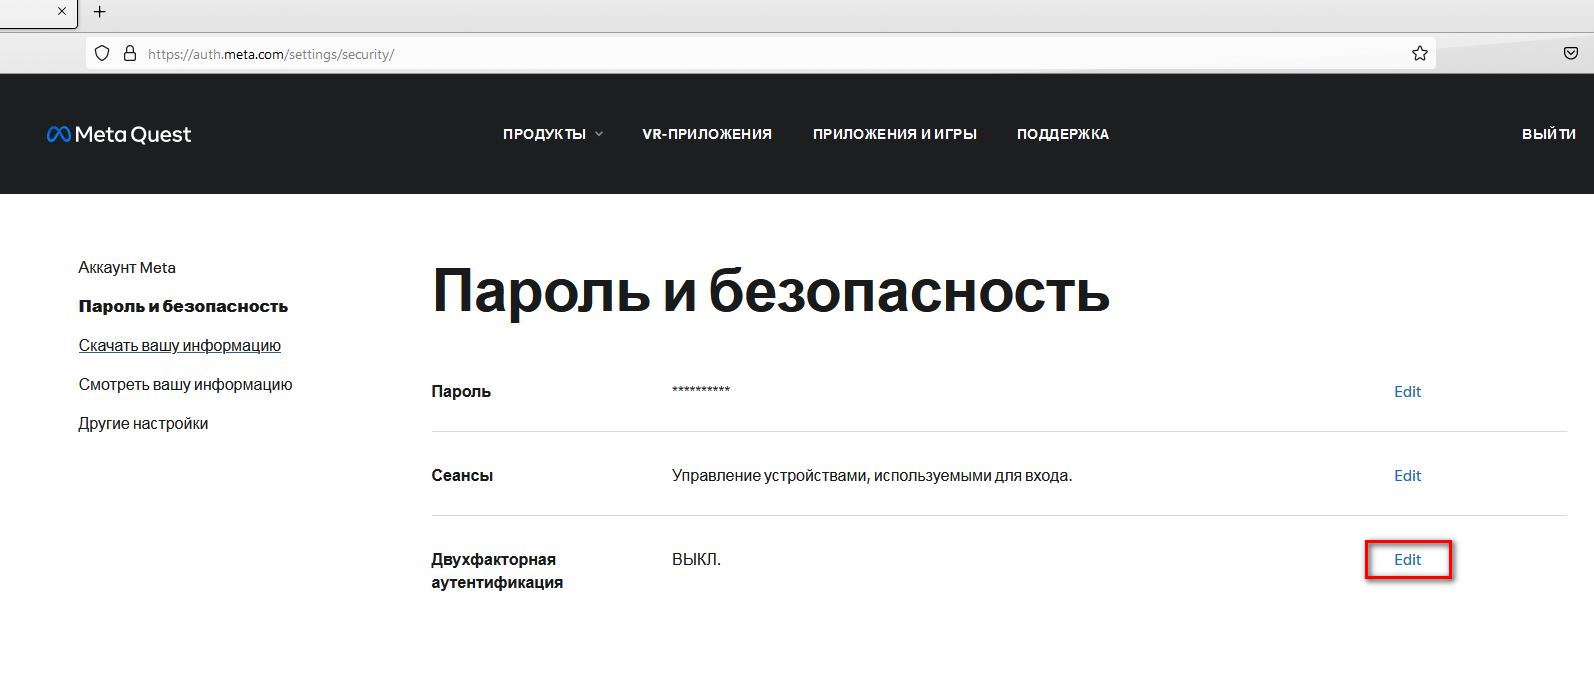
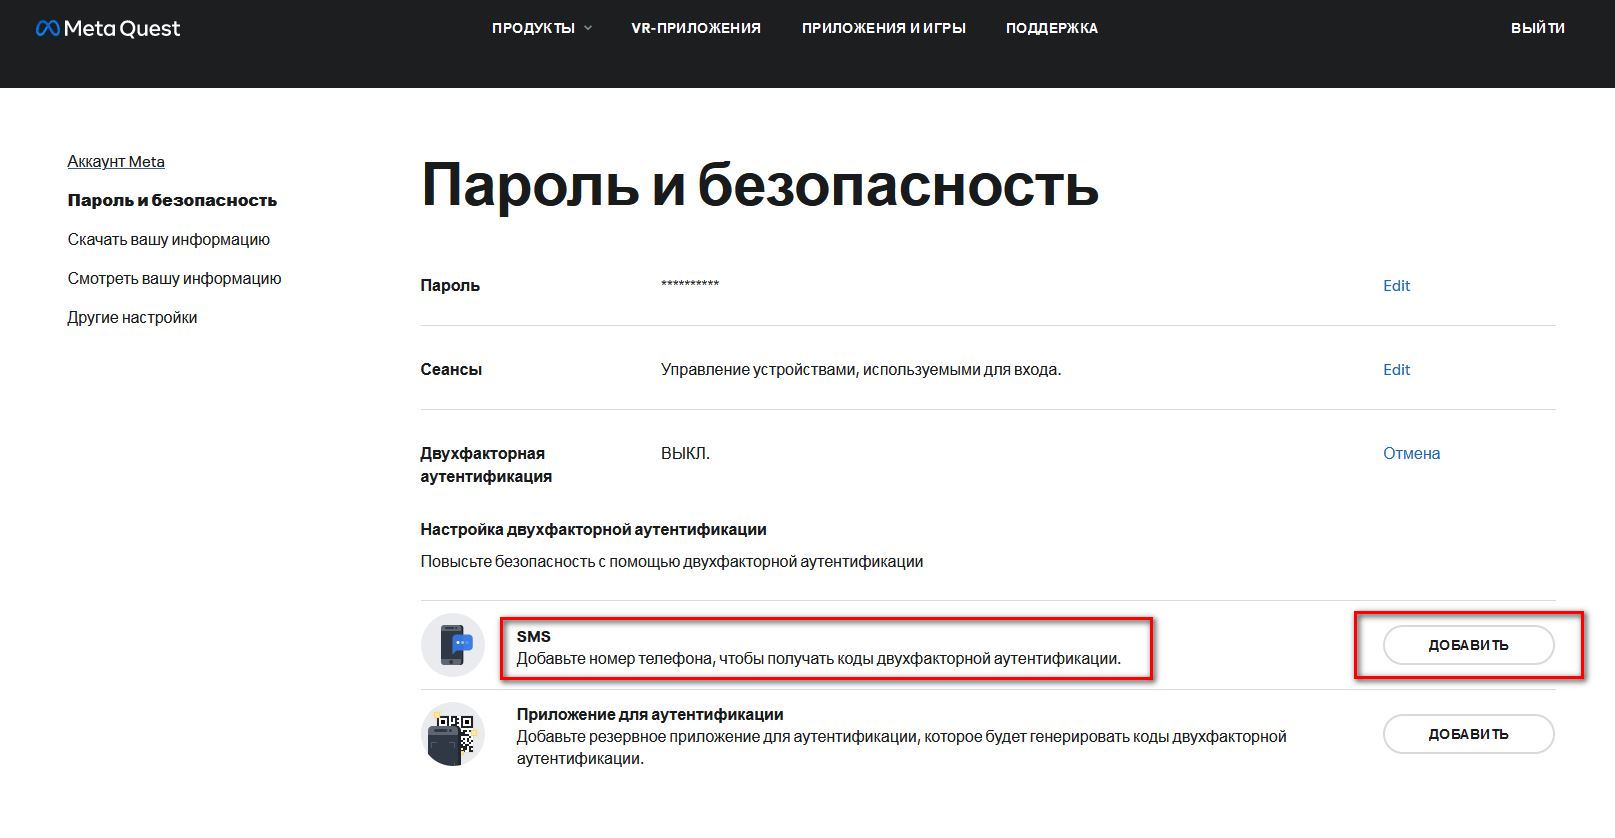
- Далее, поскольку банковские карты из России не работают (с зарубежными все в порядке), настраиваем 2FA — двухфакторную аутентификацию:


- Добавляем номер телефона.
Важно: Приложение-аутентификатор может не дать возможности создать организацию!
Также, если у вас в 2FA настроены одновременно и телефон и приложение — создание организации может быть проблематичным.
Достаточно только телефонного номера

- После добавления номера и нажатия кнопки Отправить будет запрошен код проверки, отправленный на введенный номер.
А если трудности с отправкой сообщения с сайта, используйте вариант с регистрацией турецкой виртуальной карты платежной системы Oldubil, это займет не более 15 минут.

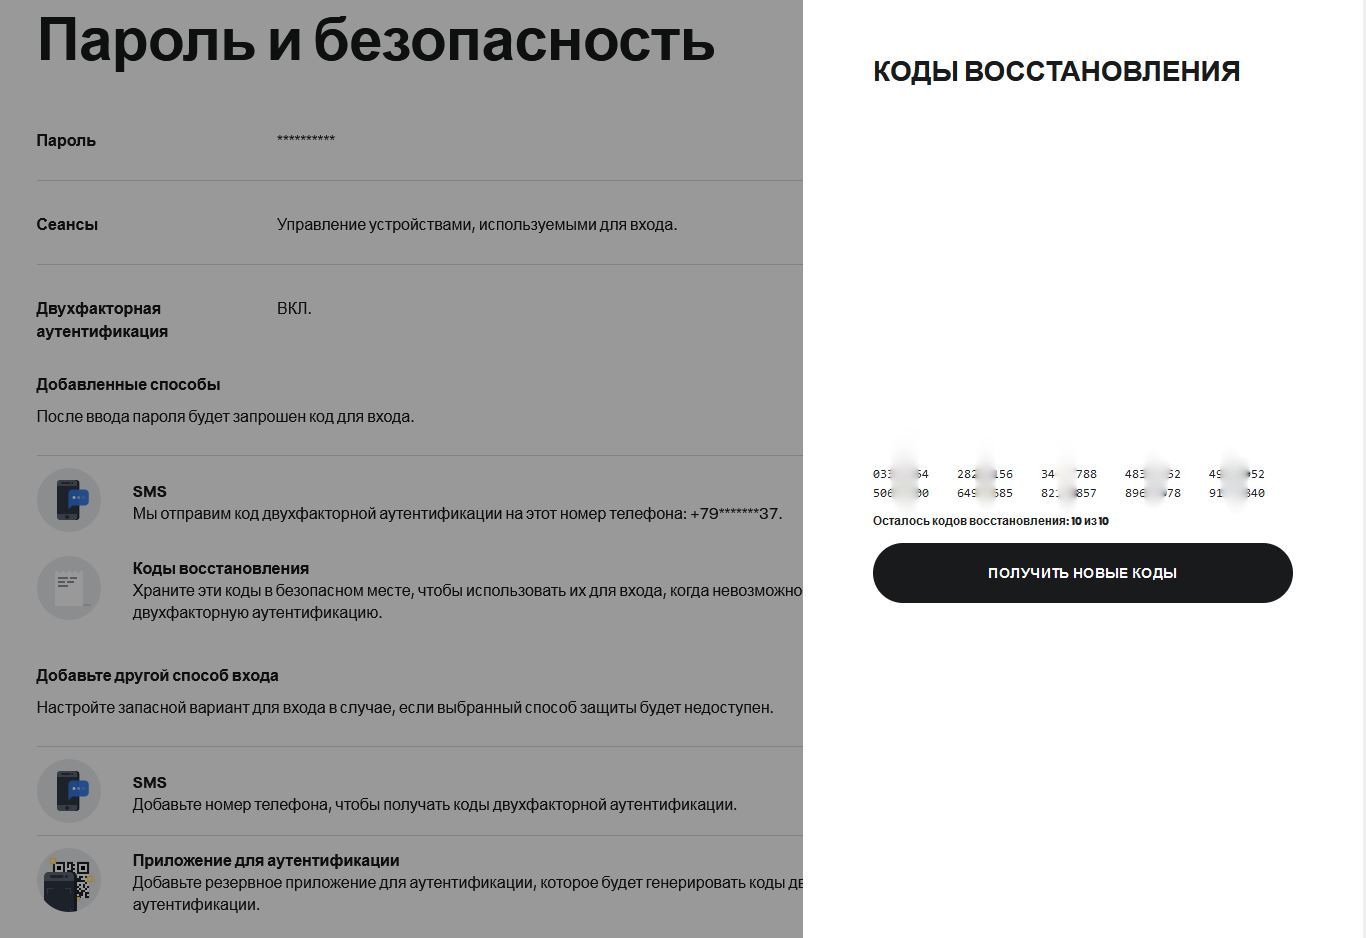
- Важно:
После того как получили код, вводим его и в «подарок» нам дают коды для восстановления.
Обязательно сохраните их, могут пригодиться.
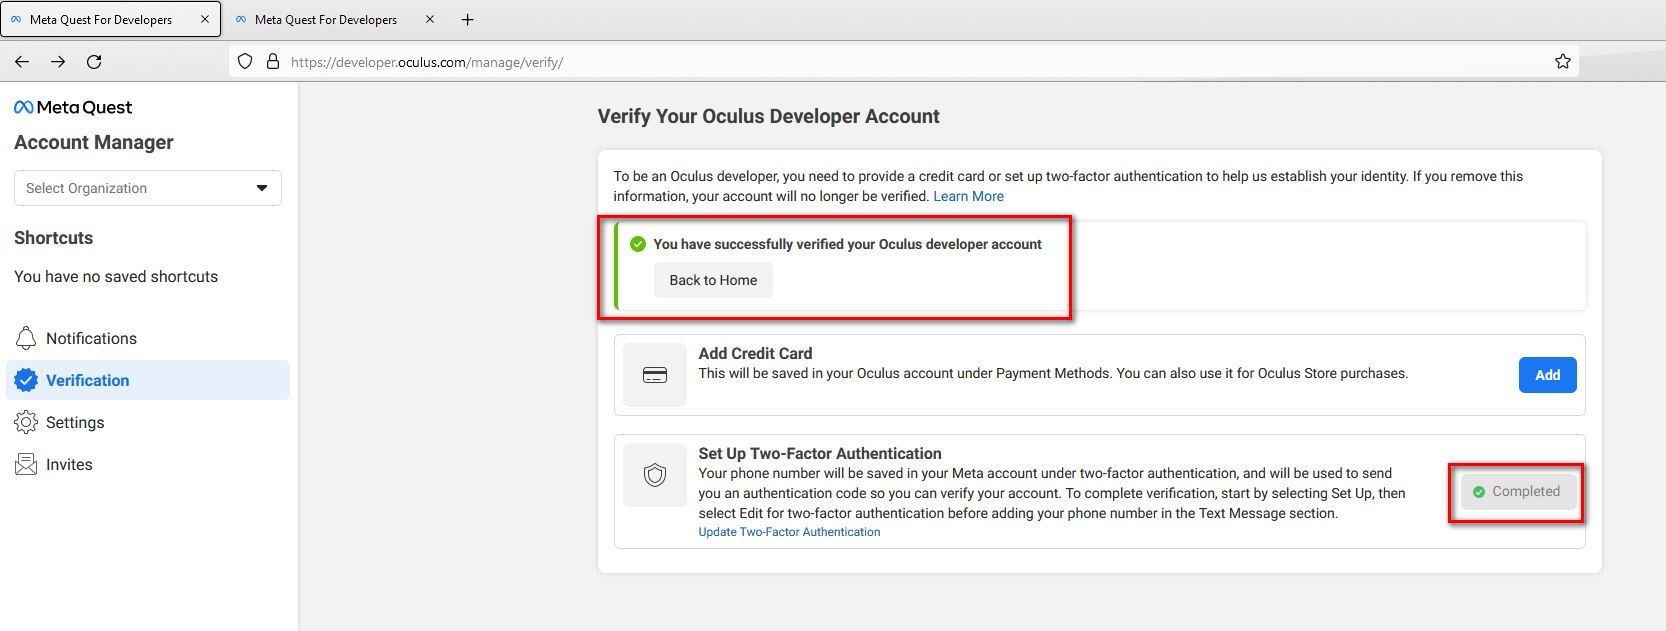
- После этого проверка будет завершена и нам откроется страница с подтвержденным и проверенным Oculus Developer Account.
- Если страница не открылась, в новой вкладке этого же браузера идем по ссылке:
https://developer.oculus.com/manage/verify/ - Там должна быть такая картина:

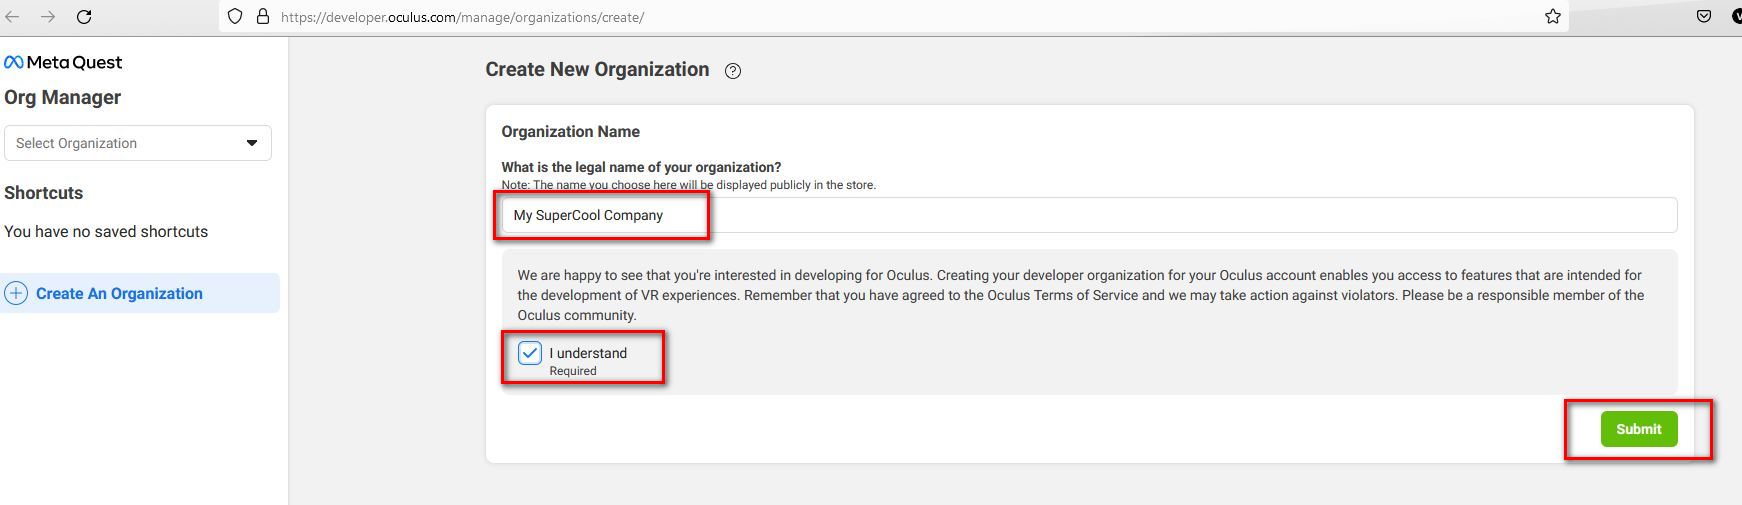
- И самое последнее: снова идем по ссылке из первого пункта, и создаем организацию:
(название организации может быть любым, на латинице)

- Соглашаемся:

- Организация создана:


Можете включать Режим разработчика.
Проcмотрели: 6 839

Доступ к широкому функционалу Oculus Quest 2 понадобится тем людям, которые создают игры и иной контент для HYPERLINK. Чтобы проверить работу программ во время разработки, придётся деактивировать различные функции, необходимые для защиты. Именно поэтому появился режим разработчика. Он позволяет получить доступ к дополнительным функциям, но нужно знать, как в него перейти. Примечательно, что он окажется интересен и тем людям, которые не занимаются созданием игр. Можно будет, к примеру, устанавливать в шлеме программы от сторонних разработчиков, убирать оповещения при подсоединении кабеля, отключать систему защиты. Это возможно, после выполнения ряда действий.
В этой статье пойдёт речь о том, как активировать режим разработчика, и для чего это потребуется.
Чего можно добиться при переходе в режим разработчика?
У пользователя появится возможность устанавливать программы, которые ещё не появились в официальном магазине и не были проверены в Oculus. Помимо приложений, представленных в Oculus Store, есть большое количество иных игр. Они доступны уже сейчас, но человеку придётся провести установку вручную.
Воспользовавшись режимом разработчика, получится лично провести установку программ при подсоединённом кабеле. Для этого можно воспользоваться SideQuest. Это веб-портал, где представлены новые приложения и игры. Они ещё тестируются, но позже появляется в магазине Oculus. Здесь их можно установить значительно раньше.
Будет возможность полностью деактивировать систему защиты, где указаны границы игровой зоны. Данная функция не доступна в обычном режиме по понятным причинам. Как только человек надевает шлем, он больше не видит то, что находится в реальном мире. Будет риск травмироваться.
По своему усмотрению в режиме разработчика можно устранить данное ограничение. Будет убрана защитная система, где указаны границы игровой зоны. Это заинтересует некоторых пользователей.

У людей будет возможность отключить всплывающие окна в шлеме, которые появляются при подсоединении кабеля. Подобные уведомления нередко начинают раздражать. Как только человек подсоединяет кабель, он видит сообщение об активации Oculus Link. Это уведомление можно назвать бесполезным.
В меню разработчика присутствует полезная опция, позволяющая деактивировать данное сообщение. Стоит отметить, что пропадёт доступ к обмену данными с компьютером, но это и не нужно при каждом подсоединении шлема к PC.

Если убрать рассматриваемую опцию, удастся получать доступ к Oculus Link через меню с быстрыми настройками. Чтобы начать обмен данными, можно в любой момент активировать сообщения о подключении кабеля.
Как перейти в режим разработчика?
Чтобы справиться с этой задачей, не придётся тратить силы и время. Потребуется открыть веб-портал Oculus, зайти в свой профиль и открыть статус «Разработчика». Следует написать наименование своей компании (её можно придумать). Придётся внести корректировки в настройки шлема на смартфоне.
Инструкция:
- Следует открыть страницу https://www.meta.com/ и авторизоваться в своем профиле.
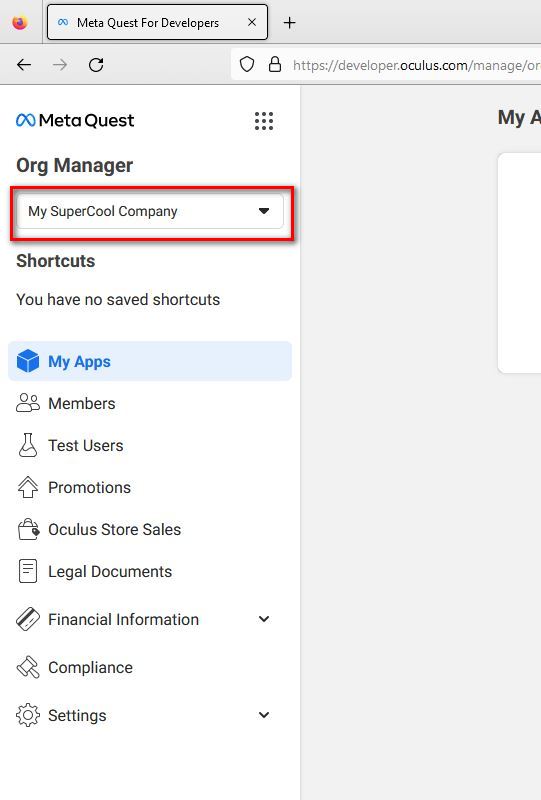
- Далее нужно перейти по адресу https://developer.oculus.com/manage/. Именно здесь нужно выбрать «Создать новую организацию».
- Следует придумать наименование вымыленной компании.
- Теперь потребуется войти в программу Oculus на смартфоне, которая была нужна для первой настройки шлема.
- Потребуется отыскать шлем, а затем подключиться к нему (для этого нужен Wi-Fi).
- Теперь нужно нажать на More Settings, выбрать вариант Developer mode и включить его.
Если всё правильно сделать, в настройках Oculus Quest появится доступ в Меню разработчика.
Рекомендуемые товары
Создателям игр и другого контента для Oculus Quest нужен доступ к более широкому функционалу гарнитуры. Для тестирования программ на этапе разработки необходимо отключение некоторых защитных функций. Учитывая это, Oculus добавили с свой шлем режим разработчика.
Однако, возможности, доступные при активации режима разработчика могут быть полезны и обычным пользователям. Отключение защитной системы, выключение раздражающих оповещений при подключении кабеля, загрузка в шлем сторонних приложений — всё это становиться доступно после некоторых манипуляций.
О том, что нужно сделать для активации меню разработчика и какие возможности можно при этом получить, расскажем в этой статье.
Что станет доступно при включенном режиме разработчика?
Загрузка приложений, которые еще не прошли проверку в Oculus и не доступны в официальном магазине.
Помимо приложений в Oculus Store, существует масса игр и программ, которые доступны к использованию уже сегодня, но только лишь при ручной установке их в VR шлем.
В режиме разработчика можно будет самостоятельно устанавливать приложения при подключенном кабеле и для этого уже есть отличный сервис — SideQuest. Целый сайт с тестовыми играми и приложениями, которые очень часто появляются в официальном магазине Oculus, спустя некоторое время. Но изначально появляются именно здесь.
Более подробно о SideQuest описано в отдельной статье:
- Как загружать сторонние приложения в Oculus Quest. SideQuest
Полное отключение защитной системы с границами игровой зоны.
Давать доступ к такой функции всем пользователям, в Oculus не считают разумным. И это вполне можно понять. Надевая шлем, вы теряете визуальный контакт с реальным миром и это может привести к травмам.

Зато после включения режима разработчика — такое ограничение пропадает и становиться возможным полное отключение защитной системы с границами игровой зоны.
Так же, более подробно об этом уже рассказано в специальной статье на нашем сайте:
- Как отключить границы Guardian в Oculus Quest
Отключение всплывающих окон в шлеме, при подключении USB кабеля.
Каждый раз, при подключении кабеля вам показывается сообщение о доступе к файловой системе и включении Oculus Link. Это довольно сильно раздражает…
В меню разработчика есть специальная опция для отключения таких сообщений. При этом вам станет недоступен обмен данными с ПК, однако такое не требуется при каждом подключении шлема к компьютеру.
При выключении данной опции, доступ к Oculus Link останется через быстрое меню в настройках. А возможность передачи файлов можно активировать, снова включив оповещения о USB подключении.

Как активировать меню разработчика в Oculus Quest?
Данный процесс не займет у вас много времени. Нужно будет зайти на сайт Oculus под своим аккаунтом и перейти в статус “Разработчика”, указав название своей, выдуманной организации. А также изменить некоторые настройки в приложении настройки шлема на телефоне.
Обо всём по порядку:
- Зайдите на сайт oculus.com под своим аккаунтом.
- Перейдите по ссылке dashboard.oculus.com и на этой странице нажмите «Создать новую организацию«
- Придумайте уникальное название своей организации и создайте её.
- Далее откройте приложение Oculus на своем телефоне, которое вы использовали для первичной настройки шлема.
- Найдите свой шлем и подключитесь к нему (шлем должен быть включен и подключен к той же Wi-Fi сети, что и телефон)
- После этого выбираем свой шлем в приложении Oculus и нажимаем More Settings
- В открывшемся меню выбираем Developer mode и активируем его.
Эти манипуляции нужно выполнить всего 1 раз, но после этого вам станет доступно Меню разработчика в настройках Oculus Quest.
Как запустить игру с SideQuest на Oculus Quest 2? Читайте далее руководство.
Вероятно, вы уже слышали об этой сторонней площадке приложений SideQuest для шлема Quest 2. Здесь разработчики публикуют контент, который не одобрен Meta и не прошел по каким-то причинам в основной магазин Oculus Store.
Зачастую авторы выкладывают VR-игры в раннем доступе, чтобы получить обратную связь от пользователей по улучшению контента. И нам же от этого хорошо: на SideQuest вы найдете очень много крутых бесплатных VR-игр и приложений, которые расширят вашу библиотеку контента.
Есть два способа скачивания игр с SideQuest – через телефон или компьютер. Предварительно для обоих способов нужно включить режим разработчика.
Как включить режим разработчика на Oculus Quest 2
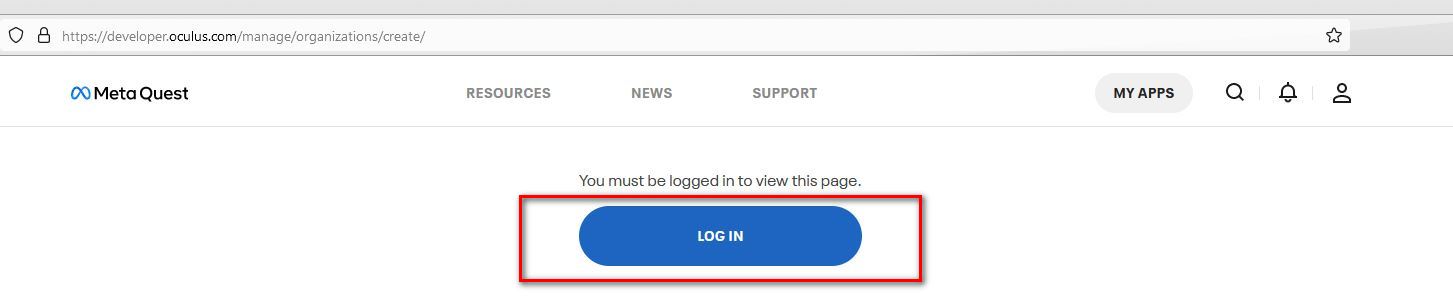
1. Зайдите на сайт Oculus for Developer по ссылке, чтобы зарегистрироваться как разработчик. Нажмите LOG IN и зайдите через свой аккаунт в Facebook. Для авторизации не забудьте включить VPN.
2. Введите название организации, можно придумать любое. Нажмите галочку I understand и далее зеленую кнопку Submit. Еще раз согласитесь с условиями.

3. Возьмите смартфон и откройте приложение Oculus. Ваш шлем Oculus Quest 2 должен быть привязан к смартфону. Если вы не знаете, как привязать шлем к телефону, прочитайте наш предыдущий гайд. Внизу нажмите на иконку «Устройства».
4. Выберите пункт «Режим разработчика» и переключите ползунок на «Вкл».
5. Перезагрузите Oculus Quest 2. Зажимайте около 2-3 секунд кнопку питания и в VR выберите «Перезагрузить».
Способ 1. Запуск SideQuest со смартфона Android
Самый простой способ подходит тем, у кого есть телефон на Android. Пользователи iOS могут его пропустить и сразу переходить к следующему.
Что потребуется:
- Смартфон Android;
- Кабель USB-C, с которым вы сможете подключить телефон к Oculus Quest 2.
1. Скачайте приложение SideQuest с Google Play.
2. Подключите Oculus Quest 2 к смартфону по USB-кабелю.
3. Откройте приложение SideQuest. У вас откроется окно с вопросом: Открыть приложению «SideQuest Installer» доступ к USB-устройству?
Нажмите галочку «Использовать по умолчанию для этого USB-устройства и нажмите ОК.

4. Наденьте Oculus Quest 2. Вы увидите окно: «Разрешить отладку по USB». Нажмите «Всегда разрешать с этого компьютера».
5. Далее в шлеме последует «Разрешить доступ к данным. Подключенные устройства получат доступ к файлам на этой гарнитуре». Нажмите кнопку «Разрешить».
На логотипе в приложении SideQuest должна появиться зеленая точка. Это значит, что шлем подключен, и вы можете начать что-то скачивать с SideQuest непосредственно в шлем. Если зеленой точки нет, попробуйте отключить кабель и повторить все действия из инструкции.

Как скачать игру SideQuest с Android-смартфона
1. Возьмите смартфон и введите в поисковой строке нужную игру. Например, Attack on Quest. Перейдите на страницу игры.
2. Нажмите на розовую кнопку «Download app (Sideload)». Если вы не зарегистрированы в SideQuest, то вас попросят заполнить страну (Россию можно выбирать) и дату рождения.
Способ 2. Установка SideQuest с ПК
Владельцам iOS повезло меньше, поскольку приложения нет в App Store. Для этого способа вам потребуется:
- Любой компьютер или ноутбук. Операционная система и конфигурация ПК не важны.
- USB-кабель для подключения Oculus Quest 2 к ПК. К кабелю и разъемам никаких требований нет, можно взять провод от смартфона.
1. Скачайте приложение SideQuest на компьютер – файл установки в ссылке. Выберите версию для нужной ОС.
2. Установите приложение и запустите его.
3. Подключите Oculus Quest к ПК по кабелю.
4. Наденьте шлем. Вы увидите сообщение «Разрешить отладку по USB?» Нажмите «Всегда разрешать для этого компьютера».
5. Далее появится сообщение «Разрешить доступ к данным. Подключенные устройства получат доступ к файлам на этой гарнитуре». Нажмите кнопку «Разрешить».
Сверху в левом углу в приложении SideQuest отобразится зеленый круг. Это значит, что шлем подключен, и вы можете начать что-то скачивать с SideQuest непосредственно в шлем. Если зеленой точки нет, попробуйте отключить кабель и повторить все действия из инструкции.

Как скачать игру SideQuest с ПК
1. Введите в поиске нужную игру и перейдите на ее страницу. Например, QuestZDoom.
2. Нажмите на розовую кнопку «Download app (Sideload)». Если вы не зарегистрированы в SideQuest, то вас попросят заполнить страну (Россию можно выбирать) и дату рождения.

NEW: Как скачать игру в VR?
С недавнего времени скачивать игры с SideQuest можно прямо в шлеме без подключения Oculus Quest 2 к компьютеру. Как это сделать — рассказываем тут.
Где находятся все игры, скаченные с SideQuest?
После скачивания всех нужных приложений, вы можете отключить устройство от шлема и перейти в виртуальную реальность.
1. Наденьте шлем и откройте меню со всеми приложениями.
2. Перейдите во вкладку «Неизвестные источники».

В этой папке будут храниться все игры, которые вы скачали с SideQuest. Для запуска просто нажмите на папку с игрой.

Надеемся, что наше руководство помогло вам успешно установить SideQuest. Увидимся в будущем!
Подписывайтесь на наш Telegram-канал, чтобы не пропустить ничего интересного.

Ваш Oculus Quest 2, также известный как Meta Quest 2, внезапно отключается? Несмотря на превосходные характеристики, у популярной гарнитуры VR есть свои проблемы, с которыми сталкиваются пользователи. Многие сообщают, что устройство выключается во время использования приложения или игры, что, несомненно, является неприятной проблемой.
Эта ошибка может быть вызвана несколькими причинами, от которых страдают несколько пользователей Oculus. К счастью, можно рассчитывать на некоторые успешные обходные пути для решения этой проблемы. Здесь вы можете узнать больше об ошибке и способах ее устранения.

Любой поклонник игр виртуальной реальности будет разочарован, если устранит неисправность Quest 2, которая несколько раз выключается при использовании. Гарнитура имеет сложную конструкцию, поэтому многие вещи могут пойти не так и вызвать такую проблему.
Начнем с того, что частой причиной многократного отключения Quest 2 может быть ухудшение состояния батареи. Такая проблема может быть связана с недостаточной зарядкой или отсутствием питания на устройстве. Сообщается, что некоторые пользователи сталкивались с проблемой при включении функций Auto Wake и Oculus Guardian.
Какой бы ни была причина, должен быть способ ее решить. Вот возможные обходные пути, чтобы ваш Quest 2 не выключался постоянно во время сеансов виртуальной реальности.
Исправление Oculus/Meta Quest 2, который постоянно выключается
Вы можете попробовать эти обходные пути:< /p> 1) Проверьте, достаточно ли мощности у вашей гарнитуры:Если гарнитура не заряжена должным образом, она, скорее всего, несколько раз выключится, чтобы указать на недостаток. Всегда полностью заряжайте гарнитуру перед ее использованием.
2) Проверьте наличие обновлений прошивки или программного обеспечения на Quest 2: Еще одной возможной причиной обсуждаемой проблемы может быть устаревшее устройство. Выполните все доступные обновления, как указано, и проверьте, сохраняется ли проблема. Вы можете проверить наличие обновлений в разделе Настройки > Система > Обновление программного обеспечения.
3) Отключите автоматический выход из режима сна. Откройте настройки гарнитуры в приложении Oculus. Выберите Мощность а затем отключите автоматическое включение. Проверьте, не исчезнет ли проблема после этого шага.
4) Отключите Guardian: эта функция безопасности должна быть включена, чтобы вы не натыкались на предметы при использовании гарнитуры. Однако некоторые пользователи сообщают о сбое, связанном с этой функцией, который вызывает повторяющуюся ошибку выключения. Попробуйте отключить его, чтобы проверить, сохраняется ли проблема.
Чтобы отключить Guardian, вам необходимо создать учетную запись разработчика на сайте developer.oculus.com. После этого откройте приложение и перейдите к настройкам гарнитуры. Выберите Дополнительные настройки > Расширенные настройки > Включите режим разработчика. В разделе «Параметры разработчика» отключите Guardian.
Повторно включите функцию Guardian, если проблема не устранена после ее отключения.
5) Снимите силиконовую крышку: Сообщается, что многие сталкивались с печально известной проблемой. при использовании силиконового чехла, который Meta предлагает с гарнитурой. Бывает так, что крышка блокирует датчик, что приводит к неисправности Quest 2. Снимите крышку и проверьте, осталась ли проблема.
Если ни один из вышеперечисленных обходных путей не подходит вам, возможно, пришло время отнести Quest 2 в официальный сервисный центр. Проблема может заключаться в аппаратном дефекте, разрядке аккумулятора или программном сбое — в приложении или в самой игре — исключительно в вашем случае. В этом случае лучше всего обратиться за помощью к официальному специалисту.
Вы также можете связаться со службой поддержки Meta через Интернет и подробно рассказать о своих проблемах для индивидуального устранения неполадок.
Доступ к широкому функционалу Oculus Quest 2 понадобится тем людям, которые создают игры и иной контент для HYPERLINK. Чтобы проверить работу программ во время разработки, придётся деактивировать различные функции, необходимые для защиты. Именно поэтому появился режим разработчика. Он позволяет получить доступ к дополнительным функциям, но нужно знать, как в него перейти. Примечательно, что он окажется интересен и тем людям, которые не занимаются созданием игр. Можно будет, к примеру, устанавливать в шлеме программы от сторонних разработчиков, убирать оповещения при подсоединении кабеля, отключать систему защиты. Это возможно, после выполнения ряда действий.
В этой статье пойдёт речь о том, как активировать режим разработчика, и для чего это потребуется.
Чего можно добиться при переходе в режим разработчика?
У пользователя появится возможность устанавливать программы, которые ещё не появились в официальном магазине и не были проверены в Oculus. Помимо приложений, представленных в Oculus Store, есть большое количество иных игр. Они доступны уже сейчас, но человеку придётся провести установку вручную.
Воспользовавшись режимом разработчика, получится лично провести установку программ при подсоединённом кабеле. Для этого можно воспользоваться SideQuest. Это веб-портал, где представлены новые приложения и игры. Они ещё тестируются, но позже появляется в магазине Oculus. Здесь их можно установить значительно раньше.
Будет возможность полностью деактивировать систему защиты, где указаны границы игровой зоны. Данная функция не доступна в обычном режиме по понятным причинам. Как только человек надевает шлем, он больше не видит то, что находится в реальном мире. Будет риск травмироваться.
По своему усмотрению в режиме разработчика можно устранить данное ограничение. Будет убрана защитная система, где указаны границы игровой зоны. Это заинтересует некоторых пользователей.
У людей будет возможность отключить всплывающие окна в шлеме, которые появляются при подсоединении кабеля. Подобные уведомления нередко начинают раздражать. Как только человек подсоединяет кабель, он видит сообщение об активации Oculus Link. Это уведомление можно назвать бесполезным.
В меню разработчика присутствует полезная опция, позволяющая деактивировать данное сообщение. Стоит отметить, что пропадёт доступ к обмену данными с компьютером, но это и не нужно при каждом подсоединении шлема к PC.
Если убрать рассматриваемую опцию, удастся получать доступ к Oculus Link через меню с быстрыми настройками. Чтобы начать обмен данными, можно в любой момент активировать сообщения о подключении кабеля.
Как перейти в режим разработчика?
Чтобы справиться с этой задачей, не придётся тратить силы и время. Потребуется открыть веб-портал Oculus, зайти в свой профиль и открыть статус «Разработчика». Следует написать наименование своей компании (её можно придумать). Придётся внести корректировки в настройки шлема на смартфоне.
Инструкция:
- Следует открыть страницу https://www.meta.com/ и авторизоваться в своем профиле.
- Далее нужно перейти по адресу https://developer.oculus.com/manage/. Именно здесь нужно выбрать «Создать новую организацию».
- Следует придумать наименование вымыленной компании.
- Теперь потребуется войти в программу Oculus на смартфоне, которая была нужна для первой настройки шлема.
- Потребуется отыскать шлем, а затем подключиться к нему (для этого нужен Wi-Fi).
- Теперь нужно нажать на More Settings, выбрать вариант Developer mode и включить его.
Если всё правильно сделать, в настройках Oculus Quest появится доступ в Меню разработчика.
Рекомендуемые товары