
advait@advait-Bravo-15-A4DDR:~$ sudo apt install ubuntu-restricted-extras
Waiting for cache lock: Could not get lock /var/lib/dpkg/lock-frontend. It is held by process 43843 (synaptic)
Waiting for cache lock: Could not get lock /var/lib/dpkg/lock-frontend. It is held by process 43843 (synaptic)
Waiting for cache lock: Could not get lock /var/lib/dpkg/lock-frontend. It is held by process 43843 (synaptic)
Waiting for cache lock: Could not get lock /var/lib/dpkg/lock-frontend. It is held by process 43843 (synaptic)
Waiting for cache lock: Could not get lock /var/lib/dpkg/lock-frontend. It is held by process 43843 (synaptic)
Waiting for cache lock: Could not get lock /var/lib/dpkg/lock-frontend. It is held by process 43843 (synaptic)
![]()
asked Jul 17, 2021 at 11:37
![]()
2
Close synaptic package manager, and the «sudo apt install» command will automatically continue.
You cannot have two different applications that work with the APT package management system open at the same time.
Yes, I very frequently see the same messages as you 
answered Jul 17, 2021 at 12:32
![]()
vanadiumvanadium
80.4k6 gold badges114 silver badges180 bronze badges
0
You can force close the process by using the process id.
If your terminal says,
Waiting for cache lock: Could not get lock /var/lib/dpkg/lock-frontend. It is held by process 43843 (synaptic)
Then, the process id in your case is 43843.
To kill the process use this command,
sudo kill 43843
answered Mar 30, 2022 at 2:17
![]()
ibnɘꟻibnɘꟻ
1434 bronze badges
3
This answer on Unix & Linux SE by Stéphane Chazelas has some useful commands:
If you want to kill processes based on their name or argument list, use pkill.
pkill regexpWill kill all processes whose name matches the regexp extended regular
expression.pkill -f regexpWill kill all processes whose list of arguments (including the first which usually contains the command name) concatenated with spaces matches the regexp.
![]()
Zanna♦
68.9k56 gold badges215 silver badges327 bronze badges
answered Jan 12, 2022 at 14:24
![]()
1
In this tutorial from Linux troubleshooting, we intend to show you How To Fix the Waiting for Cache Lock Error on Ubuntu. I’m trying to install a package on my Ubuntu server, suddenly I am faced with this error: Waiting for cache lock: Could not get lock /var/lib/dpkg/lock-frontend. So I decided to show you how to fix this error if you have this trouble.
- Steps To Fix Waiting for Cache Lock Error on Ubuntu
Steps To Fix Waiting for Cache Lock Error on Ubuntu
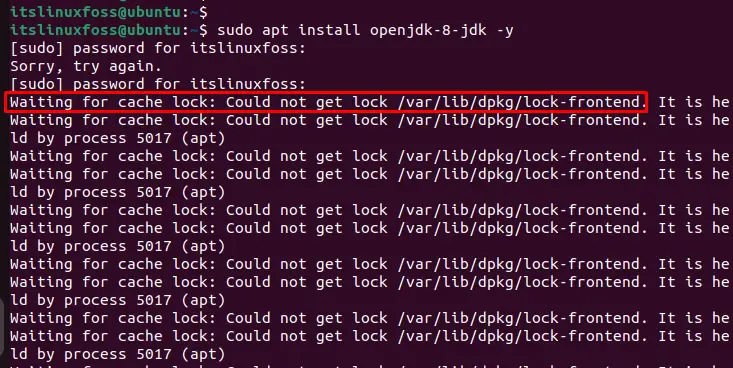
An error “waiting for cache lock ubuntu var/lib/dpkg/lock-frontend” comes across during the installation of the package. The reason this error occurs is that the package manager is already in use.
The package manager executes some configuration files while installing or removing some packages from the operating system. If dpkg does not properly compile required files due to involvement in installing any other application, the error will occur:
Error
Waiting for cache lock: Could not get lock /var/lib/dpkg/lock-frontend. It is held by process 1638 (apt)
Now you can follow one of the solutions below to fix the cache lock error.
Kill The Process ID To Fix the Cache Lock Error on Ubuntu
If you get the waiting for cache lock error, you can force close the process by using the process id.
In my case, the process ID is 1638. To kill the process, you can use the following command:
sudo kill 1638This will resolve your problem.
Waiting for your Running Process
Another way to fix this error is to just wait for the execution of processes that are currently run on Ubuntu. After the completion, you can execute the required command in the terminal.
Remove Lock File on Ubuntu
Another way to tackle the error is possible to remove the “lock-frontend” file that generates the error. These files do not permit change of the system files during the execution of any process (installing or uninstalling packages). To remove the “lock-frontend”, you can use the following command:
sudo rm /var/lib/dpkg/lock-frontendThen, run the command below to apply the changes:
sudo dpkg --configure -aFinally, run the system update:
sudo apt updateThat’s it.
Conclusion
As we said, the reason this error (Waiting for cache lock: Could not get lock /var/lib/dpkg/lock-frontend) occurs is that the package manager is already in use. To fix it, you can wait for the running process, kill the process by ID, or you can remove the lock file on Ubuntu.
Hope you can resolve your problem with these solutions.
You may be like these articles too:
Fix the Linux Time change After Reboot
Troubleshoot DNS in Linux
The dpkg is a utility to download or install any applications from the Debian repository. The “.deb” package is utilized for downloading any application by specifying the package name. An error “waiting for cache lock ubuntu var/lib/dpkg/lock-frontend” comes across during the installation of the package. The purpose of this guide is to explain all possible solutions to encounter the above-mentioned error.
The content of this article is as below:
- Reason: Package Manager dpkg Already Used
- Solution 1: Wait for Running Process
- Solution 2: Kill Running Process
- Solution 3: Remove the Lock File
Reason: Package Manager dpkg Already Used
The package manager executes some configuration files while installing or removing some packages from the operating system. If dpkg does not properly compile required files due to involvement in installing any other application, the error will generate.
Solution 1: Wait for Running Process
One of the best solutions is to just wait for the execution of processes that are currently run. After the completion, you can execute the required command in the terminal.
Solution 2: Kill Running Process
An alternative solution is also available to stop the running process from generating the error. To display the list of the running processes is possible by following the below procedure:
Display Running Process
The “ps” command is utilized to display the running processes by utilizing the “grep” that matches the pattern which is executing with “apt”. For this, execute the below script:
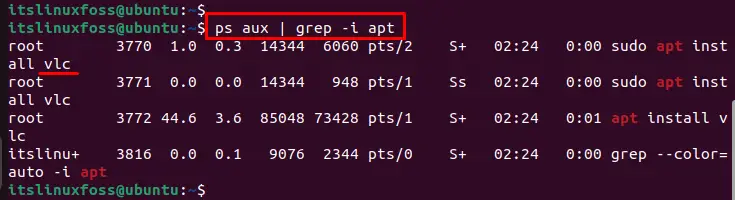
In our case, you can visualize the list of running processes such as “VLC” has process id “3770” that causes the waiting error.
Or
Also, you can find out the running dpkg packages by following the below script:

Or
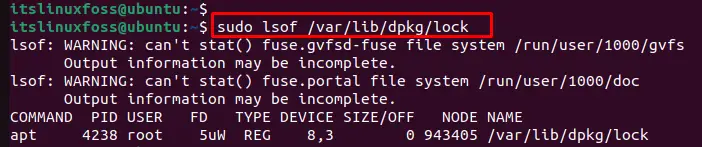
Another way to locate the running process id is possible through the “lsof” command. It displays the list of the open files on which the particular process is running:
$ sudo lsof /var/lib/dpkg/lock
Kill Specific Process via ID
To kill the “vlc” process, the “kill” command is utilized with the “-9” signal that kills the running process whose id is “3770”:

You can verify that the “vlc” process whose id “3770” has been successfully killed as seen below:

Solution 3: Remove the Lock File
One of the solutions to tackle the error is possible to remove the “lock-frontend” file that generates the error. These files do not permit change of the system files during the execution of any process (installing or uninstalling packages). To remove the “lock-frontend”, the “rm” command is utilized specifying the path directory:
$ sudo rm /var/lib/dpkg/lock-frontend

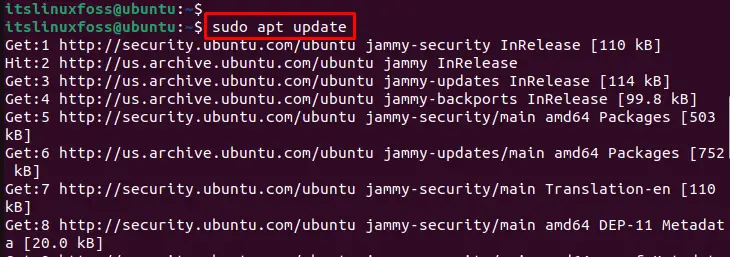
Update Debian Package Manager
To apply the changes, execute the below script for updating the Debian package as below:
$ sudo dpkg --configure -a

After executing the above process, update the repository using the root privilege “sudo” via the below command:
That is all from the guide.
Conclusion
The error “waiting for cache lock ubuntu var/lib/dpkg/lock-frontend” occurs due to the involvement of the dpkg package manager in another running process. It can be resolved by waiting for the executing process or killing the running process via process name or PID. This guide will demonstrate all possible solutions to resolve errors in the Ubuntu operating system.
We explain some steps and methods by which you can quickly fix the Could not get lock /var/lib/dpkg/lock error, which is common in Ubuntu Linux.
The Backstory
It happens more than you can imagine. One fine morning you boot up your shiny Ubuntu Linux and try to install something or upgrade your system. And you run into this error – "Could not get lock /var/lib/dpkg/lock ....".
Reason? The reason is simple and happens with the “Advanced Package Tool (apt)“. The apt package tool is busy doing other operations while you asked it to do something. When apt does some package operation, it creates a lock file to prevent this scenario. As per OS principle, a critical resource should be locked while performing system upgrades/updates so that no other process can access it. This is to prevent any unwanted system behaviour.
There are several variations of this error. But the root cause is the same as what I described above.
Here are some of the errors.
Some Sample Errors
E: Could not get lock /var/lib/dpkg/lock - open (11: Resource temporarily unavailable) E: Unable to lock the administration directory (/var/lib/dpkg/), is another process using it?
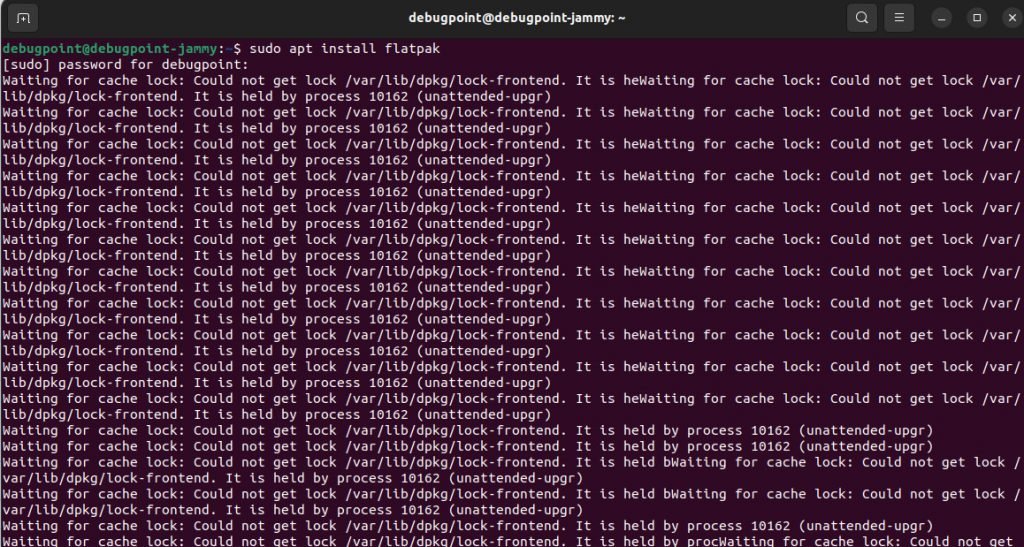
Waiting for cache lock: Could not get lock /var/lib/dpkg/lock-frontend. It is held by process 10162 (unattended-upgr)
E: Could not get lock /var/lib/apt/lists/lock - open (11: Resource temporarily unavailable)
E: Unable to lock directory /var/lib/apt/lists/
Method 1 (recommended)
The safest and recommended way to fix this is to wait. Since the apt is running in the background, it’s better you wait for a few minutes. And then, you can try to perform the operation. Most of the time, it resolves the issue by letting the system take care of it.
Method 2
The second method is to remove the lock file manually. This requires admin privileges. Open a terminal prompt and run the following command to clear the lock.
After you run the command, try to perform the operation which caused the error. And you should be fine.
sudo rm -f /var/lib/dpkg/lock
Method 3
The third method is to manually find the process ID of apt, holding the lock and terminate it.
You can filter all the processes which have apt using the command below.
ps aux | grep apt

Once you do that, you can get the process ID (2nd column in the above image) and kill it using the following sample command.
kill -9 processnumber
Method 4
The fourth method is to disable the daily auto update check timer systemd service to try your operation. To do that, open a terminal and disable the service using the following command.
sudo systemctl stop apt-daily.timer
Now, reboot the system and try your operation. If you are all set and the error is gone, you can enable the timer service again using the following command. And you should be all set.
sudo systemctl start apt-daily.timer
Method 5
The final method is specific to additional errors which come with apt lock file.
If the error contains a line like – “E: Unable to lock directory /var/lib/apt/lists/”, then try the following command.
sudo rm /var/lib/apt/lists/* -vf
Finally, if nothing works, try cleaning the apt archive lock using the following command.
sudo rm -f /var/cache/apt/archives/lock
So, that’s all.
Wrapping Up
In this article, I have explained various ways to resolve this typical error in Ubuntu Linux and related distributions. I am sure any one of the methods should work for you.
Do let me know in the comment box which command worked out for you for the benefit of others.
Recently, I run the command $ sudo apt update in my Ubuntu virtual machine, it runs successfully. But after that, when I run the command $ sudo apt upgrade, it show me the warning message Waiting for cache lock: Could not get lock /var/lib/dpkg/lock-frontend. It is held by process 12827 (unattended-upgr). This article will tell you why it happens and how to fix it.
1. Why The Error Waiting for cache lock: Could not get lock /var/lib/dpkg/lock-frontend happen.
- From the error message, we can see that there is another program ( process ) that is locking the /var/lib/dpkg/lock-frontend file, dpkg means Debian package manager.
- This issue happened when the program just updating Ubuntu to install new software.
- The goal of this locking mechanism is to avoid the Ubuntu system data is changed by two or more programs at the same time which can cause inconsistent errors.
- And the warning message has said, the process’s (that lock this file) id is 12827 and the process name contains unattended-upgr.
- So we can run the command ps -ef | grep unattended-upgr to display the locking process’s detail information.
$ ps -ef | grep unattended-upgr
root         653       1  0 08:10 ?        00:00:00 /usr/bin/python3 /usr/share/unattended-upgrades/unattended-upgrade-shutdown --wait-for-signal
jerry      77529   77475  0 09:09 pts/1    00:00:00 grep --color=auto unattended-upgr
2. How To Fix The Error.
- If the locking process name contains tex like apt.systemd.daily update, what you need to do is just wait for the programm to exit.
- Because Ubuntu has enabled some background processes to update the system automatically to install software updates & security packages.
- You can click the Show Applications icon on Ubuntu bottom left corner, then search the keyword Software & Update to open the Software & Update window, then click the Updates tab to see them.
- If the locking process is not the system updater process, then you can run the command sudo kill <process_id> or sudo kill -9 <process_id> to kill the locking process and then run the command sudo rm <locking_file> to remove the locking files.
- Now you can run your program successfully.
3. How To Fix dpkg: error: dpkg frontend lock is locked by another process.
3.1 Question1.
- When I install google chrome with the command sudo dpkg -i ./google-chrome-stable_current_amd64.deb in Ubuntu, it throws the error dpkg: error: dpkg frontend lock is locked by another process.
- Can you tell me how to fix it?
3.2 Answer1.
- First, you can run the command lsof /var/lib/dpkg/lock-frontend to return the process id which is locking the file.
- Then you can run the command sudo kill -9 PID to kill the process that locks the /var/lib/dpkg/lock-frontend file.
- Then you can run the command sudo rm /var/lib/dpkg/lock-frontend to remove the lock file.
- Now you can run the command sudo dpkg -i ./google-chrome-stable_current_amd64.deb to install the google chrome again.