
This error is directly connected to the Intel’s graphics settings app
by Loredana Harsana
Loredana is a passionate writer with a keen interest in PC software and technology. She started off writing about mobile phones back when Samsung Galaxy S II was… read more
Updated on December 27, 2022
Reviewed by
Alex Serban

After moving away from the corporate work-style, Alex has found rewards in a lifestyle of constant analysis, team coordination and pestering his colleagues. Holding an MCSA Windows Server… read more
- The IGCCTray.exe entry point not found is an error message that is affecting the associated program, not allowing it to run properly.
- To fix this issue quickly, it’s usually enough to fix or reinstall the Intel Graphics Control Panel or Intel Graphics Command Center apps.
- Running an SFC scan is yet another recommended step for solving the issue once and for all.

XINSTALL BY CLICKING THE DOWNLOAD FILE
This software will repair common computer errors, protect you from file loss, malware, hardware failure and optimize your PC for maximum performance. Fix PC issues and remove viruses now in 3 easy steps:
- Download Restoro PC Repair Tool that comes with Patented Technologies (patent available here).
- Click Start Scan to find Windows issues that could be causing PC problems.
- Click Repair All to fix issues affecting your computer’s security and performance
- Restoro has been downloaded by 0 readers this month.
With the help of the software entry point refers your operating system can, for example, launch a video game, making it an essential part of the entire process.
It appears as though one of the most common errors related to DLL files is the igcctray.exe entry point not found, and a faulty DLL file can cause the issue.
Why is the IGCCTray.exe Entry Point Not Found showing up?
The whole error message usually appears when you’re booting the system, and it reads Windows cannot find ‘C:/Program Files/WindowsApps/AppUp.IntelGraphicsExperience_1.100.2727.0_x64_8j3eq9…/IGCCTray.exe’ Make sure you typed the name correctly, and then try again.
As IGCCTray.exe is connected directly to Intel’s Graphics Control Panel or Intel Graphics Command Center apps, it’s not a system file so you shouldn’t worry too much about it. You should also consider these causes:
- Intell app – This issue is most commonly caused by a problem with the Intel app itself so reinstalling it should fix it.
- Malfunctions related to a system error, file corruption, or the result of another system failure.
That being said, let’s fix this problem quickly with the solutions below.
How can I fix the igcctray.exe entry point not found?
1. Repair and reset the Intel app
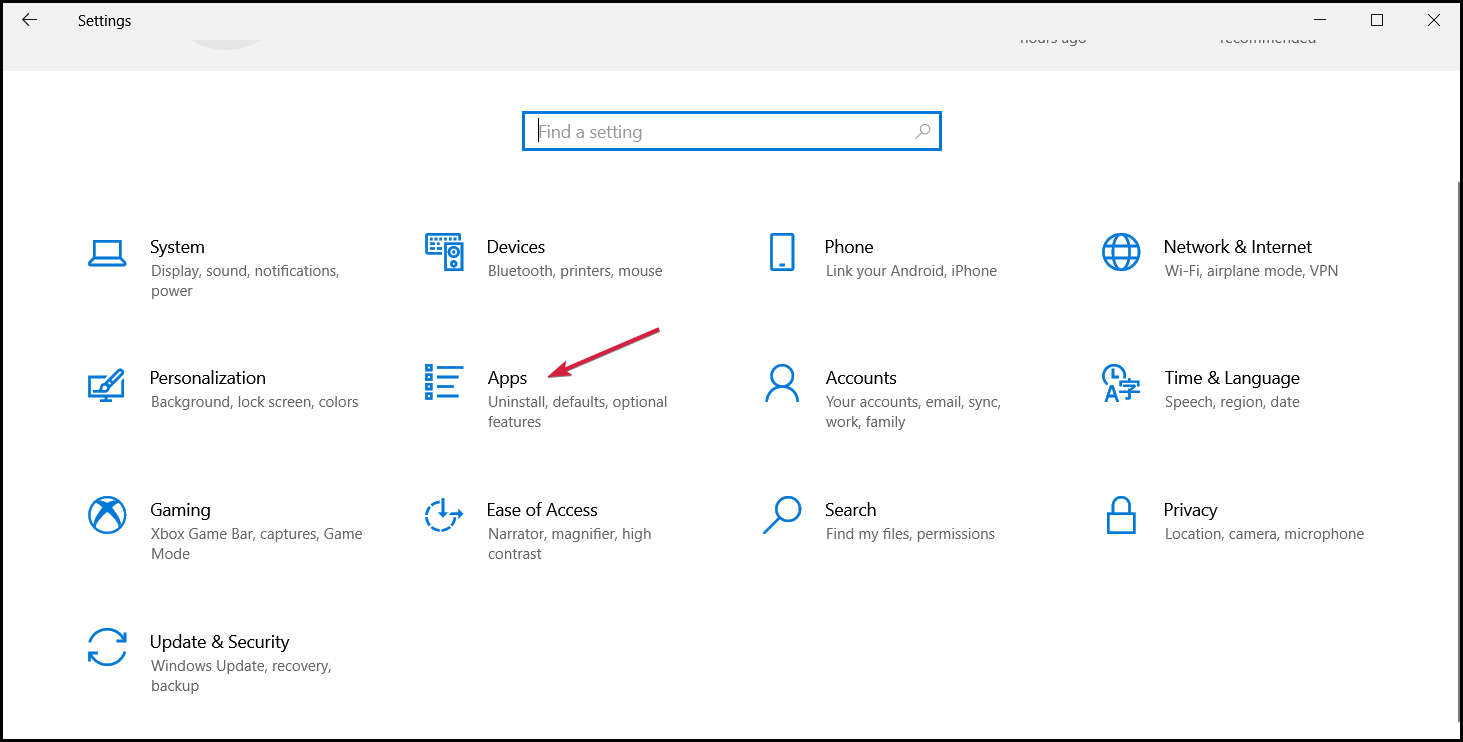
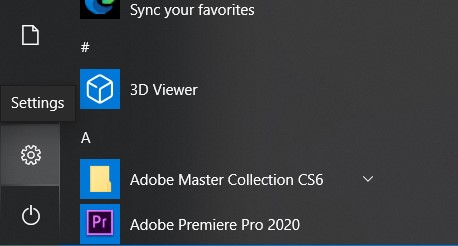
- Click the Start button and go to Settings.
- Select Apps from the menu.

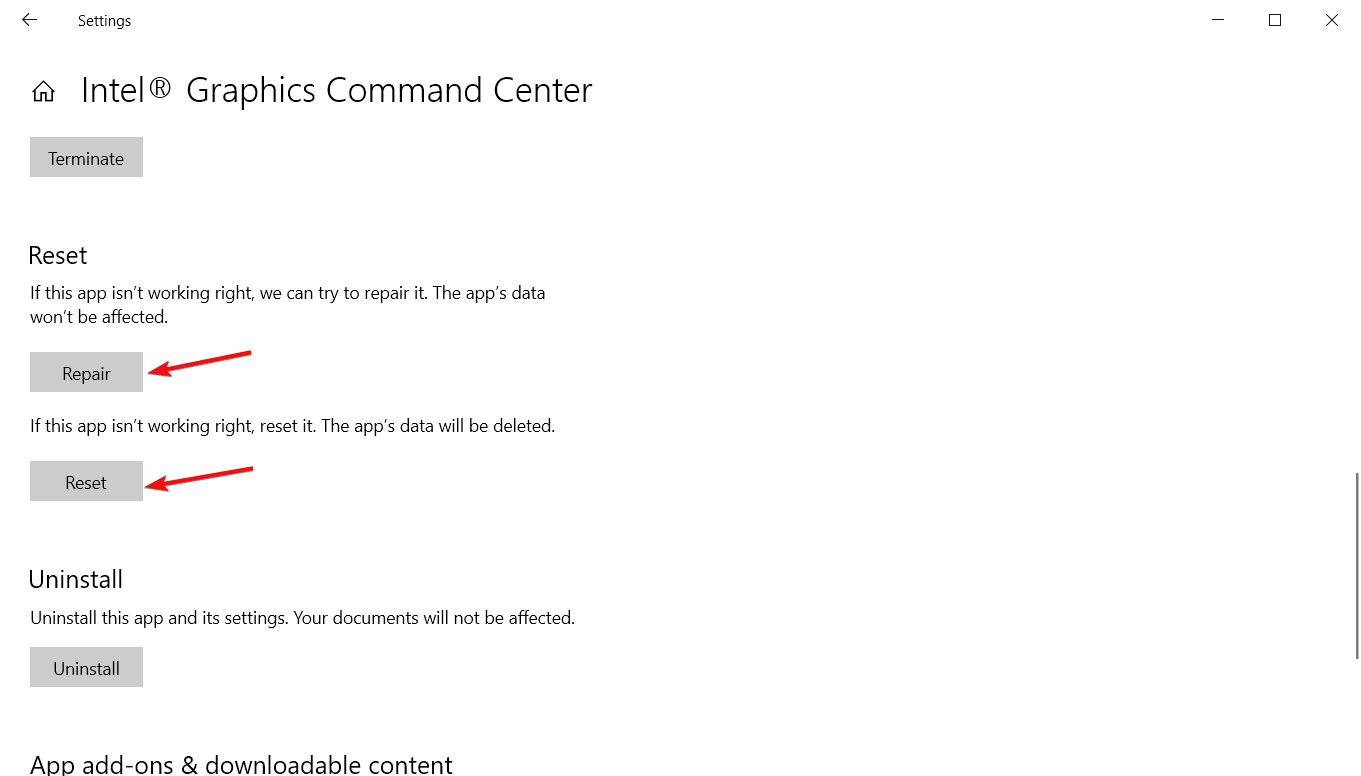
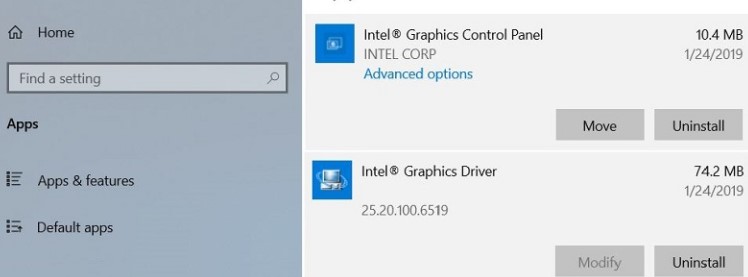
- Select Intel Graphics Control Panel or Intel Graphics Command Center and click on Advanced options.

- Scroll down and hit the Repair button. After the procedure, reboot your PC and if the error persists, repeat the process and click on the Reset button this time.

2. Reinstall the Intel app
- Click the Start button and go to Settings.
- Select Apps from the menu.
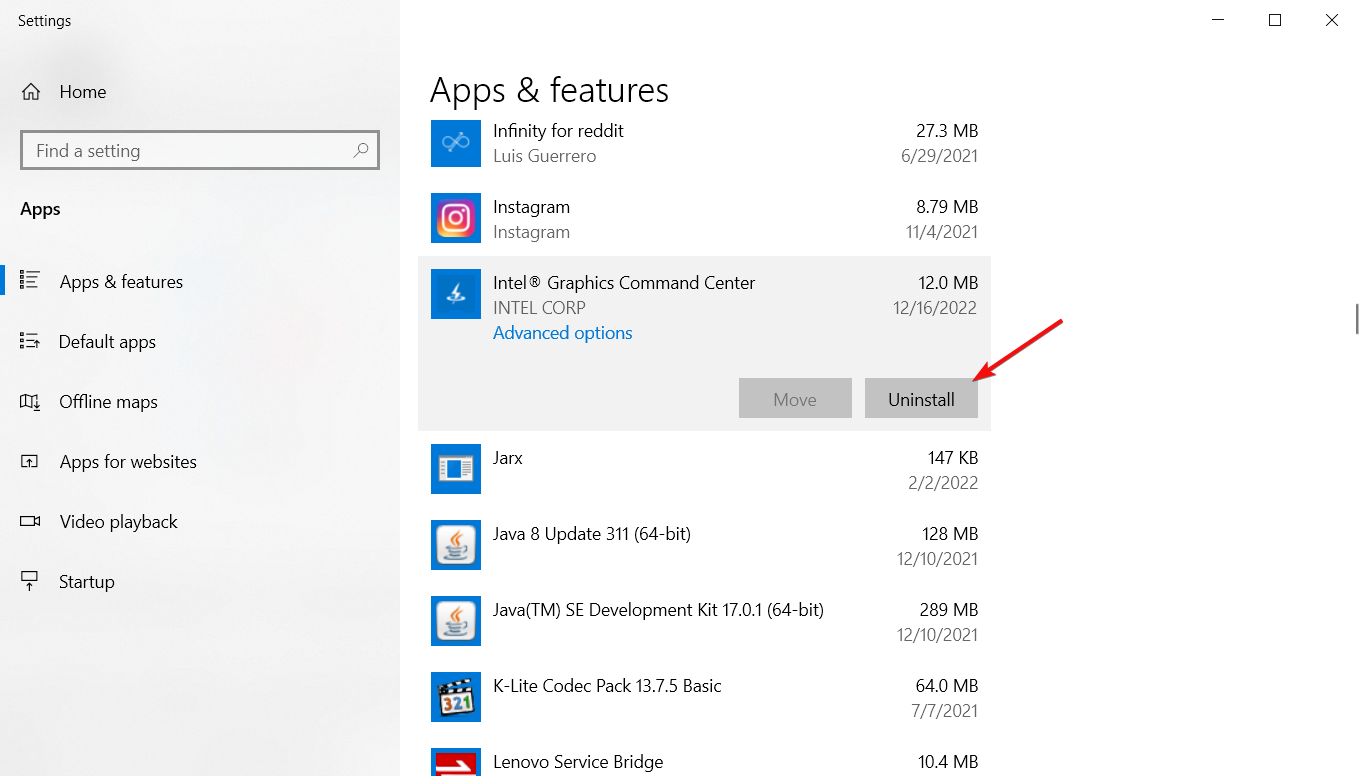
- Select Intel Graphics Control Panel or Intel Graphics Command Center and click on Uninstall.
- After the process is finished, download the app from Microsoft Store: Intel Graphics Control Panel and Intel Graphics Command Center.
- Install the app, reboot your PC and see if the error shows up again.
- Steam Shared Library Locked: 3 Ways to Fix it
- Steam App Configuration Unavailable: How to Fix
- Fix: Phone Link App Notifications Not Working
- Fix: Explorer.exe not Starting on Windows Startup
- Fix: 0x80030001 Error When Copying Files
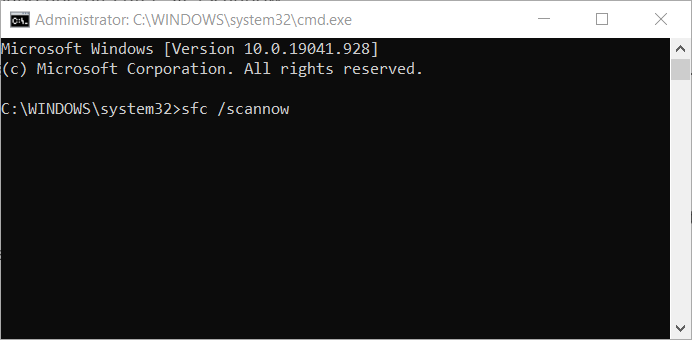
3. Run a System File Checker and DISM scans
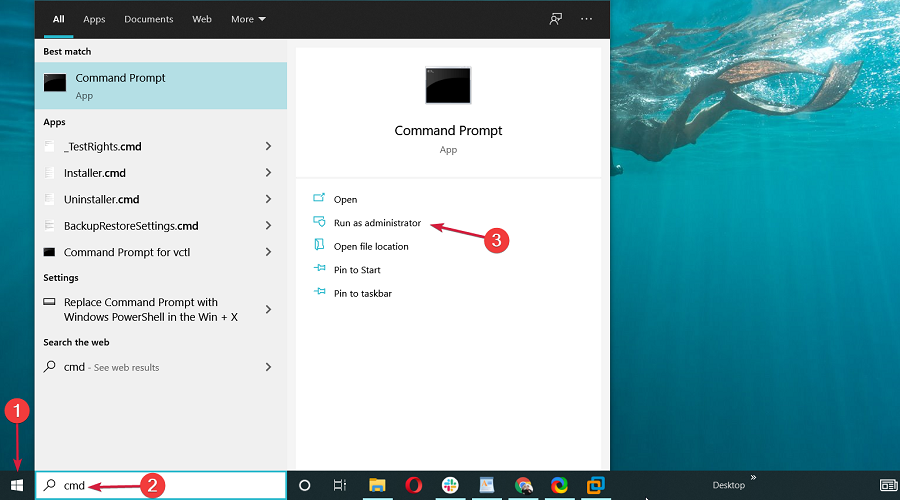
- In the Search bar type cmd and click on Run as administrator to launch Command Prompt with full privileges.

- Type the following command in the Prompt and press Enter:
DISM.exe /Online /Cleanup-image /Restorehealth - Next, write this SFC command and hit Enter:
sfc /scannow
- Wait for the scan to complete and restart your device.
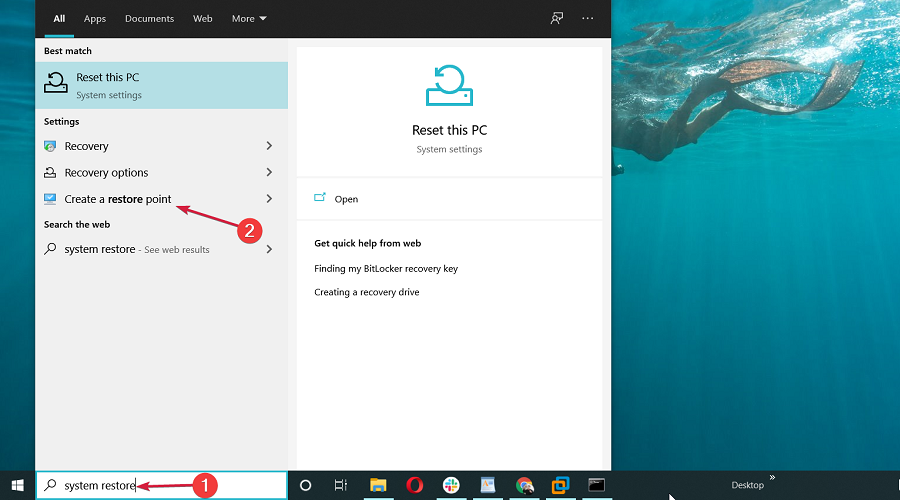
4. Restore your PC to a previous restore point

NOTE
This solution will only work if you have created a system restore point prior to the moment this error started occurring.
- Press the Windows Start button, type in system restore, and click on Create a restore point.
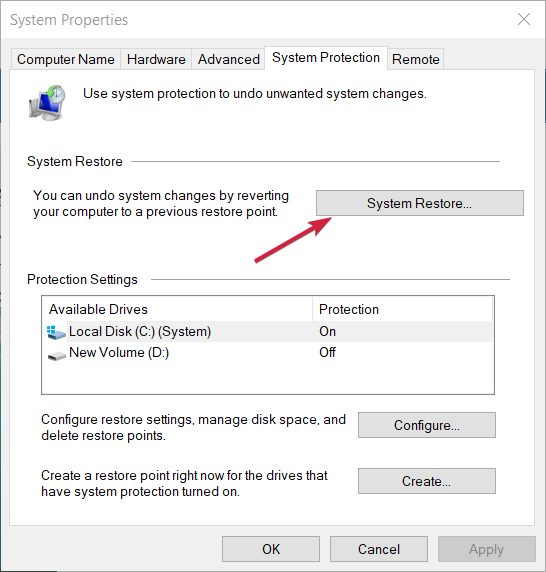
- Next, in the System Properties click on System Restore.

- Click next and select a previous restore point from the displayed list and hit Next.

- Click Finish to confirm your reset point and allow for the process to begin.

Restoring your system to a previous point in time is the last resort you can take to fix this problem.
We remind you that the IGCCTray.exe entry point not found error is not critical for the proper functioning of your PC.
With this last recommendation, we will conclude our list of the steps you need to take in order to solve this error.
If the problem extends to graphics malfunctioning, refer to our guide on how to fix the Intel graphics driver if it keeps failing.
Which one of the solutions presented in this article helped you solve the issue? Don’t hesitate to drop us a message in the dedicated section below.
Still having issues? Fix them with this tool:
SPONSORED
If the advices above haven’t solved your issue, your PC may experience deeper Windows problems. We recommend downloading this PC Repair tool (rated Great on TrustPilot.com) to easily address them. After installation, simply click the Start Scan button and then press on Repair All.
![]()
Содержание
- Security Health Systray в автозагрузке — что это? (Windows 10)
- igfxTray.exe что это такое и как исправить ошибку Windows cannot find igfxTray.exe
- Какие могут быть причины ошибки igfxTray.exe
- Обновление или удаление графических драйверов
- Нахождение и удаление вирусных программ
- Проверка системных файлов на целостность
- Использование утилиты DISM
- Обновление системы Windows
- Исправляем проблемы с igfxTray.exe восстановлением системы
- Что это за процесс igfxtray.exe и за что отвечает?
- О программе
- Как отключить?
- Может ли это быть вирус?
- Удалите эти файлы и папки Windows, чтобы освободить место на диске
- Лучший способ очистки папок Windows: очистка диска
- Что удалить в очистке диска
- 1. Файл гибернации
- 2. Папка Windows Temp
- 3. Корзина
- 4. Папка Windows.old
- 5. Загруженные программные файлы
- 6. LiveKernelReports
- 7. Rempl Папка
- Какие папки Windows вы удаляете?
- Процесс Поиск (SearchUI.exe) грузит систему Windows 10? Как исправить
- Высокая загрузка процессора из-за процесса Поиск (SearchUI.exe)
- Как исправить высокую нагрузку процесса Поиск (SearchUI.exe)
- Официальное исправление от Microsoft
- Параметр «Отключить интернет-поиска (Bing) для локального поиска»
- Удаление обновления KB4512941
Security Health Systray в автозагрузке — что это? (Windows 10)
 Сразу коротко ответ: процесс, отвечающий за отображение значка встроенного антивируса Windows Defender.
Папка запуска процесса:
Однако автозагрузка может содержать похожий компонент — Security Health, функционирующий под процессом MSASCuiL.exe, папка запуска которого:
C:Program FilesWindows Defender
Запись SecurityHealth можно также обнаружить используя утилиту оптимизации CCleaner:

Security Health Systray в автозагрузке — можно отключить? Данный компонент отвечает за отображение примерно такой иконки в системном трее:

Данная иконка необходима для быстрого доступа к некоторым функциям защитника, например:
Поэтому отключение вряд ли вызовет серьезные проблемы. Можете попробовать, если что — включите обратно.
Найдена информация, что компонент Security Health Systray — имеет другое название, а именно Windows Security notification icon, значок которого можно отключить из окна Параметры:

PS: чтобы найти данные параметры, запустите окно Параметры (зажмите Win + i), в поисковой строке напишите фразу Выберите значки, отображаемые в панели задач, далее деактивируйте ползунок Всегда отображать все значки и вручную отключите необходимый компонент.
Надеюсь данная информация оказалась полезной. Удачи.
Источник
igfxTray.exe что это такое и как исправить ошибку Windows cannot find igfxTray.exe
В диспетчере задач находится большое количество системных процессов, отвечающих за оптимальную работу Windows. igfxTray.exe является важным процессом, хотя и не системным, но за что он отвечает и почему возникает ошибка Windows cannot find «igfxTray.exe». Make you typed the name correctly, and the then try again? В этом мы сегодня и разберемся.
В диспетчере данный процесс можно увидеть с иконкой, относящийся к модулю графического ускорителя, поставляемый с видеокартами NVIDIA и драйверами для Intel. С помощью данного приложения возможно управлять настройками графики: изменение разрешение экрана, глубины цвета и прочие параметры. Если после запуска компьютера или в любой другой момент возникает ошибка, «Windows cannot find ‘igfxTray.exe’. Make you typed the name correctly, and the then try again», значит что-то не так с драйверами или иными графическими процессами.
Есть еще одна интересная про проблемы с igfxTray, вот как она называется – IGFXHK MODULE прекращена работа, что делать?
Какие могут быть причины ошибки igfxTray.exe
Самыми основными причинами появления ошибок с процессом igfxTray являются:
Возможно есть и другие причины, выявление которых проводится с помощью тщательного анализа.
В переводе на русский, ошибка выглядит следующим образом – «Windows не удается найти igfxTray.exe». Убедитесь, что вы набрали имя правильно, а затем повторите попытку». Примерно так.
В Windows XP появляется подобная ошибка – igfxTray Module has stopped working. A problem caused the program to stop working correctly. Windows will close the program and notify you if a solution is available.
Обычно ошибку можно исправить путем переустановки ПО от Intel, но что, если причина не в этом. Например, в системе могли оказаться вирусы, которые заразили файлы графической программы, тогда нужно искать вредоносные программы с помощью нескольких антивирусных средств. Это довольно сложно, когда вирус скрывается под видом процесса, в нашем случае igfxTray.
Симптомы проблемы очевидны – потеря производительности ПК и появление других ошибок и синих или черных экранов смерти. Некоторые программы, которые требуют графического процессора могут отказываться запускаться, возникновение рекламных окон и прочих непонятных действий со стороны системы.
Ниже будут представлены методы, позволяющие избавиться от ошибки, связанной с процессом igfxTray.exe.
Обновление или удаление графических драйверов
В данном случае нам необходимо избавиться от всех графических драйверов, а потом переустановить их. Дело в том, что Windows непредсказуемая система и в любой прекрасный момент может вылезти ошибка, причем не всегда в этом будет виноват пользователь. Проблемы с драйверами могут быть в их устаревших компонентах, а значит приступим к действиям.
Также данные драйвера можно удалить с помощью деинсталляторов, которые полностью очистят систему от остатков данного ПО. Используем для этого Uninstall Tool, CCleaner, Revo Uninstall или другие. (Как удалить программу с компьютера с помощью утилит).
Еще обновление драйверов возможно через Центр обновления системы или автоматических установщиков драйверов, например, DriverPack Solution. Но нужно быть осторожным, так как эти установщики иногда устанавливают не то что нужно.
Нахождение и удаление вирусных программ
Чтобы пользователю избавиться от ошибки igfxTray.exe, нужно понимать, что вирусы так же могли наделать много нехороших дел. Поэтому запаситесь несколькими специальными утилитами для проверки ПК на вирусы. К таким инструментам относятся:
Встроенным антивирусом также проверяем систему полностью.
Думаю, объяснять, как использовать данные инструменты не нужно. Все ссылки уже даны, просто перейдите по ним и там будет сказано об их использовании. Там все довольно просто.
Чтобы в будущем не возникло проблем с вирусами необходимо выполнять ряд условий:
Проверка системных файлов на целостность
Чаще проверяйте компьютер указанным ниже инструментом, процесс этот быстрый, но если найдутся повреждённые системные файлы, то утилита их восстановить. Ждать незачем, в противном случае может возникнуть много проблем.
Использование утилиты DISM
Эта утилита схожа с предыдущей, но делает другие действия, а именно – восстановление образа системы.
Обновление системы Windows
Как бы банально это не звучало, но даже ваше нынешнее обновление может содержать недоработки, для этого и существуют новые апдейты системы, чтобы эти ошибки исправлять. Если попробовать обновить системы, то ошибка с igfxTray.exe может исчезнуть.
Исправляем проблемы с igfxTray.exe восстановлением системы
Многие программные неисправности решаются восстановлением системы. Данная функция должна быть у вас включена, а если нет, значит ничего не выйдет.
По точке восстановления можно вернуться к тому моменту, когда Windows нормально работала, может это было вчера или на прошлой неделе. Стоит иметь в виду, что некоторые файлы, которые вы скачали недавно – пропадут. Поэтому перенесите их из системного диска и с рабочего стола на какой-нибудь внешний носитель.
Если опция горит серым, значит возможность восстановления у вас отключена.
Итак, мы разузнали, почему появляется ошибка Windows cannot find «igfxTray.exe». Make you typed the name correctly, and the then try again и как это дело исправить. Данный процесс не является вирусом, но сам вирус может под него замаскироваться, поэтому стоит быть внимательным и чаще проверять систему на вредоносное ПО. Если не знаете, где найти процесс, повторюсь – в диспетчере задач или аналогичном ПО его можно увидеть.
Если вы разобрались с проблемой, обязательно делитесь материалом с друзьями в социальных сетях.
Источник
Что это за процесс igfxtray.exe и за что отвечает?

Просматривая процессы Windows 10 в диспетчере задач можно заметить некий igfxtray.exe. Что это за исполняемое приложение и какие функции выполняет, читайте в рамках данной статьи.
О программе

Процесс igfxtray.exe отвечает за вывод иконки Intel Graphics на панель задач в системный трей. Программа представлена издателем Intel Corporation и не относится к системным. Также она взаимодействует с графическим драйвером чипсета серии Intel 81x и позволяет настраивать разрешение экрана, глубину цвета, контрастность и т.д. Установлена на устройства работающие с интегрированной графикой.

Процесс igfxtray.exe Module не требователен к системным ресурсам. Остановка процесса приведет к обычному закрытию программы и значок из трея исчезнет. Программа может устанавливаться как рекомендуемый софт в Центре обновления Windows или отдельно с сайта производителя, по желанию пользователя.

Как отключить?
Чтобы программа не запускалась при загрузке Windows, следует убрать ее из автозагрузки:

С последующей перезагрузкой ПК, программа не запустится в трее.
Может ли это быть вирус?
Да! Вирусы могут маскироваться под именем известных процессов. Чтобы определить, заражен ли процесс или нет:

Чтобы предотвратить заражение ПК в дальнейшем:
Источник
Удалите эти файлы и папки Windows, чтобы освободить место на диске
Windows содержит множество файлов и папок, которые вам не нужны.
Давайте рассмотрим некоторые файлы и папки Windows, которые можно безопасно удалить, чтобы освободить место на диске, и узнать, почему вы можете стереть их. Обратите внимание, что некоторые из этих папок находятся в защищенных местах, поэтому будьте осторожны при их удалении.
Лучший способ очистки папок Windows: очистка диска

Прежде чем мы рассмотрим несколько файлов и папок Windows, которые вы можете безопасно удалить, вы должны знать, что удаление их вручную — не лучший способ сделать это.
Помимо того, что вы можете тратить время на это самостоятельно, когда вы можете автоматизировать процесс, безопаснее позволить инструменту очистки диска выполнить эту очистку за вас. Это позволяет избежать случайного удаления файлов, которые вам нужны, или работы с неправильными папками.
Средство очистки диска Windows помогает вам освободить дисковое пространство на вашем компьютере и является простым в использовании. Вы можете открыть его, выполнив поиск Очистка диска в меню «Пуск».
Позвольте ему сканировать, и вы увидите несколько категорий файлов, которые вы можете стереть. Для получения дополнительных параметров выберите Очистить системные файлы, чтобы получить права администратора.
Если вам кажется, что это слишком старая школа, вы можете перейти в « Настройки»> «Система»> «Хранилище», чтобы попробовать более новый инструмент очистки хранилища в Windows 10. Нажмите Free up space сейчас, чтобы использовать его.

Что удалить в очистке диска
Это не полное руководство по инструменту очистки диска, поэтому мы не будем рассматривать все варианты, которые он предлагает. Тем не менее, следующие несколько опций являются обязательными (не забудьте выбрать Очистить системные файлы, чтобы увидеть их все):
1. Файл гибернации

Расположение: C: hiberfil.sys
Режим гибернации на вашем компьютере аналогичен спящему режиму, за исключением того, что система сохраняет всю открытую работу на жестком диске, а затем выключается. Вы можете извлечь аккумулятор из вашего ноутбука и оставаться в спящем режиме в течение недели, а затем начать работу и оставаться там, где вы остановились.
Конечно, это занимает место, для чего предназначен файл гибернации.
Это все, что нужно, чтобы отключить спящий режим. Windows должна удалить hiberfil.sys самостоятельно, когда вы это сделаете; не стесняйтесь удалить его, если нет. Обратите внимание, что отключение режима гибернации также не позволяет вашему компьютеру использовать быстрый запуск в Windows 10. Однако это не большая потеря, поскольку известно, что эта функция вызывает проблемы с загрузкой.
2. Папка Windows Temp

Расположение: C: Windows Temp
Как можно догадаться из названия, временные файлы Windows не важны за пределами их первоначального использования. Файлы и папки внутри содержат информацию, которую Windows использовала когда-то, но больше не нужна.
Помимо очистки с помощью Disk Cleanup. Вы можете посетить эту папку и удалить ее содержимое, нажав Ctrl + A выбрать все, а затем нажмите удалить. Когда вы делаете это, Windows может выдать вам ошибку о паре элементов — просто проигнорируйте их и очистите все остальное.
3. Корзина
Расположение: shell:RecycleBinFolder
Технически, Корзина — это не папка. И хотя это может быть очевидным для некоторых, мы включаем это в случае, если некоторые читатели не знают.
Каждый раз, когда вы удаляете файл в своей системе, Windows отправляет его в корзину. Это особое место, где удаленные файлы хранятся до тех пор, пока вы не удалите их навсегда или не восстановите. Если вы не помните, чтобы регулярно очищать корзину, там может быть несколько гигабайт старых данных.
Вы можете получить доступ к корзине через ярлык на рабочем столе. Если у вас его нет, введите shell: RecycleBinFolder в панели навигации Проводника. Оказавшись здесь, вы увидите все, что вы недавно удалили.
Вы можете щелкнуть правой кнопкой мыши по отдельным элементам и выбрать « Удалить», чтобы навсегда удалить их, или « Восстановить», чтобы отправить файл обратно в исходное местоположение. На ленте выше вы увидите кнопки для очистки корзины и восстановления всех элементов.

С помощью этого параметра Windows пропускает корзину и удаляет элементы без возможности восстановления при их удалении. Мы не рекомендуем этого, потому что корзина дает вам второй шанс в случае ошибки.
4. Папка Windows.old
Расположение: C: Windows.old
При необходимости вы можете использовать эту папку для отката к предыдущей версии Windows. Вы также можете открыть папку и взять несколько ненужных файлов, если вам нужно.
Windows автоматически удаляет эту папку через короткое время, но вы можете удалить ее самостоятельно, если вам не хватает места. Он не удалится, если вы попытаетесь пройти через проводник, поэтому введите « Очистка диска» в меню «Пуск» и запустите инструмент, как описано ранее.
Нажмите Очистить системные файлы в нижней части окна и позвольте утилите выполнить повторное сканирование. После этого найдите предыдущие установки Windows и удалите их с помощью этого инструмента.
Очевидно, что удаление этих файлов затрудняет восстановление данных в случае возникновения проблемы. После обновления до Windows (даже до последней версии Windows 10) мы советуем вам сохранять эту папку, пока вы не убедитесь, что все работает правильно.
5. Загруженные программные файлы
Расположение: C: Windows Загруженные программные файлы
Название этой папки немного сбивает с толку. На самом деле она содержит файлы, используемые элементами управления ActiveX Internet Explorer и апплетами Java, поэтому, если вы используете одну и ту же функцию на веб-сайте, вам не нужно загружать ее дважды.
По сути, эта папка бесполезна. ActiveX является чрезвычайно устаревшей технологией, которая полна дыр в безопасности, и Java редко используется в современной сети. ActiveX является эксклюзивным для Internet Explorer, и вы, вероятно, встретите его только на древних корпоративных сайтах.
Большинство домашних пользователей больше не используют IE, не говоря уже о ActiveX. Ваша папка « Загруженные программные файлы » может быть уже пустой, но вы можете очистить ее содержимое, если это не так.
6. LiveKernelReports

Место нахождения: C: Windows LiveKernelReports
Расположение: C: Windows LiveKernelReports
Любые огромные файлы, заканчивающиеся расширением DMP в этой папке, можно безопасно удалить. Как и в приведенных выше местах, мы рекомендуем использовать очистку диска вместо удаления файла самостоятельно.
Если происходит сбой Windows или возникают другие серьезные проблемы с компьютером, не удаляйте эти файлы дампа сразу. Вы можете использовать такую программу, как WhoCrashed, чтобы получить от них больше информации.
7. Rempl Папка
Расположение: C:Program Filesrempl
Хотя папка Rempl невелика, вы можете удивиться, увидев ее в своей системе. Он содержит несколько небольших файлов, и вы можете даже заметить несколько процессов диспетчера задач, связанных с ним.
Эта папка подключена к доставке обновлений Windows 10. Он включает в себя « улучшения надежности», которые помогут сделать обновления Windows 10 гладкими и устранить проблемы совместимости.
Так вы можете удалить папку Rempl? По-видимому, никаких негативных последствий от этого нет. Тем не менее, поскольку он занимает всего несколько мегабайт и может сделать обновления Windows менее сложными, лучше его оставить.
Какие папки Windows вы удаляете?
Требуется немного осмотреться, но Windows содержит множество ненужных файлов и папок, таких как папки «Фото» и «Сохраненные изображения». Помните, что ваш компьютер неплохо поддерживает себя в чистоте, поэтому вам не нужно навязчиво удалять содержимое этих папок, если у вас достаточно места на диске.
Источник
Процесс Поиск (SearchUI.exe) грузит систему Windows 10? Как исправить
Обновлено: 10.09.2019. Проблема высокой загрузки ЦП исправлена в обновлении KB4515384 (Build 18362.356) для Windows 10, версия 1903.
Обновлено: 03.09.2019. 3 сентября Microsoft сообщила, что в настоящее время расследует проблему высокой загрузки процессора, вызванной процессом «Поиск» (SearchUI.exe) после установки необязательного обновления KB4512941 от 30 августа.
Компания Microsoft 30 августа выпустила обновление KB4512941 (Build 18362.329) для Windows 10, версия 1903, которое доступно для установки вручную как необязательное обновление.
KB4512941 исправляет работу песочницы Windows Sandbox, проблему черного экрана при удаленном подключении к рабочему столу и ряд других ошибок. Однако, некоторые пользователи столкнулись с серьезными проблемами после установки последнего обновления, которое меняет номер сборки Windows 10 May 2019 Update (версия 1903) на 18362.329.
Высокая загрузка процессора из-за процесса Поиск (SearchUI.exe)
Согласно различным отчетам на форумах и в Центре отзывов, некоторые компьютеры после установки обновления KB4512941 сталкиваются с проблемой высокой загрузки процессора, что ухудшает общую производительность системы.
Процесс Поиска (SearchUI.exe) генерирует пиковые нагрузки процессора, и согласно данным в Диспетчере задач этот процесс достигает скачка на 30-60 процентов, хотя общий уровень использование зависит от количества ядер процессора.
«После установки KB4512941 (OS Build 18362.329) всплывающее окно с результатами поиска остается пустым, SearchUI.exe постоянно использует процессор и
200 MB оперативной памяти», – описал проблему пользователь в Центре отзывов Microsoft.
Как исправить высокую нагрузку процесса Поиск (SearchUI.exe)
Официальное исправление от Microsoft
Параметр «Отключить интернет-поиска (Bing) для локального поиска»
Некоторые пользователи утверждают, что проблему высокого использования процессора решает, изменение ключа реестра BingSearchEnabled со значения на 1 (или его полное удаление) в разделе:
После этого перезагрузите компьютер.
BingSearchEnabled отвечает за параметр Windows Отключить интернет-поиска (Bing) для локального поиска. Многие пользователи Windows 10 сталкиваются с проблемой, если ранее отключили интернет-поиска Bing, включив данный параметр в программе O&O ShutUp10 (и подобных).
В этом случае, вы можете снова включить интернет-поиска Bing (выключив параметр), чтобы убрать нагрузку на процессор.
Удаление обновления KB4512941
Однако, если вы не хотите отправлять локальные поисковые запросы через меню «Пуск» в поисковую систему Bing, или, если вы не хотите «играть» с реестром Windows, вам следует подумать об удалении обновления до устранения проблемы со стороны Microsoft. Вы можете удалить это накопительное обновление, выполнив следующие действия:
Источник
You may often find an error Windows cannot find IGCCTray.Exe when you are starting Windows. However, this error can be a parameter in which there is something wrong with IGCCTray.Exe. Then, the main thing that you must do is to look for the ways in fixing it easily. Well, here is the fast way to fix errors when Windows cannot find IGCCTray.Exe.
Table of Contents on this article below:
- More info: How to Fix QtWebEngineProcess.exe Which is Taking Too Many Resources
Fast Way to Fix Error: Windows Cannot Find IGCCTray.Exe
Let’s see the fast way in fixing an error when Windows cannot find IGCCTray.exe!
You surely have to know if GCCTray.Exe cannot be found on Windows, it means that the Intel Graphic Control Panel needs to be uninstalled and it needs the latest version installed. Well, to fix Windows cannot find GCCTray.Exe is to reinstall the app by following some steps below!
- Firstly, you have to click Start.
- After that, open the Settings app.
- In this case, you need to go to Apps and Features. Then, find the Intel Graphics Control Panel or the Intel Graphics Command Center.
- Once you find it, you need to click on it and click Uninstall.
How to install Intel Graphics Control Panel
After you uninstalled the app, it is time for you to download again the Intel Graphics Control Panel. To download it you can visit one of the links below!
- https://www.microsoft.com/en-us/p/intel-graphics-control-panel/9ndlclmmtmrc?activetab=pivot:overviewtab
- https://www.microsoft.com/en-us/p/intel-graphics-command-center/9plfnlnt3g5g?activetab=pivot:overviewtab
Well, if you cannot find either app in your computer, you can install the Intel Graphics Command Center and restart the system.
If you still do not have a peek to fix an error when Windows cannot find GCCTray.Exe, you can take a time to watch a few tutorial videos that explain it. Here is a tutorial video that you can find on YouTube:
A video from AarohanTechSol entitled Fix Windows Cannot Find IGCCTray.Exe Error, C:Program FileWindowsAppsIGCCTray.exe that you can access here.
Why Windows Cannot Find IGCCTray.Exe?
The reason why Windows cannot find GCCTray.Exe is because any errors happen to the file and there are some suspicious indicators. The suspicious indicator here may be referring to the virus and malware contained in GCCTray.Exe file.
Generally, .exe files are often inserted by viruses and malware. In this case, the cyber criminals really use the name of GCCTray to camouflage malicious software and the processes in Task Manager.
The cyber criminals basically build minor changes to names which cannot be noticed without careful inspection. Moreover, malicious files with similar names are placed in other folders and not designated for the origin of legitimate versions. Then, a malicious process is placed outside of the “C:Program FilesWindows Defender” folder.
Then, when you start opening Windows, you may get a pop up that tells an error on IGCCTray.Exe. Generally, it tells Error: Windows Cannot Find IGCCTray.Exe. Of course, you may be confused about how to fix it if Windows cannot find this file even IGCCTray.Exe always appears on the screen when you are starting Windows.
Generally, the pop up message appears after you are booting the system: Windows cannot find C:/Program Files/ WindowsApps/AppUp.IntelGraphicsExperience_1.100.2727.0_x64_8j3eq9…/IGCCTray.exe’. Make sure you typed the name correctly and then try again.
What is IGCCTray.exe?
IGCCTray.exe is a part of IGCCTray which is developed by Inter based on the IGCCTray.exe version information. IGCCTray.exe stands for “IGCCTray”. This file definitely can be found in the ‘C:Program FilesWindowsAppsAppUp.IntelGraphicsExperience_1.100.1725.0_x64__8j3eq9eme6cttGCP.ML.BackgroundSysTray’ folder.
Here are the following version information about IGCCTray.exe
- Product name: IGCCTray
- Company name: Intel
- File description: IGCCTray
- Internal name: IGCCTray.exe
- Original filename: IGCCTray.exe
- Legal copyright: Copyright © 2019
- Product version:1.100.1725.0
- File version: 1.100.1725.0
About IGCC
IGCC stands for Intel Graphics Command Center which is well-known as a new app that you can find on Microsoft Store. This app is exclusive for Windows 10 that offers the same capabilities as the traditional COntrol Panel in a package. Indeed, it is so easier to understand when you install it on your Windows 10.
It actually offers an interface that will feel very familiar to Windows 10 users. It is also featured by XAML UI elements and Fluent Design including the Reveal lighting effect and Acrylic material that can be enabled under Preferences.
At the beginning, Intel’s graphics drivers came bundled with the company’s Control Panel. It allows the user to set a variety of displays and the video-related settings. Today, Intel’s company has come to the realization which interface for which Control Panel is not the easiest one to understand. Then, it is introducing a new solution for its purposes.
Intel has also simplified in getting access to a lot of features of the Control Panel. In this case, the game optimization is done through the homepage directly. Then, several monitors are easier to set up and configure than having a separate dedicated page.
- For video settings, the color and the image correction are not listed in a single page with a few default profiles offered. But, it is also possible to make custom ones.
- For the general theme for the entire app now is easier to get to and displayed in a more friendly way with every part of the settings. The app is able to inform you about the new driver updates when you install the Intel Driver and Support Assistant.
Apart from adding many features to the app, Intel also has a plan to launch the 9th generation of H-series Intel Core Processors in the second quarter of 2019. This company is definitely promising more improvements for gamers such as the addition of support for Wi-Fi for lower latency in online games.
- Don’t miss: How to Get Rid of 100% Disk Usage Windows 10
They have also introduced its first discrete GPU in a long time. However, it is expected to be released next year. The way in improving gaming on its platform is leading up to its launch.
Finally, the goal of this new app is part of a broader effort from Intel to create your life easier by using these graphics cards either for content creation or gaming. Well, if you are interested to help the shape of the future of graphics and visual computing, you surely have to sign up for Intel’s The Odyssey program.
Well, if you really like trying the Intel’s New Graphics Command Center, the only way that you can do it is to download it from Microsoft Store.

AUTHOR BIO
On my daily job, I am a software engineer, programmer & computer technician. My passion is assembling PC hardware, studying Operating System and all things related to computers technology. I also love to make short films for YouTube as a producer. More at about me…
Приложение: IGCCTray.exe
Версия платформы: v4.0.30319
Описание. Процесс был завершен из-за необработанного исключения.
Сведения об исключении: System.AccessViolationException
в OneApp.IGCC.CoreLibrary.Driver.Native.NativeMethods.GetPlatformInfo(PlatformID, PlatformInfo, IntPtr, Byte[], IntPtr ByRef)
в OneApp.IGCC.CoreLibrary.SystemInformation.OpenCL.GetVersion(Boolean)
в GCP.ML.BackgroundSysTray.SystemInformationHandler.PlatformInformation.GetPlatformInfo(ML.CommonLibrary.Model.Bridge.PlatformPayload)
в GCP.ML.BackgroundSysTray.AllComponentInitializer+<PopulateSystemPlatformInfo>d__13.MoveNext()
в System.Runtime.CompilerServices.AsyncTaskMethodBuilder.Start[[GCP.ML.BackgroundSysTray.AllComponentInitializer+<PopulateSystemPlatformInfo>d__13, IGCCTray, Version=1.100.3282.0, Culture=neutral, PublicKeyToken=null]](<PopulateSystemPlatformInfo>d__13 ByRef)
в GCP.ML.BackgroundSysTray.AllComponentInitializer.PopulateSystemPlatformInfo(Windows.Foundation.Collections.ValueSet)
в GCP.ML.BackgroundSysTray.AllComponentInitializer+<InitializeAllComponents>d__3.MoveNext()
в System.Threading.ExecutionContext.RunInternal(System.Threading.ExecutionContext, System.Threading.ContextCallback, System.Object, Boolean)
в System.Threading.ExecutionContext.Run(System.Threading.ExecutionContext, System.Threading.ContextCallback, System.Object, Boolean)
в System.Runtime.CompilerServices.AsyncMethodBuilderCore+MoveNextRunner.Run()
в System.Threading.Tasks.AwaitTaskContinuation.RunOrScheduleAction(System.Action, Boolean, System.Threading.Tasks.Task ByRef)
в System.Threading.Tasks.Task.FinishContinuations()
в System.Threading.Tasks.Task`1[[System.Threading.Tasks.VoidTaskResult, mscorlib, Version=4.0.0.0, Culture=neutral, PublicKeyToken=b77a5c561934e089]].TrySetResult(System.Threading.Tasks.VoidTaskResult)
в System.Runtime.CompilerServices.AsyncTaskMethodBuilder`1[[System.Threading.Tasks.VoidTaskResult, mscorlib, Version=4.0.0.0, Culture=neutral, PublicKeyToken=b77a5c561934e089]].SetResult(System.Threading.Tasks.VoidTaskResult)
в System.Runtime.CompilerServices.AsyncTaskMethodBuilder`1[[System.Threading.Tasks.VoidTaskResult, mscorlib, Version=4.0.0.0, Culture=neutral, PublicKeyToken=b77a5c561934e089]].SetResult(System.Threading.Tasks.Task`1<System.Threading.Tasks.VoidTaskResult>)
в GCP.ML.BackgroundSysTray.AllComponentInitializer+<PopulateAlsSensorAvailable>d__8.MoveNext()
в System.Threading.ExecutionContext.RunInternal(System.Threading.ExecutionContext, System.Threading.ContextCallback, System.Object, Boolean)
в System.Threading.ExecutionContext.Run(System.Threading.ExecutionContext, System.Threading.ContextCallback, System.Object, Boolean)
в System.Runtime.CompilerServices.AsyncMethodBuilderCore+MoveNextRunner.Run()
в System.Threading.Tasks.AwaitTaskContinuation.RunOrScheduleAction(System.Action, Boolean, System.Threading.Tasks.Task ByRef)
в System.Threading.Tasks.Task.FinishContinuations()
в System.Threading.Tasks.Task`1[[System.__Canon, mscorlib, Version=4.0.0.0, Culture=neutral, PublicKeyToken=b77a5c561934e089]].TrySetResult(System.__Canon)
в System.Threading.Tasks.TaskFactory`1[[System.__Canon, mscorlib, Version=4.0.0.0, Culture=neutral, PublicKeyToken=b77a5c561934e089]].FromAsyncCoreLogic(System.IAsyncResult, System.Func`2<System.IAsyncResult,System.__Canon>, System.Action`1<System.IAsyncResult>, System.Threading.Tasks.Task`1<System.__Canon>, Boolean)
в System.Threading.Tasks.TaskFactory`1+<>c__DisplayClass44_0`3[[System.__Canon, mscorlib, Version=4.0.0.0, Culture=neutral, PublicKeyToken=b77a5c561934e089],[System.__Canon, mscorlib, Version=4.0.0.0, Culture=neutral, PublicKeyToken=b77a5c561934e089],[System.__Canon, mscorlib, Version=4.0.0.0, Culture=neutral, PublicKeyToken=b77a5c561934e089],[System.__Canon, mscorlib, Version=4.0.0.0, Culture=neutral, PublicKeyToken=b77a5c561934e089]].<FromAsyncImpl>b__0(System.IAsyncResult)
в System.Runtime.AsyncResult.Complete(Boolean)
в System.ServiceModel.Channels.ServiceChannel+SendAsyncResult.FinishSend(System.IAsyncResult, Boolean)
в System.ServiceModel.Channels.ServiceChannel+SendAsyncResult.SendCallback(System.IAsyncResult)
в System.Runtime.Fx+AsyncThunk.UnhandledExceptionFrame(System.IAsyncResult)
в System.Runtime.AsyncResult.Complete(Boolean)
в System.ServiceModel.Dispatcher.DuplexChannelBinder+AsyncDuplexRequest.Done(Boolean)
в System.ServiceModel.Dispatcher.DuplexChannelBinder+AsyncDuplexRequest.GotReply(System.ServiceModel.Channels.Message)
в System.ServiceModel.Dispatcher.DuplexChannelBinder.HandleRequestAsReplyCore(System.ServiceModel.Channels.Message)
в System.ServiceModel.Dispatcher.ChannelHandler.HandleRequestAsReply(System.ServiceModel.Channels.RequestContext)
в System.ServiceModel.Dispatcher.ChannelHandler.HandleRequest(System.ServiceModel.Channels.RequestContext, System.ServiceModel.OperationContext)
в System.ServiceModel.Dispatcher.ChannelHandler.AsyncMessagePump(System.IAsyncResult)
в System.ServiceModel.Dispatcher.ChannelHandler.OnAsyncReceiveComplete(System.IAsyncResult)
в System.Runtime.Fx+AsyncThunk.UnhandledExceptionFrame(System.IAsyncResult)
в System.Runtime.AsyncResult.Complete(Boolean)
в System.ServiceModel.Channels.TransportDuplexSessionChannel+TryReceiveAsyncResult.OnReceive(System.IAsyncResult)
в System.Runtime.Fx+AsyncThunk.UnhandledExceptionFrame(System.IAsyncResult)
в System.Runtime.AsyncResult.Complete(Boolean)
в System.ServiceModel.Channels.SynchronizedMessageSource+ReceiveAsyncResult.OnReceiveComplete(System.Object)
в System.ServiceModel.Channels.SessionConnectionReader.OnAsyncReadComplete(System.Object)
в System.Runtime.Fx+AsyncThunk.UnhandledExceptionFrame(System.IAsyncResult)
в System.Net.LazyAsyncResult.Complete(IntPtr)
в System.Net.LazyAsyncResult.ProtectedInvokeCallback(System.Object, IntPtr)
в System.Net.Security.NegotiateStream.ProcessFrameBody(Int32, Byte[], Int32, Int32, System.Net.AsyncProtocolRequest)
в System.Net.Security.NegotiateStream.ReadCallback(System.Net.AsyncProtocolRequest)
в System.Net.AsyncProtocolRequest.CompleteRequest(Int32)
в System.Net.FixedSizeReader.CheckCompletionBeforeNextRead(Int32)
в System.Net.FixedSizeReader.ReadCallback(System.IAsyncResult)
в System.Runtime.AsyncResult.Complete(Boolean)
в System.ServiceModel.Channels.ConnectionStream+IOAsyncResult.OnAsyncIOComplete(System.Object)
в System.ServiceModel.Channels.PipeConnection.OnAsyncReadComplete(Boolean, Int32, Int32)
в System.ServiceModel.Channels.OverlappedContext.CompleteCallback(UInt32, UInt32, System.Threading.NativeOverlapped*)
в System.Runtime.Fx+IOCompletionThunk.UnhandledExceptionFrame(UInt32, UInt32, System.Threading.NativeOverlapped*)
в System.Threading._IOCompletionCallback.PerformIOCompletionCallback(UInt32, UInt32, System.Threading.NativeOverlapped*)
The browser version you are using is not recommended for this site.
Please consider upgrading to the latest version of your browser by clicking one of the following links.
- Safari
- Chrome
- Edge
- Firefox
Article ID: 000056552
Content Type: Troubleshooting
Last Reviewed: 07/12/2021
Error: Windows Cannot Find IGCCTray.Exe
Environment
Operating System
windows1064bit
Steps on how to resolve an Intel Graphics error message.
This message appears after booting the system: Windows cannot find ‘C:/Programm Files/ WindowsApps/AppUp.IntelGraphicsExperience_1.100.2727.0_x64_8j3eq9…/IGCCTray.exe’ Make sure you typed the name correctly, and then try again.
The Intel Graphics Control Panel or Intel Graphics Command Center application needs to be uninstalled and the latest version installed. Uninstall and install the application by following these steps:
- Click Start and open the Settings app.
- Go to Apps & Features and locate Intel Graphics Control Panel or the Intel Graphics Command Center.
- Click on it and click Uninstall.
- The application can be downloaded and reinstalled from the following links:
- Intel Graphics Control Panel
- Intel Graphics Command Center
| Note |
If neither application can be found in the computer, install the Intel Graphics Command Center and restart the system. |
Related articles
Intel® Graphics Command Center – Frequently Asked Questions
How to Install the Intel® Graphics Command Center
Related Products
This article applies to 82 products
Intel® Iris® Plus Graphics
Intel® UHD Graphics for 10th Gen Intel® Processors
Intel® Iris® Xe Graphics
Intel® Iris® Xe MAX Graphics
Intel® UHD Graphics for 11th Gen Intel® Processors
Intel® HD Graphics 5300
Intel® HD Graphics 5500
Intel® HD Graphics 6000
Intel® Iris® Graphics 6100
Intel® Iris® Pro Graphics 6200
Intel® HD Graphics 510
Intel® HD Graphics 500
Intel® HD Graphics 505
Intel® HD Graphics 610
Intel® HD Graphics 615
Intel® HD Graphics 620
Intel® HD Graphics 630
Intel® HD Graphics P630
Intel® Iris® Plus Graphics 640
Intel® Iris® Plus Graphics 650
Intel® Iris® Plus Graphics 655
Intel® Iris® Plus Graphics 645
Intel® UHD Graphics 605
Intel® UHD Graphics 610
Intel® UHD Graphics 615
Intel® UHD Graphics 617
Intel® UHD Graphics 620
Intel® UHD Graphics 630
Radeon™ RX Vega M GH Graphics
Radeon™ RX Vega M GL Graphics
Intel® HD Graphics for Previous Generation Intel® Processors
Intel® UHD Graphics Family
Intel® UHD Graphics 750
Intel® UHD Graphics P750
Legacy Graphics
Intel® HD Graphics 2000
Intel® HD Graphics 3000
Intel® HD Graphics 2500
Intel® HD Graphics 4000
Intel® HD Graphics 4200
Intel® HD Graphics 4400
Intel® HD Graphics 4600
Intel® HD Graphics 5000
Intel® Iris® Graphics 5100
Intel® Iris® Pro Graphics 5200
Intel® HD Graphics 515
Intel® HD Graphics 520
Intel® HD Graphics 530
Intel® Iris® Graphics 540
Intel® Iris® Graphics 550
Intel® Iris® Pro Graphics 580
Graphics Drivers for Intel® 82810 Graphics and Memory Controller Hub (GMCH)
Graphics Drivers for Intel® 82815 Graphics Controller
Graphics Drivers for Intel® 82830M Graphics and Memory Controller Hub (GMCH)
Graphics Drivers for Intel® 82845G Graphics Controller
Graphics Drivers for Intel® 82852/82855 Graphics Controller Family
Graphics Drivers for Intel® 82865G Graphics and Memory Controller Hub (GMCH)
Graphics Drivers for Intel® 82915G/82910GL Express Chipset Family
Graphics Drivers for Intel® 82945G Express Chipset
Graphics Drivers for Intel® 82946GZ Graphics Controller
Graphics Drivers for Intel® 82G965 Graphics and Memory Controller Hub (GMCH)
Graphics Drivers for Intel® 82Q963 Graphics and Memory Controller Hub (GMCH)
Graphics Drivers for Intel® 82Q965 Graphics and Memory Controller Hub (GMCH)
Graphics Drivers for Intel® B43 Express Chipset
Graphics Drivers for Intel® G31 Express Chipset
Graphics Drivers for Intel® G33 Express Chipset
Graphics Drivers for Intel® G35 Express Chipset
Graphics Drivers for Intel® G41 Express Chipset
Graphics Drivers for Intel® G43 Express Chipset
Graphics Drivers for Intel® G45 Express Chipset
Graphics Drivers for Intel® Q33 Express Chipset
Graphics Drivers for Intel® Q35 Express Chipset
Graphics Drivers for Intel® Q43 Express Chipset
Graphics Drivers for Intel® Q45 Express Chipset
Graphics Drivers for Mobile Intel® 4 Series Express Chipset Family
Graphics Drivers for Mobile Intel® 915GM/GMS, 910GML Express Chipset Family
Graphics Drivers for Mobile Intel® 945GM Express Chipset Family
Graphics Drivers for Mobile Intel® 965 Express Chipset Family
Intel® Graphics Media Accelerator 3150 (Intel® GMA 3150)
Intel® Graphics Media Accelerator 3600 Series
Intel® Graphics Media Accelerator 500 (Intel® GMA 500)
Intel® Graphics Media Accelerator 600 (Intel® GMA 600)
- Summary
- Description
- Resolution
1
Need more help?
Contact support
Give Feedback
Did you find this information useful?
YES
NO
Characters remaining: 500
We appreciate all feedback, but cannot reply or give product support. Please do not enter contact information. If you require a response, contact support.
Thank you
Disclaimer
All postings and use of the content on this site are subject to Intel.com Terms of Use.
You may often find an error Windows cannot find IGCCTray.Exe when you are starting Windows. However, this error can be a parameter in which there is something wrong with IGCCTray.Exe. Then, the main thing that you must do is to look for the ways in fixing it easily. Well, here is the fast way to fix errors when Windows cannot find IGCCTray.Exe.
Table of Contents on this article below:
- More info: How to Fix QtWebEngineProcess.exe Which is Taking Too Many Resources
Fast Way to Fix Error: Windows Cannot Find IGCCTray.Exe
Let’s see the fast way in fixing an error when Windows cannot find IGCCTray.exe!
You surely have to know if GCCTray.Exe cannot be found on Windows, it means that the Intel Graphic Control Panel needs to be uninstalled and it needs the latest version installed. Well, to fix Windows cannot find GCCTray.Exe is to reinstall the app by following some steps below!
- Firstly, you have to click Start.
- After that, open the Settings app.
- In this case, you need to go to Apps and Features. Then, find the Intel Graphics Control Panel or the Intel Graphics Command Center.
- Once you find it, you need to click on it and click Uninstall.
How to install Intel Graphics Control Panel
After you uninstalled the app, it is time for you to download again the Intel Graphics Control Panel. To download it you can visit one of the links below!
- https://www.microsoft.com/en-us/p/intel-graphics-control-panel/9ndlclmmtmrc?activetab=pivot:overviewtab
- https://www.microsoft.com/en-us/p/intel-graphics-command-center/9plfnlnt3g5g?activetab=pivot:overviewtab
Well, if you cannot find either app in your computer, you can install the Intel Graphics Command Center and restart the system.
If you still do not have a peek to fix an error when Windows cannot find GCCTray.Exe, you can take a time to watch a few tutorial videos that explain it. Here is a tutorial video that you can find on YouTube:
A video from AarohanTechSol entitled Fix Windows Cannot Find IGCCTray.Exe Error, C:Program FileWindowsAppsIGCCTray.exe that you can access here.
Why Windows Cannot Find IGCCTray.Exe?
The reason why Windows cannot find GCCTray.Exe is because any errors happen to the file and there are some suspicious indicators. The suspicious indicator here may be referring to the virus and malware contained in GCCTray.Exe file.
Generally, .exe files are often inserted by viruses and malware. In this case, the cyber criminals really use the name of GCCTray to camouflage malicious software and the processes in Task Manager.
The cyber criminals basically build minor changes to names which cannot be noticed without careful inspection. Moreover, malicious files with similar names are placed in other folders and not designated for the origin of legitimate versions. Then, a malicious process is placed outside of the “C:Program FilesWindows Defender” folder.
Then, when you start opening Windows, you may get a pop up that tells an error on IGCCTray.Exe. Generally, it tells Error: Windows Cannot Find IGCCTray.Exe. Of course, you may be confused about how to fix it if Windows cannot find this file even IGCCTray.Exe always appears on the screen when you are starting Windows.
Generally, the pop up message appears after you are booting the system: Windows cannot find C:/Program Files/ WindowsApps/AppUp.IntelGraphicsExperience_1.100.2727.0_x64_8j3eq9…/IGCCTray.exe’. Make sure you typed the name correctly and then try again.
What is IGCCTray.exe?
IGCCTray.exe is a part of IGCCTray which is developed by Inter based on the IGCCTray.exe version information. IGCCTray.exe stands for “IGCCTray”. This file definitely can be found in the ‘C:Program FilesWindowsAppsAppUp.IntelGraphicsExperience_1.100.1725.0_x64__8j3eq9eme6cttGCP.ML.BackgroundSysTray’ folder.
Here are the following version information about IGCCTray.exe
- Product name: IGCCTray
- Company name: Intel
- File description: IGCCTray
- Internal name: IGCCTray.exe
- Original filename: IGCCTray.exe
- Legal copyright: Copyright © 2019
- Product version:1.100.1725.0
- File version: 1.100.1725.0
About IGCC
IGCC stands for Intel Graphics Command Center which is well-known as a new app that you can find on Microsoft Store. This app is exclusive for Windows 10 that offers the same capabilities as the traditional COntrol Panel in a package. Indeed, it is so easier to understand when you install it on your Windows 10.
It actually offers an interface that will feel very familiar to Windows 10 users. It is also featured by XAML UI elements and Fluent Design including the Reveal lighting effect and Acrylic material that can be enabled under Preferences.
At the beginning, Intel’s graphics drivers came bundled with the company’s Control Panel. It allows the user to set a variety of displays and the video-related settings. Today, Intel’s company has come to the realization which interface for which Control Panel is not the easiest one to understand. Then, it is introducing a new solution for its purposes.
Intel has also simplified in getting access to a lot of features of the Control Panel. In this case, the game optimization is done through the homepage directly. Then, several monitors are easier to set up and configure than having a separate dedicated page.
- For video settings, the color and the image correction are not listed in a single page with a few default profiles offered. But, it is also possible to make custom ones.
- For the general theme for the entire app now is easier to get to and displayed in a more friendly way with every part of the settings. The app is able to inform you about the new driver updates when you install the Intel Driver and Support Assistant.
Apart from adding many features to the app, Intel also has a plan to launch the 9th generation of H-series Intel Core Processors in the second quarter of 2019. This company is definitely promising more improvements for gamers such as the addition of support for Wi-Fi for lower latency in online games.
- Don’t miss: How to Get Rid of 100% Disk Usage Windows 10
They have also introduced its first discrete GPU in a long time. However, it is expected to be released next year. The way in improving gaming on its platform is leading up to its launch.
Finally, the goal of this new app is part of a broader effort from Intel to create your life easier by using these graphics cards either for content creation or gaming. Well, if you are interested to help the shape of the future of graphics and visual computing, you surely have to sign up for Intel’s The Odyssey program.
Well, if you really like trying the Intel’s New Graphics Command Center, the only way that you can do it is to download it from Microsoft Store.
AUTHOR BIO
On my daily job, I am a software engineer, programmer & computer technician. My passion is assembling PC hardware, studying Operating System and all things related to computers technology. I also love to make short films for YouTube as a producer. More at about me…
IGCCTray.exe is part of the Intel Graphics Experience. The executable makes sure you see the systray icon at the right bottom of your screen, near the clock. However, many users encounter an error when they start the computer:
Windows cannot find ‘C:Program FilesWindowsAppsAppUp.IntelGraphicsExperience_1.100.17250.0_x64_……IGCCTray.exe’. Make sure you typed the name correctly, and then try again.

This error is very easy to solve. You just need to uninstall the Intel Graphics Control Panel app, and install the latest version. Follow these steps:
- Click Start
 and open the Settings
  app
app - Go to Apps and locate Intel Graphics Control Panel.
Note: in some cases, the software is named Intel Graphics Command Center - Click on it and click Uninstall
- Optionally, you may want to reinstall the app.
Go to https://www.microsoft.com/en-us/p/intel-graphics-control-panel/9ndlclmmtmrc?activetab=pivot:overviewtab
Get the app
That’s all. The error message about IGCCTray.exe will now not popup after you logon to your computer.