
Время на прочтение
7 мин
Количество просмотров 260K
 Даже поверхностное знание программы Wireshark и её фильтров на порядок сэкономит время при устранении проблем сетевого или прикладного уровня. Wireshark полезен для многих задач в работе сетевого инженера, специалиста по безопасности или системного администратора. Вот несколько примеров использования:
Устранение неполадок сетевого подключения
- Визуальное отображение потери пакетов
- Анализ ретрансляции TCP
- График по пакетам с большой задержкой ответа
Исследование сессий прикладного уровня (даже при шифровании с помощью SSL/TLS, см. ниже)
- Полный просмотр HTTP-сессий, включая все заголовки и данные для запросов и ответов
- Просмотр сеансов Telnet, просмотр паролей, введённых команд и ответов
- Просмотр трафика SMTP и POP3, чтение писем
Устранение неполадок DHCP с данными на уровне пакетов
- Изучение трансляций широковещательного DHCP
- Второй шаг обмена DHCP (DHCP Offer) с адресом и параметрами
- Клиентский запрос по предложенному адресу
- Ack от сервера, подтверждающего запрос
Извлечение файлов из сессий HTTP
- Экспорт объектов из HTTP, таких как JavaScript, изображения или даже исполняемые файлы
Извлечение файлов из сессий SMB
- Аналогично опции экспорта HTTP, но извлечение файлов, передаваемых по SMB, протоколу общего доступа к файлам в Windows
Обнаружение и проверка вредоносных программ
- Обнаружение аномального поведения, которое может указывать на вредоносное ПО
- Поиск необычных доменов или конечных IP
- Графики ввода-вывода для обнаружения постоянных соединений (маячков) с управляющими серверами
- Отфильтровка «нормальных» данных и выявление необычных
- Извлечение больших DNS-ответов и прочих аномалий, которые могут указывать на вредоносное ПО
Проверка сканирования портов и других типов сканирования на уязвимости
- Понимание, какой сетевой трафик поступает от сканеров
- Анализ процедур по проверке уязвимостей, чтобы различать ложноположительные и ложноотрицательные срабатывания
Эти примеры — только вершина айсберга. В руководстве мы расскажем, как использовать столь мощный инструмент.
Установка Wireshark
Wireshark работает на различных операционных системах и его несложно установить. Упомянем только Ubuntu Linux, Centos и Windows.
Установка на Ubuntu или Debian
#apt-get update
#apt-get install wireshark tshark
Установка на Fedora или CentOS
#yum install wireshark-gnomeУстановка на Windows
На странице загрузки лежит исполняемый файл для установки. Довольно просто ставится и драйвер захвата пакетов, с помощью которого сетевая карта переходит в «неразборчивый» режим (promiscuous mode позволяет принимать все пакеты независимо от того, кому они адресованы).
Начало работы с фильтрами
С первым перехватом вы увидите в интерфейсе Wireshark стандартный шаблон и подробности о пакете.
Как только захватили сессию HTTP, остановите запись и поиграйте с основными фильтрами и настройками Analyze | Follow | HTTP Stream.
Названия фильтров говорят сами за себя. Просто вводите соответствующие выражения в строку фильтра (или в командную строку, если используете tshark). Основное преимущество фильтров — в удалении шума (трафик, который нам не интерестен). Можно фильтровать трафик по MAC-адресу, IP-адресу, подсети или протоколу. Самый простой фильтр — ввести http, так что будет отображаться только трафик HTTP (порт tcp 80).
Примеры фильтров по IP-адресам
ip.addr == 192.168.0.5
!(ip.addr == 192.168.0.0/24)
Примеры фильтров по протоколу
tcp
udp
tcp.port == 80 || udp.port == 80
http
not arp and not (udp.port == 53)
Попробуйте сделать комбинацию фильтров, которая показывает весь исходящий трафик, кроме HTTP и HTTPS, который направляется за пределы локальной сети. Это хороший способ обнаружить программное обеспечение (даже вредоносное), которое взаимодействует с интернетом по необычным протоколам.
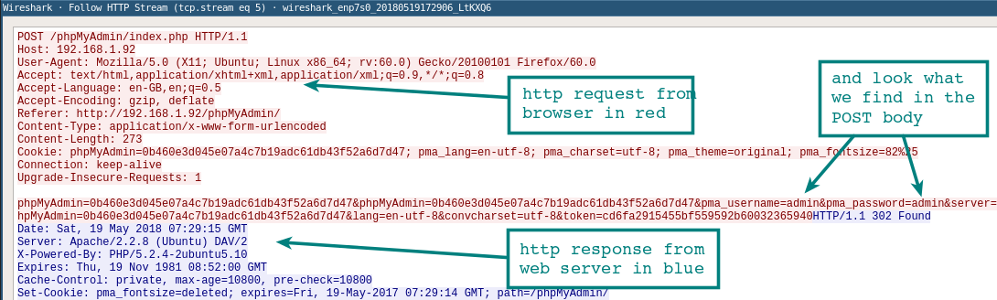
Следуйте за потоком
Как только вы захватили несколько HTTP-пакетов, можно применить на одном из них пункт меню Analyze | Follow | HTTP Stream. Он покажет целиком сессию HTTP. В этом новом окне вы увидите HTTP-запрос от браузера и HTTP-ответ от сервера.
Резолвинг DNS в Wireshark
По умолчанию Wireshark не резолвит сетевые адреса в консоли. Это можно изменить в настройках.
Edit | Preferences | Name Resolution | Enable Network Name Resolution
Как и в случае tcpdump, процедура резолвинга замедлит отображение пакетов. Также важно понимать, что при оперативном захвате пакетов DNS-запросы с вашего хоста станут дополнительным трафиком, который могут перехватить.
Tshark для командной строки
Если вы ещё не баловались с tshark, взгляните на наше руководство с примерами фильтров. Эту программу часто игнорируют, хотя она отлично подходит для захвата сессий на удалённой системе. В отличие от tcpdump, она позволяет на лету захватывать и просматривать сессии прикладного уровня: декодеры протоколов Wireshark также доступны для tshark.
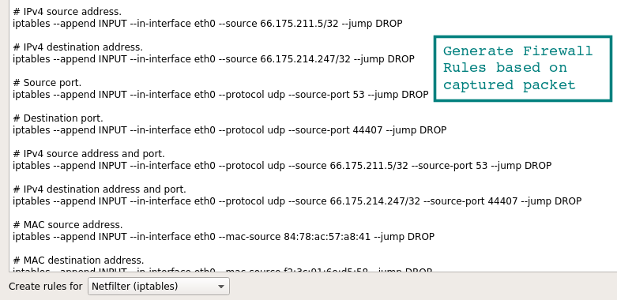
Составление правил для файрвола
Вот быстрый способ создания правил из командной строки, чтобы не искать в интернете конкретный синтаксис. Выберите подходящее правило — и перейдите в Tools | Firewall ACL Rules. Поддерживаются различные файрволы, такие как Cisco IOS, ipfilter, ipfw, iptables, pf и даже файрвол Windows через netsh.
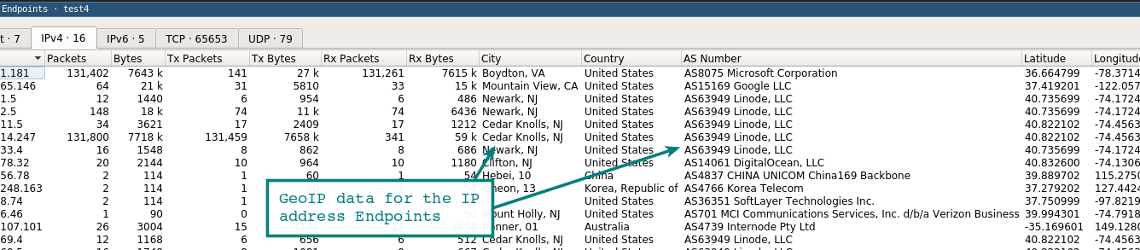
Работа с географической базой GeoIP
Если Wireshark скомпилирован с поддержкой GeoIP и у вас есть бесплатные базы Maxmind, то программа может определять местоположение компьютеров по их IP-адресам. Проверьте в About | Wireshark, что программа скомпилирована с той версией, какая у вас в наличии. Если GeoIP присутствует в списке, то проверьте наличие на диске баз GeoLite City, Country и ASNum. Укажите расположение баз в меню Edit | Preferences | Name Resolution.
Проверьте систему на дампе трафика, выбрав опцию Statistics | Endpoints | IPv4. В колонках справа должна появиться информация о местоположении и ASN для IP-адреса.
Другая функция GeoIP — фильтрация трафика по местоположению с помощью фильтра ip.geoip. Например, так можно исключить трафик из конкретной ASN. Нижеуказанная команда исключает пакеты от сетевого блока ASN 63949 (Linode).
ip and not ip.geoip.asnum == 63949Конечно, тот же фильтр можно применить к отдельным городам и странам. Удалите шум и оставьте только действительно интересный трафик.
Расшифровка сессий SSL/TLS
Один из способов расшифровки сессий SSL/TLS — использовать закрытый ключ с сервера, к которому подключен клиент.
Конечно, у вас не всегда есть доступ к приватному ключу. Но есть другой вариант простого просмотра трафика SSL/TLS на локальной системе. Если Firefox или Chrome загружаются с помощью специальной переменной среды, то симметричные ключи отдельных сеансов SSL/TLS записаны в файл, который Wireshark может прочитать. С помощью этих ключей Wireshark покажет полностью расшифрованную сессию!
1. Настройка переменной среды
Linux / Mac
export SSLKEYLOGFILE=~/sslkeylogfile.logWindows
На вкладке System Properties | Advanced нажмите кнопку Environment Variables и добавьте имя переменной (SSLKEYLOGFILE), а в качестве значения — путь к файлу.
2. Настройка Wireshark
Из выпадающего меню выберите Edit | Preferences | Protocols | SSL | (Pre)-Master-Secret Log Filename — Browse, указав файл, который вы указали в переменную среды.
Начинайте захват трафика в локальной системе.
3. Перезапуск Firefox или Chrome
После перехода на сайт HTTPS лог-файл начнёт увеличиваться в размере, поскольку записывает симметричные ключи сессии.
Взгляните на ранее запущенную сессию Wireshark. Вы должны увидеть что-то похожее на скриншот внизу с расшифрованными сессиями. Расшифрованные пакеты — на вкладке в нижней панели.
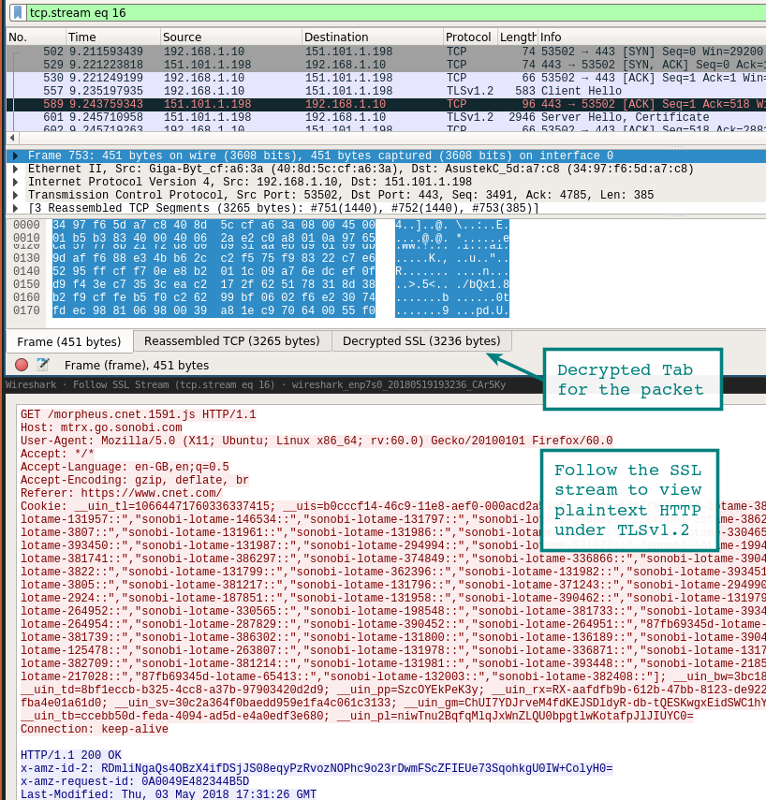
Другой способ просмотра сеанса — через выпадающее меню Analysis | Follow | Stream | SSL. Если сеанс успешно расшифрован, вы увидите опцию для SSL.
Разумеется, будьте осторожны при записи этих ключей и пакетов. Если посторонний получит доступ к лог-файлу, то легко найдёт там ваши пароли и куки аутентификации.
Ещё один вариант выхода на базовый HTTP-трафика — использовать инструмент Burp Suite с загруженным сертификатом CA в браузере. В этом случае прокси расшифровывает соединение на стороне клиента, а затем устанавливает новый сеанс SSL/TLS на сервере. Есть много способов проведения такой MiTM-атаки на себя, это два самых простых.
Извлечение файлов из пакетов с помощью функции экспорта (HTTP или SMB)
Файлы легко извлекаются через меню экспорта.
File | Export Objects | HTTP
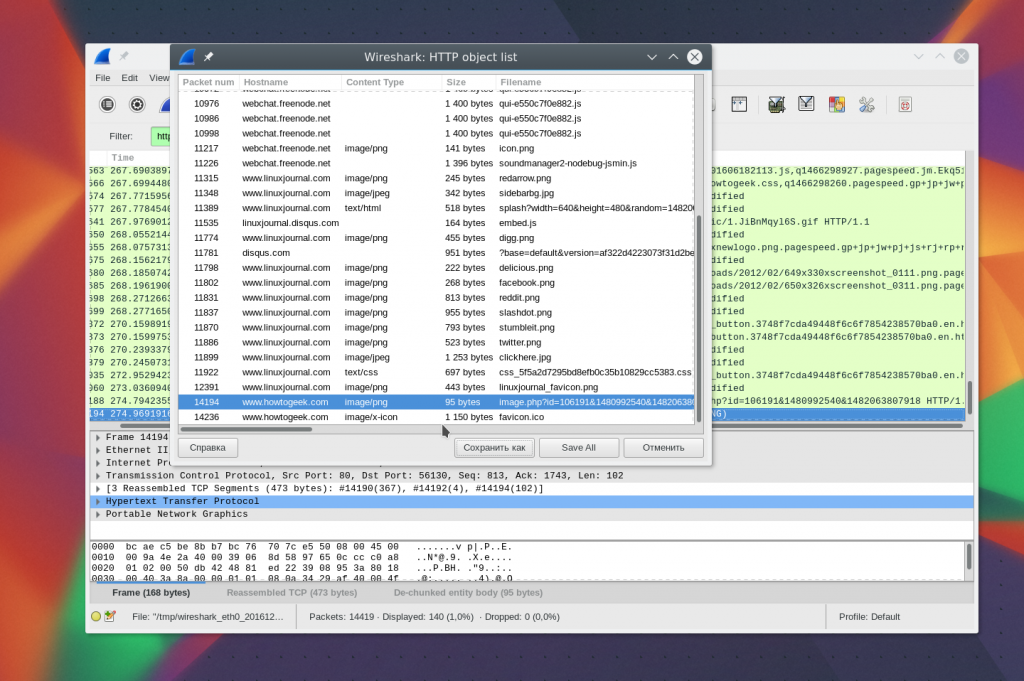
Все найденные файлы отобразятся в новом окне. Отсюда же можно сохранить отдельные файлы или сразу все. Аналогичный метод применяется для извлечения файлов из сессий SMB. Как мы уже упоминали, это протокол Microsoft Server Message Block, который используется для общего доступа к файлам под Windows.

Строка состояния
Строка состояния в правой части окна позволяет быстро перейти в нужное место сетевого дампа, щёлкнув по цветовому индикатору. Например, красным цветом в строке состояния помечены пакеты с ошибками.

Образец PCAP
Когда только начинаете работу с Wireshark, хочется посмотреть на какие-нибудь интересные дампы с пакетами. Их можно найти на странице Wireshark Samples. Примеров с разными протоколами там хватит вам на несколько месяцев анализа, есть даже образцы трафика червей и эксплоитов.
Настройка окружения
Внешний вид консоли по умолчанию всячески настраивается. Можно добавлять или удалять столбцы, добавляя даже такие простые вещи как столбец времени UTC, что сразу повышает информативность логов, если анализировать историю пакетов.
Столбцы настраиваются в меню Edit | Preferences | Appearance | Columns. Там же изменяется общий шаблон, шрифт и цвета.
На видео — полезные советы по настройке окружения, в том числе выявление неполадок по порядковым номерам последовательности TCP.
capinfos
В комплекте с Wireshark поставляется удобный инструмент командной строки capinfos. Эта утилита генерирует статистику пакетного дампа, с временем начала/окончания записи и другими подробностями. С опцией -T она выдаёт текст с табуляцией — он подходит для импорта в электронные таблицы или анализа в консоли.
test@ubuntu:~$ capinfos test.pcap
File name:           test.pcap
File type:           Wireshark/tcpdump/... - pcap
File encapsulation:  Ethernet
File timestamp precision:  microseconds (6)
Packet size limit:   file hdr: 262144 bytes
Number of packets:   341 k
File size:           449 MB
Data size:           444 MB
Capture duration:    3673.413779 seconds
First packet time:   2018-12-01 11:26:53.521929
Last packet time:    2018-12-01 12:28:06.935708
Data byte rate:      120 kBps
Data bit rate:       967 kbps
Average packet size: 1300.72 bytes
Average packet rate: 93 packets/s
SHA256:              989388128d676c329ccdbdec4ed221ab8ecffad81910a16f473ec2c2f54c5d6e
RIPEMD160:           0742b6bbc79735e57904008d6064cce7eb95abc9
SHA1:                d725b389bea044d6520470c8dab0de1598b01d89
Strict time order:   True
Number of interfaces in file: 1
Заключение
Эта статья изначально была опубликована в 2011 году, затем серьёзно обновилась. Если у вас есть какие-либо комментарии, улучшения или советы для шпаргалки, пишите мне. Wireshark — один из тех незаменимых инструментов, который многие используют, но мало кто владеет в совершенстве. Тут можно углубляться всё дальше и дальше.
By default, Wireshark’s TCP dissector tracks the state of each TCP
session and provides additional information when problems or potential
problems are detected. Analysis is done once for each TCP packet when a
capture file is first opened. Packets are processed in the order in
which they appear in the packet list. You can enable or disable this
feature via the “Analyze TCP sequence numbers” TCP dissector preference.
For analysis of data or protocols layered on top of TCP (such as HTTP), see
Section 7.8.3, “TCP Reassembly”.
Figure 7.7. “TCP Analysis” packet detail items
TCP Analysis flags are added to the TCP protocol tree under “SEQ/ACK
analysis”. Each flag is described below. Terms such as “next expected
sequence number” and “next expected acknowledgment number” refer to
the following”:
- Next expected sequence number
-
The last-seen sequence number plus
segment length. Set when there are no analysis flags and for zero
window probes. This is initially zero and calculated based on the
previous packet in the same TCP flow. Note that this may not be the same
as the tcp.nxtseq protocol field.
- Next expected acknowledgment number
-
The last-seen sequence number for
segments. Set when there are no analysis flags and for zero window probes.
- Last-seen acknowledgment number
-
Always set. Note that this is not the
same as the next expected acknowledgment number.
- Last-seen acknowledgment number
-
Always updated for each packet. Note
that this is not the same as the next expected acknowledgment number.
TCP ACKed unseen segment
Set when the expected next acknowledgment number is set for the reverse
direction and it’s less than the current acknowledgment number.
TCP Dup ACK <frame>#<acknowledgment number>
Set when all of the following are true:
- The segment size is zero.
- The window size is non-zero and hasn’t changed.
- The next expected sequence number and last-seen acknowledgment number are non-zero (i.e., the connection has been established).
- SYN, FIN, and RST are not set.
TCP Fast Retransmission
Set when all of the following are true:
- This is not a keepalive packet.
- In the forward direction, the segment size is greater than zero or the SYN or FIN is set.
- The next expected sequence number is greater than the current sequence number.
- We have more than two duplicate ACKs in the reverse direction.
- The current sequence number equals the next expected acknowledgment number.
- We saw the last acknowledgment less than 20ms ago.
Supersedes “Out-Of-Order” and “Retransmission”.
TCP Keep-Alive
Set when the segment size is zero or one, the current sequence number
is one byte less than the next expected sequence number, and none of SYN,
FIN, or RST are set.
Supersedes “Fast Retransmission”, “Out-Of-Order”, “Spurious
Retransmission”, and “Retransmission”.
TCP Keep-Alive ACK
Set when all of the following are true:
- The segment size is zero.
- The window size is non-zero and hasn’t changed.
- The current sequence number is the same as the next expected sequence number.
- The current acknowledgment number is the same as the last-seen acknowledgment number.
- The most recently seen packet in the reverse direction was a keepalive.
- The packet is not a SYN, FIN, or RST.
Supersedes “Dup ACK” and “ZeroWindowProbeAck”.
TCP Out-Of-Order
Set when all of the following are true:
- This is not a keepalive packet.
- In the forward direction, the segment length is greater than zero or the SYN or FIN is set.
- The next expected sequence number is greater than the current sequence number.
- The next expected sequence number and the next sequence number differ.
-
The last segment arrived within the Out-Of-Order RTT threshold.
The threshold is either the value shown in the “iRTT” (tcp.analysis.initial_rtt) field under “SEQ/ACK analysis” if it is present, or the default value of 3ms if it is not.
Supersedes “Retransmission”.
TCP Port numbers reused
Set when the SYN flag is set (not SYN+ACK), we have an existing conversation using the same addresses and ports, and the sequence number is different than the existing conversation’s initial sequence number.
TCP Previous segment not captured
Set when the current sequence number is greater than the next expected sequence number.
TCP Spurious Retransmission
Checks for a retransmission based on analysis data in the reverse
direction. Set when all of the following are true:
- The SYN or FIN flag is set.
- This is not a keepalive packet.
- The segment length is greater than zero.
- Data for this flow has been acknowledged. That is, the last-seen acknowledgment number has been set.
- The next sequence number is less than or equal to the last-seen acknowledgment number.
Supersedes “Fast Retransmission”, “Out-Of-Order”, and “Retransmission”.
TCP Retransmission
Set when all of the following are true:
- This is not a keepalive packet.
- In the forward direction, the segment length is greater than zero or the SYN or FIN flag is set.
- The next expected sequence number is greater than the current sequence number.
TCP Window Full
Set when the segment size is non-zero, we know the window size in the
reverse direction, and our segment size exceeds the window size in the
reverse direction.
TCP Window Update
Set when the all of the following are true:
- The segment size is zero.
- The window size is non-zero and not equal to the last-seen window size.
- The sequence number is equal to the next expected sequence number.
- The acknowledgment number is equal to the last-seen acknowledgment number.
- None of SYN, FIN, or RST are set.
TCP ZeroWindow
Set when the receive window size is zero and none of SYN, FIN, or RST are set.
The window field in each TCP header advertises the amount of data a receiver can accept.
If the receiver can’t accept any more data it will set the window value to zero, which tells the sender to pause its transmission.
In some specific cases this is normal — for example, a printer might use a zero window to pause the transmission of a print job while it loads or reverses a sheet of paper.
However, in most cases this indicates a performance or capacity problem on the receiving end.
It might take a long time (sometimes several minutes) to resume a paused connection, even if the underlying condition that caused the zero window clears up quickly.
TCP ZeroWindowProbe
Set when the sequence number is equal to the next expected sequence
number, the segment size is one, and last-seen window size in the
reverse direction was zero.
If the single data byte from a Zero Window Probe is dropped by the receiver (not
ACKed), then a subsequent segment should not be flagged as retransmission if all
of the following conditions are true for that segment:
* The segment size is larger than one.
* The next expected sequence number is one less than the current sequence number.
This affects “Fast Retransmission”, “Out-Of-Order”, or “Retransmission”.
TCP ZeroWindowProbeAck
Set when the all of the following are true:
- The segment size is zero.
- The window size is zero.
- The sequence number is equal to the next expected sequence number.
- The acknowledgment number is equal to the last-seen acknowledgment number.
- The last-seen packet in the reverse direction was a zero window probe.
Supersedes “TCP Dup ACK”.
TCP Ambiguous Interpretations
Some captures are quite difficult to analyze automatically, particularly when the
time frame may cover both Fast Retransmission and Out-Of-Order packets. A TCP
preference allows to switch the precedence of these two interpretations at the
protocol level.
TCP Conversation Completeness
TCP conversations are said to be complete when they have both opening and closing
handshakes, independently of any data transfer. However, we might be interested in
identifying complete conversations with some data sent, and we are using the
following bit values to build a filter value on the tcp.completeness field :
- 1 : SYN
- 2 : SYN-ACK
- 4 : ACK
- 8 : DATA
- 16 : FIN
- 32 : RST
For example, a conversation containing only a three-way handshake will be found
with the filter ‘tcp.completeness==7’ (1+2+4) while a complete conversation with
data transfer will be found with a longer filter as closing a connection can be
associated with FIN or RST packets, or even both :
‘tcp.completeness==31 or tcp.completeness==47 or tcp.completeness==63’
Wireshark — это мощный сетевой анализатор, который может использоваться для анализа трафика, проходящего через сетевой интерфейс вашего компьютера. Он может понадобиться для обнаружения и решения проблем с сетью, отладки ваших веб-приложений, сетевых программ или сайтов. Wireshark позволяет полностью просматривать содержимое пакета на всех уровнях: так вы сможете лучше понять как работает сеть на низком уровне.
Все пакеты перехватываются в реальном времени и предоставляются в удобном для чтения формате. Программа поддерживает очень мощную систему фильтрации, подсветку цветом, и другие особенности, которые помогут найти нужные пакеты. В этой инструкции мы рассмотрим, как пользоваться Wireshark для анализа трафика. Недавно разработчики перешли к работе над второй веткой программы Wireshark 2.0, в неё было внесено множество изменений и улучшений, особенно для интерфейса. Именно её мы будем использовать в этой статье.
Перед тем, как переходить к рассмотрению способов анализа трафика, нужно рассмотреть, какие возможности поддерживает программа более подробно, с какими протоколами она может работать и что делать. Вот основные возможности программы:
- Захват пакетов в реальном времени из проводного или любого другого типа сетевых интерфейсов, а также чтение из файла;
- Поддерживаются такие интерфейсы захвата: Ethernet, IEEE 802.11, PPP и локальные виртуальные интерфейсы;
- Пакеты можно отсеивать по множеству параметров с помощью фильтров;
- Все известные протоколы подсвечиваются в списке разными цветами, например TCP, HTTP, FTP, DNS, ICMP и так далее;
- Поддержка захвата трафика VoIP-звонков;
- Поддерживается расшифровка HTTPS-трафика при наличии сертификата;
- Расшифровка WEP-, WPA-трафика беспроводных сетей при наличии ключа и handshake;
- Отображение статистики нагрузки на сеть;
- Просмотр содержимого пакетов для всех сетевых уровней;
- Отображение времени отправки и получения пакетов.
Программа имеет множество других функций, но это были те основные, которые могут вас заинтересовать.
Как пользоваться Wireshark
Я предполагаю, что программа у вас уже установлена, но если нет, то вы можете ее установить из официальных репозиториев. Для этого наберите команду в Ubuntu:
sudo apt install wireshark
После установки вы сможете найти программу в главном меню дистрибутива. Запускать Wireshark нужно с правами суперпользователя, потому что иначе она не сможет анализировать сетевые пакеты. Это можно сделать из главного меню или через терминал с помощью команды для KDE:
kdesu wireshark
А для Gnome / Unity:
gksu wireshark
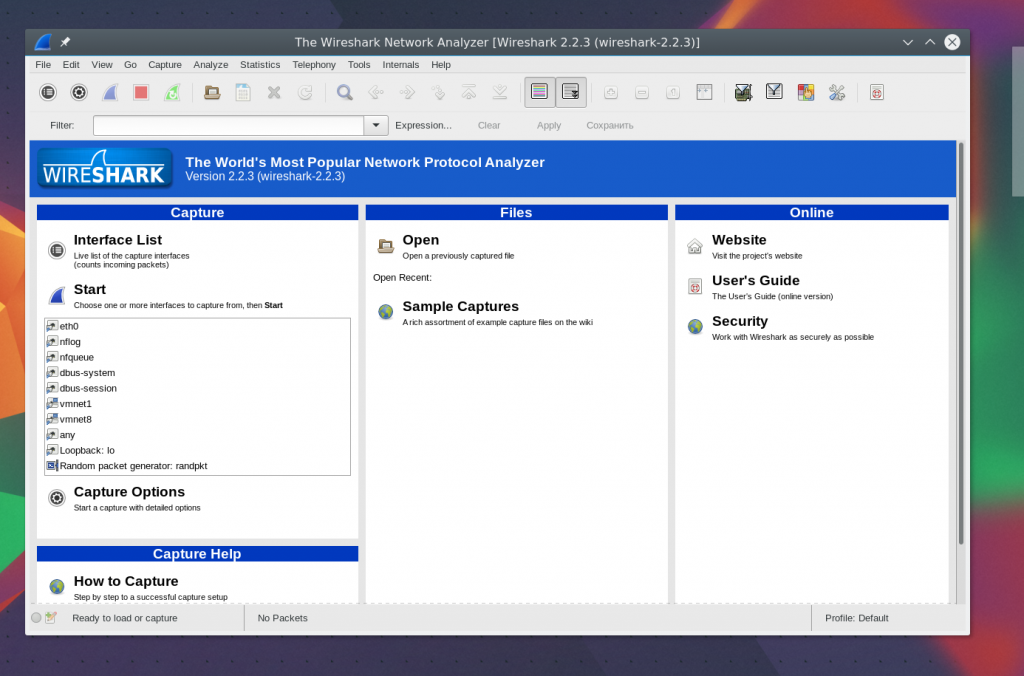
Главное окно программы разделено на три части: первая колонка содержит список доступных для анализа сетевых интерфейсов, вторая — опции для открытия файлов, а третья — помощь.
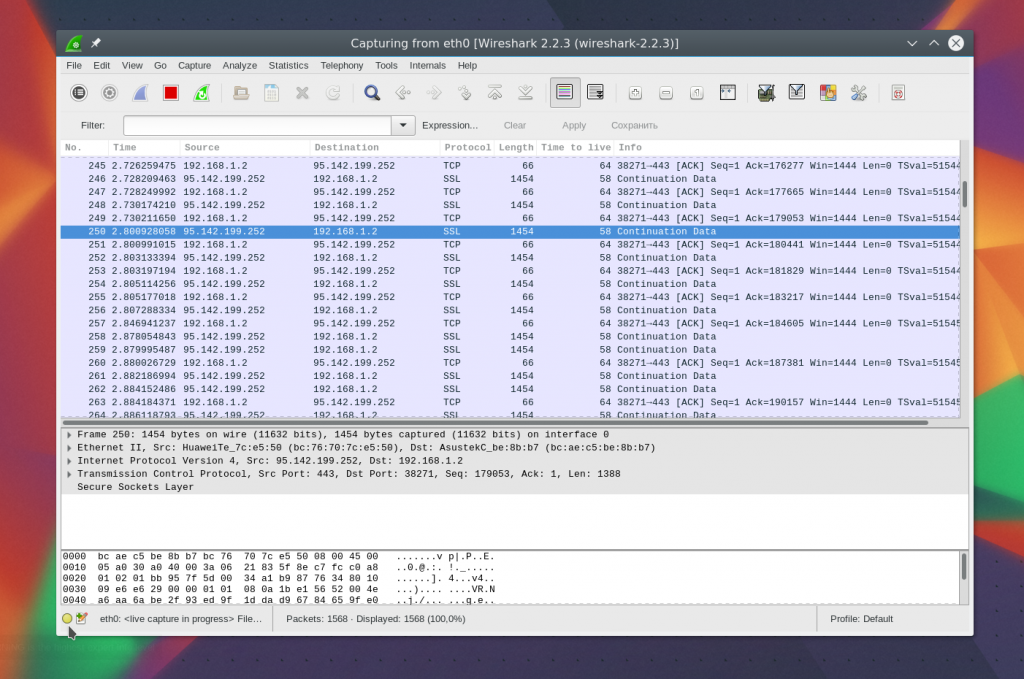
Анализ сетевого трафика
Для начала анализа выберите сетевой интерфейс, например eth0, и нажмите кнопку Start.
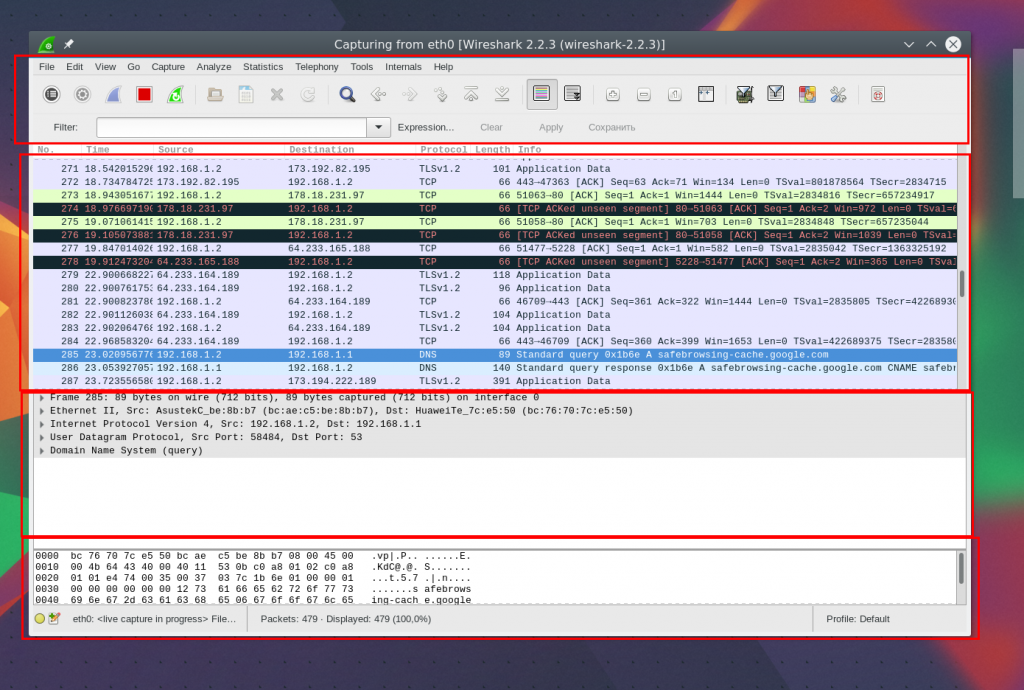
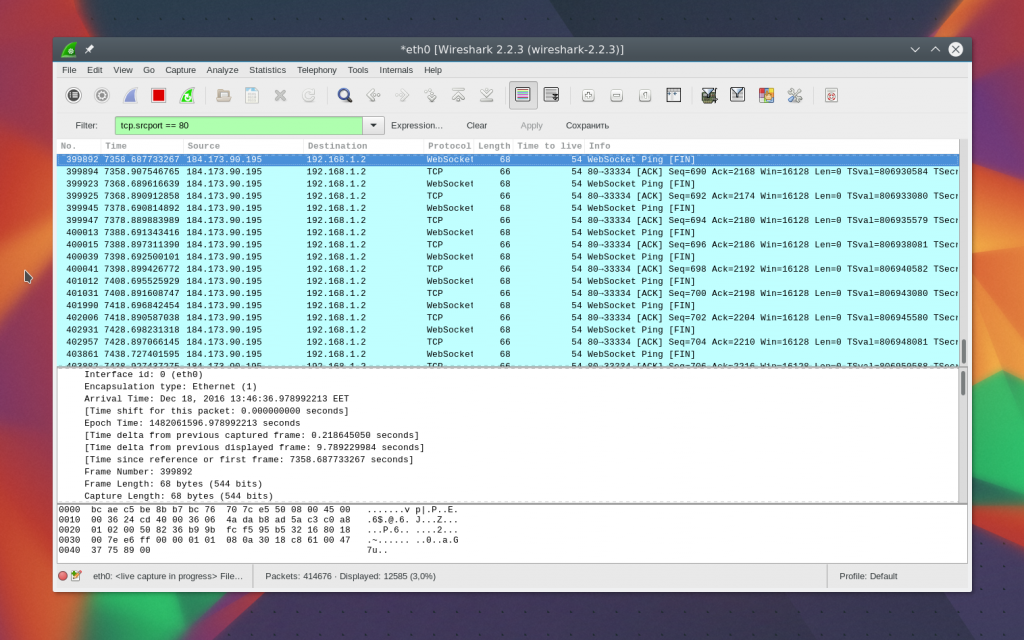
После этого откроется следующее окно, уже с потоком пакетов, которые проходят через интерфейс. Это окно тоже разделено на несколько частей:
- Верхняя часть — это меню и панели с различными кнопками;
- Список пакетов — дальше отображается поток сетевых пакетов, которые вы будете анализировать;
- Содержимое пакета — чуть ниже расположено содержимое выбранного пакета, оно разбито по категориям в зависимости от транспортного уровня;
- Реальное представление — в самом низу отображается содержимое пакета в реальном виде, а также в виде HEX.
Вы можете кликнуть по любому пакету, чтобы проанализировать его содержимое:

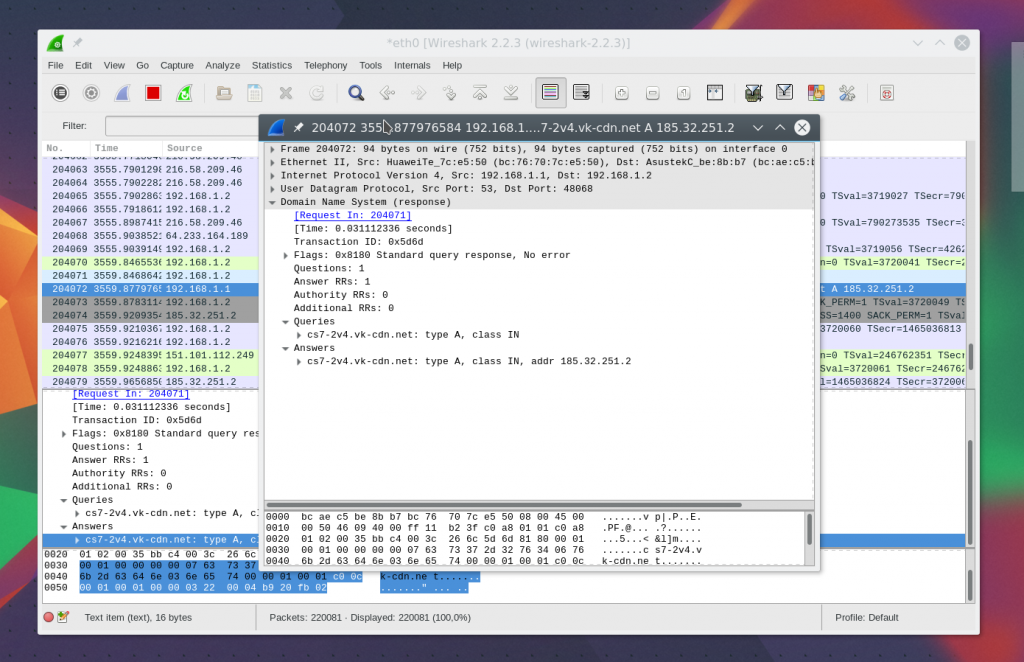
Здесь мы видим пакет запроса к DNS, чтобы получить IP-адрес сайта, в самом запросе отправляется домен, а в пакете ответа мы получаем наш вопрос, а также ответ.
Для более удобного просмотра можно открыть пакет в новом окне, выполнив двойной клик по записи:
Фильтры Wireshark
Перебирать пакеты вручную, чтобы найти нужные, очень неудобно, особенно при активном потоке. Поэтому для такой задачи лучше использовать фильтры. Для ввода фильтров под меню есть специальная строка. Вы можете нажать Expression, чтобы открыть конструктор фильтров, но там их очень много, поэтому мы рассмотрим самые основные:
- ip.dst — целевой IP-адрес;
- ip.src — IP-адрес отправителя;
- ip.addr — IP отправителя или получателя;
- ip.proto — протокол;
- tcp.dstport — порт назначения;
- tcp.srcport — порт отправителя;
- ip.ttl — фильтр по ttl, определяет сетевое расстояние;
- http.request_uri — запрашиваемый адрес сайта.
Для указания отношения между полем и значением в фильтре можно использовать такие операторы:
- == — равно;
- != — не равно;
- < — меньше;
- > — больше;
- <= — меньше или равно;
- >= — больше или равно;
- matches — регулярное выражение;
- contains — содержит.
Для объединения нескольких выражений можно применять:
- && — оба выражения должны быть верными для пакета;
- || — может быть верным одно из выражений.
Теперь рассмотрим подробнее на примерах несколько фильтров и попытаемся понять все знаки отношений.
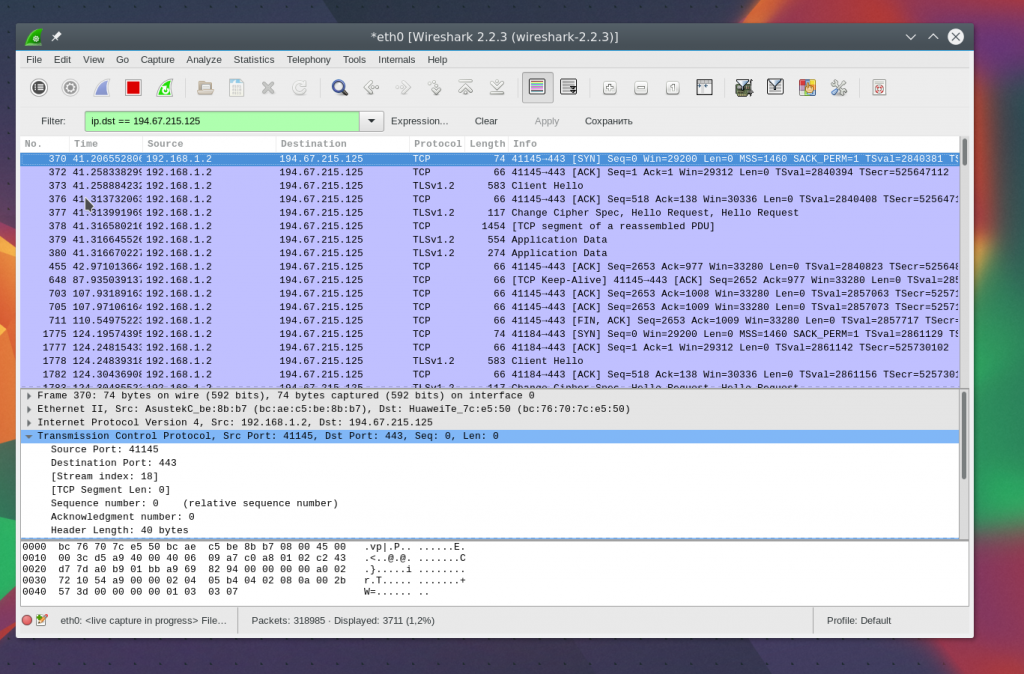
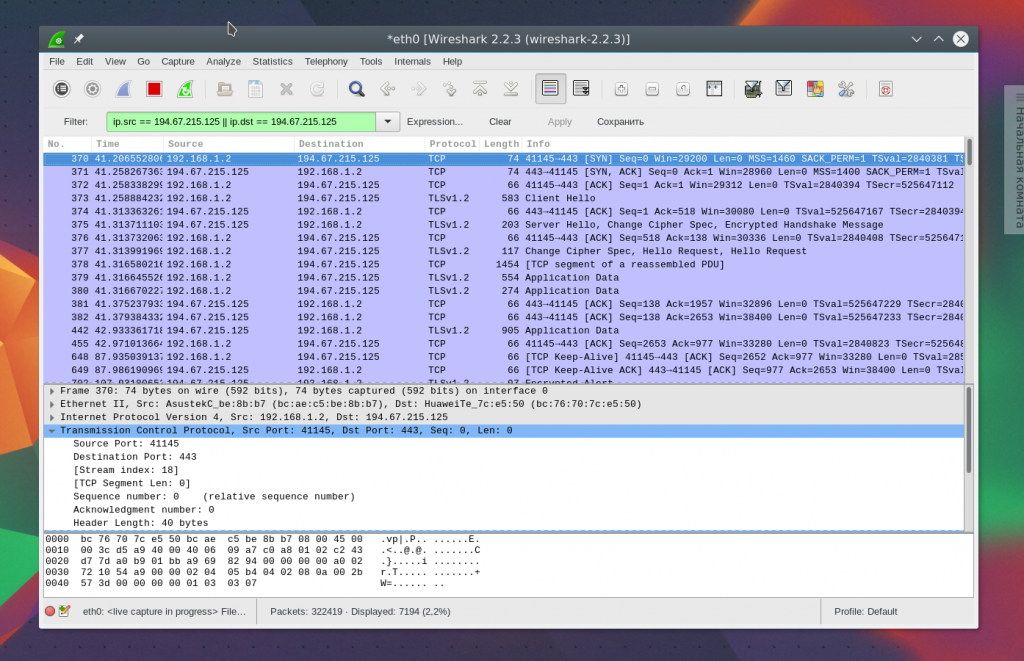
Сначала отфильтруем все пакеты, отправленные на 194.67.215.125 (losst.pro). Наберите строку в поле фильтра и нажмите Apply. Для удобства фильтры Wireshark можно сохранять с помощью кнопки Save:
ip.dst == 194.67.215.125
А чтобы получить не только отправленные пакеты, но и полученные в ответ от этого узла, можно объединить два условия:
ip.dst == 194.67.215.125 || ip.src == 194.67.215.125
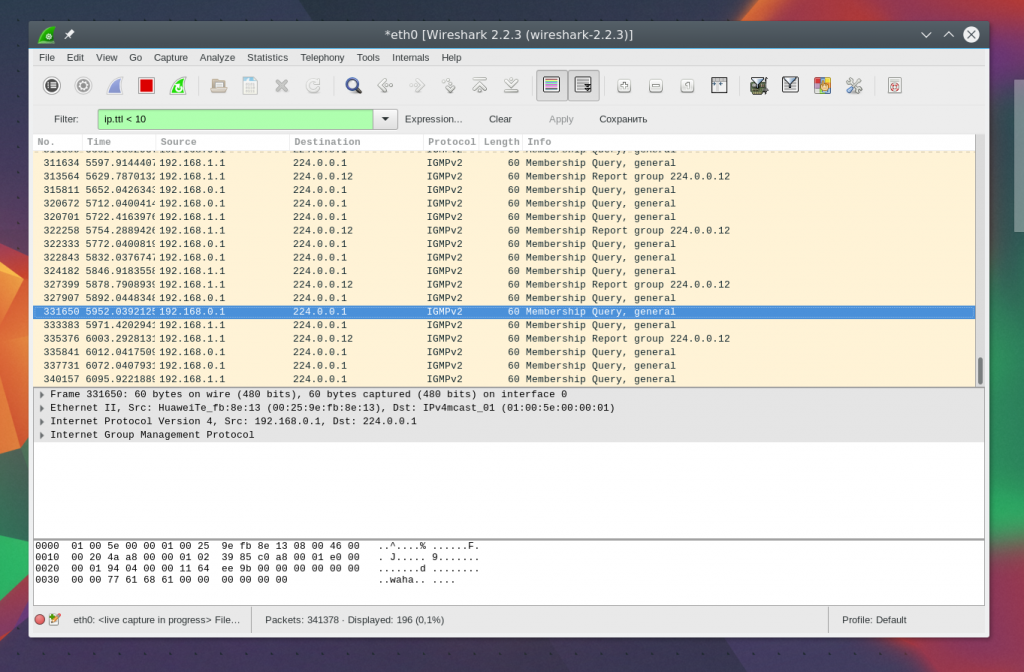
Дальше отберём пакеты с ttl меньше 10:
ip.ttl < 10
Также мы можем отобрать переданные большие файлы:
http.content_length > 5000
Отфильтровав Content-Type, мы можем выбрать все картинки, которые были загружены; выполним анализ трафика Wireshark, пакеты, которого содержат слово image:
http.content_type contains image
Чтобы очистить фильтр, вы можете нажать кнопку Clear. Бывает, вы не всегда знаете всю необходимую для фильтрации информацию, а просто хотите изучить сеть. Вы можете добавить любое поле пакета в качестве колонки и посмотреть его содержимое в общем окне для каждого пакета.
Например, я хочу вывести в виде колонки ttl (время жизни) пакета. Для этого откройте информацию о пакете, найдите это поле в разделе IP. Затем вызовите контекстное меню и выберите опцию Apply As Column:

Далее вы увидите нужную колонку после обновления:
Таким же образом можно создать фильтр на основе любого нужного поля. Выберите его и вызовите контекстное меню, затем нажмите Apply as filter или Prepare as filter, затем выбираем Selected, чтобы вывести только выбранные значения, или Not selected, чтобы их убрать:
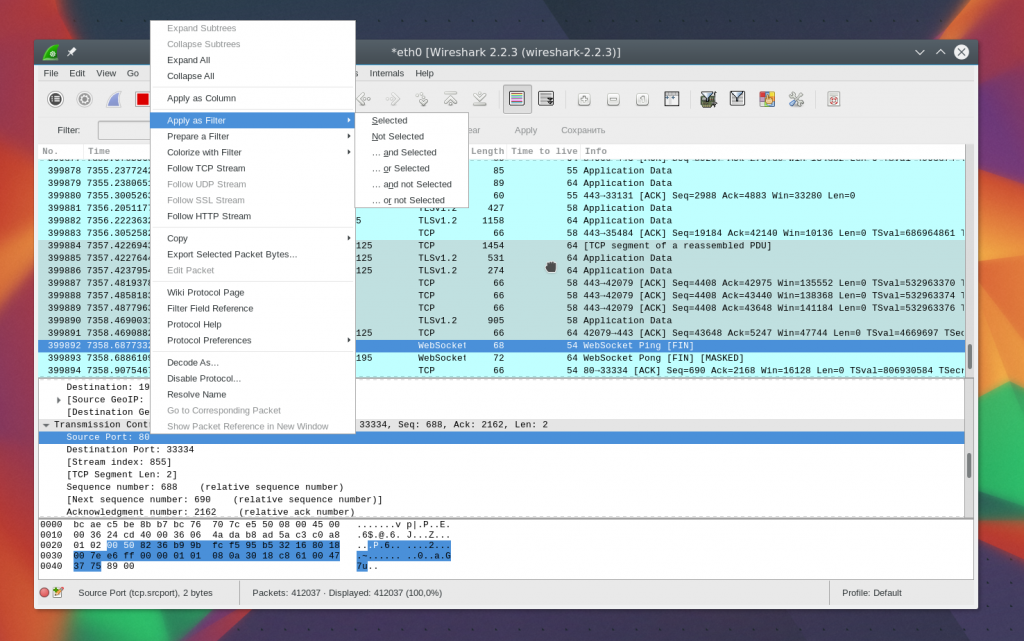
Указанное поле и его значение будет применено или во втором случае подставлено в поле фильтра:
Таким способом вы можете добавить в фильтр поле любого пакета или колонку. Там тоже есть эта опция в контекстном меню. Для фильтрации протоколов вы можете использовать и более простые условия. Например, выполним анализ трафика Wireshark для протоколов HTTP и DNS:
http || dns
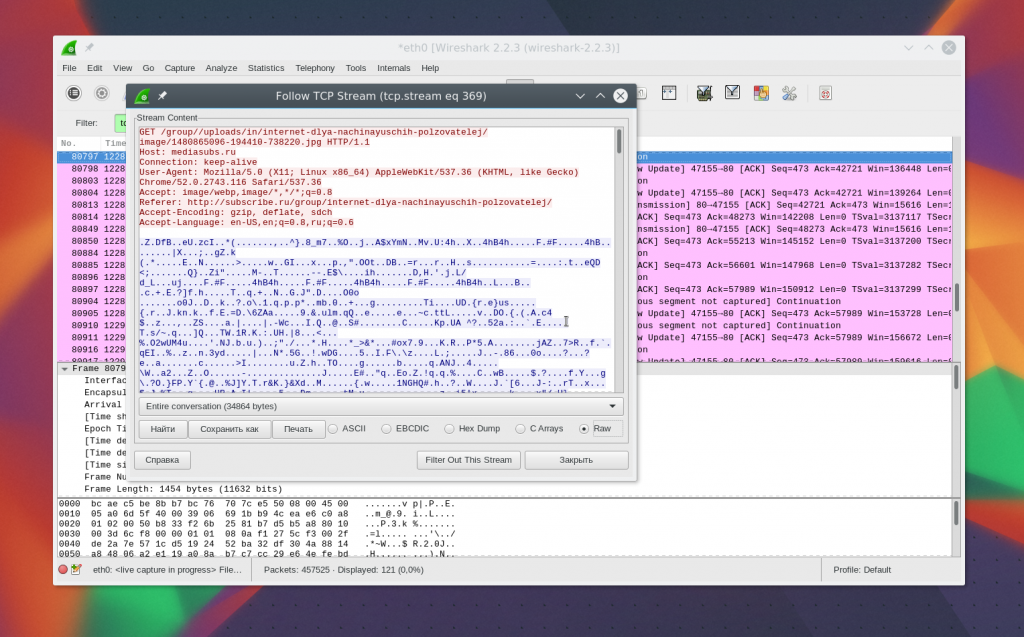
Еще одна интересная возможность программы — использование Wireshark для отслеживания определённого сеанса между компьютером пользователя и сервером. Для этого откройте контекстное меню для пакета и выберите Follow TCP stream.

Затем откроется окно, в котором вы найдете все данные, переданные между сервером и клиентом:
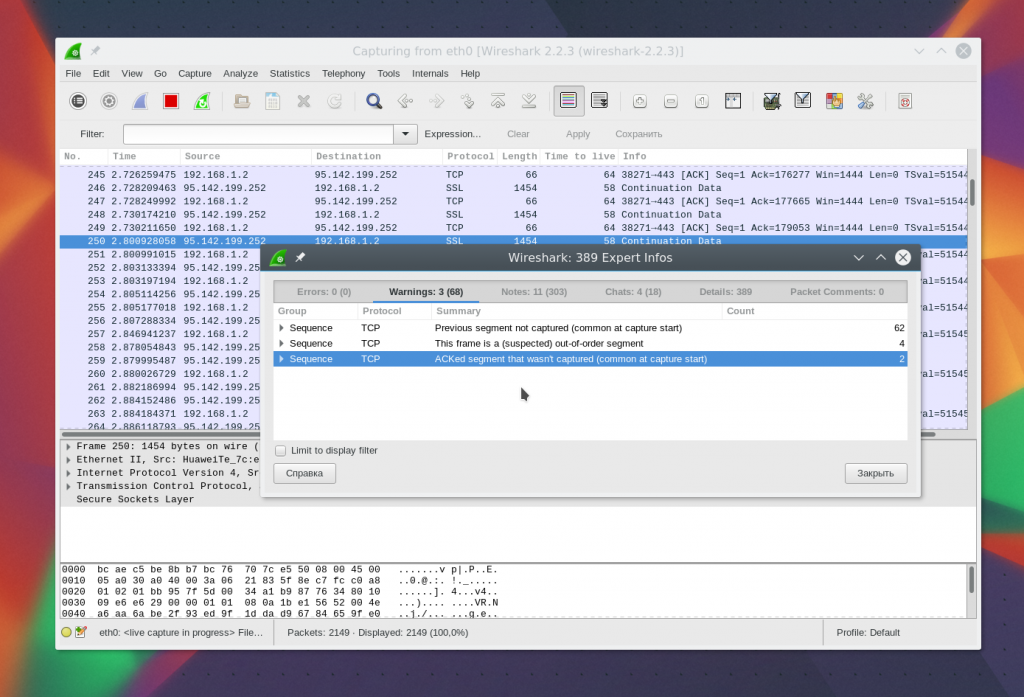
Диагностика проблем Wireshark
Возможно, вам интересно, как пользоваться Wireshark 2.0 для обнаружения проблем в сети. Для этого в левом нижнем углу окна есть круглая кнопка, при нажатии на неё открывается окно Expet Tools. В нём Wireshark собирает все сообщения об ошибках и неполадках в сети:
Окно разделено на такие вкладки, как Errors, Warnings, Notices, Chats. Программа умеет фильтровать и находить множество проблем с сетью, и тут вы можете их очень быстро увидеть. Здесь тоже поддерживаются фильтры Wireshark.
Анализ трафика Wireshark
Вы можете очень просто понять, что именно скачивали пользователи и какие файлы они смотрели, если соединение не было зашифровано. Программа очень хорошо справляется с извлечением контента.
Для этого сначала нужно остановить захват трафика с помощью красного квадрата на панели. Затем откройте меню File -> Export Objects -> HTTP:
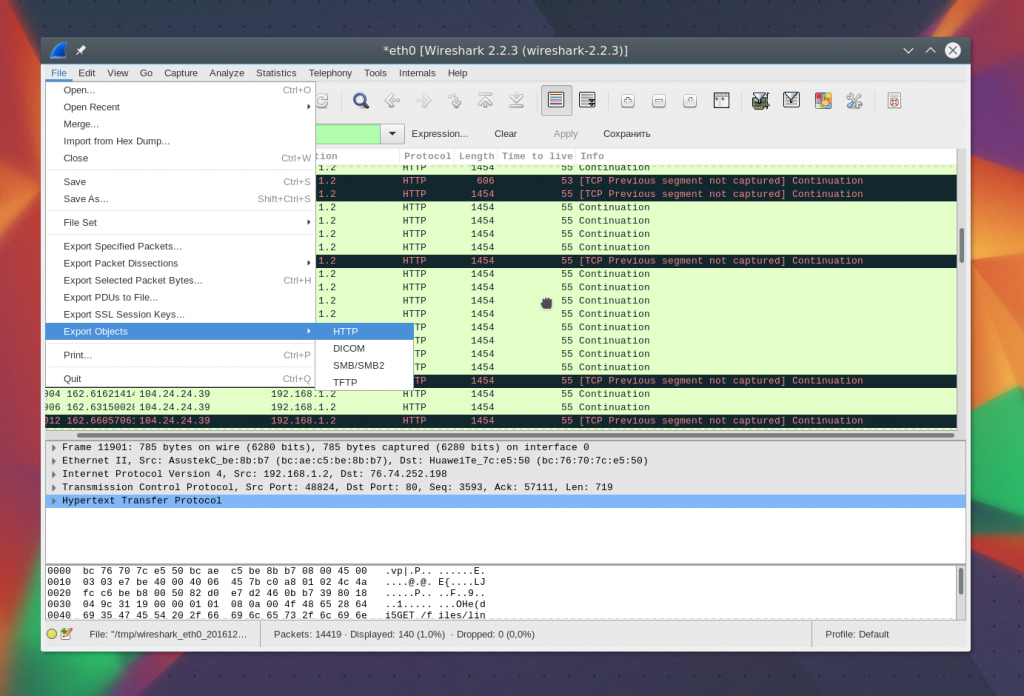
Далее в открывшемся окне вы увидите все доступные перехваченные объекты. Вам достаточно экспортировать их в файловую систему. Вы можете сохранять как картинки, так и музыку.
Дальше вы можете выполнить анализ сетевого трафика Wireshark или сразу открыть полученный файл другой программой, например плеером.
Выводы
В этой статье мы рассмотрели, как пользоваться Wireshark 2 для анализа сетевого трафика, а также примеры решения проблем с сетью. Это очень мощная утилита, которая имеет очень много функций. Всю её функциональность невозможно охватить в одной статье, но приведенной здесь базовой информации будет вполне достаточно, чтобы вы могли сами освоить всё необходимое.
Обнаружили ошибку в тексте? Сообщите мне об этом. Выделите текст с ошибкой и нажмите Ctrl+Enter.

Статья распространяется под лицензией Creative Commons ShareAlike 4.0 при копировании материала ссылка на источник обязательна .
Packet loss and other related metrics like bit error rate (BER) can be hard or impossible to empirically see by looking at dumps in Wireshark, depending on what layer you’re wanting to look at. And a lot of it is highly dependent on what protocols you’re using and what software/firmware is implementing it.
I had this exact experience with Wi-Fi routers, for example. I needed to empirically test the BER of a given Wi-Fi link. But it turns out that 802.11 has a TCP-like CRC based retransmit system that all occurs at the link layer.
So, for example, you may send a UDP packet from Wi-Fi device A to Wi-Fi device B. In transit, a couple of bits get flipped, device B sees that the CRC is wrong and sends a request for retransmit. The packet gets sent again, and again gets corrupted. On the third try, though, the packet gets through fine.
From this, you would hope to see some kind of packet loss metric right? Well, unfortunately no. This whole interchange happens below Wireshark. All it sees is a UDP packet get sent successfully, but take three times as long as normal to get there. (I wound up having to make kernel modifications to send out a notice when link layer CRC errors occurred. It was a mess!)
Introduction to TCP Retransmission
TCP is one of the reliable protocols working in the transport layer, in terms of Open System Interconnect (OSI) model. The protocol offers packet delivery guarantees, even if some of the packets have been lost during the transmission. The lost packets are recovered by retransmissions and acknowledgments while sequence numbers are used to determine correct packet reordering in the receiving side.
Whenever a sender transmits a packet, it saves a copy of the packet int its buffer and it stays there until receiving side acknowledges that it has received the packet. After that, the copy gets deleted and resources are released for future use.
Packet loss may happen due to two main reasons which can fall into many sub categories. Packet loss is mostly caused by hardware issues, software bugs, network congestion, and some other factors. Before diving into retransmissions and examining the types of retransmissions, we need to explain two concepts.
How to get TCP Round-Trip Time (RTT)?
For sake of simplicity, lets first go with pinging. I am using Windows OS and when I ping 1.1.1.1 address, it displays an output that shows me how much time it takes to send an ICMP packet from my computer to the server and gets back an answer from the server to my computer. The total time is called RTT for ping.
ALSO READ: Troubleshooting TLS Failures using Wireshark
My ping command displays the RTT for each packet sent and returned below.
# ping 1.1.1.1

Pinging 1.1.1.1 with 32 bytes of data:
Reply from 1.1.1.1: bytes=32 time=12ms TTL=56
Reply from 1.1.1.1: bytes=32 time=12ms TTL=56
Reply from 1.1.1.1: bytes=32 time=11ms TTL=56
Reply from 1.1.1.1: bytes=32 time=37ms TTL=56
Ping statistics for 1.1.1.1:
    Packets: Sent = 4, Received = 4, Lost = 0 (0% loss),
Approximate round trip times in milli-seconds:
    Minimum = 11ms, Maximum = 37ms, Average = 18ms

The similar concept can be applied to TCP as well. RTT is how long it takes to receive an ACK for data that has been sent. Wireshark is capable of calculating and displaying TCP RTT in the header. Let’s get our hands dirty and capture a TCP flow. We will measure RTT for the first packet (SYN) in the flow.
- Go to the TCP header and expand [SEQ/ACK Analysis] tree.
- You should see something like below.

As you see in the screenshot above, after SYN/ACK packet arrived, the RTT for the SYN packet has calculated as 0.229751 second.
Analysing TCP Retransmission Timeout (RTO)
When a packet is sent over a network, the sender starts a timer and expects the packet to be acknowledged before the timer expire. If the packet gets lost or the sender does not receive the acknowledgment in the time, the timer expires and the sender retransmits the packet again. This timer is called RTO which is doubled after each retransmission. When RTO is calculated, RTT parameter is taken into account. The number of retransmissions depends on what type of operating system (OS) you use or what kind of configuration they have. I will create 3 scenarios in which we will observe RTOs and retransmissions.
ALSO READ: Troubleshoot Packet Fragmentation Issues with Wireshark
Scenario 1
In this scenario, we will use a Windows 10 client and try to reach 8.8.8.8 (dns.google) through port 125, which we know it is filtered by a firewall. All our packets will be dropped. The screenshot is below.

As you see, 4 times retransmission happened before it gave up. Each time RTO doubled in the “Delta” column. RTO timer can be customized in Windows 10.
Scenario 2
We will repeat the same test with Kali. It has turned out that Kali is more stubborn compared to Windows 10 in terms of retransmissions. It tried 13 times before it gave up. You can see how RTO increased in the figure below.

Scenario 3
In this scenario, we will create the topology below in which two Cisco routers are connected to each other. The client will try to telnet to the server but it will fail due to our configuration.

We will configure the server so that it will drop all the telnet traffic coming from the client. I prepared a configuration that did the filtering. The configuration is below from my Cisco router.
!
ip access-list extended TELNET_TRAFFIC
 permit tcp any host 192.168.1.1 eq telnet

!
class-map match-all SELECT_TELNET
 match access-group name TELNET_TRAFFIC

!
policy-map DROP_TELNET_TRAFFIC
 class SELECT_TELNET
  police cir 8000 conform-action drop  exceed-action drop  violate-action drop
policy-map test

!
interface FastEthernet0/0
 ip address 192.168.1.1 255.255.255.0
 speed auto
 duplex auto
 service-policy input DROP_TELNET_TRAFFIC
!
Now, it is time to telnetting to the server from the client while we are capturing the packets between two parties.
client# telnet 192.168.1.1
Trying 192.168.1.1 ...
% Connection timed out; remote host not responding
It appears that our filtering is working and we will verify that with packet capture as well. The pcaps are below.
ALSO READ: 15 Top Wireshark IP Filters with Examples [Cheat Sheet]

The Cisco router does not seem to try much. It retransmitted only once and then gave it up. All 3 scenarios have proved that different OS uses different implementation for retransmission. This information can be used in OS fingerprinting.
Analysing TCP Retransmission
TCP Retransmission happens when RTO timer expires. For better understanding, we will continue with more scenarios.
Scenario 1
In this scenario, we will imitate packet loss with filtering only http responses coming from a site and examine the captures. Filtering will be made in a node between the client and the server. The captures are below.

Since only http packets coming from the server has been dropped, TCP 3-way handshaking is looking successful. Then the client creates a http GET request and RTO timer starts for that packet (in the row 4).
The packet arrives the server and the server responses back. When the packet reaches our filtering node between the client and the server, the node immediately drops the packet. The client is still waiting for the packet. A soon as the RTO expires, the client retransmits the packet number 5 but still gets no response from the server. It keeps retransmitting the packet until it gives up in the packet number 22 by which it resets the connection.
The RTO increase can be seen in the “Time” column.
ALSO READ: Create Wireshark Configuration Profiles [Step-by-Step]
Scenario 2
We will imitate a low bandwidth, creating an artificial congestion then we will try to download a nice wallpaper and observer what happens in the packet level. I will create a Quality of Service (QoS) rule on node between the client and server, which limits the bandwidth at rate of 8kbps (kilo bit per second). The size of wallpaper is 888KB (Kilo Byte).

Since TCP 3-way handshaking consumes very low bandwidth, the artificial congestion does not seem to affect the first 7 packets. After that you can see the latency in the packet number 8. The latency increases dramatically. Although there are pretty much latency, we do not see any RTO in the first 23 packets. The reason is high RTT. Remember that RTT is taken into consideration when calculating RTO. Then RTOs and retransmissions happen so much that the connection gets terminated later without completing the download.
When I opened the wallpaper, I saw the picture below:
It reminded me the time when we used dial up connection for the internet 😊
What is Fast Retransmission
When a TCP sender receives three duplicate acknowledgements with the same acknowledge number, the sender concludes that the packet has been sent is lost and it retransmits the packet without waiting the RTO for the packet. This method is used to avoid congestion and detect lost packet in the network faster than normal TCP retransmit.
ALSO READ: Steps to perform Remote Packet Capture with Wireshark

How to filter TCP Retransmissions with Wireshark
Wireshark provides a useful feature called “Expert Info”. When Wireshark see some anomalies, it adds some description to packet header, especially for TCP. It analyses TCP flags and inserts a relevant description to the header for informing experts (administrators). We can create a filter and make a “display filter button” for it. Steps are below.
Go to display filter and type analysis.flags && !tcp.analysis.window_update. My output before filtering is below.

Now I am applying the filter below.

After applying the display filter, go to top right and click on the “plus” button.

Fill all the relevant areas and click “OK” to save.

Now you have a button that points to your filter. You should see something like below.

Final Thoughts
TCP retransmissions happen when there is packet loss or congestion, which causes high latency and low speed. TCP implements many methods to recover connections when packet loss occurs. Retransmission and Fast Retransmission are both used for this purpose.