
Время на прочтение
4 мин
Количество просмотров 18K
Приветствую!
В статье посвященной моему профайлеру для Entity Framework-a, я вкратце описал примененную мной форму для сообщения пользователю об исключительной ошибке в приложении. После оценки количества скачиваний примера кода, было решено выделить этот пример в отдельный проект, а также добавить поддержку WPF приложений.
Исходники библиотеки вместе с примерами опубликованы на CodePlex под свободной лицензией MIT: https://uiexceptionhandler.codeplex.com/
Подробности под катом.
Введение
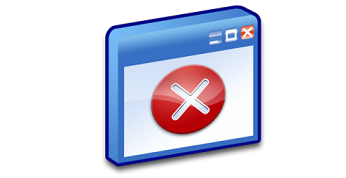
Всем известно, что приложения периодически падают по самым разным причинам, при этом, крайне желательно показывать пользователю дружественное сообщение об ошибке в приложении, вместо стандартного сообщения Windows.
Что получилось
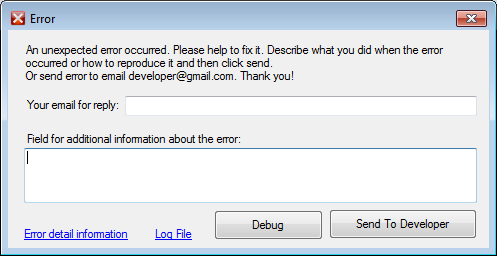
При подключенной библиотеке, в случае падения приложения будет показано следующие сообщение с просьбой добавить описание шагов которые привели к ошибке и свой email для ответа, при этом текст ошибки сохраняется в лог файл.
При клике по кнопке «Error detail information» выводиться дополнительная информация об ошибке:

Кнопка Debug позволяет подключить отладчик Visual Studio.
Кнопка «Send to Developer» отправляет письмо на почту разработчику. В случае ошибки отправки сообщения, пользователю будет предложено самому отправить лог файл разработчику на почту.
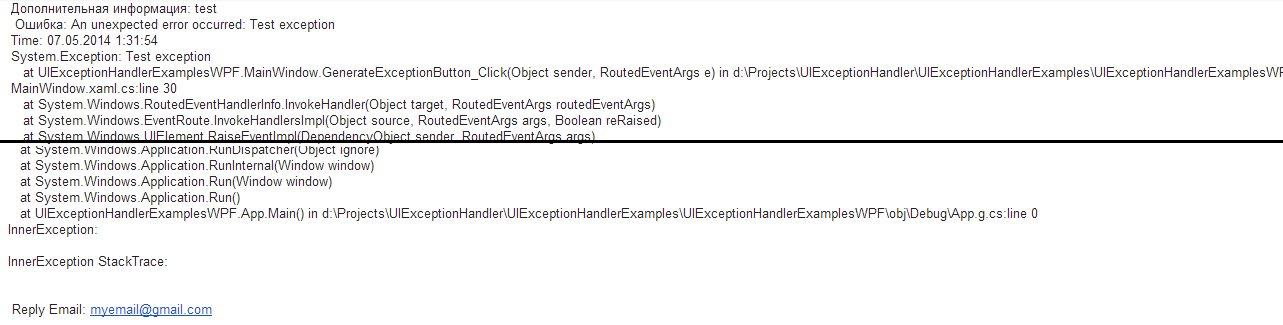
Отправленное разработчику сообщение придет в таком виде:
Использование
1. Забрать последнюю версию кода https://uiexceptionhandler.codeplex.com/SourceControl/latest
2. Собрать в Release mode.
3. Из папки «UIExceptionHandlerLibsDeploy» подключить в проект библиотеку UIExceptionHandlerWinForms.dll в случае WinForms приложения и UIExceptionHandlerWPF.dll в случае WPF приложения.
4. Инициализировать путем вызова статического метода с рядом параметров:
UIException.Start(
   string serverSmtp,
   int portSmtp,
   string passwdSmtp,
   string userSmtp,
   string programmerEmail,
   string fromEmail,
   string subject
)
Как это работает
Статический метод UIException.Start подписывает метод HandleError на событие AppDomain.CurrentDomain.UnhandledException:
AppDomain.CurrentDomain.UnhandledException += (sender, e) => HandleError((Exception)e.ExceptionObject);
Метод HandleError:
private static void HandleError(Exception exception)
{
    try
    {
        // запускаем обработчик формы и передаем ему ссылку на форму наследованную от интерфейса IErrorHandlerForm
        new ErrorHandlerController(exception, new ErrorHandlerForm()).Run();
    }
    catch (Exception e)
    {
        // сохраняем ошибку в лог файл
        LogHelper.Logger.Error(e);
        // в случае ошибки обработки выводим сообщение с просьбой отправить лог файл разработчику на почту
       MessageBox.Show("Error processing exception. Please send log file " + LogHelper.ExceptionLogFileName + " to developer: " + Settings.ProgrammerEmail + " rn Exception:" + e);
        // спрашиваем нужно ли подключить отладчик
        if (MessageBox.Show("Attach debugger? n Only for developer!!!", "Debugging...", MessageBoxButton.YesNo, MessageBoxImage.Question) == MessageBoxResult.Yes)
        {
            Debugger.Launch();
            throw;
        }
    }
    finally
    {
        // обязательно завершаем приложение чтобы windows не вывела стандартное сообщение об ошибке
        Environment.Exit(1);
    }
}
Интерфейс IErrorHandlerForm:
public interface IErrorHandlerForm
{
    event Action OnSendButtonClick;
    event Action OnShowErrorLinkClick;
    event Action OnLogFileLinkClick;
    event Action OnDebugButtonClick;

    // меняет высоту формы
    void SetHeight(int height);
    // задает подробное сообщение об ошибке
    string ExceptionInfoText { get; set; }
    // получает текст из поля дополнительной информации введенной пользователем
    string ExceptionDetailText { get; set; }
    // email пользователя для ответа
    string ReplyEmail { get; }
    void ShowExceptionInfoTextBox(bool isShow);
    // выводит информационное сообщение
    void ShowInfoMessageBox( string text, string caption);
    // выводит диалоговое сообщение
    bool ShowQuestionDialog( string text, string caption);
    // показывает окно в режиме диалога! необходимо чтобы приложение дожидалось закрытия окна и завершилось в finaly
    void ShowViewDialog();
    void UpdateContactEmail(string contactEmail);
}
В качестве библиотеки для логгирования используется NLog. Для того чтобы избежать появления лишних xml файлов, вся конфигурация Nlog-а делается в коде:
private static void ConfigureNlog()
{
    var config = new LoggingConfiguration();

    var fileTarget = new FileTarget();
    config.AddTarget("file", fileTarget);

    fileTarget.Layout = @"${longdate} ${message}";
    fileTarget.FileName = "${basedir}/" + ExceptionLogFileName;

    var rule2 = new LoggingRule("*", LogLevel.Trace, fileTarget);
    config.LoggingRules.Add(rule2);

    LogManager.Configuration = config;
}
Чтобы добиться максимальной простой интеграции в проект, я решил все используемые сборки объединить в одну библиотеку. Делается это при помощи приложения ILMerge, путем добавления скрипта в post-build событие:
if $(ConfigurationName) == Release (
"$(SolutionDir)ILMergeILMerge.exe" /out:"$(SolutionDir)Deploy$(TargetFileName)" "$(TargetDir)*.dll" /target:dll /targetplatform:v4,C:WindowsMicrosoft.NETFramework64v4.0.30319 /wildcards
)

Послесловие
Данное решение было написано для достаточно крупного проекта, применяется уже более 2-х лет, значительно улучшив процесс исправления ошибок, поскольку о каждом падении приложения узнаешь моментально, без дополнительной нотификации от пользователя.
Надеюсь это все будет кому-то полезно!
Всем спасибо за внимание!
I am trying to create an application using WPF. I am trying to fully build it using the MVVM model. However, I am puzzled on how to correctly display the error message. I thought it would be trivial step but seems to be the most complex.
I created the following view using xaml
 <StackPanel Style="{StaticResource Col}">
    <DockPanel>
        <Grid DockPanel.Dock="Top">
            <Grid.ColumnDefinitions >
                <ColumnDefinition Width="*" ></ColumnDefinition>
                <ColumnDefinition Width="*"></ColumnDefinition>
            </Grid.ColumnDefinitions>
            <StackPanel Grid.Column="0" Style="{StaticResource Col}">
                <Label Content="Name" Style="{StaticResource FormLabel}" />
                <Border Style="{StaticResource FormInputBorder}">
                    <TextBox x:Name="Name" Style="{StaticResource FormControl}" Text="{Binding Name, ValidatesOnDataErrors=True, NotifyOnValidationError=True, UpdateSourceTrigger=PropertyChanged}" />
                </Border>
            </StackPanel>
            <StackPanel Grid.Column="1" Style="{StaticResource Col}">
                <Label Content="Phone Number" Style="{StaticResource FormLabel}" />
                <Border Style="{StaticResource FormInputBorder}">
                    <TextBox x:Name="Phone" Style="{StaticResource FormControl}" Text="{Binding Phone, ValidatesOnDataErrors=True, NotifyOnValidationError=True, UpdateSourceTrigger=PropertyChanged}" />
                </Border>
            </StackPanel>
        </Grid>
        <StackPanel Orientation="Horizontal" HorizontalAlignment="Center">
            <Button Style="{StaticResource PrimaryButton}" Command="{Binding Create}">Create</Button>
            <Button>Reset</Button>
        </StackPanel>
    </DockPanel>
</StackPanel>
Then I created the following ViewModel
public class VendorViewModel : ViewModel
{
    protected readonly IUnitOfWork UnitOfWork;
    private string _Name { get; set; }
    private string _Phone { get; set; }

    public VendorViewModel()
        : this(new UnitOfWork())
    {
    }

    public VendorViewModel(IUnitOfWork unitOfWork)
    {
        UnitOfWork = unitOfWork;
    }

    [Required(ErrorMessage = "The name is required")]
    [MinLength(5, ErrorMessage = "Name must be more than or equal to 5 letters")]
    [MaxLength(50, ErrorMessage = "Name must be less than or equal to 50 letters")]
    public string Name
    {
        get { return _Name; }
        set
        {
            _Name = value;
            NotifyPropertyChanged();
        }
    }

    public string Phone
    {
        get { return _Phone; }
        set
        {
            _Phone = value;
            NotifyPropertyChanged();
        }
    }

    /// <summary>
    /// Gets the collection of customer loaded from the data store.
    /// </summary>
    public ICollection<Vendor> Vendors { get; private set; }

    protected void AddVendor()
    {
        var vendor = new Vendor(Name, Phone);
        UnitOfWork.Vendors.Add(vendor);
    }

    public ICommand Create
    {
        get
        {
            return new ActionCommand(p => AddVendor(),
                                     p => IsValidRequest());
        }
    }

    public bool IsValidRequest()
    {
        // There got to be a better way to check if everything passed or now...
        return IsValid("Name") && IsValid("Phone");
    }
}
Here is how my ViewModel base class look like
public abstract class ViewModel : ObservableObject, IDataErrorInfo
{
    /// <summary>
    /// Gets the validation error for a property whose name matches the specified <see cref="columnName"/>.
    /// </summary>
    /// <param name="columnName">The name of the property to validate.</param>
    /// <returns>Returns a validation error if there is one, otherwise returns null.</returns>
    public string this[string columnName]
    {
        get { return OnValidate(columnName); }
    }

    /// <summary>
    /// Validates a property whose name matches the specified <see cref="propertyName"/>.
    /// </summary>
    /// <param name="propertyName">The name of the property to validate.</param>
    /// <returns>Returns a validation error, if any, otherwise returns null.</returns>
    protected virtual string OnValidate(string propertyName)
    {
        var context = new ValidationContext(this)
        {
            MemberName = propertyName
        };

        var results = new Collection<ValidationResult>();
        bool isValid = Validator.TryValidateObject(this, context, results, true);

        if (!isValid)
        {
            ValidationResult result = results.SingleOrDefault(p =>                                                                  p.MemberNames.Any(memberName => memberName == propertyName));
            if (result != null)
                return result.ErrorMessage;
        }
        return null;
    }

    protected virtual bool IsValid(string propertyName)
    {
        return OnValidate(propertyName) == null;
    }

    /// <summary>
    /// Not supported.
    /// </summary>
    [Obsolete]
    public string Error
    {
        get
        {
            throw new NotSupportedException();
        }
    }
}
Here is my ObservableObject class
public class ObservableObject : INotifyPropertyChanged
{
    /// <summary>
    /// Raised when the value of a property has changed.
    /// </summary>
    public event PropertyChangedEventHandler PropertyChanged;

    /// <summary>
    /// Raises <see cref="PropertyChanged"/> for the property whose name matches <see cref="propertyName"/>.
    /// </summary>
    /// <param name="propertyName">Optional. The name of the property whose value has changed.</param>
    protected void NotifyPropertyChanged([CallerMemberName] string propertyName = "")
    {
        PropertyChangedEventHandler handler = PropertyChanged;

        if (handler != null)
        {
            handler(this, new PropertyChangedEventArgs(propertyName));
        }
    }
}
My goal is to show a red border around the incorrect field then display the error message right underneath it to tell the use what went wrong.
How do I show the error correctly? Also, how to I not show any error when the view is first loaded?
Base on this blog I need to edit the Validation.ErrorTemplate
So I tried adding the following code to the App.xaml file
    <!-- Style the error validation by showing the text message under the field -->
    <Style TargetType="TextBox">
        <Setter Property="Validation.ErrorTemplate">
            <Setter.Value>
                <ControlTemplate>
                    <StackPanel>
                        <Border BorderThickness="1" BorderBrush="DarkRed">
                            <StackPanel>
                                <AdornedElementPlaceholder x:Name="errorControl" />
                            </StackPanel>
                        </Border>
                        <TextBlock Text="{Binding AdornedElement.ToolTip, ElementName=errorControl}" Foreground="Red" />
                    </StackPanel>
                </ControlTemplate>
            </Setter.Value>
        </Setter>
        <Style.Triggers>
            <Trigger Property="Validation.HasError" Value="true">
                <Setter Property="BorderBrush" Value="Red" />
                <Setter Property="BorderThickness" Value="1" />
                <Setter Property="ToolTip" Value="{Binding RelativeSource={RelativeSource Self}, Path=(Validation.Errors)[0].ErrorContent}" />
            </Trigger>
        </Style.Triggers>
    </Style>
But that isn’t showing the error message, also when the view is first loaded I get an error. Finally, even when the form become valid, the action button stay disabled.
UPDATED
After moving the Property="Validation.ErrorTemplate" into the FormControl group it worked. However, the error message seems to be going over the buttons instead of pushing the buttons down. Also, the text does not seems to be wrapping vertically allowing the border to strach over the other control as you can see in the following screen shows.


When my textbox is empty/null, i need to display «Required».
In my xaml:
  <TextBox Name="txtLastName"  Grid.Column="1"  Grid.Row="1"  Margin="3">
            <TextBox.Text>
                <Binding Path="LastName">
                    <Binding.ValidationRules>
                        <validators:Contractor
                                    MinimumLength="1"
                                    MaximumLength="40"
                                    ErrorMessage="Required" />
                    </Binding.ValidationRules>
                </Binding>
            </TextBox.Text>
        </TextBox>
In my class:
public string LastName
        {
            get { return _lastName; }
            set
            {
                _lastName = value;
              NotifyPropertyChanged("LastName");

            }
        }

public event PropertyChangedEventHandler PropertyChanged;

    private int _minimumLength = -1;
    private int _maximumLength = -1;
    private string _errorMessage;

    public int MinimumLength
    {
        get { return _minimumLength; }
        set { _minimumLength = value; }
    }

    public int MaximumLength
    {
        get { return _maximumLength; }
        set { _maximumLength = value; }
    }

    public string ErrorMessage
    {
        get { return _errorMessage; }
        set { _errorMessage = value; }
    }

    public override ValidationResult Validate(object value,CultureInfo cultureInfo)
    {
        ValidationResult result = new ValidationResult(true, null);
        string inputString = (value ?? string.Empty).ToString();
        if (inputString.Length < this.MinimumLength || value==null ||
               (this.MaximumLength > 0 &&
                inputString.Length > this.MaximumLength))
        {
            result = new ValidationResult(false, this.ErrorMessage);
        }
        return result;
    }


  private void NotifyPropertyChanged(string propertyName)
        {
            if (PropertyChanged != null)
                PropertyChanged(this, new PropertyChangedEventArgs(propertyName));
        }
What i get is the textbox turns into red border when the data is null/empty and i am not able to see the «Required» error message, any thoughts?
asked Feb 16, 2012 at 23:36
![]()
Sharpeye500Sharpeye500
8,70525 gold badges94 silver badges142 bronze badges
(The red border is the default behavior of a TextBox when the attached property Validation.HasError is true.
In order to display the error messsage you’ll have to do that yourself by binding to Validation.Errors
. Validation.Errors is a list of error from each validator applied to the TextBox.
Now in your case you only have one validator so in order to get the error message you need to bind to Validation.Errors[0].ErrorContent
Example
<StackPanel Orientation="Horizontal">
    <TextBox Name="txtLastName" Width="100">
        <TextBox.Text>
            <Binding Path="LastName">
                <Binding.ValidationRules>
                    <validators:Contractor
                                MinimumLength="1"
                                MaximumLength="40"
                                ErrorMessage="Required" />
                </Binding.ValidationRules>
            </Binding>
        </TextBox.Text>
    </TextBox>
    <!-- Show error message tot the right of the TextBox-->
    <TextBlock Text="{Binding (Validation.Errors)[0].ErrorContent, ElementName=txtLastName}"/>
</StackPanel>
answered Feb 16, 2012 at 23:56
![]()
3
In the previous post, we created a base class that listens for unhandled exceptions in our .NET application. In this post we will derive from that class to show an error window for every unhandled exception that occurs in our program.
The WindowExceptionHandler class
Let’s start with the WindowExceptionHandler. This class inherits from GlobalExcptionHanderBase (which we implemented in the previous post) and implements the OnUnhandledException(Exception) method. This method will be called whenever there is an unhandled exception in our application.
Inside that method, we create an instance of the ExceptionWindow class, set its DataContext property and display it by calling exceptionWindow.Show().
    /// <summary>
    /// This ExceptionHandler implementation opens a new
    /// error window for every unhandled exception that occurs.
    /// </summary>
    class WindowExceptionHandler : GlobalExceptionHandlerBase
    {
        /// <summary>
        /// This method opens a new ExceptionWindow with the
        /// passed exception object as datacontext.
        /// </summary>
        public override void OnUnhandledException(Exception e)
        {
            Application.Current.Dispatcher.BeginInvoke(new Action(() => {
                var exceptionWindow = new ExceptionWindow();
                exceptionWindow.DataContext = new ExceptionWindowVM(e);
                exceptionWindow.Show();
            }));
        }
    }
Notice that the code is wrapped inside a Dispatcher.BeginInvoke(..) call. This is because the OnUnhandledException(..) method might be called from a thread other then the main thread. To make sure that our ExceptionWindow is created and shown on the main (dispatcher) thread we post our exception window creation with BeginInvoke(..) to be executed on the next dispatcher frame.
Creating the exception window
The content of an exception error window will be very different depending on your use case. If the window is for development purpose only, we probably want as much technical information about the exception as possible. If its presented to the non technical user, it might be better to just let them know that something went wrong without any technical details at all.
For the purpose of this post, we create a exception window that hides the details behind an expander control. The following screenshot shows the expanded window:

Here is the XAML code that creates the above window
<Window x:Class="Tcoc.ExceptionHandler.Windows.ExceptionWindow"
        xmlns="http://schemas.microsoft.com/winfx/2006/xaml/presentation"
        xmlns:x="http://schemas.microsoft.com/winfx/2006/xaml"
        xmlns:d="http://schemas.microsoft.com/expression/blend/2008"
        xmlns:mc="http://schemas.openxmlformats.org/markup-compatibility/2006"
        Title="Unexpected application error"
        Width="700"
        MaxHeight="650"
        ResizeMode="NoResize"
        SizeToContent="Height"
        mc:Ignorable="d">
    <Window.Resources>
        <Style x:Key="Label"
               TargetType="TextBlock">
            <Setter Property="FontWeight" Value="Bold" />
            <Setter Property="Margin" Value="0,8,0,4" />
        </Style>
        <Style x:Key="Content"
               TargetType="TextBlock">
            <Setter Property="Margin" Value="0,4,0,8" />
        </Style>
    </Window.Resources>
    <Grid>
        <Grid.RowDefinitions>
            <!--  Info  -->
            <RowDefinition Height="auto" />
            <!--  Exception details  -->
            <RowDefinition Height="*" />
            <!--  Button  -->
            <RowDefinition Height="auto" />
        </Grid.RowDefinitions>

        <!--  Info  -->
        <TextBlock Margin="16"
                   FontSize="14"
                   Text="An unexpected error occured. The application state might be corrupted."
                   TextWrapping="Wrap" />

        <!--  Exception details  -->
        <Border Grid.Row="1"
                MaxHeight="450"
                Background="#EEEEEE">
            <Expander Margin="16,8,16,8"
                      Header="Exception Details">

                <ScrollViewer HorizontalScrollBarVisibility="Auto"
                              VerticalScrollBarVisibility="Auto">
                    <StackPanel>
                        <!--  Exception Message  -->
                        <TextBlock Style="{StaticResource Label}"
                                   Text="Exception message" />
                        <TextBlock Grid.Column="1"
                                   Text="{Binding Exception.Message, Mode=OneWay, TargetNullValue=-}"
                                   TextWrapping="Wrap" />
                        <!--  Exception Type  -->
                        <TextBlock Style="{StaticResource Label}"
                                   Text="Exception type" />
                        <TextBlock Style="{StaticResource Content}"
                                   Text="{Binding ExceptionType, Mode=OneWay, TargetNullValue=-}" />
                        <!--  Callstack  -->
                        <TextBlock Style="{StaticResource Label}"
                                   Text="Callstack" />
                        <TextBlock Style="{StaticResource Content}"
                                   Text="{Binding Exception.StackTrace, Mode=OneWay, TargetNullValue=-}" />
                        <!--  Inner exception  -->
                        <TextBlock Style="{StaticResource Label}"
                                   Text="Inner exception" />
                        <TextBlock Style="{StaticResource Content}"
                                   Text="{Binding Exception.InnerException, Mode=OneWay, TargetNullValue=-}" />
                    </StackPanel>
                </ScrollViewer>
            </Expander>
        </Border>
        <!--  Close Button  -->
        <Button Grid.Row="2"
                Margin="16"
                Padding="8"
                HorizontalAlignment="Right"
                Click="OnExitAppClick"
                Content="Exit Application" />
    </Grid>
</Window>
To access the exceptions details via databinding the DataContext property of the window is set to an instance of the ExceptionWindowVM class.The view model holds the Exception object and its type as a string property:
    class ExceptionWindowVM
    {
        public Exception Exception { get; }

        public string ExceptionType { get; }

        public ExceptionWindowVM(Exception exc)
        {
            Exception = exc;
            ExceptionType = exc.GetType().FullName;
        }
    }
We could have used the Exception object itself as DataContext. But there is no Type property on the Exception class to bind to. There are of course other ways to display the type string but wrapping the exception in a view model makes the code easily extendable for future requirements.
To setup the WindowExceptionHandler in our application we just need to new up an instance of the class somewhere. This is typically done in a place where all the wiring of the application happens. In this sample project its simply the App’s constructor in App.xaml.cs:
    public partial class App : Application
    {
        private readonly WindowExceptionHandler _exceptionHandler;

        public App()
        {
            _exceptionHandler = new WindowExceptionHandler();
        }
    }
Thats all the code we need to show an exception window for every unhandled exception in our application!
Handle exception or exit application?
Once the exception windows shows up, there was an unhandled exception in our application. Which options do we give to the user now? Can she just close the exception window and use our application like before or is it better to shut down the application?
The application might work as expected even after an unhandled exception. But we have no way to proof this inside our global exception handler. Since the exception was not handled by our applications code, it might have corrupted the application state. Letting the user work with our application in this situation can be very dangerous. In the best case the app might work just like before, or there might be further exceptions. But it might also leave our application in a state where the user can do things she might not be allowed to or …, … the possibilities for error are endless.
In case of an unhandled exception in a real world application, we have no other choice then to shut down the application. This is why there is an “Exit application” button instead of an “OK” button on the exception window. There is also an event handler for the Closed event of the exception window to exit the app when the user presses the X on button.
A sample project
The MainWindow of the sample project for this post comes with a few buttons that throw different kind of exceptions. The simplest one is a normal exception that is thrown on the main thread. Then there is a button that produces an UnobservedTaskException on the finalizer thread and there are the bad ones that throw exceptions on worker threads.
As explained in the previous post, exceptions on threads other then the main thread cannot be handled and will terminate the process. This means our exception window wont work for these exceptions.
To make it work, we need to catch all exceptions on worker threads and re-throw them on to the main (dispatcher) thread. The code behind the last button “Throw on another Thread handled” does exactly that.
        private void RaiseExceptionOnThreadSafe(object sender, RoutedEventArgs e)
        {
            Thread t = new Thread(() =>
            {
                try
                {
                    // Some business logic
                    // ...
                    throw new SampleException("Sample");
                }
                catch (Exception exc)
                {
                    // Catch all exceptions on the worker thread and
                    // re-throw them on the dispatcher to prevent an
                    // application crash without exception window.
                    exc.ThrowOnDispatcher();
                }
            });
            t.Start();
        }
It wraps the business logic inside a Try-Catch block and throws the exception on the dispatcher.
If you use the Task or Task<T> for asynchronous programming in your application, a lot of these problems are handled for you. Exceptions in async methods are catched by the framework and are stored in the returning Task object. Awaiting the task will then re-throw the exception on the calling thread. Unless you are using async void… In an async void method there is no Task object returned so the exception cannot be stored and will be thrown on whatever thread the method’s code is executed. This might not be the main thread. So do not create async void methods, but if you do, wrap the await part in a Try-Catch block and re-throw the exception on the dispatcher as above. Here is a handy ThrowOnDispatcher() extension method for this situation:
        public static void ThrowOnDispatcher(this Exception exc)
        {
            Application.Current.Dispatcher.BeginInvoke(new Action(() => {
                // preserve the callstack of the exception
                ExceptionDispatchInfo.Capture(exc).Throw();
            }));
        }
Summary
We used the GobalExceptionHandlerBase class from the previous post to create a WindowExceptionHandler that shows an exception window for every unhandled exception that occurs in our application.
We saw that it is important to shut down the application after an unhandled exception because we might have corrupted the application state and that exceptions on worker threads will terminate our application without a chance to display an error to the user.
All the code for this post can be found on this Github repository
Валидация данных
Последнее обновление: 31.10.2015
При работе с данными важную роль играет валидация данных. Прежде чем использовать полученные от пользователя данные, нам надо убедиться,
что они введены правильно и представляют корректные значения. Один из встроенных способов проверки введенных данных в WPF представлен классом
ExceptionValidationRule. Этот класс обозначает введенные данные как некорректные, если в процессе ввода возникает какое-либо исключение,
например, исключение преобразования типов.
Итак, допустим, у нас определен следующий класс:
    public class PersonModel
    {
        public string Name { get; set; }
        public int Age { get;set;}
        public string Position { get; set; }
    }
Этот класс представляет человека и предполагает три свойства: имя, возраст и должность. Понятно, что возраст должен представлять числовое значение.
Однако пользователи могут ввести что угодно. Мы можем обрабатывать ввод с клавиатуры, а можем воспользоваться классом ExceptionValidationRule,
который в случае неудачи преобразования строки в число установит красную границу вокруг текстового поля.
Сначала создадим в файле кода объект нашего класса PersonModel и установим контекст данных окна:
public partial class MainWindow : Window
{
    PersonModel Tom;
    public MainWindow()
    {
        InitializeComponent();
        Tom=new PersonModel();
        this.DataContext = Tom;
    }
}
Теперь установим привязку в xaml-коде:
<Window x:Class="DataValidationApp.MainWindow"
        xmlns="http://schemas.microsoft.com/winfx/2006/xaml/presentation"
        xmlns:x="http://schemas.microsoft.com/winfx/2006/xaml"
        xmlns:d="http://schemas.microsoft.com/expression/blend/2008"
        xmlns:mc="http://schemas.openxmlformats.org/markup-compatibility/2006"
        xmlns:local="clr-namespace:DataValidationApp"
        mc:Ignorable="d"
        Title="MainWindow" Height="250" Width="300">
    <Grid>
        <Grid.RowDefinitions>
            <RowDefinition />
            <RowDefinition />
            <RowDefinition />
        </Grid.RowDefinitions>
        <Grid.ColumnDefinitions>
            <ColumnDefinition Width="Auto" />
            <ColumnDefinition />
        </Grid.ColumnDefinitions>
        <TextBox Grid.Column="1" Height="30" Margin="0 0 15 0"/>

        <TextBox Grid.Column="1" Grid.Row="1" Height="30"  Margin="0 0 15 0">
            <TextBox.Text>
                <Binding Path="Age">
                    <Binding.ValidationRules>
                        <ExceptionValidationRule />
                    </Binding.ValidationRules>
                </Binding>
            </TextBox.Text>
        </TextBox>

        <TextBox Grid.Column="1" Grid.Row="2" Height="30" Margin="0 0 15 0" />
        <Label Content="Введите имя" Height="30" />
        <Label Grid.Row="1" Content="Введите возраст" Height="30" />
        <Label Grid.Row="2" Content="Введите должность" Height="30" />
    </Grid>
</Window>
В данном случае мы задаем объект Binding для свойства Text. Данный объект имеет коллекцию правил валидации вводимых данных — ValidationRules.
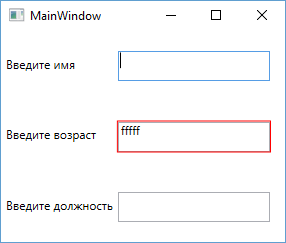
Эта коллекция принимает только одно правило валидации, представленное классом ExceptionValidationRule. Запустим приложение на выполнение
и попробуем ввести в текстовое поле какое-нибудь нечисловое значение. В этом случае текстовое поле будет обведено красным цветом, указывая на то,
что в вводимых данных имеются ошибки.
Мы также можем реализовать свою логику валидации для класса модели. Для этого модель должна реализовать интерфейс IDataErrorInfo. Этот интерфейс
имеет следующий синтаксис:
public interface IDataErrorInfo
{
	string Error {get;}
    string this[string columnName] { get;}
}
Допустим, мы хотим ограничить возраст человека только положительными значениями от 0 до 100. Тогда валидация модели будет выглядеть следующим образом:
public class PersonModel : IDataErrorInfo
{
    public string Name { get; set; }
    public int Age {get;set;}
    public string Position { get; set; }
    public string this[string columnName]
    {
        get
        {
            string error=String.Empty;
            switch (columnName)
            {
                case "Age" :
					if ((Age < 0) || (Age > 100))
					{
						error = "Возраст должен быть больше 0 и меньше 100";
					}
					break;
                case "Name" :
                    //Обработка ошибок для свойства Name
                    break;
                case "Position" :
                    //Обработка ошибок для свойства Position
                    break;
            }
            return error;
        }
    }
    public string Error
    {
        get { throw new NotImplementedException(); }
    }
}
И последнее — нам осталось немного подкорректировать xaml-код. Теперь нам надо использовать в качестве правила валидации класс
DataErrorValidationRule:
<TextBox Grid.Column="1" Grid.Row="1" Height="30"  Margin="0 0 15 0">
    <TextBox.Text>
        <Binding Path="Age">
            <Binding.ValidationRules>
                <DataErrorValidationRule />
            </Binding.ValidationRules>
        </Binding>
    </TextBox.Text>
</TextBox>
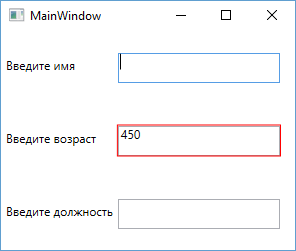
Так как число 450 больше 100 и поэтому не является валидным, то текстовое поле выделяется красным.
Настройка внешнего вида при ошибке валидации
Но это еще не все. Мы можем сами управлять через шаблоны отображением ошибки ввода. В предыдущем случае у нас граница текстового поля при ошибке
окрашивалась в красный цвет. Попробуем настроить данное действие. Для этого нам нужно использовать элемент AdornedElementPlaceholder.
Итак изменим разметку приложения следующим образом, добавив в нее шаблон элемента управления:
<Window x:Class="DataValidationApp.MainWindow"
        xmlns="http://schemas.microsoft.com/winfx/2006/xaml/presentation"
        xmlns:x="http://schemas.microsoft.com/winfx/2006/xaml"
        xmlns:d="http://schemas.microsoft.com/expression/blend/2008"
        xmlns:mc="http://schemas.openxmlformats.org/markup-compatibility/2006"
        xmlns:local="clr-namespace:DataValidationApp"
        mc:Ignorable="d"
        Title="MainWindow" Height="250" Width="300">
    <Window.Resources>
        <ControlTemplate x:Key="validationFailed">
            <StackPanel Orientation="Horizontal">
                <Border BorderBrush="Violet" BorderThickness="2">
                    <AdornedElementPlaceholder />
                </Border>
                <TextBlock Foreground="Red" FontSize="26" FontWeight="Bold">!</TextBlock>
            </StackPanel>
        </ControlTemplate>
    </Window.Resources>
    <Grid>
        <Grid.RowDefinitions>
            <RowDefinition />
            <RowDefinition />
            <RowDefinition />
        </Grid.RowDefinitions>
        <Grid.ColumnDefinitions>
            <ColumnDefinition Width="Auto" />
            <ColumnDefinition />
        </Grid.ColumnDefinitions>
        <TextBox Grid.Column="1" Height="30" Margin="0 0 15 0"/>

        <TextBox Grid.Column="1" Grid.Row="1" Height="30"  Margin="0 0 15 0"
			Validation.ErrorTemplate="{StaticResource validationFailed}" >
            <TextBox.Text>
                <Binding Path="Age">
                    <Binding.ValidationRules>
                        <DataErrorValidationRule />
                    </Binding.ValidationRules>
                </Binding>
            </TextBox.Text>
        </TextBox>

        <TextBox Grid.Column="1" Grid.Row="2" Height="30" Margin="0 0 15 0" />
        <Label Content="Введите имя" Height="30" />
        <Label Grid.Row="1" Content="Введите возраст" Height="30" />
        <Label Grid.Row="2" Content="Введите должность" Height="30" />
    </Grid>
</Window>
С помощью свойства Validation.ErrorTemplate мы получаем шаблон, который будет отрабатывать при ошибке валидации.
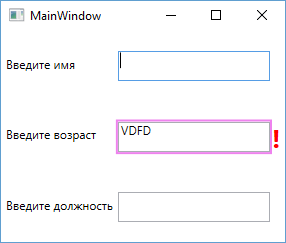
Этот шаблон, определенный выше в ресурсах окна, определяет границу фиолетового цвета вокруг элемента ввода, а также отображает рядом с ним
восклицательный знак красного цвета. Запустим приложение и попробуем ввести в текстовое поле какое-нибудь некорректное значение. В результате сработает наш шаблон:
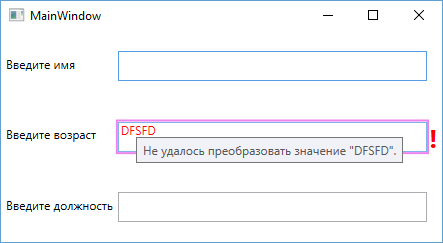
Мы также можем определить поведение и визуализацию через триггер при установке свойства Validation.HasError в True. А с помощью свойства
ToolTip можно создать привязку к сообщению ошибки:
<Style TargetType="TextBox">
    <Style.Triggers>
        <Trigger Property="Validation.HasError" Value="True">
            <Setter Property="ToolTip"
                Value="{Binding RelativeSource={RelativeSource Self},
                    Path=(Validation.Errors)[0].ErrorContent}" />
            <Setter Property="Foreground" Value="Red" />
        </Trigger>
    </Style.Triggers>
</Style>
Обработка событий валидации
WPF предоставляет механизм обработки ошибки валидации с помощью события Validation.Error. Данное событие можно использовать в любом элементе управления.
Например, пусть при ошибке валидации при вводе в текстовое поле выскакивает сообщение с ошибкой. Для этого изменим текстовое поле следующим образом:
<TextBox Grid.Column="1" Grid.Row="1" Height="30"  Margin="0 0 15 0" Validation.Error="TextBox_Error">
    <TextBox.Text>
        <Binding Path="Age" NotifyOnValidationError="True">
            <Binding.ValidationRules>
                <DataErrorValidationRule />
            </Binding.ValidationRules>
        </Binding>
    </TextBox.Text>
</TextBox>
Здесь, во-первых, надо отметить установку свойства NotifyOnValidationError="True":
<Binding Path="Age" NotifyOnValidationError="True">
Это позволит вызывать событие валидации.
И также устанавливается сам обработчик события валидации:
<TextBox Grid.Column="1" Grid.Row="1" Height="30"  Margin="0 0 15 0"
	Validation.Error="TextBox_Error">
При этом следует отметить, что событие Validation.Error является поднимающимся (bubbling events), поэтому мы можем установить для него обработчик и в контейнере Grid или в любых других контейнерах,
в которых находится это текстовое поле. И в случае ошибки событие также будет генерироваться и обрабатываться.
И в конце определим в файле кода c# сам обработчик:
private void TextBox_Error(object sender, ValidationErrorEventArgs e)
{
    MessageBox.Show(e.Error.ErrorContent.ToString());
}
Message Boxes in WPF MVVM/MVC Applications
CODE Framework supports a native way to do message boxes. And that is a lot cooler than it sounds 
Here are some of the benefits/needs:
- Message boxes needs to be completely stylable
- They should work the same in all kinds of environments (the syntax on Windows Phone should be the same as in WPF for instance to enable code reuse and know-how reuse)
- They should also work the same no matter whether message boxes are popup modal dialogs, or whether message boxes are floating elements (like in Metro or Silverlight).
- Message boxes should support a lot more than default buttons and a bit of text. Message boxes need to show any button I want and I want to show additional UI elements such as textboxes and radio buttons
- Whenever a view model calls for a message box, that should not break testability.
Message Box Fundamentals
Fundamentally, CODE Framework message boxes are quite simple, as they provide all the standard features available in typical .NET message box scenarios (such as in WPF or WinForms). The main difference between CODE Framework message boxes and other .NET environments is that in CODE Framework, for consistency, flexibility, and added power, message box calls are routed through controllers. The basic idea is simple: The Controller class now has a Message() method that takes parameters that are practically identical to the default MessageBox.Show() stuff that is available in various .NET namespaces.
So you can simply do the following:
Controller.Message("Hello World!");
The output of this will depend entirely on your skin (and you can skin it further if you want). For instance, using our Windows 95 skin (Battleship), the above line creates this message:

And if you were to run our Metro skin (with further customized colors in this example), you would see something like this:

Note: Calling Controller.Message() is just a shortcut for creating an action on a controller that returns a MessageBoxResult. You can do that as well (see below), but this shortcut is of course very convenient in many cases.
Of course you can pass a variety of parameters to get different stuff to show up. Like this example for instance:
Controller.Message("Hello World!", "Message title",
    MessageBoxButtons.YesNoCancel, MessageBoxImages.Question);
This results in the following (Win95 skin):

Here’s the Metro version:

Or a slightly longer text version in Metro:

And the same in Win95:

Getting Results
There are a few additional things to point out: Modern message boxes really have a few issues, especially when they are styled, or when they run in environments such as Windows 8 Metro: For one, they may not be modal and may not block execution. So you can’t just wait for the message box to return a result based on the button that was clicked. We have tried to solve this problem and make things as easy as possible for you to give you an easy way to handle this, by allowing you to pass the code you want to execute after a button was clicked. Example: Let’s say in the code of your view model, you want to pop up a message and ask the user if they want to save. If they click yes, you want to call the Save() method. You could do this like so:
Controller.Message("Would you like to save the current record?",
                    "Data",
                    icon: MessageBoxImages.Warning,
                    buttons: MessageBoxButtons.YesNo,
                    onComplete: r =>
                    {
                        if (r.ModelMessageBox.Result == MessageBoxResults.Yes)
                            Console.WriteLine("Saving...");
                    });
Note the onComplete code (here just echoing something to the Console, but imagine it did a this.Save()) which is called whenever the message box is closed one way or another. So it becomes a simple way to run code that works in absolutely every scenario (including testing… in test scenarios no actual UI would be displayed).
This creates these message boxes for Metro and Win95 theme respectively:


Custom Message Boxes
Here’s a little secret: Message boxes in CODE Framework are just a standardized version of views and view models. In other words: When you make a call to Controller.Message(), it creates a MessageBoxViewModel and a standard view and shows them like any other top level view (popup) view. And the best part: The default for that is just that: A default. And you can mess with that at your heart’s content. You can subclass that view model, and you can do really funky message boxes by creating your own views.
The following example shows a message box that uses 2 custom view actions rather than the default buttons:
var myActions = new List<IViewAction>
{
    new MessageBoxViewAction("Bouyah!", execute: (a2, o2) =>
    {
        var action1 = a2 as MessageBoxViewAction;
        if (action1 != null)
        {
            // Do something here...
            action1.Model.Result = MessageBoxResults.OK;
            Controller.CloseViewForModel(action1.Model);
        }
    }),
    new MessageBoxViewAction("Get out!", execute: (a3, o3) =>
    {
        var action2 = a3 as MessageBoxViewAction;
        if (action2 != null)
        {
            action2.Model.Result = MessageBoxResults.Cancel;
            Controller.CloseViewForModel(action2.Model);
        }
    })
};
Controller.Message("Hello World!", actions: myActions);
Note that these 2 custom actions are based on the MessageBoxViewAction class. This is not mandatory, but if you do, then the first parameter that gets passed to the execute method is a reference to that specific class, which has a Model property that is typed as a MessageBoxViewModel, which provides easy and convenient access to the model and important properties such as the Result property, which is generally used to indicate the overall result produced by the message box. (The model object could also be subclassed, which could provide additional information… see below).
Here is the result of this particular message box shown in Metro style:

Note: It is also possible to use the ShortcutKey and ShortcutModifiers properties on the actions to assign hotkeys to actions.
The next sample is another simple example that contains a red label and also a textbox. It also uses 2 completely non-standard button captions, by adding to view actions that get automatically shown as buttons (our message boxes can have any number of buttons/actions). Here is the Battleship (Windows 95 version):

And here is the Metro version:

This uses a custom view model as well as a custom view. The view model defines the text as well as an additional property for the textbox. It also defines 2 custom view actions. Here is the code for that view model:
public class Message3ViewModel : MessageBoxViewModel
{
    public Message3ViewModel()
    {
        Actions.Add(new ViewAction("Sure", execute: (a, o) =>
        {
            Result = MessageBoxResults.OK;
            Controller.CloseViewForModel(this);
        }) {IsDefault = true});
        Actions.Add(new ViewAction("No Way!", execute: (a, o) =>
        {
            Result = MessageBoxResults.Cancel;
            Controller.CloseViewForModel(this);
        }) {IsCancel = true});

        SomeInputText = "Test text";
        Text = "The quick brown fox jumps over the lazy dog. ".Replicate(5);
    }

    public string SomeInputText { get; set; }
}
In addition, the following view is defined:
<mvvm:View xmlns="http://schemas.microsoft.com/winfx/2006/xaml/presentation"
           xmlns:mvvm="clr-namespace:CODE.Framework.Wpf.Mvvm;assembly=CODE.Framework.Wpf.Mvvm"
           xmlns:Controls="clr-namespace:CODE.Framework.Wpf.Controls;assembly=CODE.Framework.Wpf"
           Title="Example Message">
    <Grid Controls:GridEx.RowHeights="Auto,Auto"
          Controls:GridEx.ColumnWidths="Auto,*"
          MaxWidth="500">
        <TextBlock Foreground="Red" Grid.ColumnSpan="2"
                   Text="{Binding Text}"
                   TextWrapping="Wrap"
                   FontSize="13" />
        <Label Margin="10"
               Grid.Row="1">Some other text: </Label>
        <TextBox Margin="10" Grid.Row="1"
                 Grid.Column="1"
                 Text="{Binding SomeInputText}" />
    </Grid>
</mvvm:View>
Of course views need to be placed in a location where the view definition can be found. For instance, if this was a message box shown as part of interactions related to a Customer controller, it may be put in the ViewsCustomer folder. In this example, the file is named “Message3.xaml”.
The message box can now be triggered in the following fashion:
Controller.Message("Hello World!",
                   model: new Message3ViewModel(),
                   viewName: "Message3",
                   controllerType: typeof(CustomerController)));
There are a few interesting aspects here. The view model is passed as the model parameter. The name of the view (without the “.xaml” extension) is passed as the viewName parameter. Note that since we are simply calling the method on the standard Controller class, there would be no way for the controller to know that the view goes with the Customer controller and is thus to be found in the ViewsCustomers folder. For that reason, we also have to pass the controllerType parameter, which provides this information. (Note: In the special case of having the view stored in the ViewsShared folder, the controllerType parameter is not needed).
Note that it is also possible to wrap all of this into a standard method inside the controller. The following method could have been added to the CustomerController method and then be called like all other controller actions to create the same message box:
public ActionResult Message3()
{
    return MessageBox(new Message3ViewModel());
}
This is a “cleaner” approach and may add testability. Ultimately, the prior version above is functionally almost identical to the explicit declaration of a view action.
Unit Testing Code with Message Boxes
Often, code you may want to unit test (especially view models) may have calls to message boxes. Message boxes normally launch user interfaces, which is not suitable for unit testing. To alleviate this problem, the Controller class allows pre-loading message box results for subsequent message box calls. If that is done, the queued results will be used rather than displaying an interface.
Consider the previous example of the view model. It asked the user to enter example text and then click a button (view action). We can easily mock this interaction for a unit test scenario by queuing a message box result in the following fashion:
Controller.QueueMessageBoxResult(MessageBoxResults.OK,
    m =>
    {
        var vm = m as Message3ViewModel;
        if (vm != null)
            vm.SomeInputText = "Hello World!";
    });
In this example, two interesting tasks are preformed: 1) the message box result is set to ”OK”, which simulates the user clicking the button that represented OK. 2) This example passes some code as the second (optional) parameter, which allows us to perform certain actions during the simulation. In this case, the “SomeInputText” property is set to “Hello World”. As a result, if we now make a call to Controller.Message(), the message will not be displayed on the screen but instead, it will use these simulated results.
Note that it is possible to queue as many items as are desired, since multiple message boxes may be executed within a single call to the object that is being tested. Consider the following example, which queues two results:
Controller.QueueMessageBoxResult(MessageBoxResults.OK,
    m =>
    {
        var vm = m as Message3ViewModel;
        if (vm != null)
            vm.SomeInputText = "Hello World!";
    });
Controller.QueueMessageBoxResult(MessageBoxResults.Cancel);