
КОНФЕРЕНЦИЯ СТАРТКОПИ
Принтеры, копировальные аппараты, МФУ, факсы и другая офисная техника:
вопросы ремонта, обслуживания, заправки, выбора
Всем доброго времени!
Принесли принтер после самостоятельной заправки с жалобой «мигает желтый индикатор». Подключение принтера показало светящиеся индикаторы «!» и желтого тонера, а установка Скаута выявила ошибку 092-651. Допрос клиента показал, что он самостоятельно заправлял картриджи. Тонер — АНК для данной модели. Причем, по его словам после заправки черного и замены чипа принтер прекрасно печатал. Через некоторое время попросились на замену и цветные картриджи. Был приобретен комплект цветных тонеров с чипами. После установки картриджей принтер, опять же, по словам владельца, практически сразу свалился в данную ошибку, не сделав ни единого отпечатка.
Почитав конференцию и т.п., понимаю, что виноват тонер.
Вопросы:
1. выгнать его из проявки только полной разборкой можно или есть другие методы?
2. чем посоветуете заменить этот АНК, чтоб работал?
Заранее благодарю за советы!
(0) Спасибо! В видео использован тонер для CLP-500, я правильно понял?
(2)Да, но этот тонер только для вывода из ошибки, потом нужно сыпать другой, так как этот слишком тугоплавкий
(3) У меня есть тонер Patron для СLP-365. По Вашей инструкции досыпал его достаточно много, но толку нет.
Вот снял видео процесса калибровки: https://youtu.be/zEQgDrJu4vw
Меня смущает, что сначала идет какой-то мусор в виде пыли всех цветов на ленте, а не четкие линии. И только под конец идут две последовательности цветных плашек, причем, после первой из них принтер издает щелчок реле и включается индикатор ошибки и желтого тонера.
(6) Что есть на данный момент. CLP-300/CLP-500 нет. 🙁
Кстати, описанное выше поведение при калибровке было с самого начала, как принтер попал к нам.
Ну правильно, основной состав сиеси в проявках пока пости тем же и остался, с чего тут меняться.
(8) Понял. Завтра поищу нужный тонер. Спасибо!
Вот что накопал в закромах по желтому цвету:
— D3760-70B-YOS — Xerox Phaser 6600
— D1760-24B-YOS — Xerox Phaser 6000
Ну, еще такую вот экзотику производства АНК:
— Epson Aculaser C900/C1900
— OkiC5850/C5950
Последние две позиции, видимо, совсем не покатят, а вот что из первых двух сгодится?
Победил!
Нашел тонер для CLP-300, правда, не знаю его производителя, но подсыпая его, заставил-таки принтер ожить!
Вот еще одна такая же тема, в которой был номер подкода, но было не ясно, какой тонер сыпать. Xerox Phaser 6020/6027: Ошибка 092-651 как работают датчики ADC (CDT)
Источник
Датчик ctd xerox 6020 загрязнен
КОНФЕРЕНЦИЯ СТАРТКОПИ
Принтеры, копировальные аппараты, МФУ, факсы и другая офисная техника:
вопросы ремонта, обслуживания, заправки, выбора
Доброго дня!
Продолжение темы Xerox Phaser 6020: Ошибка 092-651 после заправки цветных картриджей.
Пока аппарат отложил в сторону. На днях приехал 6027 с аналогичной ошибкой. Наблюдал за датчиками во время инициализации, и у меня появился вопрос: датчик, который стоит слева, если смотреть на аппарат сзади (https://photos.app.goo.gl/aZEAvPTHgMQac7yd6) имеет видимое излучение красного цвета, которое изменяет свою интенсивность в процессе инициализации. Вот фото платы: https://photos.app.goo.gl/ciK6D9A3fY9K2QXN8
Второй же датчик, который стоит справа, значительно скромнее: https://photos.app.goo.gl/QKkXXK7W6ufmCUWR7, состоит всего из светодиода и фототранзистора: https://photos.app.goo.gl/AzEjiJcys7crTAV66
При этом, его излучения не видно. Так на обоих устройствах. Вопрос к знатокам и владельцам таких девайсов: правый датчик должен так работать? Или, может, с ним есть проблема?
(0)Правый так и должен работать. Я эти аппараты каждую неделю делаю, брак китайских картриджей поражает своим объемом.
(1) То есть причина этой ошибки именно в говнотонере?
(2)В последнее время столкнулся с тем, что сбоит накачка тонера, движок картридж вращает, а тонер с него не поступает. Х знает, как в столь простом механизме картриджа китайцы накосячили, но это носит массовый характер.
(3) Как понять по подкоду 2080000, какой из тонер-картриджей виноват?
И что делаете, чтоб тонер нормально подавался в блок проявки?
Источник
Чистка датчиков плотности цветных тонеров – Инструкция по эксплуатации Xerox Phaser 6000
Страница 56

Цветной принтер Phaser 6000/6010
Руководство пользователя
Чистка датчиков плотности
Датчики плотности цветных тонеров (Color Toner Density, CTD) измеряют оптическую
плотность тонера, отложившегося на маркировочном блоке при калибровке в процессе
печати. С каждой стороны маркировочного блока установлено по одному датчику. Это
обеспечивает одинаковую плотность тонера по всей длине ремня. Для достижения
оптимального качества печати принтер проверяет работу датчиков CTD в начале каждого
цикла калибровки. Датчики CTD следует чистить, когда происходит сбой датчика CTD, или
на панели управления появляется соответствующее сообщение, или Программа настройки
принтера выдает данное указание.
Если тонер попал на кожу или одежду, не удаляйте его тёплой водой или
чистящими растворителями. При использовании теплой воды тонер прилипнет —
тогда его будет трудно удалить. Если тонер попал на кожу или одежду, удалите его
щеткой, сдуйте его или смойте холодной водой с мылом.
Порядок чистки датчиков CTD:
1.
Выключите принтер и выньте вилку шнура питания из розетки.
Откройте заднюю крышку, нажав на фиксатор.
Очистите датчики CTD, протерев отверстия чистым сухим ватным валиком.
Не касайтесь помеченной наклейкой зоны на
нагревательном валу и вблизи него, во фьюзере. Можно получить ожог.
Источник
Датчик ctd xerox 6020 загрязнен
Этап № 3 Отделение блока ксерографии от основы аппарата.

 На данном этапе разборки для снятия блока ксерографии необходимо открутить всего 4 шурупа, по два с каждой стороны. Шурупы находятся с задней стороны принтера и на фотографиях обведены красным. Внимание!! Обратите внимание на посадку блока ксерографии.

 Прежде, чем извлечь блок ксерографии, необходимо извлечь провода из проложенной трассы. Это достаточно неудобная процедура и в плане извлечения, и в плане последующей укладки (наберитесь терпения и дышите глубже, как говорится).

Извлечение блока ксерографии
 Все, больше блок ксерографии ничего не удерживает, и его можно извлечь. Для этого его достаточно просто поднять вверх. Внимание!! Перед последующей установкой блока ксерографии рекомендуем полностью очистить основу аппарата от пыли и тонера. Также не лишним будет почистить ролики захвата и отделения бумаги средством для восстановления резиновых поверхностей средством Platenclene.

Извлеченный блок ксерографии xerox 6010/6015

Вот такое количество шурупов и болтов пришлось открутить, чтобы извлечь блок ксерографии
Удивительно, как много деталей нужно снять для того, чтобы извлечь блок ксерографии! Кстати, оригинальное название данного блока Xero deve LPH belt assy (xerographics assembly)
Внимание!! Блок не имеет парт- номера т.е. как запчасть отдельно не поставляется. Это значит, что если аппарат на гарантии и блок ксерографии вышел из строя, то корпорация Xerox просто подарит вам новый аппарат.
Оцените качество заметки
97 комментариев
Офигеть. вот это да. Вот это работа. Спасибо большое за такой обзор. Осталось узнать, как же можно сам девелопер поменять в блоке. )) Ужас принтер.
WC 3045 с таким же гемором разбирается.
А зачем блок ксерографии снимали?
Корпус снимается так же муторно (разбор одинаков на 95%), но вот редуктор намного проще, да и сам блок ксерографии содержит на порядок меньше деталей. Хотя при первом разборе на выходе получил ошибку светодиодной линейки, к счастью светодиодная линейка и шлейф от Xerox 6000 подошли.
Вы автор этой статьи про разбор Xerox WorkCentre 6015 ? Подскажите пожалуйста название детали. Контакты которые считывают чипы у картриджей как они называются эти контакты, или вся полностью деталь? у меня сломался такой контакт, где можно найти такую деталь?
Это контактная группа чипа, деталь можно достать исключительно с другого аппарата. Ищите писанные аппараты и снимайте оттуда или обращайтесь в сервис
есть такой принтер. сбросьте фото нужной детали neptun-bo@yandex.ru
Сорри, первую часть упустил
ох, помню я этот аппарат, частенько в ремонт приходит.
Один такой разбирал, чтобы вычистить ксерографию, потом так и не завёлся, с ошибкой по плате MCU.
Огромное спасибо за статью! С вашей помощью я сэкономил много сил и времени!
ошибка 124-333 Xerox WC 6015.после разборки выскочила ошибка. ткните носом где смотреть.какой разъем на какой плате. Спасибо.буду рад любой помощи.
Поклон в пояс таким людям как автор.
Большое спасибо за статью. Только у меня после обратной сборки пропал розовый цвет. С одной стороны проявляется немного пятнами. Снимал блок проявки розовый, светодиодную линейку. Три раза уже перебрал, но толку мало. Если есть мысли, помогите.
Не попадает напряжение на магнитный вал или фотовал. Где-то прервалась цепочка
После переборки блока “Drive Assy Deve” Xerox WC 6015 (падал в ошибку 042-372 при печати монохромом), выскочила следующая ошибка: 124-333. Подскажите пожалуйста, на что он ругается. Заранее при много благодарен!))
В редукторе есть большой черный пластиковый блок с шестеренками и датчиком, этот блок отвечает за переключение режимов монохромного и цветного. В этот блок попал тонер и его клинит и датчик не фиксирует режим переключения режимов, что приводит к появлению ошибки. Необходимо очистить шестерни этого блока от грязи и заново смазать
Именно этот блок чистил и смазывал. Так как была ошибка при печати чёрным и слышен был хруст говоривший о клине муфты… А теперь номер ошибки другой. По мануалу вроде как ругается на разъемы P1 и P23. Прозвонил, всё в порядке. Вы не подумайте. Я не сомневаюсь в Вас, хочется понять в чём разница между ошибкой 042-372 и 124-333. Я практикующий мастер и у меня на обслуживании ещё 5 таких аппаратов, рано или поздно в них лезть, а этот аппарат новый и не отработан. Спасибо за понимание и помощь!)))
Невнимательно прочитал Ваш пост, ошибка 124-333. указывает на неисправность ■ LED
Driver Board, PL7.1.5
■ LED/MCU Cable, PL7.1.6
■ MCU Board, PL7.2.2
Проверьте, может один из четырех кабелей неверно зафиксировали?
Теперь в этом филиале окажусь почти через месяц. Но хочется подготовиться. LED Driver Board это ведь панель управления с кнопками управления и дисплеем? Почему-то я так решил со своим кривым знанием английского изучая мануал. Так вот, я снял панель управления для прозвонки, и увидел, что шлейф там всего один с маркировкой на плате “P1”. Всё звонилось, но увидел микротрещины на дорожках. Предположил, что возможны потери из-за повышенного сопротивления и зачистив дорожки чуть выше края, обрезал места с трещинами, в общем стандартная процедура. Но это не помогло. И по поводу четырёх кабелей. Там, как я уже сказал, один шлейф панели управления, второй шлейф линейки сканера, третья проводная-шина насколько я помню полностью относится к сканеру и четвертая это одиночный провод – земля. Перепутать там невозможно. Или это не те четыре кабеля о которых Вы говорите?
То о чем вы говорите, это LCD дисплей,а я говорю о LED. В данном случае имеются в виду светодиодные линейки расположенные в блоке ксерографии. Всего их четыре по одному на каждый цвет, поэтому и четыре шлейфа.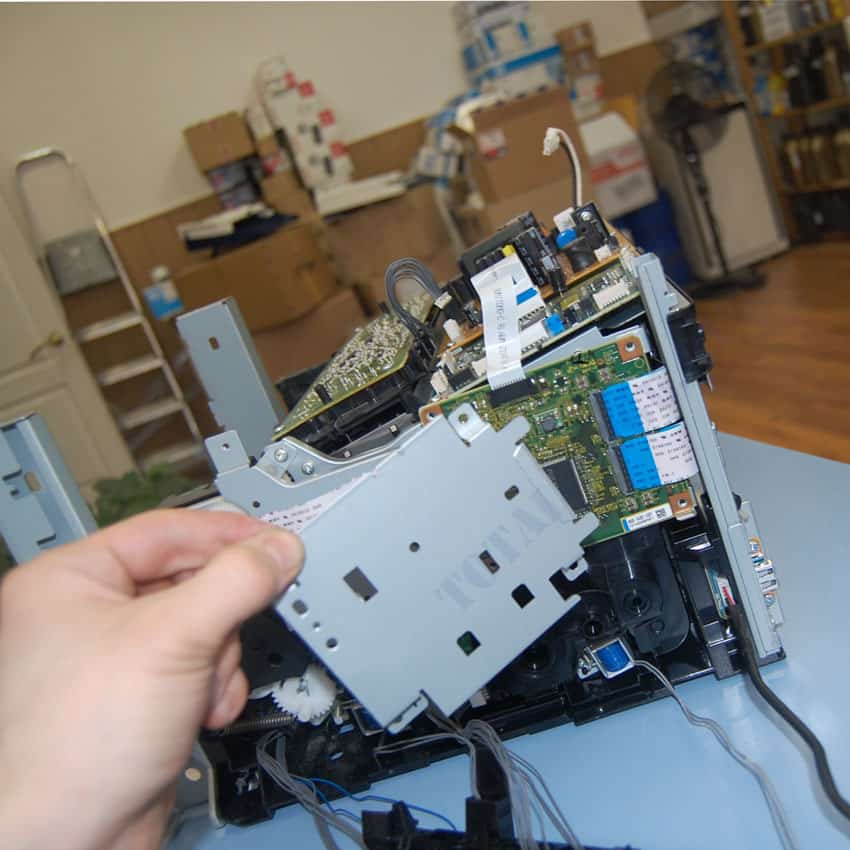
Стыдоба… Теперь понял о чём речь. На другом аппарате чистил синий блок. Спасибо, в конце месяца, как доеду до филиала, отпишусь. Большой опыт работы с Kyocera’ми, пишите на почту, если возникнут сложности, постараюсь помочь.
Здравствуйте! В общем добрался до филиала. Раскидал аппарат, все 4 шлейфа блоков были подключены надёжно. Но… Присмотревшись к контактам через лупу, я увидел металлическую стружку толщиной с волос и длиной в 2 мм. которая замыкала 2 контакта одного из разъёмов. Ума не приложу откуда она там взялась. В общем ваша подсказка мне очень помогла. Спасибо Вам огромное!
Xerox 6000 поменял девелопер теперь не заводится. Включается жужжит но на табло не загорается ни одна кнопка
Начните с правильности подключения разъемов
Здравствуйте! у нас проблема с Xerox WC6015, при сканировании и копировании выдает отпечатки синего фона, с компьютера распечатывает корректно. Можете подсказать в чем проблема?
Если сканируете с автоподатчика, то с правой стороны есть узкое стеклышко, протрите его спиртосодержащей жидкостью.
в этой модели нет автоподатчика.. он полностью все изображение синим выдает после сканирования или копирования
Тогда начните с того, что вытащите и заново вставьте шлейф сканера на плате форматора и сканирующей линейки. Если не поможет, то возможно проблема в сканирующей линейке (или грязь попала или брак). Тут в любом случае необходима помощь специалиста.
Здравствуйте! Блок питания будет выдавать напряжения с отключенными платами ? И какие напряжения должны присутствовать?
Так глубоко аппарат не ковырял
А “закройте заднюю дверцу 077-304 как лечится?
Сзади принтера с правой стороны есть блок с оптическими датчиками, возможно туда попала грязь, часто слетает пружинка с флажка датчика.
Здравствуйте! Хотел высказать свою благодарность за подробную информацию! Все получилось! Спасибо.
Уточнение: “Отсоедините верхнюю часть корпуса. Для этого открутите четыре фиксирующих шурупа и извлеките его, потянув вверх.” Пр факту их 6 (2 со стороны задней крышки).
На данном этапе все понятно с разборкой корпуса Xerox WC 6000-6015, а дальше? Поступил аппарат (Xerox WC 6015)с явным треском (при инициализации и печати) справа внизу (сторона картриджей), явно механика, но вот где искать причину и как туда добраться с наименьшими потерями мне не известно. Такой монстр у меня впервые в отличии от его монохромных братьев. Если есть возможность, подскажите куда копать. Спасибо.
Нашел ваше продолжение второй части и на другом форуме такой комментарий (Если трещит, но при этом работает(выдает копию иль печатает), то похоже заклинило шнек отвода отработки на одном из цветов.) схожий с моей проблемой, буду искать, извините за беспокойство.
Причина найдена: заклинило шнеки закоксовавшимся тонером в местах подачи тонера из картриджа в аппарат (те что с подпружиненными пятаками) на местах черного и синего картриджей.
Валерий,а как лечилось? Поподробней нельзя?
И спасибо Вам за подробную инструкцию по разборке Xerox WC 6015!
Принтер выдал сообщение “092-651 код 2110000” при включении и предлагает перезагрузить его. В чем может быть дело и как от этого избавиться? Нашел информацию об очистке датчика CTD, почистил. Но принтер после включения ругнулся на черный картридж. Поменял картридж и снова сообщение “092-651 код 2110000”
Подскажите пожалуйста, Xerox WC 6015 не включается вообще.При нажатии клавиши включения, щелчок реле и ни чего не происходит. На что обратить внимание?
Скорее всего плата main board приказала долго жить, для аппарата приговор.
Добрый день.
Помогите с заменой контактов чипа картриджа (контактная группа) в Москве. Может у кого завалялся?
Job707@list.ru
Добрый день! Разбирал по Вашему обзору Xerox Phaser 6000, очень помогло. Собрал, неделю печатал нормально. Потом перестал захватывать второй лист. Сейчас захватывает только первый лист и то если лежит один. Подкладываю второй, уже не берёт.Даже нет работы на захват и подачу бумаги. Ошибку выдаёт, нет бумаги. В чём может быть причина или причины. Заранее Спасибо!
Судя по описанию, ослабла пружина довода муфты захвата бумаги. Муфта выглядит как шестерня посаженная на ось захвата бумаги. Эту шестерню доводит пружина, попробуйте откусить несколько усиков, а лучше найти более жесткую пружину. Так же обратите внимание на язычек электромагнита, он не деформирован?
Про муфту понятно , найду. Я не специалист, а где находится электромагнит и как он выглядит? Спасибо!
Спасибо за Ваши советы и помощь!
А сам блок проявки как снять? Уже всю голову сломал. Руки опускаются.
Добрый день.
Долгие годы аппарат Xerox 6015NI не доставлял никаких проблем. Но недавно на внутренней стороне стекла сканера появился налёт и теперь на сканах тёмное кривое пятно в конце сканирования. Трудно ли добраться дотуда, чтобы почистить внутреннюю поверхность стекла? Что надо сделать?
Главное отделить сканер от принтерной части.
Для этого отделяется передний кожух аппарата, далее снимаем левый кожух, видим шлейфы и провода идущие на блок сканера, и аккуратно отделяем не забыв сфотографировать расположение проводов и разъемов. Внимание. Широкий шлейф с тонкими дорожками вытаскиваем без РАСКАЧКИ, контакты сидят в микропазах. которые можно повредить. Отделяем два подпружиненных кронштейна и плавно снимаем блок сканера. Отделяем внимательно не оторвав шлейфы. При обратной сборке криво воткнутый широкий шлейф выводит блок электроники из строя, будьте внимательны.
После отделения сканера его разборка не должна вызвать вопросов, так как там все предельно просто. Ах да чуть не забыл, нужно в блоке сканера отщелкнуть панель управления, так как под ней есть скрытые шурупы удерживающие стекло. Писанины много, а делов на пол часа. Если опыта работы с оргтехникой нет, лучше отдайте в сервис.
Здравствуйте добрался до блока ксерографии xerox wc 6015 и увидел такую вещь:
https://preview.ibb.co/h6FrQJ/IMG_20180617_193144.jpg
То есть пленка на вале порвалась до такого состояния(об крепление посередине)
Это термопленка? Просто вытащить вал, на него новую пленку и собрать?
Это лента переноса. Без нее в принципе нанесение изображения невозможно. На складе валяется с бу аппарата. Если действительно хотите починить, то могу бесплатно дать. Самовывоз в Москве или за Ваш счет вывоз транспортной компанией.
Действительно хочу починить. А тем более совсем не против получить бесплатно :). Живу не в Москве, готов оплатить транспортную компанию. Как можно связаться?
ПИШИТЕ НА ПОЧТУ, КОНТАКТЫ ВВЕРХУ САЙТА.
Здравствуйте. Разбирал МФУ и сломал разъем на сканер(верхний левый на Вашем фото, который поменьше).Подскажите пожалуйста его название? FPC, FFС, cколько pin(я насчитал 16) и если знаете, то где купить. Спасибо заранее.
Здравствуйте! Разбирал аппарат по причине ошибки “Замятие бумаги на выходе”. До этого несколько раз бумага то застревала то полностью сминалась в гармошку на выходе. При вытаскивании остались кусочки, пылесос их не вытягивал, пришлось разобрать. Разобрал, кусочки вытащил. Не собирая подключил вернюю часть (сканер) чтобы проверить. Всё работало, застреваний не было. Собрал все обратно, включил и вместо печати чистые листы (чёрный или цвет – без разницы). Ошибки никакой нет, на плёнке следов тонера нет, картриджи почти полные. Опять разобрал, все шлейфы и провода подключены, вроде бы ничего не перебито. Подскажите, что могло случиться?
Слева на крышке есть пружинный контакт на трансфер, он из паза не выскочил?
Не совсем понимаю о какой крышке и о каком контакте идёт речь. Это есть на Ваших фото?
Контакт идущий на трансфер-ролик позади принтера, он выглядит как черная пористая цилиндрическая деталь. крепящаяся на откидывающуюся крышку
Здравствуйте. Не совсем по теме. т.к. проблема с технически аналогичным аппаратом, Dell 1355cnw.Без каких либо явных причин принтер впал в “кому” с ошибкой 009-654 2880000, включите заново и если не поможет, то в сервис.
Принтер инициализируется как положено, жужжит и гремит как обычно, но с ошибкой в конце. Компьютер принтер видит. При входе в сервисное меню, все тестируется ок, при инициализации любой функции связанной с печатью пишет выполняю и зависает.
Почитав форумы, почистил CTD сенсор, не помогло.Подумав, что возможен дефект пайки с годами, разобрал и пропаял элементы CTD и MOB сенсоров.После сборки проходит инициализацию и ругается на CTD unit. До моего вмешательства были тестовые цветные прямоугольники напротив CTD сенсора. Сейчас немного равномерно сыпет тонером на плёнке переноса (цветная пыль) и в момент когда должны появится цветные прямоугольники, появляется 3 тонкие цветные полоски во всю ширину плёнки переноса, как будто просыпалось чуть больше тонера. Разобрал и собрал пару раз, не помогло. ) Обнулил NVRAM. Перепрошил с компа. Может подкинете идею куда глянуть? Интересно, что за оригинальная проблема была и могла ли она просто перерасти в большую. Например какой либо чип умер совсем. Сам принтер уже не очень нужен, но хочется дойти до истины. 🙂
Спасибо.
Источник
You are here: Home / error code / Xerox Phaser 6020 error and solving error codes
– Compatible Printer model: Xerox Phaser 6020
– Xerox Phaser 6020 Error Codes with quick guides:
- Code: 005-121
- Description: ADF Jam, Open ADF Cover and Clear Jam
- Causes: • IP Board, PL7.1.9 • ADF Assembly, PL8.1.1 • ADF Cover, PL8.1.3 • ADF Separator Pad, PL8.1.4
- Troubleshooting Guides: 1. Is the ADF closed against the document glass completely? Go to step 2. Close the ADF completely and go to step 2. 2. Does the error persist? Go to step 3. Complete. 3. Reseat P/J1, P/J6, and P/J16 on the IP Board. Does the error persist? Go to step 4. Complete. 4. Does the ADF feed the document? Go to step 5. Go to step 7. 5. Open the ADF Cover and check the document path. Is there foreign substance on the document path? Remove the foreign substance. Go to step 6. Go to step 7. 6. Does the error persist? Go to step 7. Complete. 7. Clean the ADF feed rollers. Do the feed rollers rotate smoothly? Go to step 8. Replace the ADF. 8. Replace the IP Board (Phaser 6020/6022 and WorkCentre 6025 MFP, WorkCentre 6027 MFP. Does the error persist? Replace the ADF Cover and ADF Separator Pad. Complete.
- Code: 005-301
- Description: ADF Cover Open
- Causes: • IP Board, PL7.1.9 • ADF Assembly, PL8.1.1
- Troubleshooting Guides: 1. Is the ADF Cover completely closed? Go to step 3. Close the ADF cover and go to step 2. 2. Does the error persist? Go to step 3. Complete. 3. Is the ADF Cover damaged? Replace the ADF Cover Go to step 4. Go to step 5. 4. Does the error persist? Go to step 5. Complete. 5. Reseat P/J1, P/J6, and P/J16 on the IP Board. Does the error persist? Go to step 6. Complete. 6. Replace the ADF. Does the error persist? Replace the IP Board (Phaser 6020/6022 and WorkCentre 6025 MFP, WorkCentre 6027 MFP. Complete.
- Code: 009-95x
- Description: CRUM Error The Toner Cartridge CRUM communication error is detected.
- Causes: • HARNESS ASSY DCKR PL4.1.2 • MCU Board, PL7.2.2
- Troubleshooting Guides: 1. Are the Toner Cartridges installed in the printer Xerox Toner Cartridges? Go to step 2. The customer will need to replace all non-Xerox cartridges with Genuine Xerox cartridges. 2. Inspect the contacts on the CRUM connectors. Are any bent or broken? Repair of replace the connector. Go to Step 3. 3. Disconnect P/J13 on the MCU Board and unlace the harness. Inspect the harness for damage. Is the harness damaged? Repair the harness, then go to step 4. Go to step 4. 4. Disconnect P/J13 on the PWBA MCU. Is the voltage across ground to P/J13-3 on the MCU Board approximately +3.3 VDC? Repair the Harness Assembly DCKR. Go to step 5. 5. Replace the Toner Cartridge (C, M, Y, or K). Does the error persist? 1. SaveNVM to ESS 2. Replace the MCU Board. 3. LoadNVM from ESS Complete.
- Code: 010-397
- Description: Fuser Failure The operation error of Fuser (Temperature anomaly error etc.) is detected.
- Causes: • Fuser, PL5.1.1 • MCU Board, PL7.2.2
- Troubleshooting Guides: 1. Reseat the Fuser and cycle system power. Does the error persist? WARNING: Do not touch the fuser while it is hot. Go to step 2. Complete. 2. Check these connections 1. MCU Board P/J26 and P/J18. 2. LVPS P/J201. Are the connectors secure? Go to step 3. Secure the connectors. 3. Check the Fuser harness. 1. Remove the Fuser. 2. Disconnect P/J26 and P/J18 from the MCU Board and P/J201 from the LVPS. Is the harness damaged? Repair the harness. Go to step 4. 4. Replace the Fuser. Does the error persist? 1. SaveNVM to ESS 2. Replace the MCU Board. 3. LoadNVM from ESS Complete.
- Code: 016-315
- Description: IP Board to IIT Communication Error An error occurred between the IIT and the Controller.
- Causes: • IP Board, PL7.1.9 • MCU Board, PL7.2.2 • LED Driver Board, PL7.1.5
- Troubleshooting Guides: 1. Reseat all connectors on the IP Board and the MCU Board. Does the error persist? Go to step 2. Complete. 2. Replace the LED Driver Board. Does the error persist? Go to step 3. Complete. 3. Replace the IP Board (Phaser 6020/6022 and WorkCentre 6025 MFP, WorkCentre 6027 MFP. Does the error persist when the power is turned on? 1. SaveNVM to ESS 2. Replace the MCU Board. 3. LoadNVM from ESS Complete.
- Code: 016-317
- Description: ESS ROM Main Check Fail 016-317: The standard Page Memory is corrupted.
- Causes: • IP Board, PL7.1.9 • MCU Board, PL7.2.2 • LED Driver Board, PL7.1.5
- Troubleshooting Guides: 1. Reseat all connectors on the IP Board and the MCU Board. Does the error persist? Go to step 2. Complete. 2. Replace the LED Driver Board. Does the error persist? Go to step 3. Complete. 3. Replace the IP Board (Phaser 6020/6022 and WorkCentre 6025 MFP, WorkCentre 6027 MFP. Does the error persist when the power is turned on? 1. SaveNVM to ESS 2. Replace the MCU Board. 3. LoadNVM from ESS Complete.
- Code: 016-372
- Description: DRAM Memory Allocation Fail Fax memory allocation error is detected.
- Causes: • IP Board, PL7.1.9 • MCU Board, PL7.2.2
- Troubleshooting Guides: 1. Reseat all connectors on the IP Board and the MCU Board. Does the error persist? Go to step 2. Complete. 2. Replace the IP Board (Phaser 6020/6022 and WorkCentre 6025 MFP, WorkCentre 6027 MFP. Does the error persist when the power is turned on? 1. SaveNVM to ESS 2. Replace the MCU Board. 3. LoadNVM from ESS Complete.
- Code: 016-500, 016-501, 016-502
- Description: Firmware Errors The firmware download to the printer failed. • 016-500: Erase Flash Err Restart Printer <Erase Flash Error> • 016-501: Can not update application code in FLASH <Download Write Error> • 016-502: Can not update parameters correctly in FLASH <Download Error>
- Causes: • IP Board, PL7.1.9 • MCU Board, PL7.2.2 • LED Driver Board, PL7.1.5
- Troubleshooting Guides: 1. Reseat all connectors on the IP Board and the MCU Board. Does the error persist? Go to step 2. Complete. 2. Replace the LED Driver Board. Does the error persist? Go to step 3. Complete. 3. Replace the IP Board (Phaser 6020/6022 and WorkCentre 6025 MFP, WorkCentre 6027 MFP. Does the error persist when the power is turned on? 1. SaveNVM to ESS 2. Replace the MCU Board. 3. LoadNVM from ESS Complete.
- Code: 016-503 … 016-507
- Description: E-mail Error An e-mail error has occurred. • 016-503: SMTP Error 016-503 Scan Job Failure Press OK • 016-504: POP Error 016-504 Scan Job Failure Press OK • 016-506: SMTP Login Error 016-506 Scan Job Failure Press OK • 016-507: SMTP Error 016-507 Scan Job Failure Press OK
- Causes: • IP Board, PL7.1.9 • MCU Board, PL7.2.2
- Troubleshooting Guides: 1. Reseat all connectors on the IP Board and the MCU Board. Does the error persist? Go to step 2. Complete. 2. Replace the IP Board (Phaser 6020/6022 and WorkCentre 6025 MFP, WorkCentre 6027 MFP. Does the error persist when the power is turned on? 1. SaveNVM to ESS 2. Replace the MCU Board. 3. LoadNVM from ESS Complete.
- Code: 016-718
- Description: Memory Overflow Unable to process the PCL print data because of insufficient memory.
- Causes: • IP Board, PL7.1.9/PL7.1.16 • MCU Board, PL7.2.2
- Troubleshooting Guides: 1. Reduce the resolution of the print job. does the error persist? Go to step 2 Complete. 2. Verify the controller firmware version. Update to latest version if not at latest version now. Does the error persist? Go to step 3 Complete. 3. Reseat all connections on the IP Board. Does the error persist? Go to step 4. Complete. 4. Replace the IP Board (Phaser 6020/6022 and WorkCentre 6025 MFP, WorkCentre 6027 MFP. Does the error persist? Go to step 5. Complete. 5. 1. SaveNVM to ESS 2. Replace the MCU Board. 3. LoadNVM from ESS Complete.
- Code: 016-719
- Description: Decode Error Decode error is detected.
- Causes: • IP Board, PL7.1.9 • MCU Board, PL7.2.2
- Troubleshooting Guides: 1. Reseat all connectors on the IP Board and the MCU Board. Does the error persist? Go to step 2. Complete. 2. Replace the IP Board (Phaser 6020/6022 and WorkCentre 6025 MFP, WorkCentre 6027 MFP. Does the error persist when the power is turned on? 1. SaveNVM to ESS 2. Replace the MCU Board. 3. LoadNVM from ESS Complete.
- Code: 016-720
- Description: PDL Error The current printing job process cannot be continued because the memory capacity is exceeded.
- Causes: • IP Board, PL7.1.9/PL7.1.16 • MCU Board, PL7.2.2
- Troubleshooting Guides: 1. Check the memory. Print the Configuration Page to determine the amount of memory installed. Is the print job too large? Divide the print job to fit installed memory. Go to step 2. 2. Reseat all connections on the IP Board. Does the error persist? Go to step 3. Complete. 3. Replace the IP Board (Phaser 6020/6022 and WorkCentre 6025 MFP, WorkCentre 6027 MFP. Does the error persist? Go to step 4. Complete. 4. 1. SaveNVM to ESS 2. Replace the MCU Board. 3. LoadNVM from ESS Complete.

Solve Xerox Phaser 6020 Error codes
- Code: 016-737
- Description: Download Errors The system firmware file is incorrect, corrupt, or communications to the printer failed. • 016-737: Format Error Press OK Button <Download Format Error> The file format is invalid.
- Causes: • IP Board, PL7.1.9/7.1.16 • MCU Board, PL7.2.2
- Troubleshooting Guides: 1. Reseat all connectors on the IP Board and the MCU Board. Does the error persist? Go to step 2. Complete. 2. Replace the IP Board (Phaser 6020/6022 and WorkCentre 6025 MFP, WorkCentre 6027 MFP. Does the error persist? 1. SaveNVM to ESS 2. Replace the MCU Board. 3. LoadNVM from ESS Go to step 3. Complete. 3. Does the error persist? Contact your designated field support for assistance. Complete.
- Code: 016-741 … 016-745
- Description: Download Errors The system firmware file is incorrect, corrupt, or communications to the printer failed. • 016-741: Protection Error <Download Protect Error> The Protect is invalid. Download was attempted under the condition where it is prohibited. • 016-742: Invalid ID Press OK Button <Download ID Error> An error occurred because an invalid firmware is installed. • 016-743: Range Check Error <Download Range Error> The address of the write destination is invalid. • 016-744: Format Error 016-744 System Invalid Data Press OK <Download Format Error> Invalid file format to be downloaded. • 016-745: Format Error 016-745 System Invalid Data Press OK <Download Protect Error> Download destination device protection on.
- Causes: • IP Board, PL7.1.9/7.1.16 • MCU Board, PL7.2.2
- Troubleshooting Guides: 1. Reseat all connectors on the IP Board and the MCU Board. Does the error persist? Go to step 2. Complete. 2. Replace the IP Board (Phaser 6020/6022 and WorkCentre 6025 MFP, WorkCentre 6027 MFP. Does the error persist? 1. SaveNVM to ESS 2. Replace the MCU Board. 3. LoadNVM from ESS Go to step 3. Complete. 3. Does the error persist? Contact your designated field support for assistance. Complete.
- Code: 016-749
- Description: PJL Request Error The print data cannot be processed by PJL.
- Causes: • IP Board, PL7.1.9/7.1.16 • MCU Board, PL7.2.2
- Troubleshooting Guides: 1. Reseat all connectors on the IP Board and the MCU Board. Does the error persist? Go to step 2. Complete. 2. Replace the IP Board (Phaser 6020/6022 and WorkCentre 6025 MFP, WorkCentre 6027 MFP. Does the error persist? 1. SaveNVM to ESS 2. Replace the MCU Board. 3. LoadNVM from ESS Complete.
- Code: 016-753
- Description: PDL Emulation Error PDL emulation error has occurred
- Causes: • Control Panel
- Troubleshooting Guides: 1. If necessary, check whether the correct machine password has been instructed to the other machine. Does the error persist? Complete.
- Code: 016-755
- Description: PDF Print Prohibited Attempted to process a print-protected PDF file
- Causes: • Control Panel
- Troubleshooting Guides: 1. Cancel the print protection using Adobe Reader and try printing again. Does the error persist? Go To Step 2. Complete. 2. Check whether the version of the Controller ROM is the latest one, and upgrade the version if it is not the latest. Complete.
- Code: 016-764, 016-766, 016-767
- Description: E-mail Error An e-mail error has occurred. • 016-764: Mail Connect Fail 016-764 Scan Job Failure Press OK <Connect Error> Can not connect to mail server for sending mail. • 016-766: SMTP TX Fail Error 016-766 Scan Job Failure Press OK <SMTP> Can not transfer completely. • 016-767: Invalid Address Error 016-767 Scan Job Failure Press OK <E-mail Address Error> Recipient address is invalid.
- Causes: • IP Board, PL7.1.9 • MCU Board, PL7.2.2
- Troubleshooting Guides: 1. Reseat all connectors on the IP Board and the MCU Board. Does the error persist? Go to step 2. Complete. 2. Replace the IP Board (Phaser 6020/6022 and WorkCentre 6025 MFP, WorkCentre 6027 MFP. Does the error persist when the power is turned on? 1. SaveNVM to ESS 2. Replace the MCU Board. 3. LoadNVM from ESS Complete.
- Code: 016-791 … 016-797
- Description: USB Memory Removal Error USB memory is removed while memory reading job is being executed. • 016-791: USB Memory Was Removed 016-791 System Job Failure Press OK <USB Memory Removal Error> • 016-795: File Format Error 016-795 Printer Job Failure Press OK <File Format Error> An unsupported file format was selected at USB Memory Print. • 016-797: File Read Error 016-797 Printer Job Failure Press OK <File Read Error> The contents of the USB Memory can not be read correctly.
- Causes: • IP Board, PL7.1.9/PL7.1.16 • MCU Board, PL7.2.2
- Troubleshooting Guides: 1. Reseat all connections on the IP Board and MCU Board. Does the error persist? Go to step 2. Complete. 2. Replace the IP Board (Phaser 6020/6022 and WorkCentre 6025 MFP, WorkCentre 6027 MFP. Does the error persist? Go to step 3. Complete. 3. 1. SaveNVM to ESS 2. Replace the MCU Board. 3. LoadNVM from ESS Complete.
- Code: 016-799
- Description: Invalid Job Invalid print job settings.
- Causes: • IP Board, PL7.1.9/PL7.1.16 • MCU Board, PL7.2.2
- Troubleshooting Guides: 1. Reseat all connections on the IP Board and MCU Board. Does the error persist? Go to step 2. Complete. 2. Replace the IP Board Phaser 6020/6022 and WorkCentre 6025 MFP, WorkCentre 6027 MFP. Does the error persist? Go to step 3. Complete. 3. Replace the MCU Board. Complete.
- Code: 016-920, 016-921
- Description: Wireless Error The connection with Register exceeded the time limit for communication. • 016-920: Wireless Error 016-920 System Setup Fail Press OK <AP Detecting Fail While WPS Setup> • 016-921: Wireless Error 016-921 System Setup Fail Press OK <AP Detecting Fail While WPS Setup>
- Causes: • IP Board, PL7.1.9B • MCU Board, PL7.2.2
- Troubleshooting Guides: 1. Reseat all connections on the IP Board and MCU Board. Does the error persist? Go to step 2. Complete. 2. Replace the IP Board (Phaser 6020/6022 and WorkCentre 6025 MFP, WorkCentre 6027 MFP. Does the error persist? Go to step 3. Complete. 3. 1. SaveNVM to ESS 2. Replace the MCU Board. 3. LoadNVM from ESS Complete.
- Code: 016-930, 016-931
- Description: USB Host Error An unsupported USB memory device was attached to the USB port. • 016-930: USB Host Error 016-930 System Unsupported Device Remove from USB Port <Detect Installation Of Un-supported Device> • 016-931: USB Host Error 016-931 System Unsupported Device Remove from USB Port <Detect Installation Of Hub Device>
- Causes:
- Troubleshooting Guides: Unplug the unsupported device.
- Code: 016-981
- Description: Collate Full The print job exceeds memory capacity.
- Causes: • IP Board, PL7.1.9 • MCU Board, PL7.2.2
- Troubleshooting Guides: 1. Reseat all connectors on the IP Board and the MCU Board. Does the error persist? Go to step 2. Complete. 2. Replace the IP Board (Phaser 6020/6022 and WorkCentre 6025 MFP, WorkCentre 6027 MFP. Does the error persist when the power is turned on? 1. SaveNVM to ESS 2. Replace the MCU Board. 3. LoadNVM from ESS Complete.
- Code: 016-982
- Description: Memory Overflow Memory was determined to be full due to collate, stored or interrupted jobs.
- Causes: • IP Board, PL7.1.9 • MCU Board, PL7.2.2
- Troubleshooting Guides: 1. Reseat all connectors on the IP Board and the MCU Board. Does the error persist? Go to step 2. Complete. 2. Replace the IP Board (Phaser 6020/6022 and WorkCentre 6025 MFP, WorkCentre 6027 MFP. Does the error persist when the power is turned on? 1. SaveNVM to ESS 2. Replace the MCU Board. 3. LoadNVM from ESS Complete.
- Code: 016-985
- Description: Scan Mail Size Limit Scanned mail size exceeds printer limitation.
- Causes: • IP Board, PL7.1.9 • MCU Board, PL7.2.2
- Troubleshooting Guides: 1. Reseat all connectors on the IP Board and the MCU Board. Does the error persist? Go to step 2. Complete. 2. Replace the IP Board (Phaser 6020/6022 and WorkCentre 6025 MFP, WorkCentre 6027 MFP. Does the error persist when the power is turned on? 1. SaveNVM to ESS 2. Replace the MCU Board. 3. LoadNVM from ESS Complete.
- Code: 017-970
- Description: Memory Full The printer memory is full.
- Causes: • IP Board, PL7.1.9 • MCU Board, PL7.2.2
- Troubleshooting Guides: 1. Reseat all connectors on the IP Board and the MCU Board. Does the error persist? Go to step 2. Complete. 2. Replace the IP Board (Phaser 6020/6022 and WorkCentre 6025 MFP, WorkCentre 6027 MFP. Does the error persist when the power is turned on? 1. SaveNVM to ESS 2. Replace the MCU Board. 3. LoadNVM from ESS Complete.
- Code: 017-980, 017-981
- Description: Report File Error Report job fails to open/close report file or Fax Report job fails to report file. • 017-980: Report error 017-980 System Job Failure Press OK <Fail To Decode Image Data Stored In Flash – Check Compressed Fax TX Image Data.> • 017-981: Report error 017-981 System Job Failure Press OK <Fail To Process Image Data When Executing Image Processing – Check Image Scaling Or Image Rotating>
- Causes: • IP Board, PL7.1.9 • MCU Board, PL7.2.2
- Troubleshooting Guides: 1. Reseat all connectors on the IP Board and the MCU Board. Does the error persist? Go to step 2. Complete. 2. Replace the IP Board (Phaser 6020/6022 and WorkCentre 6025 MFP, WorkCentre 6027 MFP. Does the error persist when the power is turned on? 1. SaveNVM to ESS 2. Replace the MCU Board. 3. LoadNVM from ESS Complete.
- Code: 017-988
- Description: PC Scan Time Out
- Causes: • IP Board, PL7.1.9 • MCU Board, PL7.2.2
- Troubleshooting Guides: 1. Reseat all connectors on the IP Board and the MCU Board. Does the error persist? Go to step 2. Complete. 2. Replace the IP Board (Phaser 6020/6022 and WorkCentre 6025 MFP, WorkCentre 6027 MFP. Does the error persist when the power is turned on? 1. SaveNVM to ESS 2. Replace the MCU Board. 3. LoadNVM from ESS Complete.
- Code: 018-338
- Description: Wireless Error The Wireless error is detected when checking the Wireless circuitry during initialization diagnostics.
- Causes: • IP Board, PL7.1.9B • Wireless Harness, PL1.1.31 • Wireless Board Bracket, PL1.1.30
- Troubleshooting Guides: 1. Check the connections between the IP Board and the Wireless Board. Are P/J6601 and P/J6501 properly connected? Go to step 2. Reconnect the connections, then go to step 2. 2. Does the error persist? Go to step 3. Complete. 3. Disconnect P/J6601 on the IP Board, and P/J6501 on the Wireless Board. Is each cable of the Wireless Harness continuous? Go to step 4. Replace the Wireless Harness. 4. Replace the WiFi Board. Does the error persist when the power is turned on? Replace the IP Board (Phaser 6020/6022 and WorkCentre 6025 MFP, WorkCentre 6027 MFP. Complete.
- Code: 024-340
- Description: CPU Detect Internal Error MCU firmware error detected.
- Causes: • MCU Board, PL7.2.2
- Troubleshooting Guides: 1. 1. SaveNVM to ESS 2. Replace the MCU Board 3. LoadNVM from ESS Does the error persist? Perform the Electrical Noise check. Go To Step 2. Complete. 2. Does the error persist? Contact your designated field support for assistance.
- Code: 024-360
- Description: Download Error MCU firmware download error detected.
- Causes: • MCU Board, PL7.2.2
- Troubleshooting Guides: 1. Send MCU FW data from Downloading tool. Does the error persist? Go to step 2. Complete. 2. Reseat all connections on the IP Board and MCU Board. Does the error persist? Go to step 3. Complete. 3. 1. SaveNVM to ESS 2. Replace the MCU Board. 3. LoadNVM from ESS Does the error persist? Perform the Electrical Noise check. Go to step 4. Complete. 4. Contact your designated field support for assistance.
- Code: 024-371
- Description: MCU – Image Processor Board Communication Error Communication has failed between the MCU and IP Boards.
- Causes: • IP Board PL7.1.9/7.1.16 • MCU Board PL7.2.2 • Image Processor Harness PL7.2.12
- Troubleshooting Guides: 1. Reseat the cables in the connectors on the IP and MCU Boards then cycle system power. Does the error persist? Go to step 2. Complete. 2. Check the Image Processor Harness continuity. Disconnect the IP Board P/J402 and the MCU Board P/J22. Is the harness damaged? Replace the harness. Go to step 3. 3. Replace the IP Board (Phaser 6020/6022 and WorkCentre 6025 MFP, WorkCentre 6027 MFP. Does the error persist? 1. SaveNVM to ESS 2. Replace the MCU Board. 3. LoadNVM from ESS Complete.
- Code: 024-946
- Description: Cassette Detached The Paper Cassette is not detected.
- Causes: • Paper Cassette
- Troubleshooting Guides: 1. Insert or Reseat the Paper Cassette. Does the error persist? Go to step 2. Complete. 2. Pull out the tray, and check the shape of the actuator located at the rear of the tray. Is the actuator dislocated or deformed Go To Step 4. Go To Step 3. 3. Test the sensor in diagnostics. Does the state change when the actuator is moved? Replace the MCU Board Replace the sensor. 4. Replace / reinstall the Actuator. Does the error persist? Go to step 3 Complete
- Code: 024-958
- Description: Paper Size Mismatch The size of paper in the MFP (or PSI) does not match the specified print size. AAAAAA: Paper Size BBBBBB: Paper Type
- Causes: • Registration Sensor, PL2.3.5 • Registration roller bushing(s) and spring(s)
- Troubleshooting Guides: 1. Check the Regi Sensor in diagnostics. Does the display change when the actuator is moved? Go to step 2. Replace the Regi Sensor. 1. Check the registration rollers. Are all the rollers in contact with even pressure on each side? Are the registration pressure roller bushings and springs correctly installed? Go to step 3. Correct the registration roller installation issue. 1. Is the transfer roller mounted correctly and not binding? Replace the MCU Board 1. SaveNVM to ESS 2. Replace the MCU Board. 3. LoadNVM from ESS Correct the transfer roller mounting issue.
- Code: 024-963
- Description: No Suitable Paper The MFP (or PSI) has run out of paper or the size (or type) of paper does not match the specified print size (or type). XXXXXX: Paper Size YYYYYY: Paper Type
- Causes: • Registration Sensor, PL2.3.5 • Harness Assembly RKN SNS, PL2.2.25 • MCU Board, PL7.2.2
- Troubleshooting Guides: 1. Check the Regi Sensor in CE Diag. Does the display change when the actuator is moved? Go to step 2. Replace the Regi Sensor. 2. Check the Registration Rollers. Are all the rollers in contact with even pressure on each side. Are the registration pressure roller bushings ad springs correctly installed? Go to step 3. Correct any Registration Roller installation issues. 3. Is the Transfer Roller mounted correctly and not binding? 1. SaveNVM to ESS 2. Replace the MCU Board. LoadNVM from ESS. Correct any Transfer Roller mounting issues.
- Code: 026-722, 026-723
- Description: USB Memory Write Protect Error / File Path Limit Error The USB Memory is write protected or the file path name is too long.
- Causes: • IP Board, PL7.1.9 • MCU Board, PL7.2.2
- Troubleshooting Guides: 1. 026-722 – Initialize (format) the USB memory device on a computer with one of the following file formats and attempt to perform the operation again. • Supported file formats: FAT12, FAT16 (FAT), FAT32 Note: – NTFS and software encrypted UDSB devices are not supported. Does the error persist? Contact your designated support center representative. Compete 2. 027-723 – Verify the USB device is fully inserted into the USB port and the USB device is not removed while the printer is accessing the USB device. Does the error persist? Go to step 3. Complete 3. Verify the USB device and the file on the USB device are accessible by the computer. Can the device and file(s) be accessed by the computer? Turn the printer off, unplug the printer from the wall for at least 30s, plug back in and turn on. Attempt the print/scan job again. Format the device in one of the following supported formats – FAT12, FAT16 (FAT), FAT32. Retry accessing the USB device on the computer then attempt the scan or print job again. 4. Does the error persist? Go to step 5. Complete. 5. Reload firmware from www.xerox.com. Does the error persist? Go to step 2. Complete. 6. Replace the IP Board (Phaser 6020/6022 and WorkCentre 6025 MFP, WorkCentre 6027 MFP. Does the error persist? Go to step 4. Complete. 7. 1. SaveNVM to ESS 2. Replace the MCU Board. 3. LoadNVM from ESS Complete.
- Code: 026-750, 026-751, 026-752
- Description: Scan Communication Fail Communication failed during a scan job. • 026-750: Scan Communication Fail 026-750 Scan Job Failure Press OK <I/O Manager Detects Unknown Command Or Protocol From Network Link> • 026-751: Scan Communication Fail 026-751 Scan Job Failure Press OK <Network Link Is Disconnected While Sending Data Or Status> • 026-752: Scan Communication Fail 026-752 Scan Job Failure Press OK <I/O Manager Cannot Send USB Data>
- Causes: • IP Board, PL7.1.9 • MCU Board, PL7.2.2
- Troubleshooting Guides: 1. Verify there are no TCP/IP communications issues; • No duplicate IP addresses. • Printer is not set to DHCP and a static assigned IP address is in the printer network settings. Save new settings and restart the printer and computer if TCP/IP setting have been changed. Does the error persist? Go to step 2. Complete 2. Verify firmware and upgrade revision if needed. Does the error persist? Go to step 3. Complete. 3. Verify all cables are securely connected at the IP Board, external USB board, and attempt the job again. Does the error persist? Go to step 4. Complete. 4. Replace the IP Board (Phaser 6020/6022 and WorkCentre 6025 MFP, WorkCentre 6027 MFP. Does the error persist? Go to step 4. Complete. 5. 1. SaveNVM to ESS 2. Replace the MCU Board. 3. LoadNVM from ESS Complete.
- Code: 027-446
- Description: IPv6 Duplicate Duplicate IPv6 address detected upon startup.
- Causes: • IP Board, PL7.1.9 • MCU Board, PL7.2.2
- Troubleshooting Guides: 1. Check the SMB settings in the Address Book or CWIS. Does the error persist? Go to step 2. Complete. 2. “MCU Board” on. Does the error persist when the power is turned off and on? 1. SaveNVM to ESS 2. Replace the MCU Board. 3. LoadNVM from ESS Complete.
- Code: 027-452
- Description: IPv4 Duplicate Duplicate IPv4 address detected upon startup.
- Causes:
- Troubleshooting Guides: 1. At the printer’s Control Panel, press the Menu key. Using the Up Arrow, Down Arrow, and OK keys, navigate to Admin Menu > Network Settings >TCP/IP > IPv4 > Get Address. Is Get Address set to Panel? The printer is trying to use an address that is being used by another device on the network. Change the printer’s address. Another device is trying to use the printer’s address. Find the other device and resolve the problem by changing the other device’s address.
- Code: 031-521 … 031-558
- Description: A SMB error is detected. • 031-521: SMB Error 031-521 Scan Login Error Press OK <SMB Login Error> • 031-526: SMB Error 031-536 Scan Name Resolve Error Press OK <DNS Name Resolve Error> • 031-529: SMB Error 031-529 Scan Login Failed Press OK <Share Folder ID ERROR or Illegal PASSWORD> • 031-530: SMB Error 031-530 Scan SMB Path Error Press OK <SMB Path Error> • 031-533: SMB Error 031-533 Scan File Make Error Press OK <SMB File Make Error> • 031-534: SMB Error 031-534 Scan Folder Make Error Press OK <SMB Folder Make Error> • 031-535: SMB Error 031-535 Scan Delete File Error Press OK <SMB Delete File Error> • 031-536: SMB Error 031-536 Scan Delete Folder Error Press OK <SMB Delete Folder Error> • 031-537: SMB Error 031-537 Scan Disk Full Error Press OK <SMB Server Storage Full> • 031-555: SMB Error 031-355 Scan Connect Error Press <Detects SMB Link Is Broken> • 031-556: SMB Error 031-556 Scan Write Error Press OK <SMB Write Error> • 031-557: SMB Error 031-557 Scan File Duplication Press OK <SMB File Duplication Error> • 031-558: SMB Error 031-558 Scan Connect Error Press OK <SMB Connect Error>
- Causes: IP Board, PL7.1.9 MCU Board, PL7.2.2
- Troubleshooting Guides: 1. Reseat the connectors on the IP and MCU Boards then cycle system power. Does the error persist? Go to step 2. Complete. 2. Replace the IP Board (Phaser 6020/6022 and WorkCentre 6025 MFP, WorkCentre 6027 MFP). Does the error persist? 1. SaveNVM to ESS 2. Replace the MCU Board. 3. LoadNVM from ESS Complete.
- Code: 031-571 … 031-598
- Description: FTP error is detected. • 031-571: FTP Error 031-571 Scan Connect Error Press OK <Detects FTP Server Link Is Broken> • 031-574: FTP Error 031-574 Scan Name Resolve Error Press OK <Domain Name Resolving Failure> • 031-575: FTP Error 031-575 Scan Server Address Error Press OK <Scan Server Address Error> • 031-576: FTP Error 031-576 Scan Server Not Found Press OK <Can Not Open FTP Server For Accessing> • 031-578: FTP Error 031-578 Scan Login Failed Press OK <FTP ID ERROR or FTP PASSWORD Illegal> • 031-579: FTP Error 031-579 Scan FTP Path Error Press OK <FTP Path Error> • 031-582: FTP Error 031-582 Scan File Create Error Press OK <Can Not Create File Name> • 031-584: FTP Error 031-584 Scan Connect Error Press OK <Can Not Create Directory> • 031-585: FTP Error 031-585 Scan DEL Command Error Press OK <Can Not Delete File> • 031-587: FTP Error 031-587 Scan RMD Command Error Press OK <Can Not Delete Directory> • 031-588: FTP Error 031-588 Scan Write Error Press OK <Data Can Not Be Written Onto FTP> • 031-589: FTP Error 031-589 Scan Disk Full Error Press OK <FTP Storage Full> • 031-594: FTP Error 031-594 Scan TYPE Command Error Press OK <FTP Command Type Incorrect> • 031-598: FTP Error 031-598 Scan APPE Command Error Press OK <FTP APPEND Command Error>
- Causes: • IP Board, PL7.1.9 • MCU Board, PL7.2.2
- Troubleshooting Guides: 1. Reseat the connectors on the IP and MCU Boards then cycle system power. Does the error persist? Go to step 2. Complete. 2. Replace the IP Board (Phaser 6020/6022 and WorkCentre 6025 MFP, WorkCentre 6027 MFP. Does the error persist? 1. SaveNVM to ESS 2. Replace the MCU Board. 3. LoadNVM from ESS Complete.
- Code: 033-503, 033-513
- Description: FAX Memory Error
- Causes: • Package Assy Fax Lt, Pl7.1.15 • MCU Board, PL7.2.2
- Troubleshooting Guides: 1. Reseat the connectors on the IP and MCU Boards then cycle system power. Does the error persist? Go to step 2. Complete. 2. Replace the IP Board (Phaser 6020/6022 and WorkCentre 6025 MFP, WorkCentre 6027 MFP. Does the error persist? 1. SaveNVM to ESS 2. Replace the MCU Board. 3. LoadNVM from ESS Complete.
- Code: 033-517, 033-518, 033-519
- Description: Fax Administration Errors. • 033-517: Password Error 033-517 Fax Job Failure Press OK <The Password Of The PC Fax Job Is Different From Password Of The Fax Service Lock When The Fax Service Lock Setting Is “Password Locked”> • 033-518: Region is not Set 033-518 Fax Job Failure Press OK <Fax Country is not set correctly> • 033-519: Function is Disabled 033-519 Fax Job Failure Press OK <Machine Receives A PC Fax Job When The Fax Service Lock Setting Is “Locked”.>
- Causes: • IP Board, PL7.1.9 • MCU Board, PL7.2.2
- Troubleshooting Guides: 1. Reseat the connectors on the IP and MCU Boards then cycle system power. Does the error persist? Go to step 2. Complete. 2. Replace the IP Board (Phaser 6020/6022 and WorkCentre 6025 MFP, WorkCentre 6027 MFP. Does the error persist? 1. SaveNVM to ESS 2. Replace the MCU Board. 3. LoadNVM from ESS Complete.
- Code: 033-787, 033-788
- Description: Memory Full Fax Job Failure • 033-787: Memory Full 033-787 Fax Job Failure Press OK <Calling Table Full> • 033-788: Memory Full 033-788 Fax Job Failure Press OK <Register Page/Band To Flash Memory Failed For Receiving Data From PC Host> Note: The scanned images will be transmitted out and the report will show only successful transmission with the stored pages. The message will be cleared after Job Fault time out.
- Causes: • IP Board, PL7.1.9 • MCU Board, PL7.2.2
- Troubleshooting Guides: 1. Reseat the connectors on the IP and MCU Boards then cycle system power. Does the error persist? Go to step 2. Complete. 2. Replace the IP Board (Phaser 6020/6022 and WorkCentre 6025 MFP, WorkCentre 6027 MFP. Does the error persist? 1. SaveNVM to ESS 2. Replace the MCU Board. 3. LoadNVM from ESS Complete.
- Code: 034-700 … 034-768
- Description: FAX Communication Errors. • 034-700: Busy 034-700 Fax Job Failure Press OK <Fax Busy> • 034-701: No Dial Tone 034-701 Fax Job Failure Press OK <No Dial Tone> • 034-702: No Answer 034-702 Fax Check Line Connection Press OK <No loop current for FAX modem> • 034-703: Communication Fail 034-703 Fax Job Failure Press OK <Interrupted TX at receive end> • 034-704: Communication Fail 034-704 Fax Job Failure Press OK <No answer at receive end> • 034-705: Communication Fail 034-705 Fax Job Failure Press OK <TX redial failure> • 034-706: Communication Fail 034-706 Fax Job Failure Press OK <TX ID timeout> • 034-707: Communication Fail 034-707 Fax Job Failure Press OK <FTP RMD command error is detected> • 034-708: Communication Fail 034-708 Fax Job Failure Press OK <Received data not written to FTP> • 034-709: Communication Fail Fax Job Failure Press OK (Remote polling disabled) • 034-710: Communication Fail Fax Job Failure Press OK (Remote polling or RX unavailable) • 034-711: Communication Fail Fax Job Failure Press OK (FTP APPEND command error is detected) • 034-712 through -727: Communication Fail Fax Job Failure Press OK • 034-750 to 034-768: Communication Error (RX communication error is detected)
- Causes: • IP Board, PL7.1.9 • MCU Board, PL7.2.2
- Troubleshooting Guides: 1. Reseat the connectors on the IP and MCU Boards then cycle system power. Does the error persist? Go to step 2. Complete. 2. Replace the Fax Board. Does the error persist Go to step 3 Complete. 3. Replace the IP Board (Phaser 6020/6022 and WorkCentre 6025 MFP, WorkCentre 6027 MFP. Does the error persist? 1. SaveNVM to ESS 2. Replace the MCU Board. 3. LoadNVM from ESS Complete.
- Code: 041-340
- Description: NVRAM Error The operation error of NVM (read/write check error etc.) is detected.
- Causes: • MCU Board, PL7.2.2
- Troubleshooting Guides: 1. Perform the Electrical Noise test. Does the error persist? Go to step 2. Complete. 2. Download and install firmware form www.xerox.com. Go to step 3. Complete. 3. 1. Save NVM to ESS 2. Replace the MCU Board. 3. LoadNVM from ESS Does the error persist? Contact your designated field support for assistance. Complete.
- Code: 042-325
- Description: Motor Error MCU detects an error from the Main Drive Motor.
- Causes: • Main Drive Assembly, PL6.1.2 • Main Motor Harness, PL6.1.7 • MCU Board, PL7.2.2
- Troubleshooting Guides: 1. Check the Main Drive Motor in CE Diags. Does the Motor run? 1. SaveNVM to ESS. 2. Replace the MCU Board. 3. LoadNVM from ESS. Go to step 2. 2. Check the connections between the MCU Board P/J16 and the Main Drive Assembly P/J160. Are the connections secure? Go to step 3. Reconnect the connectors, then go to step 4. 3. Does the error persist? Go to step 4. Complete. 4. Is the Main Drive Assembly installed correctly? Go to step 5. Reseat the Main Drive Assembly, then go to step 6. 5. Does the error persist when the power is turned off and on? Go to step 6. Complete. 6. Check the Main Drive harness continuity. Disconnect P/J16 from the MCU Board and P/J160 from the Main Drive Assembly to check continuity. Is the harness damaged? Repair the harness. Go to step 7. 7. Check the power to the Main Drive Assembly. Disconnect connector P/J16 on the MCU Board. Are the voltages across ground at P/J16-2 and P/J16-4 approximately +24 VDC when the Interlock Switch is closed? Replace the Main Drive Assembly. 1. SaveNVM to ESS. 2. Replace the MCU Board. 3. LoadNVM from ESS.
- Code: 042-358
- Description: Fan Motor Failure MCU detects an error from the Fan Motor.
- Causes: • LVPS, PL 7.2.1 • Fan, PL 7.1.2 • MCU Board, PL7.2.2
- Troubleshooting Guides: 1. Test the Fan in CE Diag (see “Fan”). For the 6020: Test the Fan with the “Fan”. Does the Fan function normally? Go to step 2. Go to step 3. 2. Does the error persist? Replace the Fan. Complete. 3. Check the connections between the FAN and LVPS. Is P/J205 on the LVPS securely connected? Go to step 4. Complete. 4. Disconnect P/J205 on the LVPS. Is the voltage across ground at P/J205-1 approximately +24 VDC when the Interlock Switch is pushed? 1. SaveNVM to ESS. 2. Replace the MCU Board. 3. LoadNVM from ESS. Replace the LVPS.
- Code: 042-372
- Description: DEVE Mode Change Failure DEVE Mode Change failure is detected.
- Causes: • Feed Solenoid, PL6.1.10 • Switching Sensor • Harness Assembly RKN SNS PL2.2.25/26 • Developer Drive Assembly, PL6.1.6 • MCU Board, PL7.2.2
- Troubleshooting Guides: 1. Does the error persist when the power is turned on? Go to step 2. If there is more than only the current error in the fault history, go to step 2. 2. Test the K Mode Solenoid: Enter diagnostic mode and select Engine Diag > Motor Test > K Mode Solenoid You can also use the CE Diag Tool to perform this test (“K Mode Solenoid”). Does the Feed Solenoid function normally? Go to step 4. Go to step 3. 3. Check the P/J10 connector on the MCU Board. Is P/J10 connected correctly? Replace the K Mode Solenoid. Reseat the connector. 4. Does Gear C rotate and engage the drive train when the K mode solenoid releases it? Go to step 5. Replace the developer drive assembly PL6.1.6. 5. Test the color mode sensor in diagnostics. Does the sensor function correctly? Go to step 7. Replace the sensor PL2.3.5 Then go to step 6. 6. Does the sensor function correctly in diagnostics after replacement? Complete. Go to step 7 7. Check the connections between the MCU Board P/J12 and the Feed Sensor P/J122. Are the connections secure? Replace the MCU Board. Reseat the connector.
- Code: 061-370
- Description: LPH Failure Printer Code:xxxxxxxx Restart Printer <LPH Failure>
- Causes: • IP Board, PL7.1.9 • LED Driver Board, PL7.1.5 • HEAD ASSY-M-K, PL3.3.4
- Troubleshooting Guides: 1. Check the connectors at the LED Driver Board P/J2, 3, 4, and 5 and Xerographics Assembly P/J6, 7, 8, and 9. Are the connectors securely connected? Go to step 2. Reconnect the connectors. 2. Does the error persist when the power is turned on? Go to step 3. Complete. 3. Print the test pattern ASIC. Put the printer in diagnostic mode and select Test Print > Test Pattern ASIC. You can also print the test pattern from the CE Diag Tool. See “Test Print” on. Is the image printed correctly? Replace the IP Board (Phaser 6020/6022 and WorkCentre 6025 MFP, WorkCentre 6027 MFP. Replace the LED Driver Board.
- Code: 062-321
- Description: Carriage Motor Error.
- Causes: • IP Board, PL7.1.9 • MCU Board, PL7.2.2
- Troubleshooting Guides: 1. Perform Scanner Test 1 in diagnostics. Does the scanner motor run? Go to step 2. Replace the Scanner Assembly. 2. Reseat the connectors between the scanner and IP Board. Does the error reoccur? Go to step 3 Complete. 3. Temporarily connect a replacement scanner. Does the error reoccur? Replace the IP Board. Install the replacement scanner.
- Code: 062-322
- Description: Scanner Drive Calibration Failure Scanner drive calibration failed.
- Causes: • IP Board, PL7.1.9 • MCU Board, PL7.2.2 • Scanner, PL8.1.1
- Troubleshooting Guides: 1. Reseat the connectors on the IP and MCU Boards then cycle system power. Does the error persist? Go to step 2. Complete. 2. Does the error persist? Replace the Scanner for WorkCenter 6025 MFP or for WorkCenter 6027 MFP. Complete. 3. Replace the IP Board Phaser 6020/6022 and WorkCentre 6025 MFP, WorkCentre 6027 MFP. Does the error persist? 1. SaveNVM to ESS 2. Replace the MCU Board. 3. LoadNVM from ESS Go to step 3. Complete.
- Code: 062-360
- Description: Image Processor related error occurred. System Restart
- Causes: • IP Board, PL7.1.9
- Troubleshooting Guides: 1. Check the connectors on the IP Board. Are the connections secure? Go to step 3. Securely reconnect the connectors, then go to step 2. 2. Does the error persist? Go to step 3. Complete. 3. Replace the IP Board; Phaser 6020/6022 and WorkCentre 6025 MFP, WorkCentre 6027 MFP. Does the error persist? Complete.
- Code: 062-790
- Description: Copy Limit Unable to continue due to copy limitation.
- Causes: • IP Board, PL7.1.9 • MCU Board, PL7.2.2
- Troubleshooting Guides: 1. Reseat the connectors on the IP and MCU Boards then cycle system power. Does the error persist? Go to step 2. Complete. 2. Replace the IP Board (Phaser 6020/6022 and WorkCentre 6025 MFP, WorkCentre 6027 MFP. Does the error persist? 1. SaveNVM to ESS 2. Replace the MCU Board. 3. LoadNVM from ESS Complete.
- Code: 075-100
- Description: Jam Errors The Registration Sensor is not turned ON within the specified time.
- Causes: • Feed Roller, PL22.4 • Feed Solenoid, PL6.1.10 • Registration Sensor, PL2.3.5 • Main Drive Assembly, PL6.1.2 • Registration Clutch, PL2.3.7 • Harness Assembly RKN SNS, PL2.2.25 • MCU Board, PL7.2.2
- Troubleshooting Guides: 1. Are the Feed Roller and Separator Pad installed correctly? Go to step 2. Install parts that are not correctly installed. 2. Does the Feed Roller rotate smoothly and the tray lift so that the paper contacts the feed roller? Go to step 3. Go to step 7. 3. Does the paper feed to the nip point of the registration roller? Go to step 4. Replace the feed and or separator rollers. 4. Enter diagnostic mode and run the Regi Sensor test (see page 2-136). You can also use CE Diag Tool to perform this test (see page 2-110). Lift the Main Paper Tray Chute (PL3.3.3), this pushes on the actuator, does the number on the display change each time the Main Paper Tray Chute is lifted? Go to step 5. Go to step 6. 5. Disconnect the MCU Board P/J21 and the Registration Sensor P/J120. Check the Harness Assembly RKN SNS for continuity. Is the harness damaged? Go to step 6. Repair or replace the harness. 6. Disconnect the MCU Board P/J21. Is the voltage across ground and P/J12-1 +3.3VDC? Replace the Registration Sensor. 1. SaveNVM to ESS. 2. Replace the MCU Board. 3. LoadNVM from ESS. 7. Enter diagnostic mode and run Main Motor on Full (see page 2-123). You can also use the CE Diag Tool to run this test see ‘CE Diags Tool’. Does the Main Drive Assembly function correctly. Go to step 8 Go to step 10 8. Enter diagnostic mode and run the Feed SOLENOID test. You can also use the CE Diag Tool to run this test see ‘CE Diags Tool’. Does the Feed Solenoid function correctly? Go to step 9. Replace the Feed Solenoid. 9. Enter diagnostic mode and select Engine Diag > Motor Test > Regi Clutch. You can also use the CE Diag Tool to run this test see ‘CE Diags Tool’. Does the Registration Clutch function correctly? 1. SaveNVM to ESS. 2. Replace the MCU Board. 3. LoadNVM from ESS. Replace the Registration Clutch. 10. Check the connector of P/J19 on the MCU Board. Is the connection secure? Go to step 11. Reconnect the connector, then go to step 15. 11. Does the error persist? Go to step 12. Complete. 12. Disconnect P/J16 from the MCU Board and P/J160 from the Main Drive Assembly. Check the continuity of the cable. Is the cable damaged? Repair the cable. Go to step 13. 13. Disconnect the MCU Board P/J16 and check that the voltages across ground at P/J16-2 and P/J16-4 are +24 VDC. Are the voltages correct? Replace the Main Drive Assembly. 1. SaveNVM to ESS 2. Replace the MCU Board. 3. LoadNVM from ESS
- Code: 075-921
- Description: Insert Output To Tray The sheet on which to print an odd-numbered page has not been loaded in the Paper Cassette /Bypass Tray when manual duplex printing is performed.
- Causes: • IP Board, PL7.1.9 • MCU Board, PL7.2.2
- Troubleshooting Guides: 1. Reseat the connectors on the IP and MCU Boards then cycle system power. Does the error persist? Go to step 2. Complete. 2. Replace the IP Board (Phaser 6020/6022 and WorkCentre 6025 MFP, WorkCentre 6027 MFP). Does the error persist? 1. SaveNVM to ESS 2. Replace the MCU Board. 3. LoadNVM from ESS Complete.
- Code: 077-100
- Description: Paper Remain at Regi Paper remain was detected at the Registration section (or Paper Tray/Bypass Tray section) of the printer. Applicable Error
- Causes: • Registration Sensor, PL2.3.5 • Harness Assembly RKN SNS, PL2.2.25/26 • MCU Board, PL7.2.2
- Troubleshooting Guides: 1. Is the trailing edge of the paper past the registration sensor actuator? Go to step 3. Go to step 5. 2. Enter diagnostic mode and run the Regi Sensor test (see page 2-136). You can also use CE Diag Tool to perform this test (see page 2-110). Lift the Main Paper Tray Chute (PL3.3.3), this pushes on the actuator does the number on the display change each time the Main Paper Tray Chute is lifted? Go to step 3. Replace the Registration Sensor (Phaser 6020 and WorkCentre 6025 MFP, Phaser 6022 and WorkCentre 6027 MFP. 3. Disconnect the MCU Board P/J21 and the Registration Sensor P/J120. Check the Harness Assembly RKN SNS for continuity. Is the harness damaged? Repair the harness. Go to step 4. 4. Disconnect the MCU Board P/J12. Is the voltage across ground and P/J12-1 +3.3VDC? Reconnect the connectors, then go to step 2. 1. SaveNVM to ESS 2. Replace the MCU Board. 3. LoadNVM from ESS 5. Is the ROLL REGI PL 2.3.1 installed correctly and in full contact with ROLL ASSY PINCH REGI PL 2.3.2. Go to step 6. Repair the mechanical issue with ROLL REGI. 6. Enter diagnostic mode and select Engine Diag > Motor Test > Regi Clutch. You can also use the CE Diag Tool to run this test (see ‘CE Diags Tool’). Does the Registration Clutch function correctly? 1. SaveNVM to ESS 2. Replace the MCU Board. 3. LoadNVM from ESS Replace the Registration Clutch.
- Code: 077-104
- Description: Regi Jam The paper does not pass through the Registration Sensor within the specified time.
- Causes: • Registration Sensor, PL2.3.5 • Registration Clutch, PL2.3.7 • Harness Assembly RKN SNS, PL2.2.25/26 • Main Drive Assembly, PL6.1.2 • Harness Assembly Dispenser MOT, PL6.1.7 • MCU Board, PL7.2.2
- Troubleshooting Guides: 1. Check the installation and operation of the Registration Roller and the Registration Pinch Roller Assembly. Are the Registration Roller and the Registration Pinch Roller Assembly installed properly? Go to step 2. Replace the relevant part, then go to step 2. 2. Check connectors P/J12 and P/J120 between the MCU Board and the Registration Sensor. Are the connectors secure? Go to step 3. Reseat the harness in the connectors, then go to step 3. 3. Does the error still occur when printing? Go to step 4. Complete. 4. Enter diagnostic mode and run the Regi Sensor test (see “Registration Sensor” on). You can also use the CE Diag Tool to run this test see. Lift the Paper Tray Chute (PL3.3.3), does the number on the display increase by 1 each time the Paper Tray Chute is lifted? 1. SaveNVM to ESS 2. Replace the MCU Board. 3. LoadNVM from ESS Go to step 5. 5. Disconnect the MCU Board P/J21 and the Registration Sensor P/J120. Check the Harness Assembly RKN SNS for continuity. Is the harness damaged? Go to step 6. Repair the harness. 6. Check that the voltage across ground on the MCU Board P/J12-1 is +3.3 VDC. Is the voltage correct? Replace the Registration Sensor (Phaser 6020 and WorkCentre 6025 MFP, Phaser 6022 and WorkCentre 6027 MFP. 1. SaveNVM to ESS 2. Replace the MCU Board. 3. LoadNVM from ESS 7. Check connectors P/J16 and P/J160 between the MCU Board and the Main Drive Assembly. Are the connectors secure? Go to step 9. Reconnect the connectors, then go to step 8. 8. Does the error persist when printing? Go to step 9. Complete. 9. Enter diagnostic mode and run the Main Motor test see. You can also use the CE Diag Tool to run this test. see “Main Motor” on. Does the Main Drive Assembly function normally? Go to step 14. Go to step 10. 10. Check the Main Drive Assembly for proper installation. Is the Main Drive Assembly installed correctly? Go to step 12. Reseat the Main Drive Assembly, then go to step 11. 11. Does the error still occur when printing? Go to step 12. Complete. 12. Disconnect P/J16 from the MCU Board and P/J160 from the Main Drive Assembly. Check the continuity of the cable. Is the cable damaged? Repair the cable. Go to step 13. 13. Check the MCU Board P/J25 for proper connection. Is P/J25 securely connected? Go to step 15. Reconnect the connector, then go to step 14. 14. Does the error persist? Go to step 15. Complete. 15. Disconnect P/J16 on the MCU Board. Are the voltages across ground at P/J16-2 and P/J16-4 approximately +24 VDC when the Interlock Switch is pushed? Replace the Main Drive Assembly, then go to step 16. 1. SaveNVM to ESS 2. Replace the MCU Board. 3. LoadNVM from ESS Go to step 16. 16. Does the error persist when printing? Go to step 17. Complete. 17. Enter diagnostic mode and run the Regi Clutch test. You can also use the CE Diag Tool to run this test see “Registration Clutch” on. Does the Registration Clutch function correctly? 1. SaveNVM to ESS 2. Replace the MCU Board. 3. LoadNVM from ESS Replace the Registration Clutch.
- Code: 077-106
- Description: Jam at Exit The paper does not reach the Registration Sensor within the specified time.
- Causes: • Registration Sensor, PL2.3.5 • Registration Clutch, PL2.3.7 • Harness Assembly RKN SNS, PL2.2.25/26 • Main Drive Assembly, PL6.1.2 • Harness Assembly Main MOT, PL6.1.7 • MCU Board, PL7.2.2
- Troubleshooting Guides: 1. Check the installation and operation of the Registration Roller and the Registration Pinch Roller Assembly. Are the Registration Roller and the Registration Pinch Roller Assembly installed properly? Go to step 2. Reinstall/replace the relevant part, then go to step 2. 2. Check connectors P/J12 and P/J120 between the MCU Board and the Registration Sensor. Are the connectors secure? Go to step 4. Reconnect the connectors, then go to step 3. 3. Does the error still occur when printing? Go to step 4. Complete. 4. Enter diagnostic mode and run the Regi Sensor test (see. You can also use the CE Diag Tool to run this test (see. Lift the Paper Tray Chute (PL3.3.3), does the number on the display increase by 1 each time the Paper Tray Chute is lifted? 1. SaveNVM to ESS 2. Replace the MCU Board. 3. LoadNVM from ESS Go to step 5. 5. Disconnect the MCU Board P/J12 and the Registration Sensor P/J120. Check the Harness Assembly RKN SNS for continuity. Is the harness damaged? Go to step 6. Repair the harness. 6. Check that the voltage across ground on the MCU Board P/J12-1 is +3.3 VDC. Is the voltage correct? Replace the Registration Sensor (Phaser 6020 and WorkCentre 6025 MFP, Phaser 6022 and WorkCentre 6027 MFP. Go to step 7. 1. SaveNVM to ESS 2. Replace the MCU Board 3. LoadNVM from ESS Go to step 7. 7. Does the error persist when printing? Go to step 8. Complete. 8. Check connectors P/J16 and P/J160 between the MCU Board and the Main Drive Assembly. Are the connectors secure? Go to step 9. Reconnect the connectors, then go to step 9. 9. Does the error persist when printing? Go to step 10. Complete. 10. Enter diagnostic mode and run the Main Motor test (see). You can also use the CE Diag Tool to run this test (see “Main Motor” on. Does the Main Drive Assembly function normally? Go to step 15. Go to step 11. 11. Check the Main Drive Assembly for proper installation. Is the Main Drive Assembly installed correctly? Go to step 12. Reseat the Main Drive Assembly, then go to step 12. 12. Does the error still occur when printing? Go to step 13. Complete. 13. Disconnect P/J16 from the MCU Board and P/J160 from the Main Drive Assembly. Check the continuity of the cable. Is the cable damaged? Repair the cable. Go to step 14. 14. Check the MCU Board P/J25 for proper connection. Is P/J25 securely connected? Go to step 15. Reconnect the connector, then go to step 15. 15. Does the error persist when printing? Go to step 16. Complete. 16. Check the power to the Main Drive Assembly. Disconnect P/J16 on the MCU Board. Are the voltages across ground at P/J16-2 and P/J16-4 approximately +24 VDC when the Interlock Switch is engaged? Replace the Main Drive Assembly, and then go to step 17. 1. SaveNVM to ESS 2. Replace the MCU Board. 3. LoadNVM from ESS Go to step 17. 17. Does the error persist when printing? Go to step 18. Complete. 18. Enter diagnostic mode and run the Regi Clutch test. You can also use the CE Diag Tool to run this test (see “Registration Clutch” on. Does the Registration Clutch function correctly? 1. SaveNVM to ESS 2. Replace the MCU Board. 3. LoadNVM from ESS Replace the Registration Clutch.
- Code: 077-108, 077-109
- Description: Exit Jams The paper passed through the Exit Sensor earlier than the specified time or the paper does not pass through the Exit Sensor within the specified time.• 077-108: Paper Jam 077-108 Printer Jam at Exit, <Exit Jam> Early pass • 077-109: Paper Jam 077-109 Printer Jam at Exit, <Exit Jam> No pa
- Causes: Fuser, PL5.1.1 MCU Board, PL7.2.2
- Troubleshooting Guides: 1. Remove the fuser exit guide see. Are any torn off pieces of paper present? Remove the paper. Go to step 2. 2. Check P/J18 on the MCU Board. Is P/J18 connected securely? Go to step 3. Reconnect P/J18, then go to step 3. 3. Does the error persist? Replace the Fuser. Go to step 4. Complete. 4. Does the error persist? Replace the MCU Board. Complete.
- Code: 077-304
- Description: Rear Cover Open The rear cover is open.
- Causes: • Rear Door, PL1.1.6 • Rear I/L Switch Assembly, PL1.1.12 • LVPS, PL7.2.1 • MCU Board, PL7.2.2
- Troubleshooting Guides: 1. Visually inspect the Rear Door for damage. Is the Rear Door damaged? Replace the Rear Door for Phaser 6020, or for Phaser 6022, or for WorkCenter 6025 MFP, or for WorkCenter 6027 MFP. Go step 2. 2. Enter diagnostic mode and run the Cover Open Sensor test (see. Does the number on the display increase by 1 each time the door is opened?. Go to step 4. Go to step 3. 3. Replace the Rear I/L Switch Assembly for Phaser 6020, or for 6022, or for WorkCenter 6025 MFP, or for WorkCenter 6027 MFP. Does the error persist? Go to step 4. Complete. 4. Replace the LVPS. Does the error still occur when printing? 1. SaveNVM to ESS 2. Replace the MCU Board. 3. LoadNVM from ESS Complete.
- Code: 077-900
- Description: Exit Jam Paper is remaining at the Exit section of the Printer.
- Causes: • Fuser, PL5.1.1 • MCU Board, PL7.2.2
- Troubleshooting Guides: 1. Remove the fuser exit guide see. Are any torn off pieces of paper present? Remove the paper. Go to step 2. 2. Check P/J18 on the MCU Board. Is P/J18 connected securely? Go to step 3. Reconnect P/J18, then go to step 3. 3. Does the error persist? Replace the Fuser. Go to step 4. Complete. 4. Does the error persist? Replace the MCU Board. Complete.
- Code: 077-901
- Description: Registration Jam Paper is detected at the registration section of the Printer.
- Causes: • Registration Sensor, PL2.3.5 • Harness Assembly RKN SNS, PL2.2.25 • MCU Board, PL7.2.2
- Troubleshooting Guides: 1. Check the installation and operation of the Registration Roller and the Registration Pinch Roller Assembly. Are the Registration Roller and the Registration Pinch Roller Assembly installed properly? Go to step 2. Replace the relevant part, then go to step 2. 2. Check connectors P/J12 and P/J120 between the MCU Board and the Registration Sensor. Are the connectors secure? Go to step 3. Reseat the harness in the connectors, then go to step 3. 3. Does the error still occur when printing? Go to step 4. Complete. 4. Enter diagnostic mode and run the Regi Sensor test (see “Registration Sensor”). You can also use the CE Diag Tool to run this test (see. Lift the Paper Tray Chute (PL3.3.3), does the number on the display increase by 1 each time the Paper Tray Chute is lifted? 1. SaveNVM to ESS 2. Replace the MCU Board. 3. LoadNVM from ESS Go to step 5. 5. Disconnect the MCU Board P/J21 and the Registration Sensor P/J120. Check the Harness Assembly RKN SNS for continuity. Is the harness damaged? Go to step 6. Repair the harness. 6. Check that the voltage across ground on the MCU Board P/J12-1 is +3.3 VDC. Is the voltage correct? Replace the Registration Sensor (Phaser 6020 and WorkCentre 6025 MFP, Phaser 6022 and WorkCentre 6027 MFP. 1. SaveNVM to ESS 2. Replace the MCU Board. 3. LoadNVM from ESS 7. Check connectors P/J16 and P/J160 between the MCU Board and the Main Drive Assembly. Are the connectors secure? Go to step 9. Reconnect the connectors, then go to step 8. 8. Does the error persist when printing? Go to step 9. Complete. 9. Enter diagnostic mode and run the Main Motor test (see. You can also use the CE Diag Tool to run this test. (see “Motor Test”). Does the Main Drive Assembly function normally? Go to step 14. Go to step 10. 10. Check the Main Drive Assembly for proper installation. Is the Main Drive Assembly installed correctly? Go to step 12. Reseat the Main Drive Assembly, then go to step 11. 11. Does the error still occur when printing? Go to step 12. Complete. 12. Disconnect P/J16 from the MCU Board and P/J160 from the Main Drive Assembly. Check the continuity of the cable. Is the cable damaged? Repair the cable. Go to step 13. 13. Check the MCU Board P/J25 for proper connection. Is P/J25 securely connected? Go to step 15. Reconnect the connector, then go to step 14. 14. Does the error persist? Go to step 15. Complete. 15. Disconnect P/J16 on the MCU Board. Are the voltages across ground at P/J16-2 and P/J16-4 approximately +24 VDC when the Interlock Switch is pushed? Replace the Main Drive Assembly, then go to step 16. 1. SaveNVM to ESS 2. Replace the MCU Board. 3. LoadNVM from ESS Go to step 16. 16. Does the error persist when printing? Go to step 17. Complete. 17. Enter diagnostic mode and run the Regi Clutch test. You can also use the CE Diag Tool to run this test (see “Registration Clutch”). Does the Registration Clutch function correctly? 1. SaveNVM to ESS 2. Replace the MCU Board. 3. LoadNVM from ESS Replace the Registration Clutch.
- Code: 091-402
- Description: XERO Near Life The Printer (Xerographic) is approaching the replacement time.
- Causes: • MCU Board, PL7.2.2
- Troubleshooting Guides: 1. Turn the printer off and then on. Does the error persist? Go to step 2. Complete. 2. Is the print count close to or greater than 30k prints? Go to step 3. Contact your designated field support for assistance. 3. Does print quality meet or exceed guaranteed print quality specifications? Complete. Replace any component(s) related to the print quality issues.
- Code: 091-441
- Description: XERO Life Warning The Printer Xerographic Assembly (Imaging Units, Developers and Transfer Belt Assembly) have reached end-of-life, refer to the manual. Note: The error cannot be cleared once the printer has reached EOL. Printing will not be inhibited; however, print quality is no longer guaranteed.
- Causes: • MCU Board, PL7.2.2
- Troubleshooting Guides: 1. Turn the printer off and then on. Does the error persist? Go to step 2. Complete. 2. Is the print count close to or greater than 30k prints? Go to step 3. Contact your designated field support for assistance. 3. Does print quality meet or exceed guaranteed print quality specifications? Complete. Replace any component(s) related to the print quality issues.
- Code: 092-310, 092-910
- Description: Check Unit (ADC) Sensor The CTD (ADC) Sensor has reached the Cleaning time or the CTD (ADC) Sensor needs to be cleaned. • 092-310: Check CTD Unit <CDT Sensor Contamination> • 092-910: Check CTD Unit <CDT Sensor Contamination>
- Causes: MCU Board, PL7.2.2
- Troubleshooting Guides: 1. Disconnect P/J14 on the MCU Board. Is the voltage across ground at P/J14-1 and P/J14- 9 on the MCU Board +5 VDC? Go to step 2. 1. SaveNVM to ESS 2. Replace the MCU Board. 3. LoadNVM from ESS Go to step 2. 2. Does the error persist? Contact your designated field support for assistance. Complete.
- Code: 092-651
- Description: CDT (ADC) Sensor Error CTD (ADC) sensor error is detected.
- Causes: • MCU Board, PL7.2.2
- Troubleshooting Guides: 1. Clean the ADC sensor. Does the error persist when the power is turned on? Go to step 2. Complete. 2. Disconnect the harness at MCU Board P/J14 and at Xerographics Assembly P/J140, and check the harness for continuity. Is the harness continuous? Go to step 3. Repair the harness. 3. 1. SaveNVM to ESS 2. Replace the MCU Board. 3. LoadNVM from ESS Does the error persist? Contact your designated field support for assistance. Complete.
- Code: 092-661
- Description: ENV Sensor Error The Environment (Temperature/Humidity) sensor detected the temperature anomaly. 661: Code:xxxxxxxx Restart Printer <Environmental Sensor Error>
- Causes: MCU Board, PL7.2.2
- Troubleshooting Guides: 1. 1. SaveNVM to ESS 2. Replace the MCU Board. 3. LoadNVM from ESS Does the error persist? Contact your designated field support for assistance. Complete.
- Code: 093-423 … 093-426
- Description: Toner Cartridge (X) Near Life The Toner Cartridge (X) is approaching the replacement time. When all the toner cartridges are simultaneously approaching the replacement time, a warning is indicated in the following order: 1)Black 2)Cyan 3)Magenta 4)Yellow • 093-423: Ready to Print 093-423 Printer Y Cartridge is Close to Life • 093-424: Ready to Print 093-424 Printer M Cartridge is Close to Life • 093-425: Ready to Print 093-425 Printer C Cartridge is Close to Life • 093-426: Ready to Print 093-426 Printer X Cartridge is Close to Life
- Causes: • Harn assy dckr, PL4.1.2 • MCU Board, PL7.2.2
- Troubleshooting Guides: 1. Reseat the Toner Cartridge. Does the error persist? Go to step 2. Complete. 2. Check P/J13 on the MCU Board. Is the connector secure? Go to step 4. Reconnect P/J13, then go to step 3. 3. Does the error persist? Go to step 4. Complete. 4. 1. SaveNVM to ESS 2. Replace the MCU Board. 3. LoadNVM from ESS Does the error persist? Contact your designated field support for assistance. Complete.
- Code: 093-919 … 093-922
- Description: (X) Toner Low Density • 093-919: Low Density 093-919 Printer Check Y Cartridge Now • 093-920: Low Density 093-920 Printer Check M Cartridge Now • 093-921: Low Density 093-921 Printer Check C Cartridge Now • 093-922: Low Density 093-922 Printer Check X Cartridge Now
- Causes: • MCU Board, PL7.2.2
- Troubleshooting Guides: 1. Clean the ADC sensor. Does the error persist? Go to step 2. Complete. 2. Check that MCU Board P/J14 is securely connected? Is the connection secure? Go to step 3. Reconnect P/J14, then go to step 3. 3. Does the error persist? 1. SaveNVM to ESS 2. Replace the MCU Board. 3. LoadNVM from ESS Contact your designated field support for assistance.
- Code: 093-926
- Description: CRUM ID Error, Toner Cartridge (X) Detached An unsupported cartridge is detected or the indicated Toner Cartridge is not installed in the printer. If no toner cartridge has been installed in the printer, a warning is indicated in the following order: 1)Yellow 2)Magenta 3)Cyan 4)Black • 093-926: CRUM ID 093-926 Reseat K Cartridge
- Causes: • HARN ASSY DCKR, PL4.1.2 • MCU Board, PL7.2.2
- Troubleshooting Guides: 1. Are the Toner Cartridges installed in the printer Xerox Toner Cartridges? Go to step 2. Complete. 2. Disconnect P/J13 on the MCU Board and unlace the harness. Inspect the harness for damage. Is the harness damaged? Repair the harness, then go to step 3. Go to step 3. 3. Disconnect P/J13 on the PWBA MCU. Is the voltage across ground to P/J13-3 on the MCU Board approximately +3.3 VDC? Repair the Harness Assembly DCKR. Go to step 5. 4. Replace the Toner Cartridge (C, M, Y, or K). Does the error persist? 1. SaveNVM to ESS 2. Replace the MCU Board. 3. LoadNVM from ESS Complete.
- Code: 093-930 … 093-933
- Description: Replace Toner Cartridge The indicated toner cartridge needs to be replaced.
- Causes: • Harn assy dckr, PL4.1.2 • MCU Board, PL7.2.2
- Troubleshooting Guides: 1. Reseat the appropriate Toner Cartridge. Does the error persist? Go to step 2. Complete. 2. Does the error persist when the power is turned off and on? Go to step 3. Complete. 3. Check P/J13 on the MCU Board. Is the connection secure? Go to step 5. Reconnect P/J13, then go to step 4. 4. Does the error persist? Go to step 5. Complete. 5. Disconnect P/J13 on the MCU Board, and inspect the harness. Is the harness damaged? Repair the harness, then go to step 6. Go to step 7. 6. Does the error persist? Go to step 7. Complete. 7. Replace the Toner Cartridge (C, M, Y, or K). Does the error persist? 1. SaveNVM to ESS 2. Replace the MCU Board. 3. LoadNVM from ESS Go to step 4. Contact your designated field support for assistance.
- Code: 093-950, 093-951, 093-952, 093-925
- Description: Toner Comm Fail. • 093-950 Y Cartridge Error • 093-951 M Cartridge Error • 093-952 C Cartridge Error • 093-925 K Cartridge Error
- Causes: • HARN ASSY DCKR, PL4.1.2 • MCU Board, PL7.2.2
- Troubleshooting Guides: 1. Reseat the Toner Cartridge. Does the error persist? Go to step 2. Complete. 2. Check the connection at MCU Board P/J13. Is the connection secure? Go to step 3. Reconnect P/J13, then go to step 3. 3. Does the error persist? Go to step 4. Complete. 4. Disconnect P/J13 on the MCU Board and unlace the harness. Inspect the harness for damage. Is the harness damaged? Repair the harness, then go to step 5. Go to step 6. 5. Does the error persist? Go to step 6. Complete. 6. Replace the Toner Cartridge (C, M, Y, or K). Does the error persist? 1. SaveNVM to ESS 2. Replace the MCU Board. 3. LoadNVM from ESS Go to step 7. Complete. 7. Does the error persist? Contact your designated field support for assistance. Complete.
- Code: 093-960 … 093-974
- Description: CRUM ID Error, Toner Cartridge (X) Detached An unsupported cartridge is detected or the indicated Toner Cartridge is not installed in the printer. If no toner cartridge has been installed in the printer, a warning is indicated in the following order: 1)Yellow 2)Magenta 3)Cyan 4)Black • 093-960: CRUM ID 093-960 Reseat Y Cartridge • 093-961: CRUM ID 093-961 Reseat M Cartridge • 093-962: CRUM ID 093-962 Reseat C Cartridge • 093-970: Insert Print Cart. 093-970 Printer Insert Y Cartridge • 093-971: Insert Print Cart. 093-971 Printer Insert M Cartridge • 093-972: Insert Print Cart. 093-972 Printer Insert C Cartridge • 093-973: Insert Print Cart. 093-973 Printer Insert X Cartridge • 093-974 Insert Toner Cartridge
- Causes: • HARN ASSY DCKR, PL4.1.2 • MCU Board, PL7.2.2
- Troubleshooting Guides: 1. Are the Toner Cartridges installed in the printer Xerox Toner Cartridges? Go to step 2. Complete. 2. Disconnect P/J13 on the MCU Board and unlace the harness. Inspect the harness for damage. Is the harness damaged? Repair the harness, then go to step 3. Go to step 3. 3. Disconnect P/J13 on the PWBA MCU. Is the voltage across ground to P/J13-3 on the MCU Board approximately +3.3 VDC? Repair the Harness Assembly DCKR. Go to step 5. 4. Replace the Toner Cartridge (C, M, Y, or K). Does the error persist? 1. SaveNVM to ESS 2. Replace the MCU Board. 3. LoadNVM from ESS Complete.
- Code: 116-210, 116-395
- Description: System USB Port Error • 116-210: System Restart Printer Contact Support If Message Returns <System USB Port Error> • 116-395: System Restart Printer Contact Support If Message Returns <System USB Port Error>
- Causes: • IP Board, PL7.1.9 • MCU Board, PL7.2.2
- Troubleshooting Guides: 1. Reseat the connectors on the IP and MCU Boards then turn the printer back on. Does the error persist? Go to step 2. Complete. 2. Replace the IP Board (Phaser 6020/6022 and WorkCentre 6025 MFP, WorkCentre 6027 MFP. Does the error persist? 1. SaveNVM to ESS 2. Replace the MCU Board. 3. LoadNVM from ESS Complete.
- Code: 116-314, 116-355
- Description: ESS Network Errors. • 116-314: <ESS Network MAC Address Error> • 116-355: <ESS On Board Network Fatal Error>
- Causes: • IP Board, PL7.1.9 • MCU Board, PL7.2.2
- Troubleshooting Guides: 1. Reseat all connectors on the IP Board and the MCU Board. Does the error persist? Go to step 2. Complete. 2. Replace the IP Board: Phaser 6020/6022 and WorkCentre 6025 MFP, WorkCentre 6027 MFP. Does the error persist? 1. SaveNVM to ESS 2. Replace the MCU Board. 3. LoadNVM from ESS Go to step 3. Complete. 3. Does the error persist? Contact your designated field support for assistance. Complete.
- Code: 116-323
- Description: Checksum Error (Fax) Checksum Error for Fax parameter is detected.
- Causes: • IP Board, PL7.1.9 • MCU Board, PL7.2.2
- Troubleshooting Guides: 1. Reseat all connectors on the IP Board and the MCU Board. Does the error persist? Go to step 2. Complete. 2. Replace the PACKAGE ASSY FAX LT PL7.1.15 Does the error persist when the power is turned on? Replace the IP Board: Phaser 6020/6022 and WorkCentre 6025 MFP, WorkCentre 6027 MFP. Complete.
- Code: 116-324, 116-326, 116-343
- Description: Firmware Errors The firmware download to the printer failed. • 116-324: Controller Error Restart Printer <Controller Error> • 116-326: NVM checksum error (Scan section) <Checksum Error (scan)> • 116-343: ASIC Error Restart Printer <ASIC Error>
- Causes: • IP Board, PL7.1.9 • MCU Board, PL7.2.2 • LED Driver Board, PL7.1.5
- Troubleshooting Guides: 1. Reseat all connectors on the IP Board and the MCU Board. Does the error persist? Go to step 2. Complete. 2. Replace the LED Driver Board. Does the error persist? Go to step 3. Complete. 3. Replace the IP Board Phaser 6020/6022 and WorkCentre 6025 MFP, WorkCentre 6027 MFP. Does the error persist when the power is turned on? 1. SaveNVM to ESS 2. Replace the MCU Board. 3. LoadNVM from ESS
- Code: 116-325
- Description: Checksum Error (Other) Checksum error for (Other) parameter is detected.
- Causes: • IP Board, PL7.1.9 • MCU Board, PL7.2.2
- Troubleshooting Guides: 1. Reseat all connectors on the IP Board and the MCU Board. Does the error persist? Go to step 2. Complete. 2. Replace the IP Board Phaser 6020/6022 and WorkCentre 6025 MFP, WorkCentre 6027 MFP. Does the error persist when the power is turned on? 1. SaveNVM to ESS 2. Replace the MCU Board. 3. LoadNVM from ESS Complete.
- Code: 116-703
- Description: PostScript LANG Interpretation Error (PS/PDF) There is a problem in the PostScript data and an error occurred in PostScript grammar interpretation or language interpretation. Note: This Status Code is not related to any hardware fault.
- Causes:
- Troubleshooting Guides: 1. Correct the job data. Does the error persist? No. Complete.
- Code: 116-720
- Description: PCL Memory Low, Page Simplified There is a problem in the PostScript data and an error occurred in PostScript grammar interpretation or language interpretation. Note: This Status Code is not related to any hardware fault.
- Causes:
- Troubleshooting Guides: 1. Change the print job data size; smaller image file, document, or other job file size and try the print job again. Does the error persist? Change file size or type. Complete.
- Code: 117-331 … 117-343
- Description: Image Processor related error occurred. System Restart
- Causes: • IP Board, PL7.1.9
- Troubleshooting Guides: 1. Check the connectors on the IP Board. Are the connections secure? Go to step 3. Securely reconnect the connectors, then go to step 2. 2. Does the error persist? Go to step 3. Complete. 3. Replace the IP Board; Phaser 6020/6022 and WorkCentre 6025 MFP, WorkCentre 6027 MFP. Does the error persist? Complete.
- Code: 124-333
- Description: ASIC Failure Restart Printer
- Causes: • LED Driver Board, PL7.1.5 • LED/MCU Cable, PL7.1.6 • MCU Board, PL7.2.2
- Troubleshooting Guides: 1. Check connectors P/J23 and P/J1 on the MCU Board and LED Driver Board. Are the connections secure? Go to step 3. Reconnect the connectors P/J23 and P/J1, and then go to step 2. 2. Does the error persist? Go to step 3. Complete. 3. Disconnect the MCU Board P/J23 and the LED Driver Board P/J1, and check the LED/MCU Cable continuity. Is the cable damaged? Replace the LED/MCU Cable. Go to step 4. 4. Replace the LED Driver Board. Does the error persist? 1. SaveNVM to ESS 2. Replace the MCU Board. 3. LoadNVM from ESS Complete.
- Code: 134-211
- Description: Fax Card Modem Error.
- Causes: • IP Board, PL7.1.9 • Fax Board, PL7.1.22 • Fax Harness. PL7.1.22 • MCU Board, PL7.2.2
- Troubleshooting Guides: 1. Disconnect the Fax Harness at P/J2 on the IP Board and the corresponding P/J on the Fax Board. Check the Fax Harness for continuity. Is the cable OK? Go to step 2. Replace the Fax Harness. 2. Replace the PACKAGE ASSY FAX LT PL7.1.15 Does the error persist? Replace the IP Board. Complete.
- Code: 191-310, 191-311
- Description: XERO Life Over (Counter) The Printer (XERO DEVE LPH BELT ASSY) has reached the replacement time. • 191-310: System Restart Printer Contact Support If Message Returns <XERO Life Over> • 191-311: XERO Life Over (Counter) <XERO Life Over>
- Causes: • MCU Board, PL7.2.2
- Troubleshooting Guides: 1. Turn the printer off and then on. Does the error persist? 1. SaveNVM to ESS 2. Replace the MCU Board. 3. LoadNVM from ESS Complete. 2. Contact your designated field support for assistance. Complete.
- Code: 193-700
- Description: Custom Toner Mode The printer is in custom toner mode.
- Causes: • IP Board, PL7.1.9 • MCU Board, PL7.2.2
- Troubleshooting Guides: 1. Loosen the screws on the IP Board, then tighten the screws to reseat the board. Check that all the connectors on the IP Board are secure. Does the problem persist? Go to step 2. Complete. 2. Replace the IP Board (Phaser 6020/6022 and WorkCentre 6025 MFP, WorkCentre 6027 MFP. Does the error persist? 1. SaveNVM to ESS 2. Replace the MCU Board. 3. LoadNVM from ESS Complete.
– Get more error code list with quick guide to fix printer product, click here
– About get help with reseting Epson inkpad or others, click here
– Get more information about Epson XP 15000 troubleshooting, click here
Xerox printer reset software introduction:
Notes before resetting Xerox printer:
– Identify accurate version, serial and crum of Xerox printer.
– How to get Xerox printer model info: Click Here
– Before you continue with the reprogramming of the firmware, please make sure that the device is installed on your computer.
– It is very important that under no circumstances should you remove the chip from the cartridge while reprogramming the firmware. After you have succesfully reprogrammed the printer, remove the chip from the cartridge and store it somewhere safely (the chip – a key). In all cartridges which you are going to use in the printer, the chip has to be either removed or sealed. If you have accidently inserted a new cartridge without removing the chip, the device will be blocked. In order to unblock it, you can use the stored chip as a key which help you to unblock the printer.
– And make sure that any other devices (except mouse and keyboard), which are connected to your computer via USB or LPT ports are disconnected. It’s preferable that the computer is connected to the “UPS” (uninterruptible power source) device, because if during the reprogramming process the electricity source has any interruptions, then the reprogramming will be carried out with an error, which makes the device unable to work.
– This firmware will be installed directly to your printer. Before opening firmare link make sure that printer is turned on and connected to your computer and printer drivers are installed correctly.
Be aware that with the reprogramming of the firmware the manufacturer’s warranty goes lost!!
How To Run Firmware Fix Xerox printer
1. Connect the printer to the computer and turn it on.
2. Wait until the printer is ready for work.
3. Drag and drop *.hd to usbprns2.exe file.

4. The reprogramming process starts automatically.
5. Wait until the printer reprograms (10-20 minute) and restarts.
6. After that the reprogramming process is finished, restart the printer.
– Fix Xerox B205 Toner Empty Error, click here
Contact us to get support with Xerox Phaser 6020 Error case
Telegram: https://t.me/hyperaktiv
Facebook: https://www.facebook.com/dngnm/
Or click here to get more ways.
Модератор: vetal

![]() Mo-skin » Ср ноя 13, 2019 12:07 pm
Mo-skin » Ср ноя 13, 2019 12:07 pm


 В результате манипуляций получился вот такой файл:
https://yadi.sk/d/MAiKU5Qu_-pfBA
Автор залил дамп и сообщил:
всё работает, дрова поставились и определился как 6020 , теперь выдаёт ошибку 009 — 953 ругается на чёрный катридж, смени 2 чипа новых но что то нифига, как узнать какой регион нужен чипов чтобы всё работало?
Подробности ковыряния прошивки у меня в блоге, ссылку давать не буду, кто знает — найдет.
-

Mo-skin
- Увидел тонер
-

- Персональный альбом

![]()
![]() Leon16 » Ср ноя 13, 2019 2:08 pm
Leon16 » Ср ноя 13, 2019 2:08 pm
-

Leon16
- Починил струйный принтер
-
![]()
![]() Василий Хлыстов » Ср ноя 13, 2019 6:44 pm
Василий Хлыстов » Ср ноя 13, 2019 6:44 pm
Mo-skin писал(а):В результате манипуляций получился вот такой файл:
https://yadi.sk/d/MAiKU5Qu_-pfBA
Автор залил дамп и сообщил:
всё работает, дрова поставились и определился как 6020 , теперь выдаёт ошибку 009 — 953 ругается на чёрный катридж, смени 2 чипа новых но что то нифига, как узнать какой регион нужен чипов чтобы всё работало?
Подробности ковыряния прошивки у меня в блоге, ссылку давать не буду, кто знает — найдет.
сбросил датчики чипов и попёр, всё по маслу, спасибо без вас бы я пропал. 
-

Василий Хлыстов
- Осматривается
-
- Сайт

![]()
-
-
Xerox Phaser 6600 «Invalid Yellow» / «Неверный желтый»
kotya-potya в форуме Принтеры, МФУ, факсы, копиры формата A4
- 5
- 5692
3100

Пн ноя 18, 2019 8:24 pm
-
Xerox Phaser 6600 «Invalid Yellow» / «Неверный желтый»
-
-
Xerox WC 3119: «Замятие 1»
kokubenko в форуме Принтеры, МФУ, факсы, копиры формата A4
- 22
- 39497
kokubenko
Ср ноя 23, 2011 4:47 pm
-
Xerox WC 3119: «Замятие 1»
-
-
«Неисправность» финишера Xerox 7556
v1684 в форуме Принтеры, МФУ, копиры формата A3
- 21
- 13320
v1684
Ср сен 19, 2018 4:44 pm
-
«Неисправность» финишера Xerox 7556
-
-
Xerox WC 3119 без признаков «жизни»
MorZ в форуме Принтеры, МФУ, факсы, копиры формата A4
- 5
- 6918
Goldwater
Чт окт 08, 2020 11:34 pm
-
Xerox WC 3119 без признаков «жизни»
-
-
Xerox 3315 «слетела» FIX прошивка
tekknik в форуме Принтеры, МФУ, факсы, копиры формата A4
- 7
- 7247
tekknik
Пн июн 10, 2019 4:22 am
-
Xerox 3315 «слетела» FIX прошивка
Вернуться в Принтеры, МФУ, факсы, копиры формата A4
Кто сейчас на форуме
Сейчас этот форум просматривают: нет зарегистрированных пользователей и гости: 89
Heya!
This is because on the 6280 you do have two different toners, those for people with contract (Pageback) and those for people without. It’s merely so that you cannot missmatch these two with each other.
There is a chip on the back of the toner which the machine uses to register if it’s the correct toner or not.
You can mimic this error by just putting some paper over the chip and then putting it back in the machine.
Could probably be explained easier, but hope this helps!
Thanks!
Поиск и устр. неиспр.
106
Принтер Xerox
®
Phaser
®
6020
Руководство пользователя
Получение справки
В этом разделе рассматриваются следующие вопросы.
•
•
•
Для устранения неисправностей, которые могут возникнуть при печати, для принтера
предусмотрен ряд утилит и ресурсов.
Индикаторы ошибок принтера
Состояние принтера или наличие ошибки указывается комбинацией светоиндикаторов на
панели управления. Описание светоиндикаторов на панели управления см. раздел
Кнопки и
индикаторы на панели управления
Когда возникают ошибки, на панели управления принтера можно увидеть комбинации
светоиндикаторов, представленные ниже. Чтобы увидеть комбинацию светоиндикаторов
ошибки, когда горит только один светоиндикатор ошибки, нажмите и удерживайте кнопку
OK.
Примечание:
Символами с лучами обозначены мигающие светоиндикаторы, символами
без лучей — светоиндикаторы, которые горят постоянным светом.
Комбинация
светоиндикаторов
Ошибка и устранение
•
В принтере нет бумаги. Вложите бумагу в основной лоток. См.
раздел
Вкладывание бумаги
•
В основной лоток вложена бумага неправильного размера.
Убедитесь, что размер бумаги, выбранный в настройках
драйвера принтера, соответствует размеру бумаги в
принтере.
В принтере застряла бумага. Извлеките из тракта подачи бумагу
и мусор. См. раздел
Извлечение застрявшей бумаги
Загрязнен датчик плотности цветного тонера. Выполните
процедуру очистки CTD-датчика. Подробности см. раздел
Очистка датчиков плотности
Переполнение памяти.
•
Для сброса сообщения и отмены выполняемой работы
печати нажмите кнопку
Стоп.
•
Чтобы не происходило переполнение памяти, разделите
работу печати на части.
Ошибка языка PDL.
•
Для сброса сообщения и отмены выполняемой работы
печати нажмите кнопку
Стоп.
•
Убедитесь, что на компьютере установлен правильный
драйвер принтера. См. раздел
Установка программного
обеспечения