
Модератор: kvg

-

nihum
- Разобрал струйный принтер
-
![]()
![]() Andreyak777 » Ср дек 03, 2014 1:34 pm
Andreyak777 » Ср дек 03, 2014 1:34 pm
То, что другие люди говорят обо мне, никак не характеризует меня. Зато отлично характеризует их.
-

Andreyak777
- Избран тонером
-

![]()
![]() nihum » Ср дек 03, 2014 5:54 pm
nihum » Ср дек 03, 2014 5:54 pm
-
nihum
- Разобрал струйный принтер
-
![]()
![]() gil1908 » Ср янв 14, 2015 9:25 am
gil1908 » Ср янв 14, 2015 9:25 am


pc-porta писал(а):Здравствуйте . я Статиком заправляю . 60 грамм на цветники стандартной ёмкости (3К страниц), 70 грамм на чёрный . И 100 грамм цветники увеличенной ёмкости (6K страниц), 120 грамм на чёрный . Универсальные тонеры для SAM и XEROX не прокатывают — ибо мажут и цветы блеклые . чипаки меняю , до НГ и всяких удорожаний стоили по 3$ за штуку , щас не вкурсе насколько подорожали.
Час также стоят. Но зарплату получаем в рублях, а доллар не падает 
-
gil1908
- Заправил картридж
-

- Персональный альбом

![]()
![]() ОргТехСервис » Чт окт 15, 2015 3:33 pm
ОргТехСервис » Чт окт 15, 2015 3:33 pm
pc-porta писал(а):Здравствуйте . я Статиком заправляю . 60 грамм на цветники стандартной ёмкости (3К страниц), 70 грамм на чёрный . И 100 грамм цветники увеличенной ёмкости (6K страниц), 120 грамм на чёрный . Универсальные тонеры для SAM и XEROX не прокатывают — ибо мажут и цветы блеклые . чипаки меняю , до НГ и всяких удорожаний стоили по 3$ за штуку , щас не вкурсе насколько подорожали.
Здравствуйте. А каким тонером заправляете для Xerox 6600/6605 или совместимый?
-
ОргТехСервис
- Осматривается
-
![]()
![]() pc-porta » Чт окт 15, 2015 5:16 pm
pc-porta » Чт окт 15, 2015 5:16 pm
ATM GOLD пасер 6125 — 6180 — система печати двух компонентная (тонер и девелоп в одном флаконе) . Статик уже не покупаю — дороговат стал дофига — и ну его нафиг .
Картридж и внешне схож с Пасер 6125 — один в один , тока побольше в 4-5 раз стал
-

pc-porta
- Форумный оракул
-
- Персональный альбом

![]()
![]() dmitrkv » Ср окт 28, 2015 11:22 pm
dmitrkv » Ср окт 28, 2015 11:22 pm
pc-porta писал(а):не пролетите = не парьтесь . Статик уже тоже потделывают = не парьтесь .
Спасибо за совет, если ещё кините контакты поставшика, буду премного благодарен.
Добавлено спустя 5 минут 37 секунд:
xerox 6600 заправка
Вопрос по статику есть ещё такой: разница между Одисеем и обычным какая? Мы сыпем в НР 1215 и т.д. статик Одисей в малой фасовке, хотели брать по 1кг, но он только обычный, а качество — клиент требует глянец на цвете, что в первом случае получается. Есть у кого статистика работы по цвету со статиком?
-
dmitrkv
- Не испугался и подошел к тонеру
-
- Персональный альбом
![]()
![]() dmitrkv » Ср ноя 18, 2015 5:45 am
dmitrkv » Ср ноя 18, 2015 5:45 am
VamDam писал(а):Одиссей — специально разработанный тонер под конкретную модель. Этот тонер по всем параметрам лучше оригинального.
Не одиссей — 2я версия тонера для цветных хп (OS2), тонер универсальный — подходит к широкой линейке аппаратов hp, по параметрам чуть хуже — в разных моделях может давать различный результат. Однако, тоже весьма хорош.
…SC планировала выпускать 3ю версию универсального тонера OS3, улучшенную (относительно OS2).
Спасибо большое за квалифицированный ответ, теперь всё понятно. Если есть источник, где можно почитать про это поподробней — кинтье ссылку плз.
-
dmitrkv
- Не испугался и подошел к тонеру
-
- Персональный альбом
![]()
-
- Xerox WC 3119: «Замятие 1»
kokubenko в форуме Принтеры, МФУ, факсы, копиры формата A4
- 22
- 38598
kokubenko

Ср ноя 23, 2011 4:47 pm
- Xerox WC 3119: «Замятие 1»
-
- Xerox 3315 «слетела» FIX прошивка
tekknik в форуме Принтеры, МФУ, факсы, копиры формата A4
- 7
- 6837
tekknik
Пн июн 10, 2019 4:22 am
- Xerox 3315 «слетела» FIX прошивка
-
- Xerox WC 3119 без признаков «жизни»
MorZ в форуме Принтеры, МФУ, факсы, копиры формата A4
- 5
- 6699
Goldwater
Чт окт 08, 2020 11:34 pm
- Xerox WC 3119 без признаков «жизни»
-
- Xerox WC3220 — Ложное замятие бумаги, Замятие 0
Romeo в форуме Принтеры, МФУ, факсы, копиры формата A4
- 25
- 10129
Romeo
Пн окт 12, 2020 7:13 pm
- Xerox WC3220 — Ложное замятие бумаги, Замятие 0
-
- прошил xerox 3160b прошивкой FIX_b2580_1010079.fls не прошил
Володья в форуме Принтеры, МФУ, факсы, копиры формата A4
- 8
- 12680
Володья
Сб апр 30, 2011 8:05 am
- прошил xerox 3160b прошивкой FIX_b2580_1010079.fls не прошил
Вернуться в Картриджи, их заправка и дефекты.
Кто сейчас на форуме
Сейчас этот форум просматривают: нет зарегистрированных пользователей и гости: 6
-
12-20-2019
#21
Technician
- Rep Power
- 7
Re: Xerox WC 6605/Phaser6600/ Dell 2660dn 092-671 «Reseat M Toner and M Drum» error
Originally Posted by Claudiu.D
How do you get in the admin menu to disable «Drum initialization» if you get error 092-671 ?
Thank youWhile holding number key 2 and 8 , turn the printer on.
-
12-20-2019
#22
Technician
- Rep Power
- 7
Re: Xerox WC 6605/Phaser6600/ Dell 2660dn 092-671 «Reseat M Toner and M Drum» error
Update 3:
I have to report that error is back 092-673..Does anyone have any ideas or things to try out?
Thanks
-
12-26-2019
#23
Technician
- Rep Power
- 7
Re: Xerox WC 6605/Phaser6600/ Dell 2660dn 092-671 «Reseat M Toner and M Drum» error
Update 4:
I took back drum a part and cleaned it well.. Using medical alcohol cleaned OPC drum, transfer drum, rubber blades, wast bin drive.. To be honest it looked fine in the first place since it only has 20,000 pages printed on it.. And after all of this, I still get 092-673 error…any ideas what else should I try?
-
01-22-2020
#24
Junior Member
- Rep Power
- 0
Re: Xerox WC 6605/Phaser6600/ Dell 2660dn 092-671 «Reseat M Toner and M Drum» error
Originally Posted by svastarija
Update 3:
I have to report that error is back 092-673..Does anyone have any ideas or things to try out?
Thanks
I have received my new Cyan dispenser assembly. It is essentially 2 augers at right angles that feeds toner from toner cartridge to the drum. Presumably the toner becomes caked inside the tube and the auger becomes full and despite it turning the toner doesnt get pushed thru the tube. There are spring loaded cover doors where the toner cartridge connects and another one where the drum connects. You could try something flexible like copper wire or nylon fishing line that had a small ball on the end that you could push thru these doors in along auger space. Not sure how far you would get and whether you could do it in situ. If there was going to be a likely spot for a blockage I would think it could occur where there is a 90 degree change in direction where one auger tube sits across the other. This is quite some distance from the entry or exit doors.
If you decide to disassemble your printer to get at the dispenser assembly, once out it is quite easy to take apart the dispenser auger tubes to clean them. they just clip together. So you probably may not need a new dispenser assembly as long as all the gears and augers are turning.
Just my thoughts ………. havent got around to taking my CP405d apart yet.
-
01-28-2020
#25
Junior Member
- Rep Power
- 0
Re: Xerox WC 6605/Phaser6600/ Dell 2660dn 092-671 «Reseat M Toner and M Drum» error
Next Chapter — C error, Check Toner C & DrumError 092-672 Fuli Xerox CP405D docuprint ( same physical machine as Phaser 6600)
Replaced the Cyan dispenser assembly ( couldnt find anything physically wrong with the old one- augered thru toner when turned)
Started up printer and same error.
Found a Phaser 6600 service manual online. Checked out this error and proposed solution:
basically isCyan Patch Error
Error Details — IOT could not recovery toner density
Page 303 of service manual- for procedure to follow
shake toner
replace toner,
then clean contacts on drum and reseat,
replace drum ( imaging unit)
replace MCU circuit boardnothing about dispenser assembly.
So replaced toner cartridge — no luck.
To replace the imaging units on this device you have to buy all the drums (x4)Replaced Cyan imaging unit-
I notice that on the new imaging unit there is a chip. There is no chip on the original imaging units.
Restarted and now got the correponding yellow patch error 092-670
replaced yellow imaging units and now error free and printing. (running 2 old drums and 2 new drums)Do I have to replace all drums at once and is there an admin setting to reset a counter?
on all my reading there doesnt seem to be a practical outline of what causes this error «Error Details — IOT could not recovery toner density» is not meaningfull unless someone can explain. ( Other than its generic toner cartridges)
-
03-02-2022
#26
Technician
- Rep Power
- 15
Re: Xerox WC 6605/Phaser6600/ Dell 2660dn 092-671 «Reseat M Toner and M Drum» error
Originally Posted by ocular
Next Chapter — C error, Check Toner C & DrumError 092-672 Fuli Xerox CP405D docuprint ( same physical machine as Phaser 6600)
Replaced the Cyan dispenser assembly ( couldnt find anything physically wrong with the old one- augered thru toner when turned)
Started up printer and same error.
Found a Phaser 6600 service manual online. Checked out this error and proposed solution:
basically isCyan Patch Error
Error Details — IOT could not recovery toner density
Page 303 of service manual- for procedure to follow
shake toner
replace toner,
then clean contacts on drum and reseat,
replace drum ( imaging unit)
replace MCU circuit boardnothing about dispenser assembly.
So replaced toner cartridge — no luck.
To replace the imaging units on this device you have to buy all the drums (x4)Replaced Cyan imaging unit-
I notice that on the new imaging unit there is a chip. There is no chip on the original imaging units.
Restarted and now got the correponding yellow patch error 092-670
replaced yellow imaging units and now error free and printing. (running 2 old drums and 2 new drums)Do I have to replace all drums at once and is there an admin setting to reset a counter?
on all my reading there doesnt seem to be a practical outline of what causes this error «Error Details — IOT could not recovery toner density» is not meaningfull unless someone can explain. ( Other than its generic toner cartridges)
Hy haloo .Im having the problem with machine Xerox wc 6605dn with error yellow test patch error 092-670.I clean the tube of toner line from cartridge to drum and i have seame problem.I look that i have the error and when i power on before they show me the error no rotate the gear for ading the toner.If i can how can i add toner from the service menu
-
03-03-2022
#27
Junior Member
- Rep Power
- 0
Re: Xerox WC 6605/Phaser6600/ Dell 2660dn 092-671 «Reseat M Toner and M Drum» error
Have you been using non genuine cartridges? There does not seem to be as easy solution to this problem. Putting in new drums will make the problem go away for the time being but it will return if you continue to use non genuine cartridges. Not sure if this is detected via a chip on the machine or what. Some say it is because the non genuine toner cartridges leak a lot of dust and then mess up the sensors. If this is the case — taking everthing out and cleaning all the internals ( ?compressed air) may help but I have no experience. I have 2 Xerox retired machines and moved to Brother HL-L8260CDW and haven’t looked back.


Phaser 6600 Error Code List
Chain Link
Error
093
925
IOT X CRUM
Error
093
926
IOT X CRUM ID
Error
093
928
IOT K Toner Type
Error
093
930
IOT X Toner Life
Over
093
931
IOT X Toner Life
Over
093
932
IOT X Toner Life
Over
093
933
IOT X Toner Life
Over
093
950
IOT X CRUM
Error
093
951
IOT X CRUM
Error
093
952
IOT X CRUM
Error
093
960
IOT X CRUM ID
Error
093
961
IOT X CRUM ID
Error
Xerox Internal Use Only
Error Details
Detect Black CRUM Error
Detect K Toner CRUM ID
Warning
Black Toner Type Error
Y
M
C
K
Detect Yellow CRUM
Error
Detect Magenta CRUM
Error
Detect Cyan CRUM Error
Detect Y Toner CRUM ID
Warning
Detect M Toner CRUM
ID Warning
Control Panel Messages
Blk — CRUM Error
Reseat Cartridge
Error 093-925
Reseat Cartridge
Invalid Black
Blk — Type Error
Reseat Cartridge
Error 093-928
Reseat Cartridge
Replace Yellow Cartridge
Replace Magenta Cartridge
Replace Cyan Cartridge
Replace Black Cartridge
Y — CRUM Error
Reseat Cartridge
Error 093-950
Reseat Cartridge
M — CRUM Error
Reseat Cartridge
Error 093-951
Reseat Cartridge
C — CRUM Error
Reseat Cartridge
Error 093-952
Reseat Cartridge
Invalid Yellow
Invalid Magenta
Phaser 6600 and WorkCentre 6605
Error Troubleshooting
FIP location
Page 2-187
Page 2-188
Page 2-188
Replace the
Yellow Toner
Cartridge.
Replace the
Magenta
Toner
Cartridge.
Replace the
Cyan Toner
Cartridge.
Replace the
Black Toner
Cartridge.
Page 2-184
Page 2-185
Page 2-186
Page 2-187
Page 2-188
2-105
Service Manual
How to Fix Dell Printer Error Code 092-673
How to Fix Dell Printer Error Code 092-673 – With the changing time, technology is also evolving. Experts are continuously innovating and coming up with new printing techniques and printers as well. Among all Dell is the most renowned and reliable brand that delivers top-quality printers which deliver gratifying printing experience to the users. The additional service and the quality of these printers are praised by people around the world. It a electronic device and these device are prone to encounter issues and one of the is Error Code 092-673. If you want to know How to Fix Dell Printer Error Code 092-673, then you are at the right place.
Dell printers are famous for their low cost printing and quality output but at times people have reported technical issues with these printers such as Error Code 092-673. These errors can be annoying and frustrating at the same time. This error is also known as calibrating patch errors and these are pretty common with the few models of the Dell printers. If you are a victim of this and want to know How to Fix Dell Printer Error Code 092-673, then we got you covered. We are specially trained experts and through this blog, by Tech Support expert we will provide you ways by which you can easily get this issue resolved.
We have a team of top-class technical experts who are well-versed with all the Dell printer-related issues. These experts are highly trained in the respective fields and proficient to provide quick resolutions to resolve any technical problem or glitch. So without wasting any further time let’s move on to the methods by which you can get rid of the Error Code 092-673. Let’s start.
If you are encountering any sort of error with your gadgets to you want to inquire more about us then you just simply need to dial our toll-free number 800-742-9005 or you can also send us your queries via email at support@techsupportexpert.com.
Troubleshooting Steps to Fix Dell Printer Error Code 092-673
Dell printers are famous for their high speed, low cost, and quality printing. These printers are among the best printing devices around the world that deliver a remarkable printing experience to the user. One can print a lot by sending only a little amount. But single-issue known as Error Code 092-673 ruins all the printing experience and leaves a bad impact on the users. This error is common and also known as calibrating patch errors. Luckily there are few steps by which one can easily resolve this issue. So follow the below-mentioned steps if you are the one who is facing this error.
Method 1: Clean ROS
To avoid the decline of the quality of printing caused as a result of strains inside the Dell printer, one need to regularly clear the Dell printer from inside. You just need to carefully clean the printer by using a cleaning bar while replacing the drum cartridges.
Follow the steps to perform this method:
- On the right and side, open the spread
- Now to open the waste toner box turn the toner box lock almost 90 degrees counterclockwise.
- Once done, take a firm grip on the waste toner box and pull it out of the box making sure to grab it straight to avoid spilling of the waste toner box.
- Remove the waste toner box by standing straight on a plain surface.
- Remove the cleaning bar from inside the printer.
- Place the clearing bar into any of the four openings till it clicks and pulls it out completely.
- Repeat the last step in the exact same manner in the other three remaining openings. One minute insertion is ample for each opening.
Method 2: Clean CTD Sensor
The second method to get the Error Code 092-673 resolves is to clean the CTD sensors. Follow the below-mentioned steps to perform this method:
- The first step is to make sure that your Dell printer is turned off completely.
- The next thing is to open the back cover by pushing the latch in a downward direction.
- Now open the cover on the right-hand side.
- Once opened, unlock the waste toner box by turning the lock lever around 90 degrees counterclockwise.
- Now pill out the waste toner box by holding the handle of the box. Be careful with this and make sure to keep it upright during the process to avoid unnecessary spilling of the waste toner.
- Place the box in an upright position on a plain surface.
- Open the operation panel and lift the topmost cover on the printer.
- Hold the transfer belt by putting the fingers in the loops and carefully pill it out.
- At last by using dry cotton or cloth clean the CTD sensor
Get Quick Solutions Related to Dell Printers
So these are some of the methods by which one can get rid of these issues. These methods are tested and accurate. Bu following these methods in the exact same order, one can easily resolves the Dell Printer Error Code 092-673. In the future as well if you face any technical error with Dell printers or you encounter any other tech issues with your gadget then don’t hesitate to contact Tech Support Expert for help. Dial our toll-free number dial 800-742-9005 from your mobile and get real-time and quick solutions against all your technical problems. You can also write to us at support@techsupportexpert.com.
092-670 to 673, 092-675 to 678 ADC Patch Fail RAP
BSD-ON: BSD 9.9 ADC and Environment Sensing, BSD 9.4 Development (1 of 2).
092-670 The yellow ADC electric patch is abnormally light or a fault in the ADC sensor was detected.
092-671 The magenta ADC electric patch is abnormally light or a fault in the ADC sensor was detected.
092-672 The cyan ADC electric patch is abnormally light or a fault in the ADC sensor was detected.
092-673 The black ADC electric patch is abnormally light or a fault in the ADC sensor was detected.
092-675 The yellow ADC tone patch is abnormally light or a fault in the ADC sensor was detected.
092-676 The yellow ADC tone patch is abnormally light or a fault in the ADC sensor was detected.
092-677 The yellow ADC tone patch is abnormally light or a fault in the ADC sensor was detected.
092-678 The yellow ADC tone patch is abnormally light or a fault in the ADC sensor was detected.
Initial Actions
• Perform IQ1 to check for a low density color or white vertical streaks image quality defect.
• Enter dC125. Check for the below faults and perform the applicable procedures as necessary:
– 042-325 Main Motor Fail RAP
– 043-342 Sub Motor Fail RAP
– 061-xxx(061-354 061-358) LPH System Fail RAPs
– 089-xxx(089-600 089-601 089-604 089-616 089-617) Registration Control System Failure RAPs
– 093-400, 093-406 to 093-409 Toner Cartridge Near End of Life RAP
– 094-420, 094-422 IBT Belt Unit / 2nd BTR Roll End of Life RAP
Procedure
WARNING: Ensure that the electricity to the machine is switched off while performing tasks that do not need electricity. Refer to GP 10. Disconnect the power cord. Electricity can cause death or injury. Moving parts can cause injury.
Perform the steps that follow:
1. Switch off, then switch on the machine, GP 10.
2. If the fault persists, replace a new cartridge CRUM (toner chip or drum chip) listed as below or install new components as necessary:
• MOB ADC sensor assembly, PL 90.40 Item 6. Enter dC675, perform the registration control setup cycle.
• IBT belt unit, PL 90.45 Item 1.
NOTE: Following installation of the new IBT belt unit, enter dC135 code 954-820 to reset the HFSI value for the BTR Unit.
• IBT cleaner, PL 90.45 Item 2.
• Toner cartridge:
– Black toner cartridge, PL 90.05 Item 13.
– Yellow toner cartridge, PL 90.05 Item 10.
– Magenta toner cartridge, PL 90.05 Item 11.
– Cyan toner cartridge, PL 90.05 Item 12.
• Drum cartridge:
– Black drum cartridge, PL 90.20 Item 5.
– Yellow drum cartridge, PL 90.20 Item 8.
– Magenta drum cartridge, PL 90.20 Item 7.
– Cyan drum cartridge, PL 90.20 Item 6.
• LPH, PL 60.35 Item 1.
• LPH FFC:
– Black LPH FFC, PL 60.35 Item 4.
– Cyan LPH FFC, PL 60.35 Item 5.
– Magenta LPH FFC, PL 60.35 Item 6.
– Yellow LPH FFC, PL 60.35 Item 7.
• HVPS, PL 1.05 Item 7.
• Drive PWB, PL 1.10 Item 4.
**This RAP is from Xerox Service Manual. All brand names and trademarks are their respective owner’s property.**
You may be also interested in below toner and drum chip (CRUM) for Xerox VersaLink C7020, C7025, C7030, C7000.
Toner Chip (For North America and West Europe Region):
• 106R03741 106R03744 106R03743 106R03742
• 106R03757 106R03760 106R03759 106R03758
• 106R03737 106R03740 106R03739 106R03738
Toner Chip (For South America and East Europe Region):
• 106R03749 106R03752 106R03751 106R03750
• 106R03745 106R03748 106R03747 106R03746
• 106R03765 106R03768 106R03767 106R03766
Toner Chip (For Metered Machine):
• 106R03733 106R03736 106R03735 106R03734
Drum Chip:
• 113R00780 113R00782
Содержание
- Thread: Xerox WC 6605/Phaser6600/ Dell 2660dn 092-671 «Reseat M Toner and M Drum» error
- Re: Xerox WC 6605/Phaser6600/ Dell 2660dn 092-671 «Reseat M Toner and M Drum» error
- Re: Xerox WC 6605/Phaser6600/ Dell 2660dn 092-671 «Reseat M Toner and M Drum» error
- Re: Xerox WC 6605/Phaser6600/ Dell 2660dn 092-671 «Reseat M Toner and M Drum» error
- Re: Xerox WC 6605/Phaser6600/ Dell 2660dn 092-671 «Reseat M Toner and M Drum» error
- Re: Xerox WC 6605/Phaser6600/ Dell 2660dn 092-671 «Reseat M Toner and M Drum» error
- Re: Xerox WC 6605/Phaser6600/ Dell 2660dn 092-671 «Reseat M Toner and M Drum» error
- Ремонт МФУ Xerox WC 6015 6025 6027
- Замятие бумаги WC 6015 6025 6027
- Треск при работе WC 6015
- Треск в узле ксерографии
- Треск Xerox WC 6015 в области печки
- Ошибка 024-360
- Ремонт контактной группы картриджей
- Ошибка 092-651
- Подкоды ошибки 092-651
- WC 6015 6025 6027 не печатает с компьютера
- Бледная печать WC 6015 6025 6027
- Цены на ремонт WC 6015 6025 6027
- Разборка WC 6015
Thread: Xerox WC 6605/Phaser6600/ Dell 2660dn 092-671 «Reseat M Toner and M Drum» error
Thread Tools
Display
Re: Xerox WC 6605/Phaser6600/ Dell 2660dn 092-671 «Reseat M Toner and M Drum» error
While holding number key 2 and 8 , turn the printer on.
Re: Xerox WC 6605/Phaser6600/ Dell 2660dn 092-671 «Reseat M Toner and M Drum» error
Update 3:
I have to report that error is back 092-673.. 🙁
Does anyone have any ideas or things to try out?
Re: Xerox WC 6605/Phaser6600/ Dell 2660dn 092-671 «Reseat M Toner and M Drum» error
Update 4:
I took back drum a part and cleaned it well.. Using medical alcohol cleaned OPC drum, transfer drum, rubber blades, wast bin drive.. To be honest it looked fine in the first place since it only has 20,000 pages printed on it.. And after all of this, I still get 092-673 error. 🙁
any ideas what else should I try?
Re: Xerox WC 6605/Phaser6600/ Dell 2660dn 092-671 «Reseat M Toner and M Drum» error
Update 3:
I have to report that error is back 092-673.. 🙁
Does anyone have any ideas or things to try out?
I have received my new Cyan dispenser assembly. It is essentially 2 augers at right angles that feeds toner from toner cartridge to the drum. Presumably the toner becomes caked inside the tube and the auger becomes full and despite it turning the toner doesnt get pushed thru the tube. There are spring loaded cover doors where the toner cartridge connects and another one where the drum connects. You could try something flexible like copper wire or nylon fishing line that had a small ball on the end that you could push thru these doors in along auger space. Not sure how far you would get and whether you could do it in situ. If there was going to be a likely spot for a blockage I would think it could occur where there is a 90 degree change in direction where one auger tube sits across the other. This is quite some distance from the entry or exit doors.
If you decide to disassemble your printer to get at the dispenser assembly, once out it is quite easy to take apart the dispenser auger tubes to clean them. they just clip together. So you probably may not need a new dispenser assembly as long as all the gears and augers are turning.
Just my thoughts . havent got around to taking my CP405d apart yet.
Re: Xerox WC 6605/Phaser6600/ Dell 2660dn 092-671 «Reseat M Toner and M Drum» error
Next Chapter — C error, Check Toner C & DrumError 092-672 Fuli Xerox CP405D docuprint ( same physical machine as Phaser 6600)
Replaced the Cyan dispenser assembly ( couldnt find anything physically wrong with the old one- augered thru toner when turned)
Started up printer and same error.
Found a Phaser 6600 service manual online. Checked out this error and proposed solution:
basically is
Cyan Patch Error
Error Details — IOT could not recovery toner density
Page 303 of service manual- for procedure to follow
shake toner
replace toner,
then clean contacts on drum and reseat,
replace drum ( imaging unit)
replace MCU circuit board
nothing about dispenser assembly.
So replaced toner cartridge — no luck.
To replace the imaging units on this device you have to buy all the drums (x4)
Replaced Cyan imaging unit-
I notice that on the new imaging unit there is a chip. There is no chip on the original imaging units.
Restarted and now got the correponding yellow patch error 092-670
replaced yellow imaging units and now error free and printing. (running 2 old drums and 2 new drums)
Do I have to replace all drums at once and is there an admin setting to reset a counter?
on all my reading there doesnt seem to be a practical outline of what causes this error «Error Details — IOT could not recovery toner density» is not meaningfull unless someone can explain. ( Other than its generic toner cartridges)
Источник
Ремонт МФУ Xerox WC 6015 6025 6027
Сервисный центр Комплэйс выполняет Ремонт Xerox WC 6015
Замятие бумаги WC 6015 6025 6027
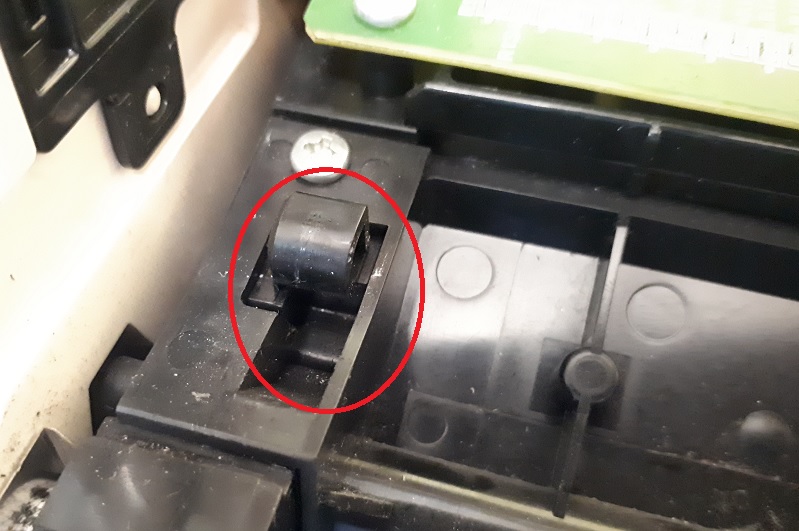
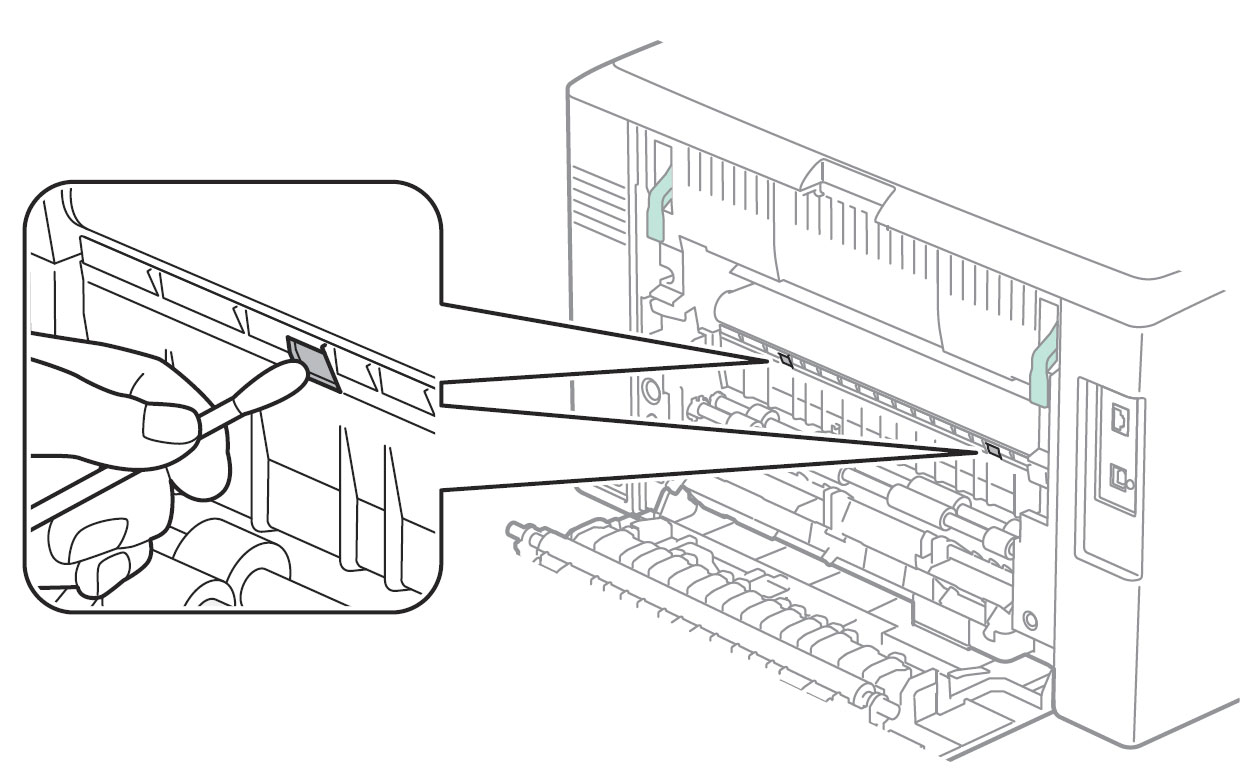
МФУ Xerox WC 6015 поступило в ремонт с постоянным сообщением о замятии бумаги, бумаги не было нигде.
После разборки аппарата подбираемся к датчику бумаги. Сам датчик прохождения бумаги находится сзади, показан стрелкой.

Сломанный датчик заменяем. На этом ремонт МФУ Xerox закончен.
Второй датчик находится в узле закрепления.
Треск при работе WC 6015
Треск в узле ксерографии
В другом МФУ Xerox WC 6015 при включении и работе раздавался сильный треск. Пришлось разбирать МФУ еще дальше.
Сильный треск был вызван тем, что в синем цвете забился тракт отвода отработанного тонера. После тщательной очистки спрессованного тонера, который превратился в камень, треск исчез. Отработанный тонер стал уходить в картридж.
Треск Xerox WC 6015 в области печки
Треск в области печки означает проскальзывание шестерней. В Xerox WC 6015 такое вероятно, если сломалось крепление печки. При такой неисправности шестерня печки не прижимаются к шестерне редуктора принтера. Поэтому и происходит проскальзывание и сильный треск.
Печка в этом МФУ с задней стороны крепится двумя винтами. А снизу печка цепляется за основание с помощью железных полукруглых упоров.
Если упор отсутствует печка не держится. В нашем случае полукруглый упор был отломан.
Ремонт выполнили следующим образом.
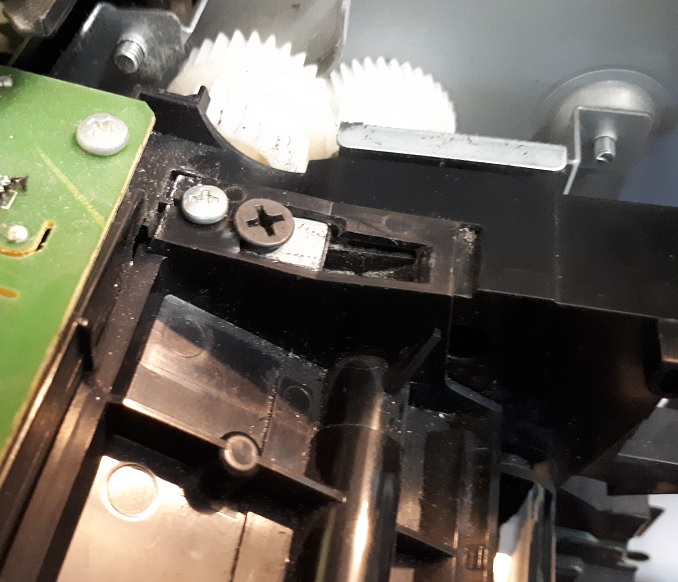
Стоимость ремонта крепления печки 3500 руб. Полукруг не обязателен.
Ошибка 024-360
Разберите по-новой весь принтер и проверьте разъемы на целостность и правильное соединение.Особенно тщательно проверьте контактные концы шлейфов. Если они повреждены, то отремонтируйте.
Ремонт контактной группы картриджей
Если у вас произошло повреждение контактной группы картриджа , то вряд ли найдете новую группу в продаже. Вообще для Xerox WC 6015 с запчастями проблема. Мы научились восстанавливать сломанные контакты. Но есть сложности — контактные группы никто не продает.
Для ремонта контакта нужно разобрать МФУ, вынуть контактную группу, починить сломанную контактную пластину.
Цена восстановления 2500 р.
Ошибка 092-651
Ошибка 092-651 с разными подкодами возникает, когда аппарат не может выполнить калибровку цветов. Эта калибровка осуществляется при включении принтера. Принтер выполняет калибровку путем нанесения на ленту переноса прямоугольных образцов всех 4 цветов по-очереди. Затем считывает плотность этих образцов датчиками CTD. Если плотность печати любого из цветов недостаточна или не изменяется, то выдается ошибка 092-651 с соответствующим подкодом и МФУ блокируется .
Расшифровку подкодов найти не удалось. Особенностью ошибки 092-651 является то, что после этой ошибки принтер не закачивает тонер из картриджей в блок ксерографии и, похоже, простого выхода из этой ситуации нет.
Первая причина ошибки 092-651 — это загрязненные датчики CTD, расположенные сзади принтера под лентой переноса. CTD — Color Toner Density Sensor. Т.е. это датчики плотности тонера для цветовой калибровке в каждом цветном лазерном принтере. Расположены они сзади под лентой переноса. Для решения этой проблемы протираем датчики спиртом и запускаем МФУ снова.
Если проблема не решается, переходим к следующей процедуре.
Вторая причина — в блоке ксерографии недостаточно девелопера, который переносит тонер. Этот вариант происходит, если заправлять картридж не подходящим тонером. Например, универсальным тонером Samsung. В этом случае девелопер уходит и принтер печатает бледно. Чтобы добавить девелопер в блок ксерографии, нужно разобрать весь МФУ. Мало кто выполнить эту работу меньше, чем за 5000 руб.
Третья причина — в блоке ксерогафии мало тонера какого-то цвета. Причиной может быть неисправный картридж. В нашем случае была ошибка 092-651 код 2440000. Причиной являлись дешевые китайские картриджи, в которых выходное отверстие было заклеено липкой бумагой. После удаления бумаги клей остался. После установки картриджей клей плотно приклеился к уплотнительной резинке принтера. Это вызыИногда из-завает перекрытие выходного отверстия для тонера.
Решение такое. Во время включения вручную принудительно закачивать тонер каждого цвета, пока тонер не появится в блоке ксерографии. Когда он появится, принтер оживет и станет самостоятельно подкачивать тонер. Цена работы 2500 руб.
Подкоды ошибки 092-651
Иногда из-за плохого тонера возникает ошибка 092-651 28f0000. При таком коде при калибровке совсем отсутствуют цвета желтый, красный, синий. Есть только черный.
Решение. Замена тонера в цветных картриджах. С помощью сервисного меню можно отдельно запустить двигатели каждого картриджа. Но не более 3 секунд на каждый.
После этого все цвета появятся, но может возникнуть ошибка 092-651 2880000. Это совсем плохо. Скорее всего, код означает, что яркости черного не хватает для калибровки. Значит в блоке ксерографии плохой тонер или недостаточно девелопера. Но за заправку девелопером мы не беремся. Слишком много геморроя.
WC 6015 6025 6027 не печатает с компьютера
Очень типичная ситуация. При подключении Xerox WC 6015 к компьютеру с Windows 7 драйверы устанавливаются автоматически через обновления Windows. Далее пробуете что-нибудь напечатать и ничего не происходит — задания на печать уходят в никуда, даже ошибки не появляется.
Виной всему неправильный драйвер для Windows 7, а, возможно, и для Windows 8 и 10.
Решение: скачайте и установите драйвер с официального сайта Xerox (весит около 200Мб). После установки оригинального драйвера принтер Xerox WC 6015, который ранее не печатал от компьютера, стал печатать под Windows 7 и Windows 10.
Бледная печать WC 6015 6025 6027
При использовании однокомонентного тонера Samsung в принтерах Xerox 6000, 6015, 6025 и 6027 начинаются проблемы с яркостью печати. Чаще всего это проявляется на черном цвете. Картинка становится тусклой, неконтрастной, текст бледным. Причина в уходе девелопера из узла ксерографии. Разбирать принтер довольно сложно. Мы разработали технологию доставки девелопера вручную без разборки. В результате происходит полное восстановление яркости цвета. Цена процедуры 4000 руб. с учетом стоимости девелопера.
Цены на ремонт WC 6015 6025 6027
Ремонт подачи бумаги (застревание) 2500-3000 руб.
Треск — ремонт узла ксерографии — от 3000 руб.
Ремонт контактной группы 2500 руб.
Ремонт крепления печки 3500 руб.
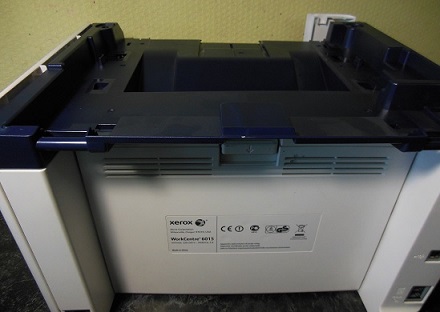
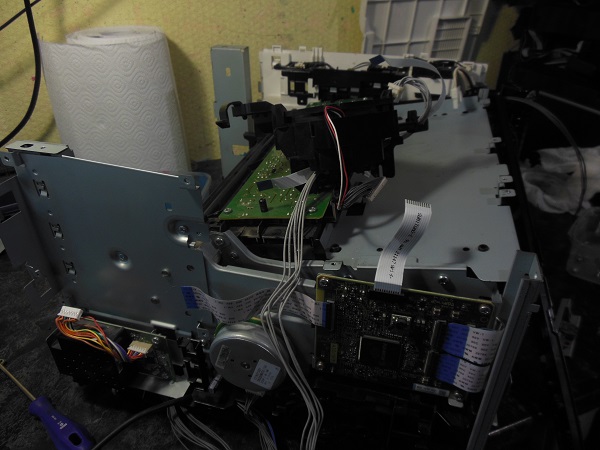
Ремонт WorkCentre 6015 начинается с разборки.
Разборка WC 6015
Сначала нужно снять сканер, для этого снимаем декоративную переднюю синюю крышку, которая крепится на защелках.
Затем снимаем боковую левую крышку.

Отсоединяем шлейфы и кабели, откручиваем спереди держатели лифта сканера, снимаем сканер вверх. Затем откручиваем сверху винты и снимаем верхнюю крышку.
Снимаем заднюю крышку принтера.
Снимаем правую боковую крышку с картриджами.
За ней узел ксерографии.
Следует отметить, что разборка Xerox WC 6015 — чрезвычайно трудоемкое дело. Спроектировано МФУ крайне неудачно для ремонта, требует большой концентрации, аккуратности и времени. За полную удачную разборку и сборку аппарата Xerox WC 6015 можно смело давать звание героя России.
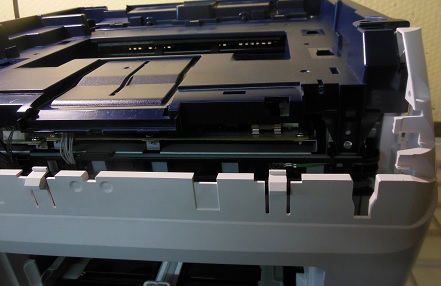
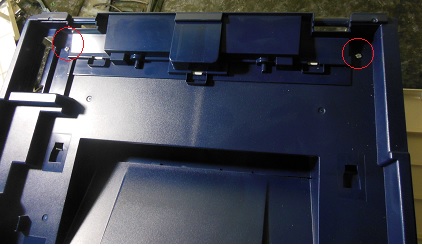
Наверху принтера расположены 3 платы.
Чтобы добраться до узла ксерографии, нужно снять их все.
После этого нужно снять все боковые платы!, чтобы открутить 2 винта, крепящие верхнюю крышку сбоку.
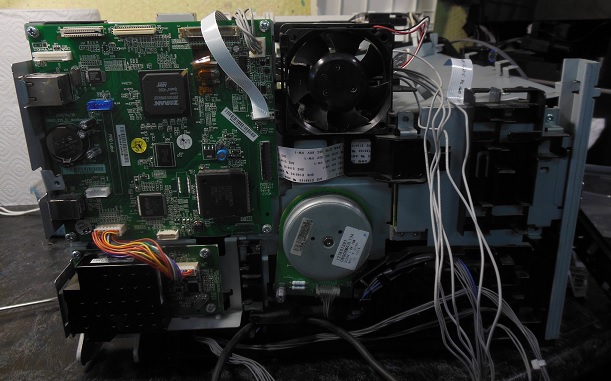
На последнем этапе снимаем плату MCU, за которой и находятся 2 винта.
Если после обратной сборки неправильно соединили какой-нибудь разъем, то при инициализации появится критическая ошибка 024-360. Диагностика тупая — разъем любой, но вероятнее всего шлейф.
Источник